

Secure Mail
Contents
Enroll Secure Mail on your device 2
Organize your email 5
Use swipe actions 11
Add Exchange accounts 19
Set colors for synchronized Secure Mail calendars 28
Export your Secure Mail calendar events 31
View your personal calendar events 35
View and sync your contacts 45
Set up caller ID 56
View and attach files 64
Sync folders and contacts 78
Change a calendar event time 81
Report a phishing email 83
Delete and auto advance to an email in Conversations 89
Show pictures of your contacts 90
Minimizing dras 91
View PDFs 93
© 1999–2024 Cloud Soware Group, Inc. All rights reserved. 1

Secure Mail
Enroll Secure Mail on your device
October 23, 2023
What is Citrix Secure Mail?
Citrix Secure Mail lets you manage your email, calendars, and contacts on your mobile phones and
tablets. Be it an enterprise or a BYOD program, you can confidently turn your mobile device into a
business tool. With Secure Mail, you can manage emails from multiple accounts, calendars (business
and personal), and contacts.
For the complete product documentation, see Secure Mail overview.
Supported mail servers
To maintain continuity, Secure Mail syncs with Microso Exchange Server and IBM Notes Traveler
Server.
For a list of supported servers, see supported Mail Servers.
Integrating Exchange Server or IBM Notes Traveler Server
To stay in sync with your mail servers, integrate Secure Mail with an Exchange Server or IBM Notes
Traveler Server. Ensure that the Exchange Server or IBM Notes Traveler Server resides in your internal
network or is behind Citrix Gateway.
For more information, see Integrating Exchange Server or IBM Notes Traveler Server.
Supported file formats
For Secure Mail for iOS, you can attach files from the iOS native Files app. Supported formats are
.txt, word, audio, video, html, .zip files, images, .eml files, and .vcf contact file formats. For more
information, see View and attach files.
Citrix Secure Mail connection modes
The Secure Ticket Authority (STA) is an XML web service that exchanges Citrix Endpoint Management
information for randomly generated tickets. It is used to control access for a Citrix Secure Gateway
server.
© 1999–2024 Cloud Soware Group, Inc. All rights reserved. 2

Secure Mail
Note:
Citrix recommends that you use a STA connection for Secure Mail because a STA connection sup‑
ports long‑lived session connections.
STA mode
A STA‑based configuration requires a Citrix Gateway. This configuration does not consume extra Citrix
Gateway Universal Licenses for mail sync. It uses an ICA Proxy or SOCKS type of connection.
Non‑STA mode
A Non‑STA based configuration allows users to connect directly to an Exchange Server (if externally
available). If Citrix Gateway is available, users connect via micro VPN and sign on to Secure Hub to
sync mail. This method consumes Citrix Gateway Universal Licenses.
Note:
Only the ActiveSync protocol is supported.
For more information on Citrix Gateway integration, see Integrating with Citrix Gateway and Citrix
ADC.
Dual mode (Secure Mail for Android)
Mobile application management SDK is available to replace areas of MDX functionality that aren’t
covered by the Android platform. The MDX wrapping technology is scheduled to reach end of life
(EOL) in September 2021. To continue managing your enterprise applications, you must incorporate
the Mobile application management SDK (MAM) SDK.
For prerequisites, setup, and other important details about the APIs available as part of the MAM SDK,
see Mobile Application Integration.
Push notifications for Secure Mail
Secure Mail can receive email and calendar notifications when the app is running in the background
or is closed.
For more information about push notifications, see
Push Notifications for Secure Mail.
© 1999–2024 Cloud Soware Group, Inc. All rights reserved. 3

Secure Mail
Note:
By default, the Push Notifications policy is disabled in the Citrix Endpoint Management console.
Modern authentication with Microso Oice 365
Secure Mail supports modern authentication with Microso Oice 365 for Active Directory Federa‑
tion Services (AD FS) or Identity Provider (IdP). Modern authentication is OAuth token‑based authen‑
tication with user name and password. Secure Mail users with iOS devices can take advantage of
certificate‑based authentication when connecting to Oice 365. For more information, see Modern
authentication with Microso Oice 365.
Micro VPN requirements
With Citrix micro VPN, a single, per‑app VPN gives access to a specific app back‑end resource. Using
micro VPN technology reduces data transfer costs and simplifies security because the VPN tunnel isn’
t always active. Instead, it’s only active when needed. This method reduces risk and optimizes the
performance of the device for a better user experience. For more information about Citrix Micro VPN,
see Citrix Secure Hub for Mobile Devices and micro VPN Technology.
Troubleshooting Citrix Secure Mail
When Secure Mail isn’t working properly, connection issues are typically the cause. This section de‑
scribes how to avoid connection issues. If issues occur, this article describes to troubleshoot the is‑
sues.
Citrix Endpoint Management authentication timeouts via Citrix Gateway
To access your mail server via the Citrix Gateway, you need to configure background services for Se‑
cure Mail. You must configure background services in the MDX app policies settings. For more infor‑
mation, see MDX app policies for the background services configuration.
Verify SSL connectivity
Ensure that the SSL certificate chain is properly configured. You can check for missing Root or Inter‑
mediate CAs that are not linked or installed on mobile devices by using the SSL Certificate Checker.
Server certificates, signed by multiple hierarchical Certificate Authorities (CA), form a chain of certifi‑
cates that you must link. For information about installing or linking your certificates, see Install, link,
and update certificates.
© 1999–2024 Cloud Soware Group, Inc. All rights reserved. 4

Secure Mail
Delay in receiving push notifications
If push notifications are not working correctly, connection issues are typically the cause. For informa‑
tion about avoiding connection issues, see Secure Mail Push Notifications FAQs.
For information about troubleshooting push notifications for Secure Mail for iOS, see Troubleshooting
Secure Mail Issues with iOS Push Notifications.
For other information about badge count or notification behavior, see FAQ: Badge and Notification
Behavior For End Users.
Reporting issues in Secure Mail
You can report any issues you face in Secure Mail by opening Citrix Secure Hub. Citrix Secure Hub is
the launchpad for the mobile productivity apps. To generate device logs while reporting an issue, see
How to generate the device side logs.
Other resources
See the following links for more information about related Citrix products:
• Citrix Endpoint Management documentation
• Citrix Secure Hub documentation
• Secure Mail documentation
• Secure Mail user help center
• MDX Service documentation
• MAM SDK documentation
Organize your email
March 26, 2020
You can view your unread emails, meeting invites that require your attention, and upcoming meetings
in the Feeds screen. To organize your mail in Secure Mail, you organize your Feeds card.
Note:
This feature is available for iOS and Android.
You can:
© 1999–2024 Cloud Soware Group, Inc. All rights reserved. 5

Secure Mail
• Add up to three email folders.
The added folders appear as cards on the Feeds screen.
• Reorder your existing cards.
• Remove an existing card.
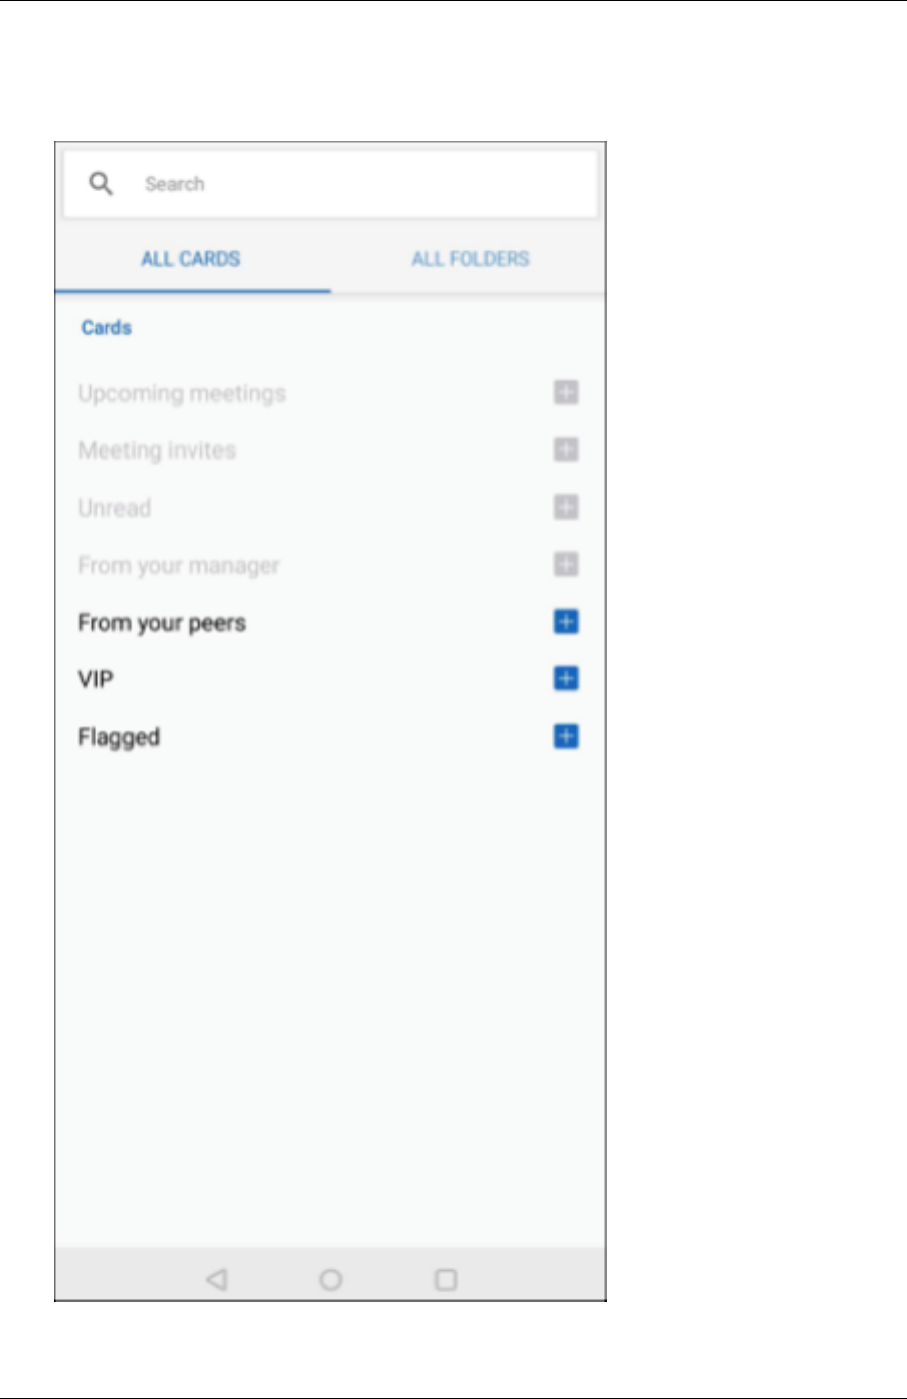
• In Secure Mail for Android, you can add cards for peers and direct reports. You can also create
folders such as VIP or Flagged.
To start, tap on the Manage Feeds button in your feeds view.
© 1999–2024 Cloud Soware Group, Inc. All rights reserved. 6

Secure Mail
Or, tap the Manage Feeds option under MAIL from your settings screen.
© 1999–2024 Cloud Soware Group, Inc. All rights reserved. 7

Secure Mail
You can add, reorder, or delete your cards based on your preference.
© 1999–2024 Cloud Soware Group, Inc. All rights reserved. 8
Secure Mail
To add a card
1. Tap All Cards or All Folders tab.
© 1999–2024 Cloud Soware Group, Inc. All rights reserved. 9

Secure Mail
2. Tap the Add icon (+) on the top le of your screen to select cards of your choice.
3. Tap Done.
The cards you have selected are added and appear in your feeds.
© 1999–2024 Cloud Soware Group, Inc. All rights reserved. 10

Secure Mail
To reorder your cards
1. Tap the Manage Feeds button.
2. From the available cards, tap and hold to select a card.
3. Move the card to the desired location.
To delete a card
1. Tap the Manage Feeds button.
2. Tap the ‑ icon next to the cards.
3. Tap Done.
The cards are removed from your feeds.
Use swipe actions
June 28, 2024
In Secure Mail, when you swipe an email either le or right, you get more options. You can swipe le,
long swipe le, or swipe right.
Note:
This feature is available for iOS and Android.
Depending on whatfolder you’rein, swiping an email reveals dierent options. You then tap an option
to perform an action.
The following table lists the options depending on the folder you are in and the kind of swipe you
make.
Folders Le swipe Long le swipe Right swipe
Inbox, Sent, Delete Delete; Flag or Unflag;
More
Delete Mark as Read or
Unread
Dras Delete; Flag or Unflag Delete Mark as Read or
Unread
Outbox Delete; Resend or
Cancel
Delete No Action
Server Results Forward; Reply and
Reply All
Reply and Reply All No Action
© 1999–2024 Cloud Soware Group, Inc. All rights reserved. 11

Secure Mail
The following image is a representaion of swiping action.
The following sections provide more information about each menu item.
More option
The More menu shows the following options:
• Reply
• Forward
• Move
• Cancel
© 1999–2024 Cloud Soware Group, Inc. All rights reserved. 12

Secure Mail
Flag option
The Flag option allows you to mark the email for a faster reference. Using this option, you can flag or
unflag an email.
Swipe le and tap Flag or Unflag.
© 1999–2024 Cloud Soware Group, Inc. All rights reserved. 13

Secure Mail
Delete option
The Delete option allows you to delete the selected email.
Swipe le and tap Delete.
© 1999–2024 Cloud Soware Group, Inc. All rights reserved. 14

Secure Mail
You can also delete an email by long swiping the email item toward the le.
In both delete scenarios (long and short le swipe gestures), the Undo option appears for a few sec‑
© 1999–2024 Cloud Soware Group, Inc. All rights reserved. 15

Secure Mail
onds so that you can reverse the delete action.
Tap the Undo button to revese the delete action.
You can delete multiple emails by long‑pressing an email item, and then selecting other emails that
you want to delete.
Mark option
The Mark option allows you to mark an email as read or unread. This swipe gesture lets you toggle
between Read and Unread options.
Long‑swipe right to mark an email as unread.
© 1999–2024 Cloud Soware Group, Inc. All rights reserved. 16

Secure Mail
Long‑swipe right to mark an email as read.
Short‑swipe right and tap Read to mark an email as read.
© 1999–2024 Cloud Soware Group, Inc. All rights reserved. 17

Secure Mail
Short‑swipe right and tap Unread to unmark an email as unread.
© 1999–2024 Cloud Soware Group, Inc. All rights reserved. 18

Secure Mail
Add Exchange accounts
July 23, 2024
In Secure Mail, you can add multiple Exchange email accounts and switch between them. You can
monitor your mails, contacts, and calendars in one place.
Note:
This feature is available for iOS and Android.
Before you start
• You need a user name and password to configure extra accounts.
• Citrix recommends that you do not configure multiple accounts on shared devices.
For administrative prerequisites, see the Citrix Product Documentation article, Multiple Exchange ac‑
counts.
To add an Exchange email account for iOS and Android
1. Open Secure Mail, tap the hamburger icon, and then tap the Settings icon.
2. Under ACCOUNTS:
• For iOS, tap Add Exchange Account.
• For Android, tap Add account.
© 1999–2024 Cloud Soware Group, Inc. All rights reserved. 19

Secure Mail
3. For Android, on the Add Account screen, edit the fields, and then tap Sign In or tap Cancel to
return to the Settings screen.
Optionally, you can switch on the Make this my default account toggle to set the new account
as your default account.
© 1999–2024 Cloud Soware Group, Inc. All rights reserved. 20

Secure Mail
For iOS, on the Account screen, edit the fields for the new account, and then tap Save or tap
Cancel to return to the previous screen.
Optionally, you can switch on the Make this my default account toggle to set the new account
as your default account.
To edit an account for iOS and Android
You can edit the password and description of your email account.
1. Open Secure Mail, tap the hamburger icon on the upper‑le corner of the screen, and then tap
the Settings icon.
2. Under ACCOUNTS, tap the account you want to edit.
3. On the Account/Account Details screen, edit the fields.
4. Tap Save to confirm your action or tap Cancel to return to the Settings screen.
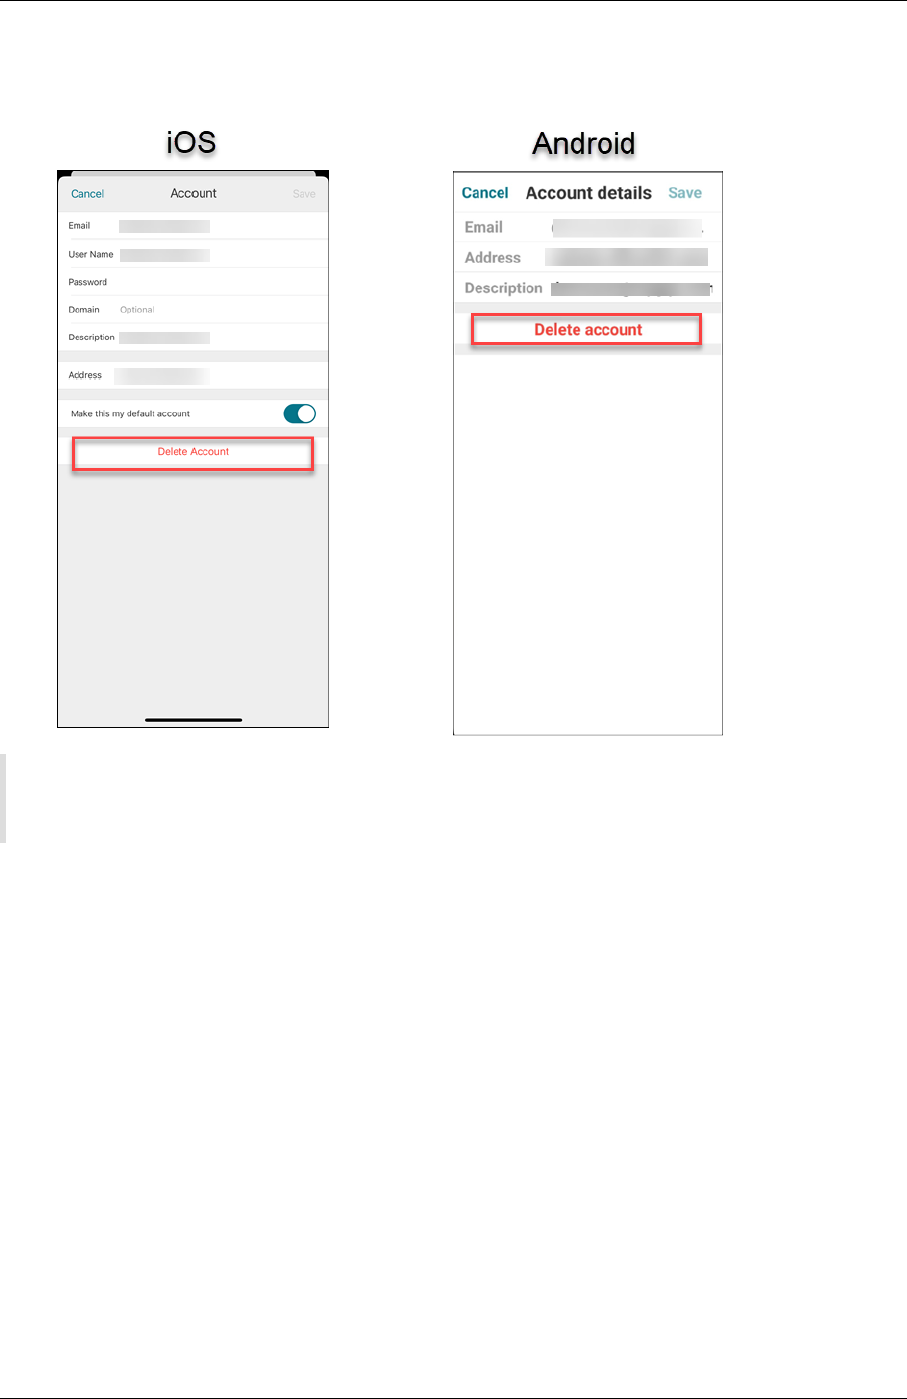
To delete an account for iOS and Android
1. Open Secure Mail, tap the hamburger icon, and then tap the Settings icon.
2. Under ACCOUNTS, tap the account you want to delete.
© 1999–2024 Cloud Soware Group, Inc. All rights reserved. 21
Secure Mail
3. On the Account screen for iOS or the Account details screen for Android, tap Delete Account
at the bottom of the screen or tap Cancel to return to the Settings screen.
Note:
If you delete the default account, the next account will become the default account.
To set a default account
Secure Mail uses the default account in the following scenarios:
• Composing emails:
The
From:
field auto‑populates with the email ID of the default account.
• App badge count:
Indicates the unread mail count of the default account.
For Android, when you add one or more email accounts, the first account you create is the default
account.
For Android, to change the default account, tap the hamburger icon on the upper‑le corner of the
screen. On the Settings screen, under General, tap the email id next to Default.
© 1999–2024 Cloud Soware Group, Inc. All rights reserved. 22

Secure Mail
On the Default account screen, tap the account you want to set as default.
For iOS, to set as a default account, you can navigate to Settings > ACCOUNTS, and then tap the
© 1999–2024 Cloud Soware Group, Inc. All rights reserved. 23

Secure Mail
account you want to set as default. On the Account screen, switch on the Make this my default
account toggle.
Settings for multiple Exchange accounts
If you have configured multiple Exchange accounts, some Secure Mail settings are available to each
of these accounts individually. Whereas some other settings are global to all accounts. The following
settings are account‑specific for iOS:
• Default
• Notifications
• Auto Refresh
• Out of Oice
• Sync Mail Period
• S/MIME
• Oline Files
• Signature
• Sync with Local Contacts
• Export Settings
The following settings are account‑specific for Android:
• Default
• Notifications
• Out of Oice
• Sync inbox frequency
• Sync mail period
• Sync email
• S/MIME
• Oline Files
• Signature
• Quick responses
• Sync calendar
• Sync contacts
• Sync contacts
• Export Settings
These settings appear with the > icon. Tap the > icon to view the accounts on your device.
To apply the setting to a specific account, expand a setting item by tapping >, and then selecting the
email account.
© 1999–2024 Cloud Soware Group, Inc. All rights reserved. 24

Secure Mail
Note:
For iOS, you can only import the previously exported Secure Mail settings to the default or pri‑
mary account.
Mailboxes screen for iOS and Android
The Mailboxes screen displays all the accounts you have configured and has the following views:
• All Accounts: Contains emails from all Exchange accounts that you have configured. The All
Accounts mailbox is the global view by default. This view contains attachments and emails
from all Exchange accounts that you have configured on your device.
• Individual accounts: Contains emails and folders of an individual account. These accounts
appear as a list that you can expand to view the subfolders.
For Android, to view your mailboxes, open Secure Mail and tap the hamburger icon. On the Mailboxes
screen, tap the account to expand the options.
© 1999–2024 Cloud Soware Group, Inc. All rights reserved. 25

Secure Mail
The All Accounts view displays your emails from multiple accounts collectively. But the following
actions use the email address of the default or primary account:
• New message
• New event
You can change the email address of the sender while composing a mail from the
All Accounts
view.
To do so, tap the default address on the From: field and Select a dierent account from the mail
accounts that appear.
© 1999–2024 Cloud Soware Group, Inc. All rights reserved. 26

Secure Mail
Note:
Composing an email from the conversation view auto‑populates the From: field with the email
address that conversation is addressed to.
Individual accounts
The default or the primary account always appears first followed by the other accounts in alphabetical
order.
The individual accounts display any subfolders you might have created.
On Android, the subfolders appear as follows:
© 1999–2024 Cloud Soware Group, Inc. All rights reserved. 27

Secure Mail
The following actions are limited to individual accounts only:
• Moving items.
• Composing emails from the conversation view.
• Importing vCard (for Android)
• Saving contacts.
Set colors for synchronized Secure Mail calendars
July 23, 2024
© 1999–2024 Cloud Soware Group, Inc. All rights reserved. 28

Secure Mail
The Secure Mail calendar shows all events that relate to synchronized mail accounts on your device.
You can set colors for individual accounts to dierentiate calendar events.
Note:
This feature is available for iOS and Android.
To set colors for calendar events
1. Tap the Calendar icon at the bottom of the screen, and then tap the hamburger icon.
The Calendar screen displays all the configured accounts.
2. Tap the default color displayed on the right of an Exchange account.
The Colors screen displays the available colors for that account.
1. Select a color and then tap Save to apply the color or tap Cancel cancel the action.
© 1999–2024 Cloud Soware Group, Inc. All rights reserved. 29

Secure Mail
The selected color is set for all calendar events that apply to that Exchange account.
The selected color appears next to the calendar event.
© 1999–2024 Cloud Soware Group, Inc. All rights reserved. 30
Secure Mail
Note:
When you exit and then open Secure Mail, the app restores the last configured calendar settings
on your device.
Export your Secure Mail calendar events
July 23, 2024
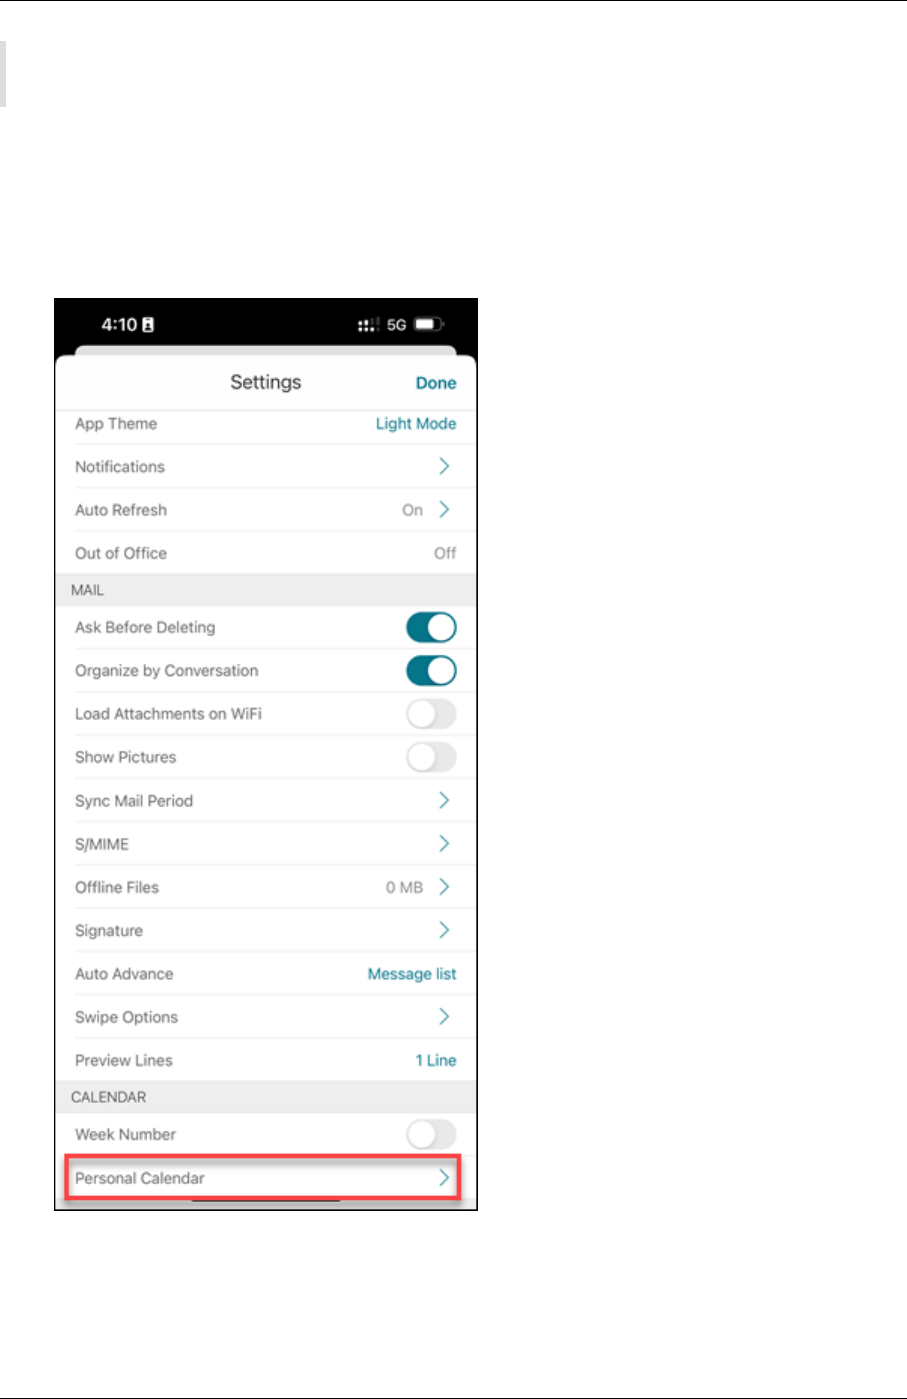
You can export Secure Mail calendar events to the personal calendar on your device. To do so, tap the
hamburger icon on the upper‑le of the screen, and then Settings on the lower‑le of the screen.
On the Settings screen, tap Personal Calendar.
© 1999–2024 Cloud Soware Group, Inc. All rights reserved. 31

Secure Mail
In the Export Secure Mail Calendar, screen switch on the Toggle button to the right of your email
address.
© 1999–2024 Cloud Soware Group, Inc. All rights reserved. 32

Secure Mail
Note:
This feature is available for iOS and Android.
Edit Secure Mail events
To edit Secure Mail events, tap an event in your calendar.
© 1999–2024 Cloud Soware Group, Inc. All rights reserved. 33

Secure Mail
This action redirects you to the event page to make the required changes.
Tap Edit event to edit a single event, or tap Edit series to edit a series of events.
© 1999–2024 Cloud Soware Group, Inc. All rights reserved. 34

Secure Mail
Edit the required fields and tap Send, or tap Cancel to cancel editing the event.
Note
:
• Calendar events you export from Secure Mail are read‑only.
• For iOS, this feature works only if iCloud is enabled.
• For Android, the Secure Mail Event link is not available on Samsung and Huawei devices.
• For administrative policy settings, see Export Secure Mail calendar events in the Citrix Product
Documentation.
View your personal calendar events
July 23, 2024
You can import your personal calendar from the native calendar app on your device. Then, you can
view your personal events in Secure Mail. Your personal calendar information doesn’t sync back to
the Exchange or Lotus Notes mail server.
Note:
© 1999–2024 Cloud Soware Group, Inc. All rights reserved. 35
Secure Mail
This feature is available for iOS and Android. This feature is not available on Android Enterprise
devices.
You can enable the personal calendar overlay either from the pop‑up notification or from Secure Mail
settings.
1. In the Secure Mail app, tap the hamburger icon in the upper‑le corner of the screen.
2. Tap Settings on the lower‑right corner of the screen, and then tap Personal Calendar.
3. In the Personal Calendar screen, turn on the View Personal Calendar toggle.
© 1999–2024 Cloud Soware Group, Inc. All rights reserved. 36

Secure Mail
4. Select a color for the events for the selected account.
Note
If the Secure Mail prompts, change the privacy settings.
© 1999–2024 Cloud Soware Group, Inc. All rights reserved. 37

Secure Mail
The selected color appears next to the event.
© 1999–2024 Cloud Soware Group, Inc. All rights reserved. 38

Secure Mail
Also, in the day view of calendar, the selected color appears. You can switch between the Day, Week,
Month, and Agenda by tapping on the day/date, and selecting as per the requirement.
© 1999–2024 Cloud Soware Group, Inc. All rights reserved. 39
Secure Mail
In Personal Calendar screen, select the personal calendar account that needs to appear.
© 1999–2024 Cloud Soware Group, Inc. All rights reserved. 40

Secure Mail
Secure Mail also displays the following details about a personal calendar event:
© 1999–2024 Cloud Soware Group, Inc. All rights reserved. 41

Secure Mail
You can also edit an event.
Tap an event in the calendar.
© 1999–2024 Cloud Soware Group, Inc. All rights reserved. 42

Secure Mail
Tap the Pencil icon at the lower‑middle of the screen to edit the fields, and then tap Send to confirm
or tap Cancel to cancel the edit action.
© 1999–2024 Cloud Soware Group, Inc. All rights reserved. 43

Secure Mail
Secure Mail for Android displays a conflict when you try to add an invitee for an event and the invitee
is already invited for some other event at your selected time slot.
Tap the Availability field. The following Availability screen displays the current conflict and the avail‑
able time shots for that day.
© 1999–2024 Cloud Soware Group, Inc. All rights reserved. 44

Secure Mail
View and sync your contacts
July 23, 2024
You can view your contacts in Secure Mail and from other mail accounts you’ve set up. You can also
export your Secure Mail contacts and sync them with other mail accounts on your device.
Note:
This feature is available for iOS and Android.
© 1999–2024 Cloud Soware Group, Inc. All rights reserved. 45

Secure Mail
To view your contacts
Tap the Contacts icon at the bottom of the screen, and then tap the hamburger icon.
The Contacts screen shows the following:
• All contacts: Displays all contacts from multiple email accounts. This option appears only if
you set up multiple email accounts.
• Individual email account: Displays contacts relating to the particular email account you set
up.
• Categories: On Android, displays contact categories that you have created or selected from a
predefined list for grouping contacts.
• Contact folders or subfolders: On iOS, displays contacts from folders or subfolders you cre‑
ated in Microso Outlook.
© 1999–2024 Cloud Soware Group, Inc. All rights reserved. 46

Secure Mail
To view contact folders or categories
1. Tap the Contacts icon at the bottom of the screen, and then tap the hamburger icon.
© 1999–2024 Cloud Soware Group, Inc. All rights reserved. 47

Secure Mail
2. On the Contacts screen, tap the email account to view the contacts associated with that ac‑
count.
© 1999–2024 Cloud Soware Group, Inc. All rights reserved. 48

Secure Mail
The contacts associated with the email id displays.
Note:
All Contacts appears only if you set up multiple email accounts.
3. On iOS, to view the contacts from a contact folder or subfolder, tap the Contacts icon on the
bottom of the screen, and then tap the hamburger icon on the upper‑le corner of the screen.
© 1999–2024 Cloud Soware Group, Inc. All rights reserved. 49

Secure Mail
4. Under Contacts folder, tap the sub‑folder Company.
© 1999–2024 Cloud Soware Group, Inc. All rights reserved. 50

Secure Mail
You can view the contacts under the sub‑folder Company.
© 1999–2024 Cloud Soware Group, Inc. All rights reserved. 51

Secure Mail
5. On Android, tap the hamburger at the upper‑le corner, and then tap Categories to view the
contacts grouped under specific categories.
© 1999–2024 Cloud Soware Group, Inc. All rights reserved. 52

Secure Mail
The Categories screen displays.
© 1999–2024 Cloud Soware Group, Inc. All rights reserved. 53

Secure Mail
To sync contacts
1. Tap the Contacts icon at the bottom of the screen, and then tap the hamburger icon on the
upper‑le of the screen.
© 1999–2024 Cloud Soware Group, Inc. All rights reserved. 54

Secure Mail
2. Tap the Settings icon.
3. Under Contact, turn on the Sync contacts toggle switch.
© 1999–2024 Cloud Soware Group, Inc. All rights reserved. 55

Secure Mail
To disable the contact sync, turn o the Sync Contacts toggle switch.
Set up caller ID
July 23, 2024
You can identify incoming calls from your Secure Mail for iOS contacts.
Note:
The caller ID feature is available for Secure Mail for iOS.
When you receive an incoming call, your iOS device shows the App name with the Caller ID. For exam‑
ple, “Secure Mail Caller ID: Number/Name”.
© 1999–2024 Cloud Soware Group, Inc. All rights reserved. 56

Secure Mail
© 1999–2024 Cloud Soware Group, Inc. All rights reserved. 57

Secure Mail
To identify international calls, iOS requires that you save the contact’s phone number with the ap‑
propriate country code. For example, for +1 (210) 555‑5555, +1 is the country code for North America,
followed by the digits.
Note:
For the policy prerequisite that administrators must set, see the Citrix Product Documentation
on Secure Mail Caller ID).
To enable Caller ID on an iPhone
To enable Secure Mail Caller ID, navigate to Settings, and then tap Phone.
© 1999–2024 Cloud Soware Group, Inc. All rights reserved. 58

Secure Mail
Tap Call Blocking & Identification.
Turn on the Secure Mail toggle.
© 1999–2024 Cloud Soware Group, Inc. All rights reserved. 59

Secure Mail
To enable Caller ID on an iPad
To enable Secure Mail Caller ID on an iPad, navigate to Settings, tap FaceTime, and then tap Call
Blocking & Identification.
© 1999–2024 Cloud Soware Group, Inc. All rights reserved. 60

Secure Mail
© 1999–2024 Cloud Soware Group, Inc. All rights reserved. 61

Secure Mail
Under Call Blocking & Identification, turn on the Secure Mail toggle.
© 1999–2024 Cloud Soware Group, Inc. All rights reserved. 62

Secure Mail
© 1999–2024 Cloud Soware Group, Inc. All rights reserved. 63

Secure Mail
View and attach files
July 23, 2024
For Secure Mail for iOS, you can attach files from the iOS native Files app. For more information about
the iOS Files App, see the Apple Support documentation.
For Secure Mail for Android, an attachment opens directly within the app or a list of supported apps
appears. You canselect an app toview the attachment. Supported formatsare .txt, word, audio, video,
html, .zip files, images, .eml files, and .vcf contact file formats.
Note:
For Android, as a prerequisite, an administratormust configure policies. For details, see the Citrix
Product Documentation on Admin steps to enable file attachments from the Gallery in Android.
To attach files in Secure Mail for Android
You can either attach a file to a new email or attach a file while responding to an email.
1. Do one of the following:
• Tap the Compose icon on the lower‑right corner of the screen to create a new email.
• Open an email, and then tap the Respond icon to reply to an email.
2. Tap the Attachments icon on the lower‑right corner of your screen.
© 1999–2024 Cloud Soware Group, Inc. All rights reserved. 64
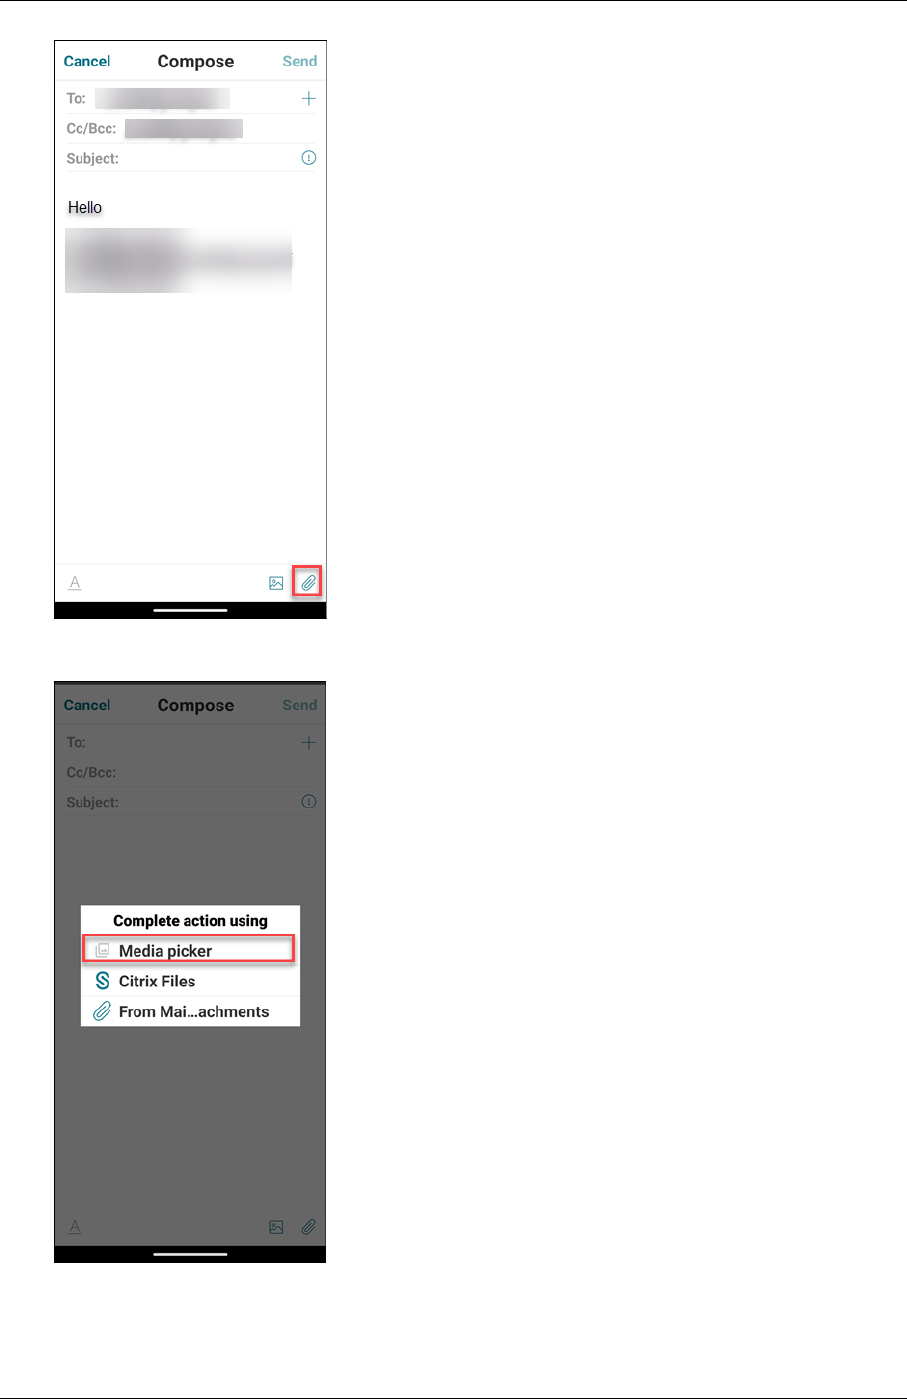
Secure Mail
3. From the attachment options, tap Media Picker.
© 1999–2024 Cloud Soware Group, Inc. All rights reserved. 65

Secure Mail
Note:
The Files app shows files from your device and other integrated cloud storage solutions,
such as OneDrive and Google Drive.
4. Tap the hamburger icon on the upper‑le corner of the screen. On the Open from screen, select
one of the file locations such as Recent, Images, Videos, Audio, Documents, etc. and select a
file to attach.
5. To attach multiple files, long‑press on a file.
6. Tap on multiple files, and then tap Select on the upper‑le corner. The files will be attached to
the email.
© 1999–2024 Cloud Soware Group, Inc. All rights reserved. 66

Secure Mail
To view files in Secure Mail for Android
In Secure Mail for Android, you can attach a file to a new or existing message. With attachments to
emails, you can do the following:
• Save the attachment oline and delete the attachment later.
• Open the attachment by using a dierent app.
• View the source email or calendar event of the attachment.
• Preview attachments while viewing a message, composinganew message, or forwarding a mes‑
sage. You can also preview attachments from the Attachments folder and calendar events.
To attach files to an existing or new email in Secure Mail for Android
1. Tap the Attachments icon on the lower‑right corner of the screen. The Attachment screen ap‑
pears.
© 1999–2024 Cloud Soware Group, Inc. All rights reserved. 67

Secure Mail
Do one of the following:
• To select a single attachment, tap the Attachment icon on the upper‑right corner of the
screen.
© 1999–2024 Cloud Soware Group, Inc. All rights reserved. 68

Secure Mail
In the Inbox screen, tap the email you want to attach. The selected file will be attached to the
email selected.
© 1999–2024 Cloud Soware Group, Inc. All rights reserved. 69

Secure Mail
• To attach multiple files, long‑press a file and select multiple files, and tap the Attachment
icon on the lower‑le of the screen.
2. Do one of the following:
• To attach the file to an existing email, tap an existing email.
• To attach the file to a new email, tap New message.
You can compose and send the email with the attachment.
To save the attachment for oline access in Secure Mail for Android
1. Tap the Attachments icon on the lower‑right of the screen, and then open an attachment.
© 1999–2024 Cloud Soware Group, Inc. All rights reserved. 70

Secure Mail
2. Tap the More icon on the upper‑right of the screen, and then tap Save for Oline Access.
© 1999–2024 Cloud Soware Group, Inc. All rights reserved. 71

Secure Mail
To delete the attachment from oline files in Secure Mail for Android
1. Tap the Attachment icon on the lower‑right of the screen, and tap an attachment to open.
2. Tap the More icon on the upper‑right of the screen, and then tap Remove from Oline Files.
© 1999–2024 Cloud Soware Group, Inc. All rights reserved. 72

Secure Mail
To open the attachment by using dierent apps in Secure Mail for Android
1. Tap Attachments icon on the lower‑right corner of the screen.
© 1999–2024 Cloud Soware Group, Inc. All rights reserved. 73

Secure Mail
Do one of the following:
• Swipe le to view the list of actions, and then select Open with…
• Open an attachment.
2. Tap the More icon on the upper‑right of the screen, and then tap Open with….
© 1999–2024 Cloud Soware Group, Inc. All rights reserved. 74

Secure Mail
3. From the options that appear, tap the app you want to open the attachment with.
© 1999–2024 Cloud Soware Group, Inc. All rights reserved. 75

Secure Mail
To view the source email or calendar event of the attachment for Secure Mail for
Android
1. Tap the Attachments icon on the lower‑right of your screen.
2. Tap an attachment, and then tap the More icon (three dots) on the upper‑right of the screen.
3. Tap View Original Email to view the source of an attachment.
© 1999–2024 Cloud Soware Group, Inc. All rights reserved. 76

Secure Mail
The source of an attachment appears similar to the following image.
© 1999–2024 Cloud Soware Group, Inc. All rights reserved. 77

Secure Mail
Sync folders and contacts
June 28, 2024
You can refresh and sync Secure Mail content.
Mail folder sync
You can sync all Secure Mail content by tapping the Sync icon.
Note:
This feature is available for iOS and Android.
The Sync icon appears in Secure Mail slide outs, such as Mailboxes, Calendars, Contacts, and Attach‑
ments.
When you tap the Sync icon, the folders that are configured to auto refresh are updated. The time‑
stamp of the last sync appears next to the Sync icon.
To sync your folders
1. Open Secure Mail.
2. From the available folders on the footer tab bar, tap the folder you want to sync.
© 1999–2024 Cloud Soware Group, Inc. All rights reserved. 78

Secure Mail
3. Tap the hamburger icon on the upper‑le corner of your screen.
4. Tap the Sync icon on the lower‑le corner of your screen.
© 1999–2024 Cloud Soware Group, Inc. All rights reserved. 79

Secure Mail
The folder sync progress shows, and the folder is synced. The timestamp appears next to the Sync
icon.
Dras folder auto‑sync
In Secure Mail for Android, the dras folder syncs automatically. Your dras are available across all
your devices. For Android, the feature is available on devices running Oice 365 or Exchange Server
2016 and later.
In Secure Mail for iOS, this feature is available on setups running Exchange ActiveSync v16 or later.
If your Secure Mail dra contains attachments, the attachments aren’t synced to the server.
The following one‑minute video demonstrates how this feature works:
© 1999–2024 Cloud Soware Group, Inc. All rights reserved. 80


Secure Mail
Note:
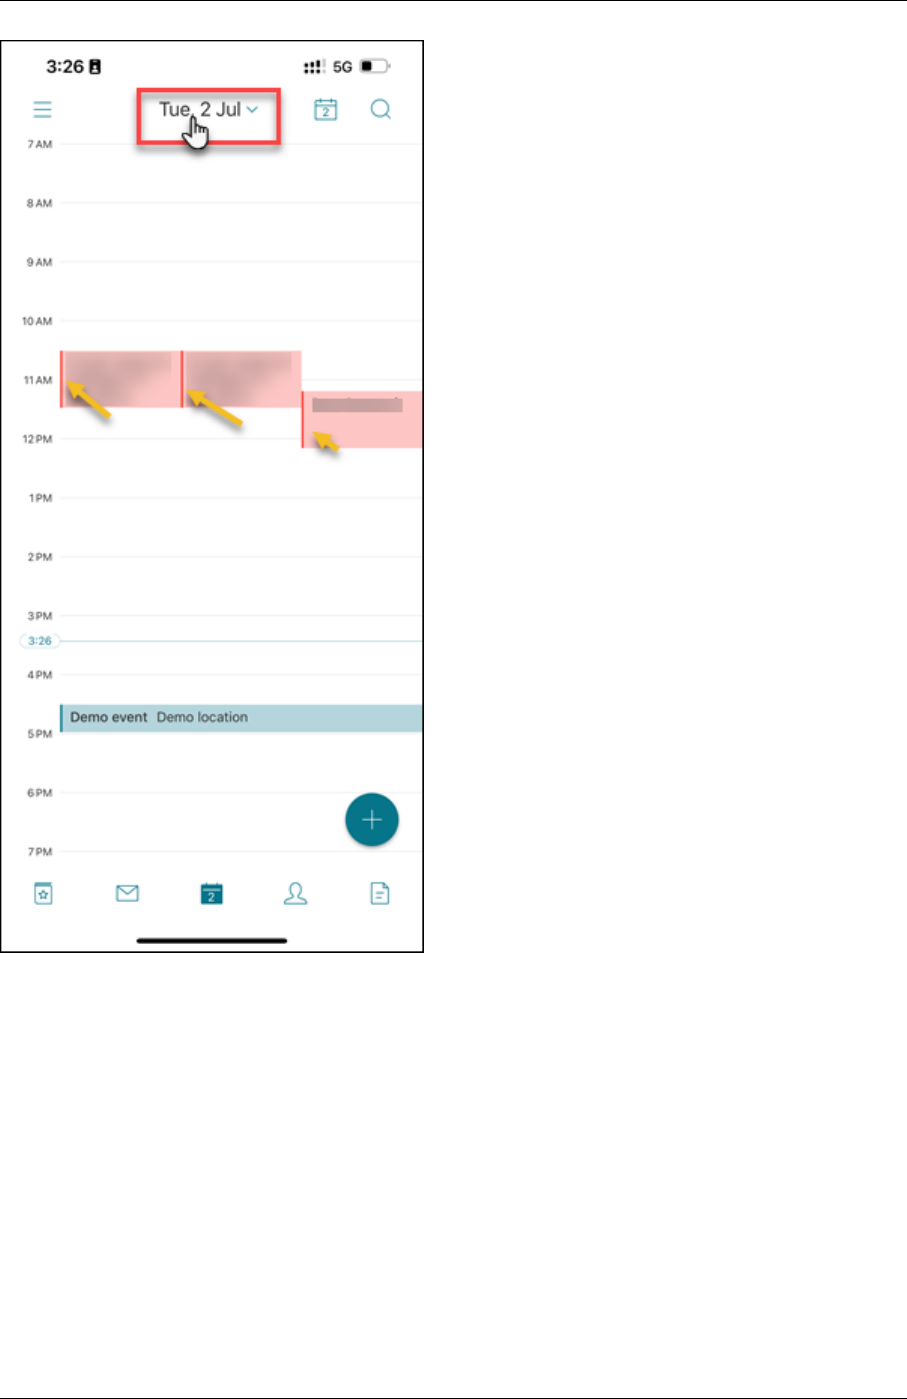
You can change the time of an event only for the same day the meeting occurs.
You can also change the duration of the event. To change the event duration, tap and hold the anchor
(three lines) and drag up or down to a desired time.
© 1999–2024 Cloud Soware Group, Inc. All rights reserved. 82

Secure Mail
Report a phishing email
July 25, 2024
You can report the email that you suspect as phishing. The way you report the email is based on the
policy your admin configures. The options for sending the email are as a forward or as an attach‑
ment.
The default setting in the policy is Report via attachment (.eml).
For more information on administrative policies for Secure Mail, refer the following links:
• MAM SDK policies for third‑party apps for Android
• MAM SDK policies for third‑party apps for iOS.
Admins configure these policies in Citrix Endpoint Management.
Note:
This feature is available for iOS and Android.
© 1999–2024 Cloud Soware Group, Inc. All rights reserved. 83

Secure Mail
Report a phishing email as a forward
You can forward suspicious messages to email addresses that admins configure. To enable this fea‑
ture, your admin must configure the Report Phishing Email Address policy for Secure Mail.
Considerations
• The Report as Phishing feature is supportedfor individual emails only. You can’t report an entire
conversation.
• For an HCL Domino server, phishing emails are reported as attachments. The attachment goes
to an email address or addresses that an admin configures.
• The original email isn’t deleted or hidden from the inbox.
• Aer you report a phishing email, future emails from that sender aren’t blocked automatically.
• Aer you report a phishing email, the subject line is unchanged.
To report a phishing email as a forward
1. Do one of the following:
• Open an email, tap the More icon at the bottom of the screen, and then tap Report as
phishing
.
© 1999–2024 Cloud Soware Group, Inc. All rights reserved. 84

Secure Mail
• In your inbox, swipe le on any email you suspect of being a phishing attempt, and then
tap More.
2. Tap Report as phishing.
© 1999–2024 Cloud Soware Group, Inc. All rights reserved. 85

Secure Mail
3. Tap REPORT AND DELETE.
© 1999–2024 Cloud Soware Group, Inc. All rights reserved. 86

Secure Mail
The email is forwarded to the email address or addresses that your admin configured in the
Report Phishing Email Address policy.
Report a phishing email as an attachment
You can send a suspected phishing message as an attachment to an email address or to a list of email
addresses. Your admin configures the addresses in the Report Phishing Email Address policy.
To report a phishing email as an attachment
1. In the Inbox, swipe the phishing email to the le, and then tap More.
2. Tap Report as phishing.
© 1999–2024 Cloud Soware Group, Inc. All rights reserved. 87

Secure Mail
3. Tap REPORT AND DELETE to confirm.
© 1999–2024 Cloud Soware Group, Inc. All rights reserved. 88

Secure Mail
The email is reported to the address or addresses that the admin configured.
Delete and auto advance to an email in Conversations
June 28, 2024
In Secure Mail, when you delete a message in Conversations, you can choose which message you
return to.
Notes:
• This feature is available for iOS and Android.
• You can use this feature only if you’ve sorted your emails to appear in Conversations.
Tap the hamburger icon on the upper‑le corner. Navigate to Settings > Auto Advance.
Select one of the following options:
• Newer message –Returns to the succeeding email in the chain aer you delete an email.
• Older message –Returns to the previous email in the chain aer you delete an email.
• Message list –Returns to the conversation screen aer you delete an email. This option is the
default setting.
© 1999–2024 Cloud Soware Group, Inc. All rights reserved. 89

Secure Mail
When you delete all emails in Conversations, you return to the Inbox.
Show pictures of your contacts
July 23, 2024
You can view a picture of your contact when you add recipients to your emails or to your meeting
invites.
Note:
This feature is available for iOS and Android.
The image of your contact appears next to their name. If your contacts have the same name, the image
helps you to pick the correct person.
In the email Compose screen or in the Calendar > New Event > Invitees screen, enter the characters
of a name of your contact (The contacts that are not saved locally). The matching contacts will show
in the results.
© 1999–2024 Cloud Soware Group, Inc. All rights reserved. 90

Secure Mail
Minimizing dras
June 28, 2024
When you’re writing an email, you can minimize the dra email. You can navigate in Secure Mail and
return to your dra email later.
Note:
This feature is available for Android and devices running iOS 13 and later.
To minimize dra email on Android
To minimize the dra email on the compose screen, you can either:
• swipe le from the extreme edge of the screen.
• tap Cancel and tap Save in Dras folder.
© 1999–2024 Cloud Soware Group, Inc. All rights reserved. 91

Secure Mail
The email dra is available at the bottom of your screen.
To return to the email dra, tap the minimized dra button.
© 1999–2024 Cloud Soware Group, Inc. All rights reserved. 92

Secure Mail
To minimize dra email on iOS
To minimize the dra email, tap Cancel and tap Save Dra on the compose screen.
The email dra is available at the bottom of your screen.
To return to the email dra, tap the minimized dra button.
View PDFs
December 12, 2019
You can view PDF files and the PDF bookmarks and annotations within Secure Mail. You can also see
an enhanced view of other Microso Oice attachments.
© 1999–2024 Cloud Soware Group, Inc. All rights reserved. 93

Note:
This feature is available for Android.

Secure Mail
© 2024 Cloud Soware Group, Inc. All rights reserved. Cloud Soware Group, the Cloud Soware Group logo, and other
marks appearing herein are property of Cloud Soware Group, Inc. and/or one or more of its subsidiaries, and may be
registered with the U.S. Patent and Trademark Oice and in other countries. All other marks are the property of their
respective owner(s).
© 1999–2024 Cloud Soware Group, Inc. All rights reserved. 95
