
Commercial Vehicle Pre-Trip Inspection Checklist
You are only required to inspect the items on the CDL Vehicle Inspection checklist. You may use the checklist
provided in this section for your test and check o items as you have completed them, but NO additional markings
or writing may be placed on this list prior to the test. You MUST name, point to and/or touch and fully explain to the
examiner WHAT you are inspecting each safety critical item for. If you do not, you will not get credit for the item(s).
Department of Public Safety Driver and Vehicle Services - 445 Minnesota St., Saint Paul, MN 55101
Phone: (651) 201-7626 TTY: (651) 282-6555 Fax: (651) 296-5316
Rev. October 2023
Section 10M - Vehicle Inspection Page 10M-11
Version: September 9, 2022
Class A Checklist
Tractor Semi-Trailer or Truck & Trailer or Bus & Trailer
In-Vehicle/Engine Start
☐ *air or *hydraulic brake check
☐ parking & trailer brake check
☐ service brake check
☐ lighting indicators
☐ emergency equipment
☐ windshield & traffic monitoring devices
☐ wipers & washers
☐ heater & defroster
☐ horn(s)
Lights Operations Check
☐ all external lights
Front of Vehicle/Engine Area
☐ lenses
☐ fluid levels
☐ fluid & air leaks
☐ steering systems
Steering Axle
☐ tires
☐ rims
☐ lug nuts
☐ springs/mounts & air bags & shocks
☐ brake lines or hoses & leaks
☐ brake contaminates
Side of Vehicle
☐ lenses & reflectors
☐ traffic monitoring devices
☐ battery
☐ fuel tank(s)/DEF tank
☐ frame(s)
Combination Vehicles Only
☐ air & electric lines & connectors
☐ fifth wheel skid plate or pintle hook
or tow hitch
☐ kingpin & apron & gap or drawbar ring &
tongue or coupler & tongue
☐ locking & safety devices
Trailer Only
☐ landing gear & clearance
☐ reflective tape
Rear of Trailer
☐ lenses & reflectors
* Automatic failure if not performed correctly
Passenger and School Bus
Only
☐ passenger entry & lift
☐ emergency exits
☐ passenger seating
☐
passenger monitoring devices
School Bus Only
☐ student lights (front & back)
☐ stop arm(s) & safety arm
☐ first aid & body fluid kits
zŽƵĂƌĞŽŶůLJƌĞƋƵŝƌĞĚƚŽŝŶƐƉĞĐƚƚŚĞŝƚĞŵƐŽŶƚŚĞ>sĞŚŝĐůĞ/ŶƐƉĞĐƚŝŽŶĐŚĞĐŬůŝƐƚ͘You may use this checklist
for your test and check off items as you have completed them, NO additional markings or writing may be
placed on this list. You MUST name, point to and/or touch and fully explain what you are inspecting
each safety critical item for. If you do not do so, you will not get credit for the item(s).
The Commercial Vehicle Pre-Trip Inspection Test is designed to test your ability to check a variety of commercial vehicle safety
equipment and vehicle components. You are required to check the items listed below that relate to the operation of your vehi-
cle. You will need to point out the item to be checked and explain how you check that item. You may use this checklist during
your pre-trip inspection.
All commercial vehicles must display a current inspection sticker to receive a road test.
READ MN CDL MANUAL SECTION 10M PAGES 189-200
(Remember to latch the hood.)
1
PG. 3
PG. 4
PG. 4
PG. 4 & 5
PG. 5
PG. 6
PG. 6
PG. 6

Department of Public Safety Driver and Vehicle Services - 445 Minnesota St., Saint Paul, MN 55101
Phone: (651) 201-7626 TTY: (651) 282-6555 Fax: (651) 296-5316
Rev. October 2023
Section 10M - Vehicle Inspection Page 10M-12
Version: September 9, 2022
Class B or Class C Checklist
Straight Truck or Other Straight Vehicle
In-Vehicle/Engine Start
☐ *air or *hydraulic brake check
☐ parking & trailer brake check
☐ service brake check
☐ lighting indicators
☐ emergency equipment
☐ windshield & traffic monitoring devices
☐ wipers & washers
☐ heater & defroster
☐ horn(s)
Lights Operations Check
☐ all external lights
Front of Vehicle/Engine Area
☐ lenses
☐ fluid levels
☐ fluid & air leaks
☐ steering systems
Steering Axle
☐ tires
☐ rims
☐ lug nuts
☐ springs/mounts & air bags & shocks
☐ brake lines or hoses & leaks
☐ brake contaminates
Side of Vehicle
☐ lenses & reflectors
☐ traffic monitoring devices
☐ battery
☐ fuel tank(s)/DEF tank
☐ frame(s)
Rear of Vehicle
☐ lenses & reflectors
* Automatic failure if not performed correctly
zŽƵĂƌĞŽŶůLJƌĞƋƵŝƌĞĚƚŽŝŶƐƉĞĐƚƚŚĞŝƚĞŵƐŽŶƚŚĞ>sĞŚŝĐůĞ/ŶƐƉĞĐƚŝŽŶĐŚĞĐŬůŝƐƚ͘You may use this checklist
for your test and check off items as you have completed them, NO additional markings or writing may be
placed on this list. You MUST name, point to and/or touch and fully explain what you are inspecting
each safety critical item for. If you do not do so, you will not get credit for the item(s).
Commercial Vehicle Pre-Trip Inspection Checklist
You are only required to inspect the items on the CDL Vehicle Inspection checklist. You may use the checklist
provided in this section for your test and check o items as you have completed them, but NO additional markings
or writing may be placed on this list prior to the test. You MUST name, point to and/or touch and fully explain to the
examiner WHAT you are inspecting each safety critical item for. If you do not, you will not get credit for the item(s).
The Commercial Vehicle Pre-Trip Inspection Test is designed to test your ability to check a variety of commercial vehicle safety
equipment and vehicle components. You are required to check the items listed below that relate to the operation of your vehi-
cle. You will need to point out the item to be checked and explain how you check that item. You may use this checklist during
your pre-trip inspection.
All commercial vehicles must display a current inspection sticker to receive a road test.
READ MN CDL MANUAL SECTION 10M PAGES 189-200
(Remember to latch the hood.)
2

INSIDE VEHICLE
Safe start: SHOW: Before starting the truck, pull on the parking & trailer brake valves brake is
on and then show the transmission is in neutral.” Start the truck.
AIR BRAKE CHECK*:
1. Air Gauge &
Governor Cuto
Check Explain: Air Gauges read at the safe level (90-120 psi). Explain, I would Chock the wheels, (leave
both the parking and trailer brakes pushed in, gently press service brake and gas pedal) start the
vehicleandinspectthattheairgaugeisworkingandbuildstheairpressuretogovernorcuto
(approximately125–140psi)andidentifythecutopressureforyourvehicle.
2. Air Loss check (leave both the parking and trailer brakes pushed in, and keep your foot on the brake pedal)
Put the truck in neutral, turn o the truck but turn the key back to the ON position;
Both parking brake valves should be released. Explain: “I should not lose more than 4 psi per
minute.” (3 psi for class B.) Wait the full minute while holding the service brakes.
3. Low Air Alarm
check: Explain: “The Low Air Alarm should come on between 80 - 60 psi.” Start to pump the brakes
slowly until alarm sounds. Explain: “Alarms work. Both visible and audible.”
Emergency Brake
check:
Both parking brake valves should still be pushed in and released at this time. Explain: “Both valves
should pop out and apply automatically between 40 - 20 psi.” Start to pump the brakes until both
valves apply. Immediately start the engine, put the truck in drive and try to pull against the brakes.
Explain: “Emergency brakes hold.” Put the truck in neutral and build air pressure to at least 90 psi.
Parking &
Trailer Brake Check
Step 1. Parking Brake:
Release
(push in)
trailer brake (red valve) leaving yellow valve applied and put the truck
in drive. Gently pull against the parking brake; truck should not move;
Explain: “Parking brake Holds.”
Step 2. Trailer Brake
& connection Release (push in) parking brake (yellow valve) and pull the trailer brake (red valve) out.
Gently pull truck forward Explain: “Trailer Brake Holds.” Leave the trailer brake
(red valve) out. Explain: “Now Testing Trailer Connection, to show hitch is securely
locked and coupled together.” Then gently pull truck forward and
Explain,“Trailer Brake holds the truck and trailer is connected securely.”
Service brake: Release all parking & trailer brakes, put the truck in drive, roll forward and stop with service brake
(brake pedal); “Service brake works and also brakes evenly apply without pulling to either side.”
Lighting indicators: Turnonlightsandcheckbothinsideturnsignalindicatorsandashers.
Turn on head lights and check the high beam indicator. Explain: ABS Light is not ON and
DEF is full and now warning lights are visible.
Emergency Equip: Sparefuses;3reectivetriangles;properlychargedandmountedsecuredreextinguisher.
Windshield
& mirrors: Windshield is clean, clear, and not cracked. No illegal stickers and nothing blocking my view.
The mirrors are clean, clear, and adjusted properly.
Wipers & washers: Thewiperbladesarenotcrackedormissingandoperatesmoothly.Testthewasheruid.
Heater & defroster: Turn on the fan and test (twist) the heater/defroster controls to see if it works.
Horn: Toot the horn/s, explain city horn works, and if equipped air/freeway horn works.
3

Lights Operation Check:
(Leave lights on and truck idling, Mention to examiner I now will check all my lights):
All External Lights:
Low Beams: Check front;
High Beams: Check front;
Running Lights: Check all sides of truck and trailer and top of cab.
Right turn signal: Get out and check front & back;
Left turn signal: Check front & back;
Hazard/Flashers: Check front & back;
Brake Lights: Ask the examiner to help you check the brake lights.
Front of Vehicle/Engine Area
Lenses Lights&reectors:Lightsarenotcracked,looseormissing.Theyareallclean,clearand
propercolor(amber=front).Reectorsareclean,clearnotcracked,looseormissing.Wiresare
connected, not corroded, exposed or loose. All securely mounted.
(Do not actually check the uid level, but explain how you would.)
Fluid Level Oil level check whileengineiso,removeyellowdipstick,andshouldbeaboveaddmark,if
below, point to where it should be added. Cap is not loose, cracked or leaking and is securely
mounted.
Coolant level is at ADD & FULL lines, should be above the add mark. If below, point to where
it should be added. The Reservoir is mounted securely, not cracked or leaking, not missing nuts
or bolts, hoses are not loose, cracked or leaking, Securely Mounted.
Power steering Fluid Should be above the minimum/add mark (checked while engine is
running on automatic only.) Reservoir mounted securely, not cracked or leaking, not missing
nuts or bolts, hoses are not loose, cracked or leaking, and are securely mounted.
Automatic Transmission Fluid Automatic transmissions only,
Check Red dipstick - Should be above the add mark (while the engine is running), If low add
where I check it.
Fluid & Air Leaks: Smell for burnt rubber or plastic. Look for leaks or puddles on top of motor,
near the radiator and under the engine compartment. Hoses should not be cracked, worn
through, loose or leaking, no loose or missing hose clamps.
Steering box
& hoses: Steering box is not twisted, sagging, or loose; no missing nuts or bolts; not leaking.
Hose; they’re no abrasions bulges or cuts; not leaking.
Steering linkage:
the steering shaft, pitman arm and drag link are not cracked, bent, dented or
loose; no missing nuts or bolts, bushings and joints are greased. Castle nuts and cotter keys
Note: if equipped are not missing, cracked or loose. Note: some trucks have only nuts and
bolts. Check for excessive play at the steering shaft not more than 10 degrees of play at the shaft
or 2 inches at the steering wheel.
Tires Tire tread is virgin tread not recapped, tread depth is not worn dangerously thin it’s at least
4/32deep,evenlyworn,noatspots,sidewalls,arenotcrackedwornthroughorleaking.
I’dcheckforproperinationatvalvestemandwithanairgauge.Tiresareproperlyinated,no
missing dust caps and are securely mounted.
Rims Rims are not warped, cracked, bent or dented, there is no gap, illegal welds or exposed bead
between the tire and rim. The tire is sealed to the rim, and is securely mounted.
Lug Nuts Lug nuts are None are loose, missing or cracked, no gap between nut and rim, no shiny
threads or rust trails. All securely mounted.
(Remember to latch the hood.)
4

Springs/Mounts/Airbag & Shocks
Springs Springs The metal is cracked, bent or dented, rusted through, not sagging or loose; Springs
not scissoring, no missing nuts or bolts, Securely Mounted.
Mounts Spring mounts, The metal is not bent, cracked, or dented; not twisted, sagging or loose, no
gaps or missing bolts. No torn or missing bushings and are securely mounted. The spring
U-Bolt mounts Not cracked, bent, or dented; not twisted, sagging or loose; no missing nuts
and are Securely Mounted.
Airbag Air bags, NoAbrasions,BulgesorCuts,notleaking;eveninationonbothairbags.
Shocks Shocks are not cracked, bent or dented, rusted through, twisted sagging or loose, they’re not
leaking. Bushings not torn or missing, no missing nuts or bolts, and securely mounted.
Brake hoses/Lines
/Leaks: Brake hoses, No Abrasions, bulges or cuts; no leaks or missing hose clamps. ABS line they’re
no corroded, exposed or loose wires. Securely Mounted.
Brake contaminates: Check for no discoloration, signs of over-heating, drums are not warped, cracked, or welded
drums; linings, at least 1/4 thick, evenly worn, they’re dry -no grease or oil., mud or rocks
or debris, inside the drums or on the linings, securely mounted (automatic only) must look
through inspection holes:
Lenses & Reectors
(FRONT & SIDE OF VEHICLE) Lenses are not cracked, loose or missing.
Theyareallclean,clearandpropercolor(amber=front,red=rear).Reectorsareclean,clear
not cracked, loose or missing. Wires are connected not corroded,
exposed or loose All securely mounted..
(REAR OF TRUCK) DOT approved tape, clean and clear, Wires are connected, Not corroded,
exposedorloosewires.Lensesareclearnotcracked,securelymounted.Reectorsareclean,
clear not cracked, loose or missing. All are securely mounted (and the proper color red = rear).
(REAR OF TRAILER) DOT approved tape is clean and clear and covers at least 100%,
Wires are connected, Not corroded, exposed or loose lights are clean, clear not cracked,
securely mounted. Proper color (red=rear)
Trac Monitoring
Devices:
(Mirrors) Mirrors, Metal is not cracked, bent or dented, mirrors are clean, clear not cracked, loose or
missing, no missing nuts or bolts. Securely Mounted
Battery: Battery is not corroded, loose, cracked or leaking, wires are not cut, exposed, loose. Batteries
are securely mounted.
Fuel tank(s)/
DEF tanks: Fuel Tank is secured with 2 metal straps, they’re not twisted or loose, rusted through, bushings
are not missing, metal is not rubbing on metal. Gas cap seal is in pace, not worn through,
missing or leaking. I’d look for leaks at the top of fuel tank, at the cap and below the tank, Tank
is securely mounted.
DEF tanks: Def Tank is not twisted or loose, DEF cap and seal is in pace, not worn through, missing or
leaking. I’d look for leaks at the top of DEF tank, at the blue cap and below the tank, DEF Tank
is securely mounted.
Frame(s): Frame is straight; no illegal welds, not twisted or sagging, cracked, bend, dented or rusted
through; cross members are straight, no gaps, missing nuts or bolts or rusted through. Frame
and cross members securely mounted.
(Remember to latch the hood.)
5

Could Ask questions about the Rear Axles
Rear Tires: Rear Tires (duels tires) can be recapped, tread depth is not worn dangerously thin, it’s at least
2/32inchdeep,evenlyworn,noatspots,sidewalls,arenotcrackedwornthrough
or leaking. Budd Spacing Check for even spacing between wheels; no gap between rims, tires
nottouchingorrubbing;noforeignobjectstocauseapunctureorre.
Duel tires arethesametypeandsize.I’dcheckforproperinationatvalvestemsandwithan
airgauge.Tiresareproperlyinated,nomissingdustcapsandaresecurelymounted.
Combination Vehicles (ONLY)
(TRACTOR) Air and Electric connectors and lines, Electrical cord plugged in and secured w/safety latch,
lines are not Cut, Exposed or Loose wires, and enough slack for the turn of trailer. Air lines connected at
glad hands, rubber seal is not torn or leaking and the lines have enough slack for turns.
(SEMI_TRAILER) Air and electric connectors, Electricalcordrmlypluggedinandsecured,notcut,no
corroded exposed or Loose wires, not dragging below the trailer frame. Securely Mounted. Air lines properly
connected, no air leaks, no tears or cuts and not dragging below the trailer frame. Securely Mounted.
Fifth Wheel Skid Plate or Pintle Hook or Tow Hitch
Fifth Wheel 5th Wheel Skid Plate Not Greased, in place of grease is a (poly plate) mounted secured, no
cracks. Not bent or warped. Securely Mounted.
MOUNTING BOLTS Nuts and bolts are not loose or missing, no gaps between platform, bracket and frame,
no loose, cracked bolts or missing nuts and bolts. All Securely Mounted
PLATFORM Secured to frame, not Cracked, Bent and Dented or rusted trough, no missing bolts and nuts.
Securely Mounted.
King Pin & Apron & Gap or Drawbar ring & Tongue
KINGPIN Locked in locking jaws, not Cracked, Bent, or Dented. Head is visible under the locking jaws.
APRON Not cracked, bent or dented, secured to trailer frame. No missing or broken welds.
GAP Look for gaps between the apron and 5th wheel, should be no gap. If there was a gap it would indicate
the kingpin is not properly locked or locking jaw is on the head of the kingpin where it cannot be.
The locking jaw is around the neck of kingpin exactly where it should be. The trailer is securely connected.
Locking & Safety Devices
LOCKING JAWS Locking jaw is around the “shank”, and not the “head” of the kingpin, latched secured and
visible. Not bent or cracked. Properly greased. Securely Mounted
RELEASE ARM properly seated in drive position and safety latch/lock engaged and secured, no cracks
or bent arm. Proper spring tension. If equipped with a Latch, These have safety latch or arm -mention not
missing safety pin and cotter key. Securely Mounted
Trailer Only
Landing gear: Fullyraisedupoground;nomissingwelds,bracketsarenotcracked,bent,dentedorrusted
through. No loose or missing bolts, Handle in stowed in drive potion. Securely Mounted and
strong enough for cargo.
Lenses & Reectors
Reective Tape: Reective tape, is DOT approved tape, clean and clear, covers 50% of the trailer side and
100% at the rear of trailer.
6

Section 11M – Basic Control Skills Page 11M-1
Version: September 9, 2022
Section 11M
Basic Control Skills Test
This Section Covers
• Basic Control Skills Test Scoring
• Basic Control Skills Test Exercises
For the Basic Control Skills test, you will
demonstrate basic skills in controlling a
commercial vehicle and judging its position in
relation to other objects.
It tests for the basic skills needed for safe control
and operation of the vehicle. The types of
judgment and skills required for these basic control
skills are also required in many different driving
situations.
You will receive points for changing direction to
gain a better position, crossing over or touching
boundary lines or cones and for your final position.
You may be permitted to exit the vehicle to check
around the vehicle during backing exercises. When
entering/exiting the vehicle, you must set your
parking brake, place the vehicle in neutral, and
safely exit/enter by facing the vehicle and
maintaining three (3) points of contact at all times
(when entering/exiting a bus, face forward and
maintain a firm grasp on the handrail).
If at any time you open the door, move from a
seated position when in physical control of the
vehicle, (or on a bus, walk to the back to get a
better view), you will be scored for a look.
You will receive specific instructions for each
exercise prior to performing them. You will have an
opportunity to ask questions. You must complete
the exercise as directed. If you see the examiner
raise their hand (like this ), stop and return your
vehicle within the exercise boundary lines.
Your Basic Control Skills test will include the
following exercises, either off-road or somewhere
on the street during the Road Test:
Step 1 – Forward Stop,
Step 2 – Straight-Line Backing,
Step 3 – Forward Offset Tracking, and
Step 4 – Reverse Offset Backing.
These exercises are shown in Figures 12M.1
through 12M.4 on page 12M-4.
11M.1 Scoring
During the Basic Control Skills test exercises, you
will be scored for:
Pull-ups – pulling forward on a backing exercise to
clear an encroachment or to get a better position is
scored as a “pull-up.” These exercises include
Exercise 2 – Straight-Line Backing and Exercise
4 – Reverse Offset Backing. The examiner will
score the number of times you pull-up.
Stopping without changing direction does not count
as a pull-up.
You will not be penalized for initial pull-ups.
However, an excessive number of pull-ups, will
count as errors. Your examiner will cover “pull-ups”
when giving instructions for these exercises.
Back-ups – backing up on a forward moving
exercise to clear an encroachment or to get a
better position is scored as a “back-up.” “Back-ups”
will be scored on Exercise 3 – Forward Offset
Tracking. The examiner will score the number of
times you back-up.
Encroachments – crossing over or touching
exercise boundary lines or cones with any portion
of your vehicle, other than the vehicle’s mirrors
(door or fender) or other unique vehicle parts at
door mirror height or higher, such as a bucket
truck, is scored as an encroachment. Unique parts
below door mirror height are counted as an
“encroachment.”
If you have encroached, the examiner will stop you
and you must return the vehicle within the exercise
boundaries. You must stop immediately when
signaled by the examiner. The examiner will score
the number of times you touch or cross over an
exercise boundary line or cone. Each
encroachment will count as an error.
Looks – exiting the vehicle while performing an
exercise to check the vehicle’s position while
backing. You may be permitted to safely stop and
exit the vehicle to check the external position of the
vehicle (look).
When doing so, you must set the parking brake(s)
and place the vehicle in neutral. Then, when
exiting/entering the vehicle, you must do so safely
by facing the vehicle and maintaining three (3)
points of contact with the vehicle at all times (when
exiting/entering a bus, you may face forward and
maintain a firm grasp on the handrail). If you do not
safely secure the vehicle or safely exit/enter the
vehicle, it may result in an automatic failure for an
unsafe act.
If you open your door or move from a seated
position, it will count as a "look.” If you open your
door while the vehicle is moving (not in neutral and
park), it may result in an automatic failure for an
unsafe act.
On a bus, if you walk to the back of the bus to get
a better view, it will count as a “look.”
You may be allowed a maximum of one (1) free
look on Exercise 2 – Straight-line Backing, and two
(2) free looks on Exercise 4 – Reverse Offset
Backing, to check the position of your vehicle. Your
7

Section 11M – Basic Control Skills Page 11M-2
Version: September 9, 2022
examiner will cover “looks” when giving instructions
for these exercises.
Final Position – the final position of the vehicle for
backing exercises. You will be scored for final
vehicle position on Exercise 2 – Straight-Line
Backing and on Exercise 4 – Reverse Offset
Backing.
It is important that you finish each exercise exactly
as the examiner has instructed. Your vehicle must
be within final exercise boundaries (other than
mirrors and unique vehicle parts higher than the
door mirrors, such as a bucket truck). If you do not
maneuver the vehicle into its final position as
described by the examiner, you will be penalized
and will fail the Basic Control Skills test. You
MUST complete the exercises as directed.
Failure to Follow Instructions or Unsafe Act –
Failure to follow examiner instructions for
completing the exercise as directed may result in
an automatic failure and the test may be
terminated by the examiner. Always follow the
examiner instructions and directions. If you do not
understand the instructions or understand how to
complete the exercises, ask the examiner for
clarification. [If permitted, you may ask the
examiner to walk you through the exercise area.]
Committing an “unsafe act” (e.g., forgetting to set
the parking brake or opening the door while in
motion), may result in an automatic failure for an
unsafe act and the test may be terminated by the
examiner. Safety of the driver, the examiner and
the testing area is of the highest priority. Always
think SAFETY.
11M.2 Exercises
11M.2.1
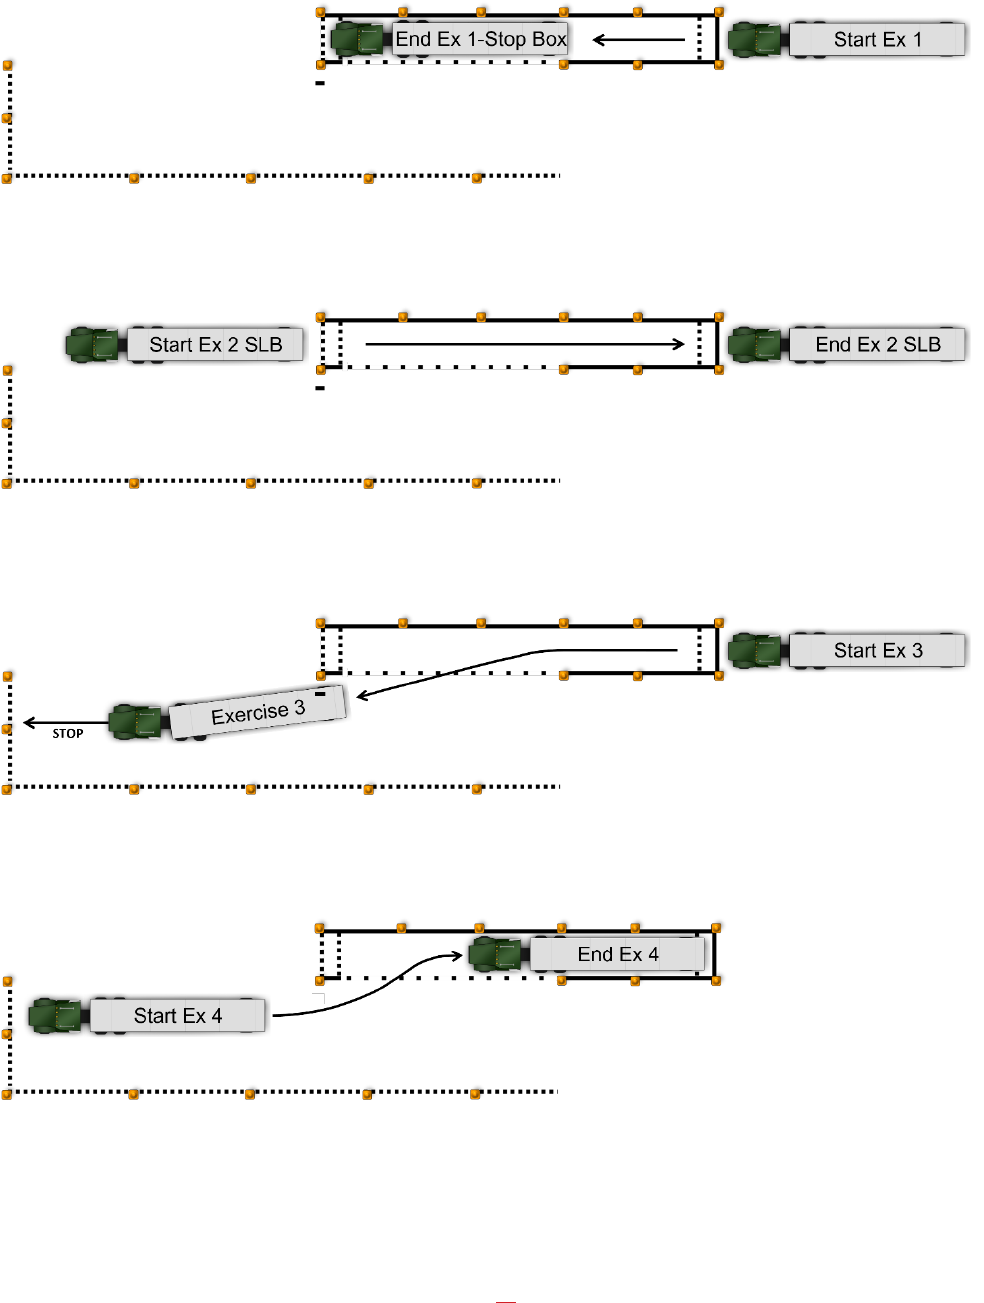
Exercise 1 – Forward Stop
You will demonstrate your ability to judge the front
of your vehicle during a controlled stop. Drive
forward through the alley and stop with the front
most part of the vehicle (other than unique vehicle
parts higher than the door mirrors, such as a
bucket truck) within the box at the end of the alley
without going past it. You may stop only once.
Your examiner will point out the front most part of
your vehicle when giving instructions for this
exercise.
When you have stopped, set your parking brake,
shift to neural and sound the horn. The examiner
will then score the exercise. You will receive points
if the front most part of the vehicle (other than
unique vehicle parts higher than the door mirrors,
such as a bucket truck) is not in the stop box. (See
Figure 12M.1 on page 12M-4).
11M.2.2
Exercise 2 – Straight Line Backing
You will demonstrate your ability to back a vehicle
in a straight line. From your stopped position from
the previous exercise, the examiner will ask you to
pull forward and stop when they raise their hand
(like this ).
Then back straight through the alley until the front
of your vehicle has cleared the last set of cones at
the far end of the alley. (See Figure 12M.2 on page
12M-4)
You will be scored for pull-ups, encroachments and
final position.
You are allowed one (1) free pull-up and may
safely exit the vehicle only one (1) time to check
around the vehicle.
When you have completed the exercise, set your
parking brake, shift to neutral and sound your horn.
This will inform the examiner you have completed
the exercise and allow them to score your final
position.
11M.2.3
Exercise 3 – Forward Offset Tracking
You will demonstrate your ability to maneuver a
vehicle around other objects while moving forward.
You will drive forward and steer to the left through
the opening into the opposite lane,
keeping the right most rear tire
between the cone and the line.
You will be scored for back-ups, encroachments
and forward tracking clearance (rear tire between
the cone and the line).
There are NO free back-ups, and you are NOT
permitted to exit the vehicle during this exercise.
Stop your vehicle when you are parallel to the
outer boundary, prior to or at the cones at the far
end of the exercise. Then, set your parking brake,
shift to neutral and sound your horn. This will
inform the examiner you have completed the
exercise and allow them to score the exercise.
(See Figure 12M.3 on page 12M-4)
8

Section 11M – Basic Control Skills Page 11M-3
Version: September 9, 2022
11M.2.4
Exercise 4 – Reverse Offset Backing
You will demonstrate your ability to offset back and
park a vehicle at the end of an alley. Starting
parallel with the outer boundary, offset back into
the alley, bringing the rear most part of your
vehicle (other than unique vehicle parts higher
than the door mirrors, such as a bucket truck)
within three (3) feet of the rear of the alley.
Stop with the rear most
part of the vehicle
(other than unique
vehicle parts)
in the three (3) foot box
at the end of the alley.
Your examiner will point out the rear most part of
your vehicle when giving instructions for this
exercise.
Your vehicle must be straight within the alley when
completed. Your vehicle must be completely within
the defined exercise boundaries when completed
(other than mirrors or other unique vehicle parts
higher than the door mirrors, such as a bucket
truck). You may not go beyond the outer boundary
line. (See Figure 12M.4 on page 12M-4)
You will be scored for pull-ups, encroachments and
final position.
You are allowed two (2) free pull-ups and may exit
the vehicle a maximum of two (2) times to check
around the vehicle during this exercise.
When you have completed the exercise, set your
parking brake, shift to neutral and sound your horn.
This will inform the examiner you have completed
the exercise and allow them to score your final
position.
Remember, the Basic Control Skills test must be
passed before you can proceed to the Road Test.
9
Section 11M – Basic Control Skills Page 11M-4
Version: September 9, 2022
Figure 11M.1: Exercise 1 – Forward Stop
Figure 11M.2: Exercise 2 – Straight Line Backing
Figure 11M.3: Exercise 3 – Forward Offset Tracking
Figure 11M.4: Exercise 4 – Reverse Offset Backing
10

MENTALLY PREPARE FOR YOUR ROAD TEST
Proper Turns: During turns, remember to stay straight and turn late, to make wide enough turns
and to ensure either the drive tire wheels (if class B) and/or trailer wheels do not get too close, rub
or hit a curb. Remember these steps: The closer you are to the right-hand curb the further straight
you have to travel forward to avoid hitting the curb. Be aware of the left and right-hand sides of
your vehicle/s while making turns. Allowing too much space between you and the curb will also
create enough space for drivers to attempt to pass your commercial vehicle, putting you and
other drivers at risk of an accident. Close this gap, meaning; do not make turns too wide so as to
create enough space for dangerous/risky drivers to pass your vehicle on either right and/or left
while completing turns.
Right turns: The truck and trailer tires should be 3-4 feet from the curb, when you start the turn.
And then return to the curb about 3-4 feet to complete the right turn. It’s okay to enter into the
opposinglaneoftracaslongasit’ssafetodoso.It’salsookaytocrossoverthecenterofroad,
center-line/s on right hand turn. Watch your rear wheel / rear trailer wheels in passenger side
mirror, wait for the furthest rear wheel on your commercial vehicle/s setup to enter into the round
portion of the curb and then come back to the curb on your right. DO NOT hit a curb with the
drive tires (if Class B) and trailer tires (if Class A) on any right turn.
Left turns: The truck and trailer must remain in the left most lane, tires must go around the center
lineand/orpaintedyellowcenterlines.Alwaysnishtheturninthesamelaneyoustartedfrom.
DO NOT let the trailer or class B vehicle rears tires cut or cross the yellow the center line/s on a
left turn.
Double Left turns: As a commercial driver you need to turn from the outside lane whenever 2 turn
lanesareavailable.Thus,leavingtheinsidelaneforothertrac.Remembertoreturntothesame
lane you started your left turn from i.e. outside lane to outside lane.
Proper Stops: Come to a complete stop, behind the stop sign 2-3 feet, cross-walks and stop
bars. You should be able to see the bottom edge of the road marking. Remember to stop, look
in both directions and then move when it is safe to do so. You do not want to stop or slow other
drivers down while you proceed through the intersection and/or to complete any turns.
Proper Observation: Be alert and aware of all sides of your commercial vehicle and trailer.
Establish a cushion of space around you and other drivers. Don’t allow your mind to drift into
thought, be present and focused on driving. Keep your head moving during the road test, you can
never look too-much but you can look too-little. Remain focused and observant at all controlled
and uncontrolled intersections, backing & performing lane changes. Move head shoulder to
shoulder. Learn to turn your head and use the windows on the doors not just the window in front
of you.
Proper Hill Park: Always signal to the curb. The truck and trailer if equipped with a trailer
must be parallel to the curb and also 1 foot or less from the curb. Try not to rub the curb
with either the truck or trailer tires. When parking uphill move the tires to the left or away
from the curb. Whenever parking down hill move the tires right or into the curb.
11

Class A Leasing
Oce Address
8899 Hastings St. NE
Blaine, MN 55449
Arden Hills
Exam Station Address
5400 Old Highway 8
Arden Hills, MN 55112
Plymouth
Exam Station Address
2455 Fernbrook Lane N
Plymouth, MN 55442
CDL Appointments for Plymouth and Arden Hills: 651-297-5029
Contacts: Main Line (612)723-4398
Eric / Owner (612)618-1812 | Sabrina (763)344-3113
Brannon (651)802-5063
Proper Highway Driving: Remember to signal early, often and continuous when entering
the highway/freeway. Proper lane changes require you signal early, look, assess and then
move into the lane when it is safe to do so. Commercial drivers should allow a cushion of
space around their vehicle/s. Always have an out or escape plan. Do not follow too close
provide a minimum of 150 feet in the front of the truck. Observe all speed limits, do not
speed.
Backing: Once Truck is in the reverse gear be sure and check both mirrors at least 2-3
times before moving on any of the backing exercises.
Class A Drivers: Should remember the following. Always steer the steering wheel at “a
problem” to avoid “the problem.”
Class B Drivers steer away from the problem to avoid the problem.
Backing exercises are considered extremely risky and potentially dangerous. Always
proceed with caution. Failure to observed both sides of your vehicle is perceived as a risk
to you and others. Always proceed with caution, and look-look, and look again to avoid
risk, issues and failure.
While Driving outside the course the Examiner May Ask Questions: Be prepared to answer
questions about driving scenarios such as, Road signs, Rail Road Crossings, and bridge
Clearances.
READ MN CDL MANUAL SECTION 12 PAGES 214 - 216
Truck – Trailer Rental
Class A or Class B CDL Road Test
www.classAleasing.com
(612) 723-4398
CLASS
LEASING
MINNESOTA TRUCK & TRAILER SCHOOL
A
12

REMINDERS & HELPFUL TIPS
1. You’re not actually checking uid levels, landing gear pins, glad-hands, gas cap & seals,
removing oil and automatic transmission uid dip sticks, coupling and uncoupling of trailer,
crawling under the trailer, pulling release arm so as to unlock the locking jaw of the trailer.
But rather mention this is what I “WOULD DO.”
2.
Make sure you point at the part and give a detailed description/explanation about
every item listed!
MENTION 3-4 things about it, Check it o and move on.
BE detailed but not so detailed that you run out of time, you have 45 minutes to complete
the Pre-Trip portion of the exam.
In short, try to give a 3 - 4 point description about nearly
every item listed.
Examples” - “not cracked, broken, or loose”
- “no missing bolts; mounted securely”
- “not bent, twisted, or warped; not rusted through”
- “not leaking” etc.
Follow the list, and Be mindful of what you are saying and Your time.
3. Study your Pre-Trip. In addition to the presentations, reading this document and watching
the pre-trip videos. You’ll also need to practice, rehearse and study the Pre-Trip on your
own to establish knowledge, condence and passable results.
4. Ask your examiner for a time check throughout the pre-trip exam, examiners are not
responsible to keep you on track. Aim for 10-12 minutes per box.
5.
Arrive at the Driver’s Exam Station at least 30-45 minutes, before your scheduled road
test. And dress and prepare for the inclement weather, cold, rain, snow and ice.
Check in at the Outside Dispatch Window. DO NOT check in at the front door. Instead
walk around the DMV building to the dispatch window.
Wait in or by your CDL Test Truck.
HELPFUL ACRONYMS:
CBD = No Cracks, Bends, Dented ABC = No Abrasions, Bulges, Cracks/Cuts
CDL = No Cracks/Cuts, Dents, Leaks/Loose PMS = Properly Mounted, Secure
CEL = No Corroded, Exposed or Loose wires CCC = Clean, Clear, not Cracked
