
Photo Editor
Gemstone Photo Editor 12
Page 1 of 346
ACDSee User Guide

Gemstone Photo Editor 12
Page 2 of 346
Contents
CH APT ER 1: G E T T IN G S T AR T E D 11
Welcome to ACDSee Gemstone Photo Editor 12 11
Multi Document Interface 11
RAW Development 11
Full Layered Editor 12
Overview of ACDSee Gemstone Photo Editor 12 12
Features 13
CH APT E R 2: G E T T I N G H E LP 14
About The Home Screen 14
Create a New File Pane 15
Template/Presets Section 17
Previous Projects Section 20
Finding Other Resources and Support 20
About The Home Screen 21
Create a New File Pane 22
Template/Presets Section 24
Previous Projects Section 27
Create a New File Pane 27
Template/Presets Section 28
Previous Projects Section 31
About the Geometry Tab 31
Correcting Perspective 32
Cropping 33
Fixing Lens Distortion 35
Rotating and Straightening 37
Fixing Lens Vignetting 38
About the Detail Tab 38
Correcting Chromatic Aberration 39
Reducing Noise 41
Sharpening 43
Fine-Tuning Skin Tone 44

Gemstone Photo Editor 12
Page 3 of 346
About the Repair Tab 44
Reducing Red Eye 45
Repairing an Image 46
About the Tune Tab 47
Adjusting Color With Color EQ 49
Adjusting Lighting 53
Adjusting Split Tone 60
Adjusting Tone Curves 61
Adjusting White Balance 62
Selecting an Output Color Space For RAW Files 64
Color Grading with LUTs 65
Adjusting Color With the Color Wheel 66
Applying Effects 68
Using the Develop Brush 70
Using Blend Modes and Opacity 78
Using the Linear Gradient Tool 80
Making General Adjustments 83
Adding a Post-Crop Vignette 84
Using the Radial Gradient Tool 85
Adjusting Soft Focus 88
Adjusting Tones With the Tone Wheels 89
ACDSee RAW Interface 91
Using the Undo/Redo Button 97
Copying and Pasting 97
RAW Processing 98
Saving Images 103
Develop Presets 104
About ACDSee RAW 109
Opening files in ACDSee RAW 109
CH APT E R 3: E D IT IN G 1 10
Creating an HDR Image 110
Shooting Photos for HDR 110

Gemstone Photo Editor 12
Page 4 of 346
Merging with Focus Stacking 111
Loading Files into a Stack 111
Resize, Rotate, or Flip 112
Resize 112
Rotate 112
Flip 113
CH APT E R 4: E D IT IN G - U S I N G LAY E R S 11 4
Layer Editor 114
Adding Layers 114
Layer Visibility 115
Layer Manipulation 115
Layer Merge and Flatten 116
Layer Blend Mode and Opacity 116
Saving Layered Images 117
Using Adjustment Layers 118
Adjustment Layers and Settings 119
Using Masks with Layers 124
Mask Properties 127
Mask Flexibility 128
Creating Layer Masks From Specific Colors and Tones 129
Creating Layer Masks From Images 130
Text Layers 131
Rasterizing Text 132
Resizing the Canvas 132
Resizing by Dragging 132
Resizing and Positioning 133
Layer Effects 134
Frequency Separation 137
Retouching Images 138
Focus Stacking 139
HDR Images 140
Shooting Photos for HDR 141

Gemstone Photo Editor 12
Page 5 of 346
Using Auto-Align 142
Using Auto-Blend 143
CH APT E R 5: E D IT IN G - S E L E CT ION T O OL S 14 4
Using Selections 144
Overlay Options 145
Using the Selection Tools 146
Combining the Tools 150
Targeting Selections 151
Edits and Effects 152
Smart Eraser 153
CH APT E R 6: E D IT IN G - R E PAI R T O OL S 15 5
Red Eye 155
Removing Flaws 155
Smart Erase 157
Skin Tune 158
Chromatic Aberration 159
CH APT E R 7: E D IT IN G - AD D T O OLS 16 1
Drawing Tools 161
Watermark 163
Borders 164
Adding Your Own Textures or Edges 167
Vignette 169
Grain 171
Tilt-Shift 172
Tilt-Shift Options 172
About Special Effect Filters 173
Bathroom Window 174
Blinds 175
Blue Steel 176
Bob Ross 177
Bulge 178

Gemstone Photo Editor 12
Page 6 of 346
Cartoon 180
Childhood 181
Clouds 181
Collage 183
Colored Edges 184
Contours 185
Crayon Drawing 186
Crosshatch 186
Dauber 187
Dramatic 188
Edge Detect 189
Emboss 189
Furry Edges 190
Gloom 192
Glowing Edges 193
Gradient Map 193
Granite 194
Grunge 195
Jiggle 196
Lomo 197
Mirror 198
Negative 199
Oil Paint 200
Old 201
Orton 202
Outline 203
Pencil Drawing 204
Photo Effect 204
Pixel Explosion 205
Pixelate 206
Posterize 207
Purple Haze 208
Radial Waves 209

Gemstone Photo Editor 12
Page 7 of 346
Rain 210
Ripple 212
Scattered Tiles 213
Sepia 214
Seventies 215
Sheet Metal 215
Shift 216
Slant 217
Sobel 219
Solarize 219
Somber 220
Stained Glass 221
Sunspot 222
Swirl 223
Threshold 224
Topography 225
Water 226
Water Drops 227
Waves 228
Weave 229
Wind 230
User Defined Convolution 232
About Blend Modes 233
CH APT E R 8: E D IT IN G - G E O ME T R Y T OO LS 23 6
Rotating an Image 236
Flipping an Image 236
Cropping an Image 236
Resizing the Crop Window 237
Perspective Correction 237
Distortion Correction 238
Lens Correction 239
Resizing an Image 240
Gemstone Photo Editor 12
Page 8 of 346
Resizing Tips 241
Liquify 242
Distorting and Retouching with the Liquify Tool 242
CH APT E R 9: E D IT IN G - E X PO S U R E AN D L IG H T IN G T O OL S 24 4
Exposure 244
Levels 245
Auto Levels 247
Tone Curves 248
Light EQ 249
The 1-Step Tab 250
The Basic Tab 250
The Standard Tab 252
The Advanced Tab 254
Dehaze 259
Dodge and Burn 259
Dodging and Burning Parts of an Image 260
CH APT E R 10 : ED I T IN G - COL OR T O OL S 26 2
White Balance 262
Color EQ 263
Split Tone 266
Color Balance 268
Convert to Black & White 269
Color Picker 271
The Standard Tab 271
The Custom Tab 272
Selecting and Adjusting Colors 272
Histogram 272
CH APT E R 11 : ED I T IN G - D E T AIL TO OLS 27 3
Sharpen 273
Blur 274
About Noise and Noise Reduction 279

Gemstone Photo Editor 12
Page 9 of 346
Remove Noise 280
Add Noise 283
Detail Brush 285
Clarity 286
CH APT E R 12 : OPT IO N S AN D CON F IG U R AT IO N 28 8
ACDSee Gemstone Photo Editor Options 288
ACDSee RAW Options 288
Color Management 289
Display 292
Ruler and Guideline Options 292
CH APT E R 13 : PR IN T IN G 2 94
Printing Images 294
Printer Options 294
Image Size and Positioning 296
Print Adjustments 297
Adding Text to Pages 297
Custom Print Layouts 298
CH APT E R 14 : S H OR T CU T S 29 9
Keyboard Shortcuts 299
Gemstone Shortcuts 299
ACDSee RAW Shortcuts 320
Mouse Shortcuts 322
CH APT E R 15 : PL U G - I N S 32 4
Working with Plug-ins 324
Types of Plug-ins 324
Managing Plug-ins 324
Disabling a Plug-in 325
Changing the Plug-in Order 325
Viewing Plug-in Properties and Getting Help 325
CH APT E R 16 : F I LE IN F O R MAT IO N 3 26
Glossary 327


Gemstone Photo Editor 12
Page 11 of 346
Chapter 1: Getting Started
Welcome to ACDSee Gemstone Photo Editor 12
It's not every day that new software hits the ground running and makes an impactful difference to
workflows. So congratulate yourself on choosing to be a integral part of ACDSee's newest ground-
breaking product. We are immensely proud of ACDSee Gemstone for the work it represents and the
work you will produce with this fast, powerful, and easy-to-use image editor that everyone from
beginners to professionals can use and enjoy.
Gemstone includes a feature-rich host of image processing tools, robust RAW support for over 600
cameras, a full layered editor, and our first ever photo editor with a Multi Document Interface (MDI).
From the Home Screen you can start new projects from templates, open RAW files in the dedicated
ACDSee RAW window, or continue working on previously opened projects. New and exciting to
Gemstone are the Color Wheel and Tone Wheels that allow for a finer grade of control over a wider
range of colors and tones. For creative additions, Gemstone has added path text, and frame text to for
an expanded dimension to image edits.
Attention to detail was not just added to new features, Gemstone has been optimized under the hood
for big performance gains when working with large and complex documents. Gemstone also has a
blindingly fast start-up and faster RAW decoding times. Some of the other improvements include non-
destructive Move and Crop tools, the ability to Rotate to Crop, pan an image without needing to zoom
in, less obtrusive watermarks with relative positioning, and a host of more lens correction profiles
added to an already impressive list.
Multi Document Interface
With a Multi Document Interface, users can now have multiple documents open at one time, have two
projects open on a split-screen for easy comparison, or have documents open in their own tab to
move to another monitor. You can even keep your workspace tidy by easily hiding multiple open
documents with the tab feature. Gemstone offers very flexible workflow options allowing customized
workflows for each user.
RAW Development
Gemstone features ACDSee RAW, a dedicated interface for editing RAW files that includes a robust
collection of Tune, Detail, Geometry, and Repair tools. Gemstone has optimized the performance of
Gemstone Photo Editor 12
Page 12 of 346
RAW decoding for faster loading times and supports over 500 cameras. ACDSee RAW also features a
Presets pane for saving customized adjustments and easily applying them to future image edits. Once
completed, you can move your presets to a category or create a custom category for better
organization. RAW also offers a History panel so you can see and access each adjustment made during
the editing process.
Full Layered Editor
Gemstone also offers a full layered editor that allows you to add as many creative elements to your
document as you would like such as color backgrounds, image files, masks, and so much more. Edit
each layer to your liking to find the perfect outcome. A great way to use the layered editor is to find
examples of repeated work, like making posters, and create a poster preset that you can re-use
repeatedly and tweak on the fly where necessary. All new in Gemstone is the ability to link and unlink
masks.
Overview of ACDSee Gemstone Photo Editor 12
ACDSee Gemstone Photo Editor 12 can be used to edit the overall look of images by changing the
lighting and color, or Gemstone can crop, flip, resize, or rotate images. Special effects, shapes, text,
and much more can be added to images. Selections can be used to fix specific parts of an images, and
final touches, such as red eye removal can be added as well. Layers are a non-destructive tool for
adding effects and shapes to photos, perform photo manipulations, create composite images, or work
on a single element in an image without disturbing others, and much more.
Gemstone features include:
Use the Selection tool or Edit Brush to apply edits to a specific part of the image.
Use the Layers pane to create complex photo manipulations using layers, and add adjustment layers
for non-destructive adjustments and effects.
Use Pixel Targeting to selectively adjust pixels by color and tone.
Remove flaws, red eye, or correct skin tone and chromatic aberration.
Add watermarks, vignettes, a tilt-shift, special effects, a grain effect, and drawings.
Crop, flip, resize, rotate, liquify, and correct perspective, distortion, and barrel and pincushion
distortion automatically.
Adjust lighting using the Exposure, Levels, Auto Levels, Tone Curves, Light EQ™, Dehaze, and Dodge
and Burn tools.
Adjust color using the White Balance, Color EQ, Color Balance, Convert to Black & White or Split Tone
tool.

Gemstone Photo Editor 12
Page 13 of 346
Add details to your image using Sharpen, Remove Noise, Add Noise, the Detail Brush, Blur, or Clarity
tools.
After saving a layered image, the Save Image As dialog opens with the file format set to .acdc by
default. By saving in the .acdc file format, layers will remain accessible for future edits.
Features
Gemstone is an unparalleled Multi Document Interface photo editor featuring a robust layered editor
for achieving complex adjustments and a dedicated interface for editing RAW files with support for 500
camera models. Here a just some of the outstanding features found in Gemstone.
Performance
l Big performance gains when working with large and complex documents.
l Faster application start-up.
l Faster RAW decoding performance.
Layers
l Achieve complex adjustments and effects and go back to tweak them at any time.
l Non-destructively adjust and add effects to adjustment layers stacked in a dedicated Layers pane.
l Target a particular part of a layer to hide or reveal portions of the layer, combine multiple images into a
single image, or simply make localized adjustments.
ACDSee RAW
l Dedicated interface for editing RAW files using Tune, Detail, Geometry, and Repair tools.
l Optimized workflow with Presets and History panes.
l Support for over 500 camera models.
Photo Editing Power
l MDI (Multi Document Interface) interface allows for multiple documents open at once; view or edit in a
split view or child view.
l Greater color and tone selection with new and improved Color Wheel and Tone Wheels.
l Redesigned canvas for greater editing flexibility.
l Added path text to write on a curve, and added frame text.

Gemstone Photo Editor 12
Page 14 of 346
Chapter 2: Getting Help
About The Home Screen
The Home Screen is the initial screen displayed when Gemstone is opened. The Home Screen can also
be accessed directly from the Editor.
To view the Home Screen from the Editor:
1.
Click the Home Screen icon above the toolbar to the left of the Editor.
To return to the Editor, click the Home Screen's Back to images button.
From the Home Screen, new projects can be started, or pre-existing projects continued.
The Home Screen consists of three panes:
1. The Create a New File pane,
2. The Template/Presets pane, and
3. The Previous Projects pane.
Gemstone Photo Editor 12
Page 15 of 346
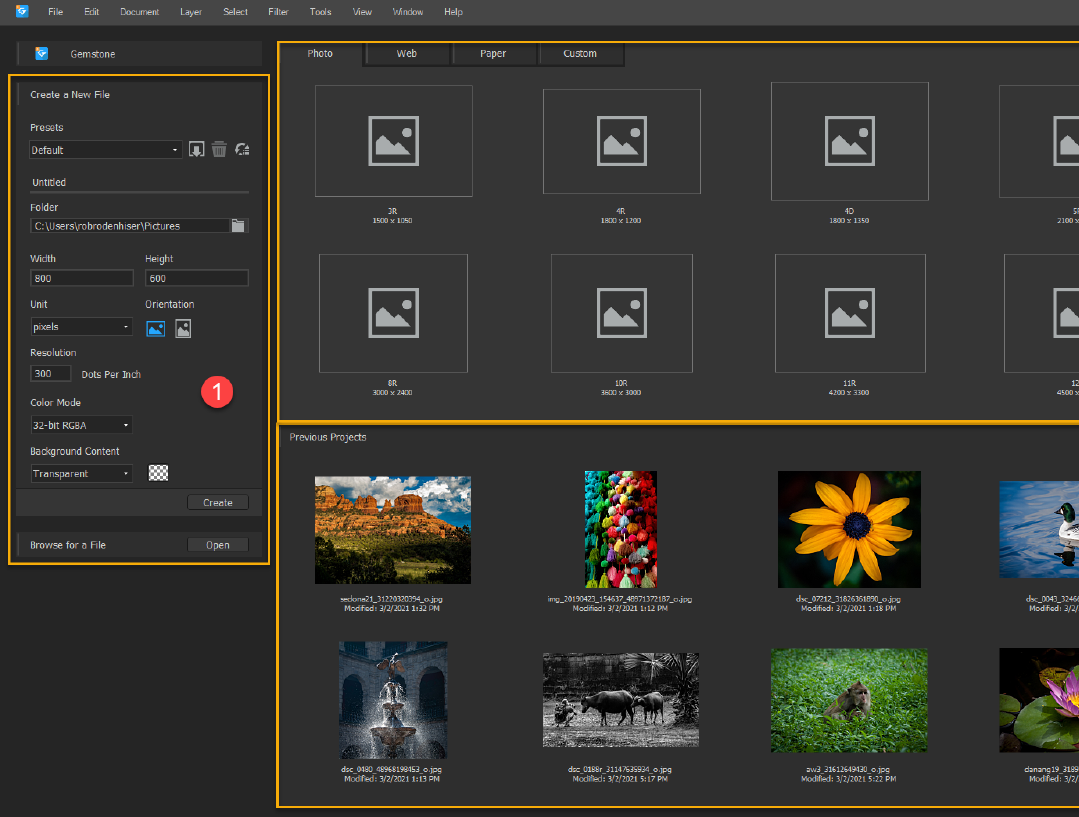
Create a New File Pane
The Create a New File pane occupies the left side of the Home Screen.
To create a new image:
1. Optional: To populate the Create a New File pane with values based on templates, make a selection
from the four tabs in the "Project Type" section: Photo, Web, Paper, and Custom.
2. In the Create a New File pane, do one of the following:
l Use the default parameters,
l Select a preset, or
l Customize the image properties.
3. Click the Create button to open the new image in the new Display Area screen.

Gemstone Photo Editor 12
Page 16 of 346
To open an existing image that does not appear in the Previous Projects section, click the
Open button in the Browse for a file bar to browse and select a pre-existing project.
Create a New File Options
Presets
Presets Leave the Presets drop-down list set to "Default" to keep all of the settings
applied to the Image field set. Or, select a preset from the drop-down list
to accept a customized set of image parameters.
Opens the New Preset dialog. Enter a name for the preset, then click the
OK button to populate the new preset into the Preset drop-down list. The
new preset will be constructed of the parameters set in the Image field
set. It is recommended to complete any customizations in the Image field
set before completing the New Preset dialog.
Deletes a preset from the Preset drop-down list.
Image Field Set
Width Enter a value to determine the image width.
Height Enter a value to determine the image height.
Unit Make a selection from the drop-down menu to determine the unit of
measurement for both the Width and Height fields. Options include:
"Centimeters", "Inches", and "Pixels".
Orientation Click the appropriate icon to specify the image's orientation, either
Portrait or Landscape.
Resolution Specifies the Dots Per Inch (DPI) of the image. The higher the DPI the
better the image quality and the bigger the image's file size.
Color Mode Specifies the image's color mode. Options include: "32-bit RGBA" and "64-
bit RGBA". The higher the bit count the better the image quality and the
bigger the image's file size.
Background Content Make a selection from the drop-down menu to determine the composition
of the image's background. Options include: "Black", "Custom", "Trans-
parent", and "White". Another method for setting the background content is
to use a Color Picker.

Gemstone Photo Editor 12
Page 17 of 346
Template/Presets Section
The Template/Presets pane is located directly above the Previous Projects pane and to the right of
the Create a New File pane.
The Template/Presets pane contains four tabs:
l Photo
l Web
l Paper, and
l Custom
Photo Tab
The Photos tab contains 9 default options as detailed in the table below.
Photo Sizes Resolution
3R 1500 x 1050
4R 1800 x 1200
4D 1800 x 1350
5R 2100 x 1500
6R 2400 x 1800
8R 3000 x 2400
10R 3600 x 3000
11R 4200 x 3300
12R 4500 x 3600
Web Tab
The Web tab contains 10 default options as detailed in the table below.

Gemstone Photo Editor 12
Page 18 of 346
Output Type Resolution
HD 1080p 1920 x 1080
UHD 4k 3840 x 2160
Instagram Square 1080 x 1080
Instagram Portrait 1080 x 1350
Instagram Landscape 1080 x 566
Instagram Story 1080 x 1920
Facebook cover photo 820 x 312
Facebook newsfeed photo 1200 x 1200
YouTube Channel Cover 2560 x 1440
YouTube Thumbnail 1280 x 720
Paper Tab
The Paper tab contains 23 default options as detailed in the table below.

Gemstone Photo Editor 12
Page 19 of 346
Output Type Dimensions
Letter 8.5 x 11 inches
Legal 8.5 x 14 inches
Poster 11 x 24 inches
A0 (letter) 841 x 1189 mm
A1 594 x 841 mm
A2 420 x 594 mm
A3 297 x 420 mm
A4 210 x 297 mm
A5 148 x 210 mm
A6 105 x 148 mm
A7 74 x 105 mm
A8 52 x 74 mm
A9 37 x 52 mm
A10 26 x 37 mm
B2 500 x 707 mm
B3 353 x 500 mm
B4 250 x 353 mm
B5 176 x 250 mm
B6 125 x 176 mm
B7 88 x 125 mm
B8 62 x 88 mm
B9 44 x 62 mm
B10 31 x 44 mm
Custom Tab
The Custom tab is populated with the Default setting, the Last Used (if different than the Default) and
any custom designed presets created in the Create a New File pane's Presets field set.
To create a new Preset and populate it to the Custom tab:

Gemstone Photo Editor 12
Page 20 of 346
1. From the Home Screen, navigate to the Create a New File pane.
2. Make adjustments to affect the file's storage location, dimensions, and resolution, color mode and back-
ground.
3.
In the Presets field set, click the adjacent icon to open the New Preset dialog.
4. Enter a name for the preset, then click the OK button. The new preset will populate to the Custom tab.
Previous Projects Section
The Previous Projects section is populated with files previously saved in Gemstone. Information
related to the image resides below the image, including file name and last modified date and time.
To open an existing project:
To open an existing project, double-click the project thumbnail image to either open the file in
ACDSee RAW or the Editor, depending on the file type.
To clear recent projects:
From the Home Screen, select File | Open Recent... | Clear Recent File List from the main menu.
Finding Other Resources and Support
The Help menu on the Gemstone menu bar contains links to open plug-in help files and options that
link to the ACDSee website, which features updates, newsletters, and system requirements.
Other links open the support page, registration page, or the community home page where end-users
can join our community and participate in ACDSee forums.
The Help menu is also used to convert a trial version of Gemstone to a full version by entering a license
code.
Click Help to see the following menu options:
Help Contents
Provide Feedback on the Forum
Release Notes
ACDSee Products
ACDSee Community
Facebook
Twitter
About

Gemstone Photo Editor 12
Page 21 of 346
About The Home Screen
The Home Screen is the initial screen displayed when Gemstone is opened. The Home Screen can also
be accessed directly from the Editor.
To view the Home Screen from the Editor:
1.
Click the Home Screen icon above the toolbar to the left of the Editor.
To return to the Editor, click the Home Screen's Back to images button.
From the Home Screen, new projects can be started, or pre-existing projects continued.
The Home Screen consists of three panes:
1. The Create a New File pane,
2. The Template/Presets pane, and
3. The Previous Projects pane.

Gemstone Photo Editor 12
Page 22 of 346
Create a New File Pane
The Create a New File pane occupies the left side of the Home Screen.
To create a new image:
1. Optional: To populate the Create a New File pane with values based on templates, make a selection
from the four tabs in the "Project Type" section: Photo, Web, Paper, and Custom.
2. In the Create a New File pane, do one of the following:
l Use the default parameters,
l Select a preset, or
l Customize the image properties.
3. Click the Create button to open the new image in the new Display Area screen.

Gemstone Photo Editor 12
Page 23 of 346
To open an existing image that does not appear in the Previous Projects section, click the
Open button in the Browse for a file bar to browse and select a pre-existing project.
Create a New File Options
Presets
Presets Leave the Presets drop-down list set to "Default" to keep all of the settings
applied to the Image field set. Or, select a preset from the drop-down list
to accept a customized set of image parameters.
Opens the New Preset dialog. Enter a name for the preset, then click the
OK button to populate the new preset into the Preset drop-down list. The
new preset will be constructed of the parameters set in the Image field
set. It is recommended to complete any customizations in the Image field
set before completing the New Preset dialog.
Deletes a preset from the Preset drop-down list.
Image Field Set
Width Enter a value to determine the image width.
Height Enter a value to determine the image height.
Unit Make a selection from the drop-down menu to determine the unit of
measurement for both the Width and Height fields. Options include:
"Centimeters", "Inches", and "Pixels".
Orientation Click the appropriate icon to specify the image's orientation, either
Portrait or Landscape.
Resolution Specifies the Dots Per Inch (DPI) of the image. The higher the DPI the
better the image quality and the bigger the image's file size.
Color Mode Specifies the image's color mode. Options include: "32-bit RGBA" and "64-
bit RGBA". The higher the bit count the better the image quality and the
bigger the image's file size.
Background Content Make a selection from the drop-down menu to determine the composition
of the image's background. Options include: "Black", "Custom", "Trans-
parent", and "White". Another method for setting the background content is
to use a Color Picker.
Gemstone Photo Editor 12
Page 24 of 346
Template/Presets Section
The Template/Presets pane is located directly above the Previous Projects pane and to the right of
the Create a New File pane.
The Template/Presets pane contains four tabs:
l Photo
l Web
l Paper, and
l Custom
Photo Tab
The Photos tab contains 9 default options as detailed in the table below.
Photo Sizes Resolution
3R 1500 x 1050
4R 1800 x 1200
4D 1800 x 1350
5R 2100 x 1500
6R 2400 x 1800
8R 3000 x 2400
10R 3600 x 3000
11R 4200 x 3300
12R 4500 x 3600
Web Tab
The Web tab contains 10 default options as detailed in the table below.

Gemstone Photo Editor 12
Page 25 of 346
Output Type Resolution
HD 1080p 1920 x 1080
UHD 4k 3840 x 2160
Instagram Square 1080 x 1080
Instagram Portrait 1080 x 1350
Instagram Landscape 1080 x 566
Instagram Story 1080 x 1920
Facebook cover photo 820 x 312
Facebook newsfeed photo 1200 x 1200
YouTube Channel Cover 2560 x 1440
YouTube Thumbnail 1280 x 720
Paper Tab
The Paper tab contains 23 default options as detailed in the table below.

Gemstone Photo Editor 12
Page 26 of 346
Output Type Dimensions
Letter 8.5 x 11 inches
Legal 8.5 x 14 inches
Poster 11 x 24 inches
A0 (letter) 841 x 1189 mm
A1 594 x 841 mm
A2 420 x 594 mm
A3 297 x 420 mm
A4 210 x 297 mm
A5 148 x 210 mm
A6 105 x 148 mm
A7 74 x 105 mm
A8 52 x 74 mm
A9 37 x 52 mm
A10 26 x 37 mm
B2 500 x 707 mm
B3 353 x 500 mm
B4 250 x 353 mm
B5 176 x 250 mm
B6 125 x 176 mm
B7 88 x 125 mm
B8 62 x 88 mm
B9 44 x 62 mm
B10 31 x 44 mm
Custom Tab
The Custom tab is populated with the Default setting, the Last Used (if different than the Default) and
any custom designed presets created in the Create a New File pane's Presets field set.
To create a new Preset and populate it to the Custom tab:

Gemstone Photo Editor 12
Page 27 of 346
1. From the Home Screen, navigate to the Create a New File pane.
2. Make adjustments to affect the file's storage location, dimensions, and resolution, color mode and back-
ground.
3.
In the Presets field set, click the adjacent icon to open the New Preset dialog.
4. Enter a name for the preset, then click the OK button. The new preset will populate to the Custom tab.
Previous Projects Section
The Previous Projects section is populated with files previously saved in Gemstone. Information
related to the image resides below the image, including file name and last modified date and time.
To open an existing project:
To open an existing project, double-click the project thumbnail image to either open the file in
ACDSee RAW or the Editor, depending on the file type.
To clear recent projects:
From the Home Screen, select File | Open Recent... | Clear Recent File List from the main menu.
Create a New File Pane
The Create a New File pane occupies the left side of the Home Screen.
To create a new image:
1. Optional: To populate the Create a New File pane with values based on templates, make a selection
from the four tabs in the "Project Type" section: Photo, Web, Paper, and Custom.
2. In the Create a New File pane, do one of the following:
l Use the default parameters,
l Select a preset, or
l Customize the image properties.
3. Click the Create button to open the new image in the new Display Area screen.
To open an existing image that does not appear in the Previous Projects section, click the
Open button in the Browse for a file bar to browse and select a pre-existing project.
Create a New File Options

Gemstone Photo Editor 12
Page 28 of 346
Presets
Presets Leave the Presets drop-down list set to "Default" to keep all of the settings
applied to the Image field set. Or, select a preset from the drop-down list
to accept a customized set of image parameters.
Opens the New Preset dialog. Enter a name for the preset, then click the
OK button to populate the new preset into the Preset drop-down list. The
new preset will be constructed of the parameters set in the Image field
set. It is recommended to complete any customizations in the Image field
set before completing the New Preset dialog.
Deletes a preset from the Preset drop-down list.
Image Field Set
Width Enter a value to determine the image width.
Height Enter a value to determine the image height.
Unit Make a selection from the drop-down menu to determine the unit of
measurement for both the Width and Height fields. Options include:
"Centimeters", "Inches", and "Pixels".
Orientation Click the appropriate icon to specify the image's orientation, either
Portrait or Landscape.
Resolution Specifies the Dots Per Inch (DPI) of the image. The higher the DPI the
better the image quality and the bigger the image's file size.
Color Mode Specifies the image's color mode. Options include: "32-bit RGBA" and "64-
bit RGBA". The higher the bit count the better the image quality and the
bigger the image's file size.
Background Content Make a selection from the drop-down menu to determine the composition
of the image's background. Options include: "Black", "Custom", "Trans-
parent", and "White". Another method for setting the background content is
to use a Color Picker.
Template/Presets Section
The Template/Presets pane is located directly above the Previous Projects pane and to the right of
the Create a New File pane.
The Template/Presets pane contains four tabs:
l Photo
l Web

Gemstone Photo Editor 12
Page 29 of 346
l Paper, and
l Custom
Photo Tab
The Photos tab contains 9 default options as detailed in the table below.
Photo Sizes Resolution
3R 1500 x 1050
4R 1800 x 1200
4D 1800 x 1350
5R 2100 x 1500
6R 2400 x 1800
8R 3000 x 2400
10R 3600 x 3000
11R 4200 x 3300
12R 4500 x 3600
Web Tab
The Web tab contains 10 default options as detailed in the table below.
Output Type Resolution
HD 1080p 1920 x 1080
UHD 4k 3840 x 2160
Instagram Square 1080 x 1080
Instagram Portrait 1080 x 1350
Instagram Landscape 1080 x 566
Instagram Story 1080 x 1920
Facebook cover photo 820 x 312
Facebook newsfeed photo 1200 x 1200
YouTube Channel Cover 2560 x 1440
YouTube Thumbnail 1280 x 720

Gemstone Photo Editor 12
Page 30 of 346
Paper Tab
The Paper tab contains 23 default options as detailed in the table below.
Output Type Dimensions
Letter 8.5 x 11 inches
Legal 8.5 x 14 inches
Poster 11 x 24 inches
A0 (letter) 841 x 1189 mm
A1 594 x 841 mm
A2 420 x 594 mm
A3 297 x 420 mm
A4 210 x 297 mm
A5 148 x 210 mm
A6 105 x 148 mm
A7 74 x 105 mm
A8 52 x 74 mm
A9 37 x 52 mm
A10 26 x 37 mm
B2 500 x 707 mm
B3 353 x 500 mm
B4 250 x 353 mm
B5 176 x 250 mm
B6 125 x 176 mm
B7 88 x 125 mm
B8 62 x 88 mm
B9 44 x 62 mm
B10 31 x 44 mm
Custom Tab
The Custom tab is populated with the Default setting, the Last Used (if different than the Default) and
any custom designed presets created in the Create a New File pane's Presets field set.

Gemstone Photo Editor 12
Page 31 of 346
To create a new Preset and populate it to the Custom tab:
1. From the Home Screen, navigate to the Create a New File pane.
2. Make adjustments to affect the file's storage location, dimensions, and resolution, color mode and back-
ground.
3.
In the Presets field set, click the adjacent icon to open the New Preset dialog.
4. Enter a name for the preset, then click the OK button. The new preset will populate to the Custom tab.
Previous Projects Section
The Previous Projects section is populated with files previously saved in Gemstone. Information
related to the image resides below the image, including file name and last modified date and time.
To open an existing project:
To open an existing project, double-click the project thumbnail image to either open the file in
ACDSee RAW or the Editor, depending on the file type.
To clear recent projects:
From the Home Screen, select File | Open Recent... | Clear Recent File List from the main menu.
About the Geometry Tab
The Geometry tab is used to correct lens distortion and perspective, or rotate and straighten images.
It is also possible to use the Crop tool to change the composition of the image.
Settings can be set as a preset for future use.
To use the Geometry tab:
1. In the Develop Tools pane, select the Geometry tab.
2. Develop the image by expanding and editing any of the following:
l Lens Correction,
l Rotate & Straighten,
l Perspective,
l Crop, or
l Vignette Correction.
Saving and Canceling
After developing an image, choose from one of the many options for saving the image, depending on
the next workflow step.
To save an image:

Gemstone Photo Editor 12
Page 32 of 346
1. Click Done.
2. Select one of the following:
Save: Save any changes.
Save as: Save a copy of the developed image with a new name or format.
Discard: Discard any changes.
Cancel: Remain on the same image in Develop with all changes intact, without saving the image.
To discard changes to an image and return to the previous mode:
Click Cancel.
It is not possible to directly save changes to a RAW file. Changes to a RAW file must be saved
as a different file type.
ACDSee will automatically apply geometry corrections to DNG files that include geometric
distortion correction tags. DNG files created from the Adobe DNG Converter© will often
generate geometric distortion tags for micro 4/3rds cameras.
Correcting Perspective
Perspective issues, which can occur if the camera is not held horizontal or perpendicular to the object
of the photo, can be common in images taken with wide angle lenses. For example, if a photo of a tall
building were taken looking up from street level, the building can appear to bend in the photo. Correct
perspective issues using the tools in the Perspective group.
Settings can be set as a preset for future use.
To correct Perspective:
1. In the Develop Tools pane, select the Geometry tab.
2. In the Perspective group, set the options as described below.
Click the Show Grid button to display a grid over the image. This tool is useful when fixing
alignment in images. When the grid is not activated, it is gray .
Perspective Options
Gemstone Photo Editor 12
Page 33 of 346
Vertical Drag the slider to the left or right to identify the center of the image on the vertical
axis.
Horizontal Drag the slider to the left or right to identify the center of the image on the
horizontal axis.
Vertical Shear Drag the slider to the left or right to identify the center of the image on the vertical
and diagonal axis.
Horizontal Shear Drag the slider to the left or right to identify the center of the image on the
horizontal and diagonal axis.
Right-click a slider to reset to the default value.
Cropping
Use the Crop tool to remove unwanted parts of images, or to reduce the image canvas to a particular
size.
Settings can be set as a preset for future use.
To crop an image:
1. In the Develop Tools pane, select the Geometry tab.
2. In the Crop group, resize the crop window, and position it over the desired area of the image. See
below for more details.
Click the Preview Cropped Image button at the top of the Geometry tab or press E to
preview the image when cropped.
Click the Show Grid button to display a grid over the image. This tool is useful when fixing
alignment in images. When the grid is not activated, it is gray .
Resizing the Crop Window
Resize the crop window in the following ways:
Drag the edges of the crop window to the desired size.
Specify an exact size for the crop window.
Apply a ratio to constrain to the crop window proportions.
Use the arrow keys to manipulate the size of the crop window.
To resize the crop window by dragging:
Gemstone Photo Editor 12
Page 34 of 346
1. Position the cursor over the edge or corner of the crop window until it changes into a double-pointed
arrow.
2. Drag the crop window's border to the desired size.
To maximize crop area:
1. Click the Maximize crop area button. The crop selection expands to the outer edges of the image.
2. Drag the crop window's border to the desired size.
To specify an exact size for the crop window:
1. Type the desired crop window proportions into the Width and Height spin boxes.
2. In the Units drop-down list, select a unit of measurement.
3. Use the Dots per inch spin box to specify a resolution.
To constrain the crop window to a ratio:
1. Enable the Constrain proportion checkbox.
2. Select a ratio from the drop-down list.
3. Position the cursor over the edge of the crop window until it changes into a double-pointed arrow, and
then drag the edge of the crop window to the desired size.
To delete a proportion:
1. Select a proportion from the Constrain proportion drop-down list.
2. Click the down arrow button beside the drop-down list, and select Delete.
3. Click Yes.
To set a proportion as default:
1. Enable the Constrain proportion checkbox.
2. Select a ratio from the drop-down list.
3. Click the down arrow button beside the drop-down list, and select Set as Default.
Crop Options

Gemstone Photo Editor 12
Page 35 of 346
Constrain proportion Enable this option to constrain the crop area to a specified
proportion. Select the proportion from the drop-down list.
Maximize crop area Click to expand the crop area to the entire image, and then click and
drag the crop borders. To redo your crop selection, click the
Maximize crop area button to expand the selection to the entire
image again, and make the crop adjustments.
Rotate the cropping area Click to rotate the crop area.
Fixing Lens Distortion
Correct barrel and pincushion distortion in digital photographs. In barrel distortion, the photo
appears to bulge outwards from the center. In pincushion distortion, the photo appears to shrink
inwards toward the center. Barrel and pincushion distortion are common in photos taken with wide
angle or zoom lenses.
ACDSee offers the option of using manual correction via the Manual Correction slider, or enabling lens
correction via the lens profile. Select the make, model, and lens of the camera used to take the image.
The Lens Correction tool can apply automatic adjustments based on the distortion inherent to the
lens used, or enable lens correction for each image manually. After a lens profile has been mapped to
an EXIF profile, the Make and Model drop-down menus will be pre-populated with the camera used to
take the image based on its EXIF information. The Lens Correction tool contains a database of camera
makes, models, and their possible lenses. The possible lenses for the selected camera will be available
in the Lens drop-down menu, unless there is only one possible lens, in which case, that lens will be pre-
selected.
The name of the lens used in the EXIF information of the image is usually accurate. However, the lens
value displayed in the EXIF may not be reliable in the case of third-party lenses, as the camera itself
may only recognize the third-party lens as an ID number. If possible, recover the correct lens value and
select it from the Lens drop-down menu.
It is also possible to map the correction specific to the lens, (the lens profile), to the camera make,
model, and lens combination. Mapping the lens profile will apply the correction to all images with the
same camera-lens combination that opened in the Develop pane Lens Correction tool.
Use the Manual Correction slider for further adjustments after using automatic correction, or on its
own.
Use the lens profile to correct chromatic aberration, if it is available.
Settings can be set as a preset for future use.
For quick viewing of the available lens profiles, go to Lensfun.
To fix lens distortion using the lens profile:

Gemstone Photo Editor 12
Page 36 of 346
1. In the Develop Tools pane, select the Geometry tab.
2. In the Lens Correction group, enable the Enable Lens Profile checkbox.
3. If the displayed camera make and model are not correct, select the correct options from the Make and
Model drop-down menus.
4. From the Lens drop-down menu, select the lens used to take the image. Find this information displayed
in the EXIF panel in the lower right corner of Develop pane. The correction will occur automatically.
5. For further adjustments, move the Manual Correction slider to the left for a bulge effect, or to the right
to stretch the edges of the image.
Right-click a slider to reset to the default value.
Click the Show Grid button to display a grid over the image. This tool is useful when fixing
alignment in images. When the grid is not activated, it is gray .
To save lens profile as a default for future use:
Save the camera and lens combination's correction profile and use it as a default for other images
taken with the same camera/lens combination. This will ensure that every time an image is opened
from a particular camera make, model, and lens combination in the Lens Correction tool, the Lens
field will be pre-populated with the lens mapped to that camera. It is also possible to automatically
apply this lens profile to other images taken with the same camera/lens combination upon entering
the Develop pane.
As this function relies on EXIF data, this can mainly be performed with JPEG, DNG, RAW, and
TIFF images.
1. With the desired camera and lens combination selected in the Make, Model, and Lens drop-down
menus, click the Map Default button.
2. Enable the Auto-apply this mapped profile when entering Develop mode checkbox to apply the
mapped default to future images upon entering the Develop pane.
3. In the Map Default dialog box, click OK to save, or Cancel to abort.
To manage saved defaults:
1. Click the Manage Defaults button.
2. In the Manage Mapped Defaults dialog, do one of the following:
Select a default option and click the Delete Mapped Default button.
Enable the Auto-apply the selected mapped profile when entering Develop mode checkbox to
apply the selected mapped default to future images taken with the same camera/lens combination
upon entering the Develop pane.
3. Click OK to continue, or click Cancel to keep the mapped default.

Gemstone Photo Editor 12
Page 37 of 346
To fix Chromatic Aberration using the lens profile:
Chromatic aberration occurs due to the properties of a given lens. Therefore, use the lens profile to
automatically correct it. The Chromatic Aberration checkbox will be enabled if the selected lens has a
corresponding chromatic aberration correction available.
1. In the Develop pane, select the Geometry tab.
2. In the Lens Correction group, enable the Enable Lens Profile checkbox.
3. Enable the Chromatic Aberration checkbox.
4. Navigate to the Detail tab to view the corrected image.
Save the lens profile with the Chromatic Aberration checkbox enabled to ensure that
chromatic aberration will always be corrected.
Rotating and Straightening
Straighten a crooked photo in the Develop Tools pane by rotating the photo at a custom angle.
Settings can be set as a preset for future use.
To ccorrect a crooked photo:
1. In the Develop Tools pane, select the Geometry tab.
2. In the Rotate and Straighten group, adjust the image as described below.
Right-click a slider to reset to the default value.
Click the Show Grid button to display a grid over the image. This tool is useful when fixing
alignment in images. When the grid is not activated, it is gray .
Rotate Options
90 degrees to the left Rotates image 90 degrees to the left.
90 degrees to the right Rotates image 90 degrees to the right.
Straighten Options

Gemstone Photo Editor 12
Page 38 of 346
Slider Adjusts the horizontal angle of the image. Move the slider left
or right until the image appears straightened.
-5 Degrees left Adjusts the image -5 degrees to the left.
+5 Degrees right Adjusts the image +5 degrees to the right.
Straighten tool Straightens the image. Use the cursor to draw a line along the
crooked horizon. Release the cursor to automatically
straighten the horizon.
Fixing Lens Vignetting
Vignetting, an unusual darkness in the corners of images, is the result of the inability of the lens to
distribute light into the corners of the image. Fix lens vignetting in the Develop Tools pane by
brightening the corners of the image.
Settings can be set as a preset for future use.
To fix vignetting:
1. In the Develop Tools pane, select the Geometry tab.
2. In the Vignette Correction group, adjust the image as described below.
Right-click a slider to reset to the default value.
Vignette Correction Options
Strength Adjust how much the corners of the image will be brightened.
Radius Adjust the distance from the corners of the image that pixels will be brightened.
The higher the radius, the closer to the center of the image pixels will be
brightened.
Click the Show Grid button to display a grid over the image. This tool is useful when fixing
alignment in images. When the grid is not activated, it is gray .
About the Detail Tab
In the Detail tab, sharpen, reduce noise, or correct chromatic aberration in photos.
To use the Detail tab:

Gemstone Photo Editor 12
Page 39 of 346
1. In the Develop Tools pane, select the Detail tab.
2. To develop the image, make changes in the following groups:
l Sharpening,
l Noise Reduction,
l Skin Tune, or
l Chromatic Aberration.
Saving and Canceling
After developing an image, choose from one of the many options for saving the image, depending on
the next workflow step.
To save an image:
1. Click Done.
2. Select one of the following:
Save: Save any changes.
Save as: Save a copy of the developed image with a new name or format.
Discard: Discard any changes.
Cancel: Remain on the same image in Develop with all changes intact, without saving the image.
To discard changes to an image and return to the previous mode:
Click Cancel.
It is not possible to directly save changes to a RAW file. Changes to a RAW file must be saved
as a different file type.
Correcting Chromatic Aberration
Chromatic aberration is a lens artifact that can result in fringes in high contrast areas of some photos.
The camera lens can cause different wavelengths of light to focus differently, which appears in photos
as colored fringing or colored lines on the borders of high contrast areas. Purple fringing can also occur
when there is a bright spot of light in front of the lens.
This zoomed-in image shows an example of blue/yellow fringing.

Gemstone Photo Editor 12
Page 40 of 346
Use the Defringe and Chromatic Aberration tools in the Develop Tools pane to reduce the appearance
of colored fringes. Chromatic aberration can be especially useful for photos with architectural details.
For best results, it's recommended to use the Chromatic Aberration sliders first, and then the Defringe
sliders.
Settings can be set as a preset for future use.
To reduce fringing in an image:
1. In the Develop Tools pane, select the Detail tab.
2. In the Chromatic Aberration group, adjust the sliders as described below.
Right-click a slider to reset to the default value.
Chromatic Aberration Options
Fix Red/Cyan Adjust the red and cyan channels to reduce red/cyan fringing.
Fix Blue/Yellow Adjust the blue and yellow channels to reduce blue/yellow fringing.
Defringe Options
Defringe strength Adjust the amount of fringe color you want to remove from high contrast
edges. A setting of zero means that defringing is off.
Defringe radius Adjust the number of pixels surrounding an edge that will be defringed.
Color Adjust the color to remove from high contrast edges.
View the effects of the changes in the preview window, located at the top of the Detail pane.
Move the overlay square on the image to change the area the preview window displays.

Gemstone Photo Editor 12
Page 41 of 346
Reducing Noise
Reduce noise in images caused by high ISO settings or long exposure.
Settings can be set as a preset for future use.
To reduce noise in an image:
1. In the Develop Tools pane, select the Detail tab.
2. In the Noise Reduction group, adjust the sliders as described below.
Right-click a slider to reset to the default value.
Noise Reduction Options
Luminance Drag the slider to the right to reduce the visibility of lighting
noise. Apply a setting that is proportional to the noise in the
image and refer to the preview window to ensure that you
balance the level of noise reduction with loss of detail. Hold
down the Alt key while using the slider to see the remaining
noise in the image.
Strength Drag the slider to the right to control how aggressively to
reduce noise. Prevent the loss of detail by balancing
Luminance with Strength.
Color Noise Reduction Drag the slider to the right to remove color noise from the
image. Hold down the Alt key while using the slider to see
the remaining color noise in the image.
Preserve Detail Restores details lost due to strong noise removal. Set the
slider to adjust how much detail is restored.
Preserve Detail Threshold Determines the level of detail necessary to be included in
the Preserve Detail slider's adjustments.
Noise Reduction Applied With the Develop Brush
For targeting specific areas of noise reduction within an image, use the Develop Brush to apply the
noise reduction.
To apply Noise Reduction with the Develop Brush:
1. Open an image in ACDSee RAW.
2. In the Develop Tools pane, select the Detail tab.
3. In the Detail tab, select the Develop Brush.
4. Adjust the noise reduction options as described below.

Gemstone Photo Editor 12
Page 42 of 346
Develop Brush Noise Reduction Options
Sharpness Move the slider to the right to brush on sharpness, or move
the slider to the left to brush on blur.
Luminance Noise Reduction Luminance noise is random variations of brightness, and par-
ticularly in gray areas, may appear spotted when there should
be a solid color in the area of the image. Slide to the right to
add Luminance Noise Reduction.
Color Noise Reduction Color noise is random variations of color in the image. Slide to
the right to add Color Noise Reduction.
Noise Reduction Applied With the Linear Gradient
For targeting specific areas of noise reduction within an image, use the Linear Gradient tool to apply
the noise reduction.
To apply Noise Reduction with the Linear Gradient tool:
1. Open an image in ACDSee RAW.
2. In the Develop Tools pane, select the Detail tab.
3. In the Detail tab, select the Linear Gradient tool.
4. Adjust the noise reduction options as described below.
Linear Gradient Noise Reduction Options
Sharpness Move the slider to the right to brush on sharpness, or move
the slider to the left to brush on blur.
Luminance Noise Reduction Luminance noise is random variations of brightness, and par-
ticularly in gray areas, may appear spotted when there should
be a solid color in the area of the image. Slide to the right to
add Luminance Noise Reduction.
Color Noise Reduction Color noise is random variations of color in the image. Slide to
the right to add Color Noise Reduction.
Noise Reduction Applied With the Radial Gradient
For targeting specific areas of noise reduction within an image, use the Radial Gradient tool to apply
the noise reduction.
To apply Noise Reduction with the Radial Gradient tool:
1. Open an image in ACDSee RAW.
2. In the Develop Tools pane, select the Detail tab.
3. In the Detail tab, select the Radial Gradient tool.
4. Adjust the noise reduction options as described below.

Gemstone Photo Editor 12
Page 43 of 346
Radial Gradient Noise Reduction Options
Sharpness Move the slider to the right to brush on sharpness, or move
the slider to the left to brush on blur.
Luminance Noise Reduction Luminance noise is random variations of brightness, and par-
ticularly in gray areas, may appear spotted when there should
be a solid color in the area of the image. Slide to the right to
add Luminance Noise Reduction.
Color Noise Reduction Color noise is random variations of color in the image. Slide to
the right to add Color Noise Reduction.
Sharpening
Use the Sharpening tool to define details and fine-tune images.
Settings can be set as a preset for future use.
To sharpen an image:
1. In the Develop Tools pane, select the Detail tab.
2. In the Sharpening group, adjust the sliders as described below.
Right-click a slider to reset to the default value.
Sharpening Options
Amount Specifies the amount of sharpening applied by increasing contrast around the edges.
Radius Controls the number of pixels to adjust around each edge. Higher values increase the
number of sharpened pixels and tend to bring out coarser detail, while lower values
reduce the number of sharpened pixels and tend to bring out finer detail.
Mask Allows the targeting of edges, while suppressing the sharpening of noise and texture.
To view the areas the mask affects, press the Alt key when moving the mask slider.
Areas affected by sharpening appear white.
Detail Suppresses the halo, (the light border that forms around edges with extreme
sharpening), by reducing its intensity. The higher the value, the stronger the reduction.
Threshold Specifies how different the pixel lightness values within an edge must be before the
pixels within the edge are sharpened. Higher values sharpen only stronger edges but
minimize the appearance of noise. Lower values sharpen both strong and weaker
edges, but can increase the appearance of noise. We recommend you set the
threshold to enhance edges while keeping background noise to a minimum.

Gemstone Photo Editor 12
Page 44 of 346
View the effects of the changes in the preview window, located at the top of the Detail pane.
Move the overlay square on the image to change the area the preview window displays.
Set the default sharpening for RAW files by clicking the Adjust develop settings for this group
icon in the Sharpening group and selecting Save New Default.
Fine-Tuning Skin Tone
Use the Skin Tune tool to even skin tone and smooth away blemishes and flaws.
Settings can be set as a preset for future use.
To correct skin tone:
1. In the Develop Tools pane, select the Detail tab.
2. In the Skin Tune group, adjust the sliders as described below.
Right-click a slider to reset to the default value.
Skin Tune Options
Smoothing Drag the slider to the right to refine skin by suppressing texture detail.
Glow Drag the slider to the right to increase the brightness of skin while subtly
smoothing.
Radius Specifies the scale of the texture detail that is affected by the effect. Drag the
slider to the left to enhance small details. Drag the slider to the right to enhance
larger details.
View the effects of the changes in the preview window, located at the top of the Detail pane.
Move the overlay square on the image to change the area the preview window displays.
About the Repair Tab
Use the Repair tab to reduce red eye and repair images.
To use the Repair tab:
1. In the Develop Tools pane, select the Repair tab.
2. Select the Red Eye Reduction or Repair tool.

Gemstone Photo Editor 12
Page 45 of 346
Saving and Canceling
After developing an image, choose from one of the many options for saving the image, depending on
the next workflow step.
To save an image:
1. Click Done.
2. Select one of the following:
Save: Save any changes.
Save as: Save a copy of the developed image with a new name or format.
Discard: Discard any changes.
Cancel: Remain on the same image in Develop with all changes intact, without saving the image.
To discard changes to an image and return to the previous mode:
Click Cancel.
It is not possible to directly save changes to a RAW file. Changes to a RAW file must be saved
as a different file type.
Reducing Red Eye
Use the Red Eye Reduction tool in the Develop Tools pane to correct red eye in digital photographs.
The Red Eye Reduction tool specifically targets red pixels. Nearby pixels are unaffected.
To correct Red Eye:
1. In the Develop Tools pane, select the Repair tab.
2. Use the Zoom tools at the bottom right corner of the Display Area to enlarge and center the eye to be
corrected.
3. Click within the red portion of the eye.
4. In the Red Eye Reduction group, adjust the sliders as described below.
Right-click a slider to reset to the default value.
Red Eye Reduction Options
Size Drag the slider to the right to increase the size of the area being darkened, or to the left to
decrease.
Darkening Drag the slider to the right to darken the corrected portion of the eye.

Gemstone Photo Editor 12
Page 46 of 346
Correct as many red eyes as necessary. Simply keep clicking the image to add a new eye-definition.
Move the eye-definitions by clicking and dragging, or delete them by pressing Delete.
Scroll with the mouse to adjust the size of the area to darken at any time.
Show or hide the red eye outline by toggling On or Off the eye icon, located at the top left
corner of the Red Eye group.
Press Delete to remove the currently selected red eye adjustment.
Repairing an Image
Use the Repair tool to remove flaws, such as:
Skin blemishes
Telephone wires and other unwanted objects
Flash flares from snowflakes or windows
Lens scratches and water drops
Shadows cast on the sensor by dust
There are three options available for the Repair tool: the Heal brush, the Blended Cloning tool, and
the Clone brush.
When selecting the Heal brush, it copies pixels from one area of a photo to another, but analyzes the
pixels in the source area before copying them. The Heal brush also analyzes the pixels in the target
area, and then blends the pixels of both source and target, to match the surrounding area. This
ensures that the lighting and color of the replacement pixels integrate with the surrounding area. The
Heal brush works particularly well with photos that involve complicated textures like skin or fur.
When selecting the Clone brush, the tool copies the exact pixels from one area of a photo to another,
creating an identical image area. The Clone brush is more effective for photos that have strong, simple
textures or uniform colors, as it is more difficult to identify the copied pixels in the finished photo.
When selecting the Blended Clone tool, the Repair tool copies the exact pixels from one area of a
photo to another, but analyzes the pixels in the target area and blends them with the copied pixels.
Settings can be set as a preset for future use.
To achieve the best results, perform any geometric operations on the image before using the
Heal brush.
To remove flaws from a photo:

Gemstone Photo Editor 12
Page 47 of 346
1. In the Develop Tools pane, in the Repair tab's Repair group, select one of the following:
Heal: Copies the pixels from the source area to the target area, and blends pixels into the
surrounding image area.
Clone: Copies the pixels from the source area to the target area.
Blended Clone: Copies the pixels from the source area to the target area, then analyzes the
pixels in the target area and blends them with the copied pixels.
2. Drag the Nib Width and Feathering sliders as described in the table below.
3. Right-click the image to set a source location. Pixels will be copied from this location and used in the
target location.
4. Click and drag over the area to cover. If selecting the Heal brush, Gemstone analyzes and replaces the
pixels when releasing the mouse button. If selecting the Blended Clone tool, Gemstone analyzes,
replaces, and blends the pixels when releasing the mouse button.
5. Do one of the following:
Click Done to apply your changes and close the tool.
Click Cancel to discard all changes and close the tool.
Scroll to adjust the brush size, or press the Shift key while scrolling to adjust feathering.
For the most accurate preview, zoom the image to 100% while healing or cloning.
Red Eye Reduction and selective adjustments, such as the Develop Brush and gradients, are
the only adjustments that cannot be healed or cloned.
Repair Tool Options
Nib Width Sets the width of the brush. The maximum brush width is relative to the size of your
image.
Feathering Sets the amount to feather on the edge of the brush to prevent sharp transitions
between the original and healed part of the photo.
Feathering is set as a percentage of the nib width, not as a specific number of pixels.
This means that you do not have to adjust the feathering when you reset the Nib
Width, as it automatically adjusts to a percentage of the new nib width. This option is
not available with the Blended Clone tool.
Right-click a slider to reset to the default value.
About the Tune Tab
In the Tune tab, adjust exposure, white balance, saturation, brightness, hue, color profile and much
more.

Gemstone Photo Editor 12
Page 48 of 346
To use the Tune tab:
1. In the Develop Tools pane, select the Tune tab.
2. To develop the image, make changes to any of the following groups:
l General,
l White Balance,
l Light EQ™,
l Color EQ,
l Color Wheel,
l Tone Wheels,
l Tone Curves,
l Soft Focus,
l Effects,
l Color LUTs,
l Split Tone,
l Post-Crop Vignette, or
l Output Color Space.
Saving and Canceling
After developing an image, choose from one of the many options for saving the image, depending on
the next workflow step.
To save an image:
1. Click Done.
2. Select one of the following:
Save: Save any changes.
Save as: Save a copy of the developed image with a new name or format.
Discard: Discard any changes.
Cancel: Remain on the same image in Develop with all changes intact, without saving the image.
To discard changes to an image and return to the previous mode:
Click Cancel.
It is not possible to directly save changes to a RAW file. Changes to a RAW file must be saved
as a different file type.

Gemstone Photo Editor 12
Page 49 of 346
Adjusting Color With Color EQ
Color EQ makes color adjustments for Saturation, Brightness, Hue, and Contrast. Make adjustments
to the entire image in Standard mode using the vertical slider, or adjust on a color by color basis in
Standard or High Quality mode. For an explanation of the controls, see below.
Settings can be set as a preset for future use.
To adjust color:
1. In the Develop Tools pane, select the Tune tab.
2. In the Color EQ group, select the Saturation, Brightness, Hue, or Contrast tab, and adjust them
according to the options described in the table below.
Right-click a slider to reset to the default value.
Color EQ Options
Select High Quality mode or Standard mode from the Mode drop-down menu. To adjust colors
individually, left-click a color in the image and drag up or down to alter. The changes are reflected in
the Saturation, Brightness, Hue, and Contrast tabs color sliders in High Quality mode and the graph
in Standard mode, respectively. This works in the Saturation, Brightness, Hue, and Contrast tabs.

Gemstone Photo Editor 12
Page 50 of 346
High Quality
Adjust image colors individually. High Quality
uses the newer, more modern color models,
allowing for a visually perceptive and higher
quality adjustment.
Adjust each color individually by dragging sliders
right for more intensity, or left for less intensity.
Or, enter a number into the fields for precise
adjustments. Select a precise color to adjust by
placing the cursor on the image for the double
arrow icon to appear. Then, click and drag up or
down to adjust the colors beneath the double
arrow icon. The affected color sliders
automatically adjust as the cursor is moved.
Standard

Gemstone Photo Editor 12
Page 51 of 346
Supports previously developed images. Adjust
colors individually or make global adjustments.
Vertical slider Apply
adjustments to
the entire
image. A slider
on the left has
the following
effects on the
tabs:
Saturatio
n: Adjusts
from
saturation
to
grayscale.
Brightnes
s: Adjusts
the light
or dark
tones in
the
image.
Hue:
Changes
to a
different
color.
Or, enter a
number into
the field for
precise
adjustments.
Individual color sliders Adjust each
color with
individual
sliders. Select
the color to
adjust and click
and drag the
sliders. Or,
enter a
number into

Gemstone Photo Editor 12
Page 52 of 346
the fields for
precise
adjustments.
Direct image adjustments Place the
cursor on the
image for the
double arrow
icon to appear.
Then click and
drag up or
down to adjust
the colors
beneath the
double arrow
icon. The
curve control
and the
affected color
sliders
automatically
adjust as the
cursor is
moved. The
black down
arrow on the
graph indicates
the color being
adjusted in the
image.
The curve
appears black
in the graph,
and cannot be
directly
adjusted. To
apply further
adjustments,
alter the white
curve. When
adjusting the
white curve,
the black
curve
automatically
changes with

Gemstone Photo Editor 12
Page 53 of 346
it. Or, enter a
number into
the fields for
precise
adjustments.
Adjusting Lighting
Use the Light EQ™ tool to adjust tone levels in images that are too dark or too light, without affecting
other areas of the photo. Tone level is the average brightness of a pixel and its surrounding pixels.
It is also possible to simultaneously brighten dark areas that are too dark, and darken areas that are
too bright. Examples would be a back-lit photo of a person silhouetted against a bright background,
such as the sea, or a window. In fact, most photos taken on a dull day, or with a flash, can be
improved in various ways with fine adjustments using the Light EQ™ tool.
Settings can be set as a preset for future use.
To reduce lighting in an image:
1. In the Develop Tools pane, select the Tune tab.
2. In the Light EQ™ group, select Basic mode, Standard mode, or Advanced mode from the drop-down
menu at the top of the pane and configure the settings as described below.
Right-click a slider to reset to the default value.
Basic Light EQ™
Basic is for very quick and easy adjustments using just three sliders. Click directly on an area of the
image to generate automatic settings optimal for that area (usually the subject of the photo).
Do one of the following:
Click on an area in the image to generate automatic settings optimal for that area.
Manually adjust the lighting as described below.
Basic Light EQ™ Options
Shadows Drag the slider to the right to brighten or drag the slider to the left to darken the shadows.
Midtones Drag the slider to the right to brighten or drag the slider to the left to darken midtones.
Highlights Drag the slider to the right to brighten or drag the slider to the left to darken highlights.
Auto Click the Auto button for Gemstone to automatically adjust the lighting in your image.

Gemstone Photo Editor 12
Page 54 of 346
Standard Light EQ™
Standard works like a sound equalizer but with light. Adjust the brightness and contrast of different
tone bands (areas of relative brightness or darkness) independently using two sliders for each tone
band — one for brightening and one for darkening. A graph shows the amount of brightening or
darkening applied throughout the tonal range. The gray areas in the graph are suggested boundaries
for adjustment to avoid clipping and loss of detail, and turn pink to indicate where you have adjusted
the sliders far enough to cause clipping.
Do one of the following:
Select an area of the image to adjust, left-click and drag up to brighten or right-click and drag down to
darken.
Manually adjust the lighting as described below.
Standard Light EQ™ Options

Gemstone Photo Editor 12
Page 55 of 346
Brighten sliders
(top)
Drag the sliders up to increase the brightening in each tonal band. The sliders on the
left affect dark tones. The sliders on the right affect bright tones. Moving a slider
changes the amount of brightening only in that particular tonal band in the image.
Or, type a number into the number boxes and increment them slowly to make precise
adjustments.
Darken sliders
(bottom)
Drag the sliders down to increase the darkening in each tonal band. The sliders on the
left affect dark tones. The sliders on the right affect bright tones. Moving a slider
changes the amount of darkening only in that particular tonal band in the image.
Or, type a number into the number boxes and increment them slowly to make precise
adjustments.
Graph The graph indicates the amount of brightening and darkening applied throughout the
tone range of the image. The portion of the graph above the horizontal axis
corresponds to brightening, while the portion of the graph below the horizontal axis
corresponds to darkening. When both brightening and darkening are applied within the
same tonal band, contrast is increased. The area between the top of the brightening
graph and the bottom of the darkening graph indicates the relative increase of contrast
throughout the tone range of the image. Left-click on the graph or on the image and
drag the double-pointed arrow up to brighten or right-click and drag down to darken.
# tone bands Set the number of tone bands you would like to adjust. A greater number of tone
bands allows for more precise control, while fewer tone bands make it easier to
smooth adjustments quickly.
On Image
Double-click with
left mouse
button
Automatically sets Brightening to optimum for that area of the
image. A brighter area (e.g. a face) works best.
Double-click with
right mouse
button
(or Shift +
double-click with
left mouse
button)
Automatically sets the Darkening to optimum for that area of the
image.
Ctrl + double-
click with left
mouse button
Modifies the current brightening adjustment curve to optimize it
for the area surrounding the tone level you clicked on. In most
cases, this will result in increasing the amount of brightness
applied to the area surrounding the tone level you clicked on,
while decreasing the amount applied to other tone levels.
Use this method to make a specific subject or area stand out by
brightening.

Gemstone Photo Editor 12
Page 56 of 346
Ctrl + double-
click with right
mouse button
Modifies the current darkening adjustment curve to optimize it
for the area surrounding the tone level you clicked on. In most
cases, this will result in increasing the amount of darkness applied
to the area surrounding the tone level you clicked on, while
decreasing the amount applied to other tone levels.
Use this method to make a specific subject or area blend in by
darkening.
Scroll up or
down with the
mouse wheel
over the image
Increases or decreases the amount of brightening applied at that
tone level in the image. Both the image and the graph show the
changes.
Shift + scroll with
the mouse
wheel over the
image
Decreases or increases the amount of darkening applied at that
tone level in the image.
Hold down "A"
+ scrolling or
+ dragging with
the left mouse
button
Adjusts all of the brighten sliders at once.
Hold down "A" +
Shift
+ scrolling or
+ dragging with
the right mouse
button
Adjusts all of the darken sliders at once.
Click and drag up
and down on the
image (left
mouse button)
Increases or decreases the amount of Brightening applied at that
tone level in the image. Both the image and the graph show the
changes.
(Only works if the image is actual size—no zooming.)
Shift + click and
drag up and
down on the
image (left or
right mouse
button)
Decreases or increases the amount of Darkening applied at that
tone level in the image.
(Only works if the image is actual size—no zooming.)
Auto Click the Auto button for Gemstone to automatically adjust the lighting in your image.

Gemstone Photo Editor 12
Page 57 of 346
Advanced Light EQ™
Advanced provides ultimate control of the brightness and contrast in an image. Adjustment curves
can be constructed using four sliders, and can manually adjust the curves by clicking and dragging
within the graph area or on the image itself.
Do one of the following:
Select an area of the image to adjust, left-click and drag up to brighten or right-click and drag down to
darken.
Manually adjust the lighting as described below.
Graph
The top half of the graph corresponds to brightening, and the bottom half corresponds to darkening.
Tone levels of the shadows are represented on the left, midtones in the middle, and highlights on the
right.
The light gray in the graph shows the amount of brightening or darkening applied throughout the
image. The dark gray areas in the graph are suggested boundaries for adjustment, and turn red to
indicate where you have adjusted far enough to cause a loss in detail. When the cursor is over the
image, the two vertical yellow lines correspond to the lower and upper bounds of the tone level of the
area under the cursor and indicate the center of adjustment.
Adjustment Light EQ™ Options

Gemstone Photo Editor 12
Page 58 of 346
Area Action Result
Sliders
Drag Brightening slider To the right: increases the light applied to the darker areas.
To the left: applies brightening more uniformly to all areas of the
image.
Drag Darkening slider To the right: increases the darkening applied to the brighter areas
of the image.
To the left: applies the darkening more uniformly to all areas of the
image.
Drag Amplitude slider
(Brightening)
To the right: increases the intensity of the brightening across all
areas of the image. The height of the curve increases.
To the left: reduces the intensity of the brightening and the height
of the curve.
If the Amplitude slider is 0: no brightening is applied.
If the Amplitude is 100-200: proportional amount of clipping
increases.
In most cases, 100 is the right amount of amplitude. For images with
fine detail in the highlights, decreasing brighten amplitude
preserves the detail.
In most cases it is not necessary to adjust amplitude.
Drag Amplitude slider
(Darkening)
To the right: increases the intensity of the darkening across all
areas of the image. The height of the bottom orange curve
increases.
To the left: reduces the intensity of the darkening and the height of
the curve.
On Graph
Drag the graph (top) The graph changes as you left-click and drag up on the graph itself.
The graph represents the brightening adjustments you are making.
The dark gray graph represents the maximum amount you can drag
the graph before clipping (pink) begins.
The height of the graph represents the level of brightening applied
at each tone level. (Tone moves from black on left to white on the
right.)
When you make direct brightening or darkening adjustments on the
graph or image, the corresponding Brightening or Darkening slider
changes to Custom curve. If you adjust the position of the slider

Gemstone Photo Editor 12
Page 59 of 346
Area Action Result
after this, it discards all direct curve adjustments.
When you make direct brightening or darkening adjustments on the
graph or image, the corresponding Brightening or Darkening
Amplitude slider changes to indicate the current curve amplitude.
(An amplitude of 100 is the maximum amplitude a curve can have
without causing clipping.)
Drag the graph (bottom) The graph changes as you right-click and drag down on the graph
itself. The graph represents the darken adjustments you are making.
The dark gray graph represents the maximum amount you can drag
the graph before clipping (pink) begins.
You can use all the
shortcuts below that
apply to the image,
directly to the Graph
itself.
Changes the tonal band on the graph itself with a corresponding
change in the image. This is useful for making fine adjustments to a
specific tonal band.
On Image
Double-click with left
mouse button
Automatically sets Brightening to optimum for that area of the
image. A brighter area (e.g. a face) works best.
Double-click with right
mouse button
(or Shift + double-click
with left mouse button)
Automatically sets the Darkening to optimum for that area of the
image.
Ctrl + double-click with
left mouse button
Modifies the current brightening adjustment curve to optimize it for
the area surrounding the tone level you clicked on. In most cases,
this will result in increasing the amount of brightness applied to the
area surrounding the tone level you clicked on, while decreasing
the amount applied to other tone levels.
Use this method to make a specific subject or area stand out by
brightening.
Ctrl + double-click with
right mouse button
Modifies the current darkening adjustment curve to optimize it for
the area surrounding the tone level you clicked on. In most cases,
this will result in increasing the amount of darkness applied to the
area surrounding the tone level you clicked on, while decreasing
the amount applied to other tone levels.
Use this method to make a specific subject or area blend in by
darkening.

Gemstone Photo Editor 12
Page 60 of 346
Area Action Result
Scroll up or down with the
mouse wheel over the
image
Increases or decreases the amount of brightening applied at that
tone level in the image. Both the image and the graph show the
changes.
Shift + scroll with the
mouse wheel over the
image
Decreases or increases the amount of darkening applied at that
tone level in the image.
Hold down "A"
+ scrolling or
+ dragging with the left
mouse button
Sets the brightening Amplitude slider directly.
Hold down "A" + Shift
+ scrolling or
+ dragging with the right
mouse button
Sets the darkening Amplitude slider directly.
Click and drag up and
down on the image (left
mouse button)
Increases or decreases the amount of brightening applied at that
tone level in the image. Both the image and the graph show the
changes.
(Only works if the image is actual size—no zooming.)
Shift + click and drag up
and down on the image
(left or right mouse
button)
Decreases or increases the amount of darkening applied at that
tone level in the image.
(Only works if the image is actual size—no zooming.)
Auto
Click the Auto button for Gemstone to automatically adjust the lighting in your image.
Adjusting Split Tone
Split toning is a powerful technique originating in film photography to tint the highlights and shadows.
The Split Tone tool provides creative control over the Hue and Saturation of highlights and shadows.
Use the sliders to adjust the balance of tones in the highlights and shadows of photos. Split toning
allows for adding a creative element to RAW conversion and non-destructive editing in ACDSee.
Settings can be set as a preset for future use.
To adjust highlights and shadows:
Gemstone Photo Editor 12
Page 61 of 346
1. In the Develop Tools pane, select the Tune tab.
2. Navigate to the Split Tone group.
3. Drag the sliders to apply colored highlights and shadows as described in the table below.
Right-click a slider to reset to the default value.
Adjustment Options
Highlights
Hue Drag the slider to the right to select a
highlight color.
Saturation Drag the slider to the right to increase
saturation of the color in the highlights of
the image.
Shadows
Hue Drag the slider to the right to select a
shadow color.
Saturation Drag the slider to the right to increase
saturation of the color in the shadows of the
image.
Balance
Drag the slider to the right to emphasize the highlight color; drag the slider
to the left to emphasize the shadow color. For example if the slider is set to
the maximum at 50, then full emphasis is applied to the highlight color; if
the slider is set to the minimum -50, then full emphasis is applied to the
shadow color.
Create a Sepia tone effect by first reducing the saturation of the photo with the Advanced
Color tool and then apply a reddish brown hue with the Split Tone tool. Or, create a
monochromatic black and white photo with a slight tint of hue.
Adjusting Tone Curves
In the Develop Tools pane, use the Tone Curves tool to change the tonal range of an image. Select the
RGB color channel to adjust the entire range of the image, or select a specific color.
Settings can be set as a preset for future use.
To adjust the brightness curves in an image:

Gemstone Photo Editor 12
Page 62 of 346
1. In the Develop Tools pane, select the Tune tab.
2. In the Tone Curves group, adjust the curves as described below.
Right-click the number field or the arrow for Blacks, Midtones, or Whites to reset it to the
default setting. Or, double-click the number field or on the arrows to use automatic settings.
Tone Curves Options
Curve Select a curve to apply to an image. Standard curve is the default. Use Camera to
use the curve generated by Gemstone to produce a curve suitable for the image.
The Curve drop-down list is only available for RAW files.
Channel Specify the color channels to adjust.
Histogram Displays a graphic of the color information levels in the image, based on the
selected channel. Click and drag the line to manipulate the curve. Each time the
curve is clicked, a new point is added. Drag the points up and down the curve. To
delete a point, right-click it and choose Delete point. Or, delete a point by dragging
it off of the top or the bottom of the graph.
Blacks Click and drag the black triangle or click it to automatically set the black point. Or,
enter a number into the fields or use the up or down arrow buttons to set an exact
black point.
Midtones Click and drag the gray triangle or click it to automatically set the midtone point.
Or, enter a number into the fields or use the up or down arrow buttons to set an
exact midtone point.
Whites Click and drag the white triangle or click it to automatically set the white point. Or,
enter a number into the fields or use the up or down arrow buttons to set an exact
white point.
Auto Automatically sets the points for blacks, midtones, and whites.
Color Picker A color picker is available when a point is selected on the histogram curve and the
cursor dragged onto the image.
Adjusting White Balance
Use the White Balance group to remove unwanted color casts in images. A color cast is a visible color
tint that affects an image. Color casts are usually due to the lighting present when the photo was
taken. If taking photos indoors, remove the blue tint or remove the yellow tint that indoor lighting can
often give.
Settings can be set as a preset for future use.
To adjust the White Balance in an image:

Gemstone Photo Editor 12
Page 63 of 346
1. In the Develop Tools pane, select the Tune tab.
2. In the White Balance group, do one of the following:
Automatically adjust white balance by using the White Balance eyedropper to select a portion of
the image with neutral gray pixels.
Manually adjust white balance with the sliders as described below.
Right-click a slider to reset to the default value.
White Balance Options

Gemstone Photo Editor 12
Page 64 of 346
White Balance For RAW images, select one of the following white balance correction options:
l As Shot: selected automatically. Applies the camera's white balance setting
as stored in the camera when the photo was taken.
l Auto: adjusts the color temperature and tint to settings automatically
determined by analyzing the image.
l Sunny: adjusts the color temperature to 5500K, approximately that of the
midday sun.
l Cloudy: adjusts the color temperature to 6500K, approximately that of a
lightly overcast sky.
l Shade: adjusts the color temperature to 7500K, approximately that of a
heavily overcast sky.
l Tungsten: adjusts the color temperature to 2850K, approximately that of a
household light bulb.
l Fluorescent: adjusts the color temperature to 3800K, approximately that of
a fluorescent light bulb.
l Flash: adjusts the color temperature to 5500K, approximately that of a cam-
era flash.
l Custom: allows you to specify a specific white balance, by adjusting the Tem-
perature and Tint sliders. You can also hover your mouse over the image
until it turns into an eye dropper, and click an area of the image that is a
neutral color (gray).
For encodable images, such as JPEGs, select one of the following white balance
correction options:
l As Shot: selected automatically. Applies the camera's white balance setting
as stored in the camera when the photo was taken.
l Auto: adjusts the color temperature and tint to settings automatically
determined by analyzing the image.
l Custom: allows you to specify a specific white balance, by adjusting the Tem-
perature and Tint sliders. You can also hover your mouse over the image
until it turns into an eye dropper, and click an area of the image that is a
neutral color (gray).
Temperature Drag the Temperature slider to the left (more blue) or right (more yellow) to
select a specific color temperature.
Tint Drag the Tint slider to the left (more green) or right (more magenta) to match the
white balance settings that you selected when you took the photo.
Strength Drag the slider to the right to increase, or to the left to decrease the white balance
adjustment.
Selecting an Output Color Space For RAW Files
Select the output color space to use when developing RAW files. This option is only available for
RAWfiles.

Gemstone Photo Editor 12
Page 65 of 346
To Set the Output Color Space for a RAW File:
1. In the Develop Tools pane, select the Tune tab.
Look to the Histogram to help determine the best Output Color Space for an image. The
Histogram provides a graphical representation of the intensity level of pixels within each
color channel. Spikes at either end of the graph indicate clipped colors. Aim for an output
color space that provides the widest gamut of colors possible while minimizing spikes at
either end of the graph.
2. In the Output Color Space group, select a color space.
3. Enable Set as Default to use this same color space as the default color space for developing RAW files
from the Develop Tools pane.
When saving RAW images, the dialog box will have the Embed Color Profile in Image option
selected by default. Deselecting this option will prevent the Output Color Space from being
embedded in the file.
Color Grading with LUTs
"Color LUT" stands for Color Lookup Table. Color LUTs are lists that instruct ACDSee or related
programs to map specific RGB values to other specific color values. LUTs can be imported to use as
filters in ACDSee. LUTs can also be created in the Editor for use in the Develop Tools pane. Apply a
Color LUT in the same way as using any other effect in the Develop Tools pane. Color LUT supported
file types are .3DL and .CUBE.
To apply a Color LUT to an image:
1. In the Develop Tools pane, select the Tune tab.
2. In the Color LUTs group, do one of the following:
Select a LUT from the drop-down menu. The LUT is immediately applied.
Click the Import LUTs button. In the Open dialog, browse to the location of the LUT files, and
click Open.
If an imported LUT file's location has changed, reload it using the Color LUTs panel.
To remove Color LUTs:
1. In the Color LUTs group, click the Remove LUTs button.
2. In the Remove LUTs dialog, enable/disable the checkboxes next to the LUTs to be deleted.
3. Click Remove LUTs.
To refresh the list of Color LUTs:

Gemstone Photo Editor 12
Page 66 of 346
Refresh the list of available LUTs to reveal moved or deleted files.
In the Color LUTs group, click the Refresh List button.
Color LUTs created in the Editor using adjustment layers will automatically become available in
the Color LUTs group in the Develop Tools pane.
Adjusting Color With the Color Wheel
In the Develop Tools pane and the Editor, use the color wheel to adjust precise colors in an image.
The Color Wheel changes a precise color's saturation, hue, brightness, contrast, and contrast balance.
The Color Wheel also adjusts smoothness, which acts like a feathering tool to soften a color's edges.
The Color Wheel is particularly useful for common requests like making a blue sky more blue, or
brightening dark water that is meant to depict a bright lake.
To adjust color using the Color Wheel:
1. Open the Color Wheel using one of the following options:
In the Develop Tools pane, navigate to the Color Wheel group under the Tune tab.
Note: To use the Color Wheel in the Develop Tools pane, under the Tune tab expand the Color
EQ group and set the Mode drop-down to "High Quality".
2. Choose a color to edit by clicking and dragging the section of the color wheel around, or by using the
eyedropper on the image itself. In the eyedropper, a dot, known as the hue indicator, moves around the
wheel to show where the color being hovered over sits on the wheel.
3. Refine the selection. Increase or decrease the color selection size by clicking and dragging the double
arrows at the edge of the selection on the wheel. Also refine the color saturation of the selection by
clicking and dragging the selection away from the edges of the wheel, or away from the center of the
wheel. The less saturated colors are in the center of the wheel and the more saturated colors are
towards the edge of the wheel.

Gemstone Photo Editor 12
Page 67 of 346
To invert the selected colors, click the Invert the selected colors on the wheel icon.
To view the selected colors, click and hold the Preview selection mask icon.
4. Adjust the edge of the selection by using the Smoothness slider. This tool softens or sharpens the edges
of selections, working similarly to feathering, to soften or sharpen the cut off point.
5. Use the sliders to adjust the selected colors in the image. The individual sliders will have the following
effects:
Saturation: Slide left to decrease saturation and slide right to increase saturation.
Hue: Slide left or right to adjust hue.

Gemstone Photo Editor 12
Page 68 of 346
Brightness: Slide left to decrease brightness and slide right to increase brightness.
Contrast: Slide left to decrease contrast and slide right to increase contrast.
Contrast Balance: After adjusting the contrast, adjust the contrast balance, which changes whether
the contrast is applied to the lighter or darker colors in the image.
To see the original image without the edit, click the Show Previous button in the Editor,
or click the Show Original button below the image in ACDSee RAW.
To reset any changes, right-click on either the relevant slider, or the wheel to reset all
changes.
6. Click Done to save any changes and exit the Color Wheel.
To adjust multiple colors using the Color Wheel:
After making the initial color wheel edits, make changes to other colors using additional color wheels.
To do this, click the green plus + symbol next to the Color Wheel icon.
To delete edits made using the Color Wheel:
Delete color wheel edits until saving the image as a new file in the Develop Tools pane, or until clicking
the Apply or Done buttons in the Editor.
To do this, click the red X to the lower right of the Color Wheel.
See also:
Adjusting Tone Curves
Adjusting Tones With the Tone Wheels
Adjusting Color with Color EQ
Applying Effects
A number of effects can be applied to images in the Develop Tools pane.
Settings can be set as a preset for future use.
Photo Effect
Use the Photo Effect drop-down menu to apply a variety of filters to images.
To apply a Photo Effect:

Gemstone Photo Editor 12
Page 69 of 346
1. In the Develop Tools pane, select the Tune tab.
2. In the Effects group, enable the Photo Effect checkbox.
3. Select a filter from the Photo Effect drop-down menu.
Use the Opacity slider and Blend Modes drop-down menu to adjust how the selected effect
blends with the image. To access these tools, click the arrow button to the right of the Photo
Effect drop-down menu.
Color Overlay
Use the Color Overlay drop-down menu to apply a color over an image.
To apply a color to an image:
1. In the Develop Tools pane, select the Tune tab.
2. In the Effects group, enable the Color Overlay checkbox.
3. Select a color from the Color Overlay drop-down menu.
Use the Opacity slider and Blend Modes drop-down menu to adjust how the selected effect
blends with the image. To access these tools, click the arrow button to the right of the Photo
Effect drop-down menu.
Gradient Map
Use the Gradient Map effect to add colors to the dark and light parts of an images. The Gradient Map
effect maps shadows to one color, and highlights to another based on the lightness value of each
pixel. Give the darker parts of an image a completely different color from the lighter parts.
To apply a Gradient Map effect:
1. In the Develop Tools pane, select the Tune tab.
2. In the Effects group, enable the Gradient Map checkbox.
3. In the Shadows drop-down menu, specify a color to be added to the dark parts of the image. In the
Highlights drop-down menu, specify a color to be added to the light parts of the image.
Use the Opacity slider and Blend Modes drop-down menu to adjust how the selected effect
blends with the image. To access these tools, click the arrow button to the right of the Photo
Effect drop-down menu.
Add Grain
Use the Grain effect to make images look like they were printed in a newspaper. It is also useful to use
the Grain tool in combination with other effects to achieve a general vintage look.

Gemstone Photo Editor 12
Page 70 of 346
To apply a Grain effect:
1. In the Develop Tools pane, select the Tune tab.
2. In the Effects group, adjust the Add Grain settings as described below.
Grain Options
Grain Amount Specifies the strength of the grain.
Grain Smoothing Specifies the smoothness of the grain.
Grain Size Specifies the size of the grain.
Cross Process Effect and Lomo
A popular film photography technique in the '80s and '90s involved processing film in a solution that
was intended for another type of film. This cross processing gave photos a boost in saturation and
contrast, and shifted colors towards greenish-yellow highlights and bluish shadows. Simulate these
retro-effects with the Cross Process tool. Using Cross Process along with Post-Crop Vignette creates
an effect called Lomo.
To apply the Cross Process effect:
1. In the Develop Tools pane, select the Tune tab.
2. In the Effects group, drag the Cross Process slider to the right to increase the retro-effect.
Right-click a slider to reset to the default value.
Using the Develop Brush
The Develop Brush makes a variety of edits to specific areas of a photo. Adjust the Exposure,
Saturation, Vibrance, Temperature, Tint, Fill Light, Contrast, Clarity, and Color Strength, as well as
Color EQ, Tone Curves, and Sharpness in a photo by brushing on the effects. For example, instead of
adding fill light to an entire photo, only add it to certain areas, such as backlit subjects. Apply up to
eight brushes to separate areas in an image and assign each with unique effect settings.
Develop Brush
The Develop Brush button is located at the top of the Tune and Detail tabs.
To use the Develop Brush:
1.
In the Develop Tools pane, in the Tune or Detail tab, click the Brush button at the top of the
pane to open the Develop Brush panel and enter Brushing mode. Or, toggle the Develop Brush panel
open and closed with the B key.
2. Specify the brush settings in the panel, or while working, as described in the table below.

Gemstone Photo Editor 12
Page 71 of 346
3. Start painting the effects onto a photo.
4. Adjust the sliders to get the desired effect.
To apply another brush, (up to eight are available), select the next brush in the sequence
at the bottom of the panel. The box above the brush will become enabled. The
checkmarks represent the activated brushes, while the selected brush icon (highlighted in
blue) represents the currently enabled brush. Return to any of the brushes at any given
time by selecting its respective brush icon. A blue brush represents a brush that has been
used. Deactivate or re-activate any brush by disabling or re-enabling its respective
checkbox.
5. Click Apply or Done.

Gemstone Photo Editor 12
Page 72 of 346

Gemstone Photo Editor 12
Page 73 of 346
Hovering over a brush button will reveal that specific brush's strokes on the image. The brush
strokes will appear in the color selected in the drop-down next to the Show mask checkbox.
(By default, the color is red.) Alternatively, hold down the S key to see the brush strokes on
the image.
If all of the sliders are at zero, brush strokes will appear in color, (as selected in the drop-down
next to the Show mask checkbox), as no changes have been made to the image.
To delete brush strokes:
To remove brush strokes, select the brush to be deleted and click the icon. Note that disabling a
brush checkbox will only remove the brush strokes until the box is re-checked.
Develop Brush Options

Gemstone Photo Editor 12
Page 74 of 346
Show mask When this option is enabled, the currently selected
brush's strokes will be displayed in the color selected in
the adjacent color selection tool. This is helpful when
brushing a complex area with a subtle effect because it
can be hard to tell which spots have been covered. The
color of the brushed area can be changed to stand out
from the colors of the image.
Mask Preview Color Opens the Colors dialog used to select a color for brush
strokes.
Clear all brush strokes Removes all brush strokes of the currently selected brush
from the image.
Invert all brush strokes Toggle this option to invert the brush strokes of the
currently selected brush. This makes brushed areas no
longer brushed and untouched areas brushed. This is
useful for instances where the majority of the image is
brushed and a small section untouched. Simply brush
only the small area to be left unbrushed, then invert the
brush strokes.
Pixel Targeting Opens the Pixel Targeting dialog for precise color
selection. (see Pixel Targeting for more information)
Nib Width Adjusts the size of the brush. Use the mouse wheel to
adjust nib width or adjust the Nib Width slider.
Feathering Adjust the slider to control the softness of the transition
between the brush strokes and the image. Use Shift +
mouse wheel to adjust the amount of feathering or adjust
the Feathering slider.
Pressure Adjust the slider to control the strength of the brush.
Smart Brushing See the Smart Brushing section below.
Tolerance Only enabled if a Smart Brushing option is selected, the
Tolerance slider increases or decreases the range of
pixels affected by the Smart Brush.
Add brush stroke Brush while holding the left mouse button down.
Erase brush stroke Brush while holding the right mouse button down.
Using the Develop Brush on the Tune Tab

Gemstone Photo Editor 12
Page 75 of 346
General
Exposure Drag the slider to the right to increase exposure,
or drag to the left to decrease exposure. One eV
is equivalent to one stop of exposure change.
Brush on exposure.
Saturation Drag the slider to the right to increase
saturation, or to the left to decrease saturation.
Brush on saturation.
Vibrance Drag the slider to the right to increase vibrance,
or to the left to decrease vibrance. Increasing
the vibrance does not affect skin tone in an
image. This is unlike saturation, which intensifies
all colors equally. Brush on vibrance.
Temperature Drag the Temperature slider to the left (more
blue) or right (more yellow) to select a specific
color temperature. Brush on white balance.
Tint Drag the Tint slider to the left (more green) or
right (more magenta) to match the white
balance settings that you selected when you
took the photo. Brush on white balance.
Fill Light Drag the slider to the right to add light to the
darkest areas of the image. Brush on fill light.
Contrast Drag the slider to the right to increase contrast,
or to the left to decrease contrast. Brush on
contrast.
Clarity The Clarity tool adds subtle definition to the
details in your image. Use the Clarity slider to
enhance the contrast of midtones, without
overpowering the shadows and highlights. Drag
the slider to the right to increase clarity, or to
the left to reverse clarity. Brush on clarity.
Color
Strength
Use the Color Overlay sliders to add tint to your
image without affecting brightness levels. Set
the Color Strength slider, then move the Color
slider to the desired color band. With Color
Strength set to 0, no color will be applied.
Brush on color.

Gemstone Photo Editor 12
Page 76 of 346
Color EQ
Drag the color sliders to adjust individual colors' saturation,
brightness, hue, and contrast on their respective tabs. Drag the
sliders right for more intensity, or left for less intensity. Or, enter a
number into the fields for precise adjustments. Select one of the
following icons:
Saturation
Brightness
Hue
Contrast
Color Selection
Select a precise color to adjust by dragging directly on the image.
In order to toggle the Color Selector on, click the Color Selector
icon. Place your cursor on the image for the double arrow icon to
appear. Then click and drag up or down to adjust the colors
beneath the double arrow icon. The affected color sliders
automatically adjust as you move your cursor. However, no change
will occur to the image until you brush on the adjustment.
Brush on Color EQ.
Tone Curves
Move the curve and/or add points by clicking to adjust the tonal
range of the image. Select any of the color icons on the right side
of the graph to target the adjustment to one of the following color
channels:
RGB
Red
Green
Blue
Brush on a tone curves adjustment.

Gemstone Photo Editor 12
Page 77 of 346
Delete points on a curve by right-clicking and choosing Delete
point. Or, delete a point by dragging it off of the graph.
Using the Develop Brush on the Detail Tab
Sharpness Move the slider to the right to brush on sharpness, or move
the slider to the left to brush on blur.
Luminance Noise Reduction Luminance noise is random variations of brightness, and par-
ticularly in gray areas, may appear spotted when there should
be a solid color in the area of the image. Slide to the right to
add Luminance Noise Reduction.
Color Noise Reduction Color noise is random variations of color in the image. Slide to
the right to add Color Noise Reduction.
Right-click a slider to reset to the default value.
To exit the brushing panel, toggle the Develop Brush button.
Smart Brushing
Use the Smart Brush to target brushing to specific colors, brightness values, or a combination of color
and brightness. The Smart Brush only affects pixels similar in value to the pixel in the center of the
brush stroke, and allows you to apply adjustments to those pixels.
To use the Smart Brush:
1.
In the Develop Tools pane, on the Tune or Detail tab, click the Brush button at the top of the
pane to open the control panel and enter Brushing mode. Or, toggle the Brush panel open and closed
with the B key.
2. Select an option from the Smart Brushing drop-down menu:
Color Uses the color of pixels similar in value to the pixel in the center of the brush
stroke to determine if they should be brushed on, depending on the
Tolerance slider setting.
Brightness Uses the brightness of pixels similar in value to the pixel in the center of the
brush stroke to determine if they should be brushed on, depending on the
Tolerance slider setting.
Magic Uses a combination of the color and brightness values similar to the pixel in
the center of the brush stroke to determine which pixels should be brushed
on, depending on the Tolerance slider setting.

Gemstone Photo Editor 12
Page 78 of 346
3. Use the Tolerance slider to increase or decrease the range of pixels affected by the Smart Brush.
4. Place the cursor over the color or brightness to be selected and begin painting on the effect.
5. Adjust the sliders to get the desired effect.
To apply another brush, (up to eight are available), select the next brush in the sequence
at the bottom of the panel. The box above the brush will become enabled. The
checkmarks represent the activated smart brushes, while the selected brush icon
(highlighted in blue) represents the currently enabled smart brush. Return to any of the
brushes at any given time by selecting its respective brush icon. A blue brush represents a
smart brush that has been used. Deactivate or re-activate any brush by disabling or re-
enabling its respective checkbox.
6. Click Apply or Done.
Hold down Shift prior to making a brush stroke to temporarily disable the Smart Brush. Use
this keyboard shortcut on a stroke by stroke basis.
Erase brush strokes by right-clicking and brushing over the strokes.
To Turn off Smart Brushing:
Select "Off" from the Smart Brushing drop-down menu.
Using Blend Modes and Opacity
When using a tool from the Effects group in the Develop Tools pane, adjust the Blend Mode and
Opacity tools to customize how the effect blends with the image.
Opacity
The Opacity slider changes the opacity of the effect being applied to the image and provides control
over how much of the effect should be visible on the image. Access the Opacity slider by clicking the
arrow button to the right of the effect's drop-down menu.
Blend Modes
The ability to control how the effects and the image merge means that other blend modes besides
opacity can be used to affect the final image.
Blend Mode Types

Gemstone Photo Editor 12
Page 79 of 346
Normal Pixels in the developed image are combined with those in the original. Only opacity
affects this blend.
Screen Combines the developed image color with the inverse of the original photo color,
resulting in a color that is the same or lighter.
Multiply Combines the developed image color with the original photo to produce a darker color.
Multiplying any color with black produces black; multiplying any color with white leaves
the color unchanged.
Dodge Combines the developed image color with the original pixels in the photo to produce a
lighter color.
Burn Combines the developed image color with the original pixels in the photo to produce a
darker color.
Overlay Preserves the shadows and highlights of the lower layers while applying either Multiply or
Screen blend mode based on the original image area's color values.
Difference Subtracts the developed image color from the color of the original photo. Any white in the
developed image produces a true negative of the color in the image, while black produces
no effect.
Darken Applies pixels in the developed image that are darker than the original image. Pixels in the
developed image that are lighter than the original image disappear (based on RGB values).
Lighten Applies pixels in the developed image that are lighter than the original image. Pixels in the
developed image that are darker than the original image disappear (based on RGB values).
Hard Light Adds strong highlights or shadows by applying Multiply or Screen based on the original
image area's color values.
Soft Light Adds soft highlights or shadows by darkening or lightening based on the original image
area's color values.
Hue Applies the hue value of colors in the developed image to the color of the original image
areas.
Saturation Applies the saturation value of colors in the developed image to the color of the original
image areas.
Color Applies the hue and saturation of the developed image to the image. This blend does not
affect the luminance of the original image.
Luminosity Applies the lightness value of colors in the developed image to the color of the original
image areas.
Dissolve Applies some pixels from the developed image layer onto the original image, resulting in
specks of color. The Opacity slider controls the amount of speckling.

Gemstone Photo Editor 12
Page 80 of 346
Exclusion Like Difference, but with less contrast, Exclusion subtracts the blend color from the color
of the underlying photo. Any white in the blend color produces a true negative of the
color in the image, while black produces no effect.
Vivid Light Combines the blend color with the underlying pixels in the photo by increasing or
decreasing contrast to produce a lighter or darker color, as determined by the blend
color.
Pin Light When the light source is lighter than 50% gray, the pixels darker than the light source are
replaced. Pixels lighter than the light source remain the same. When the light source is
darker than 50% gray, the pixels lighter than the light source are replaced. Pixels darker
than the light source remain the same.
Linear Light Dodges or burns by lightening or darkening the brightness value, depending on the blend
color.
Hard Mix Applies red, green, and blue channel values of the blend color to the RGB values of the
image.
Subtract Subtracts the blend color from the image (base) color in each channel.
Divide Divides the blend color from the image (base) color.
Darker Color From the blend color and the image (base) color, the lower channel values are chosen.
Lighter Color From the blend color and the image (base) color, the higher channel values are chosen.
Using the Linear Gradient Tool
While the Develop tools allow for a variety of adjustments to be made to photos, sometimes it is
desirable to have these effects gradually progress across a photo. Adjust the Exposure, Saturation,
Vibrance, Temperature, Tint, Fill Light, Contrast, Clarity, and Color Strength, as well as Color EQ,
Tone Curves, and Sharpness in one or a series of gradients over a photo. For example, instead of
applying exposure adjustments across an entire photo, use the Linear Gradient tool to have them be
stronger in some areas and weaker or absent from others.
Linear Gradient Tool
The Linear Gradient tool button is located at the top of Tune and Detail tabs.
To use the Linear Gradient tool:
1.
In the Develop Tools pane, in the Tune or Detail tab, click the Gradient button at the top of the
pane to open the Gradient panel and enter Gradient mode. Or, toggle the Gradient panel open and
closed with the G key.
2. Specify the gradient settings in the panel as described in the table below.

Gemstone Photo Editor 12
Page 81 of 346
3. Position the guides on the photo. Inside the guide boxes, the gradient is transitioning. On either side of
the boxes, the effect being applied by the Linear Gradient tool is at full strength or not applied at all. To
make this clearer, enable the Show gradient mask checkbox. Move the boxes to define where the
effect will begin or end. Hold down the Shift key while positioning the effect to lock to the nearest 45°
angle, for straightness.
4. Adjust the sliders to get the desired effect.
To apply another gradient, (up to eight are available), select the next gradient in the
sequence at the bottom of the panel. The box above the gradient will become enabled.
The checkmarks represent the activated gradients, while the selected gradient icon
(highlighted in blue) represents the currently enabled gradient. Return to any of the
gradients at any given time by selecting its respective gradient icon. A blue gradient
represents a gradient that has been used. Disable or re-enable any gradient by disabling
or re-enabling its respective checkbox.
5. Click Apply or Done.

Gemstone Photo Editor 12
Page 82 of 346
Linear Gradient Tool Options

Gemstone Photo Editor 12
Page 83 of 346
Pixel Targeting Opens the Pixel Targeting dialog (see Pixel Targeting for more
details).
Show gradient mask When this option is enabled, the gradient mask will be displayed in
the color shown. Alternatively, hold down the S key to see the mask
on the image. Click the drop-down arrow to select another display
color.
Invert gradient Toggle this option to invert the gradient. By clicking the Invert button
after applying a gradient beginning at the top of the image, the
gradient would instead begin at the bottom, and vice versa.
Using the Linear Gradient Tool on the Detail Tab
Sharpness Move the slider to the right to brush on sharpness, or move
the slider to the left to brush on blur.
Luminance Noise Reduction Luminance noise is random variations of brightness, and par-
ticularly in gray areas, may appear spotted when there should
be a solid color in the area of the image. Slide to the right to
addLuminance Noise Reduction.
Color Noise Reduction Color noise is random variations of color in the image. Slide to
the right to addColor Noise Reduction.
To exit Gradient mode, toggle the Linear Gradient tool button.
Making General Adjustments
In the General group, make global adjustments to an image.
Settings can be set as a preset for future use.
To develop an image in General:
1. In the Develop Tools pane, select the Tune tab.
2. In the General group, make adjustments as described below.
Right-click a slider to reset to the default value.
General Group Adjustment Options

Gemstone Photo Editor 12
Page 84 of 346
Exposure Drag the slider to the right to increase exposure, or drag to the left to decrease exposure.
One eV is equivalent to one stop of exposure change.
Highlight
Enhancement
Drag the slider to the right to recover detail in overexposed areas of the image.
Fill Light Drag the slider to the right to add light to the darkest areas of the image.
Contrast Drag the slider to the right to increase contrast, or to the left to decrease contrast.
Saturation Drag the slider to the right to increase saturation, or to the left to decrease saturation.
Vibrance Drag the slider to the right to increase vibrance, or to the left to decrease vibrance.
Increasing the vibrance does not affect skin tone in an image. This is unlike saturation,
which intensifies all colors equally.
Clarity The Clarity tool adds subtle definition to image details. Use the Clarity slider to enhance
the contrast of midtones, without overpowering the shadows and highlights. Drag the
slider to the right to increase clarity, or to the left to reverse clarity.
Dehaze The Dehaze tool restores contrast, detail, and lost color to images. This is especially useful
for images that have been captured through a haze. A haze can occur when dust, smoke,
or other particles obscure the clarity of the image, particularly the sky. Drag the slider to
the right to reduce haze.
Use the Adjust develop settings button to reset sliders to Last Saved or Last Used
settings. Also, save your settings as a preset, copy, or paste them.
A Brief Technical Explanation of eV
eV stands for Exposure Value. When an image is captured, the exposure is determined by several
factors — the f-stop (or aperture) shutter speed, and ISO. Typically, the camera automatically
determines the optimal exposure based on a built-in light meter and then sets the f-stop and shutter
speed accordingly. However, the light meter can be fooled by a bright sky or dark surroundings,
leading it to choose an incorrect f-stop and shutter speed. This results in an underexposed or
overexposed image. With the Exposure slider it is possible to compensate for exposure problems
caused by incorrect settings when the image was captured.
Adding a Post-Crop Vignette
Use the Post-Crop Vignette effect to add a frame around a subject, or control the appearance of the
border. Use the Post-Crop Vignette tool after an image is cropped to give more control over the focal
point of the image.
Settings can be set as a preset for future use.

Gemstone Photo Editor 12
Page 85 of 346
To apply a Vignette Effect:
1. In the Develop Tools pane, select the Tune tab.
2. In the Post-Crop Vignette group, make adjustments as described below.
Right-click a slider to reset to the default value.
Post-Crop Vignette Options
Strength Drag the slider to the right to add a white vignette, or drag to the left to add a black vignette.
Radius Adjusts the distance from the corners of the image where the pixels will be softened. The
higher the radius, the further from the center the pixels will be before the softening begins.
Feathering Feathering controls how soft or hard the edge of the vignette is. Drag the slider to the right to
increase the softness of the vignette transition.
Roundness Drag the slider to the right to increase the roundness of the vignette, or to the left to make it
more rectangular.
Using the Radial Gradient Tool
While the Develop tools can make a variety of adjustments to photos, sometimes it is preferred to
have these effects draw attention to a specific area of a photo. Adjust the Exposure, Saturation,
Vibrance, Temperature, Tint, Fill Light, Contrast, Clarity, and Color Strength, as well as Color EQ,
Tone Curves, and Sharpness in one or a series of gradients over the photo. For example, instead of
applying sharpening across an entire photo, only sharpen the center subject.
Radial Gradient Tool
The Radial Gradient tool button is located at the top of Tune and Detail tabs.
To use the Radial Gradient tool:
1.
In the Develop Tools pane, in the Tune or Detail tab, click the Radial Gradient button at the top
of the pane to open the Radial Gradient panel and enter Radial Gradient mode. Or, toggle the Radial
Gradient panel open and closed with the R key.
2. Specify the Radial Gradient panel settings as described in the table below.
3. Position the guides on a photo. Inside the circle, the image is unaltered. At the perimeter of the circle,
the effect being applied by the Radial Gradient tool is transitioning between not applied at all (inside),
and full strength (outside). To make this clearer, enable the Show gradient mask checkbox. Move the
guides to define where the effect will begin or end. Hold down the Shift key while positioning the effect
to change the radial gradient to a perfect circle.
4. Adjust the sliders to get the desired effect.

Gemstone Photo Editor 12
Page 86 of 346
To apply another gradient, (up to eight are available), select the next gradient in the
sequence at the bottom of the panel. The box above the gradient will become enabled.
The checkmarks represent the activated gradients, while the selected gradient icon
(highlighted in blue) represents the currently enabled gradient. Return to any of the
gradients at any given time by selecting its respective gradient icon. A blue gradient
represents a gradient that has been used. You can deactivate or re-activate any gradient
by disabling or re-enabling its respective checkbox.
5. Click Apply or Done.

Gemstone Photo Editor 12
Page 87 of 346
Gradient Tool Options

Gemstone Photo Editor 12
Page 88 of 346
Feathering Adjust the slider to control how gradual the transition of the edge of
the gradient will be.
Pixel Targeting Opens the Pixel Targeting dialog (see Pixel Targeting for more
details).
Squareness Adjust the slider to the right to change the shape of the gradient tool
from an oval to a square.
Show gradient mask When this option is enabled, the gradient mask will be displayed in
the color shown. Alternatively, hold down the S key to see the mask
on the image.
Invert gradient Toggle this option to invert the gradient. By pressing the Invert
button, the effects will be applied to the center of the image (inside
the circular guides), and outside of the radial gradient will be
unaltered.
Using the Radial Gradient Tool on the Detail Tab
Sharpness Move the slider to the right to brush on sharpness, or move
the slider to the left to brush on blur.
Luminance Noise Reduction Luminance noise is random variations of brightness, and par-
ticularly in gray areas, may appear spotted when there should
be a solid color in the area of the image. Slide to the right to
addLuminance Noise Reduction.
Color Noise Reduction Color noise is random variations of color in the image. Slide to
the right to addColor Noise Reduction.
Double-click the + at center of the guides to expand the radial gradient to fill the entire width of
the image.
To exit Gradient mode, toggle the Radial Gradient tool button.
Adjusting Soft Focus
Use the Soft Focus tool to add a dreamy quality to an image. This softening can be applied across the
entire tonal range or limited to the image's midtones. To target the Soft Focus effect to a specific tonal
range within your image or the entire tonal range, use the Tonal Width slider.
Settings can be set as a preset for future use.
To add Soft Focus to an image:

Gemstone Photo Editor 12
Page 89 of 346
1. In the Develop Tools pane, select the Tune tab.
2. In the Soft Focus group, make adjustments as described below.
Soft Focus Options
Strength Adjusts the amount of soft focus. Move the slider to the right to intensify the effect.
Brightness Drag the slider to the right to increase brightness.
Contrast Drag the slider to the right to increase contrast.
Tonal Width Drag the slider to the right to increase the tonal width of the soft focus and affect a wider
range of shadows, midtones and highlights, or to the left to decrease the tonal width by
limiting the soft focus' affect to a smaller range of shadows, midtones and highlights.
Right-click a slider to reset to the default value.
Adjusting Tones With the Tone Wheels
Colors in every image are split into highlights, midtones, and shadows. Use the tone wheels in the
Develop Tools pane and the Editor to add color tints to certain tones in an image. There are two
curved sliders with each tone wheel. The curved slider on the left is the saturation slider, the slider on
the right is the brightness slider. The tone wheels themselves allow pinpointing hues to adjust.
To adjust color using the Tone Wheels:
1. Open the Tone Wheels using one of the following options:
In the Develop Tools pane, choose Tone Wheels in the Tune tab.
Note: to use the Tone Wheels in the Develop Tools pane, the Color EQ must be set to "High
Quality". To ensure this, open Color EQ and select "High Quality" from the drop down menu.
2. Choose a hue to edit by clicking and dragging the target point within the tone wheel, or by using the
relevant eyedropper on the image itself. Move the eyedropper around the image and take note of a dot,
known as the hue indicator, then move around the wheel to show where the color being hovered over
sits on the wheel. The three eyedroppers relate to the relevant tone wheels. Refine the saturation of
the selection by clicking and dragging a selection away from the edges of the wheel, or away from the
center of the wheel. The less saturated colors are in the center of the wheel and the more saturated
colors are towards the edge of the wheel.

Gemstone Photo Editor 12
Page 90 of 346
Moving the target point towards the outside of the wheel increases tone saturation.
Moving it towards the inside of the wheel decreases tone saturation.
3. With a hue selected, increase saturation and/or brightness for the selected tones.
4. Click Done to exit the Color Wheel.

Gemstone Photo Editor 12
Page 91 of 346
To reset any changes, right-click on either the relevant slider, or the wheel to reset all changes.
See also:
Adjusting Tone Curves
Adjusting Color with the Color Wheel
Adjusting Color with Color EQ
ACDSee RAW Interface
ACDSee RAW Interface
The ACDSee RAW interface is comprised of 5 panes:
1. Display Area,
2. Histogram,
3. Develop Pane,
4. Tool Bar, and
5. Button Bar.

Gemstone Photo Editor 12
Page 92 of 346
Display Area
Located in the large central portion of the screen, the Display Area is used to display the current state
of the opened image.
Display Area Options
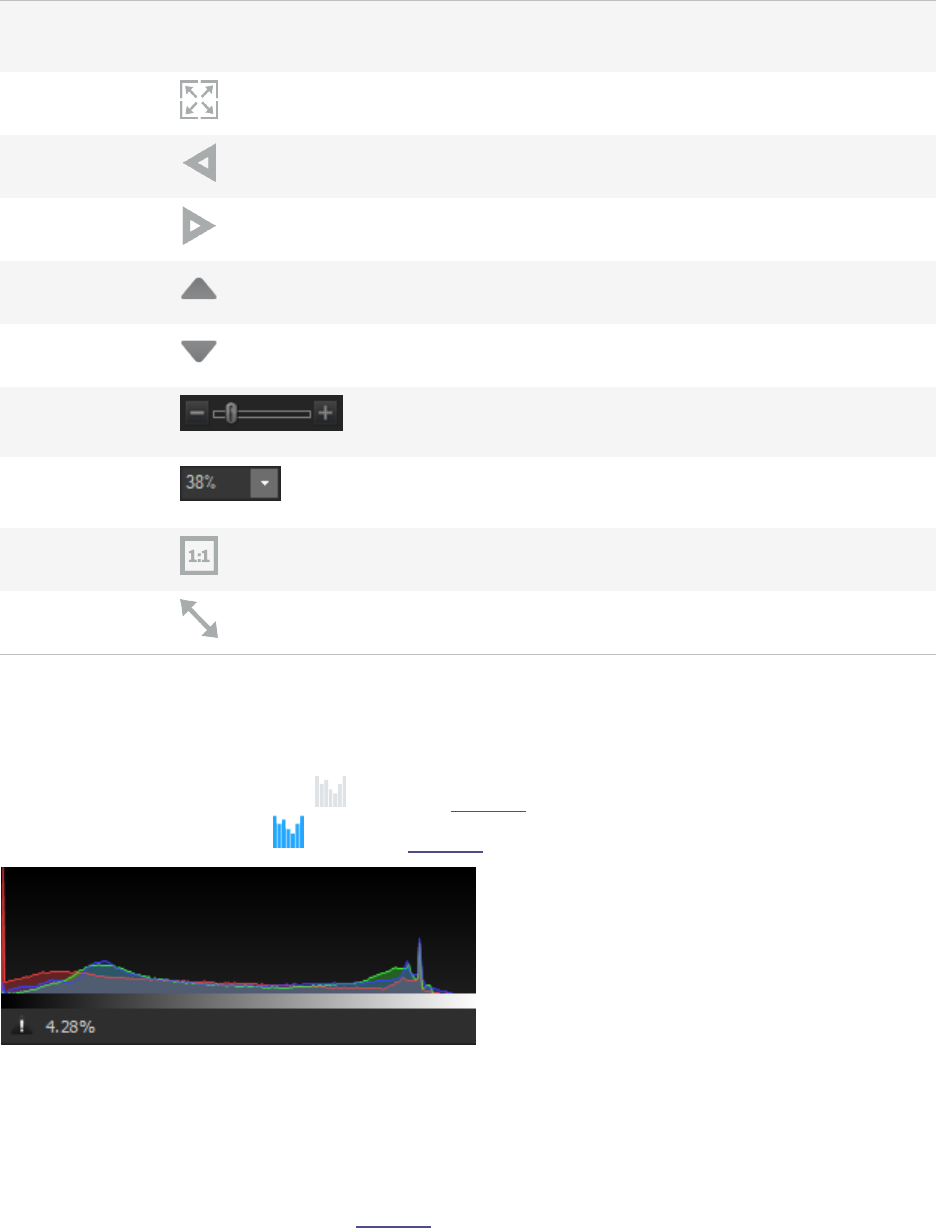
Gemstone Photo Editor 12
Page 93 of 346
Show Original Click and hold to view the original image. Release the button to return
to the edited image.
Full Screen Click to display a full screen preview of the final image.
Previous Image Click to return to the previous image.
Next Image Click to advance to the next image.
Show Filmstrip Click to show the filmstrip.
Hide Filmstrip Click to hide the filmstrip.
Zoom Slide Move the slide to the right to zoom into the image. Move the slide to
the left to zoom out of the image.
Zoom Percentage Enter a numerical value or select a number from the drop down list to
set the zoom level.
Actual Size Click to return the image to its actual size.
Fit Image Click to fit the image to the Display Area.
Histogram
The Histogram is a graph that represents the distribution of color intensity for each color channel in an
image. The Histogram, when enabled, resides at the top of the right-side column of tools.
To enable the Histogram, click the icon in the Tool Bar or press H. To disable the Histogram and
remove it from view, click the icon in the Tool Bar.
A proportion of clipped pixels is reported as a percentage value directly below the Histogram graph.
Develop Pane
The Develop pane is home to the main body of functionality for ACDSee RAW. Residing to the right of
the Display Area, and directly below the Histogram, if enabled, the tools available in the Develop pane
are driven from selections made in the Tool Bar.

Gemstone Photo Editor 12
Page 94 of 346
The Develop pane has 4 sets of tools:
l Develop Tools,
l History,
l Develop Presets, and
l Snapshots.
Develop Tools
The Develop Tools pane is enabled by clicking the crown icon in the Tool Bar or pressing Ctrl +
Shift + T.
The Develop Tools pane consists of 4 tabs,
l Tune,
l Detail,
l Geometry, and
l Repair.
Develop Tools Options

Gemstone Photo Editor 12
Page 95 of 346
Undo Removes the last action.
Redo Reinstates the last action removed by an Undo.
Reset to Defaults
Expand All Groups Expand all groups under the selected tab.
Collapse All Groups Collapse all groups under the selected tab.
Auto-Collapse Groups If enabled, all groups in all tabs will open in a collapsed state.
Adjust develop settings
Reset to Last Saved
Reset the fields in the selected group to match the last saved
settings.
Reset to Defaults Reset the fields in the selected group to their defaults.
Apply Last Used Apply the last used field settings to the current image
Presets Select to view an extensive list of preset image configurations.
Save Preset...
Select to open the Save Develop Settings Preset dialog and
select the settings to save in a preset.
Manage Presets...
Select to open the Manage Presets dialog where existing pre-
sets can be deleted or named.
Copy Settings...
Select to open the Copy settings dialog where develop set-
tings can be selected and copied to the clipboard.
Paste Settings
Pastes the develop settings selected in the Copy settings dia-
log into their respective groups.
History
The History pane is enabled by clicking the icon in the Tool Bar or pressing F9.
The History pane is used to view the sequence of changes made to an image, jump around in the
editing sequence, or revert back to a previously-applied adjustment. For example, if a series of
adjustments were applied to an image, such as color adjustments, followed by sharpening, and
exposure tweaking, but you want to revert back several steps to the state the photo was in with just
the color adjustment, use the History pane to travel back to that point in the edit sequence.
To return to a specific adjustment, select and double-click the desired adjustment in the History pane,
or click the Undo All button at the bottom of the pane to undo all adjustments.

Gemstone Photo Editor 12
Page 96 of 346
Develop Presets
The Develop Presets pane is enabled by clicking the icon in the Tool Bar or pressing Ctrl + Shift +
P.
To make the Develop process easier, use the Develop Preset pane to create, delete, manage, and
categorize global presets. (See Develop Presets for more information).
Snapshots
The Snapshots pane is enabled by clicking the icon in the Tool Bar or pressing P.
Snapshots allow adjustments to be made at any point during the development workflow. As new
adjustments are made, take a snapshot to save the work up to that point. Continue to edit as desired
but return to a previous version of the edits by selecting the snapshot. Unlike presets, snapshots save
directly to the image and automatically re-enter the Develop workflow where snapshots can be
interchanged and further edits applied.
To take a Snapshot:
1. Make adjustments to an image.
2.
Click the Snapshots icon.
3.
At the bottom of the Snapshots pane, click the icon.
4. In the New Snapshot dialog, enter a name for the snapshot and click OK. The saved snapshot will be lis-
ted in the Snapshot pane.
Snapshot Options
Update to Current Settings Applies the currently saved image settings into the snapshot,
erasing all previously held settings in the snapshot.
Apply Selected Applies the snapshot's settings into the image.
Delete Selected Deletes the snapshot from the Snapshots pane.
Rename Selected Renames the selected snapshot.
Tool Bar
The Tool Bar resides at the extreme right of the ACDSee RAW interface.
The Tool Bar contains 5 icons for populating the Develop pane:
l Historgram,
l Tools,
l History,
l Presets, and
l Snapshots

Gemstone Photo Editor 12
Page 97 of 346
Button Bar
The Button Bar resides at the bottom of the ACDSee RAW interface.
The Button Bar contains 3 buttons for file management in the Develop pane:
l Open: Saves changes made to the image and opens the image in the Editor.
l Cancel: Cancels any changes made to the image and closes ACDSee RAW.
l Done: Saves any changes and exits ACDSee RAW.
Using the Undo/Redo Button
Undo and redo changes when editing an image.
To undo a change:
In the Develop Tools pane, do one of the following:
Click the Undo button found near the top of the right pane.
Use the keyboard shortcut Ctrl + Z.
To redo a change:
In the Develop Tools pane, do one of the following:
Click the Redo button found near the top of the right pane.
Use the keyboard shortcut Ctrl + Y.
The History pane can also be used to Undo/Redo changes. (see History pane).
Copying and Pasting
In the Develop Tools pane, perform complex adjustments once and have them benefit an unlimited
number of images by copying the precise adjustments and apply them to other images.
Settings can be set as a preset for future use.
To copy develop settings from an image and apply them to other images:
1. After adjusting an image in the Develop Tools pane, click the Adjust develop settings button.
2. Select Copy Settings... from the drop-down menu.
3. In the Copy settings dialog, select the settings to copy.
4. Click OK.
5. In the filmstrip, right-click an image and select Paste Settings... from the context menu.
6. Or, switch to another image from the filmstrip and click the Adjust develop settings button.
7. Select Paste Settings... from the drop-down menu.

Gemstone Photo Editor 12
Page 98 of 346
A blue square icon appears at the top of the Tune, Detail, Geometry, and Repair tabs to
indicate that changes have been made.
When copying settings from one image and pasting them to a second image with different
dimensions, the settings will be automatically scaled to fit the target image.
A blue square icon appears at the top of the Tune, Detail, Geometry, and Repair tabs to
indicate that changes have been made.
When copying settings from one image and pasting them to a second image with different
dimensions, the settings will be automatically scaled to fit the target image.
RAW Processing
When adjusting images in the Develop Tools pane, the original file is never changed. The changes are
saved in a separate file and are applied each time the image is opened to allow for non-destructive
developing. It is recommended to do most of an image's adjustments in the Develop Tools pane.
When opening a developed image in the Develop Tools pane, the image is displayed with its previous
edits applied. Revisit the image at any time to adjust the previous settings.
For more information on how develop settings are saved, see How ACDSee Saves Changes to Images.
Developing an Image
To develop an image:
1. Select the Develop Tools pane.
2. In the Tune tab, make develop adjustments in the following groups:
l General,
l White Balance,
l Light EQ™,
l Color EQ,
l Tone Curves,
l Soft Focus,
l Effects,
l Color LUTs,
l Split Tone,
l Post-Crop Vignette,
l or for RAW files, Output Color Space.
2. In the Detail tab, make develop adjustments in the following groups:
l Sharpening,
l Noise Reduction,
l Skin Tune, or
l Chromatic Aberration.
3. In the Geometry tab, make develop adjustments in the following groups:

Gemstone Photo Editor 12
Page 99 of 346
l Lens Correction,
l Rotate & Straighten,
l Perspective,
l Crop, and
l Vignette Correction.
4. In the Repair tab, make develop adjustments in the following groups:
l Repair, or
l Red Eye Reduction.
Saving and Canceling
After developing an image, choose from one of the many options for saving the image, depending on
the next workflow step.
To save an image:
1. Click Done.
2. Select one of the following:
Save: Save any changes.
Save as: Save a copy of the developed image with a new name or format.
Discard: Discard any changes.
Cancel: Remain on the same image in Develop with all changes intact, without saving the image.
To discard changes to an image and return to the previous mode:
Click Cancel.
It is not possible to directly save changes to a RAW file. Changes to a RAW file must be saved
as a different file type.
Histogram and Image Viewing Controls
While developing an image, adjust the magnification with the zoom controls, located in the bottom
right corner.
It is extremely useful to have access to both the Exposure Warning and Histogram while
adjusting exposure. Below the Histogram, the percentage of the pixels underexposed and
overexposed is shown.

Gemstone Photo Editor 12
Page 100 of 346
Histogram pane Displays the histogram preview for the
current image. The histogram pane shows
the red, green, and blue color channels of
the photo. Keeping the histogram open is
particularly useful when adjusting
exposure, as the histogram reflects all
adjustments as you make them.
At the bottom of the histogram, icons
appear to notify you if there is a loss in
details in the highlights , or loss in
details in the dark areas of the image.
Numbers beside these two icons
represents the percent of pixels that have
lost details in either the shadows or the
highlights.
Clipped Shadows and Highlights Displays clipped shadows and highlights.
Click the icon or press E on the keyboard,
to highlight over- and under-exposed
areas of the image. When the shadows
and highlights tool is enabled the icon is
blue, and gray when disabled.
Undo/Redo Use the Undo button to discard changes,
slider by slider, adjustment by adjustment.
Use the Redo button to return to the
options that you had selected prior to
clicking Undo.
Reset Group Discards the selected settings within a
group and reverts the group to its default
settings. If changes are applied to an
image using an individual group, the
dedicated Reset Group button for the
edited group turns blue. Click the
associated Reset Group button to reset
the image to its default settings.
Reset All Groups Discards the selected settings for all
groups and reverts all groups to their
default settings. If changes are applied to
an image using any individual group, the
Reset All Groups button turns blue. Click
the Reset All Groups button to reset the
image to its default settings.

Gemstone Photo Editor 12
Page 101 of 346
Preview Turns on or off changes you have made
within the group. This button is available in
each group, so you can view the effects of
each group's develop settings. When the
icon is green the group's changes are
visible. A gray icon indicates that the
changes are hidden.
Develop Settings Resets Develop Settings for an individual
group to "Last Saved", "Default", or "Last
Used". Or, save the settings as a preset,
copy, or paste them.
Develop Settings All Resets Develop All Settings for the image
to "Last Saved", "Default", or "Last Used".
Or, save the settings as a preset, copy, or
paste them.
Show Filmstrip Toggles the Filmstrip view on or off.
Show Original Toggles the changes on or off, to compare
changes to the original.
Display Full Screen Displays the image on a full screen. Press F
to view full screen. Press any key to
return to Develop.
Previous Image Displays the previous image in the
Filmstrip view.
Next Image Displays the next image in the Filmstrip
view.
Actual Size Returns the current image to its actual
size.
Navigator The Navigator icon only appears when the
image is magnified or if the Actual Size
icon has been clicked. Click the Navigator
icon to display a small duplicate of your
image. Then drag your cursor to the
section of the image you would like to see
magnified. Release the cursor to settle on
an area of the image.
Fit Image Reduces the image to fit within the
Develop mode area.

Gemstone Photo Editor 12
Page 102 of 346
Show Original Toggles the changes on or off, to compare
your changes to the original.
Zoom slider Increases the size of the image if you drag
it to the right, decreases the size if you
drag to the left.
Zoom drop-down list Displays a list of zoom sizes to select.
Filmstrip
View other images by clicking the Filmstrip at the bottom of the screen.
To view the Filmstrip, click the Show Filmstrip icon . Navigate through the Filmstrip images by
using the Previous Image and Next Image icons.
If there are no other images in the Filmstrip, click the Done button to return to the Home Screen and
select another image to develop.
To populate multiple images into the Filmstrip, in the Home Screen select multiple images and press
the Enter key. All selected images will be populated to the Filmstrip.
Filmstrip Right-Click Menu Items
Restore to Original Removes any changes to the image and restores the image to it's original state.
Copy Settings... Opens the Copy Settings dialog, used to select develop settings to copy.
Paste Settings Pastes into the selected image the settings selected in the Copy Settings dialog.
Apply Preset Click to produce a list of available Presets to be applied to the image.
Select All Select all images in the Filmstrip.
Customizing the View
Right-click the body of the Develop Tools pane to customize how the groups expand and collapse
within the pane by selecting either of the following:
Expand all groups: Expands all the groups in pane.
Collapse all groups: Collapses all the groups that are open.
Auto-collapse groups: Useful for keeping groups in one pane without having to scroll, this default setting
automatically collapses groups and keeps the working group open.
Undo and Redoing
Using the History Pane:

Gemstone Photo Editor 12
Page 103 of 346
Use the History pane to view the sequence of changes made to the image. Also, use the History pane
to jump around in the editing sequence and revert back to a previously-applied adjustment. For
example, if a series of adjustments were made to the image, such as color adjustments, followed by
sharpening, and exposure tweaking, to revert back several steps to the state the photo was in with
just the color adjustment applied, use the History pane to navigate to that point in time.
To open the History pane, click the icon in the Tool Bar or press F9.
To return to a specific adjustment, select the desired adjustment in the History pane and double-click
it. Or, use the Undo/Redo buttons to step back through the edits. For a more comprehensive
correction, select Undo All to undo all of your adjustments.
Using Color Pickers
When using the color pickers in the Develop Tools pane, the RGB values beside the color picker relate
to the original image before any edits.
Saving Images
In the Develop Tools pane, changes are non-destructive, so that every time a previously developed
image is opened, the adjustments are exactly like they were saved. This allows for a return to the
image to undo or further tweak adjustments.
To permanently save any changes made to a RAW file, save the changes as a separate file, in a different
file format (JPEG or TIFF, for example).
Saving Images
After developing an image, choose from one of the many options for saving an image, depending on
workflow.
To save an image:
1. Click Done.
2. Select one of the following:

Gemstone Photo Editor 12
Page 104 of 346
Save Save any changes.
Save as Save a copy of the developed image with a new name or format.
Depending on the file type, any of the following checkboxes appear in the bottom left
corner of the Save as dialog box:
Preserve Metadata: Retains metadata with the new image.
Embed Color Profile in Image: Retains color profile selected in Color
Management with the new image.
Discard Discard any changes.
Cancel Remain on the same image in Develop with any changes intact, without saving the image.
To discard changes to the image and return to the previous mode:
Click Cancel.
It is not possible to directly save changes to a RAW file. Changes to a RAW file must be saved
as a different file type.
Auto Save
Enable AutoSave in order to avoid selecting a saving option each time an image is finished being
developed. When AutoSave is enabled, clicking Done, or selecting another image from the Filmstrip
will prompt ACDSee to automatically save any changes. The Save Changes dialog will no longer be
displayed.
To disable AutoSave
1. Select Tools | Options... from the main menu.
2. In the Options dialog, click ACDSee RAW.
3. Disable the AutoSave all ACDSee RAW adjustments checkbox.
AutoSave is not available for RAW images.
Develop Presets
Save Develop settings as presets to apply the same adjustments to additional images. Presets are
used to quickly apply changes to an image without having to repeat the steps each time to apply the
same change. For example, if images are always corrected using the Contrast tool with the value of 25
and the Midtones tool with the value of -8, save these settings as a preset and quickly apply them to
change future contrast and midtone settings.
Presets ensure that settings are applied consistently to images and can be created with one or
multiple develop settings. It is possible to save presets from all Develop settings across the Tune,

Gemstone Photo Editor 12
Page 105 of 346
Detail, Geometry, and Repair tabs. Or, save presets from the settings from all of the groups within a
single tab, such as all of the settings on the Tune tab. Or, save presets by individual group only, such
as the Color EQ group.
To make the Develop experience easier, use the Develops Preset pane to create, delete, manage, and
categorize global presets.
Apply multiple presets to an image. Each time a preset is added, the settings are applied on
top of the previous settings.
Using the Develop Presets Pane
To create a Preset using the Develop Presets pane:
1.
Click the Develop Presets icon.
2. Select a tab, and within a group make corrections to the image.
3.
Click the Create new Preset button at the bottom of the Develop Presets pane.
4. In the Save Develop Settings Preset dialog, select the settings to save to the preset and enter a name for
the preset.
5. Click OK.
To rename a Preset using the Develop Presets pane:
1. In the Develop Presets pane, right-click on the preset to rename, and select Rename Preset from the
context menu.
2. In the Rename Preset dialog, enter a new name for the preset.
3. Click OK.
To delete a Preset using the Develop Presets pane:
1. In the Develop Presets pane, right-click on the preset to delete, and select Delete Preset from the
context menu.
2. In the Delete Preset dialog, click Yes to the prompt.
To apply a Preset to an image using the Develop Presets pane:
With an image open in ACDSee RAW, click any preset in the Develop Presets list. The image is
updated with the selected preset.
Using Categories in the Develop Presets Pane
Categories in the Develop Presets pane are used to organize and manage presets. When first opening
ACDSee Gemstone Photo Editor 12, the Develop Presets pane is comprised of a series of organized
default categories containing default presets.

Gemstone Photo Editor 12
Page 106 of 346
To create a Category:
1. Right-click on a Category header in the Develop Presets pane and select New Category.
2. In the Add a new Category dialog, enter a Category name and click OK.
To delete a Category:
Do one of the following:
l Right-click an existing category in the Develop Presets pane and select Delete Category.
l
Click the delete icon associated with the category.
To add a Preset to a Category:
1. In the Develop Presets pane, right-click a preset.
2. Select Set Category.
3. Make a selection from the list of categories to add the preset to the selected category.
To remove a Preset from a Category:
1. In the Develop Presets pane, right-click a preset.
2. Select Delete Preset.
Other Ways to Create and Apply Presets
To create a Preset from a Tab:
1. In the Develop Tools pane, select either the Tune, Detail, Geometry, or Repair tab.
2. Make edits to an image.
3.
Click the Adjust develop settings icon located at the top right of the tab.
4. Select Save Preset... from the menu.
5. Select the group settings to save into the preset.
6. In the Save Develop Settings Presets dialog, enter a name for the preset.
7. Click OK.
To create a Preset from a Group:
1. In the Develop Tools pane, select either the Tune, Detail, Geometry, or Repair tab.
2. Select a group and make edits to an image.

Gemstone Photo Editor 12
Page 107 of 346
3.
Click the Adjust develop settings for this group icon located at the top right of the group.
4. Select Save Preset... from the menu.
5. In the Save Develop Settings Presets dialog, enter a name for the preset.
6. Click OK.
Applying a Preset to a Single Image
To apply a Preset to a Single Image:
1.
Click the Adjust develop settings for this group icon at the top of either a pane, tab, or group.
2. Make a selection from the Presets menu. The image is updated with the selected preset.
Presets can also be applied to an image in the Filmstrip. Select an image in the Filmstrip, right-
click and select Apply Preset. Then select the preset to apply to the image. The image is
updated with the selected preset.
Renaming Presets
Presets can be renamed at any time.
To rename a Preset:
1.
Click the Adjust develop settings icon located at the top right of the Develop Tools pane.
2. Select Manage Presets....
3. In the Manage Presets dialog, select a preset and click Rename.
4. Enter a new name for the preset.
5. Click OK to save and close the dialog.
Deleting Presets
Delete presets that are no longer needed. Deleting a preset does not affect images that already have
the preset applied.
To delete a Preset:
1.
Click the Adjust develop settings icon located at the top right of the Develop Tools pane.
2. Select Manage Presets....

Gemstone Photo Editor 12
Page 108 of 346
3. In the Manage Presets dialog, select a preset and click Delete.
4. Click OK to save and close the dialog.
Importing and Exporting Presets
Share presets with other users by exporting them. Presets made by other users or residing on an old
computer can also be imported.
To export Presets:
1. In the Develop Presets pane, navigate to the bottom of the Develop Presets pane and click the Export
Presets icon.
2. In the Export Presets dialog, select which Develop presets to export by clicking the plus + signs to
expand the tree, and enable/disable the checkboxes to select which presets to export. Global, tab, or
group presets can be exported.
Choose to export only specific presets under the branches by checking/unchecking their
checkboxes. A gray checkbox indicates that some presets under the branches are
selected, but not all.
3. To export ACDSee RAW presets, enable the Include ACDSee presets checkbox.
4. Click Export.
5. In the Save As dialog, browse to specify the destination for the exported presets.
6. Enter a name in the field, and click Save.
To Import Presets:
1. In the Develop Presets pane, navigate to the bottom of the Develop Presets pane and click the Import
Presets icon.
2. In the Open dialog, navigate to the location of the presets.
3. Select the presets for import and click Open.
4. In the Import Presets dialog, click the plus + signs to expand the tree, and enable/disable the
checkboxes to select which presets to import. Global, tab, or group presets can be imported.
Choose to import only specific presets under the branches by enabling/disabling their
checkboxes. A gray checkbox indicates that some presets under the branches are
selected, but not all.
5. Click Import. Find the imported presets in the presets menus in their respective groups.

Gemstone Photo Editor 12
Page 109 of 346
About ACDSee RAW
ACDSee RAW allows non-destructive processing of RAW, JPEG and other file types. Non-destructive
means the changes you make do not permanently change the original image, so they are reversible.
In ACDSee RAW you can:
l Tune the image using exposure, white balance, lighting, color, tone curves, soft focus, effects, split tone,
and post-crop vignette tools, or set the output color space of a RAW image.
l Adjust details in your image using the sharpening, noise reduction, skin tune, and chromatic aberration
tools.
l Fix geometry in your image using the lens distortion, rotate and straighten, perspective, vignette cor-
rection, and cropping tools.
l Repair your image with the Red Eye Reduction tool or remove flaws.
Opening files in ACDSee RAW
ACDSee RAW opens automatically whenever a RAW photo file is selected to be opened. A RAW file is
like a negative. RAW files contain all of the data collected by the digital camera's sensor when capturing
a photo.
The following options open Raw images in ACDSee RAW:
l Select File | Open... from the main menu and select a RAW file to open.
l In the Home Screen select a previously opened RAW file in the Previous Projects pane
To open images that are in a different format in ACDSee RAW:
Select File | Open in ACDSee Raw... from the main menu.
ACDSee will automatically apply geometry corrections to DNG files that include geometric
distortion correction tags. DNG files created from the Adobe DNG Converter© will often
generate geometric distortion tags for micro 4/3rds cameras.
To permanently save changes made to a RAW file, save the changes as a separate file, in a different file
format (JPEG, PNG, or TIFF, for example).

Gemstone Photo Editor 12
Page 110 of 346
Chapter 3: Editing
Creating an HDR Image
High-dynamic-range imaging (HDR) is a technique used in digital image processing to combine a series
of images with different exposures to produce one image with an optimal overall range. Use the HDR
tool to create a new image with a greater dynamic range of luminosity. Ideally, the images you use
with the HDR tool will include a well-balanced range of highlights and shadows. See below for
additional tips on achieving the best results.
Shooting Photos for HDR
For a higher chance of generating quality results, follow these instructions when shooting images for
HDR:
l Use the shutter speed to vary exposures. That said, varying the aperture setting changes the depth of
field, leading to poor quality results. Similarly, varying the ISO or aperture may generate noise or vign-
ettes. Set your ISO to its lowest value.
l Generally, do not use your camera's auto-bracket feature as the exposure changes are not significant
enough.
l Ensure the scene does not include features in motion. HDR is meant for photos of the same scene with
exposure variances.
l Keep the camera stable using a tripod.
l Use your camera's timer to avoid camera shake.
l Keep the focus and zoom constant between images.
l Shoot in RAW rather than JPEG. This will provide for greater range and flexibility.
l Ensure there is detail in the deep shadows of your darkest exposure.
l Ensure no area of the image is blown out in your lightest exposure.
l Ensure the set of images is "balanced" (i.e. the middle image of the set has well-exposed midtones).
l Using a quantity of photos higher than suggested in the table below can result in unwanted artifacts due
to improper alignment and ghosting.
Camera Bracket Settings Optimum Number of Exposures for Creating HDR Images
-1.0 to +1.0
3
-2.0 to +2.0
5
-3.0 to +3.0
7
To create an HDR image:
1. Select File | New HDR Merge... from the main menu.

Gemstone Photo Editor 12
Page 111 of 346
Selected images must have the same dimensions.
2. In the HDR open dialog, select images to merge and click Open.
3. In the HDR dialog, select a preset from the Presets drop-down menu and click the OK button.
Running HDR on large images will require a significant amount of memory.
There is a 50 image limit when performing HDR.
Merging with Focus Stacking
Focus Stacking merges a series of images with different focal distances. By combining multiple images
with different areas in focus, a new image is created with a greater depth of field.
To use Focus Stacking:
1. Select File | New Focus Merge... from the main menu.
Selected images must have the same dimensions.
2. In the Focus Stack dialog, select images to merge.
3. Click the Open button.
Running the Focus Stack command on large images will require a significant amount of
memory.
There is a 50 image limit when Focus Stacking.
Focus Stacking cannot be performed on a single image.
Loading Files into a Stack
To load multiple files into one image and have each image in the stack be assigned to a separate layer,
use the Stacking command.
To load files into a Stack:
1. Select File | New Stack... from the main menu.
2. In the New Stack dialog, select images to include in the stack.
3. Click the Open button.

Gemstone Photo Editor 12
Page 112 of 346
Running the Stack command on large images will require a significant amount of memory.
There is a 50 image limit when Stacking.
Resize, Rotate, or Flip
Resize
Resizing can be applied to both the Document and the Canvas.
To resize the Document:
1. Select Document | Resize Document... from the main menu.
2. In the Resize Document dialog, navigate to the New Dimensions field set and adjust the options as
described below.
3. Click the OK button.
Resize Document is a non-destructive scaling operation.
To resize the Canvas:
1. Select Document | Resize Canvas... from the main menu.
2. In the Resize Canvas dialog, navigate to the New Dimensions field set and adjust the options as described
below.
3. Click the OK button.
Resizing Options
Width Enter a numerical value for the image width.
Units Select a unit of measurement. Options include "pixels", "inches",
"cm", and "percent".
Anchor For resizing the canvas only, select an anchor point for the resizing.
Height Enter a numerical value for the image height.
Aspect Ratio Make a selection from the drop down to either keep the image's
original aspect ratio, to not preserve the aspect ratio, select a pre-
defined ratio, or create a custom ratio.
Rotate
The document can be rotated to predefined angles or rotated to custom settings.
To rotate the document:

Gemstone Photo Editor 12
Page 113 of 346
1. Select Document | Rotate from the main menu.
2. Make selection from options described below.
Rotating Options
180
o
Rotates the image 180 degrees.
90
o
Clockwise Rotates the image 90 degrees in a clockwise direction.
90
o
Counter Clockwise Rotates the image 90 degrees in a counter clockwise direction.
Arbitrary... Opens the Rotate Canvas dialog where a custom angle for rotation
can be entered and a rotation direction set.
Flip
Image's canvas can be flipped along the horizontal or vertical axis.
To Flip a canvas:
Depending on the type of flip desired, do one of the following,
l Select Document | Flip Canvas Horizontal from the main menu, or
l Select Document | Flip Canvas Vertical from the main menu.

Gemstone Photo Editor 12
Page 114 of 346
Chapter 4: Editing - Using Layers
Layer Editor
The Layers pane is used to add effects and shapes to photos in layers, perform photo manipulations,
create composite images, and much more. Layers allow work to be performed on a single element of
an image without disturbing other layers. Layer attributes such as transparency and opacity are
adjustable, and when layers are stacked, the desired level of visibility can be achieved in a non-
destructive arrangement.
Layers can also be hidden or employed in conjunction with image effects and adjustment tools,
drawing tools, text, and more. Effects and adjustments are applied to the layer selected in the Layers
pane. For better visibility of difficult elements, create a blank image and layer the transparencies or
elements of a similar color range on top of the blank.
Geometry adjustments are applied only to the selected layer.
Watermarks can be added to new layers.
To open the Layers pane:
1. With an image open, select Window | Layers from the main menu.
2. In the Layers pane, the opened image is represented as "Layer 1".
3. Either edit the original photo, or add additional layers containing other photos or drawing elements,
such as shapes.
4. Optionally, create a mask to hide or reveal portions of the layers below.
Adding Layers
To add a layer:

Gemstone Photo Editor 12
Page 115 of 346
1. Do one of the following:
l
Click the Add blank layer button at the bottom of the Layers pane.
l Select Layer | New Blank Layer from the main menu.
2. Edit a layer by first selecting the layer in the Layers pane.
To add another image to the Layers pane:
Do one of the following:
l
Click the Add a File as a Layer button at the bottom of the Layers pane.
l Select Layer | Add a File as a Layer... from the main menu.
l Select an image thumbnail from the Filmstrip and drag it into the Layers pane.
l Right-click an image thumbnail from the Filmstrip and select Add Image as a New Layer from
the context menu.
Layer Visibility
To set layer visibility:
To show or hide all layers, do one of the following:
l Select Layer | Show All Layers from the main menu, or press Shift + J.
l Select Layer | Hide All Layers from the main menu, or press Ctrl + Shift + Y.
To show or hide individual layers, select the layer and click the Show/Hide Layer button.
Show Layer
Hide Layer
Layer Manipulation
To delete a layer:
Select the layer and click the Delete Layer button.
To duplicate a layer:
Select the layer to be duplicated and click the Duplicate button.
To move a layer:

Gemstone Photo Editor 12
Page 116 of 346
In the Layers pane, select the layer and drag it up or down.
To name a layer:
1. To rename a layer from "Layer 1", etc, select the layer and right-click.
2. Select Rename Layer from the context menu.
3. In the Rename Layer dialog, enter a layer name.
4. Click OK.
Layer Merge and Flatten
To merge a layer:
Merge a layer with the layer below.
1. Select the top layer, or a layer above another.
2.
Click the Merge Layer Down button.
To flatten an image:
To merge all layers into a single image, do the following:
l Select Layer | Flatten Image from the main menu.
Layer Blend Mode and Opacity
To change a layer's Blend Mode and Opacity:
Blend modes determine how the layers blend together. Blending is assigned to the layer it is applied
to, regardless of the layer order being changed. Opacity determines the layer's transparency.
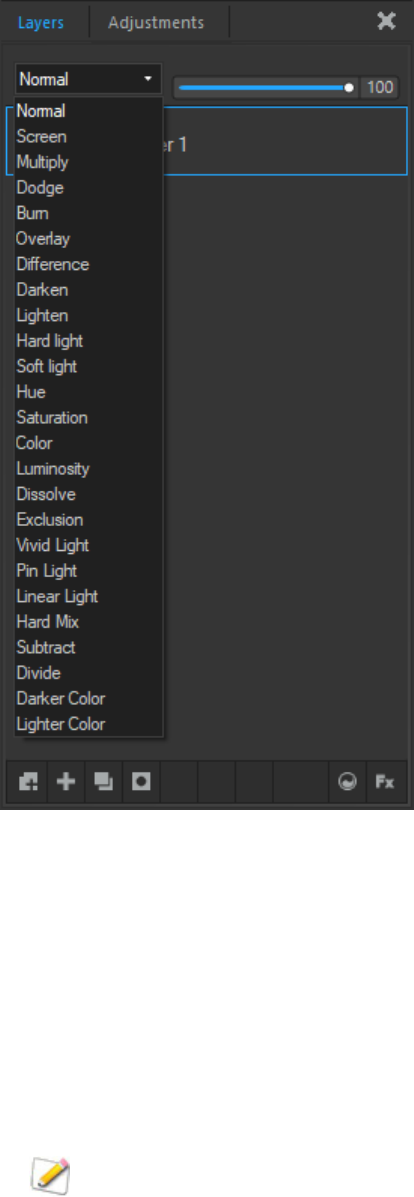
Gemstone Photo Editor 12
Page 117 of 346
1. Select a layer.
2. Select a Blend Mode from the drop-down menu at the top of the Layers pane.
3. Move the Opacity slider at the top of the Layers pane.
Saving Layered Images
When saving a layered image, the Save Image As dialog opens with the file format set to .gsd by
default. By saving in the .gsd file format, layers will remain accessible if re-opening the image in
Gemstone in the future.
The .gsd file format will not be displayed in the Save Image As dialog by default if the image
has been flattened or all layers merged.

Gemstone Photo Editor 12
Page 118 of 346
The .gsd file format saves in 8 bits per channel by default for all bit depth images. Save in 16 bits per
channel for images that already have 16 bits per channel data, such as RAW files, 64-bit TIFF files, etc.
This will allow for a higher quality image, but will also create a larger file size. To save in 16 bit, enable
the 16 bit per channel data checkbox in the Save Image As dialog box. When using the 16-bit option
to save images that have lower than 16 bits per channel data, the image will be saved as 8 bits per
channel.
To add a layer mask, see Layer Masks.
Using Adjustment Layers
You can use the Adjustment Layers section of the Layers pane to non-destructively adjust and add
effects to your images. Adjustment layers stack in the Layers pane, allowing you to return to individual
layers at any time and continue making adjustments to each effect. Each adjustment layer includes a
mask by default.
By saving an image with adjustment layers as a .acdc file, you can re-open it and still adjust each effect
individually at any time.
For best results, make all global adjustments prior to adding adjustment layers.
To Add an Adjustment Layer:
With an image open, do one of the following:
Select an adjustment layer icon from the bottom of the Layers pane.
Select an adjustment layer from the Add adjustment layer menu at the bottom of the Layers pane.
The adjustment layer will be added above your image in the Layers pane. The settings for your
adjustment layer will appear at the bottom of the panel. Configure the settings as described below.
To Apply an Adjustment Layer to a Particular Image:
If you have multiple images in the Layers pane, you can restrict adjustment layers to a specific image.
To apply an adjustment layer only to the closest image layer below it, enable the Clipping button.
Clipping off
Clipping on
You can apply multiple adjustment layers to one particular image layer by enabling all of their Clipping
buttons.

Gemstone Photo Editor 12
Page 119 of 346
Adjustment Layers and Settings
Exposure Adjustment Layer Options
Exposure Drag the slider to the right to increase exposure, or drag to the left to decrease exposure.
Contrast Drag the slider to the right to increase contrast, or drag to the left to decrease contrast.
Levels Adjustment Layer Options
Use the buttons on the right of the Levels panel to select Luminance, Red, Green, or Blue as the channel
to adjust.
Use the arrows at the bottom of the panel to adjust the shadows, midtones, and highlights. Move the
shadows arrow to define the blackest area of the image. Move the midtones arrow to define the
midtone. Move the highlights arrow to define the whitest area of the image.
Curves Adjustment Layer Options
Use the buttons on the right of the Curves panel to select the RGB, Red, Green, or Blue color channel
to adjust.
See Adjusting Tone Curves.
Light EQ™ Adjustment Layer Options
Brighten Drag the slider to increase the brightness of dark areas in your image.
Darken Drag the slider to decrease the brightness of light areas in your image.
White Balance Adjustment Layer Options
Temperature Adjusts the warmth of the correction, from blue to yellow.
Tint Adjusts the tint of the correction, from magenta to green.
Vibrance Adjustment Layer Options

Gemstone Photo Editor 12
Page 120 of 346
Vibrance
Drag the slider to the right to increase vibrance, or to the left to decrease vibrance.
Increasing vibrance does not affect skin tone in an image. This is unlike saturation, which
intensifies all colors equally.
Saturation Drag the slider to the right to increase saturation, or to the left to decrease saturation.
Hue
Adjusts the hue of the image. Drag the slider to the right to increase or drag to the left to
decrease hue.
Lightness
Adjusts the image brightness. Drag the slider to the right to increase or drag to the left to
decrease the image's brightness.
Color EQ Adjustment Layer Options
Choose the Saturation, Hue, or Brightness tab and adjust colors individually by dragging the sliders.
Vibrance
Drag the slider to adjust the vibrance of the image without
affecting skin tones.
Saturation Adjusts from saturation to grayscale.
Hue Changes the color's hue.
Brightness Adjusts the light or dark tones in the image.
RGB Adjustment Layer Options
Adjust the Red, Green, or Blue sliders to balance or heighten the RGB channels in the image.
Split Tone Adjustment Layer Options
Highlights Hue Drag the slider to the right to select a highlight color.
Highlights
Saturation
Drag the slider to the right to increase saturation of the specified color in the highlights of
the image.
Shadows Hue Drag the slider to the right to select a shadow color.
Shadows
Saturation
Drag the slider to the right to increase saturation of the specified color in the shadows of
the image.
Balance
Drag the slider to the right to emphasize the highlight color; drag the slider to the left to
emphasize the shadow color. For example if the slider is set to the maximum at 50, then
full emphasis is applied to the highlight color; if the slider is set to the minimum -50, then
full emphasis is applied to the shadow color.

Gemstone Photo Editor 12
Page 121 of 346
Add Color Adjustment Layer Options
Select a color to add to your image.
Use the Density slider to specify the strength of the added color.
Black & White Adjustment Layer Options
Adjust the Red, Green, or Blue sliders to add color back into the black and white image.
Brightness Adjusts the brightness of the colors in the image.
Negative Adjustment Layer
The Negative adjustment layer creates a negative out of your image. There are no settings for this
adjustment layer.
Photo Effect Adjustment Layer Options
Select a photo effect from the drop-down menu to change the look and feel of your image.
You can use your mouse wheel to quickly scroll through the photo effects.
Skin Tune Adjustment Layer Options
Smoothing Refines skin by suppressing texture detail.
Glow Increases the brightness of skin while subtly smoothing.
Radius
Specifies the scale of the texture detail that is affected by the effect. A lower value
enhances small details, while a large value enhances larger details.
Sharpen Adjustment Layer Options

Gemstone Photo Editor 12
Page 122 of 346
Strength
Specifies the strength of the sharpening applied by increasing contrast around
edges.
Radius
Controls the number of pixels to adjust around each edge. Higher values increase
the number of sharpened pixels and tend to bring out coarser detail, while lower
values reduce the number of sharpened pixels and tend to bring out finer detail.
Detail
Suppresses the halo, (the light border that forms around edges with extreme
sharpening), by reducing its intensity. The higher the value, the stronger the
reduction.
Threshold
Specifies how different the pixel lightness values within an edge must be before
the pixels within the edge are sharpened. Higher values sharpen only stronger
edges but minimize the appearance of noise. Lower values sharpen both strong and
weaker edges, but can increase the appearance of noise. We recommend you set
the threshold to enhance edges while keeping background noise to a minimum.
Blur Adjustment Layer Options
Select the Gaussian or Directional button to select the type of blur.
Gaussian
Produces an even, smooth blur.
Strength
Specifies the strength of the blur. Move the slider to the right to
intensify the effect.
Directional
Produces a blurring effect that gives the illusion of movement.
Strength
Specifies the strength of the blur. Move the slider to the right to
intensify the effect.
Angle Specifies the direction of the blur effect.
Noise Reduction Adjustment Layer Options
Luminance Removes the random variations of brightness in the noise.
Color Reduces the random variations of color in the noise.
Clarity Adjustment Layer Options
Gemstone Photo Editor 12
Page 123 of 346
Clarity
Drag the slider to the right to enhance texture in the image. Drag the slider
to the left to smooth out texture in the image.
Orton Drag the slider to enhance local contrast while subtly smoothing texture.
Soft Light Drag the slider to increase brightness while subtly smoothing texture.
Tonal Width
Drag the slider to control the amount shadow and highlights are affected by
the Clarity, Orton, and Soft Light sliders. Choose a value of 0 to restrict the
adjustments to midtones. Choose a value of 100 to apply the adjustments
equally in all tones.
Radius
Drag the slider to control the scale of the texture detail being affected.
Choose a value of 0 to enhance small details, or a value of 100 to enhance
larger details.
Enhanced edge processing
Select this checkbox to reduce the appearance of halos around edges with
enhanced texture, and to minimize the softening of edges when texture is
smoothed.
Dehaze Adjustment Layer Options
Drag the slider to adjust the strength of the contrast, detail, and color correction.
Gradient Map Adjustment Layer Options
Shadows Specify the color to be added to the dark parts of your image.
Highlights Specifies the color to be added to the light parts of your image.
Vignette Adjustment Layer Options
Strength Specifies the size and intensity of the vignette.
Distance
Specifies the size of the clear area around the focal point in the portrait. Drag the slider
to the left to reduce the size of the clear area. Drag the slider to the right to increase the
size of the clear area.
Shape Specifies the shape of the frame.
Posterize Adjustment Layer Options
See Applying a Posterize Effect.

Gemstone Photo Editor 12
Page 124 of 346
Threshold Adjustment Layer Options
Use the slider to select a brightness level. All pixels brighter than that brightness will become white,
and every darker pixel will become black.
Color LUTs Layer Options
Select a Color LUT from the drop-down menu. Or press the Import LUTs button to import a new LUT to
your list.
Using Masks with Layers
Layer masks allow you to control a layer's level of transparency. While it is easy to control the opacity
of a layer globally using the Opacity slider, layer masks are useful when you want to target a particular
part of a layer. Use layer masks to hide or reveal portions of the layer beneath. Layer masks are
effective for combining multiple images into a single image or for making localized adjustments.
The easiest way to understand layer masks may be to think of them in the following ways:
A black layer mask completely covers the layer below it. As you paint on the black layer mask with a
white brush, you are brushing "holes" through the mask, allowing you to see through to the layer
below. Conversely, a white layer mask is transparent and completely displays the layer below it. As
you paint on the white layer mask with a black brush, you are masking the image, covering the layer
below.
To Create a Layer Mask:
Do one of the following:
In the Layers pane, right-click the layer you want to add a layer mask to and select Set Mask White or
Set Mask Black.
Go to Layer | Mask | Set Mask White or Set Mask Black.
At the bottom of the Layers pane, press the Add layer mask button.
The layer mask will appear as a white or black box in the Layers pane next to the thumbnail of the
image on the layer you selected. To perform actions to the layer mask, you must select it in the Layers
pane. You can alter the opacity of the layer mask by dragging the Opacity slider at the top of the
Layers pane. You can apply any adjustment to the layer mask by selecting it and entering the tool.

Gemstone Photo Editor 12
Page 125 of 346
Selected white layer
mask

Gemstone Photo Editor 12
Page 126 of 346
Selected black layer
mask
To Disable a Mask:
You can disable a mask without deleting it. You can even disable it, save your layers as a .acdc file and
exit Photo Editor, then reopen it at a later date and enable your mask again.
1. Select the mask in the Layers pane.
2. Do one of the following:
Right-click on the mask and choose Disable mask from the context menu.
In the Layers pane, press the Disable mask button.
Choose Layer | Mask | Disable Mask.
Press Ctrl + Shift + M.
To Enable a Mask:

Gemstone Photo Editor 12
Page 127 of 346
1. Select the mask in the Layers pane.
2. Do one of the following:
Right-click on the mask and choose Enable mask from the context menu.
In the Layers pane, press the Enable mask button.
Choose Layer | Mask | Enable Mask.
Press Ctrl + Shift + M.
Mask Properties
You can adjust the properties of each layer mask on each layer individually using the Mask Properties
panel. The adjustments you make are non-destructive, meaning that you can adjust them at any time
throughout the editing process.
To Access the Mask Properties Panel:
Select the mask in the Layers pane. The Mask Properties will appear at the bottom of the pane, above
Adjustment Layers.
You can make the following adjustments to your layer mask:
Feathering
You can non-destructively feather your mask to avoid sharp edges or a stark
contrast between the mask and the layer. Move the slider to blur the edges of the
mask.
Invert
You can non-destructively invert your mask. This will turn a white mask black, and
a black mask white.
Displaying a Mask Overlay:
You can make your mask easier to see by enabling the Show Overlay checkbox in the Mask Properties
panel.
To Customize the Mask Overlay:
1. Right-click on the mask in the Layers pane and choose Mask Overlay Options... from the context menu.
2. In the Mask Overlay Options dialog, select one of the following overlay options:
Mask Highlighted
This option highlights your mask in the color of your choosing. Select a color
from the drop-down menu. You can customize the transparency of the mask
overlay by using the Opacity slider.
Mask Exposed
This option highlights the non-masked areas of your layer in the color of your
choosing. Select a color from the drop-down menu. You can customize the
transparency of the unmasked area by using the Opacity slider.

Gemstone Photo Editor 12
Page 128 of 346
3. Press OK.
The mask overlay is only visible when the layer is selected.
To Edit a Layer Mask:
Select the layer mask in the Layers pane, then choose any adjustment, or drawing or selection tool.
Mask Flexibility
You can create or modify selections from masks.
To Create a Layer Mask From a Selection:
You can make a layer mask from a selection.
1. Make a selection.
2. Go to Layer | Mask | From Selection.
Or:

Gemstone Photo Editor 12
Page 129 of 346
1. Make a selection.
2. Press the Add layer mask button. Or add any adjustment layer by selecting one of the icons from the
bottom of the Layers pane. A mask will automatically be made from the selection.
Or:
1. Make a selection.
2. Right-click the layer and choose Mask From Selection from the context menu.
To Add a Mask to a Selection:
1. With the mask selected in the Layers pane, make a selection.
2. Right-click the mask and choose Add Mask To Selection.
To Subtract a Mask from a Selection:
1. With the mask selected in the Layers pane, make a selection.
2. Right-click the mask and choose Subtract Mask From Selection.
To Select the Area Common to the Mask and the Selection:
1. With the mask selected in the Layers pane, make a selection.
2. Right-click the mask and choose Intersect Mask With Selection.
To Delete Selected Mask Pixels:
See Using Selections.
Creating Layer Masks From Specific Colors and Tones
You can create masks from specific targeted colors and/or tones—and even skin tones.
To Create a Layer Mask by Targeting Colors or Tones:
1. Select your layer and set a white or black mask, as described above.
2. Right-click the mask and choose Pixel Targeting... from the context menu.
3. On the Pixel Targeting panel, configure the settings as described below.
4. Press OK. The mask will be created from the targeted color(s) and/or tone(s).
The Pixel Targeting Panel
The Pixel Targeting panel consists of four sections: Targeted Tones, Targeted Colors, Skin Targeting,
and the Target Mask.
Target Mask:

Gemstone Photo Editor 12
Page 130 of 346
The Target Mask allows you to see the areas in the image that are targeted by displaying them in
white. When no pixels are targeted, the Target Mask will appear completely black. Conversely, when
all pixels are targeted, as is the case before any sliders have been altered on the Pixel Targeting panel,
the entire Target Mask will appear completely white.
Targeted Tones:
The Targeted Tones sliders allow you to target tones of brightness for the mask. To target one or more
tones, you may find it easiest to press the Min button under the Targeted Tones section. This
deselects all tones, and you can then select specific tones to target for the mask by moving their
sliders up between 0 and 100, depending on your desired intensity.
Targeted Colors:
The Targeted Colors sliders allow you to target specific colors for the mask. To target one or more
colors, you may find it easiest to press the Min button under the Targeted Colors section. This
deselects all colors, and you can then select specific colors to target for the mask by moving their
sliders up between 0 and 100, depending on your desired intensity.
Skin Targeting:
The Target Skin slider allows you to specifically target skin tones for the mask. To target skin tones,
move the slider to the right between 0 and 100, depending on your desired intensity.
When you move the Skin Targeting slider, all other colors (except for skin tones), are excluded. You
cannot then alter the green color slider, for instance.
To exclude skin tones from your mask, move the slider to the left between 0 and -100.
Creating Layer Masks From Images
You can copy color images and paste them as grayscale (luminance) masks on other layers, including
adjustment layers.
To Create a Mask from an Image:
1. Do one of the following:
Right-click an image in the Layers pane and choose Copy from the context menu.
With an image selected in the Layers pane, choose Edit | Copy.
2. Select a layer in the Layers pane and do one of the following:
Right-click the layer and choose Paste as Mask from the context menu.
Choose Edit | Paste as Mask.
Choose Layer | Mask | Paste as Mask.

Gemstone Photo Editor 12
Page 131 of 346
Text Layers
Add text as a layer by using the Text tool. Adjusting the opacity of the text creates a watermark effect,
which is useful for placing copyright information on photos.
Images with text layers can be saved as .gsd files, which allow layers to remain editable for future work
on the image using Gemstone.
Layer effects can be added to text layers.
To add text as a layer:
1.
Select the Text tool from the Toolbar.
2. Click a text destination area in the image. A text box is added to the image and a text layer appears at the
top of the Layers pane.
3. Click and drag the text marquee to reposition the text anywhere on the image, or drag the marquee's
handles to resize the text. In the Context bar above the image, select or enter a specific point size in the
Size field.
Press the Shift key while resizing to transform the text without maintaining aspect ratio.
4. Type a text message in the text box. Each time another text box is added, a new text layer is added to
the Layers pane. Selecting a text layer on an image also selects the layer in the Layers pane.
5. In the Context bar, use the drop-down menus to specify the font and formatting options, such as italics
or justification, and the color of the text.
6. At the top of the Layers pane, drag the Opacity slider to specify the transparency of the text.
7. At the top of the Layers pane, select an option from the Blend Mode drop-down list to specify the
amount of blend between the text and the underlying image.
Filters cannot be entered while a text layer is selected. Trying to enter a filter will prompt a
warning asking to rasterize the text layer. The text layer will no longer be editable after
rasterizing.
While text layers cannot be merged with other text layers, text can be merged with regular
image layers, which rasterizes the text. The text layer will no longer be editable after
rasterizing.
Adjustment layers can be added above text layers and clipped directly to text layers. See Using
Adjustment Layers.
It is possible to add a mask to a text layer, but if the text layer is moved, only the text layer will
be moved.

Gemstone Photo Editor 12
Page 132 of 346
Select the text layer to modify a text layer, including customizing style settings.
Typical keyboard shortcuts, such as Ctrl + C, Ctrl + V, Ctrl + A, etc, will work in text boxes. It is also
possible to use Home, End, Ctrl + Home, and Ctrl + End to move the cursor to the beginning or end of
the text.
Use Ctrl + Z to undo recent changes when editing within a text box. However, using the Undo/Redo
buttons will undo and redo entire text actions, such as adding a text box.
Apply Alt codes in text boxes using the following keyboard shortcuts to add copyright information to
your images:
® (Registration symbol)
Alt + 0174
© (Copyright symbol)
Alt + 0169
™ (Trademark Symbol)
Alt + 0153
Rasterizing Text
It is good practice to select multiple text layers and rasterize once, rather than rasterizing layer by
layer.
To rasterize text:
With a text layer selected, do one of the following:
Select Layer | Rasterize Text Layer from the main menu.
Press Ctrl + Shift + T.
Right-click a text layer in the Layers pane and select Rasterize Layer from the context menu.
Resizing the Canvas
The Resize Canvas tool crops or expands the size of a canvas to fit layered content.
Changes made to the canvas are non-destructive.
Resizing by Dragging
The Resizing and Dragging method resizes the canvas in the following ways:
By dragging the edges of a photo to expand the canvas to a desired size.
By specifying an exact size for the canvas using pixels, inches, centimeters, or a percentage.
By applying a ratio to constrain the canvas proportions.
Gemstone Photo Editor 12
Page 133 of 346
To resize the canvas by dragging:
1.
Select the Crop tool from the Toolbar.
2. Position the cursor over the edge or corner of an image until the corner changes into a double-pointed
arrow.
3. Drag the canvas' border to the desired size.
4. In the Tool Properties bar, click the OK button.
For more information on the Crop tool's options available in the Tool Properties bar, see Crop Tool.
Use the Arrow keys to move the canvas around pixel by pixel.
Resizing and Positioning
The Resizing and Positioning method resizes the canvas in the following ways:
By specifying an exact size for the canvas using pixels, inches, centimeters, or a percentage.
By applying a ratio to constrain the canvas proportions.
To resize and position the canvas:
1. Select Document | Resize Canvas... from the main menu.
2. In the Resize Canvas dialog, configure the settings as described below.
3. Click OK.
Resize Canvas Options
Current Dimensions
Displays the current file size and dimensions of the layer.
New Dimensions Enter the desired canvas size in the Width and Height fields, or customize the
unit of measurement with the drop-down menu. As the canvas size is altered,
the file size is updated adjacent to New Dimensions.
Anchor Anchor buttons lock layers to a specific region, such as the top left corner.
The canvas will expand around the anchor.
Aspect Ratio Select a ratio from the drop-down list or define a custom ratio using the Cus-
tom option. Ratios can be deleted by selecting them in the drop-down and
clicking the Delete button.
Resolution Use the Dots Per Inch field to specify a resolution.

Gemstone Photo Editor 12
Page 134 of 346
Layer Effects
Layer effects added to either regular images or text layers appear between layers. Layer effects cannot
be added to any adjustment layer, regardless of the layer type. Saving a images with layer effects as
.gsd files allows the images to remain editable for future work using Gemstone.
To add layer effects:
1. In the Layers pane, select the layer to add effects.
2. Do one of the following:
At the bottom of the Layers pane, click the Layer Effects button.
In the Layers pane, right-click the layer and select Layer Effects... from the context menu.
Select Layer | Layer Effects... from the main menu.
Press Ctrl + Alt + X.
3. In the Layer Effects dialog, enable the checkboxes of desired effects. Configure the settings as
described below.
4. Click the Close button. Closing the Layer Effects dialog does not remove or disable layer effects. By
saving a layered image as an .gsd file, the image can be re-opened in Gemstone for future work.
Layer Effects Options
Gemstone Photo Editor 12
Page 135 of 346
Inner Glow
Thickness Specifies the thickness of the glow effect. Drag the slider to set the
thickness.
Blur Blurs the edges of the glow. Drag the slider to determine how much blur is
applied.
Opacity Specifies the opacity of the glow. Type a number from 1 to 99 or drag the
slider to adjust the opacity of the glow. The higher the opacity, the more
visible the glow is.
Blend Mode Specifies how the effect blends with the layer. Select a blend mode from
the drop-down menu.
Color Specifies the color of the glow. Click the color picker to select a different
color. See Using the Color Dialog Box.
Inner Shadow
Blur Blurs the edges of the shadow. Drag the slider to determine how much
blur is applied.
Distance Specifies the size of the shadow according to the angle setting. Drag the
slider to adjust how far the shadow encroaches on the layer.
Opacity Specifies the opacity of the shadow. Type a number from 1 to 99 or drag
the slider to adjust the opacity of the shadow. The higher the opacity, the
more visible the shadow is.
Blend Mode Specifies how the effect blends with the layer. Select a blend mode from
the drop-down menu.
Angle Specifies the angle of the shadow. Type a number from 1 to 360 or drag
the arrow to adjust the angle.
Color Specifies the color of the shadow. Click the color picker to select a
different color. See Using the Color Dialog Box.
Bevel
Elevation Specifies the visibility of the bevel effect. As the Elevation slider is
reduced, the layer darkens, making the effect stand out more.
Radius Specifies how spread out the bevel is.
Light Source Specifies an imaginary light source. Click and drag the glow on the ball to
reposition the imaginary light source.
Outline

Gemstone Photo Editor 12
Page 136 of 346
Thickness Specifies the thickness of the outline effect. Drag the slider to set the
thickness.
Blur Blurs the edges of the outline. Drag the slider to determine how much
blur is applied.
Opacity Specifies the opacity of the outline. Type a number from 1 to 99 or drag
the slider to adjust the opacity of the outline. The higher the opacity, the
more visible the outline is.
Color Specifies the color of the outline. Click the color picker to select a
different color. See Using the Color Dialog Box.
Blur
Strength Specifies the strength of the blur. Move the slider to the right to intensify
the effect.
Shadow
Blur Blurs the edges of the shadow. Drag the slider to determine how much
blur is applied.
Distance Specifies the size of the shadow according to the angle setting. Drag the
slider to adjust how far the shadow encroaches on the layer.
Opacity Specifies the opacity of the shadow. Type a number from 1 to 99 or drag
the slider to adjust the opacity of the shadow. The higher the opacity, the
more visible the shadow is.
Angle Specifies the angle of the shadow. Type a number from 1 to 360 or drag
the arrow to adjust the angle.
Color Specifies the color of the shadow. Click the color picker to select a
different color. See Using the Color Dialog Box.
When clipping an Adjustment Layer to a text or image layer with layer effects applied to it, the
layer effects will not be affected.
To continue to edit an image's Layer Effects at a future date, when rasterizing a text layer with
layer effects applied, do not rasterize its layer effects.
To copy and paste layer effects:

Gemstone Photo Editor 12
Page 137 of 346
1. Configure the desired layer effects settings in the Layer Effects dialog.
2. Click the Copy button.
3. Select another image or text layer. (The bottom layer cannot be selected.)
4. In the Layer Effects dialog, click the Paste button.
To reset all layer effects settings:
In the Layer Effects dialog, click the Reset button.
Frequency Separation
By separating images into high frequency and low frequency layers, Frequency Separation negates
image imperfections while retaining detail and texture.
To Apply Frequency Separation:
1. With an image selected in the Layers pane, do one of the following:
Right-click the layer and select Frequency Separation.
Select Layer | Frequency Separation from the main menu.
Press Ctrl+Shift+ F.
2. In the Frequency Separation pane, adjust the Blur Radius slider to determine how much detail is visible
in the high frequency layer, and, by contrast, to determine the blur level of the low frequency layer.

Gemstone Photo Editor 12
Page 138 of 346
Toggle the view of each layer using the High Frequency and Low Frequency radio buttons. Please note
that these buttons do not impact the Blur Radius setting.
It is recommended to select a setting in which the details just become visible in the high
frequency layer.
3. Click Done.
A frequency separated image is separated into two layers: High Frequency (HF) and Low Frequency
(LF). The Low Frequency layer contains the tones, colors, and shadows of the image, and will appear
blurry on its own. This is because the texture information is stored on the High Frequency layer.
Retouching Images
By isolating adjustments to one layer or the other, it is possible to repair flaws while maintaining a
natural look.
Approach retouching with Frequency Separation in two ways:

Gemstone Photo Editor 12
Page 139 of 346
l Low Frequency Layers, and
l High Frequency Layers.
Low Frequency Layer
Use blurring on the Low Frequency layer to smooth out lighting inconsistencies and splotchiness. With
the Low Frequency layer selected, use the Detail Brush or Blur tool, or apply blurring to specific areas
by using a selection tool or brush.
High Frequency Layer
Use cloning on the High Frequency Layer to even texture and correct detail-related flaws. With the
High Frequency layer selected, use the Repair tool to apply cloning.
Increase sharpening by duplicating the high frequency layer one or more times.
Focus Stacking
You can use focus stacking to merge a series of images with different focal distances. By combining
multiple images with different areas in focus, you can create a new image with a greater depth of field.
To Use Focus Stacking:
Your selected images must have the same dimensions.
1. Open the first image in your series.
2.
At the bottom of the Layers pane, press the Add a File as a Layer button.
3. In the Import image as layer dialog, select the remaining images in your series. Ensure that you do not
select the first image a second time.
4. In the top left corner, press the Commit button.
You must arrange the images according to the order of their focal distance. This means
that the area that is in focus in each photo must move consistently in one direction, be it
from front to back, or back to front, or right to left, or left to right. Use rearranging in the
Layers pane, culling, renaming, or Ctrl + click to achieve this order of selection, as
necessary.
5. Choose Layer | Focus Stack...
6. A warning dialog will pop up. In the Layers pane, your layers must be arranged according to their focal
distance. If the layers are arranged according to focal distance, press Proceed. If the layers are not
arranged properly, press Cancel, and rearrange the order in the Layers pane.
7. In the Focus Stack dialog, configure the settings as described below.

Gemstone Photo Editor 12
Page 140 of 346
8. Press OK. If you have disabled Keep Layer Stack, all other layers will be removed and the focus stack
layer will be the only remaining layer in the Layers pane. If you have enabled Keep Layer Stack, the
focus stack layer will appear as the top layer in the Layers pane.
Focus Stacking Options
Merge
All Layers: Performs focus stacking using all layers in the Layers pane.
Selected Layers: Performs focus stacking on the selected layers in the Layers pane.
Focus stacking cannot be performed on a single layer.
Auto-Align
Layers
Aligns the images in the stack. For best results, keep this option enabled.
Keep Layer
Stack
Disable this option to delete all other layers, keeping only the resulting focus stack layer.
If you have accidentally disabled this option and deleted all other layers, press
Ctrl + Z after the command has run.
The Focus Stack command will ignore all masks, text layers, and adjustment layers.
Running the Focus Stack command on large images will require a significant amount of
memory.
HDR Images
High-dynamic-range imaging (HDR) is a technique used in digital image processing to combine a series
of images with different exposures to produce one image with an optimal overall range. You can use
the HDR tool to create a new image with a greater dynamic range of luminosity. Ideally, the images
you use with the HDRtool will include a well-balanced range of highlights and shadows. See below for
additional tips on achieving the best results.
In some cases, the HDR dialog's preview may not accurately reflect the HDR image it creates.
This is because the image is scaled down for the preview.
To create an HDR image, your set of images must have the following attributes defined in their EXIF
data:
an f-stop/number
an ISO value
a shutter speed/exposure value

Gemstone Photo Editor 12
Page 141 of 346
Shooting Photos for HDR
You will have a higher chance of generating quality results if you follow these instructions when
shooting your images for HDR:
Use the shutter speed to vary exposures. That said, varying the aperture setting changes the depth of
field, leading to poor quality results. Similarly, varying the ISO or aperture may generate noise or
vignettes. Set your ISO to its lowest value.
Generally, do not use your camera's auto-bracket feature as the exposure changes are not significant
enough.
Ensure that the scene you are shooting does not include features in motion. HDR is meant for photos of
the same scene with exposure variances.
Keep the camera stable using a tripod.
Use your camera's timer to avoid camera shake.
Keep the focus and zoom constant between images.
Shoot in RAW rather than JPEG. This will provide for greater range and flexibility.
Ensure there is detail in the deep shadows of your darkest exposure.
Ensure no area of the image is blown out in your lightest exposure.
Ensure the set of images is "balanced" (i.e. the middle image of the set has well-exposed midtones).
Using a quantity of photos higher than suggested in the table below can result in unwanted artifacts due
to improper alignment and ghosting.
Camera Bracket Settings Optimum Number of Exposures for Creating HDRImages
-1.0 to +1.0 3
-2.0 to +2.0 5
-3.0 to +3.0 7
To Create an HDR Image:
1. Open the first image in your series.
2.
At the bottom of the Layers pane, press the Add a File as a Layer button.
3. In the Import image as layer dialog, select the remaining images in your series. Ensure that you do not
select the first image a second time.
4. In the top left corner, press the Commit button.
5. Choose Layer | HDR... or press Ctrl + Shift + D.

Gemstone Photo Editor 12
Page 142 of 346
6. In the HDR dialog, configure the settings as described below.
7. Press OK. If you have disabled Keep Layer Stack, all other layers will be removed and the HDR layer will
be the only remaining layer in the Layers pane. If you have enabled Keep Layer Stack, the HDR layer will
appear as the top layer in the Layers pane.
HDR Options
Merge
All Layers: Merges all layers in the Layers pane.
Selected Layers: Merges the selected layers in the Layers pane. If only one layer is selected, ACDSee
will perform the command on that one layer, which will not generate any results.
Auto-
Align
Layers
Aligns the images in the stack. For best results, keep this option enabled.
Keep
Layer
Stack
Disable this option to delete all other layers, keeping only the resulting HDR layer.
If you have accidentally disabled this option and deleted all other layers, press Ctrl +
Z after the command has run.
The HDR command will ignore all masks, text layers, and adjustment layers.
Running HDR on large images will require a significant amount of memory.
Using Auto-Align
You can use Auto-Align to align layers for the purpose of creating composites. By stacking, aligning,
and masking sets of nearly-identical images in the Layers pane, you can omit unwanted areas while
exposing select areas to create one optimal version of the image.
After aligning, you can use layer masks to create an ideal composite.
To Align Multiple Layers:
1. Shift-click or Ctrl-click to select multiple images in the Layers pane.
2. Choose Layer | Auto-Align Layers.
The Auto-Align command will only align vertically. Therefore, attempting to align panoramas
or dissimilarly-sized images will yield undefined results.
Running the Auto-Align command on large images will require a significant amount of
memory.

Gemstone Photo Editor 12
Page 143 of 346
Using Auto-Blend
You can use Auto-Blend to merge stacks of images in two different ways:
Focus Stack: You can blend using focus stacking. This will merge images with different focal distances
to create a new image with a greater depth of field.
HDR: You can blend using HDR. This will merge images with different exposures to create a new image
with an optimal dynamic range.
Focus Stacking and HDR will ignore all masks, text layers, and adjustment layers.
Running HDR or Focus Stacking on large images will require a significant amount of memory.
To Auto-Blend Using Focus Stacking:
1. Open images in the Layers pane.
2. In the Layers pane, Ctrl + click to select specific layers or Shift + click to select a range of layers.
3. Choose Layer | Auto-Blend Layers...
4. In the Auto-Blend dialog, select Focus Blend.
5. Press OK.
6. A warning dialog will pop up. If you have selected your images according to the order of their focal
distance, press Proceed. If your image selection is not in order, press Cancel and change your order of
selection, whether by culling, renaming, or ctrl-clicking. The focus blended layer will appear as the top
layer in the Layers pane.
To Auto-Blend Using HDR:
1. Open images in the Layers pane.
2. In the Layers pane, Ctrl + click to select specific layers or Shift + click to select a range of layers.
3. Choose Layer | Auto-Blend Layers...
4. In the Auto-Blend dialog, choose HDR Blend.
5. Press OK. The HDR blended layer will appear as the top layer in the Layers pane.
Gemstone Photo Editor 12
Page 144 of 346
Chapter 5: Editing - Selection Tools
Using Selections
Use selections to isolate an area of a photo in order to apply edits or filters to only that area, rather
than the whole photo. Selection tools are enabled from the toolbar.
There are six Selection tools, each for selecting an area of a photo in a unique way:
Brush selection tool,
Polygon selection tool,
Rectangle selection tool,
Ellipse selection tool,
Lasso selection tool, and
Magic Wand selection tool.
The controls available for each Selection tool change depending on the selected tool.
Selection tools can be used with the following Edit tools:
Repair: Skin Tune, Chromatic Aberration
Add: Vignette, Special Effects, Tilt-Shift, Drawing tools, Grain
Exposure/Lighting: Exposure, Levels, Auto Levels, Tone Curves, Light EQ™, Dehaze, Dodge and Burn
Color: White Balance, Color EQ, Color Balance, Convert to Black and White, Split Tone
Detail: Sharpen, Blur, Noise, Clarity, Detail Brush
Selection Tools

Gemstone Photo Editor 12
Page 145 of 346
Lasso Click the left mouse button and drag the cursor to draw around the
area to select. While drawing, a line appears showing drawn areas.
Release the mouse, the end of the line automatically joins to the start
of the line to complete the selection. The entire selection animates
with a marching ants treatment.
Magic Wand Click any area of an image and all of the pixels of the same color are
included in the selection. Choose whether to select only the same
color pixels that are actually touching the clicked pixel, or select all the
pixels in the photo that are similar. Increase the threshold to include
more pixels in the selection. The lower the threshold, the more sim-
ilar a pixel has to be to the one clicked in order to be included. The
greater the threshold, the more different a pixel can be and still be in
the selection.
Rectangle Click and drag either a rectangle that begins at the point of first click
and ends where the mouse is released.
Ellipse Click and drag either an ellipse that begins at the point of first click and
ends where the mouse is released.
Polygon Click any area of the image to begin the selection. As the mouse is
moved, the selection will follow the cursor. To change the direction of
the selection line, click the left mouse button. Double-click to com-
plete the selection.
Brush Use the Brush selection tool to target a selection based on color,
brightness, or a combination of both color and brightness. Select
"Color", "Brightness", or "Magic" from the drop-down menu in the con-
text bar to define the selection. Then, align the center of the brush
with the color, brightness, or combination to be targeted, and begin
brushing. Increase the Tolerance slider to include a wider range of
pixels in the selection. The lower the Tolerance slider value, the more
similar a pixel has to be to the one clicked in order to be included. You
can erase the selection by right-clicking.
Overlay Options
The visual representation of a selection, known as an overlay, can be customized to find a visualization
best suited to the selection task.
To customize the selection overlay:
1. Select from the main menu Select | Overlay Options....
2. In the Overlay Options dialog, select one of the following overlay options:

Gemstone Photo Editor 12
Page 146 of 346
Marching Ants This option outlines the selection with animated dashes.
Selection Highlighted This option highlights the selection area in the color selected from
the drop-down menu. Customize the transparency of the color
overlay by adjusting the Opacity slider.
Selection Exposed This option highlights the non-selected area of an image in the color
selected from the drop-down menu. Customize the transparency of
the non-selected area by adjusting the Opacity slider.
3. Click OK.
Using the Selection Tools
To use the Lasso:
1.
Select the Lasso button from the toolbar.
2. On the image, click and hold down the left mouse button, then draw around the area to select.
3. Release the mouse button to complete the selection.
4. To clear the selection, click anywhere on the unselected part of the image (for the Lasso , Rectangle, or
Ellipse selection).
5.
To add to an existing selection, hold down Shift, or click the Add to selection icon in the Tool
Properties bar above the image, then draw a shape that includes any part of the original selection line.
After releasing the mouse, the original selection expands to include the outer edge of the
addition.

Gemstone Photo Editor 12
Page 147 of 346
6.
To add to an existing selection, hold down Shift, or click the Add to selection icon in the Tool
Properties bar above the image, and draw around any part of the image.
As long as the original selection is avoided, several separate additions can be added to an
original selection.
7.
To subtract from a selection, hold down Ctrl, or click the Subtract from selection icon in the Tool
Properties bar above the image, and draw a shape that includes part of the original selection, or
encircles it completely.
8. To apply edits or effects to the outside areas of the image, select from the main menu Select | Inverse
to reverse the selected area.
Inverse selection includes all of the area outside of the initial selection.

Gemstone Photo Editor 12
Page 148 of 346
Preview the selection mask by holding down the Preview button.
Editing tools or special effects can be applied to the selection.
To use the Magic Wand:
1.
Select the Magic Wand button in the toolbar.
2. Click any color in the image.
3. Do any of the following:
In the Tool Properties bar above the image, slide the Threshold slider to adjust the number of
pixels to be included or excluded. The Threshold slider sets how similar a pixel needs to be to
the one originally clicked in order to be included in the selection.
In the Tool Properties bar above the image, enable the Connected checkbox to include only
pixels touching the initially clicked pixel.
Hold down Shift and click around the selection to include more pixels.
Hold down Ctrl and click around the selection to remove pixels from the selection.
4. From the Wand type drop-down list in the Tool Properties bar, select one of the following:
Brightness: Selects pixels similar in brightness to the clicked area of the image.
Color: Selects pixels similar in hue and brightness to the clicked area of the image.
Color is generally the best option for the Magic Wand tool.
RGB: Selects pixels with a red, green, and blue combination similar to the clicked area of the
image
Preview the selection mask by holding down the Preview button.
Editing tools or special effects can be applied to the selection.
To use the Rectangle or Ellipse selection tool:
1.
Select either the Rectangle or Ellipse button from the toolbar. or
2. Click and drag to draw the selection on the image.

Gemstone Photo Editor 12
Page 149 of 346
3. Do any of the following:
To add to an existing selection, hold down Shift, or click the Add to selection icon in the
Tool Properties bar above the image, then draw a shape that includes any part of the original
selection line. After releasing the mouse, the original selection expands to include the outer
edge of the addition.
To add multiple areas to a selection, hold down Shift, or click the Add to selection icon in
the Tool Properties bar above the image, and draw around any part of the image.
To subtract from a selection, hold down Ctrl, or click the Subtract from selection icon in
the Tool Properties bar above the image, and draw a shape that includes part of the original
selection, or encircles it completely.
Preview the selection mask by holding down the Preview button.
Editing tools or special effects can be applied to the selection.
To use the Polygon selection tool:
1.
Select the Polygon button from the toolbar.
2. Click anywhere on the image to start a selection.
3. Click again to change the direction of the selection line.
4. Double-click to complete the selection.
5. Do any of the following:
To add to an existing selection, hold down Shift, or click the Add to selection icon in the
Tool Properties bar above the image, then draw a shape that includes any part of the original
selection line. After releasing the mouse, the original selection expands to include the outer
edge of the addition.
To add multiple areas to a selection, hold down Shift, or click the Add to selection icon in
the Tool Properties bar above the image, and draw around any part of the image.
To subtract from a selection, hold down Ctrl, or click the Subtract from selection icon in
the Tool Properties bar above the image, and draw a shape that includes part of the original
selection, or encircles it completely.
Preview the selection mask by holding down the Preview button.
Editing tools or special effects can be applied to the selection.

Gemstone Photo Editor 12
Page 150 of 346
To use the Brush selection tool:
1. Select the Brush Selection button from the toolbar.
2. In the Tool Properties bar above the image, select an option from the Smart Brushing drop-down list:
Color Selects pixels based on how similar they are to the color value of the pixel in the
center of the brush, depending on the Tolerance setting.
Brightness Selects pixels based on how similar they are to the brightness value of the pixel in
the center of the brush, depending on the Tolerance setting.
Magic Selects pixels based on how similar they are to the combination of the color and
brightness values in the center of the brush, depending on the Tolerance setting.
3. Adjust the Tolerance slider to increase or decrease the range of pixels selected.
4. Place the cursor over the desired color or brightness, and click and/or drag on the image to create a
selection.
To remove areas from the selection, right-click and drag over the area to deselect.
To use the brush as a regular selection tool, hold down Shift while brushing.
You can select an editing tool or a special effect to apply to the selection.
Right-click a slider to reset to the default value.
Combining the Tools
Selection tools can be used separately or in combination. For example, use the Magic Wand to select
most of a particular color, then switch to the Lasso to add to, or subtract from, the selection. Or, use
the Rectangle selection to select a large general area, then refine it using the Lasso.
To combine selection tools:
1. Select a tool from the toolbar and perform a selection on the image.
2. Select a second tool from the toolbar.
3.
Click the Add to selection icon.
4. Perform additional selections on the image.
Saving selections as presets:

Gemstone Photo Editor 12
Page 151 of 346
Save customized settings as a preset for future use. After making a selection, select from the main
menu Select | Save Selection....
To use a previously saved selection, select from the main menu Select | Load Selection....
To delete a saved selection, select from the main menu Select | Manage Selections....
To cut and paste selections:
1. Make a selection on an image.
2. Do one of the following:
Press Ctrl + C.
Select Edit | Copy from the main menu.
3. Do one of the following:
Press Ctrl + P.
Select Edit | Paste from the main menu.
The selection pastes onto a new layer above the selected (active) layer in the Layer Editor pane.
To delete selected pixels:
1. Make a selection on the image.
2. Select from the main menu Select | Delete Selected Pixels, or press Alt + Delete.
To retrieve deleted pixels, use the Undo button.
To create a layer mask from a selection:
See Layer Masks.
To add or subtract a mask from a selection:
See Layer Masks.
To intersect a mask with a selection:
See Layer Masks.
Targeting Selections
Selections can be targeted to specific color tones and brightness values, as well as skin tones.
To select pixels by color or tone:

Gemstone Photo Editor 12
Page 152 of 346
1. Select from the main menu Select | Luminance/Color Range....
2. In the Luminance/Color Range dialog, configure the settings as described below.
3. Press OK. Your targeted color(s) or tone(s) will be selected.
Pixel Targeting Dialog
Presets Select a saved preset from the drop-down list, or click the Save icon to save
the settings as a new preset.
Luminance Range The Luminance Range sliders target tones of brightness for selection.
Color Range The Color Range wheel targets specific colors for selection.
Smoothness Refines skin by suppressing texture detail.
Skin Targeting The Skin Targeting slider is used to specifically target skin tones for
selection. To target skin tones, move the slider to the right to values
between 0 and 100, depending on the desired intensity.
When moving the Skin Targeting slider, all other colors (except for skin
tones) are excluded and cannot be altered.
To exclude unwanted skin tones from the selection, move the slider to the
left to values between 0 and -100.
Luminosity Selection
Create a selection based on the brightness in the image. The brighter a pixel is, the stronger the
selection will be on that pixel.
To select pixels by brightness:
Select from the main menu Select | Luminosity Selection.
Subject Selection
Isolates and selects the subject from the image's background.
To select an image subject:
Select from the main menu Select | Select Subject.
Edits and Effects
After an area of an image is selected with one of the Selection tools, apply any of the editing tools,
such as color and exposure, or any of the special effects filters, to the selected area. An active selection
in an image looks like a line of marching ants.
To apply an edit or effect to a selection:

Gemstone Photo Editor 12
Page 153 of 346
1. Use a Selection tool to make a selection.
2. From the Filter main menu item, select a tool to use from any of the following groups:
Exposure/Lighting
Color
Detail
Add (Special Effects)
3. Use the tool to edit the image.
For the above filters, special selection options are available right-justified in the Tool Properties Bar.
Special Selection Options
Use Selection Click to use the selection or apply the edit or effect to the whole
image. Edit just the selection, then deselect Use Selection and apply
another edit to the whole image without clearing the selection.
Invert Selection Click to invert the selection.
Feathering Drag to increase or decrease the blurring between the edge of the
selection and the edit or effect.
Feathering prevents an unnatural or sharp transition between the
selection and the rest of the image as it blends the edges. This control
also makes it unnecessary for the selection to be perfectly on the edge
of the area you want to select.
Smart Eraser
Remove unwanted objects from images by selecting or brushing them and using the Smart Erase tool.
Smart Erase will analyze the image and predict how to best fill in the brushed or selected area. The
Smart Erase prediction is based on what the image would most likely look like without the selected or
brushed object(s).
Smart Erase will not work as intended if more than 25% of the image is selected or brushed.
To erase and fill a selection:
1. Select a Selection tool from the toolbar.
2. Select the area of the image to be filled by the Smart Eraser.
3. Select from the main menu Select | Smart Erase to apply the Smart Eraser.
4. Repeat until the desired look is achieved.

Gemstone Photo Editor 12
Page 154 of 346
When using the Brush selection tool, the Strength slider must be set to 50 or more.
To erase and fill using the Smart Erase brush:
1.
Select the Smart Erase brush from the toolbar.
2. Brush over the area to be filled.
3. Release the mouse button to apply the fill.
4. Repeat until the desired look is achieved.

Gemstone Photo Editor 12
Page 155 of 346
Chapter 6: Editing - Repair Tools
Red Eye
The Red Eye Reduction filter corrects red eye in digital photographs.
To correct red eye:
1. Select Filter | Repair | Red Eye Reduction from the main menu.
2. Use the Zoom tools in the bottom left corner to enlarge and center the eye to be corrected.
3. Click within the red portion of the eye.
4. In the Red Eye Reduction group, adjust the sliders as described below.
Red Eye Reduction Options
Crown Icon
Size Drag the slider to the right to increase the size of the area being
darkened, or to the left to decrease.
Darkening Drag the slider to the right to intensify the fill color, or to the left to
lighten.
Show outline Shows or hides the outline of the darkened area.
Right-click a slider to reset to the default value.
Scroll with the mouse to adjust the size of the area to darken.
Show or hide the outline of the darkened area by toggling the Show Outline checkbox.
Use the Delete key to remove the currently selected red eye adjustment.
Removing Flaws
Use Repair Filters to remove flaws, such as:
Skin blemishes,
Telephone wires and other unwanted objects,
Flash flares from snowflakes or windows, and
Lens scratches and water drops.

Gemstone Photo Editor 12
Page 156 of 346
There are four types of repairs available:
l Heal,
l Clone,
l Blended Clone, and
l Smart Erase.
Repair Tool Types
Heal Enabling the Heal radio button evokes the Healing Brush. The Healing
Brush copies pixels from one area of a photo to another, but analyzes the
pixels in the source area before copying. The Healing Brush also analyzes
the pixels in the target area, and then blends the pixels of both source and
target to match the surrounding area, ensuring that the lighting and color
of the replacement pixels integrate with the surrounding area. The Healing
Brush works particularly well with photos that involve complicated tex-
tures, like skin or fur.
Clone Enabling the Clone radio button evokes the Cloning Brush. The Cloning
Brush copies the exact pixels from one area of a photo to another, creating
an identical image area. The Cloning Brush is more effective for photos
that have strong, simple textures or uniform colors, as it is more difficult to
identify the copied pixels in the finished photo.
Blended Clone The Blended Clone tool copies the exact pixels from one area of a photo to
another, but it analyzes the pixels in the target area and blends them with
the copied pixels.
Smart Erase For information on Smart Erase, see the Smart Erase section below.
Repair settings can be saved as presets for future use.
To remove flaws from a photo:
1. Select Filter | Repair | Repair Tools from the main menu.
2. Select one of the following:
Heal: Copies the pixels from the source area to the target area, and blends pixels into the
surrounding image area.
Clone: Copies the pixels from the source area to the target area.
Blended Clone: Copies the pixels from the source area to the target area, then analyzes the
pixels in the target area and blends them with the copied pixels.

Gemstone Photo Editor 12
Page 157 of 346
Smart Erase: Analyzes pixels and fills in the brushed area based on what the image would most
likely look like without the brushed object. See the "Smart Erase" on page 157 section below.
3. Drag the Nib Width and Feathering sliders as described in the table below.
4. Right-click the image to set a source location. Pixels will be copied from this location and used in the
target location.
5. Click and drag over the area that you want to cover. If you selected the healing brush, Gemstone
analyzes and replaces the pixels when you release the mouse button. If you selected the blended clone
tool, Gemstone analyzes, replaces, and blends the pixels when you release the mouse button.
6. Do one of the following:
Click OK to apply your changes and close the tool.
Click Cancel to discard all changes and close the tool.
Click Reset to reset the sliders. If you saved your changes, you cannot reset your settings.
Scroll with your mouse to adjust the brush size on the fly, or press the Shift key while you
scroll to adjust feathering.
Repair Options
Nib Width Sets the width of the brush. The maximum brush width is relative to the
size of your image.
Feathering Sets the amount to feather on the edge of the brush to prevent sharp
transitions between the original and healed part of the photo.
Feathering is set as a percentage of the nib width, not as a specific
number of pixels. This means that you do not have to adjust the
feathering when you reset the Nib Width, as it automatically adjusts to a
percentage of the new nib width. This option is not available with the
Blended Clone tool.
Show preview in cursor Enable this checkbox to display a preview of your selected source point
in the cursor.
Right-click a slider to reset to the default value.
Smart Erase
Remove unwanted objects from images by brushing an image area while using the Smart Erase filter.
The Smart Erase filter analyzes the image and predicts how to best fill in the brushed area. This is

Gemstone Photo Editor 12
Page 158 of 346
based on what the image would most likely look like without the brushed object(s).
1. Select Filter | Repair | Repair Tools from the main menu.
2. In the Repair dialog, enable the Smart Erase radio button.
3. Drag the Nib Width slider or adjust the mouse wheel to set the width of the brush.
4. Brush over the area to be filled with the mouse button depressed. After releasing the mouse button,
the fill will be applied. Repeat until the desired look is achieved.
Skin Tune
Use the Skin Tune filter to even skin tone and smooth away blemishes and flaws.
To correct Skin Tone:
1. Do one of the following:
Click Filter | Repair | Skin Tune.
Press K.
2. In the Skin Tune dialog, adjust the settings as described below.
3. Do one of the following:
Click OK to accept your changes and close the panel.
Click Cancel to discard your changes and close the panel.
Skin Tune Options
Smoothing Refines skin by suppressing texture detail.
Glow Increases the brightness of skin while subtly smoothing.
Radius
Specifies the scale of the texture detail that is affected by the effect. A lower value
enhances small details, while a large value enhances larger details.
This filter features a Pixel Targeting tab (see Pixel Targeting for more details).
Use the Edit Brush to paint this effect onto specific areas of the image.
Use the Gradient tool to transition this effect across specific areas of the image.

Gemstone Photo Editor 12
Page 159 of 346
Use the Radial Gradient tool to apply effects around, or directly to, a center point.
Chromatic Aberration
Chromatic aberration is a lens artifact that can result in fringes in high contrast areas of some photos.
The camera lens can cause some wavelengths of light to focus differently, which appear in photos as
colored fringing or colored lines on the borders of high contrast areas. Purple fringing can also occur
when there is a bright spot of light in front of the lens.
This zoomed-in image shows an example of blue/yellow fringing.
The Chromatic Aberration filter is used to reduce the appearance of colored fringes, which can be
especially useful for photos with architectural details. For best results, it's recommended to use the
Chromatic Aberration sliders first, and then the Defringe sliders.
To reduce fringing in an image:
1. Select Filter | Repair | Chromatic Aberration from the main menu.
2. Adjust the sliders as described below.
3. Do one of the following:
Click OK to accept your changes and close the panel.
Click Cancel to discard your changes and close the panel.
Right-click a slider to reset to the default value.
Chromatic Aberration Options

Gemstone Photo Editor 12
Page 160 of 346
Fix Red/Cyan Adjust the red and cyan channels to reduce red/cyan fringing.
Fix Blue/Yellow Adjust the blue and yellow channels to reduce blue/yellow fringing.
Defringe strength Adjust the amount of fringe color to be removed from high contrast edges. A
setting of zero means that defringing is off.
Defringe radius Adjust the number of pixels surrounding an edge that will be defringed.
Fringe color Adjust the color to remove from high contrast edges.
This filter features a Pixel Targeting tab (see Pixel Targeting for more details).
Use the Edit Brush to paint this effect onto specific areas of the image.
Use the Gradient tool to transition this effect across specific areas of the image.
Use the Radial Gradient tool to apply effects around, or directly to, a center point.

Gemstone Photo Editor 12
Page 161 of 346
Chapter 7: Editing - Add Tools
Drawing Tools
Use the Drawing Tools to add lines and shapes, such as squares, circles, and arrows to an image. Other
options include adjusting the width, feathering, and blending of your brush, which is useful for
creating subtle and dramatic drawings.
To draw on an image:
1. Select a drawing tool on the Toolbar (see Toolbar and Tool Properties Bar).
2.
Optional: Select from one or more of the following options (Note: Options vary depending on
the tool selected):

Gemstone Photo Editor 12
Page 162 of 346
Option Instructions
Color
Select a color by clicking the color boxes at the top right of the
panel to open the Foreground or Background Color dialog, which
displays a dialog of swatches to choose from. If you are drawing a
solid shape, such as a rectangle, the top (foreground) color box
defines the color for the outline of the shape. The bottom
(background) color box defines the color that fills the center of the
shape. If you want your shape to be a solid color, set both color
boxes to match.
You can reset to black and white by pressing the reset
button directly next to the color boxes.
You can also access the color palette on the fly by
using the Color pane at the top of the Layered Editor.
Nib Width
Drag the Nib Width slider to set the diameter of the brush
measured in pixels.
Feathering
Select the Nib Width button to reveal the Feathering slider. Drag
the Feathering slider to set the blurring radius of the brush. Hold
down Shift while using the mouse wheel to adjust the feather
radius, represented by the dotted circle.
Spacing
Drag the Spacing slider to set how far apart each brush segment
will be. This slider specifies the percentage of the size of the nib
width, which determines how smooth or choppy the strokes will
appear.
Use Auto Spacing: Select the Use Auto Spacing checkbox to allow
ACDSee to choose a spacing percentage based on the nib width and
feathering settings, which will create a smooth-looking stroke.
Fill
Select the Fill checkbox to fill the shapes you draw with the
selected color.
Opacity
Drag the Opacity slider to specify the transparency of the brush
strokes.

Gemstone Photo Editor 12
Page 163 of 346
Blending
Select an option from the Blending drop-down menu to affect how
your brush strokes blend with your image as you draw.
3. Drag over the image to draw.
Right-click a slider to reset to the default value.
Watermark
The Watermark filter adds a watermark to a photo. The watermark can be moved to any position on
the photo, or the blend mode and opacity of the watermark can be changed.
Customized settings can be saved as a preset for future use. Presets can be selected from the
Presets drop-down, or saved by clicking the adjacent Save icon.
A watermark image will need to be created before adding a watermark to a photo.
To add a watermark to an image:
1. Select Filter | Add | Watermark from the main menu to open the Watermark dialog and display a
default watermark on the image.
2.
In the dialog's Watermark field set, select a watermark from the drop-down list, or click the Add
button and browse to open a new watermark.
3. Click and drag the watermark to reposition it anywhere on the image, or in the Positioning field set,
make a selection from the Anchor Point field to use a pre-defined location, or enter customized values
in the Horizontal and Vertical fields.
4. Drag the marquee handles to resize the watermark image.
5. Select Maintain aspect ratio when resizing to resize the watermark image without distorting it.
6. Select an option from the Blend Mode drop-down list to specify how you want the watermark to blend
into the underlying image.
7. Drag the Opacity slider to specify the transparency of the watermark.
8. Enable Add watermark as new layer to have the watermark added to the image as a new, separate
layer in the Layer Editor.
9. Enable Apply Alpha Channel to apply the alpha channel if it is present in the watermark. (Only TIF and
ICO watermark files can have an alpha channel.)
10. Select Apply Transparency to make a color in the watermark transparent.
The default color is black. Use the color picker to select a customized color.

Gemstone Photo Editor 12
Page 164 of 346
11. Do one of the following:
Click Apply to add the watermark to the image, and keep the Watermark tool open.
Click OK to add the watermark to the image, and leave the tool.
Click Cancel to discard any changes and leave the tool.
Right-click a slider to reset to the default value.
Borders
You can use the Borders tool to add one or more borders and edge effects to your images. You can set
the size of each side of the border, change the color and texture of the border or pick up a color from
within the image by clicking on that color in the image.
There are libraries of edges and textures to get you started, but you can save your own textures or
edges to the ACDSee folder so that they appear in the library for you to use.
You can also use Edge blur to soften the edges or blend the image into the background texture. You
can also add a third dimension to your images using the Drop Shadow and Raised edge effects.
Using combinations of multiple borders and edge effects can add to the mood and atmosphere of a
photo, emphasize contrast, and enhance color.
You can save your settings as a preset for future use.
To Add a Border to an Image:
1. Do one of the following:
Click Filter | Add | Borders.
On the Toolbar, click the Add icon and choose Borders from the menu.
2. Create the border by selecting its size, color, texture, edge, or edge effects as described in the Borders
options below.
3. Do one of the following:
Click Done to apply your changes and close the Border tool.
Click Cancel to discard all changes and close the tool.
4. To add another border, restart the border tool and repeat these steps.
Border Options

Gemstone Photo Editor 12
Page 165 of 346
Eyedropper
Picks up the color beneath the cursor when you click on the
image. The border changes to the clicked color, which also
appears in the Color box on the Borders pane so that you can
adjust it if you open the Color dialog box.
The eyedropper is not available when you are
using a texture.
Border
Size Sets the size of all the sides of the border
simultaneously. Drag the slider left and right to
adjust the width of the border. You can also type
in a different number or use the up and down
arrows to change the size of the border.
The text below the Size field shows the final size
of your image with the border added. The final
size changes dynamically as you adjust the size of
the border.
Advanced
size
controls
Opens a fly-out of advanced size controls. Use the
sliders, up- and down-arrow keys, or type in a
number, to set the size of each side of the border
individually. For example, you can set the bottom
border to be larger to include a space for
copyright information. Click on the arrow beside
the Size slider to open the advanced size controls
menu.
Color box Activates when you select the Color radio button.
Do any of the following:
Click on a color in the image to make the
border that color. The clicked color
appears in the Color box.
Click on the color in the middle of the
Color box to open the Colors dialog,
where you can adjust the color in
multiple ways.
Click the down-arrow beside the box and
hover over the quick-color box until you
find a color you like. When you click
inside the quick color box, the picked
color appears in the Color box and the
border changes to the selected color.

Gemstone Photo Editor 12
Page 166 of 346
Texture
box
Activates when you select the Texture radio
button.
Do any of the following:
Click the side arrow to open the texture
library and view thumbnails of textures to
select.
Click the forward and back arrows to
browse through the textures one at a
time, without opening the library.
Edge
Straight Sets the edge of the border to be a straight line.
Irregular Activates when you select the Irregular radio
button.
Do any of the following:
Click the side arrow beside the edge box
to open the edge library and view
thumbnails of edges to select.
Click the forward and back arrows to
browse through the edges one at a time,
without opening the library.
Edge blur Blurs the edges of the edge of the image into the
border. Drag the slider to the right to increase
the blur, or to the left to decrease the blur.
Edge effects
Drop
shadow
Adds a drop shadow to the image that appears to
lift it off the page. The drop shadow appears
behind the image, between it and the border.
You can adjust the depth of the blur on the edge
of the shadow, and the transparency of the
shadow, which affects how much of the border
shows through the shadow. You can also change
the direction of the imaginary source of light by
dragging the glow on the Light Source ball.
Blur: Adjusts the blur on the edge of the
shadow when you drag the slider.
Opacity: Adjusts the transparency of the
drop shadow when you drag the slider.

Gemstone Photo Editor 12
Page 167 of 346
Raised Adds a raised edge to the image that appears to
raise it above the border, giving it a 3D look. The
raised effect is applied to the image, between it
and the border. You can change the direction of
the imaginary source of light of the raised edge
by dragging the glow on the Light Source ball. You
can also adjust the size, strength, and color of the
raised edge in the following ways:
Size: Drag the slider to the right to
increase the size of the raised edge so
that it appears higher. The greater the size
the more rounded the effect.
Strength: Drag the slider to the right to
increase the 3D effect of the raised edge.
Colored: Select this option to apply the
border color to the raised edge.
Light Source
Activates when you click either the Drop shadow or Raised
checkboxes. Click and drag the glow on the ball to reposition
the imaginary light source for the 3D effect of the Drop shadow
or Raised edge effects.
Right-click a slider to reset to the default value.
Adding Your Own Textures or Edges
It is possible to add custom textures and edges to the libraries in the Borders tool. If you make your
own edges or textures, or own a collection from the Internet, you can add them to the texture and
edge libraries. You can also delete existing files from the libraries to make room for others.
The textures or edges have to be in the following file formats with these extensions:
BMP
EMF
GIF
JPG
GIF
PNG
TIF

Gemstone Photo Editor 12
Page 168 of 346
Textures
As the textures are tiled, it is important to use an image that can be seamlessly repeated. The files are
used at their full resolution, not scaled up or down. For example, if your texture image is 100 x 100
pixels and you are creating a bordered image that is 1000 x 1000 pixels, then your texture file will be
tiled 10 times. If you use a texture file that is 1000 x 1000 pixels, then there would just be the one
texture tile for the whole border.
To Add Your Own Textures to the Texture Library:
1. In Photo Editor, close the Borders tool if it is open.
2. Copy and paste your texture files into this folder:
C:\Program Files\Common Files\ACD Systems\borders\textures
3. Do one of the following:
Click Filter | Add | Borders.
On the Toolbar, click the Add icon and choose Borders from the menu.
4. Select the Texture radio button and then click the arrow on the right side of the texture box to open the
texture library.
Thumbnails of the textures display for you to select.
Edges
Edge files are grayscale images that are resized to fit the image. The image file shows through any areas
in the edge file that are white, and does not show through any black areas. Pixels that are tones of
gray in the edge file show through with relative opacity depending on how close the pixels are to black
or white (in other words, the darker the gray pixel, the less it shows through).
To Add Your Own Edges to the Edges Library:
1. In Photo Editor, close the Borders tool if it is open.
2. Copy and paste your edge files into this folder:
C:\Program Files\Common Files\ACD Systems\borders\edges
3. Do one of the following:
Click Filter | Add | Borders.
On the Toolbar, click the Add icon and choose Borders from the menu.
4. Select the Irregular radio button and then click the arrow on the right side of the edge box to open the
edge library.
Thumbnails of the edges display for you to select.

Gemstone Photo Editor 12
Page 169 of 346
If you open an image with borders already applied, another border will be applied to the
image.
Vignette
The Vignette filter adds a frame around a subject, such as a person or a bouquet of flowers, which can
help to enhance the focal point of the portrait. The appearance of the Vignette border is customizable.
Customized settings can be saved as a preset for future use. Presets can be selected from the
Presets drop-down, or saved by clicking the adjacent Save icon.
To apply a vignette filter:
1. Select Filter | Add | Vignette from the main menu, or press Shift + Alt + V.
2. Set the options as described below.
3. Do one of the following:
Click OK to apply any changes and close the tab.
Click Cancel to discard all changes and close the tab.
Vignette Options

Gemstone Photo Editor 12
Page 170 of 346
Horizontal Specifies the focal point of the portrait on the horizontal axis. A value of 500 places
the center in the middle of the photo.
Vertical Specifies the focal point of the portrait on the vertical axis. A value of 500 places the
center in the middle of the photo.
Clear zone Specifies the size of the clear area around the focal point in the portrait. Drag the
slider to the left to reduce the size of the clear area. Drag the slider to the right to
increase the size of the clear area.
Transition zone Specifies the width of the transition area between the clear zone and the frame.
Drag the slider to the left to narrow the transition area. Drag the slider to the right
to widen the transition area.
Stretch Stretches the vignette horizontally to make the shape elliptical rather than round.
Shape Specifies the shape of the frame:
Round: Select "Round" for a round frame.
Rectangular: Select "Rectangular" for a rectangular frame.
Show outline Select Show outline to display an outline that shows the outside edge of the clear
zone and the inside edge of the frame.
Frame Applies the following special effects to the vignette frame area around the focal
point:
Color: Changes the color of the frame area to the color selected in the color
picker.
Saturation: Removes color from the people or objects in the vignette frame
so they are gray scale.
Blur: Blurs the vignette frame area.
Clouds: Applies a Clouds effect to the frame area.
Edges: Applies an Edges effect by tracing the lines and details of people or
objects with neon colors.
Radial Waves: Creates the appearance of waves radiating from the focal
point into the frame area.
Radial Blur: Creates a Radial Blur that rotates and stretches the frame area.
Zoom Blur: Applies a Zoom Blur to the frame area.
Crayon Edges: Applies the Crayon Edges effect by tracing the lines and
details around people or objects with crayon.
Dauber: Creates the impression that the people or objects around the focal
point were painted with a brush.
Gemstone Photo Editor 12
Page 171 of 346
Pixelate: Applies a pixel effect to the frame.
Old: Applies an aging effect to the frame to make it look like an old photo.
Glowing Edges: Applies glowing edges to all the strong lines in the frame
area.
Ripple: Adds ripples to the frame so that it looks like liquid ripples moving
outwards from the focal area.
Color Settings Select a color from the drop-down list to produce a Color Picker for selecting the
vignette color.
Right-click a slider to reset to the default value.
This filter features a Pixel Targeting tab (see Pixel Targeting for more details).
Grain
The Grain filter gives images a stylized look, like old film grain. The Grain filter can also be used in
combination with other filters to achieve a generic vintage look.
Customized settings can be saved as a preset for future use. Presets can be selected from the
Presets drop-down, or saved by clicking the adjacent Save icon.
To apply a grain filter:
1. Select Filter | Add | Grain from the main menu, or press Alt + G.
2. Set the options as described below.
3. Do one of the following:
Click OK to apply any changes and close the tab.
Click Cancel to discard any changes and close the tab.
Grain Options
Amount Specifies the strength of the grain.
Smoothing Specifies the smoothness of the grain.
Size Specifies the size of the grain.
Right-click a slider to reset to the default value.

Gemstone Photo Editor 12
Page 172 of 346
This filter features a Pixel Targeting tab (see Pixel Targeting for more details).
Use the Edit Brush to paint this effect onto specific areas of the image.
Use the Gradient tool to transition this effect across specific areas of the image.
Use the Radial Gradient tool to apply effects around, or directly to, a center point.
Tilt-Shift
The Tilt-Shift filter creates emphasis on specific subjects in a photo, or makes photos look like
miniature landscapes.
To use the Tilt-Shift filter:
1. Select Filter | Add | Tilt-Shift from the main menu, or press Shift + Alt + X.
2. In the Tilt-Shift dialog, set the options as described below.
3. Do one of the following:
Click OK to accept any changes and close the panel.
Click Cancel to discard any changes and close the panel.
Tilt-Shift Options
Use the guides on the image to place the effect. The inside boxes represent the points where the focus
is transitioning to blur. Complete blur occurs at the outside boxes. Move the boxes to define where
the effect will begin or end. Hold down the Shift key while positioning the effect to lock to the nearest
45° angle, for straightness.
Tilt-Shift Options

Gemstone Photo Editor 12
Page 173 of 346
Blurring
Blurring
Use the drop-down list to select the type of blur. Options
include:
Lens Blur, and
Gaussian Blur.
See Blur Types for more information.
Amount Specifies the amount of blur applied.
Bokeh Frequency Specifies how often the bokeh shapes occur.
Bokeh Brightness Specifies how bright the bokeh shapes appear.
Bokeh Sides Defines the number of sides the bokeh shape will have.
Saturation
Drag the slider to the right to intensify the effect.
Use the Edit Brush to paint this effect onto specific areas of the image.
Use the Gradient tool to transition this effect across specific areas of the image.
Use the Radial Gradient tool to apply effects around, or directly to, a center point.
About Special Effect Filters
Gemstone includes more than 40 special effect filters, such as Crosshatch, Pencil Drawing, and Solarize
to add unique effects to images.
To access the Special Effects filters:
1. Select Filters | Add | Special Effects from the main menu.
2. Make a Special Effects selection in the Effects dialog. Special Effects are grouped under the following
headings:
l Artistic
l Color
l Distort
l Edges
l Light

Gemstone Photo Editor 12
Page 174 of 346
l Nature
l Painting
l Retro
l User Defined
For more information about each effect, click the Help menu item to view a Help file page
specific to that effect.
This filter features a Pixel Targeting tab (see Pixel Targeting for more details).
Use the Edit Brush to paint this effect onto specific areas of the image.
Use the Gradient tool to transition this effect across specific areas of the image.
Use the Radial Gradient tool to apply effects around, or directly to, a center point.
Bathroom Window
The Bathroom Window effect divides images into bars, transforming them to resemble the view
through privacy glass often found in bathroom windows. Select or customize the Bathroom Window
effect options to apply to the image.
Customized settings can be saved as a preset for future use. Presets can be selected from the
Presets drop-down, or saved by clicking the adjacent Save icon.
To apply a Bathroom Window effect:
1. Select Filter | Add | Special Effects from the main menu.
2. In the Effects dialog, navigate to the Distort group.
3. Select Bathroom Window.
4. Set the options as described below.
5. Do one of the following:
Click OK to accept your changes and close the panel.
Click Cancel to discard your changes and close the panel.
Bathroom Window Options

Gemstone Photo Editor 12
Page 175 of 346
Bar width Slide to dictate the width of the individual image slates.
Bar direction Enable either the Horizontal or Vertical radio buttons to specify the orientation of
the image bars.
Right-click a slider to reset to the default value.
Use the Edit Brush to paint this effect onto specific areas of the image.
Use the Gradient tool to transition this effect across specific areas of the image.
Use the Radial Gradient tool to apply effects around, or directly to, a center point.
Blinds
The Blinds effect divides an image into bars that look like venetian or vertical window blinds. The
characteristics of the blinds can be customized.
Customized settings can be saved as a preset for future use. Presets can be selected from the
Presets drop-down, or saved by clicking the adjacent Save icon.
To apply a Blinds effect:
1. Select Filter | Add | Special Effects from the main menu.
2. In the Effects dialog, navigate to the Artistic group.
3. Select Blinds.
4. Set the options as described below.
5. Do one of the following:
Click OK to accept your changes and close the panel.
Click Cancel to discard your changes and close the panel.
Blinds Options

Gemstone Photo Editor 12
Page 176 of 346
Width Specifies the width of the blinds. Enter a number from 1 to 1000 or drag the slider
to adjust the width of each blind. As the value increases, the width of the blind also
increases.
Opacity Specifies the opacity of the blinds. Enter a number from 1 to 99 or drag the slider to
adjust the opacity of the blinds. The higher the opacity, the more the image is
obscured.
Angle Specifies the angle of the blinds. Enter a number from 1 to 360 or drag the arrow to
adjust the angle.
Blind color Specifies the color of the blinds.
Right-click a slider to reset to the default value.
Use the Edit Brush to paint this effect onto specific areas of the image.
Use the Gradient tool to transition this effect across specific areas of the image.
Use the Radial Gradient tool to apply effects around, or directly to, a center point.
Blue Steel
The Blue Steel effect gives images a stylish blue tint.
To apply the Blue Steel effect:
1. Select Filter | Add | Special Effects from the main menu.
2. In the Effects dialog, navigate to the Retro group.
3. Select Blue Steel.
4. Do one of the following:
Click OK to accept your changes and close the panel.
Click Cancel to discard your changes and close the panel.
Use the Edit Brush to paint this effect onto specific areas of the image.

Gemstone Photo Editor 12
Page 177 of 346
Use the Gradient tool to transition this effect across specific areas of the image.
Use the Radial Gradient tool to apply effects around, or directly to, a center point.
Bob Ross
The Bob Ross effect gives images a painted look in the style of Bob Ross, an American painter and host
of the PBS TV show The Joy of Painting.
Customized settings can be saved as a preset for future use. Presets can be selected from the
Presets drop-down, or saved by clicking the adjacent Save icon.
To apply the Bob Ross effect to an image:
1. Select Filter | Add | Special Effects from the main menu.
2. In the Effects dialog, navigate to the Painting group.
3. Select Bob Ross.
4. Set the options as described below.
5. Do one of the following:
Click Done to accept your changes and close the panel.
Click Cancel to discard your changes and close the panel.
Bob Ross Options

Gemstone Photo Editor 12
Page 178 of 346
Brush size
Drag the Brush size slider to specify the width of the brush strokes in the
effect. The higher value, the wider the brush stroke.
Coverage
Drag the Coverage slider to specify the amount or density of paint on the
canvas.
Paint thickness
Drag the Paint thickness slider to specify how three dimensional the paint
appears.
Colorfulness
Drag the Colorfulness slider to specify the amount of color in the image.
Background color
Enable the Image checkbox to use the color in the image as the background
color behind the brush strokes added to the photo. To use a different color for
the background, disable the Image checkbox and select a new color from the
color picker.
Randomize
Indicates the random placement of the paint daubs. When applying the Bob
Ross effect to an image, Gemstone places the daubs randomly to make the
paint daubs appear different every time the filter is applied. To generate a
new random placement of the paint daubs, click the Randomize button.
Right-click a slider to reset to the default value.
Use the Edit Brush to paint this effect onto specific areas of the image.
Use the Gradient tool to transition this effect across specific areas of the image.
Use the Radial Gradient tool to apply effects around, or directly to, a center point.
Bulge
Use the Bulge effect to stretch or shrink areas of an image, horizontally and vertically. Customizing the
Bulge effect includes the strength, radius, and position of the distortion.
Customized settings can be saved as a preset for future use. Presets can be selected from the
Presets drop-down, or saved by clicking the adjacent Save icon.
To apply a Bulge effect:

Gemstone Photo Editor 12
Page 179 of 346
1. Select Filter | Add | Special Effects from the main menu.
2. In the Effects dialog, navigate to the Distort group.
3. Select Bulge.
4. Set the options as described below.
5. Do one of the following:
Click OK to accept your changes and close the panel.
Click Cancel to discard your changes and close the panel.
Bulge and Shrink Options
Horizontal position Specifies the center of the distortion along the horizontal axis. A lower value moves
the distortion towards the left side of the image, while a higher value moves it
towards the right side of the image.
Vertical position Specifies the center of the distortion along the vertical axis. A lower value moves
the distortion towards the bottom of the image, while a higher value moves it
towards the top of the image.
Radius Specifies the radius of the distorted area. A lower value decreases the radius of the
distortion, while a higher value increases the radius of the distortion.
Strength Specifies the strength of the distortion. A negative value shrinks the center of the
distortion, while a higher value bulges the distortion.
Background color Specifies the background color for the filtered image.
Select the Image checkbox to use the original image color, or click the color picker
to select a different color.
Bulge direction Specifies the direction of the distortion. Select one or both of the following options:
Horizontal: Moves the distortion horizontally.
Vertical: Moves the distortion vertically.
Right-click a slider to reset to the default value.
Use the Edit Brush to paint this effect onto specific areas of the image.
Use the Gradient tool to transition this effect across specific areas of the image.

Gemstone Photo Editor 12
Page 180 of 346
Use the Radial Gradient tool to apply effects around, or directly to, a center point.
Cartoon
The Cartoon effect gives images a sketched appearance.
Customized settings can be saved as a preset for future use. Presets can be selected from the
Presets drop-down, or saved by clicking the adjacent Save icon.
To apply a Cartoon effect:
1. Select Filter | Add | Special Effects from the main menu.
2. In the Effects dialog, navigate to the Painting group.
3. Select Cartoon.
4. Set the options as described below.
5. Do one of the following:
Click OK to accept your changes and close the panel.
Click Cancel to discard your changes and close the panel.
Cartoon Options
Shading strength
Specifies the strength of the shading in the image. The higher the setting, the
more intense the shading that is applied to the image.
Shading radius Specifies how spread out the shading is.
Shading threshold
Specifies how sharp an edge must be in the image before shading is applied. If a
higher value is specified, more edges in the photo will be shaded.
Smoothness Controls how smooth the transitions between similar colors are.
Outline detail Specifies how much the details are outlined in black.
Outline strength Specifies how strong the black outlines are applied.
Artifact suppression
Enable the Remove small details checkbox to prevent small details from being
outlined in black, allowing the image to appear more cartoon-like.
Right-click a slider to reset to the default value.

Gemstone Photo Editor 12
Page 181 of 346
Use the Edit Brush to paint this effect onto specific areas of the image.
Use the Gradient tool to transition this effect across specific areas of the image.
Use the Radial Gradient tool to apply effects around, or directly to, a center point.
Childhood
The Childhood effect gives an image a dreamy, nostalgic look.
To apply the Childhood effect:
1. Select Filter | Add | Special Effects from the main menu.
2. In the Effects dialog, navigate to the Retro group.
3. Select Childhood.
4. Do one of the following:
Click OK to accept your changes and close the panel.
Click Cancel to discard your changes and close the panel.
Right-click a slider to reset to the default value.
Use the Edit Brush to paint this effect onto specific areas of the image.
Use the Gradient tool to transition this effect across specific areas of the image.
Use the Radial Gradient tool to apply effects around, or directly to, a center point.
Clouds
The Clouds effect makes graphical content out of an images, such as backgrounds and more.
Gemstone Photo Editor 12
Page 182 of 346
Customized settings can be saved as a preset for future use. Presets can be selected from the
Presets drop-down, or saved by clicking the adjacent Save icon.
To apply the Clouds effect:
1. Select Filter | Add | Special Effects from the main menu.
2. In the Effects dialog, navigate to the Nature group.
3. Select Clouds.
4. Set the options as described below.
5. Do one of the following:
Click OK to accept your changes and close the panel.
Click Cancel to discard your changes and close the panel.
Clouds Options
Size Specifies the size of the clouds. Drag the slider to the right to increase the size.
Detail Specifies the detail's fineness. Enter a number from 0 to 10 or drag the slider to
adjust the details of the clouds.
Randomize Indicates the random placement of the clouds.
When applying the Clouds effect to an image, Gemstone places the fragments
randomly to make the effect different every time the filter is applied. Define a
specific random seed to generate identical fragment patterns.
To generate a new random seed, click the Randomize button.
Right-click a slider to reset to the default value.
Use the Edit Brush to paint this effect onto specific areas of the image.
Use the Gradient tool to transition this effect across specific areas of the image.
Use the Radial Gradient tool to apply effects around, or directly to, a center point.

Gemstone Photo Editor 12
Page 183 of 346
Collage
The Collage effect creatively breaks up a photo into a number of photos.
Customized settings can be saved as a preset for future use. Presets can be selected from the
Presets drop-down, or saved by clicking the adjacent Save icon.
To use the Collage effect:
1. Select Filter | Add | Special Effects from the main menu bar.
2. In the Effects dialog, navigate to the Artistic group.
3. Select Collage.
4. Set the options as described below.
5. Do one of the following:
Click OK to accept your changes and close the panel.
Click Cancel to discard your changes and close the panel.
Collage Options
Number of photos Sets the number of photos to include in the collage.
Size Sets the size of the photos to include in the collage.
Background color Selects a background color by clicking the drop-down arrow to display color
gradients
Randomize Reshuffles the photos.
Right-click a slider to reset to the default value.
Use the Edit Brush to paint this effect onto specific areas of the image.
Use the Gradient tool to transition this effect across specific areas of the image.
Use the Radial Gradient tool to apply effects around, or directly to, a center point.

Gemstone Photo Editor 12
Page 184 of 346
Colored Edges
The Colored Edges effect traces the lines and details of people or objects in an image.
Customized settings can be saved as a preset for future use. Presets can be selected from the
Presets drop-down, or saved by clicking the adjacent Save icon.
To apply a Colored Edges effect:
1. Select Filter | Add | Special Effects from the main menu.
2. In the Effects dialog, navigate to the Artistic group.
3. Select Colored Edges.
4. Set the options as described below.
5. Do one of the following:
Click OK to accept your changes and close the panel.
Click Cancel to discard your changes and close the panel.
Colored Edges Options
Intensity Specifies the amount of color added to the edges within the image. The higher the
setting, the thicker the color that is applied to the image.
Edge color Specifies the color of the edges.
Edge detection Specifies the edge detection algorithm. The algorithm controls the formula used to
detect the edges and the direction of the edge indicators.
Blurring Blurs the edges in the image. Enable the Use blurring checkbox, then select a blur
setting from the drop-down to determine how much blur is applied.
Right-click a slider to reset to the default value.
Use the Edit Brush to paint this effect onto specific areas of the image.
Use the Gradient tool to transition this effect across specific areas of the image.
Use the Radial Gradient tool to apply effects around, or directly to, a center point.

Gemstone Photo Editor 12
Page 185 of 346
Contours
The Contours effect draws contour lines on an image to create a cartoon effect. Customization
includes rounding, line frequency, color, and strength.
Customized settings can be saved as a preset for future use. Presets can be selected from the
Presets drop-down, or saved by clicking the adjacent Save icon.
To apply a Contours effect:
1. Select Filter | Add | Special Effects from the main menu.
2. In the Effects dialog, navigate to the Artistic group.
3. Select Contours.
4. Set the options as described below.
5. Do one of the following:
Click OK to accept your changes and close the panel.
Click Cancel to discard your changes and close the panel.
Contours Options
Rounding Specifies the amount of curve in the contour lines. The higher the value, the
rounder the lines.
Line frequency Specifies the amount of space between the contour lines. The higher the value, the
closer the lines move together.
Strength Specifies the strength of the line. The higher the value, the darker the line.
Line color Specifies the color of the contour lines.
Right-click a slider to reset to the default value.
Use the Edit Brush to paint this effect onto specific areas of the image.
Use the Gradient tool to transition this effect across specific areas of the image.
Use the Radial Gradient tool to apply effects around, or directly to, a center point.

Gemstone Photo Editor 12
Page 186 of 346
Crayon Drawing
The Crayon Drawing effect gives photos the appearance of a crayon drawing.
To use the Crayon Drawing effect:
1. Select Filter | Add | Special Effects from the main menu.
2. In the Effects dialog, navigate to the Painting group.
3. Select Crayon Drawing.
4. Do one of the following:
Click OK to accept your changes and close the panel.
Click Cancel to discard your changes and close the panel.
Use the Edit Brush to paint this effect onto specific areas of the image.
Use the Gradient tool to transition this effect across specific areas of the image.
Use the Radial Gradient tool to apply effects around, or directly to, a center point.
Crosshatch
The Crosshatch effect adds crosshatching to an image.
To use the Crosshatch effect:
1. Select Filter | Add | Special Effects from the main menu.
2. In the Effects dialog, navigate to the Artistic group.
3. Select Crosshatch.
4. Do one of the following:
Click OK to accept your changes and close the panel.
Click Cancel to discard your changes and close the panel.
Use the Edit Brush to paint this effect onto specific areas of the image.

Gemstone Photo Editor 12
Page 187 of 346
Use the Gradient tool to transition this effect across specific areas of the image.
Use the Radial Gradient tool to apply effects around, or directly to, a center point.
Dauber
The Dauber effect makes images look like they were painted with a paint dauber. Customization
options include intensity, frequency, and randomizing.
Customized settings can be saved as a preset for future use. Presets can be selected from the
Presets drop-down, or saved by clicking the adjacent Save icon.
To use the Dauber effect:
1. Select Filter | Add | Special Effects from the main menu.
2. In the Effects dialog, navigate to the Painting group.
3. Select Dauber.
4. Set the options as described below.
5. Do one of the following:
Click OK to accept your changes and close the panel.
Click Cancel to discard your changes and close the panel.
Dauber Options
Intensity Specifies the amount of color applied with each daub.
Frequency Specifies the number of daubs added to the image.
Background color Specifies the background color of the filtered image.
Select the Image checkbox to use the original image colors or click the color picker
to select a different color.
Randomize Indicates the random placement of the paint daubs.
When applying the Dauber effect to an image, Gemstone places the daubs
randomly to make the paint daubs different every time the filter is applied. To
generate a new random seed, click the Randomize button.
Right-click a slider to reset to the default value.

Gemstone Photo Editor 12
Page 188 of 346
Use the Gradient tool to transition this effect across specific areas of the image.
Use the Radial Gradient tool to apply effects around, or directly to, a center point.
Dramatic
The Dramatic effect makes images look dramatic and moody by drastically changing the contrast in
specific areas.
Customized settings can be saved as a preset for future use. Presets can be selected from the
Presets drop-down, or saved by clicking the adjacent Save icon.
To apply a Dramatic effect:
1. Select Filter | Add | Special Effects from the main menu.
2. In the Effects dialog, navigate to the Artistic group.
3. Select Dramatic.
4. Set the options as described below.
5. Do one of the following:
Click Done to accept your changes and close the panel.
Click Cancel to discard your changes and close the panel.
Dramatic Options
Strength Specifies the strength of the contrast being applied.
Spread Specifies how far the effect spreads over the details in the photo.
Right-click a slider to reset to the default value.
Use the Edit Brush to paint this effect onto specific areas of the image.
Use the Gradient tool to transition this effect across specific areas of the image.

Gemstone Photo Editor 12
Page 189 of 346
Use the Radial Gradient tool to apply effects around, or directly to, a center point.
Edge Detect
The Edge Detect effect creates a highlighted outline of an image. After creating a black image, the Edge
Detect effect uses colored lines to outline the detail of an image where significant color differences
exist. Greater differences between colors in the original image produce brighter outline colors. (The
Sobel effect is similar to the Edge Detect effect, but produces sharper and brighter outlines.)
To use the Edge Detect effect:
1. Select Filter | Add | Special Effects from the main menu.
2. In the Effects dialog, navigate to the Edges group.
3. Select Edge Detect.
4. Do one of the following:
Click OK to accept your changes and close the panel.
Click Cancel to discard your changes and close the panel.
Use the Edit Brush to paint this effect onto specific areas of the image.
Use the Gradient tool to transition this effect across specific areas of the image.
Use the Radial Gradient tool to apply effects around, or directly to, a center point.
Emboss
The Emboss effect adds a grayscale relief to an image.
Customized settings can be saved as a preset for future use. Presets can be selected from the
Presets drop-down, or saved by clicking the adjacent Save icon.
To Emboss an image:
1. Select Filter | Add | Special Effects from the main menu.
2. In the Effects dialog, navigate to the Artistic group.

Gemstone Photo Editor 12
Page 190 of 346
3. Select Emboss.
4. Set the options as described below.
5. Do one of the following:
Click OK to accept your changes and close the panel.
Click Cancel to discard your changes and close the panel.
Emboss Options
Elevation Specifies the light source's elevation on the image. Lower values produce more
shadows and a darker image. Higher values produce fewer shadows and a lighter
image.
Weight Specifies the amount of relief added to the image. Higher values increase the relief
depth.
Azimuth Specifies the angle of shadows that extend from the edges of image details. A value
of 0 adds shadows to the left side, while a value of 180 adds shadows to the right
side.
Right-click a slider to reset to the default value.
Use the Edit Brush to paint this effect onto specific areas of the image.
Use the Gradient tool to transition this effect across specific areas of the image.
Use the Radial Gradient tool to apply effects around, or directly to, a center point.
Furry Edges
The Furry Edges effect adds fur and bristles to the lines and details of people or objects in an image.
Customized settings can be saved as a preset for future use. Presets can be selected from the
Presets drop-down, or saved by clicking the adjacent Save icon.
To use the Furry Edges effect:
1. Select Filter | Add | Special Effects from the main menu.
2. In the Effects dialog, navigate to the Artistic group.

Gemstone Photo Editor 12
Page 191 of 346
3. Select Furry Edges.
4. Set the options as described below.
5. Do one of the following:
Click OK to accept your changes and close the panel.
Click Cancel to discard your changes and close the panel.
Furry Edges Options
Frequency Specifies how much fur is added to the image. The higher the setting, the more
dense the fur that is applied to the image.
Threshold Specifies how sharp an edge must be before fur is applied to it. As the value
decreases, the area of the image that fur is added to increases.
Fur length Specifies the length of each strand of fur. As the value increases, the length of each
fur strand also increases.
Variance Specifies how much of the fur grows in the direction indicated by the Hair direction
setting. The higher the value, the more random the fur direction will be.
Hair direction Specifies the general direction in which fur appears to grow.
Edge detection Specifies the edge detection algorithm. The algorithm controls the formula used to
detect the edges and the direction of the edge indicators.
Background color Specifies the background color of the filtered image. Select the Image checkbox to
use the original image colors, or click the color picker to select a different color.
Fur color Specifies the color of the fur. Select the Image checkbox to use the original image
colors, or click the color picker to select a different color.
Randomize Indicates the random placement of the fur strands.
When applying the Furry Edges effect to an image, Gemstone places the fur
randomly to make the fur strands different every time the filter is applied. You can
define a specific random seed to generate identical fur patterns.
To generate a new random seed, click the Randomize button.
Right-click a slider to reset to the default value.
Use the Edit Brush to paint this effect onto specific areas of the image.

Gemstone Photo Editor 12
Page 192 of 346
Use the Gradient tool to transition this effect across specific areas of the image.
Use the Radial Gradient tool to apply effects around, or directly to, a center point.
Gloom
The Gloom effect gives an images a dark, gloomy appearance.
Customized settings can be saved as a preset for future use. Presets can be selected from the
Presets drop-down, or saved by clicking the adjacent Save icon.
To apply a Gloom effect:
1. Select Filter | Add | Special Effects from the main menu.
2. In the Effects dialog, navigate to the Artistic group.
3. Select Gloom.
4. Set the options as described below.
5. Do one of the following:
Click OK to accept your changes and close the panel.
Click Cancel to discard your changes and close the panel.
Gloom Options
Color Slide to add a color tint to the image.
Right-click a slider to reset to the default value.
Use the Edit Brush to paint this effect onto specific areas of the image.
Use the Gradient tool to transition this effect across specific areas of the image.
Use the Radial Gradient tool to apply effects around, or directly to, a center point.

Gemstone Photo Editor 12
Page 193 of 346
Glowing Edges
The Glowing Edges effect adds color to the lines and details of people or objects in an image. The
colored lines and details appear to glow.
Customized settings can be saved as a preset for future use. Presets can be selected from the
Presets drop-down, or saved by clicking the adjacent Save icon.
To apply a Glowing Edges effect:
1. Select Filter | Add | Special Effects from the main menu.
2. In the Effects dialog, navigate to the Artistic group.
3. Select Glowing Edges.
4. Set the options as described below.
5. Do one of the following:
Click OK to accept your changes and close the panel.
Click Cancel to discard your changes and close the panel.
Glowing Edges Options
Intensity Specifies the amount of color added to the edges within the image. The higher the
setting, the more intense the color that is applied to the image.
Color Specifies the color of the edges.
Right-click a slider to reset to the default value.
Use the Edit Brush to paint this effect onto specific areas of the image.
Use the Gradient tool to transition this effect across specific areas of the image.
Use the Radial Gradient tool to apply effects around, or directly to, a center point.
Gradient Map
The Gradient Map effect adds colors to the dark and light parts of an image. The Gradient Map effect
maps shadows to one color, and highlights to another based on the lightness value of each pixel. Give

Gemstone Photo Editor 12
Page 194 of 346
the darker parts of an image a completely different color from the lighter parts.
Customized settings can be saved as a preset for future use. Presets can be selected from the
Presets drop-down, or saved by clicking the adjacent Save icon.
To apply a Gradient Map effect:
1. Select Filter | Add | Special Effects from the main menu.
2. In the Effects dialog, navigate to the Color group.
3. Select Gradient Map.
4. Set the options as described below.
5. Do one of the following:
Click OK to accept your changes and close the panel.
Click Cancel to discard your changes and close the panel.
Gradient Map Options
Dark Specify the color to be added to the dark parts of an image.
Light Specifies the color to be added to the light parts of an image.
Right-click a slider to reset to the default value.
Use the Edit Brush to paint this effect onto specific areas of the image.
Use the Gradient tool to transition this effect across specific areas of the image.
Use the Radial Gradient tool to apply effects around, or directly to, a center point.
Granite
The Granite effect gives images the appearance of being painted on a rock wall.
Customized settings can be saved as a preset for future use. Presets can be selected from the
Presets drop-down, or saved by clicking the adjacent Save icon.
To use the Granite effect:
Gemstone Photo Editor 12
Page 195 of 346
1. Select Filter | Add | Special Effects from the main menu.
2. In the Effects dialog, navigate to the Nature group.
3. Select Granite.
4. Set the options as described below.
5. Do one of the following:
Click OK to accept your changes and close the panel.
Click Cancel to discard your changes and close the panel.
Granite Options
Light Angle Specifies the direction from which an imaginary light source is shining on the image.
Drag the arrow to adjust the angle. Different light angles will change the highlights
and shadows in the peaks and valleys on the rock.
Use the Edit Brush to paint this effect onto specific areas of the image.
Use the Gradient tool to transition this effect across specific areas of the image.
Use the Radial Gradient tool to apply effects around, or directly to, a center point.
Grunge
The Grunge effect gives an image a moody, dark look.
Customized settings can be saved as a preset for future use. Presets can be selected from the
Presets drop-down, or saved by clicking the adjacent Save icon.
To apply a Grunge effect:
1. Select Filter | Add | Special Effects from the main menu.
2. In the Effects dialog, navigate to the Artistic group.
3. Select Grunge.
4. Set the options as described below.
Gemstone Photo Editor 12
Page 196 of 346
5. Do one of the following:
Click OK to accept your changes and close the panel.
Click Cancel to discard your changes and close the panel.
Grunge Options
Color Slide to add a color tint to the image. When the Color slider is set to 0, no tint has
been added.
Right-click a slider to reset to the default value.
Use the Edit Brush to paint this effect onto specific areas of the image.
Use the Gradient tool to transition this effect across specific areas of the image.
Use the Radial Gradient tool to apply effects around, or directly to, a center point.
Jiggle
The Jiggle effect adds jiggly distortions to an image. Customize distortion characteristics to be added
to an image. Some distortions will change the shape of the outside edges of the image, revealing a
transparent background.
Customized settings can be saved as a preset for future use. Presets can be selected from the
Presets drop-down, or saved by clicking the adjacent Save icon.
To apply a Jiggle effect:
1. Select Filter | Add | Special Effects from the main menu.
2. In the Effects dialog, navigate to the Distort group.
3. Select Jiggle.
4. Set the options as described below.

Gemstone Photo Editor 12
Page 197 of 346
5. Do one of the following:
Click OK to accept your changes and close the panel.
Click Cancel to discard your changes and close the panel.
Jiggle Options
Size Specifies the size of the jiggle distortion. Type a number from 1 to 100 or drag the
slider to adjust the width of the distortions. As the value increases, the width of the
wave also increases.
Detail Specifies how jagged the distortion becomes. Type a number from 1 to 10 or drag
the slider to adjust the detail.
Strength Specifies the intensity of the distortion. Type a number from 1 to 100 or drag the
slider to adjust the strength.
Randomize Indicates the random placement of the distortions.
When applying the Jiggle effect to an image, Gemstone places the fragments
randomly to make the effect different every time the filter is applied. To generate a
new random seed, click the Randomize button.
Right-click a slider to reset to the default value.
Use the Edit Brush to paint this effect onto specific areas of the image.
Use the Gradient tool to transition this effect across specific areas of the image.
Use the Radial Gradient tool to apply effects around, or directly to, a center point.
Lomo
The Lomo effect simulates the retro-effects of a lomo camera. Photos taken with a lomo camera are
high contrast, with a golden hue and a noticeable vignette.
Customized settings can be saved as a preset for future use. Presets can be selected from the
Presets drop-down, or saved by clicking the adjacent Save icon.
To use the Lomo effect:

Gemstone Photo Editor 12
Page 198 of 346
1. Select Filter | Add | Special Effects from the main menu.
2. In the Effects dialog, navigate to the Artistic group.
3. Select Lomo.
4. Set the options as described below.
5. Do one of the following:
Click OK to accept your changes and close the panel.
Click Cancel to discard your changes and close the panel.
Lomo Options
Color Distortion Slide to the right to increase the color distortion.
Vignette Strength Slide to the right to increase the vignette strength.
Right-click a slider to reset to the default value.
Use the Edit Brush to paint this effect onto specific areas of the image.
Use the Gradient tool to transition this effect across specific areas of the image.
Use the Radial Gradient tool to apply effects around, or directly to, a center point.
Mirror
The Mirror effect reflects an image along the horizontal or vertical axis. Select or change the Mirror
effect options to apply mirroring to an image, including mirror axis and direction.
Customized settings can be saved as a preset for future use. Presets can be selected from the
Presets drop-down, or saved by clicking the adjacent Save icon.
To apply a Mirror effect:
1. Select Filter | Add | Special Effects from the main menu.
2. In the Effects dialog, navigate to the Distort group.
3. Select Mirror.

Gemstone Photo Editor 12
Page 199 of 346
4. Set the options as described below.
5. Do one of the following:
Click OK to accept your changes and close the panel.
Click Cancel to discard your changes and close the panel.
Mirror Options
Mirror axis Slide to adjust the position of the mirror. A value of 500 places the mirror in the
center of the image.
Mirror direction Enable either the Horizontal or Vertical radio buttons to specify the orientation of
the image bars.
Right-click a slider to reset to the default value.
Use the Edit Brush to paint this effect onto specific areas of the image.
Use the Gradient tool to transition this effect across specific areas of the image.
Use the Radial Gradient tool to apply effects around, or directly to, a center point.
Negative
The Negative effect creates a negative of the image. The Negative effect can also be applied to a
negative scanned from a roll of film to produce a positive image.
To create an image negative:
1. Select Filter | Add | Special Effects from the main menu.
2. In the Effects dialog, navigate to the Color group.
3. Select Negative.
4. Do one of the following:
Click OK to accept your changes and close the panel.
Click Cancel to discard your changes and close the panel.

Gemstone Photo Editor 12
Page 200 of 346
Use the Edit Brush to paint this effect onto specific areas of the image.
Use the Gradient tool to transition this effect across specific areas of the image.
Use the Radial Gradient tool to apply effects around, or directly to, a center point.
Oil Paint
The Oil Paint effect give an image a painted with oils appearance.
Customized settings can be saved as a preset for future use. Presets can be selected from the
Presets drop-down, or saved by clicking the adjacent Save icon.
To create an Oil Paint effect:
1. Select Filter | Add | Special Effects from the main menu.
2. In the Effects dialog, navigate to the Painting group.
3. Select Oil Paint.
4. Set the options as described below.
5. Do one of the following:
Click OK to accept your changes and close the panel.
Click Cancel to discard your changes and close the panel.
Oil Paint Options
Brush Width Drag the Brush width slider to specify the width of the brush strokes in the effect.
The higher the value, the wider the brush stroke.
Variance Drag the Variance slider to specify the color variance in each brush stroke. Higher
values increase the number of colors used in each stroke.
Vibrance Drag the Vibrance slider to adjust the intensity of the colors in the image.
Right-click a slider to reset to the default value.

Gemstone Photo Editor 12
Page 201 of 346
Use the Edit Brush to paint this effect onto specific areas of the image.
Use the Gradient tool to transition this effect across specific areas of the image.
Use the Radial Gradient tool to apply effects around, or directly to, a center point.
Old
The Old effect gives an image an antique look. (The Old effect is similar to the Sepia effect, but
produces a more realistic appearance of age.)
Customized settings can be saved as a preset for future use. Presets can be selected from the
Presets drop-down, or saved by clicking the adjacent Save icon.
To apply the Old effect:
1. Select Filter | Add | Special Effects from the main menu.
2. In the Effects dialog, navigate to the Retro group.
3. Select Old.
4. Set the options as described below.
5. Do one of the following:
Click OK to accept your changes and close the panel.
Click Cancel to discard your changes and close the panel.
Old Options
Age Specifies the intensity or degree of the effect. (The numbers do not correspond to
how old the photo should appear.)
Right-click a slider to reset to the default value.
Use the Edit Brush to paint this effect onto specific areas of the image.

Gemstone Photo Editor 12
Page 202 of 346
Use the Gradient tool to transition this effect across specific areas of the image.
Use the Radial Gradient tool to apply effects around, or directly to, a center point.
Orton
The Orton effect creates beautiful impressionistic images. The Orton effect mimics a darkroom
technique created by sandwiching two images together, one of which is slightly out of focus, and both
of which are slightly overexposed.
Customized settings can be saved as a preset for future use. Presets can be selected from the
Presets drop-down, or saved by clicking the adjacent Save icon.
To use the Orton effect:
1. Select Filter | Add | Special Effects from the main menu.
2. In the Effects dialog, navigate to the Artistic group.
3. Select Orton.
4. Set the options as described below.
5. Do one of the following:
Click OK to accept your changes and close the panel.
Click Cancel to discard your changes and close the panel.
Orton Options
Blur Slide to the right to increase the blur.
Contrast Slide to the right to increase the contrast.
Brightness Slide to the right to increase the brightness.
Right-click a slider to reset to the default value.
Use the Edit Brush to paint this effect onto specific areas of the image.

Gemstone Photo Editor 12
Page 203 of 346
Use the Gradient tool to transition this effect across specific areas of the image.
Use the Radial Gradient tool to apply effects around, or directly to, a center point.
Outline
Use the Outline effect to create a highlighted outline of an image, similar to the Edge Detect effect.
However, with the Outline effect, the thickness of the outline can be controlled, whether an edge is
outlined or not, and the color that displays behind the outlined image.
Customized settings can be saved as a preset for future use. Presets can be selected from the
Presets drop-down, or saved by clicking the adjacent Save icon.
To use the Outline effect:
1. Select Filter | Add | Special Effects from the main menu.
2. In the Effects dialog, navigate to the Edges group.
3. Select Outline.
4. Set the options as described below.
5. Do one of the following:
Click OK to accept your changes and close the panel.
Click Cancel to discard your changes and close the panel.
Outline Options
Line width Specifies the width of the outline in the effect. The higher the value, the wider the
outline.
Threshold Specifies how sharp an edge must be in order to be outlined. If a higher value is
specified, more edges in the photo will be outlined.
Background color Specifies the background color of the filtered image. Click the color picker to select
a different color.
Right-click a slider to reset to the default value.
Use the Edit Brush to paint this effect onto specific areas of the image.

Gemstone Photo Editor 12
Page 204 of 346
Use the Gradient tool to transition this effect across specific areas of the image.
Use the Radial Gradient tool to apply effects around, or directly to, a center point.
Pencil Drawing
The Pencil Drawing effect creates a pencil drawing from an image.
To create a Pencil Drawing from an image:
1. Select Filter | Add | Special Effects from the main menu.
2. In the Effects dialog, navigate to the Painting group.
3. Select Pencil Drawing.
4. Do one of the following:
Click OK to accept your changes and close the panel.
Click Cancel to discard your changes and close the panel.
Use the Edit Brush to paint this effect onto specific areas of the image.
Use the Gradient tool to transition this effect across specific areas of the image.
Use the Radial Gradient tool to apply effects around, or directly to, a center point.
Photo Effect
The Photo Effect applies a variety of filters to an image.
Customized settings can be saved as a preset for future use. Presets can be selected from the
Presets drop-down, or saved by clicking the adjacent Save icon.
To apply a Photo Effect:

Gemstone Photo Editor 12
Page 205 of 346
1. Select Filter | Add | Special Effects from the main menu.
2. In the Effects dialog, navigate to the Artistic group.
3. Select Photo Effect.
4. Select an option from the Filter Type drop-down menu.
5. Do one of the following:
Click OK to accept your changes and close the panel.
Click Cancel to discard your changes and close the panel.
Right-click a slider to reset to the default value.
Use the Edit Brush to paint this effect onto specific areas of the image.
Use the Gradient tool to transition this effect across specific areas of the image.
Use the Radial Gradient tool to apply effects around, or directly to, a center point.
Pixel Explosion
The Pixel Explosion effect explodes pixels from a center point in an image. The Pixel Explosion effect
settings can be customized, such as intensity and direction.
Customized settings can be saved as a preset for future use. Presets can be selected from the
Presets drop-down, or saved by clicking the adjacent Save icon.
To use the Pixel Explosion effect:
1. Select Filter | Add | Special Effects from the main menu.
2. In the Effects dialog, navigate to the Artistic group.
3. Select Pixel Explosion.
4. Set the options as described below.

Gemstone Photo Editor 12
Page 206 of 346
5. Do one of the following:
Click OK to accept your changes and close the panel.
Click Cancel to discard your changes and close the panel.
Pixel Explosion Options
Horizontal center Specifies the center point of the explosion on the horizontal axis. A value of 500
places the explosion at the middle of the image.
Vertical center Specifies the center point of the explosion on the vertical axis. A value of 500 places
the explosion at the middle of the image.
Intensity Specifies the intensity of the explosion. A higher value creates a larger, more
brilliant spread of the pixels in the image.
Explosion direction Specifies the direction of the explosion. Select one or both of the following:
Explode horizontally: Explodes the pixels towards the right and left sides of
the image.
Explode vertically: Explodes the pixels towards the top and bottom of the
image.
Randomize Indicates the random placement of the pixels.
When applying the Pixel Explosion effect to an image, Gemstone places the pixels
randomly to make the pixels different every time the filter is applied. To generate a
new random seed, click the Randomize button.
Right-click a slider to reset to the default value.
Use the Edit Brush to paint this effect onto specific areas of the image.
Use the Gradient tool to transition this effect across specific areas of the image.
Use the Radial Gradient tool to apply effects around, or directly to, a center point.
Pixelate
A pixel is the smallest piece of a digital image, arranged in rows and columns. When the resolution of
an image is reduced, the size of the pixel increases and produces blurring. The Pixelate effect increases

Gemstone Photo Editor 12
Page 207 of 346
the size of the pixels in an image.
Customized settings can be saved as a preset for future use. Presets can be selected from the
Presets drop-down, or saved by clicking the adjacent Save icon.
To apply a Pixelate effect:
1. Select Filter | Add | Special Effects from the main menu.
2. In the Effects dialog, navigate to the Distort group.
3. Select Pixelate.
4. Set the options as described below.
5. Do one of the following:
Click OK to accept your changes and close the panel.
Click Cancel to discard your changes and close the panel.
Pixelate Options
Width Slide to the right to increase the width of the pixels in an image.
Height Slide to the right to increase the height of the pixels in an image.
Square Enable the Square checkbox to make the width and height equal.
Right-click a slider to reset to the default value.
Use the Edit Brush to paint this effect onto specific areas of the image.
Use the Gradient tool to transition this effect across specific areas of the image.
Use the Radial Gradient tool to apply effects around, or directly to, a center point.
Posterize
The Posterize effect reduces the number of brightness levels in an image.

Gemstone Photo Editor 12
Page 208 of 346
Customized settings can be saved as a preset for future use. Presets can be selected from the
Presets drop-down, or saved by clicking the adjacent Save icon.
To apply a Posterize effect:
1. Select Filter | Add | Special Effects from the main menu.
2. In the Effects dialog, navigate to the Color group.
3. Select Posterize.
4. Set the options as described below.
5. Do one of the following:
Click OK to accept your changes and close the panel.
Click Cancel to discard your changes and close the panel.
Posterize Options
Brightness levels Slide to adjust the variance of colors in the image. The lower the value, the fewer
colors used in the image.
Right-click a slider to reset to the default value.
Use the Edit Brush to paint this effect onto specific areas of the image.
Use the Gradient tool to transition this effect across specific areas of the image.
Use the Radial Gradient tool to apply effects around, or directly to, a center point.
Purple Haze
The Purple Haze effect gives an image a hyper-retro, purple tint.
To apply the Purple Haze effect:
1. Select Filter | Add | Special Effects from the main menu.
2. In the Effects dialog, navigate to the Color group.
3. Select Purple Haze.

Gemstone Photo Editor 12
Page 209 of 346
4. Do one of the following:
Click OK to accept your changes and close the panel.
Click Cancel to discard your changes and close the panel.
Right-click a slider to reset to the default value.
Use the Edit Brush to paint this effect onto specific areas of the image.
Use the Gradient tool to transition this effect across specific areas of the image.
Use the Radial Gradient tool to apply effects around, or directly to, a center point.
Radial Waves
The Radial Waves effect displays waves radiating from a center point in the photo. The center point of
the photo and the appearance of the waves can be customized.
Customized settings can be saved as a preset for future use. Presets can be selected from the
Presets drop-down, or saved by clicking the adjacent Save icon.
To apply a Radial Waves effect:
1. Select Filter | Add | Special Effects from the main menu.
2. In the Effects dialog, navigate to the Distort group.
3. Select Radial Waves.
4. Set the options as described below.
5. Do one of the following:
Click OK to accept your changes and close the panel.
Click Cancel to discard your changes and close the panel.
Radial Waves Options

Gemstone Photo Editor 12
Page 210 of 346
Horizontal position Specifies the center of the waves on the horizontal axis. A value of 500 places the
waves in the middle of the image.
Vertical position Specifies the center of the waves on the vertical axis. A value of 500 places the
waves in the middle of the image.
Amplitude Specifies the depth and height of each wave.
Wavelength Specifies the amount of space between waves.
Light strength Specifies the amount of light contrast between the top and bottom of each wave.
Background color Specifies the background color of the filtered image. Select the Image checkbox to
use the original image colors, or click the color picker to select a different color.
Wave direction Specifies the direction of the waves. Select one, or both, of the following:
l Wave horizontally: Makes the waves move towards the right and left sides of
the image.
l Wave vertically: Makes the waves move towards the top and bottom of the
image.
Right-click a slider to reset to the default value.
Use the Edit Brush to paint this effect onto specific areas of the image.
Use the Gradient tool to transition this effect across specific areas of the image.
Use the Radial Gradient tool to apply effects around, or directly to, a center point.
Rain
The Rain effect makes it look like it was raining when you took a photo. Customize the amount of rain,
the angle, strength and other characteristics.
Customized settings can be saved as a preset for future use. Presets can be selected from the
Presets drop-down, or saved by clicking the adjacent Save icon.
To apply the Rain effect:

Gemstone Photo Editor 12
Page 211 of 346
1. Select Filter | Add | Special Effects from the main menu.
2. In the Effects dialog, navigate to the Nature group.
3. Select Rain.
4. Set the options as described below.
5. Do one of the following:
Click OK to accept your changes and close the panel.
Click Cancel to discard your changes and close the panel.
Rain Options
Strength Specifies the length of the rain drops. Drag the slider to the right to increase the
length.
Opacity Specifies the opacity of the rain drops. Type a number from 0 to 100 or drag the
slider to adjust the opacity of the rain drops. The higher the opacity, the more the
image is obscured.
Amount Specifies the number of rain drops.
Angle variance Specifies the angle of the rain drops. Type a number from 0 to 50 or drag the arrow
to adjust the angle.
Strength variance Specifies how much variety there should be in the length of the rain drops. Drag the
slider to the left to have a similar length. Drag the slider to the right to vary the
length of rain drops. The more varied the length of the rain drops, the more natural
they will appear.
Background blur Specifies the amount of blur in the photo. Since heavy rainfall reduces visibility, use
the blur option to make the rain effect look more natural.
Angle Specifies the angle at which the rain drops are falling.
Color Specifies the color of the rain drops.
Right-click a slider to reset to the default value.
Use the Edit Brush to paint this effect onto specific areas of the image.
Use the Gradient tool to transition this effect across specific areas of the image.

Gemstone Photo Editor 12
Page 212 of 346
Use the Radial Gradient tool to apply effects around, or directly to, a center point.
Ripple
The Ripple effect divides images into concentric circles that resemble ripples from a pebble dropped
into water. Customization includes position and strength.
Customized settings can be saved as a preset for future use. Presets can be selected from the
Presets drop-down, or saved by clicking the adjacent Save icon.
To apply a Ripple effect:
1. Select Filter | Add | Special Effects from the main menu.
2. In the Effects dialog, navigate to the Distort group.
3. Select Ripple.
4. Set the options as described below.
5. Do one of the following:
Click OK to accept your changes and close the panel.
Click Cancel to discard your changes and close the panel.
Ripple Options
Horizontal position Specifies the center of the ripples on the horizontal axis. A value of 500 places the
ripples in the middle of the image.
Vertical position Specifies the center of the ripples on the vertical axis. A value of 500 places the
ripples in the middle of the image.
Amplitude Specifies the depth and height of each ripple.
Wavelength Specifies the amount of space between ripples.
Light strength Specifies the amount of light contrast between the top and bottom of each ripple.
Background color Specifies the background color of the filtered image. Enable the Image checkbox to
use the original image colors, or click the color picker to select a different color.
Ripple direction Specifies the direction of the ripples. Enable one or both of the following:
l Ripple vertically: Makes the ripples move towards the top and bottom of the
image.
l Ripple horizontally: Makes the ripples move towards the right and left sides
of the image.

Gemstone Photo Editor 12
Page 213 of 346
Right-click a slider to reset to the default value.
Use the Edit Brush to paint this effect onto specific areas of the image.
Use the Gradient tool to transition this effect across specific areas of the image.
Use the Radial Gradient tool to apply effects around, or directly to, a center point.
Scattered Tiles
The Scattered Tiles effect divides an images into rectangular tiles, and scatters and stacks the tiles.
Customized settings can be saved as a preset for future use. Presets can be selected from the
Presets drop-down, or saved by clicking the adjacent Save icon.
To apply a Scattered Tiles effect:
1. Select Filter | Add | Special Effects from the main menu.
2. In the Effects dialog, navigate to the Distort group.
3. Select Scattered Tiles.
4. Set the options as described below.
5. Do one of the following:
Click OK to accept your changes and close the panel.
Click Cancel to discard your changes and close the panel.
Scattered Tiles Options

Gemstone Photo Editor 12
Page 214 of 346
Tile size Specifies the size of the tiles.
Scatter amount Specifies how much the tiles will move from their original positions.
Background color Specifies the color of the background. Click the color picker to select a different
color.
Randomize Indicates the random placement of the tiles.
When applying the Scattered Tiles effect to an image, Gemstone places the tiles
randomly to make the effect different every time the filter is applied. To generate a
new random seed, click the Randomize button.
Right-click a slider to reset to the default value.
Use the Edit Brush to paint this effect onto specific areas of the image.
Use the Gradient tool to transition this effect across specific areas of the image.
Use the Radial Gradient tool to apply effects around, or directly to, a center point.
Sepia
The Sepia effect gives images an antique look. (The Old effect is similar to the Sepia effect, but
produces a more realistic appearance of age.)
To add a Sepia treatment to an image:
1. Select Filter | Add | Special Effects from the main menu.
2. In the Effects dialog, navigate to the Retro group.
3. Select Sepia.
4. Do one of the following:
Click OK to accept your changes and close the panel.
Click Cancel to discard your changes and close the panel.
Use the Edit Brush to paint this effect onto specific areas of the image.

Gemstone Photo Editor 12
Page 215 of 346
Use the Gradient tool to transition this effect across specific areas of the image.
Use the Radial Gradient tool to apply effects around, or directly to, a center point.
Seventies
The Seventies effect gives images a retro look based on the styles of the 1970s.
To apply the Seventies effect:
1. Select Filter | Add | Special Effects from the main menu.
2. In the Effects dialog, navigate to the Retro group.
3. Select Seventies.
4. Do one of the following:
Click OK to accept your changes and close the panel.
Click Cancel to discard your changes and close the panel.
Right-click a slider to reset to the default value.
Use the Edit Brush to paint this effect onto specific areas of the image.
Use the Gradient tool to transition this effect across specific areas of the image.
Use the Radial Gradient tool to apply effects around, or directly to, a center point.
Sheet Metal
The Sheet Metal effect turns an images into sheet metal impressions.
Customized settings can be saved as a preset for future use. Presets can be selected from the
Presets drop-down, or saved by clicking the adjacent Save icon.
To apply a Sheet Metal effect:
Gemstone Photo Editor 12
Page 216 of 346
1. Select Filter | Add | Special Effects from the main menu.
2. In the Effects dialog, navigate to the Artistic group.
3. Select Sheet Metal.
4. Set the options as described below.
5. Do one of the following:
Click OK to accept your changes and close the panel.
Click Cancel to discard your changes and close the panel.
Sheet Metal Options
Rounding Specifies the amount of curve in the edges of the impressions.
Detail Specifies the amount of detail in the impression.
Angle Specifies the angle of the grain in the sheet metal.
Metal color Specifies the color of the sheet metal.
Direction Specifies the direction in which the sheet metal was manipulated. Select one of the
following:
l Indented: Stamps the metal from the top side of the image.
l Pushed out: Stamps the metal from underneath the image.
Right-click a slider to reset to the default value.
Use the Edit Brush to paint this effect onto specific areas of the image.
Use the Gradient tool to transition this effect across specific areas of the image.
Use the Radial Gradient tool to apply effects around, or directly to, a center point.
Shift
The Shift effect divides images into bars and shifts the bars in random directions.

Gemstone Photo Editor 12
Page 217 of 346
Customized settings can be saved as a preset for future use. Presets can be selected from the
Presets drop-down, or saved by clicking the adjacent Save icon.
To apply a Shift effect:
1. Select Filter | Add | Special Effects from the main menu.
2. In the Effects dialog, navigate to the Distort group.
3. Select Shift.
4. Set the options as described below.
5. Do one of the following:
Click OK to accept your changes and close the panel.
Click Cancel to discard your changes and close the panel.
Shift Options
Strength Specifies the amount of shift between the bars.
Width Specifies the width of each bar.
Angle Specifies the angle of the bars.
Background color Specifies the background color of the filtered image. Enable the Image checkbox to
use the original image colors, or click the color picker to select a different color.
Right-click a slider to reset to the default value.
Use the Gradient tool to transition this effect across specific areas of the image.
Use the Radial Gradient tool to apply effects around, or directly to, a center point.
Slant
The Slant effect makes a photo appear slanted. For example, use the Slant effect to distort a photo by
pushing the top of the photo to the left and the bottom of the photo to the right. Similarly, use the
slant effect to push the left side of the photo upwards and the right side of the photo downwards.
Customized settings can be saved as a preset for future use. Presets can be selected from the
Presets drop-down, or saved by clicking the adjacent Save icon.

Gemstone Photo Editor 12
Page 218 of 346
To apply a Slant effect:
1. Select Filter | Add | Special Effects from the main menu.
2. In the Effects dialog, navigate to the Distort group.
3. Select Slant.
4. Set the options as described below.
5. Do one of the following:
Click OK to accept your changes and close the panel.
Click Cancel to discard your changes and close the panel.
Slant Options
Amount Specifies the degree of the slant.
Fulcrum Specifies the center of the slant. Drag the slider to the left to place the center of the
slant near the bottom of the photo. Drag the slider to the right to place the center
of the slant near the top of the photo.
Background color Specifies the background color of the filtered image. Click the color picker to select
a different color.
Slant Direction Specifies the angle of the slant:
Horizontal: Select Horizontal to push the top or bottom of the photo to the left
or right.
Vertical: Select Vertical to push the left or right side of the photo up or down.
Right-click a slider to reset to the default value.
Use the Edit Brush to paint this effect onto specific areas of the image.
Use the Gradient tool to transition this effect across specific areas of the image.
Use the Radial Gradient tool to apply effects around, or directly to, a center point.

Gemstone Photo Editor 12
Page 219 of 346
Sobel
The Sobel effect creates a highlighted outline of an image. After creating a black image, the Sobel effect
uses colored lines to outline the detail of an image where significant color differences exist. Greater
differences between colors in the original image produce brighter outline colors. (The Sobel effect is
similar to the Edge Detect effect, but produces sharper and brighter outlines.)
To use the Sobel effect:
1. Select Filter | Add | Special Effects from the main menu.
2. In the Effects dialog, navigate to the Edges group.
3. Select Sobel.
4. Do one of the following:
Click OK to accept your changes and close the panel.
Click Cancel to discard your changes and close the panel.
Use the Edit Brush to paint this effect onto specific areas of the image.
Use the Gradient tool to transition this effect across specific areas of the image.
Use the Radial Gradient tool to apply effects around, or directly to, a center point.
Solarize
The Solarize effect simulates the effect of overexposing an image, as though the film was exposed to
light before developing.
Customized settings can be saved as a preset for future use. Presets can be selected from the
Presets drop-down, or saved by clicking the adjacent Save icon.
To apply a Solarize effect:
1. Select Filter | Add | Special Effects from the main menu.
2. In the Effects dialog, navigate to the Color group.
3. Select Solarize.
4. Set the options as described below.

Gemstone Photo Editor 12
Page 220 of 346
5. Do one of the following:
Click OK to accept your changes and close the panel.
Click Cancel to discard your changes and close the panel.
Solarize Options
Threshold Specifies the brightness threshold of the image.
Effect Specify which pixels to adjust by selecting one of the following options.
Solarize: Adjusts pixels located above the specified threshold option. The effect
takes any pixels above the threshold and replaces them with their negative value.
When solarizing an image, a higher threshold value sets a brighter threshold, and
colors need to be brighter to be overexposed.
Lunarize: Adjusts pixels located below the specified threshold option. The effect
takes any pixels below the threshold and replaces them with their negative value.
When lunarizing an image, a higher threshold value sets a darker threshold, and
colors do not have to be as bright to be overexposed.
Right-click a slider to reset to the default value.
Use the Edit Brush to paint this effect onto specific areas of the image.
Use the Gradient tool to transition this effect across specific areas of the image.
Use the Radial Gradient tool to apply effects around, or directly to, a center point.
Somber
The Somber effect gives an image an austere or sleek look.
To apply the Somber effect:
1. Select Filter | Add | Special Effects from the main menu.
2. In the Effects dialog, navigate to the Retro group.
3. Select Somber.

Gemstone Photo Editor 12
Page 221 of 346
4. Do one of the following:
Click OK to accept your changes and close the panel.
Click Cancel to discard your changes and close the panel.
Use the Edit Brush to paint this effect onto specific areas of the image.
Use the Gradient tool to transition this effect across specific areas of the image.
Use the Radial Gradient tool to apply effects around, or directly to, a center point.
Stained Glass
The Stained Glass effect divides images into fragments of a random size and shape, to give the photo
the appearance of a stained glass window.
Customized settings can be saved as a preset for future use. Presets can be selected from the
Presets drop-down, or saved by clicking the adjacent Save icon.
To apply a Stained Glass effect:
1. Select Filter | Add | Special Effects from the main menu.
2. In the Effects dialog, navigate to the Artistic group.
3. Select Stained Glass.
4. Set the options as described below.
5. Do one of the following:
Click OK to accept your changes and close the panel.
Click Cancel to discard your changes and close the panel.
Stained Glass Options
Fragment size Specifies the size of the fragments.
Randomize Indicates the random placement of the fragments.
When applying the Stained Glass effect to an image, Gemstone places the
fragments randomly to make the effect different every time the filter is applied. To
generate a new random seed, click the Randomize button.

Gemstone Photo Editor 12
Page 222 of 346
Right-click a slider to reset to the default value.
Use the Edit Brush to paint this effect onto specific areas of the image.
Use the Gradient tool to transition this effect across specific areas of the image.
Use the Radial Gradient tool to apply effects around, or directly to, a center point.
Sunspot
The Sunspot effect adds a bright spot to images.
Customized settings can be saved as a preset for future use. Presets can be selected from the
Presets drop-down, or saved by clicking the adjacent Save icon.
To apply a Sunspot effect:
1. Select Filter | Add | Special Effects from the main menu.
2. In the Effects dialog, navigate to the Light group.
3. Select Sunspot.
4. Set the options as described below.
5. Do one of the following:
Click OK to accept your changes and close the panel.
Click Cancel to discard your changes and close the panel.
Sunspot Options
Horizontal position Specifies the horizontal position of the sunspot.
Vertical position Specifies the vertical position of the sunspot.
Brightness Specifies the intensity of the sunspot.
Right-click a slider to reset to the default value.

Gemstone Photo Editor 12
Page 223 of 346
Swirl
The Swirl effect rotates and stretches people and objects in an image.
Customized settings can be saved as a preset for future use. Presets can be selected from the
Presets drop-down, or saved by clicking the adjacent Save icon.
To apply a Swirl effect:
1. Select Filter | Add | Special Effects from the main menu.
2. In the Effects dialog, navigate to the Distort group.
3. Select Swirl.
4. Set the options as described below.
5. Do one of the following:
Click OK to accept your changes and close the panel.
Click Cancel to discard your changes and close the panel.
Swirl Options
Horizontal position Specifies the center of the swirl on the horizontal axis. A value of 500 places the
swirl in the middle of the image.
Vertical position Specifies the center of the swirl on the vertical axis. A value of 500 places the swirl
in the middle of the image.
Radius Specifies the size of the swirl effect.
Strength Specifies the strength and direction of the swirl. Higher values create a clockwise
swirl, while negative values create a counter-clockwise swirl.
Focus Specifies the concentration of the swirl. Higher values concentrate the effect on the
center of the swirl, while lower values spread the swirl across the image.
Background color Specifies the background color of the filtered image. Select the Image checkbox to
use the original image colors, or click the color picker to select a different color.
Swirl direction Specifies the direction of the swirl. Select one or both of the following:
l Swirl horizontally: Moves the swirl towards the top and bottom of the image.
l Swirl vertically: Moves the swirl towards the right and left sides of the image.
Right-click a slider to reset to the default value.

Gemstone Photo Editor 12
Page 224 of 346
Use the Edit Brush to paint this effect onto specific areas of the image.
Use the Gradient tool to transition this effect across specific areas of the image.
Use the Radial Gradient tool to apply effects around, or directly to, a center point.
Threshold
The Threshold effect creates a black and white image.
Customized settings can be saved as a preset for future use. Presets can be selected from the
Presets drop-down, or saved by clicking the adjacent Save icon.
To apply the Threshold effect:
1. Select Filter | Add | Special Effects from the main menu.
2. In the Effects dialog, navigate to the Artistic group.
3. Select Threshold.
4. Set the options as described below.
5. Do one of the following:
Click OK to accept your changes and close the panel.
Click Cancel to discard your changes and close the panel.
Threshold Options
Threshold The Threshold slider determines which pixels become black and which ones
become white in a black and white rendering of the image. Any pixels that are
brighter than the selected threshold will become white and any pixels that are
darker than the threshold will become black.
Right-click a slider to reset to the default value.
Use the Edit Brush to paint this effect onto specific areas of the image.

Gemstone Photo Editor 12
Page 225 of 346
Use the Gradient tool to transition this effect across specific areas of the image.
Use the Radial Gradient tool to apply effects around, or directly to, a center point.
Topography
The Topography effect changes the details of an images into contour lines.
Customized settings can be saved as a preset for future use. Presets can be selected from the
Presets drop-down, or saved by clicking the adjacent Save icon.
To apply a Topography effect:
1. Select Filter | Add | Special Effects from the main menu.
2. In the Effects dialog, navigate to the Artistic group.
3. Select Topography.
4. Set the options as described below.
5. Do one of the following:
Click OK to accept your changes and close the panel.
Click Cancel to discard your changes and close the panel.
Threshold Options
Rounding Adjusts the amount of curve in the contour lines.
Number of lines Specifies how many contour lines to add.
Right-click a slider to reset to the default value.
Use the Edit Brush to paint this effect onto specific areas of the image.
Use the Gradient tool to transition this effect across specific areas of the image.
Use the Radial Gradient tool to apply effects around, or directly to, a center point.
Gemstone Photo Editor 12
Page 226 of 346
Water
The Water effect inserts an expanse of water below the subject of a photo to display a reflection of the
subject in the water. The position of the water below the subject can be customized. For example,
position the water below a person's chin, below their waist, or control the appearance of ripples in the
water and how dark or light the water appears.
Customized settings can be saved as a preset for future use. Presets can be selected from the
Presets drop-down, or saved by clicking the adjacent Save icon.
To apply a Water effect:
1. Select Filter | Add | Special Effects from the main menu.
2. In the Effects dialog, navigate to the Nature group.
3. Select Water.
4. Set the options as described below.
5. Do one of the following:
Click OK to accept your changes and close the panel.
Click Cancel to discard your changes and close the panel.
Water Options
Position Specifies the position of the water below the subject of the photo.
Amplitude Specifies the height of the ripples in the water. Drag the slider to the left to reduce
the height of the ripples and the distortion caused by the ripples. Drag the slider to
the right to increase the height of the ripples and the distortion caused by the
ripples.
Wavelength Specifies the distance between ripples. Drag the slider to the left to reduce the
distance between ripples and increase the distortion caused by the ripples. Drag
the slider to the right to increase the distance between ripples and reduce the
distortion caused by the ripples.
Perspective Changes the size of the waves as they get farther from the subject. Drag the slider
to the left to increase the size of the waves farthest from the subject and to
increase the illusion of distance.
Lighting Specifies the amount of light in the water.
Right-click a slider to reset to the default value.

Gemstone Photo Editor 12
Page 227 of 346
Use the Edit Brush to paint this effect onto specific areas of the image.
Use the Gradient tool to transition this effect across specific areas of the image.
Use the Radial Gradient tool to apply effects around, or directly to, a center point.
Water Drops
The Water Drops effect displays water drops on the surface of the photo. The number and size of
water drops, and their position on the photo are customizable.
Customized settings can be saved as a preset for future use. Presets can be selected from the
Presets drop-down, or saved by clicking the adjacent Save icon.
To apply the Water Drops effect:
1. Select Filter | Add | Special Effects from the main menu.
2. In the Effects dialog, navigate to the Nature group.
3. Select Water Drops.
4. Set the options as described below.
5. Do one of the following:
Click OK to accept your changes and close the panel.
Click Cancel to discard your changes and close the panel.
Water Drops Options

Gemstone Photo Editor 12
Page 228 of 346
Density Specifies the number of water drops on the photo. Drag the slider to the left to
remove water drops. Drag the slider to the right to add water drops.
Radius Specifies the size of the water drops. Drag the slider to the left to make the water
drops smaller. Drag the slider to the right to make the water drops larger.
Height Specifies the height of the water drops above the photo surface. Drag the slider to
the left to reduce the height of the water drops and the distortion caused by the
water drops. Drag the slider to the right to increase the height of the water drops
and the distortion caused by the water drops.
Randomize Indicates the random placement of the water drops.
When applying the Water Drops effect to an image, Gemstone places the water
drops randomly to make the effect different every time the filter is applied. To
generate a new random seed, click the Randomize button.
Right-click a slider to reset to the default value.
Use the Edit Brush to paint this effect onto specific areas of the image.
Use the Gradient tool to transition this effect across specific areas of the image.
Use the Radial Gradient tool to apply effects around, or directly to, a center point.
Waves
The Waves effect displays waves across a photo. Change the distance between waves, called
"wavelength", or change the height of the waves, and the angle at which the waves cross the photo.
Customized settings can be saved as a preset for future use. Presets can be selected from the
Presets drop-down, or saved by clicking the adjacent Save icon.
To apply a Waves effect:
1. Select Filter | Add | Special Effects from the main menu.
2. In the Effects dialog, navigate to the Distort group.
3. Select Waves.
4. Set the options as described below.

Gemstone Photo Editor 12
Page 229 of 346
5. Do one of the following:
Click OK to accept your changes and close the panel.
Click Cancel to discard your changes and close the panel.
Waves Options
Wavelength Specifies the distance between waves. Drag the slider to the left to reduce the
distance between waves and increase the distortion caused by the waves. Drag the
slider to the right to increase the distance between waves and reduce the
distortion caused by the waves.
Amplitude Specifies the height of the waves. Drag the slider to the left to reduce the height of
the waves and the distortion caused by the waves. Drag the slider to the right to
increase the height of the waves and the distortion caused by the waves.
Angle Specifies the angle of the waves. Type a number from 1 to 360 or drag the arrow to
adjust the angle.
Background color Specifies the background color. Enable the Image checkbox to use the original
image colors, or click the color picker to select a different color.
Right-click a slider to reset to the default value.
Use the Edit Brush to paint this effect onto specific areas of the image.
Use the Gradient tool to transition this effect across specific areas of the image.
Use the Radial Gradient tool to apply effects around, or directly to, a center point.
Weave
The Weave effect gives a photo the appearance of being woven into a tapestry or basket. Control the
width of the vertical and horizontal strips, the width of the gap between the strips, and the
background color that displays through the gap.
Customized settings can be saved as a preset for future use. Presets can be selected from the
Presets drop-down, or saved by clicking the adjacent Save icon.
To apply a Weave effect:

Gemstone Photo Editor 12
Page 230 of 346
1. Select Filter | Add | Special Effects from the main menu.
2. In the Effects dialog, navigate to the Artistic group.
3. Select Weave.
4. Set the options as described below.
5. Do one of the following:
Click OK to accept your changes and close the panel.
Click Cancel to discard your changes and close the panel.
Weave Options
Strip width Specifies the width of the vertical and horizontal strips.
Gap width Specifies the width of the gap between the strips.
Background color Specifies the color of the background. Click the color picker to select a different
color.
Right-click a slider to reset to the default value.
Use the Edit Brush to paint this effect onto specific areas of the image.
Use the Gradient tool to transition this effect across specific areas of the image.
Use the Radial Gradient tool to apply effects around, or directly to, a center point.
Wind
The Wind effect adds wind lines that make stationary objects in an image look like they are moving.
Customized settings can be saved as a preset for future use. Presets can be selected from the
Presets drop-down, or saved by clicking the adjacent Save icon.
To apply a Wind effect:
1. Select Filter | Add | Special Effects from the main menu.
2. In the Effects dialog, navigate to the Artistic group.

Gemstone Photo Editor 12
Page 231 of 346
3. Select Wind.
4. Set the options as described below.
5. Do one of the following:
Click OK to accept your changes and close the panel.
Click Cancel to discard your changes and close the panel.
Wind Options
Strength Determines how strong the wind lines are in the image. The higher the value, the
stronger the wind lines.
Threshold Determines how sharp an edge must be before the filter will apply wind. The higher
the value, the sharper the edge needs to be.
Chance of wind Determines the amount of wind lines to place in the image.
Edge detection Specifies the edge detection algorithm. The algorithm controls the formula used to
detect the edges and the direction of the edge indicators.
Background color Specifies the background color. Enable the Image checkbox to use the original
image colors, or click the color picker to select a different color.
Wind color Specifies the color of the wind lines. Enable the Image checkbox to use the original
image colors, or click the color picker to select a different color.
Wind angle Specifies the angle of the wind lines.
Randomize Indicates the random placement of the wind lines.
When applying the Wind effect to an image, Gemstone places the wind lines
randomly to make the wind lines different every time the filter is applied. To
generate a new random seed, click the Randomize button.
Right-click a slider to reset to the default value.
Use the Edit Brush to paint this effect onto specific areas of the image.
Use the Gradient tool to transition this effect across specific areas of the image.
Use the Radial Gradient tool to apply effects around, or directly to, a center point.

Gemstone Photo Editor 12
Page 232 of 346
User Defined Convolution
The User Defined Convolution effect creates a customized special effect.
Customized settings can be saved as a preset for future use. Presets can be selected from the
Presets drop-down, or saved by clicking the adjacent Save icon.
To create a User Defined Convolution effect:
1. Select Filter | Add | Special Effects from the main menu.
2. In the Effects dialog, navigate to the User Defined group.
3. Select User Defined Convolution.
4. Set the options as described below.
5. Do one of the following:
Click OK to accept your changes and close the panel.
Click Cancel to discard your changes and close the panel.
User Defined Convolution Options
Convolution Matrix Specifies the formula to use when altering the image.
Enter numbers in the matrix fields to change the pixels in the image. Using a
mathematical formula, the color value of each pixel in an image is multiplied by the
numbers in the matrix to produce an effect.
Division factor Specifies the fractional coefficient of the matrix.
Enter a number into the Division factor field to use fractional coefficients in the
matrix. The product of the convolution matrix is divided by the division factor
before being applied to a pixel.
Bias Specifies the brightness of the image.
Enter a number into the Bias field to change the brightness of the image. The bias
number is added to the RGB values of each pixel. A positive number brightens the
image, while a negative number darkens the image.
Clear Matrix Resets the matrix.
This matrix is Loads a sample effect to use as a starting point for creating a personalized effect.
Use the Edit Brush to paint this effect onto specific areas of the image.

Gemstone Photo Editor 12
Page 233 of 346
Use the Gradient tool to transition this effect across specific areas of the image.
Use the Radial Gradient tool to apply effects around, or directly to, a center point.
About Blend Modes
Blend modes are filters that change the appearance of the text added to images. The following table
lists the blend modes available at the top of the Layers pane, and gives a brief explanation of their
effects.
Blend Modes

Gemstone Photo Editor 12
Page 234 of 346
Normal Applies the text to the underlying image with the specified color. Only opacity
affects this blend.
Screen Combines the text color with the inverse of the underlying photo color, resulting in
a color that is the same or lighter.
Multiply Combines the text color with the underlying photo to produce a darker color.
Multiplying any color with black produces black; multiplying any color with white
leaves the color unchanged.
Dodge Combines the text color with the underlying pixels in the photo to produce a lighter
color.
Burn Combines the text color with the underlying pixels in the photo to produce a darker
color.
Overlay Preserves the shadows and highlights of the lower layers while applying either
Multiply or Screen blend mode based on the underlying image area's color values.
Difference Subtracts the text color from the color of the underlying photo. Any white in the
text produces a true negative of the color in the image, while black produces no
effect.
Darken Applies pixels in the text that are darker than the underlying image. Pixels in the
text that are lighter than the underlying image disappear (based on RGB values).
Lighten Applies pixels in the text that are lighter than the underlying image. Pixels in the
text that are darker than the underlying image disappear (based on RGB values).
Hard Light Adds strong highlights or shadows by applying Multiply or Screen based on the
underlying image area's color values.
Soft Light Adds soft highlights or shadows by darkening or lightening based on the underlying
image area's color values.
Hue Applies the hue value of colors in the text to the color of the underlying image
areas.
Saturation Applies the saturation value of colors in the text to the color of the underlying
image areas.
Color Applies the hue and saturation of the text to the image. This blend does not affect
the luminance of the underlying image.
Luminosity Applies the lightness value of colors in the text to the color of the underlying image
areas.
Dissolve Randomly replaces the pixels with the image (base) or text (blend) color, depending
on the opacity at any pixel location.
Gemstone Photo Editor 12
Page 235 of 346
Exclusion Like Difference, but with less contrast, Exclusion subtracts the text (blend) color
from the color of the underlying photo. Any white in the text produces a true
negative of the color in the image, while black produces no effect.
Vivid Light Combines the text (blend) color with the underlying pixels in the photo by
increasing or decreasing contrast to produce a lighter or darker color, as
determined by the blend color.
Pin Light When the light source is lighter than 50% gray, the pixels darker than the light
source are replaced. Pixels lighter than the light source remain the same. When the
light source is darker than 50% gray, the pixels lighter than the light source are
replaced. Pixels darker than the light source remain the same.
Linear Light Dodges or burns by lightening or darkening the brightness value, depending on the
text (blend) color.
Hard Mix Applies red, green, and blue channel values of the text (blend) color to the RGB
values of the image.
Subtract Subtracts the text color from the image (base) color in each channel.
Divide Divides the text color from the image (base) color.
Darker Color From the text color and the image (base) color, the lower channel values are
chosen.
Lighter Color From the text color and the image (base) color, the higher channel values are
chosen.
You can use the Edit Brush to paint an effect onto specific areas of your image,
and then set the blend mode and opacity slider to change the way the effect is applied.

Gemstone Photo Editor 12
Page 236 of 346
Chapter 8: Editing - Geometry Tools
Rotating an Image
Images can be rotated at common preset angles or custom angles.
To rotate an image:
1. Select Document | Rotate from the main menu.
2. Select one of the following:
180
o
: Rotates the image 180 degrees so that the image appears upside-down compared to the
original.
90
o
Clockwise: Rotates the image 90 degrees to the right.
90
o
Counter Clockwise: Rotates the image 90 degrees to the left.
Arbitrary...: Opens the Rotate Canvas dialog. Enter a numeric value in the Angle field, then
select either the
o
Clockwise or
o
Counterclockwise radio button. Click the OK button to proceed.
Flipping an Image
Images can be flipped vertically and horizontally.
To flip an image horizontally:
1. Select Document | Flip Canvas Horizontal from the main menu.
To flip an image vertically:
1. Select Document | Flip Canvas Vertical from the main menu.
Cropping an Image
The Crop tool is used to remove portions of a photo to create focus on a subject or strengthen the
overall composition by removing distractions. Besides cropping, the Crop tool can be used to
straighten photos.
To crop an image:
1. Select the Crop tool from the toolbar.
2. Customize the crop by manipulating the options in the Tool Properties bar, directly above the image
(see Crop Tool).

Gemstone Photo Editor 12
Page 237 of 346
3. Do one of the following in the Tool Properties bar:
Click OK to crop the image and close the tool.
Click Cancel to exit the tool without cropping the image.
Resizing the Crop Window
There are three options for resizing the crop window:
Drag the edges of the crop window to the desired size.
Specify an exact size for the crop window in pixels, inches, centimeters, or millimeters.
Apply a ratio to constrain the crop window proportions.
To resize the crop window by dragging:
1. Position the cursor over one of the yellow squares residing on the edge or corner of the crop window.
2. After the cursor changes into a double-pointed arrow, drag the crop window's border to the desired
size.
To specify an exact size for the crop window:
1. In the Tool Properties bar, select "Aspect ratio not preserved" from the drop-down list.
2. Enter the desired crop window proportions into the two numeric fields.
3. In the Units drop-down list, select a unit of measurement.
4. Click the OK button.
To constrain the crop window to a ratio:
1. In the Tool Properties bar, select any option other than "Aspect ratio not preserved" from the drop-
down list.
2. If selecting "Custom", in the resultant Custom Aspect Ratio dialog, enter values in the Width and Height
fields and click the OK button.
3. If selecting a value other than "Custom", click the OK button in the Tool Properties bar.
Perspective Correction
The Perspective Correction filter corrects perspective distortion in digital photographs. Perspective
distortion is caused by wide-angle and telephoto lenses, which distort the perspective of large or far-
away objects. For example, when taking a photo of a tall building, the building may appear to be
narrower at the top even though the building is the same width from top to bottom.
To correct Perspective Distortion:

Gemstone Photo Editor 12
Page 238 of 346
1. Select Filter | Geometry | Perspective Correction from the main menu, or press Ctrl + Alt + D.
2. An outline displays around the image. The outline has yellow handles at all four corners, and in the
middle of all sides. Drag the handles to change the perspective.
3. Set the options as described below.
4. Do one of the following:
Click OK to apply any changes and close the tool.
Click Cancel to discard all changes and close the tool.
Perspective Correction Options
Background color When correcting distortion in a photo, the edges of the photo may bulge outwards
or shrink inwards. Use the Background color color picker to select a color for
filling-in gaps in the corners or sides of a corrected photo. Enable the Transparent
checkbox to use transparency to fill-in gaps in the corners or sides of a corrected
photo.
Show Grid Enable the Show Grid checkbox to display a grid over the photo, which is useful for
assessing whether objects in the photo are straight.
Distortion Correction
The Distortion Correction filter corrects barrel, pincushion, and fisheye distortion in digital
photographs. In barrel distortion, the photo appears to bulge outwards from the center. In
pincushion distortion, the photo appears to shrink inwards toward the center. In fisheye distortion,
the photo appears to bulge outwards from the center, as if the photo were wrapped around a sphere.
Barrel, pincushion, and fisheye distortions are common in photos taken with wide angle or zoom
lenses.
Customized settings can be saved as a preset for future use. Presets can be selected from the Presets
drop-down, or saved by clicking the adjacent Save icon.
To correct distortion:
1. Select Filter | Geometry | Distortion Correction from the main menu, or press Alt + Z.
2. In the Distortion Correction dialog, make a selection from the Presets drop-down list, or set the options
as described below
3. Optional: Save any customized settings as a new preset.

Gemstone Photo Editor 12
Page 239 of 346
4. Do one of the following:
Click OK to apply any changes and close the tool.
Click Cancel to discard all changes and close the tool.
Distortion Correction Options
Horizontal Center Drag the slider to the left or right to identify the center of the image on the
horizontal axis.
Vertical Center Drag the slider to the left or right to identify the center of the image on the vertical
axis.
Correction Strength Drag the slider to the right until the objects in the photo appear to be straight.
Scale Drag the slider to the left or right to change the scale of the photo.
Background Color When correcting distortion in a photo, the edges of the photo may bulge outwards
or shrink inwards. Use the Background color color picker to select a color for
filling-in gaps in the corners or sides of a corrected photo. Enable the Transparent
checkbox to use transparency to fill-in gaps in the corners or sides of a corrected
photo.
Type of Distortion Enable either the Barrel, the Pincushion, or Fisheye radio buttons to change the
distortion type effect on the image.
Show Grid Enable the Show Grid checkbox to display a grid over the photo, which is useful for
assessing whether objects in the photo are straight.
Right-click a slider to reset to the default value.
Lens Correction
In Gemstone, lens distortion can be managed by using manual correction via the Manual Correction
slider, or corrected based on the lens profile by selecting the make, model, and lens of the camera
used to take the image.
The Lens Correction filter contains a database of camera makes, models, and their possible lenses. The
possible lenses for the selected camera will be available to choose from the Lens drop-down menu,
unless there is only one possible lens, in which case, that lens will be pre-selected.
The name of the lens used to take the photo can be found in the Current Lens Information section.
The lens profile can also be used to correct chromatic aberration, if it is available.
Use the Manual Correction slider for further adjustments after using automatic correction, or on its
own.

Gemstone Photo Editor 12
Page 240 of 346
For quick viewing of the available lens profiles, go here.
To fix lens distortion using lens profile:
1. Select Filter | Geometry | Lens Correction.from the main menu, or press Ctrl + Shift + C.
2. In the Lens Correction dialog, enable the Enable Lens Profile checkbox.
3. If the displayed camera make and model are not correct, select the correct options from the Make and
Model drop-down menus.
4. From the Lens drop-down menu, select the lens used to take the image. This information is displayed in
the Current Lens Information section. The correction will occur automatically.
5. To make further adjustments, move the Strength slider in the Manual Correction section to the left for
a bulge effect, or to the right to stretch the edges of the image.
Right-click a slider to reset to the default value.
Enable the Show Grid checkbox to display a grid over the image, useful for fixing alignment
issues in an image.
To fix chromatic aberration using lens profile:
Chromatic aberration occurs due to the properties of a given lens. Therefore, use the lens profile to
automatically correct it. The Chromatic Aberration checkbox will be enabled if the selected lens has a
corresponding chromatic aberration correction available.
1. Select Filter | Geometry | Lens Correction from the main menu, or press Ctrl + Shift + C.
2. Enable the Enable Lens Profile checkbox.
3. Enable the Chromatic Aberration checkbox.
To fill-in the edges of a manually corrected image:
Some manual adjustments may affect the edges of the image. Choose the color to be used to fill the
discrepancies created by the lens correction. Alternatively, opt for transparency in the fill-in area by
enabling the Transparency checkbox.
Resizing an Image
Resize an image by adjusting its dimensions in pixels, percentage, or actual/print size. While resizing,
choose an aspect ratio and a resampling filter to adjust the resized image's appearance.
Customized settings can be saved as a preset for future use. Presets can be selected from the
Presets drop-down, or saved by clicking the adjacent Save icon.
To resize an image:

Gemstone Photo Editor 12
Page 241 of 346
1. Select Document | Resize Canvas... from the main menu.
2. In the Resize Canvas dialog, enter values in the Width and Height fields then navigate to the New
Dimensions field set and select one of the following measurement unit options from the drop-down:
Pixels: Resizes the image to specific dimensions in pixels.
Inches: Resizes the image to specific dimensions in inches.
Centimeters: Resizes the image to specific dimensions in centimeters.
Percent: Resizes the image to a percentage of the original.
3. To maintain a specific width to height ratio, navigate to the Aspect Ratio drop-down and select any
value other than "Aspect ratio not preserved". The following options from the Aspect Ratio drop-down
list will preserve or set an aspect ratio:
Original: Maintains the original image's width to height ratio.
1 x 1: Forces the width and height to be equal.
2 x 3: Forces a width to height ratio of 2:3.
3 x 2: Forces a width to height ratio of 3:2.
3 x 5: Forces a width to height ratio of 3:5.
5 x 3: Forces a width to height ratio of 5:3.
Custom...: Applies a custom ratio. Enter a width to height ratio in the Custom Aspect Ratio
dialog box. Custom ratios are automatically saved to the Aspect Ratio drop-down list after
clicking the OK button in the Custom Aspect Ratio dialog box.
4. Optional: From the Anchor field, select an anchor to dictate the resizing starting point.
5. In the Resolution field, enter a Dots Per Inch value to set image quality (the lower the number, the less
quality).
6. Do one of the following:
Click OK to apply any changes and close the Resize tool.
Click Cancel to discard all changes and close the tool.
Resizing Tips
Maintain image quality by reducing images only by 33%, 50%, or 66%. Other percentages can distort the
aspect ratio.
Avoid resizing an image repeatedly. Each resizing places image pixels using a slightly different
orientation. As a result, multiple resizes can change the overall color and appearance of the image. If a
first resize attempt does not produce the desired result, click the Undo button.
Avoid increasing the size of an image. Increasing image size makes the image's pixels more apparent,
causing a grainy effect.

Gemstone Photo Editor 12
Page 242 of 346
Liquify
Distorting and Retouching with the Liquify Tool
The Liquify filter moves pixels without altering them.
Customized settings can be saved as a preset for future use. Presets can be selected from the
Presets drop-down, or saved by clicking the adjacent Save icon.
To liquify an image:
1. Select Filter | Geometry | Liquify from the main menu.
2. In the Distortion Tools section of the Liquify dialog, select the type of distortion to apply.
3. Set the options as described below.
4. Do one of the following:
Click OK to accept your changes and close the panel.
Click Cancel to discard your changes and close the panel.
Liquify Options

Gemstone Photo Editor 12
Page 243 of 346
Distortion Tools
Distort images by moving the cursor, essentially brushing on the effect by pushing and
pulling pixels around the image.
Shift
Use the Shift tool to push pixels in images.
Pinch
Use the Pinch tool to condense pixels
towards a center point.
Bulge
Use the Bulge tool to expand pixels outward.
Restore
Use the Restore tool to brush the pixels back
to their original position.
Hold down the right mouse
button to activate the Restore
tool while using any of the other
Distortion tools.
Nib Width
Adjusts the size of the brush. Use the mouse wheel to adjust nib width or adjust with the
Nib Width slider.
Density
Adjusts the size of the area affected. Within the inner circle of the nib, the effect is being
applied at 90% or more. The area between the inner and outer circle, the effect is
transitioning between 90%-0% at the outer edge.
Use Shift+mouse wheel to adjust the density.
Strength
Adjusts the intensity of the overall effect. Move the slider to the right to intensify the
effect.
Fill color
When distorting the image to the point where its edges are pulled in past the canvas line,
use the Fill color picker to select the background color.
Transparent
When distorting the image to the point where its edges are pulled in past the canvas line,
enable the Transparent checkbox to make the bare canvas portions transparent.

Gemstone Photo Editor 12
Page 244 of 346
Chapter 9: Editing - Exposure and Lighting Tools
Exposure
The Exposure filter adjusts an image's exposure, contrast, and fill light.
Customized settings can be saved as a preset for future use. Presets can be selected from the
Presets drop-down, or saved by clicking the adjacent Save icon.
To adjust an image's exposure:
1. Select Filter | Exposure / Lighting | Exposure from the main menu, or press Alt + X.
2. Set the options as described below.
3. Do one of the following:
Click Apply to apply any changes and set options on another tab.
Click OK to apply any changes and close the tool.
Click Cancel to discard all changes and close the tool.
Exposure Options
Exposure Drag the slider to the right to increase the
exposure, or drag to the left to decrease
exposure.
Auto Click the Auto button to automatically adjust
the exposure level.
Contrast Drag the slider to the right to increase contrast,
or drag to the left to decrease contrast.
Fill Light Drag slider to the right to increase the amount
of light in the darkest areas of the image, or
drag to the left to decrease fill light. Fill light
brightens dark areas of the image.
Right-click a slider to reset to the default value.
This filter features a Pixel Targeting tab (see Pixel Targeting for more details).
Use the Edit Brush to paint this effect onto specific areas of the image.

Gemstone Photo Editor 12
Page 245 of 346
Use the Gradient tool to transition this effect across specific areas of the image.
Use the Radial Gradient tool to apply effects around, or directly to, a center point.
Levels
The Levels filter precisely adjusts an image's contrast and light levels.
Customized settings can be saved as a preset for future use. Presets can be selected from the
Presets drop-down, or saved by clicking the adjacent Save icon.
To adjust an image's levels:
1. Select Filter | Exposure / Lighting | Levels from the main menu, or press L.
2. Do one of the following:
Set the options as described below to adjust the contrast and light levels manually.
Click Auto... and select a menu option to automatically adjust image properties.
3. Do one of the following:
Click Apply to apply any changes.
Click OK to apply any changes and close the Levels tool.
Click Cancel to discard all changes and close the tool.
Levels Options

Gemstone Photo Editor 12
Page 246 of 346
Channel Specifies the brightness or color channel to adjust.
Shadows Specifies the black point of an image.
Move the slider or type a number from 0 to 255 into the spin box to define the
blackest area of an image. As the value increases, the dark colored areas of the
image become darker. As an alternative to using the spin box, click the arrows to
manually set it to where the black point starts in the image.
Midtones Specifies the midtones in an image.
Move the slider or type a number into the spin box to set the midtone. Higher
values make the image appear brighter, while lower values make the image
appear darker. As an alternative to using the spin box, click the arrows to manually
set it to the midtone of the image.
Highlights Specifies the white point of an image.
Move the slider or type a number from 0 to 255 into the spin box to define the
whitest area of an image. As the value increases, the light colored areas of the
image become lighter. As an alternative to using the spin box, click the arrows to
manually set it to where the highlights start in the image.
Auto Select one of the following options:
l Adjust Contrast: Automatically analyzes and adjusts image contrast.
l Adjust Color and Contrast: Automatically analyzes and adjusts each color
channel independently, and then adjusts the contrast.
l Adjust Color and Brightness: Automatically analyzes and adjusts image color
and brightness.
l Tolerance: Opens the Tolerance settings dialog box. Specify the maximum
clipping percentage for black and white levels, and click OK. Gemstone
adjusts the image levels automatically.
Black Point picker Click the Black Point picker, and then click the image area to set as the black point.
Mid Point picker Click the Mid Point picker, and then click the image area to set as the mid point.
White Point picker Click the White Point picker, and then click the image area to set as the white
point.
When clicking the image with a selected eye dropper the RGB numbers change to reflect the
RGB values of the pixel under the eye dropper. The RGB values represent the source pixel
(unprocessed) and the current pixel as it appears on the screen.

Gemstone Photo Editor 12
Page 247 of 346
This filter features a Pixel Targeting tab (see Pixel Targeting for more details).
Use the Edit Brush to paint this effect onto specific areas of the image.
Use the Gradient tool to transition this effect across specific areas of the image.
Use the Radial Gradient tool to apply effects around, or directly to, a center point.
Auto Levels
The Auto Levels filter automatically corrects the exposure levels of an images. Using the Auto Levels
filter makes the darkest image pixels darker, and the brightest pixels brighter.
Customized settings can be saved as a preset for future use. Presets can be selected from the
Presets drop-down, or saved by clicking the adjacent Save icon.
To automatically correct image levels:
1. Select Filter | Exposure / Lighting | Auto Levels from the main menu, or press Alt + J.
2. Select one of the following options:
Auto Contrast and Color: Adjusts color differences, brightness, and balances RGB channels.
Auto Contrast: Adjusts the color differences and brightness only.
Auto Color: Balances the RGB channels in the image, without changing the brightness or
contrast.
3. Use the Strength slider to fine tune the amount of exposure to apply.
4. Do one of the following:
Click OK to accept your changes and close the panel.
Click Cancel to discard your changes and close the panel.
Right-click a slider to reset to the default value.
This filter features a Pixel Targeting tab (see Pixel Targeting for more details).

Gemstone Photo Editor 12
Page 248 of 346
Use the Edit Brush to paint this effect onto specific areas of the image.
Use the Gradient tool to transition this effect across specific areas of the image.
Use the Radial Gradient tool to apply effects around, or directly to, a center point.
Tone Curves
The Tone Curves filter changes the tonal range of an image. Select the RGB color channel to adjust the
entire range of the image, or select a specific color.
Customized settings can be saved as a preset for future use. Presets can be selected from the
Presets drop-down, or saved by clicking the adjacent Save icon.
To adjust image curves:
1. Select Filter | Exposure / Lighting | Tone Curves from the main menu, or press Ctrl + Shift + A.
2. Set the options as described below.
3. Do one of the following:
Click Apply to apply any changes.
Click OK to apply any changes and close the Tone Curves tool.
Click Cancel to discard all changes and close the tool.
Tone Curves Options
Channel Specifies the color channels to adjust.
Show Histogram Toggles the histogram display on and off.
Histogram Displays a graphic of the color information levels in the image, based on the
selected channel. Click and drag the line to manipulate the curve. A new node is
added each time the curve is clicked. Drag the nodes up and down the curve to
change the settings. To remove a node, drag the node up and out of the graph, or
down and out of the graph.
Color Picker Drag the cursor onto the image to change the cursor to a color picker that
provides the RGB value of the picker's current location. Click the image at a
desired tone to add a corresponding point to the adjustment curve.

Gemstone Photo Editor 12
Page 249 of 346
This filter features a Pixel Targeting tab (see Pixel Targeting for more details).
Use the Edit Brush to paint this effect onto specific areas of the image.
Use the Gradient tool to transition this effect across specific areas of the image.
Use the Radial Gradient tool to apply effects around, or directly to, a center point.
Light EQ
The Light EQ™ filter adjusts areas in an image that are too dark or too light, without affecting other
areas of the photo. An effective benefit of the Light EQ™ filter is the ability to simultaneously lighten
dark areas that are too dark, and darken areas that are too bright. Examples would be a photo of a
person silhouetted against a bright background like the sea, or a window. In fact, most photos taken
on a dull day, or with a flash, can be improved in various ways with fine adjustments.
Customized settings can be saved as a preset for future use. Presets can be selected from the
Presets drop-down, or saved by clicking the adjacent Save icon.
The Light EQ™ filter features four tabs — each tab is associated with an adjustment technique that
achieves results in different ways. In addition, there are several keyboard and mouse shortcuts for
making adjustments on specific areas of the photo itself.
The four Light EQ™ tabs include:
1-Step tab: For an instant, effortless exposure adjustment.
Basic tab: Is for very quick and easy adjustments using three sliders. Gemstone analyzes the photo and
varies the adjustment throughout the image automatically. For example, darker images are brightened
more. By clicking the Auto button, Gemstone fully analyzes the photo and sets the slider positions
automatically. It is also possible to directly click an area of the image to generate automatic settings
optimal for that area, (usually the subject of the photo).
Standard tab: Works like a sound equalizer but with light. Adjust the brightness and contrast of different
tone bands (areas of relative brightness or darkness) of the image independently using a slider for each
tone band. A graph shows the amount of brightening or darkening applied throughout the tonal range.
The gray areas in the graph are suggested boundaries for adjustment to avoid clipping and loss of detail,
and turn red to indicate where the sliders have been adjusted far enough to cause clipping.

Gemstone Photo Editor 12
Page 250 of 346
Advanced tab: Provides ultimate control of the brightness and contrast in an image. Basic adjustment
curves can be constructed using four sliders, and the curves can be manually adjusted by clicking and
dragging within the graph area or on the image itself.
To open the Light EQ™ filter:
Select Filter | Exposure / Lighting | Light EQ™ from the main menu, or press Q.
The 1-Step Tab
When opening an image in the Light EQ™ filter, the 1-Step tab is set by default and automatically
adjusts the image's exposure. Further adjusts can be made using the Amount slider.
The Basic Tab
To darken areas that are too bright:
1. Drag the Shadows slider to the right to lighten and return detail to areas that are too dark.
2. Adjust the settings using any of the controls in the table below.
To adjust midtones that are too light or dark:
1. Drag the Midtones slider to the right to lighten and return detail to areas that are too dark.
2. Adjust the settings using any of the controls in the table below.
To add light to dark areas:
1. Drag the Highlights slider to the right to add light to the dark parts of the photo.
2. Adjust the settings using any of the controls in the table below.
Light EQ™ Controls

Gemstone Photo Editor 12
Page 251 of 346
Right-click on a slider Right-click on a
slider to reset it.
Auto Click to allow the
software to
analyze the
photo and apply
optimal settings
based on the
amount of light
and dark pixels in
the photo.
Darker photos
are brightened
more than
photos that are
already bright.
OK Click to apply any
changes and
close the tool.
Cancel Click to discard
all changes and
close the tool.

Gemstone Photo Editor 12
Page 252 of 346
The Standard Tab
The Standard tab has two sets of sliders. The top
set is for brightening. The lower set is for
darkening. The dark-to-light gradient on each
slider indicates which tone band will brighten
when the slider is moved up (top row of sliders)
or tone band will darken when the slider is
moved down (bottom row).
Between the two sets of sliders are two
horizontal bars graded from black to white.
These bars indicate that sliders on the far left
affect the dark tonal bands. The sliders on the
right affect light tonal bands. Moving a slider
changes the light in that particular tonal band.
In the middle of the bands are two graphs that
change as the sliders are adjusted to represent
the amount of darkening and lightening
throughout the tonal range of the image. The
two gray graphs show the maximum amount of
brightening or darkening that can be applied
before clipping begins. If a slider is pushed too
far, the clipping is shown in bright pink.
To increase contrast within a tonal band, apply brightening and darkening simultaneously in equal
amounts by dragging the upper and lower sliders up and down, respectively. The area between the

Gemstone Photo Editor 12
Page 253 of 346
top of the upper graph and the bottom of the lower graph indicates the amount by which contrast is
increased.
To use the Standard tab:
1. Do one of the following:
Drag the tone band sliders up or down depending on which light bands you want to adjust.
Type the exact number into the number boxes or increment the numbers to make precise
adjustments.
Click the # Tone Bands drop-down list to increase or decrease the number of tone band sliders.
Click the Auto button to apply settings automatically.
Drag the Brightening slider to lighten the dark areas of the image.
Drag the Darkening slider to darken the light areas of the image.
Drag the Contrast slider to increase the contrast in the image.
Drag the Fill Light slider to lighten dark areas of the image.
Left-click and drag upwards to brighten the dark areas of the photo. Try to prevent clipping
(shown in pink on the graph).
Right-click and drag downwards to darken the bright areas of the photo. Try to prevent clipping
(shown in pink on the graph).
2. Do one of the following:
Click OK to accept your changes and close the panel.
Click Cancel to discard your changes and close the panel.

Gemstone Photo Editor 12
Page 254 of 346
The Advanced Tab
Sliders
The Advanced tab has two sliders for
brightening (Amplitude and Custom curve) and
two for darkening (Amplitude and Custom
curve). The Custom curve sliders control the
shape of the adjustment curves, while the
Amplitude sliders control the height of the
curves.
The more brightening or darkening, the more
the balance of the dark against the light areas is
increased in the image. The Amplitude sliders
increase the intensity of the effects of
brightening or darkening.
The Scale slider at the bottom of the tool adjusts
the overall adjustment sensitivity to local
variation in brightness. Moving this slider to the
left makes the adjustment more sensitive to
smaller areas of brightness variation, which may
be beneficial in some images. For most images,
however, leaving the slider in the default
position gives the best result. Adjust the
Contrast slider to decrease or increase contrast,
or use the Fill Light slider to lighten dark areas of
the image.

Gemstone Photo Editor 12
Page 255 of 346
Graphs
Between the Brightening and Darkening controls are two gray graphs that indicate the maximum
amount of lightening or darkening that can be applied before clipping begins (shown as bright pink).
Two colored curves appear and change when dragging the Brightening, Darkening and Amplitude
sliders — these curves indicate the amount of brightening and darkening applied throughout the tonal
range of the image. Darker tonal areas are on the left, and brighter tonal areas are on the right.
Moving the cursor over the image, a vertical line in the graph indicates the tone level of the area under
the cursor within the tonal range. At times there are two lines because the tone levels for brightening
and darkening are not necessarily the same. This is because brightening is sensitive to maximum color
values while darkening is sensitive to minimum color values.
The Advanced tab is unique in that you can adjust the curves manually, either on the graph itself, or
on the actual photo. Adjustments made on the photo are reflected in the curve on the graph.
Adjustments made on the graph are reflected on the photo.
To increase contrast within a tonal range without changing the brightness, apply brightening and
darkening simultaneously in equal amounts by dragging the upper and lower curves up and down,
respectively. The area between the top of the upper graph and the bottom of the lower graph
indicates the amount by which contrast is increased.
To use the Advanced tab:
1. Do one of the following:
Drag the Brightening or Darkening sliders to adjust the bright or dark pixels. While dragging, a
gray curve appears to indicate the adjustments.
Left-click and drag upwards to brighten the dark areas of the photo. Try to prevent clipping
(shown in pink on the graph).
Right-click and drag downwards to darken the bright areas of the photo. Try to prevent clipping
(shown in pink on the graph).
Drag the Scale slider to the right to make your adjustments more sensitive to smaller areas of
brightness variation.
Drag the Contrast slider to increase or decrease contrast in your image.
Drag the Fill Light slider to add light to the dark areas in your image.
Make adjustments using any of the options in the table below, including on the image itself.
2. Do one of the following:
Click OK to accept your changes and close the panel.
Click Cancel to discard your changes and close the panel.
Adjustment Options - Advanced Tab

Gemstone Photo Editor 12
Page 256 of 346
Area Action Result
Sliders
Drag Brightening To the right: Increases the lightening applied to the
darker areas.
To the left: Applies brightening more uniformly to all
areas of the image.
(The name of the slider changes to Custom curve when
changing the curve manually or making adjustments on
the image.)
Drag Darkening To the right: Increases the darkening applied to the
brighter areas of the image.
To the left: Applies the darkening more uniformly to all
areas of the image.
Drag Amplitude (Brightening) To the right: Increases the intensity of the brightening
across all areas of the image. The height of the curve
increases.
To the left: Reduces the intensity of the brightening and
the height of the curve.
If the Amplitude slider is 0, no brightening is applied.
If the Amplitude is 100 - 200, the proportional amount of
clipping increases.
In most cases it is not necessary to adjust amplitude.
Drag Amplitude (Darkening) To the right: Increases the intensity of the darkening
across all areas of the image. The height of the bottom
curve increases.
To the left: Reduces the intensity of the darkening and
the height of the curve.
Drag Scale To the left: Makes the tool more sensitive to smaller
areas of brightness variation.
This means that smaller areas can be adjusted
independently. Generally the default scale of 10 gives the
best result, but if an image contains small details that
need brightening, a lower scale might give better results.
On Graph
Drag the graph (top) Clicking and dragging up on the graph itself changes the
graph. The graph represents brightening adjustments. The
dark gray graph represents the maximum amount the

Gemstone Photo Editor 12
Page 257 of 346
Area Action Result
graph can be dragged before clipping begins (displayed as
pink).
The height of the graph represents the level of
brightening applied at each tone level. (Tone moves from
black on the left to white on the right.)
When you make direct brightening or darkening
adjustments on the graph or image, the corresponding
Brightening or Darkening slider changes to Custom curve.
Adjusting the position of the slider after changing to
Custom curve, discards all direct curve adjustments.
When make direct brightening or darkening adjustments
on the graph or image, the corresponding Brightening or
Darkening Amplitude slider changes to indicate the
current curve amplitude.
Drag the graph (bottom) The graph changes as you right-click and drag down on
the graph itself. The graph represents the darken
adjustments you are making. The dark gray graph
represents the maximum amount you can drag the graph
before clipping (pink) begins.
Use all the shortcuts below that
apply to the image, directly to the
graph itself.
Changes the tonal band on the graph itself with a
corresponding change in the image. This is useful for
making fine adjustments to a specific tonal band.
On Image
Double-click with left mouse
button
Automatically sets Brightening to optimum for that area
of the image. A brighter area (e.g. a face) works best.
Double-click with right mouse
button
(or Shift + double-click with left
mouse button)
Automatically sets the Darkening to optimum for that
area of the image.
Ctrl + double-click with left
mouse button
Increases the amount of brightening around that tone
level while decreasing the brightening in the rest of the
image.
Use this method to quickly brighten a specific subject or
area to bring it out of the image.
Ctrl + double-click with right
mouse button
Increases the amount of darkening around that tone level
while decreasing the amount of darkening in the rest of
the image.

Gemstone Photo Editor 12
Page 258 of 346
Area Action Result
Scroll up or down with the
mouse wheel above the image
Increases or decreases the amount of brightening applied
at that tone level in the image. Both the image and the
graph show the changes.
Shift+ scroll with the mouse
wheel above the image
Decreases or increases the amount of darkening applied
at that tone level in the image.
Hold down "A"
+ scrolling or
+ dragging with the left mouse
button
Sets the brightening Amplitude slider directly.
Hold down "A" + Shift
+ scrolling or
+ dragging with the right mouse
button
Sets the darkening Amplitude slider directly.
Click and drag up and down on
the image (left mouse button)
Increases or decreases the amount of brightening applied
at that tone level in the image. Both the image and the
graph show the changes.
(Only works if the image is actual size - no zooming.)
Shift + click and drag up and
down on the image (left mouse
button)
Decreases or increases the amount of darkening applied
at that tone level in the image.
(Only works if the image is actual size - no zooming.)
Right-click a slider to reset to the default value.
This filter features a Pixel Targeting tab (see Pixel Targeting for more details).
Use the Edit Brush to paint this effect onto specific areas of the image.
Use the Gradient tool to transition this effect across specific areas of the image.
Use the Radial Gradient tool to apply effects around, or directly to, a center point.

Gemstone Photo Editor 12
Page 259 of 346
Dehaze
The Dehaze filter restores contrast, detail, and lost color to images. This tool is especially useful for
images that have been captured through a haze. A haze can occur when dust, smoke, or other
particles obscure the clarity of the image, particularly the sky.
To dehaze an image:
1. Select Filter | Exposure / Lighting | Dehaze from the main menu, or press Ctrl + Alt + H.
2. Drag the Amount slider to adjust the strength of the correction.
3. Do one of the following:
Click OK to accept your changes and close the panel.
Click Cancel to discard your changes and close the panel.
Right-click a slider to reset to the default value.
This filter features a Pixel Targeting tab (see Pixel Targeting for more details).
Use the Edit Brush to paint this effect onto specific areas of the image.
Use the Gradient tool to transition this effect across specific areas of the image.
Use the Radial Gradient tool to apply effects around, or directly to, a center point.
Dodge and Burn
Enhance photos and improve contrast by controlling the light and intensity of color in select areas.
Dodge, burn, saturate and desaturate photos to accentuate and define shapes, magnify and fade
color, and add shadows and highlights.
The Dodge and Burn tool lightens or darkens areas in a photo without affecting other areas. The tool
is often used to lighten underexposed areas or darken overexposed areas.
Customized settings can be saved as a preset for future use. Presets can be selected from the
Presets drop-down, or saved by clicking the adjacent Save icon.

Gemstone Photo Editor 12
Page 260 of 346
Dodging and Burning Parts of an Image
To open the Dodge and Burn tool:
Select Filter | Exposure / Lighting | Dodge and Burn from the main menu, or press D.
To Lighten or Darken Areas of a Photo:
1. In the Operation field set, enable the Dodge tool to lighten areas, or the Burn tool to darken areas.
2. In the Tool settings field set, enable the area to adjust: Shadows, Midtones, or Highlights.
3. Drag the Range slider to fine-tune targeted areas within the shadows or highlights. Increasing the range
broadens the affected range of tones, while decreasing the range narrows the affected range of tones.
4. In the Brush settings field set, select from the following preference settings:
Drag the Nib Width slider to select a brush size.
Drag the Feathering slider to soften stroke edges.
Drag the Strength slider to adjust the stroke intensity.
5. Draw over the areas of the image to lighten or darken.
6. Do one of the following:
Click OK to accept your changes and close the panel.
Click Cancel to discard your changes and close the panel.
When adjusting the Range slider, a preview of the areas of the image that will be affected by
brushing will be shown as a grayscale image. The brighter the pixels are in the preview image,
the more they will be affected by brush strokes. Areas that are pure white will be affected with
full strength, and areas that are black will be completely unaffected. For best results, move the
Range slider until the pixels to dodge or burn are white, and areas to be left unaffected are
black.
Scroll with your mouse to adjust the brush size on the fly, or use Shift + mouse scroll to
adjust feathering.
To saturate or desaturate areas of a photo:
1. Enable the Saturate tool to intensify colors, or the Desaturate tool to fade colors.
2. In the Tool settings field set, enable the Vibrance checkbox to target the less saturated colors and to
prevent skin tones from becoming over-saturated.

Gemstone Photo Editor 12
Page 261 of 346
3. In the Brush settings field set, enable from the following preference settings:
Drag the Nib Width slider to select a brush size.
Drag the Feathering slider to soften the edges of your strokes.
Drag the Strength slider to adjust the intensity of your strokes.
4. Draw over the areas of the image to lighten or darken.
5. Do one of the following:
Click OK to accept your changes and close the panel.
Click Cancel to discard your changes and close the panel.
Right-click a slider to reset to the default value.

Gemstone Photo Editor 12
Page 262 of 346
Chapter 10: Editing - Color Tools
White Balance
The White Balance filter removes unwanted hue from an image. For example, if a sunset photo has an
unwanted reddish hue, use the White Balance tool to remove it.
Customized settings can be saved as a preset for future use. Presets can be selected from the
Presets drop-down, or saved by clicking the adjacent Save icon.
To remove a color cast from an image:
1. Select Filter | Color | White Balance from the main menu, or press A.
2. Set the options as described below.
3. Do one of the following:
Click OK to accept your changes and close the panel.
Click Cancel to discard your changes and close the panel.
White Balance Options
Temperature Drag the Temperature slider to the left (more blue) or right (more yellow) to select
a specific color temperature.
Tint Drag the Tint slider to the left (more green) or right (more magenta) to match the
white balance settings that you selected when you took the photo.
Strength To specify the strength of the white balance adjustment, move the Strength slider.
Higher settings remove more of the unwanted color.
Auto Click the Auto button to allow Gemstone to analyze and correct the image.
Right-click a slider to reset to the default value.
This filter features a Pixel Targeting tab (see Pixel Targeting for more details).
Use the Edit Brush to paint this effect onto specific areas of the image.

Gemstone Photo Editor 12
Page 263 of 346
If the desired effect is not forthcoming, try clicking an image area that is a different shade of
white or gray.
Use the Gradient tool to transition this effect across specific areas of the image.
Use the Radial Gradient tool to apply effects around, or directly to, a center point.
Color EQ
The Color EQ filter (hue, saturation, contrast, and brightness) is used to adjust overall colors in an
image or each color individually. The advanced tools can subtly fine-tune and enhance colors, or
completely change individual colors in an image.
For instance, if an image has a yellow car, use the Saturation tab to saturate the yellow, or use the
Brightness tab to brighten the yellow. In the Hue tab, change the color of the car from yellow to pink.
In the Contrast tab, adjust the contrast of the yellow and use the Balance slider to target the
brightness range for that contrast adjustment.
Customized settings can be saved as a preset for future use. Presets can be selected from the
Presets drop-down, or saved by clicking the adjacent Save icon.
If an image contains a yellow car with a yellow building in the background, change just the car
by using the Selections tool. Select the car using the Selections tool and then apply color
adjustments.
To adjust color:
1. Select Filter | Color | Color EQ from the main menu, or press O.
2. Set the options as described below.
3. Do one of the following:
Click Apply to apply any changes.
Click OK to apply any changes and close the tool.
Click Cancel to discard all changes and close the tool.
Color EQ
TM
Options
Select High Quality mode or Standard mode from the top of the Color EQ dialog. To adjust colors
individually, click a color on the image and drag up or down to alter. Changes are reflected in the color
sliders in High Quality mode, and the graph in Standard mode respectively. This works in the
Saturation, Brightness, Hue, and Contrast tabs.

Gemstone Photo Editor 12
Page 264 of 346
High Quality Adjust image colors individually. High Quality uses the newer,
more modern color models, allowing for a visually perceptive and
higher quality adjustment.
Color EQ Adjust each color individually by dragging sliders right for more
intensity, or left for less intensity. You can also enter a number
into the fields for precise adjustments. Or select a precise color to
adjust by placing your cursor on the image for the double arrow
icon to appear. Then click and drag up or down to adjust the col-
ors beneath the double arrow icon. The affected color sliders
automatically adjust as you move your cursor.
Saturation Color saturation adjustments can be
made in the Red, Orange, Yellow,
Green, Cyan, Blue, Purple, and
Magenta bands. Drag sliders to the
right for more intensity, or to the left
for less intensity of color. Levels can
also be entered numerically to the
right of the slider on a scale of 0 - 100.
Brightness Color brightness adjustments can be
made in the Red, Orange, Yellow,
Green, Cyan, Blue, Purple, and
Magenta bands. Drag sliders to the
right for more intensity, or to the left
for less intensity of color. Levels can
also be entered numerically to the
right of the slider on a scale of 0 - 100.
Hue Color hue adjustments can be made in
the Red, Orange, Yellow, Green, Cyan,
Blue, Purple, and Magenta bands. Drag
sliders to the right for more intensity,
or to the left for less intensity of color.
Levels can also be entered numer-
ically to the right of the slider on a
scale of 0 - 100.
Contrast Contrast adjustments can be made in
the Red, Orange, Yellow, Green, Cyan,
Blue, Purple, and Magenta bands. Drag
sliders to the right for more intensity,
or to the left for less intensity of color.
Each color band also has an adjacent
Balance slider with a range of -100 to
+100. Levels can also be entered
numerically to the right of the sliders.

Gemstone Photo Editor 12
Page 265 of 346
Global Adjustments
Vibrance Drag the slider to adjust the vibrance
of the image without affecting skin
tones.
Saturation Drag the slider to adjust the saturation
of the image.
Color Shift Drag the slider to adjust the amount of
color shift in the image.
Hue Drag the slider to adjust the hue of the
image.
Lightness Drag the slider to adjust the lightness
of the image.
Red Drag the slider to adjust the amount of
red in the image.
Green Drag the slider to adjust the amount of
green in the image.
Blue Drag the slider to adjust the amount of
blue in the image.
Standard Adjust colors individually or make global adjustments.
Vibrance Drag the slider to adjust the vibrance
of the image without affecting skin
tones.
Vertical Slider
Apply adjustments to the entire
image. The main slider on the left
has the following effects on the tabs:
Saturation: Adjusts from
saturation to grayscale.
Brightness: Adjusts the light or
dark tones in the image.
Hue: Changes to a different
color.
It is also possible to enter a number
into the field for precise
adjustments.
Individual Color Sliders Adjust each color with individual
sliders. Select the color to adjust and
click and drag the sliders. It is also pos-
sible to enter a number into the fields

Gemstone Photo Editor 12
Page 266 of 346
for precise adjustments.
Direct Image Adjust-
ments
Place the cursor on the image for
the double arrow icon to appear.
Then click and drag up or down to
adjust the colors beneath the double
arrow icon. The curve control and
the affected color sliders
automatically adjust as the cursor is
moved. The black down arrow on
the graph indicates which color is
being adjusted in the image.
The curve appears black in the graph
and is not directly adjustable. To
apply further adjustments, alter the
white curve. When adjusting the
white curve, the black curve
automatically changes with it. It is
also possible to enter a number into
the fields for precise adjustments.
Right-click a slider to reset to the default value.
This filter features a Pixel Targeting tab (see Pixel Targeting for more details).
Use the Edit Brush to paint this effect onto specific areas of the image.
Use the Gradient tool to transition this effect across specific areas of the image.
Use the Radial Gradient tool to apply effects around, or directly to, a center point.
Split Tone
Split toning is a powerful technique originating in film photography to tint highlights and shadows.
The Split Tone filter provides creative control over the hue and saturation of highlights and shadows.
Use the sliders to adjust the balance of tones in photo highlights and shadows. Split toning allows for
adding a creative element to RAW conversion and non-destructive editing in Gemstone.

Gemstone Photo Editor 12
Page 267 of 346
Customized settings can be saved as a preset for future use. Presets can be selected from the
Presets drop-down, or saved by clicking the adjacent Save icon.
To adjust highlights and shadows:
1. Select Filter | Color | Split Tone from the main menu, or press Shift + Alt + T.
2. Set the options as described below.
3. Do one of the following:
Click OK to apply any changes and close the tool.
Click Cancel to discard all changes and close the tool.
Split Tone Options
Highlights
Hue Drag the slider to the right to select a highlight color.
Saturation Drag the slider to the right to increase saturation of the specified color in the
highlights of the image.
Shadows
Hue Drag the slider to the right to select a shadow color.
Saturation Drag the slider to the right to increase saturation of the specified color in the
shadows of the image.
Balance
Drag the slider to the right to emphasize the highlight color; drag the slider to
the left to emphasize the shadow color. For example if the slider is set to the
maximum at 50, then full emphasis is applied to the highlight color; if the slider
is set to the minimum -50, then full emphasis is applied to the shadow color.
Create a sepia tone effect by first reducing the saturation of your photo with the Advanced
Color tool and then applying a reddish brown hue with the Split Tone tool. Or create a
monochromatic black and white photo with a slight tint of hue.
Right-click a slider to reset to the default value.
This filter features a Pixel Targeting tab (see Pixel Targeting for more details).
Use the Edit Brush to paint this effect onto specific areas of the image.

Gemstone Photo Editor 12
Page 268 of 346
Use the Gradient tool to transition this effect across specific areas of the image.
Use the Radial Gradient tool to apply effects around, or directly to, a center point.
Color Balance
Adjust an image's color values using the Color Balance filter.
Customized settings can be saved as a preset for future use. Presets can be selected from the
Presets drop-down, or saved by clicking the adjacent Save icon.
To adjust an image's color:
1. Select Filter | Color | Color Balance from the main menu.
2. Adjust the sliders as described in the table below.
3. Do one of the following:
Click Apply to apply any changes.
Click OK to apply any changes and close the tool.
Click Cancel to discard all changes and close the tool.
Color Balance Options
Vibrance Boosts color in the image, and avoids affecting skin tones.
Saturation Adjusts the saturation of the image. Drag the slider to the right to increase or drag to
the left to decrease saturation.
Hue Adjusts the hue of the image. Drag the slider to the right to increase or drag to the left
to decrease hue.
Lightness Adjusts the image brightness. Drag the slider to the right to increase or drag to the left
to decrease the image's brightness.
Red Adjusts the red channel in the image. Drag the slider to the right to increase or drag to
the left to decrease the red tone in your image.
Green Adjusts the green channel in the image. Drag the slider to the right to increase or drag
to the left to decrease the green tone in your image.
Blue Adjusts the blue channel in the image. Drag the slider to the right to increase or drag to
the left to decrease the blue tone in your image.
Gemstone Photo Editor 12
Page 269 of 346
Right-click a slider to reset to the default value.
This filter features a Pixel Targeting tab (see Pixel Targeting for more details).
Use the Edit Brush to paint this effect onto specific areas of the image.
Use the Gradient tool to transition this effect across specific areas of the image.
Use the Radial Gradient tool to apply effects around, or directly to, a center point.
Convert to Black & White
Create rich grayscale images by controlling the brightness of the red, green, and blue channels, as well
as the overall brightness. Use the Convert to Black & White filter to emphasize different areas or
aspects of a photo, as well as alter its mood and tone.
Hover the mouse over each slider and watch the effect on the small preview to view which parts of the
image will be affected by each channel. This helps to gauge the effect of each slider on the image.
Customized settings can be saved as a preset for future use. Presets can be selected from the
Presets drop-down, or saved by clicking the adjacent Save icon.
To create a grayscale image:
1. Select Filter | Color | Convert to Black & White from the main menu, or press W.
2. Set the options as described below.
3. Do one of the following:
Click OK to apply any changes and close the tool.
Click Cancel to discard all changes and close the tool.
Grayscale Options
The preview window inside the Convert to Black & White dialog will reflect changes made with the
current slider.

Gemstone Photo Editor 12
Page 270 of 346
Brightness Tab
In the Brightness tab, do any of the following:
Drag individual color sliders, or left-click on the image (where a color previously occurred) and drag up or
down to alter the brightness of specific tones. For instance, drag the cursor on sky areas to alter the
brightness of the blue.
Drag the Percent Red slider to the left or right.
The more red there is in a pixel, the more effect the red slider has on that pixel. The area of red in the
picture is brightened or darkened more than other areas.
Drag the Percent Green slider the left or right.
The more green there is in a pixel, the more effect the green slider has on that pixel. The area of green
in the picture is brightened or darkened more than other areas.
Drag the Percent Blue slider to the left or right.
The more blue there is in a pixel, the more effect the blue slider has on that pixel. The area of blue in
the picture is brightened or darkened more than other areas.
Drag the Percent Brightness slider to the right or left to brighten or darken the whole image.
Right-click the slider to reset the value to zero.
Contrast Tab
Increase or decrease the contrast of each individual color. In addition, specify the brightness range that the
contrast adjustment will target for each color.
On the Contrast tab, do the following:
Strength: To adjust the contrast in specific color tones, drag individual color sliders, or left-click on the image
(where a color previously occurred) and drag up or down.
Balance: To set the targeted brightness range for the contrast adjustment, adjust the slider to bring details out
of highlights or shadows. To bring details out of the midtones, leave the Balance sliders set to 0.
Hold down Shift while clicking and dragging on the image to target the color's corresponding
Balance slider.
Right-click the slider to reset the value to zero.
At the bottom of the Convert to Black & White panel, use the Amount and Hue sliders to add color back into
the image. Choose the color using the Hue slider. The saturation of the color added back to any given pixel is
scaled based on both the amount of color/saturation that existed in the original image and the Amount slider.
This filter features a Pixel Targeting tab (see Pixel Targeting for more details).

Gemstone Photo Editor 12
Page 271 of 346
Use the Edit Brush to paint this effect onto specific areas of the image.
Use the Gradient tool to transition this effect across specific areas of the image.
Use the Radial Gradient tool to apply effects around, or directly to, a center point.
Color Picker
The Colors dialog box appears in several places in Gemstone when you select or apply a color. You can
use the Color dialog box to select a color in multiple ways and to adjust a color using several different
tools.
The Standard Tab
On the first tab, there is a fixed honeycomb of Basic colors to choose from, including gray, black, and
white at the bottom. Below it is a grid of Custom or Favorite colors that you can fill in by selecting a

Gemstone Photo Editor 12
Page 272 of 346
color and then right-clicking a box in the grid. To create a custom color, click the Custom tab.
The Custom Tab
On the second tab, there is a color palette. On the far right is a color slider, which you can use to
navigate to a color group and gain access to any or all colors of the spectrum. Add colors to your
Custom colors by selecting the color in the palette and then right-clicking a box in the grid.
Selecting and Adjusting Colors
To select a color, click on a square in the grid of custom colors, or on the color palette. You can also
drag over the color palette. When you click a color, that color appears in the New box and all of its
numerical values, (Hue, Saturation, Luminosity, as well as Red, Green, and Blue), appear in the fields
on the Custom tab.
You can also adjust a color by changing the Hue, Saturation, and Luminosity values. To select a precise
color, type in the values for that color. You can do the same using the Red, Green, and Blue values.
Histogram
The Histogram displays a graphical representation of the distribution of intensity levels of pixels for
each color channel in an image.
To Display and Use the Histogram:
1. Click Panes | Histogram.
2. On the Histogram, select or clear the following checkboxes:
R: Shows or hides the red color channel.
G: Shows or hides the green color channel.
B: Shows or hides the blue color channel.
L: Shows or hides the lightness of the image.

Gemstone Photo Editor 12
Page 273 of 346
Chapter 11: Editing - Detail Tools
Sharpen
The Sharpen filter sharpens an image by enhancing medium and high contrast edges.
Customized settings can be saved as a preset for future use. Presets can be selected from the
Presets drop-down, or saved by clicking the adjacent Save icon.
To sharpen an image using the Sharpen tool:
1. Select Filter | Detail | Sharpen from the main menu, or press Alt + N.
2. Set the image as described below.
3. Do one of the following:
Click OK to apply any changes and close the tool.
Click Cancel to discard all changes and close the tool.
Sharpen Options
Amount Specifies the amount of sharpening applied by increasing contrast around the
edges.
Radius Controls the number of pixels to adjust around each edge. Higher values increase
the number of sharpened pixels and tend to bring out coarser detail, while lower
values reduce the number of sharpened pixels and tend to bring out finer detail.
Mask Allows the targeting of edges, while suppressing the sharpening of noise and
texture. To view the areas the mask affects, press the Alt key when moving the
mask slider. Areas affected by sharpening appear white.
Detail
Suppresses the halo, (the light border that forms around edges with
extreme sharpening), by reducing its intensity. The higher the value, the
stronger the reduction.
Threshold
Specifies how different the pixel lightness values within an edge must be
before the pixels within the edge are sharpened. Higher values sharpen only
stronger edges but minimize the appearance of noise. Lower values sharpen
both strong and weaker edges, but can increase the appearance of noise. It
is recommend to set the threshold to enhance edges while keeping
background noise to a minimum.
100% Preview
Click the preview image in the 100% Preview box to compare the image
before and after filtering.

Gemstone Photo Editor 12
Page 274 of 346
Right-click a slider to reset to the default value.
This filter features a Pixel Targeting tab (see Pixel Targeting for more details).
Use the Edit Brush to paint this effect onto specific areas of the image.
Use the Gradient tool to transition this effect across specific areas of the image.
Use the Radial Gradient tool to apply effects around, or directly to, a center point.
Blur
The Blur filter applies various types of blur to an image.
Customized settings can be saved as a preset for future use. Presets can be selected from the
Presets drop-down, or saved by clicking the adjacent Save icon.
To blur an image:
1. Select Filter | Detail | Blur from the main menu, or press Alt + U.
2. In the Blur dialog, navigate to the Blur type section and select the type of blur to apply.
3. Set the options as described below.
4. Do one of the following:
Click OK to apply any changes and close the tool.
Click Cancel to discard all changes and close the tool.
Blur Types

Gemstone Photo Editor 12
Page 275 of 346
Gaussian
Produces an even, smooth blur.
Amount Specifies
the
amount
of blur.
Move
the
slider to
the right
to
intensify
the
effect.
Linear
Produces a blurring effect that gives the illusion of
movement.
Amount Specifies
the
amount
of blur.
Move
the
slider to
the right
to
intensify
the
effect.
Angle Specifies
the
direction
of the
blur
effect.
Radial
Produces blur around a center point. Click the image
to set the center point.
Amount Specifies
the
amount
of blur.

Gemstone Photo Editor 12
Page 276 of 346
Move
the
slider to
the right
to
intensify
the
effect.
Clockwise Specifies
clockwis
e blur.
Counter-clockwise Specifies
counter-
clockwis
e blur.
Horizontal position Specifies
the
blur's
center
point on
the
horizont
al axis.
Vertical position Specifies
the
blur's
center
point on
the
vertical
axis.
Spread
Produces a smeared or frosted blur.
Amount Specifies
the
amount
of blur.
Move
the
slider to
the right

Gemstone Photo Editor 12
Page 277 of 346
to
intensify
the
effect.
Zoom
Produces inward or outward blur to or from a
center point.
Amount Specifies
the
amount
of blur.
Move
the
slider to
the right
to
intensify
the
effect.
Zoom in Creates a
blur that
zooms in
to the
image's
center.
Zoom out Creates a
blur that
zooms
out from
the
image's
center.
Horizontal position Specifies
the
blur's
center
point on
the
horizont
al axis.
Vertical position Specifies
the

Gemstone Photo Editor 12
Page 278 of 346
blur's
center
point on
the
vertical
axis.
Smart Blur
Produces blur by detecting and avoiding edges, and
preserves detail based on the threshold setting. This
effect is usually used to smooth out skin.
Amount Specifies
the
amount
of blur.
Move
the
slider to
the right
to
intensify
the
effect.
Threshold Specifies
how
little
detail an
area
must
have
before
the blur
will
apply to
it.
Lens
Produces a blur that mimics the blurring effect of a
camera aperture.
Select a bokeh shape from the options on the Blur
panel. These shapes concentrate in highlights.
Amount Specifies
the
strength
of the
blur.

Gemstone Photo Editor 12
Page 279 of 346
Move
the
slider to
the right
to
intensify
the
effect.
Bokeh Frequency Specifies
how
often the
bokeh
shapes
show up.
Bokeh Brightness Specifies
how
much
the
bokeh
shapes
stand
out.
Right-click a slider to reset to the default value.
This filter features a Pixel Targeting tab (see Pixel Targeting for more details).
Use the Edit Brush to paint this effect onto specific areas of the image.
Use the Gradient tool to transition this effect across specific areas of the image.
Use the Radial Gradient tool to apply effects around, or directly to, a center point.
About Noise and Noise Reduction
Image noise looks like random black, white, or colored pixels in an area of a photo where there should
be solid color, such as a dark night sky. In digital photography, noise is typically more visible in the

Gemstone Photo Editor 12
Page 280 of 346
dark areas of a photo.
There are many causes of image noise. The amount of image noise will be increased if a high ISO
setting is used (such as ISO 800) to capture a photo, or if the exposure time is extended. (Typically, a
high ISO setting and extend exposure times are used to take photos in low light.) However, image
noise can also be caused by dead or stuck pixels in a digital camera's image sensor. Similarly, dust on a
camera lens or scanner bed can cause noise by blocking or reflecting light.
Images generally have two types of noise: luminance and color. Luminance noise is random variations
of brightness, and particularly in gray areas, may appear spotted when there should be a solid color in
the area of the image.
Color noise is random variations of color in the image.
Noise is visually distracting and in most cases will need to be reduced. However, if noise is reduced too
much, the image sharpness may be unintentionally reduced. Use the Noise tool to remove both
luminance and color noise in your images.
Remove Noise
The Remove Noise filter removes noise from images while preserving the image details.
Use the Remove Noise filter to remove hot image pixels caused by digital cameras with
malfunctioning CCD array sensors, or the unwanted pixels caused by a dusty scanner or
camera lens.
Customized settings can be saved as a preset for future use. Presets can be selected from the
Presets drop-down, or saved by clicking the adjacent Save icon.
To remove noise from an image:
1. Select Filter | Detail | Noise from the main menu, or press N.
2. Select the Remove Noise tab.

Gemstone Photo Editor 12
Page 281 of 346
3. Make a selection from the Noise Type section.
4. Set the options as described below.
Hold down the Alt key while adjusting a slider to view a preview of its effect on the image.
5. Do one of the following:
Click OK to apply any changes and close the tool.
Click Cancel to discard all changes and close the tool.
Remove Noise | Noise Type Options

Gemstone Photo Editor 12
Page 282 of 346
Camera Noise Removal
Removes digital camera noise. Adjust the associated
following sliders to further remove noise.
Luminance Reduces the random variations
of brightness in the noise.
Strength Controls the strength of the
Luminance slider.
Color Reduces the random variations
of color in the noise.
Tonal Range Tonal Range refers to a range of
average brightness values in an
image. For example, the tonal
range of a photo taken in a dark
cavern it would be low, whereas
a sunny sky would be high.
The Tonal Range slider increases
in value from left to right,
increasing from a low tonal range
on the left to a high tonal range
on the right. The Tonal Range
slider is used to focus noise
reduction to areas of the image
that have a corresponding tonal
range. For example, the left-most
position would reduce the noise
in a cavern more than a sky.
Tonal Range only affects
luminance noise reduction.
Frequency Range
The Frequency Range slider
adjusts the noise pattern. High
frequency noise looks like fine
static while low frequency noise
looks like coarse grain or
"splotches". Move the Frequency
Range slider to the left to limit
noise reduction to high
frequency noise.
Frequency Range affects both
luminance and color noise
reduction.

Gemstone Photo Editor 12
Page 283 of 346
Median Noise Removal
Square Removes noise using a 3 x 3
pixel square.
X Removes noise using a 3 x 3
pixel X shape. Use this option
when you want to preserve an
image's thin and diagonal lines.
Plus Removes noise using a 3 x 3
pixel plus (+) shape. Use this
option to preserve an image's
thin, vertical, and horizontal
lines.
Despeckle
Removes noise.
Right-click a slider to reset to the default value.
This filter features a Pixel Targeting tab (see Pixel Targeting for more details).
Use the Edit Brush to paint this effect onto specific areas of the image.
Use the Gradient tool to transition this effect across specific areas of the image.
Use the Radial Gradient tool to apply effects around, or directly to, a center point.
Add Noise
The Add Noise filter adds a grainy texture to an image. Adding small amounts of noise can reduce the
appearance of minor imperfections in the original image.
Customized settings can be saved as a preset for future use. Presets can be selected from the
Presets drop-down, or saved by clicking the adjacent Save icon.
To add noise to an image:

Gemstone Photo Editor 12
Page 284 of 346
1. Select Filter | Detail | Noise from the main menu, or press N.
2. Select the Add Noise tab.
3. Set the options as described below.
4. Do one of the following:
Click OK to apply any changes and close the tool.
Click Cancel to discard all changes and close the tool.
Add Noise Options
Intensity Specifies the amount of noise to add to the image. A higher intensity increases the
chance that a noise pixel will replace a pixel in the original image.
Color proximity Specifies the color of noise pixels to add to the image. A lower value gives each
noise pixel a color similar to the pixel it replaces. Higher values result in a random
selection of the noise pixel color.
Noise color Select one of the following options to specify noise pixel color:
l Random: Randomly selects the color.
l Monochrome: Produces black and white noise pixels.
l Adjustable: Randomly selects the color of each noise pixel, but more pixels
match a defined color. To define a color, click the color picker and select a
color.
Noise placement Adds noise to image areas that closely match a defined color. Select the Set color
checkbox to enable noise placement, and click the color picker to specify a color.
Randomize Indicates the random placement of noise in an image.
When using the Add Noise tool, Gemstone places the noise pixels based on a
random seed to make the image noise different each time the Add Noise tool is
used. To generate a new random seed, click the Randomize button.
Right-click a slider to reset to the default value.
This filter features a Pixel Targeting tab (see Pixel Targeting for more details).
Use the Edit Brush to paint this effect onto specific areas of the image.
Use the Gradient tool to transition this effect across specific areas of the image.

Gemstone Photo Editor 12
Page 285 of 346
Use the Radial Gradient tool to apply effects around, or directly to, a center point.
Detail Brush
To highlight important photo details and remove the emphasis off others, use the Detail Brush filter.
The impact of the Detail Brush filter is cumulative, meaning the more the tool is brushed in a particular
area using the blur option, for example, the more blurry the area will become.
Customized settings can be saved as a preset for future use. Presets can be selected from the
Presets drop-down, or saved by clicking the adjacent Save icon.
To adjust details:
1. Select Filter | Detail | Detail Brush from the main menu, or press I.
2. Set the options as described below.
3. Do one of the following:
Click OK to apply any changes and close the tool.
Click Cancel to discard all changes and close the tool.
Detail Brush Options
Gemstone Photo Editor 12
Page 286 of 346
Operation
Select the operation to perform:
Blur
Sharpen
Tool settings
Blur does not have any tool settings. If Sharpen is selected, set the following:
Radius Controls the number of pixels to adjust around each edge. Higher
values increase the number of sharpened pixels and tend to bring
out coarser detail, while lower values reduce the number of
sharpened pixels and tend to bring out finer detail.
Threshold Specifies how different the pixel lightness values within an edge
must be before the pixels within the edge are sharpened. Higher
values sharpen only stronger edges but minimize the appearance
of noise. Lower values sharpen both strong and weaker edges, but
can increase the appearance of noise. It is recommended to set
the Threshold value to enhance edges while keeping background
noise to a minimum.
Brush settings
Nib Width Drag the slider to select a brush size.
Feathering Drag the slider to soften the stroke edges.
Strength Drag the slider to determine the strength of the sharpening or
blurring.
Enter a numerical value into the number box to incrementally make precise adjustments.
Right-click a slider to reset to the default value.
Clarity
The Clarity filter adds subtle definition to an image's details. Use the Clarity filter to enhance the
contrast of image midtones, without overpowering the shadows and highlights.
Customized settings can be saved as a preset for future use. Presets can be selected from the
Presets drop-down, or saved by clicking the adjacent Save icon.
To adjust image clarity:

Gemstone Photo Editor 12
Page 287 of 346
1. Select Filter | Detail | Clarity from the main menu, or press Alt + C.
2. Drag the Strength slider to the right for greater clarity, or to the left for reverse clarity.
3. Do one of the following:
Click OK to apply any changes and close the tool.
Click Cancel to discard all changes and close the tool.
Enter a numerical value into the number box to incrementally make precise adjustments.
Right-click a slider to reset to the default value.
This filter features a Pixel Targeting tab (see Pixel Targeting for more details).
Use the Edit Brush to paint this effect onto specific areas of the image.
Use the Gradient tool to transition this effect across specific areas of the image.
Use the Radial Gradient tool to apply effects around, or directly to, a center point.

Gemstone Photo Editor 12
Page 288 of 346
Chapter 12: Options and Configuration
ACDSee Gemstone Photo Editor Options
The Options dialog box can be used to configure settings for Gemstone.
To set the Editor Options:
1. Select Tools | Options... from the menu.
2. In the Options dialog box, select General.
3. Configure the options as described below.
4. Click OK to apply any changes.
GPU selection In order to ensure optimum performance, parts of Gemstone run off the GPU.
Gemstone automatically chooses the best GPU in the system. The Let ACDSee
Gemstone Photo Editor decide option is enabled by default. When Let ACDSee
Gemstone Photo Editor decide is enabled, the GPU model text displays next to
the option, specifying whether Gemstone is running off of the primary GPU or
another, more superior GPU that Gemstone has detected. In most cases, the
GPU detected and identified as the best by Gemstone will be one and the same:
the primary GPU.
l Use primary: Enable this option to use the primary GPU over the GPU
Gemstone has chosen.
l Let ACDSee Gemstone Photo Editor decide: Enable this option to use the
superior GPU found by Gemstone.
Adobe® Photoshop®
Plug-in Paths
Displays the paths of the hard drive locations of any Photoshop® plug-ins (This
will tell Gemstone where to find the plug-in.). Direct the path to the location
where Photoshop® plug-ins are already stored.
To change or add a location, click the Add... button, then browse to the location,
select it, and click Select Folder.
To remove a location, select it and click Remove.
To move plug-ins to a listed location, select the location, and click Open Folder,
then drag any plug-ins into the folder.
ACDSee RAW Options
The ACDSee Gemstone Options dialog box can be used to change the ACDSee RAW options.
To set the ACDSee RAW options:

Gemstone Photo Editor 12
Page 289 of 346
1. Select Tools | Options... from the main menu.
2. In the ACDSee Gemstone Options dialog box, select ACDSee RAW.
3. Set or change the options described below.
4. Click OK to accept any changes.
ACDSee RAW Options
Field Description
Enable fast image switching for RAW files in ACDSee RAW Displays a
JPEG
version of
the RAW
file while
the RAW
file loads.
AutoSave all ACDSee RAW adjustments All changes
made to a
RAW image
are kept in
an XMP
sidecar file
until the
RAW file
changes
are saved
as a JPEG.
Color Management
The Gemstone color management options help reduce color matching problems between devices,
such as a computer, a monitor, and a printer. Gemstone automatically detects the color profile
assigned to a monitor (if the monitor is setup correctly within the operating system). It is
recommended to regularly profile a monitor with color management hardware and software.
Before changing the color management settings, make sure to have accurate color profiles for each of
the devices to be used. Color profiles can be obtained from device manufacturers if the profiles were
not included in the device's software, or from the professional printers.
Color management can be a complex process. If you are not familiar with color management
systems, it is recommended to accept the default color management settings in Gemstone.
To Set the Color Management Options:
Gemstone Photo Editor 12
Page 290 of 346
1. Select Tools | Options... from the menu.
2. In the Options dialog box, select Color Management.
3. In the Color Management page, set or change any of the options as described below.
4. Click OK to accept any changes.
Color Management Options

Gemstone Photo Editor 12
Page 291 of 346
Field Set Field Description
Enable
Enable Color
Management
Activates the color management system in Gemstone
and the fields in this dialog box.
Color Management
Engine
Select from the drop-down list of color management
engines.
Input
Default Input Profile Specifies the default color profile to use when the
image is not tagged with an ICC profile.
Soft Proofing
Enable soft proofing Choose from a selection of device profiles for
monitor simulation proofing. Choose a connected
printer profile to be the emulated device and then
preview what the printer's output would look like on
your monitor (soft proofing).
Emulated Device
Profile
Choose the device to be emulated.
Rendering Intent A strategy for handling situations where not all colors
will fit in the output device's color space. Strategy
options consist of:
Perceptual: Remaps colors outside of the target
color space by compressing all colors for the
entire image. Colors may become less saturated
as everything condenses towards neutral and
away from the saturated colors at the edges of
the target color space.
Relative Colorimetric: Maps all out-of-gamut
colors to the closest in-gamut color. Colors that
fall outside the range of what the output device
can render are adjusted to the closest color the
device is capable of displaying.
Saturation: Preserves the saturation of colors,
potentially at the cost of hue and lightness. This
intent is most valuable for business applications,
such as graphics, where images need to be
vibrant and contrast distinctly from one another.

Gemstone Photo Editor 12
Page 292 of 346
Field Set Field Description
Absolute Colorimetric: Colors that fall outside
the range of what the output device can render
are adjusted to the closest color that can be
rendered. However, the white point does not
move, which may result in the distance of the
colors to the white point changing.
Profile Details For a detailed account of the profile list, click the Profile
Details button.
There are soft proofing items available from the View | Soft Proofing menu, including
"Enable", "Perceptual", "Relative Colorimetric", "Saturation", and "Absolute Colorimetric".
Display
The Display dialog box can be used to change the window background.
To set the Display:
1. Select Tools | Options... from the menu.
2. In the Options dialog box, select Display.
3. In the Display page, set or change the options described below.
4. Click OK to accept any changes.
Display Options
Field Set Field Description
Background
Default color Uses the default Gemstone color for the background.
Custom color Specifies a color to use as the background.
Tab Tooltips
File Name Includes a File Name in the tooltip.
File Location Includes a File Location in the tooltip.
None Tooltips are not displayed.
Ruler and Guideline Options
The Options dialog box can be used to configure settings for rulers and guidelines.

Gemstone Photo Editor 12
Page 293 of 346
To set the Rulers and Guidelines Options:
1. Select Tools | Options... from the menu.
2. In the Options dialog box, select Rulers and Guidelines.
3. Set the options as described below.
4. Click OK to apply any changes.
Rulers and Guidelines Options
Field Set Field Description
Guidelines
Color Select a guideline color.
Rulers
DPI Determines the ruler scale by dividing the layer's pixel value
by Dots Per Inch (DPI).
Load resolution from
EXIF metadata
When this checkbox is enabled, the EXIFmetadata value will
override the value in the DPI field.
Units
Select a unit of measure for the rulers:
l Inches
l Centimeters
l Pixels
l Percent

Gemstone Photo Editor 12
Page 294 of 346
Chapter 13: Printing
Printing Images
With the Gemstone print utility, you can print your images on any size of paper, in any orientation,
and at any resolution your printer can support. You can also use the print utility to create and print
contact sheets, complete with headers, footers, and captions specific to each image.
As you change the options in the Print dialog box, you can view a dynamically updated preview of the
image and its position on the page. You can adjust the output size, print multiple copies of each
image, and change the orientation of the images on each page.
To Print a Single Image:
1. Select the image you want to print.
2. Click File | Print Image.
3. Under Format, choose a print size.
4. On the Printer Options tab, specify the printer you want to use, the paper size, the number of copies
you want, the range of pages that you want to print, and image resolution.
5. On the Page Settings tab, specify the image position on the paper and the margin widths, and specify
the number of prints of each photo.
6. Add captions, headers, or footers.
7. Click Print.
Printer Options
When printing images with ACDSee, be sure to specify which printer to use, and set the printer options
on the Printer Options tab in the Print dialog box. Select File | Print... from the main menu to open
the Print dialog box.
Printer Options

Gemstone Photo Editor 12
Page 295 of 346
Printer Specifies the printer to use. Select a printer from the drop-down list
and click the Properties button to set its options. Refer to the printer
manufacturer's Help file or manual for more information.
Paper size Specifies the size of the paper, e.g. Letter, Legal, A4.
Orientation Specifies "Portrait" or "Landscape" page orientation.
Copies Specifies the number of copies to print.
Print range Select one of the following options:
l All: Prints all of the pages in the document.
l Pages from: Prints a range of pages. Specify the first and last
pages of the range in the fields.
Resolution Specifies a resolution in pixels-per-inch (PPI) for the image. The
higher the value, the more dots per inch, and the higher the
resolution of the printed image. For example, 600 PPI is 360,000
(600 x 600) pixels per square inch.
Filter Specifies the resampling filter to use when printing images. Click the
drop-down list and select one of the following:
l Box: Displays considerable tiling or jaggies when resizing an
image.
l Triangle: Produces good results for image reduction and
enlargement, but displays sharp transition lines.
l Bicubic: Produces good results with photo-realistic images and
with images that are irregular or complex. Uses interpolation
to minimize the raggedness normally associated with image
expansion.
l Bell: Smooths the image.
l B-Spline: Produces smooth transitions, but may cause excess-
ive blurring.
l Lanczos: Produces the sharpest images, but may also intro-
duce some ringing artifacts.
l Mitchell: Produces smooth transitions when enlarging photo-
realistic images. This filter is good compromise between the
ringing effect of Lanczos and the blurring effect of other filters.
Color Management From the drop-down menu, choose between allowing the printer to
manage colors, or managing colors with ACDSee.
Manage colors using ACDSee:
l Printer Profile: Select from all printer profiles currently stored
on the computer. Scroll down to find the profile cor-

Gemstone Photo Editor 12
Page 296 of 346
responding to the currently selected printer.
l Rendering Intent: A strategy for handling situations where not
all colors will fit in the output device's color space.
l Soft Proof: Preview what the printed output would look like
with the currently selected printer profile.
l Gamut Warning: Displays colors that cannot be reproduced by
the printer in the preview. In such cases, the closest available
color is selected. The rendering intent describes the method
used to select another color.
For more information, see Color Management.
Use EXIF 2.2 printing
(if available)
Some cameras may capture EXIF information that can be shared with
a designated printer to optimize printing results. Select this option if
your camera and printer support EXIF 2.2 printing.
Image Size and Positioning
The Page Settings tab in the Print dialog box can be used to adjust and control the size of the images
for printing, and the positioning of images on each page. Select File | Print... from the main menu to
open the Print dialog box.
Page Settings Options
Page position Specifies where to place the image on each page.
Margins Specifies the size of the margins. Type a value or click the
arrows in the Top, Bottom, Left, and Right spin boxes.
Number of prints Specifies how many copies of each image to print. The print
utility adds pages as required.
Automatically rotate picture based on
print format
Specifies whether the print utility will automatically
determine which orientation to use for each image. With the
Automatically rotate picture based on print format
checkbox enabled, the print utility changes each page's
orientation to best suit the image to be printed.
Maintain aspect ratio Specifies whether the print utility will maintain the original
image's aspect ratio.
Select one of the following options to indicate how the print
utility should handle the aspect ratio for oversized images:
l Crop image to fit print format: Prints only the part of
the image that fits within the print format.
l Shrink image to fit print format: Prints the entire
image, reduced to fit inside the print format.

Gemstone Photo Editor 12
Page 297 of 346
Print Adjustments
The settings on the Adjustments tab of the Print dialog can be used to compensate for quirks specific
to a connected printer, such as the way the printer handles exposure.
It is recommended to adjust these settings only after printing to better determine any
corrections the printer may require.
Please note that any adjustments made on the Adjustments tab will not be reflected in the
Preview window.
To Apply Adjustments to Images Prior to Printing:
1. Select File | Print from the menu.
2. In the Print dialog's Adjustments tab, adjust the Exposure, Contrast, or Sharpness sliders as desired.
3. Click Print.
Adding Text to Pages
From the Print dialog box, headers and footers can be added to printed pages, and captions added
beneath images.
To Add Captions to Printed Images:
1. Select File | Print... from the main menu.
2. In the Print dialog box, select the Caption tab.
3. Enable the Use caption text checkbox.
4. Click the Font... button to open the Font dialog box and set the font options.
5. In the text box, type the caption text to be displayed.
6. Click Insert Metadata to insert file-specific information into the caption for each image.
7. In the Text alignment drop-down list, select the caption positioning.
8. To set the maximum number of text lines for each caption to display, select the Number of lines
checkbox, and then specify a number in the field.
To Add Headers and Footers to Printed Pages:
1. Do one of the following:
Select the Header tab and enable the Use header text checkbox.
Select the Footer tab and enable the Use footer text checkbox.
Gemstone Photo Editor 12
Page 298 of 346
2. Click the Font... button to open the Font dialog box and set the font options.
3. In the text box, type the text to be displayed.
4. To insert the current page number or the total number of pages into the text, click Insert Page Number,
and then select an option from the menu.
5. In the Text alignment drop-down list, select the header or footer positioning.
6. To set a maximum number of text lines, select the Number of lines checkbox, and then specify a
number in the field.
Custom Print Layouts
In the Print dialog custom print layouts can be created and stored as print options.
To Create a Custom Print Format:
1. Select File | Print... from the main menu.
2. In the Print dialog box, enable the Full page radio button.
3. In the Print format area, click the Add... button.
4. In the Add Custom Format dialog box, select a measurement unit from the Measurement units drop-
down list.
5. Enter the dimensions for the new format in the Format width and Format height fields.
6. Click Add.

Gemstone Photo Editor 12
Page 299 of 346
Chapter 14: Shortcuts
Keyboard Shortcuts
Gemstone Shortcuts
Use the following keyboard shortcuts.
To define custom keyboard shortcuts, see Customizing Keyboard Shortcuts.

Gemstone Photo Editor 12
Page 300 of 346
Shortcut Resulting Action
General
Alt + F4 Closes Photo Editor.
Shift + Esc Minimizes Photo Editor.
Ctrl + Shift + Alt +
S
Opens the Customize Shortcuts dialog box, in which you can
customize keyboard shortcuts.
Alt + O Opens the Options dialog box.
F1 Opens the Help file.
` (grave accent) Toggles the display of the full file path in the Status bar.
Ctrl + Q Exit
File Menu
Page Arrow Right
Page Down
3 (numeric
keypad)
Opens the next image.
Page Arrow Left
Page Up
9 (numeric
keypad)
Opens the previous image.
Ctrl + S Saves the image.
Ctrl + Alt + S Saves a copy.
Ctrl + O Opens the Open Files dialog.
Ctrl + Q Closes the image.
Ctrl + Shift + Q Closes all images.
Ctrl + P Opens the current image in the ACDSee Print utility.
End Switches to the last image in the Filmstrip.
Home Switches to the first image in the Filmstrip.
Edit Menu
Gemstone Photo Editor 12
Page 301 of 346
Shortcut Resulting Action
Ctrl + Y Redo.
Ctrl + Z Undo.
Ctrl + Shift + Z Undo all.
Ctrl + C Copy.
Ctrl + V Paste.
Delete Delete.
Viewing
Ctrl + Page Arrow
Right
Toggles the right pane open and closed.
Ctrl + Page Arrow
Left
Toggles the left pane open and closed.
Ctrl + Page Arrow
Down
Toggles the bottom pane open and closed.
/ (forward slash) Zooms the image to its actual size.
Shift + 8
* (numeric keypad
asterisk)
Fits the image to the viewing area.
+ (plus) Zooms in.
- (minus) Zoomed out.
F Displays the image full screen.
' Toggles Navigator open and closed when zoomed into the image.
[ Enables soft proofing.
Z Displays saved version of the image.
Page Arrow Right Pans right when zoomed into the image.
Page Arrow Left Pans left when zoomed into the image.
Page Down Pans down when zoomed into the image.

Gemstone Photo Editor 12
Page 302 of 346
Shortcut Resulting Action
Page Up Pans up when zoomed into the image.
Customizing the Interface
Ctrl + Shift + H Toggles the Histogram open and closed.
Ctrl + Shift + U Toggles the Undo History pane open and closed.
Ctrl + T Toggles rulers on and off.
Ctrl + Shift + G Enables/disables snapping to guidelines.
Ctrl + Shift + ; Clears all guidelines.
Ctrl + Alt + ; Locks guidelines in place.
Ctrl + ; Toggles guidelines on and off.
Selecting
Alt + A Selects all.
Alt + D Deselects.
Alt + I Inverts selection.
Alt + Del Deletes selected pixels.
Alt + Shift + F Applies Smart Erase to a selection.
Alt + Shift + P Opens the Pixel Targeting panel for targeting the selection to specific
colors and/or tones.
Alt + Shift + S Saves the selection.
Ctrl + Alt + L Creates a selection based on brightness in the image.
Alt + Shift + L Opens the Load Selection dialog box.
Alt + Shift + M Opens the Manage Selections dialog box
Alt + Shift + O Opens the Overlay Options dialog box.
Filters

Gemstone Photo Editor 12
Page 303 of 346
Shortcut Resulting Action
F2 Opens the Red Eye Reduction tool.

Gemstone Photo Editor 12
Page 304 of 346
Shortcut Resulting Action
F3 Opens the Repair tool.

Gemstone Photo Editor 12
Page 305 of 346
Shortcut Resulting Action
F4 Opens the Skin Tune tool.

Gemstone Photo Editor 12
Page 306 of 346
Shortcut Resulting Action
F5 Opens the Chromatic Aberration tool.

Gemstone Photo Editor 12
Page 307 of 346
Shortcut Resulting Action
F6 Opens the Watermark tool.

Gemstone Photo Editor 12
Page 308 of 346
Shortcut Resulting Action
F7 Opens the Border tool.

Gemstone Photo Editor 12
Page 309 of 346
Shortcut Resulting Action
F8 Opens the Vignette tool.

Gemstone Photo Editor 12
Page 310 of 346
Shortcut Resulting Action
F9 Opens the Special Effects panel.

Gemstone Photo Editor 12
Page 311 of 346
Shortcut Resulting Action
F10 Opens the Tilt-Shift tool.

Gemstone Photo Editor 12
Page 312 of 346
Shortcut Resulting Action
F11 Opens the Grain tool.

Gemstone Photo Editor 12
Page 313 of 346
Shortcut Resulting Action
F12 Opens the Rotate tool.

Gemstone Photo Editor 12
Page 314 of 346
Shortcut Resulting Action
Alt + F1 Opens the Flip tool.

Gemstone Photo Editor 12
Page 315 of 346
Shortcut Resulting Action
Alt + F2 Opens the Crop tool.
Alt + F3 Opens the Perspective Correction tool.
Alt + F5 Opens the Distortion Correction tool.
Alt + F6 Opens the Lens Correction tool.
Alt + F7 Opens the Resize tool.
Alt + F8 Opens the Liquify tool.
Alt + F9 Opens the Exposure tool.
Alt + F10 Opens the Levels tool.
Alt + F11 Opens the Auto Levels tool.
Alt + F12 Opens the Tones Curves tool.
Ctrl + F1 Opens the Light EQ™ tool.
Ctrl + F2 Opens the Dehaze tool.
Ctrl + F3 Opens the Dodge and Burn tool.
Ctrl + F4 Opens the White Balance tool.
Ctrl + F5 Opens the Color EQ tool.
Ctrl + F6 Opens the Color Balance tool.
Ctrl + F7 Opens the Convert to Black & White tool.
Ctrl + F8 Opens the Split Tone tool.
Ctrl + F9 Opens the Color LUTs tool.
Ctrl + F10 Opens the Sharpen tool.
Ctrl + F11 Opens the Blur tool.
Ctrl + F12 Opens the Noise Reduction tool.
Shift + F1 Opens the Clarity tool.
Shift + F2 Opens the Detail Brush tool.
Working Inside Filters

Gemstone Photo Editor 12
Page 316 of 346
Shortcut Resulting Action
B Toggles Brush controls open and closed.
S Toggles the brush stroke display when working inside a filter.
G Toggles Gradient controls open and closed.
R Toggles Radial Gradient controls open and closed.
Spacebar Switches to the Hand tool when working with the Brush or Gradients
inside a filter.
E Toggles the exposure warning on and off in the Exposure tool.
Layered Editor
Ctrl + Alt + I Opens the Import image as layer dialog box.
Ctrl + Alt + N Adds a new blank layer.
Ctrl + Alt + D Duplicates the selected layer.
Ctrl + Delete Deletes the selected layer.
Ctrl + Alt + R Opens the Rename Layer dialog box.
Ctrl + Alt + V Toggles the Show/Hide Layer button on and off.
Ctrl + Alt + C Toggles the Clipping button on and off.
Ctrl + Shift + Down Merges the selected layer with the layer below it.
Ctrl + Alt + F Merges all layers into a single image.
Shift + J Shows all layers.
Shift + Y Hides all layers.
Ctrl + Shift + F Applies Frequency Separation.
Ctrl + Shift + T Rasterizes the selected text layer.
Ctrl + Shift + D Opens the HDR dialog.
Ctrl + Shift + O Opens the Focus Stack dialog.
Shift + Alt + A Auto-aligns the selected images.
Shift + Alt + B Opens the Auto-Blend dialog.

Gemstone Photo Editor 12
Page 317 of 346
Shortcut Resulting Action
Layer Masks
Ctrl + Alt + W Adds a white layer mask.
Ctrl + Alt + B Adds a black layer mask.
Ctrl + Alt + , Adds the mask to a selection.
Ctrl + Alt + - Subtracts the mask from a selection.
Ctrl + Alt + = Selects the area common to the mask and the selection.
Ctrl + Alt + . Creates a mask from the selection.
Ctrl + Alt + J Inverts the mask.
Ctrl + Shift +
Delete
Deletes the mask.
Ctrl + Alt + P Opens the Pixel Targeting panel, allowing you to mask specific colors
and/or tones.
Ctrl + Shift + V Pastes the image layer as a luminance mask.
Ctrl + Shift + M Disables/enables the selected mask.
Adjustment Layers

Gemstone Photo Editor 12
Page 318 of 346
Shortcut Resulting Action
Shift + E Adds an Exposure Adjustment Layer.
Shift + B Adds a Blur Adjustment Layer.
Shift + Z Adds a Posterize Adjustment Layer.
Shift + U Adds a Curves Adjustment Layer.
Shift + I Adds a Negative Adjustment Layer.
Shift + F Adds a Color Adjustment Layer.
Shift + W Adds a Black and White Adjustment Layer.
Shift + T Adds a Threshold Adjustment Layer.
Shift + G Adds a RGB Adjustment Layer.
Shift + R Adds a Clarity Adjustment Layer.
Shift + L Adds a Levels Adjustment Layer.
Shift + X Adds a Vibrance Adjustment Layer.
Shift + V Adds a Vignette Adjustment Layer.
Shift + S Adds a Sharpen Adjustment Layer.
Shift + O Adds a Color EQ Adjustment Layer.
Shift + Q Adds a Light EQ Adjustment Layer.
Shift + M Adds a Gradient Map Adjustment Layer.
Shift + K Adds a Skin Tune Adjustment Layer.
Shift + P Adds a Photo Effect Adjustment Layer.
Shift + A Adds a White Balance Adjustment Layer.
Shift + H Adds a Dehaze Adjustment Layer.
Shift + C Adds a Split Tone Adjustment Layer.
Shift + N Adds a Noise Reduction Adjustment Layer.
Shift + D Adds a Color LUT Adjustment Layer.
Tools

Gemstone Photo Editor 12
Page 319 of 346
Shortcut Resulting Action
M Activates the Move tool.
Ctrl + Shift + C Activates the Resize Canvas tool.
T Activates the Text tool.
Ctrl + Shift + R Activates the Rectangle tool.
Ctrl + Shift + E Activates the Elliptical tool.
Ctrl + Shift + L Activates the Line tool.
Ctrl + A Activates the Arrow tool.
Ctrl + Shift + P Activates the Polygon tool.
Ctrl + Shift + B Activates the Curve tool.
B Activates the Brush tool.
Ctrl + F Activates the Fill tool.
Ctrl + G Activates the Gradient tool.
Alt + E Activates the Eraser tool.
Ctrl + E Activates the Smart Erase tool.
Ctrl + Shift + I Activates the Eyedropper tool.
Color Tools
Ctrl + [ Opens the Foreground Color dialog box.
Ctrl + ] Opens the Background Color dialog box.
Ctrl + X Switches the foreground and background color.
Selection Tools

Gemstone Photo Editor 12
Page 320 of 346
Shortcut Resulting Action
Ctrl + R Activates the Rectangle Selection tool.
Ctrl + I Activates the Ellipse Selection tool.
Ctrl + L Activates the Lasso Selection tool.
Ctrl + W Activates the Magic Wand Selection tool.
Ctrl + B Activates the Brush Selection tool.
Actions
Ctrl + Shift + S Stops recording.
Alt + Shift + R Starts recording.
ACDSee RAW Shortcuts
Use the following keyboard shortcuts in ACDSee RAW.
To define custom keyboard shortcuts, see Customizing Keyboard Shortcuts.

Gemstone Photo Editor 12
Page 321 of 346
Shortcut Resulting Action
General
Alt + F4 Closes ACDSee in all modes.
Ctrl + Shift +
Alt + K
Opens the Customize Shortcuts dialog box, in which you can customize
keyboard shortcuts.
F1 Opens the Help file.
File Menu
Page Arrow
Right
Page Down
3 (numeric
keypad)
Opens the next image.
Page Arrow
Left
Page Up
9 (numeric
keypad)
Opens the previous image.
End Switches to the last image in the Filmstrip.
Edit Menu
Ctrl + Y Redo.
Ctrl + Z Undo.
Delete Delete.
Viewing
Shift + 8
* (numeric
keypad
asterisk)
Fits the image to the viewing area.
Alt + Arrow
Right
Fits image width to the display area.
Alt + Arrow
Down
Fits image height to the display area.

Gemstone Photo Editor 12
Page 322 of 346
Shortcut Resulting Action
+ (plus) Zooms in.
- (minus) Zooms out.
F Displays the image full screen.
H Toggles the Histogram open and closed.
Ctrl + Shift + I Toggles the Info palette open and closed.
P Toggles the Snapshots pane open and closed.
Ctrl + Shift + P Opens the Develop Presets pane.
Ctrl + Shift + U
F9
Opens the History pane.
Ctrl + Shift + H
F7 H
Opens the Histogram pane.
Mode Switching
Ctrl + E
Shift + E
Ctrl + F5
Opens the image in Edit mode.
Using Develop Mode
B Toggles Brush controls open and closed.
G Toggles Gradient controls open and closed.
R Toggles Radial Gradient controls open and closed.
Spacebar Switches to the Hand tool when working with the Brush or Gradients while
zoomed in. You can then use the Hand tool to pan the image.
E Toggles the exposure warning on and off when using the Exposure tool.
Mouse Shortcuts
Use the following mouse shortcuts to make quick image adjustments.
To print this page for easy reference, right-click and select Print...

Gemstone Photo Editor 12
Page 323 of 346
Shortcut Resulting Action
Shift + click
Turns off the auto-collapse feature in the pane as you open
groups.
Shift + mouse wheel Makes large adjustments to the sliders.
Spacebar + click + drag
Scrolls the image by dragging the mouse. Use when you
have the image zoomed in.
Right-click Resets any slider to its default value.
Mouse wheel over slider
Makes fine adjustments to a slider. Place your cursor over
the slider and scroll up or down.
Mouse wheel over image
Adjusts brush size. Place your cursor over the image and
scroll up or down to adjust nib width.
Shift + mouse wheel
Adjusts feathering. Place your cursor over the image and
scroll up or down to adjust feathering.

Gemstone Photo Editor 12
Page 324 of 346
Chapter 15: Plug-ins
Working with Plug-ins
A plug-in is a software module that adds functionality to a larger program. Gemstone comes standard
with many different plug-ins.
Types of Plug-ins
Plug-in Desscription
Image Decode Converts a file from a binary format to the image displayed in Gemstone.
Decode plug-ins allow Gemstone to display images of many different file
formats. The files that can be viewed with Gemstone depend on which decod-
ing plug-ins are installed on the host computer.
Image Encode Converts the image displayed in Gemstone to a binary file format. Encode
plug-ins allow Gemstone to save (or convert) images to many different file
formats. The files that can be edited and saved with Gemstone depend on
which encoding plug-ins are installed on the host computer.
Archive Allows Gemstone to display and save archives of many different file formats.
The archives that can be viewed and created with Gemstone depend on which
archive plug-ins are installed on the host computer.
Camera Allows Gemstone to browse images on a digital camera and transfer them to a
hard drive.
Command Extension Adds functionality to Gemstone. For example, there is a plug-in used to share
images over the Internet.
Pane Extension Adds a pane to Gemstone where tasks can be performed such as order prints
of digital images.
ACDSee cannot ensure the quality of plug-ins that are not certified by ACD Systems. As with
any other piece of software, you are trusting that the plug-in is free of viruses and that the
company that produced the plug-in is trustworthy.
Managing Plug-ins
The Plug-in Settings dialog box displays a list of all the ACDSee plug-ins installed on the host computer
and can also be used to control which plug-ins Gemstone uses.
To Access the Plug-in Settings Dialog Box:
Select Tools | Plug-in Settings... from the menu.

Gemstone Photo Editor 12
Page 325 of 346
Disabling a Plug-in
A plug-in listed in the Plug-in Settings dialog box can be disabled so that Gemstone no longer uses it.
To Disable a plug-in:
1. In the Plug-in Settings dialog box, select one of the Plug-in tabs.
2. Disable the checkbox adjacent to the name of the plug-in that is no longer required.
3. Click OK.
Changing the Plug-in Order
Some file formats can be supported by more than one plug-in. However, when this happens,
Gemstone allows for the control of which plug-in is used to read or write a file format. The order that
plug-ins appear in the Plug-in Settings dialog box is the order that Gemstone uses to determine which
plug-ins read or write to a file.
To Change the Plug-in Order:
1. In the Plug-in Settings dialog box, select one of the Plug-in tabs.
2. Select a plug-in in the Plug-ins list.
3. Do one of the following:
Click the Move up button to move the plug-in higher in the list.
Click the Move down button to move the plug-in lower in the list.
4. Click OK.
Viewing Plug-in Properties and Getting Help
Certain plug-ins can be viewed and their properties set.
To View Plug-in Properties:
1. In the Plug-in Settings dialog box, select one of the Plug-in tabs.
2. Select a plug-in in the Plug-ins list.
3. Click the Properties button.
To View a Plug-in's Help File:
1. In the Plug-in Settings dialog box, select one of the Plug-in tabs.
2. Select a plug-in in the Plug-ins list.
3. Click the Plug-in Help button.
Gemstone Photo Editor 12
Page 326 of 346
Chapter 16: File Information

Gemstone Photo Editor 12
Page 327 of 346
Glossary
A
Absolute Colorimetric
Rendering intent, generally used for proofing. Based on a device-independent color space,
reproducing colors within the available gamut perfectly, and reducing colors outside of the gamut
to the nearest reproducible hue (at the expense of saturation).
Acquire
Often used term to describe the process of locating images on peripheral devices (such as scanners
and digital cameras) and adding the images to your hard drive. Can also refer to taking screen
captures. See import.
Aliasing
Jagged edges caused by pixels. Occurs most often in low resolution images or images that have
been enlarged. See jaggies.
Anchor
Method of fixing an object such as a selection to a screen, page, or image location.
Antialiasing, Anti-Aliasing
Software technique for reducing jagged lines, or ‘jaggies’. Uses shades of gray and color to smooth
out the contrast between adjacent pixels.
Aspect Ratio
An image’s width-to-height ratio. For example, an image with an aspect ratio of 3:1 has a width 3
times larger than its height.
Azimuth
Angle of shadows that extend from the edges of image details. In Gemstone you can control
azimuth when applying the Emboss effect to an image.
B
Background Processing
Tasks or programs that function without user interaction.
Bandwidth
Amount of data that can be sent through a network connection in a fixed amount of time.
Bandwidth is measured in kilobits per second (Kbps).
Barrel Distortion
In barrel distortion the photo appears to bulge outwards from the center.

Gemstone Photo Editor 12
Page 328 of 346
Bit
Bits are small units of computer memory. The color depth of your image is constrained by the
number of bits available to store color information. For example, it is possible to store 256 different
color values per color channel in 8-bit RGB images. Similarly, it is possible to store 65,536 different
color values per color channel in 18-bit images.
Blackpoint
An image’s darkest area. You can control the intensity of the black in an image by adjusting its
blackpoint.
Blend Modes
Filters that change the effect of a tool or the appearance of a selected object.
Brightness
Light intensity of an image. You can make an image appear brighter or darker by adjusting its
brightness.
Brush
A tool that you can use to isolate or indicate pixels you want to apply effects or adjustments to. The
Brush in Drawing Tools can be used to draw in color on your image. See Smart Brushing.
C
Chromatic Aberration
A lens artifact that can result in fringes in high contrast areas of some photos.
CMYK
Color model that uses cyan, magenta, yellow, and black (key) as its primary colors.
Color Cast
Changes the hue of an image while keeping the saturation and brightness intact. For example,
many digital cameras produce pictures with a slightly blue color cast. Gemstone includes a tool that
removes an unwanted color cast.
Color Channel Value
Contains all pixel information for a single color. A grayscale image has one channel, while an RGB
image has three channels. You can adjust RGB values when editing a color.
Color Gamut
Range of colors that a device such as a printer or monitor can produce or display.
Color Management
Process of adjusting your computer settings so that the color output from your printer matches
the colors you see on your monitor.
Color Space
Gemstone Photo Editor 12
Page 329 of 346
There are two types of color spaces: device-independent or device-dependent. A device-
independent color space, such as RGB, describes all possible colors. A device-dependent color space
describes the subset of colors (from the device-independent color space) that a particular device
can reproduce. Device-dependent color spaces are used to map colors between devices (for
example, from a monitor to a printer) to ensure that colors are reproduced accurately.
Compression
Process that converts data to a storage format requiring less space than the original data.
Contact Sheet
Physical or digital page that contains a series of small images, usually in a grid format.
Contrast
Measure of an image’s color and brightness differences.
Convert
Change a file from one format to another. For example, you might convert a file from a bitmap
(.bmp) to a JPEG (.jpg) to reduce the file size.
Cropping
Removing unwanted image areas.
D
Dock
Attaching a toolbar, window, or pane to different screen areas.
DPI (dots per inch)
Measurement of an image’s resolution. For example, 92 DPI means 92 dots horizontally and 92
dots vertically, which equals 8,464 dots per square inch. More dots per inch result in higher
resolution and image quality.
Dynamic Range
The dynamic range of an image is directly related to the dynamic range of your digital camera's
sensor. If your digital camera's sensor has a large dynamic range it can capture the darkest shadows
and brightest highlights at the same time, without clipping the shadows or highlights. (RAW images
preserve the dynamic range of your digital camera's sensor.) Adjusting the tonal range of the image
changes how the dynamic range of the image is represented on a monitor or in a photo.
E
Elevation
Height of an imaginary light source over an image. The elevation of the light source works in
conjunction with azimuth to generate a three-dimensional emboss effect.
Encode
Gemstone Photo Editor 12
Page 330 of 346
Writing (or saving) a file format.
Encryption
Method of converting data into a secure format. You need a digital password or key to read an
encrypted file.
EXIF (Exchangeable Image File)
Standard for storing information, primarily with images that use JPEG compression. Most digital
cameras create EXIF information and embed it in the image file. For example, EXIF information can
include details about shutter speed and whether a flash was used.
Export
Moving data from one application to another. The exporting application places the data in a format
that the other application understands.
Exposure
Exposure is the amount of time that your digital camera's sensor is exposed to light.
F
Feather
Softening image edges to blend them into the background.
File Format
Medium for encoding information in a file. Each type of file has a different file format that specifies
how it organizes the information it contains.
Filter
Program that can apply an effect to an image, such as an embossed appearance or a sepia tone.
Fisheye Distortion
In fisheye distortion, the photo appears to bulge outwards from the center, as if the photo were
wrapped around a sphere.
G
Gamma
Range of color values a monitor, scanner, or printer can display. Adjusting this value increases or
decreases the intensity of the light spectrum.
Grayscale Image
Image composed of different shades of gray.
H
Highlights
Highlights are the brightest or whitest parts of an image.
Gemstone Photo Editor 12
Page 331 of 346
Histogram
A histogram is a graph that displays the dynamic range of shadows and highlights in an image.
HSL
An acronym for hue, saturation, and lightness.
Hue
Predominant color in an image.
I
Image Resolution
Quality of image details and colors. Also used to describe the quality of monitors and printer
output.
Interpolation
Process that uses nearby pixels to estimate the color of new pixels added to the larger image. For
example, interpolation might be used when enlarging a digital image.
J-K
Jaggies
Individual pixels displayed in an image with low resolution. The appearance of pixels in an image
causes lines and curves to appear jagged.
L
Lens Vignetting
Unusual darkness in the corners of images as a result of an inability of the lens to distribute light
into the corners of the image.
Lossless Compression
Form of compression that retains all image data and quality.
Lossless Rotation and Flipping
Rotation of a JPEG image without loss of image quality. This works best on images with dimensions
that are a multiple of 8 or 16.
Lossy Compression
Form of compression that attempts to remove unnecessary data. This data loss can affect image
quality.
M
Marquee
Gemstone Photo Editor 12
Page 332 of 346
Dashed-line frame that identifies a selected portion of an image. Depending on the tool, you can
resize or move a marquee with or without changing the underlying image.
Metadata
Information about an image and how it was taken. For example, the metadata of digital camera
images can contain the date and time the picture was taken, the shutter speed, the exposure
settings of the camera, and whether a flash was used.
Monochrome Image
Image containing a single color.
N
Noise
Effect produced when a variety of pixel colors are used in the same color region. Noise often occurs
in images with high ISO setting or slow shutter speed.
O
Opacity
Determines how visible an effect is when applied to an image or a selection. High opacity produces a
more solid effect, while low opacity results in a nearly invisible effect.
Overexposed
Images that are overexposed have too many highlights, and tend to look faded. You typically
overexpose images by exposing your digital camera's sensor to light for too long.
P-Q
Panning
Moving zoomed images vertically, horizontally, and diagonally across the display area to view
specific areas of the image.
Perceptual
Rendering intent that scales all of the colors within one gamut to fit within another gamut. Best
used for photographic images, as it maintains the relationship between the colors more accurately
than the colors themselves.
Perspective Distortion
Perspective distortion is caused by wide angle and telephoto lenses, which distort the perspective
of large or far-away objects. For example, if you take a photo of a tall building, the building may
appear to be narrower at the top even though the building is the same width from top to bottom.
Pincushion Distortion
In pincushion distortion the photo appears to shrink inwards toward the center.
Pixel (PICture ELement)

Gemstone Photo Editor 12
Page 333 of 346
Smallest visible portion of a digital image, arranged in rows and columns.
Plug-in
Software module that adds functionality to a larger program.
PPI (pixels per inch)
Measurement of how an image is displayed. More pixels per inch result in higher image quality.
Presets
A preset contains image correction settings. You can create and use presets to ensure that settings
you apply are the same and consistent across all images.
Primary Colors
Colors that can produce other colors when blended. For example, in the RGB color model, red,
green, and blue are primary colors.
R
Raster Image
Image composed of a rectangular grid of pixels. Each pixel contains a defined value about its color,
size, and location in the image. As a result, resizing the image can affect its quality.
RAW
An image file format. RAW files contain all of the image data that was captured by your digital
camera's sensor. RAW files are not processed by your camera.
Red Eye
Red eye occurs when the light from your digital camera's flash reflects off the retinas in the subject's
eyes. The subject's eyes look red instead of their normal color.
Relative Colorimetric
Rendering intent that maps the colors that fall exactly within the color gamuts of both the input
and output devices. Best used for single- or limited-color images as colors outside of both gamuts
may be mapped to a single color.
Render
Drawing images to your screen.
Rendering Intent
Approach used to map colors from one color gamut to another. There are four rendering intents
available: Perceptual, Relative Colorimetric, Saturation, and Absolute Colorimetric.
Resolution
Quality and clarity of an image, measured in pixels, dots per inch, or pixels per inch.
RGB
Gemstone Photo Editor 12
Page 334 of 346
Color model that uses red, green, and blue as its primary colors.
Ringing Artifacts
Distortion around the edges of image subjects, caused by compressing or resizing an image.
S
Saturation
Purity of a color. Higher color saturation results in more gray.
Saturation (rendering intent)
Rendering intent that maintains color saturation from one gamut to another. Best suited for
images in which the actual color represented is less important than the color’s vividness.
Selection
Portion of an image that you define with a selection tool. A marquee surrounds a selection. ACDSee
Gemstone Photo Editor includes selection tools.
Sepia
Sepia-toned images are composed of shades of brown. Many old photographs have a sepia tone.
Sharpen
The sharpen tool is for sharpening images. The original image is blurred slightly. This blurred
version of the image is subtracted from the original image, revealing the edges in the original image.
These edges can then be sharpened by increasing contrast.
Sharpness
The sharpness in an image is determined, primarily, by your digital camera's lens and sensor. You
can also create the illusion of sharpness by increasing the contrast between edges within an image.
Shortcut Menu
Menu that appears when you right-click within a program. Sometimes referred to as a context
menu.
Smart Brushing
Brushing targeted to specific colors, brightness values, or combination of color and brightness. The
Smart Brush only affects pixels similar in value to the pixel in the center of the brush stroke, and
allows you to apply adjustments to those pixels.
Soft Proofing
Using your computer's monitor as a proofing device. The monitor displays a simulation of how
colors will appear when rendered by the printer.
T
Thumbnails
Gemstone Photo Editor 12
Page 335 of 346
Small preview of a full-sized image.
U
Underexposed
Images that are underexposed have too many shadows. Images typically become underexposed if
you don't expose your digital camera's sensor to light long enough.
V
Vector Image
Image consisting of individual objects rather than pixels. Mathematical equations define the
objects. You can adjust the size of a vector image and the image will retain its clarity and quality.
W
Watermark
Background text or graphics added to an image, usually to provide copyright protection.
White Balance
Removes color cast to create a photo that is correctly lit. You can use your camera settings to apply
the correct white balance before taking an image, or correct the white balance inGemstone.
Whitepoint
Lightest image area. You can control the intensity of the white in an image by adjusting its
whitepoint.
Z
Zoom
In Gemstone, zoom refers to the process of increasing or decreasing the display scale for an image.
Increase the display scale to view a portion of an image or a specific image detail. Decrease the
display scale to view more or all of the image.
Gemstone Photo Editor 12
Page 336 of 346
Index
Gemstone Photo Editor 12
Page 337 of 346
A
Adjusting Clarity 286
adjusting post-crop vignetting 84
adjusting soft focus 88
Advanced Color 263
Align 142
Aligning Layers 142
Auto-Align 142
Auto-Blend 143
B
barrel distortion 238
blend modes 233
blurring 274
border 164
brightness 244
C
Canvas 132
clarity 286
color
setting color management options 289
Color Wheel 66
Crayon Drawing effect 186
crooked photos 37
cropping 33, 236
Crosshatch effect 186
D
Dauber effect 187
Detail tab 38
Develop 98
Advanced Color group 49
Crop group 33
Gemstone Photo Editor 12
Page 338 of 346
Detail tab 38
General group 83
Geometry tab 31
Lens Distortion group 35
Light EQ™ 53
Lighting group 53
Noise Reduction group 41
Output Color Space group 64
Perspective group 32
Post-Crop Vignette group 84
presets 104-105
Red Eye Reduction 45
Rotate & Straighten group 37
Sharpening group 43
Soft Focus group 88
Split Tone 60
Tone Curves group 61
Tune tab 47
White Balance group 62
Develop Presets Pane 105
developing
adjusting color 49
adjusting lighting 53
adjusting tone curves 61
adjusting white balance 62
cropping images 33
fixing lens distortion 35
Highlights, shadows, hue, saturation 60
making general adjustments 83
post-crop vignette 84
reducing noise 41
rotating and straightening 37
selecting an output color space 64
Gemstone Photo Editor 12
Page 339 of 346
sharpening images 43
soft focus 88
Developing
managing presets 104
E
Edge Detect effect 189
Edit
Add Noise 283
Advanced Color 263
Auto Levels 247
Blur 274
Border 164
Clarity 286
Color Balance 268
Convert to Black & White 269
Crop 236
Flip 236
Lens Distortion Correction 238
Perspective Correction 237
Red Eye Reduction 155
Remove Noise 280
Repair tool 155
Resize 240
Rotate 236
Selections 144
Sharpen 273
Text 161
Tone Curve 248
Vignette 169
Watermark 163
editing
adding noise 283
Gemstone Photo Editor 12
Page 340 of 346
adding text 161
blurring 274
brightness 244
clarity 286
cloning 46, 156
correcting barrel distortion 238
correcting fisheye distortion 238
correcting perspective distortion 237
correcting pincushion distortion 238
correcting shadows and highlights 249, 259
cropping 236
exposure 247
flipping 236
HSL values 263
light levels 245
removing noise 280
removing red eye 45, 155
repairing 155
resizing 240
RGB values 268
rotating 236
sharpen 273
special effects 173
tone curve 248
effects
about 173
Bathroom Window 174
Blinds 175
Blur 202
Bulge 178
collage 183
Colored Edges 184
Contours 185
Gemstone Photo Editor 12
Page 341 of 346
Crayon Drawing 186
Crosshatch 186
Dauber 187
Edge Detect 189
Emboss 189
Furry Edges 190
Glowing Edges 193
golden hue 197
Granite 194
Mirror 198
Negative 199
Oil Paint 200
Old 201
Outline 203
Pencil Drawing 204
Pixel Explosion 205
Pixelate 206
Posterize 207
Radial Waves 209
Rain 210
Ripple 212
Scattered Tiles 213
Sepia 214
Sheet Metal 215
Shift 216
Slant 217
Sobel 219
Solarize 219
Stained Glass 221
Sunspot 222
Swirl 223
Threshold 224
Topography 225
Gemstone Photo Editor 12
Page 342 of 346
user defined 232
Vignette 169
Water 226
Water Drops 227
Waves 228
Weave 229
Wind 230
Emboss effect 189
exposure
adjusting automatically 247
F
fisheye distortion 238
flipping
in Edit 236
focus 88
Focus Stack 111, 139
footer
printing on pages 297
Frequency Separation 137
Furry Edges effect 190
G
Geometry tab 31
Glowing Edges effect 193
Granite effect 194
H
HDR 140
header
printing on pages 297
Heal tool 155
highlights 249, 259
histogram 272
HSL 263
Gemstone Photo Editor 12
Page 343 of 346
L
Layer Effects 134
Layer Mask 124
Layers 114
Layers Pane 114
Light EQ™ 249
light levels 245
local contrast enhancement 249, 259
Luminance Mask 130
M
Mask 124
Mirror effect 198
N
Negative effect 199
noise
about 279
adding to an image 283
removing from an image 280
O
Oilpaint effect 200
Old effect 201
Orton effect 202
Outline effect 203
P
Pencil Drawing effect 204
perspective distortion 237
Photo Repair tool 46, 155
photos 183
pincushion distortion 238
Pixel Explosion effect 205
Pixelate effect 206
Gemstone Photo Editor 12
Page 344 of 346
plug-ins
about 324
managing 324
viewing properties 325
polaroid 183
Posterize effect 207
printing
custom print formats 298
setting size and positioning 296
text on pages 297
Process mode
Develop 98
R
Radial Waves effect 209
Rain effect 210
RAW images
developing 98
red eye reduction 45, 155
resizing
one image 240
retro effect 197
RGB 268
Ripple effect 212
rotating
in Develop 37
in Edit 236
S
Scattered Tiles effect 213
Selections tool 144
Sepia effect 214
sharing 259
sharpen 273
Gemstone Photo Editor 12
Page 345 of 346
Sheet Metal effect 215
Shift effect 216
Slant effect 217
Sobel effect 219
soft focus 88
Solarize effect 219
Stained Glass effect 221
Straightening crooked photos 37
Sunspot effect 222
Swirl effect 223
T
text
adding to an image 161
adding to pages (printing) 297
blend modes 233
Text Layers 131
Threshold effect 224
Tone Wheels 89
Topography effect 225
Tune tab 47
U
undo/redo 97
V
Vibrance 83, 263
View mode
histogram 272
setting display options 292
Vignette effect 84, 169
W
Water Drops effect 227
Water effect 226
