
SHAWN KELLY
0
JUSTICE AV SOLUTIONS | LOUISVILLE, KENTUCKY
USER MANUAL 3.1.1

NOTEWISE 3.3 MANUAL
PAGE 3 OF 44
Table of Contents
1. Introduction ........................................................................................................................... 5
2. Definitions.............................................................................................................................. 6
3. User Interface Overview ........................................................................................................ 7
4. Settings .................................................................................................................................. 8
4.1 Users ..................................................................................................................................................... 8
4.1.1 Adding a User ...................................................................................................................................... 9
4.1.2 Edit User Permissions ....................................................................................................................... 10
Departments ....................................................................................................................................... 11
Session Info ......................................................................................................................................... 12
Quick Notes ......................................................................................................................................... 13
Personal info ...................................................................................................................................... 14
Device Configuration........................................................................................................................... 15
4.6.1 Audio ................................................................................................................................................. 16
4.6.2 Video ................................................................................................................................................. 17
Edit Channel Names ............................................................................................................................ 17
Account Settings (Cloud Licensing Required) ..................................................................................... 18
5. Browse Tab .......................................................................................................................... 19
Filter Options ...................................................................................................................................... 19
Session Options (Browse) ................................................................................................................... 20
5.2.1 Multi-Select Options (Browse).......................................................................................................... 21
Session Properties ............................................................................................................................... 21
5.4 Publishing a Session ............................................................................................................................ 22
5.5 Browse Screen Refresh ....................................................................................................................... 22
6. Schedule Tab ........................................................................................................................ 23
6.1 Create a Schedule ............................................................................................................................... 23
6.2 Import Schedules ................................................................................................................................ 24
6.3 Schedule Options ................................................................................................................................ 25
6.3.1 Multi-Select Options (Schedule) .................................................................................................... 25
7. Recording ............................................................................................................................. 26
7.1 Record Tab (Non-Recording) .............................................................................................................. 26
7.2 Record Tab (Recording) ...................................................................................................................... 27
7.3 Recording Tools ................................................................................................................................... 27

NOTEWISE 3.3 MANUAL
PAGE 4 OF 44
7.4 Audio Block review ............................................................................................................................. 28
8. Playback Window ................................................................................................................. 29
9. Player Find ........................................................................................................................... 30
10. Annotations ....................................................................................................................... 31
10.1 System Notes .................................................................................................................................. 31
10.2 Automatic Notes ............................................................................................................................. 31
10.3 Manual Notes .................................................................................................................................. 32
10.4 Quick Notes ..................................................................................................................................... 32
11. Mixer Gain ......................................................................................................................... 34
12. Notifications Panel ............................................................................................................. 35
13. Spanish Text Capability ...................................................................................................... 35
14. Installation ......................................................................................................................... 36
14.1 Minimum System Requirements .................................................................................................... 36
14.2 Installation ...................................................................................................................................... 36
15. Logging In for the First Time ............................................................................................... 38
15.1 Logging in ........................................................................................................................................ 38
16. Activation & Expiration ...................................................................................................... 39
17. Add-On Licenses ................................................................................................................. 40
17.1 Cloud Storage License ..................................................................................................................... 40
18. Appendix A - Example Report ............................................................................................. 42
19. Appendix B - Supported Devices ........................................................................................ 43
20. Appendix C – Audio Storage Size ........................................................................................ 44
21. Appendix D – Video Storage Size ........................................................................................ 44
22. Appendix E - Support ......................................................................................................... 44

NOTEWISE 3.3 MANUAL
PAGE 5 OF 44
1. INTRODUCTION
With a focus on simplicity, flexibility, and reliability, Notewise is an innovative platform designed for mobile
venues such as depositions, hearings and meetings. Notewise is designed to run on a laptop for easy setup to
record proceedings.
Notewise allows for the creation of annotations, automatically or manually. Automatic logging consists of
using audio channel activity to create automated speaker identification. Manual notes can be created by a
user of the system and can provide additional context to the proceeding being recorded.
Utilizing visual indicators allows users to easily see what is happening during recording. The application is
designed to capture each individual speaker to create a clear record and for ease of playback or transcription.
A timeline displaying Audio Blocks, which represent up to twelve available audio channels, provide a clear
visual indication of what is happening during recording.
Notewise is not only recording software, but boasts features assisting in management and storage of
recordings. Users may add as many custom fields as necessary and arrange their respective order. These
fields, including departments, names, and descriptions, may be used to search and locate recordings at any
time.
Notewise users can easily review and publish any recording for media distribution. Notewise records in an
open file format that can be played in a standard media player offering stereo audio or played through the
JAVS Universal Player providing access to the user annotations and the multi-channel audio.

NOTEWISE 3.3 MANUAL
PAGE 6 OF 44
2. DEFINITIONS
Annotations refers to notes that are added to the recording that include a timestamped link to the recording.
Audio Blocks is the visual representation of active audio on a recording channel.
Audio Channel is a representation of sound coming from an independent source (a microphone) going to an
independent destination (recording channel.
Automatic Notes are annotations that are automatically generated when the audio from a microphone detects a
specified level of energy.
Departments is a predefined grouping of recordings.
Gain refers to a boost in the energy level of the microphone. More energy equals louder sound.
H.264 is a video compression codec popular for high definition video.
M4A is an audio file created in the MPEG-4 format, a multimedia container format used to store compressed audio
and video data.
MP3 is a coding format for digital audio.
Nimble is a low profile, six-microphone input audio interface device designed, manufactured and sold by JAVS.
P306B is a six-microphone input mixer designed, manufactured and sold by JAVS.
P412 is a twelve-microphone input mixer designed, manufactured and sold by JAVS.
Primary Recording Path is the location on the computer designated for storing the files produced for a recording
session.
Publish in Notewise refers to the process of packaging the specific files created from a recording session. These
published files are intended for use outside of the Notewise recorder.
Quick Notes refers to commonly used words or phrases to be added to annotations with a keyboard shortcut or
mouse click.
Report in Notewise refers to a printout of the timestamps and annotations to a pdf file.
Roles is the title given to a user with a defined set of function controls.
Scheduled Session refers to the staging are in Notewise for future recordings. These scheduled recordings will have
some or all of the property fields completed.
Sealed Session is a recording session that has been locked and can only be played in the Notewise recording software.
Secondary Recording Path is an alternate location to store a second set of files produced from a recording session.
Session defines a specific recording occurring in a calendar day. This recording is defined by name, date and time and
includes are specific metadata data. A user may have multiple sessions in a given day.
Session Properties refers to detailed information added to clearly identify information pertinent to a recording
session.
System Generated Notes are annotations that are created by the recording system. These annotations include a time
stamp linked to the recording and are not removeable. An example of a system generate note would be when the
recording is started or stopped.
Tally is a defined level of energy on a microphone indicating to the system that someone is speaking. This is
configurable in the mixer gain control window.
WASAPI (Windows Audio Session API) is Microsoft’s multi-channel audio interface for communication with audio
devices.
WAV file is an audio file that uses a standard digital audio file format used for storing waveform data.

NOTEWISE 3.3 MANUAL
PAGE 7 OF 44
Figure 3.0.0.2
3. USER INTERFACE OVERVIEW
The user interface will have two appearances; inactive and activated. The inactive screen will comprise of the Browse
tab and no other functionality. The active screen will comprise of the software’s full functionality as can be seen below.
1
About
Activate the software, find the user manual, and find the expiration date
2
Schedule Tab
Shows the Schedule page where users can create/manage future scheduled
recordings
3
Browse Tab
Shows the Browse page, where users can browse past recordings
4
Record Tab
The Record tab produces a pop out allowing users to enter Session Info before
recording
5
Record/Pause/Stop
Start a quick recording. Pause and Stop current recording session
6
Confidence Monitoring
Audible record confirmation, reaffirms the user that the recording has taken place
7
Recording Session Name
Editing box allows the user to create a session name before or during a recording
8
Edit Session Properties
Allows the user to edit the session info of active recordings
9
Global PA
Allows the user to mute / unmute the PA (P306B & P412 Only)
10
Adjust mixer Gain
Live access to mixer controls for gain, tally and polar patter (when applicable)
11
Notifications
Shows system updates and errors
12
Activity
Status shown for any online or background activity
13
Account
For logging out of NoteWise
14
Settings
The Settings button varies between user to user
6
7
8
Inactive
Active
9
11
2
3
4
5
13
12
14
1
Figure 3.0.0.1
10

NOTEWISE 3.3 MANUAL
PAGE 8 OF 44
4. SETTINGS
Settings consists of 6 sections: Users, Departments, Session Info, Quick Notes, Personal Info, and Device
Configuration. Users may access settings anytime by clicking the Gear Icon in the top right of the screen.
Depending on licensing and user permissions, some settings may not be available and therefore, not
presented (hidden) for certain users. This manual covers all settings from the perspective of a licensed owner
level with all settings available.
4.1 USERS
The users section allows owners the ability to add new users along with the editing of existing users.
Administrators can also edit associated roles and permissions for new and existing users.
Figure 4.0.0.1
Figure 4.1.0.1

NOTEWISE 3.3 MANUAL
PAGE 9 OF 44
Figure 4.1.1.1
There are 4 roles within Notewise: Guest,
Basic, Admin, and Owner. Permissions vary
between each role (Table 4.1.0.1).
4.1.1 ADDING A USER
1) Click Add a User.
2) Enter email of new user and click Next.
These users will receive an email from
notifications@support.javs.com detailing whose
account they have been invited to, where to
download Notewise, and a registration code.
3) After clicking Next, edit user permissions (see 4.1.2
Edit User) as desired, click Save when done.
Delete
Removes user from only this account. This will not delete the JAVS
ID associated with that user/email address.
Edit
Allows user’s account permissions or role to be changed (see Edit
User).
Role Permissions
Guest
Basic
Admin
Owner
Browse Sessions
X
X
X
X
Playback
X
X
X
X
Edit Schedules
X
X
X
Record
X
X
X
Edit Session Info
X
X
X
Add Custom Fields
X
X
Add Departments
X
X
Create Notes
X
X
X
Edit Notes
X
X
X
Delete Notes
X
X
X
Add Guest
X
Add User
X
Edit User
X
X
Delete User
X
Manage Subscription
X
Table 4.1.0.1
Note: Some features available to certain user
roles may not be available for unlicensed
software.
Next
Figure 4.1.1.2

NOTEWISE 3.3 MANUAL
PAGE 10 OF 44
Figure 4.1.2.3
4.1.2 EDIT USER PERMISSIONS
Name and Email: Displays the first and
last name for a User and the Email
associated with the JAVS ID account.
(These settings may only be changed by
the user of that account, see Personal
Info)
Departments: Select Department(s)
the user will have access to. By default,
users have access to all Departments.
(Figure 4.1.2.3)
Role: Select the user’s role. (see Users for detailed role information)
Sealed Session Access: Select level of Sealed Access, this specifies whether the user can not view
sealed sessions (No), can only view sealed sessions (View only), or can view and modify sealed sessions
(Yes). Sealed Sessions are designated by a Lock Icon on the Browse Screen (see image below). Anyone
may view Sealed Session properties; however, these sessions are unable to be played or edited by
users without Sealed Access.
A sealed session’s files are encrypted; therefore, these files may only be played back within Notewise.
Files may be decrypted by unsealing or publishing the session.
Permission to Delete Sessions: Determines if user may delete sessions.
Figure 4.1.2.1
Figure 4.1.2.2
Figure 4.1.2.4

NOTEWISE 3.3 MANUAL
PAGE 11 OF 44
DEPARTMENTS
Departments are used to categorize sessions and users.
Users may be assigned to multiple departments, but sessions
can only be assigned to one department.
Users will only see sessions matching departments that they
have access to.
Delete
Deletes a Department. Departments may only be deleted if they are no longer
assigned to any sessions.
Edit Allows a Department’s name to be changed.
Figure 4.2.0.2
Figure 4.2.0.1
NOTEWISE 3.3 MANUAL
PAGE 12 OF 44
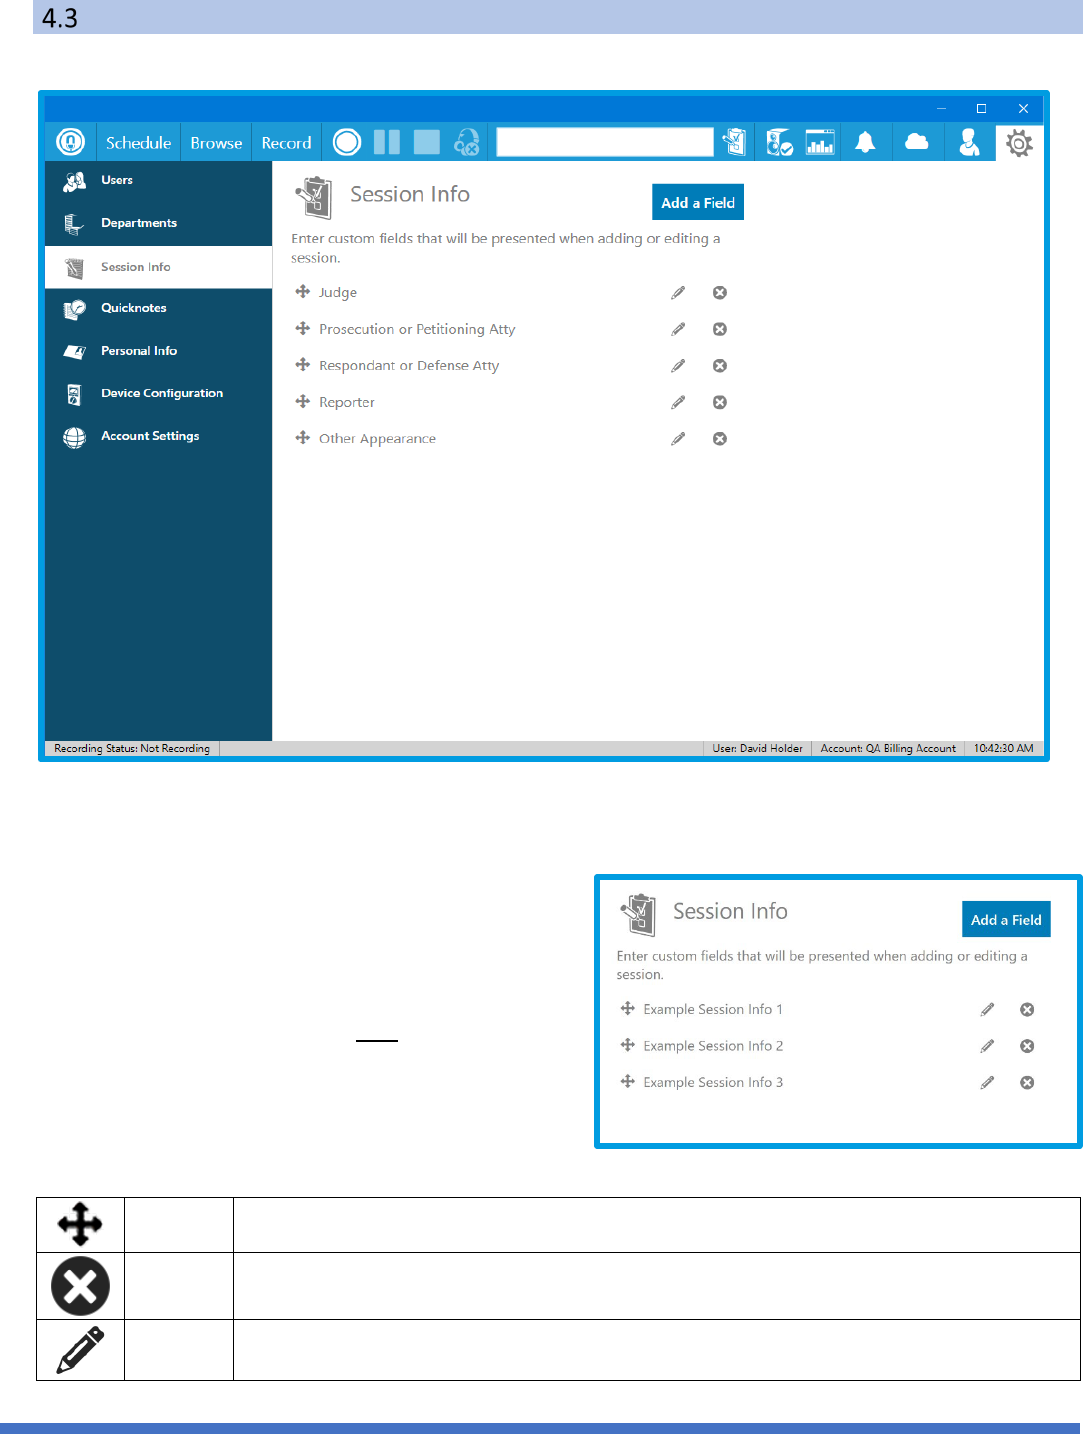
SESSION INFO
Session Info are custom fields a user can generate for
internal data and information capture. These new
fields are added anywhere session properties are
found.
Adding or removing Session Info only affects new
recordings. Past recordings will maintain their Session
Info even if those fields are changed or removed later.
Reorder Fields may be reordered by clicking and dragging the field to a new location.
Delete Deletes a field.
Edit Allows a field’s name to be changed.
Figure 4.3.0.2
Figure 4.3.0.1

NOTEWISE 3.3 MANUAL
PAGE 13 OF 44
QUICK NOTES
Quick Notes are commonly used notes that can be inserted into the annotations quickly. There are two
types of Quick Notes – user specific and global.
1
User Tab
These are the user specific Quick Notes.
2
Global Tab
These are the global Quick Notes accessible to all users.
3 Quick Notes List
Quick notes lists can be a unique subset of quick notes specific for different
usages. Click on the name to edit.
4
Add a New List
Click in this field to add a new Quick Notes list.
5
Quick Notes Text
This is the text to be inserted into the annotations. Click on the text to edit.
6
Quick Notes
Keyboard
Shortcut
This is the keyboard shortcut designated to the quick note. Click on the text
to edit.
7
Add New Quick
Note
Click in this field to add a new Quick Note row to the list of quick notes.
1
2
3
4
5
6
7
Figure 4.4.0.1

NOTEWISE 3.3 MANUAL
PAGE 14 OF 44
PERSONAL INFO
The personal info displays the user information including name, email address and password. This
information can only be edited.
Edit Allows a field’s name to be changed.
Figure 4.5.0.1

NOTEWISE 3.3 MANUAL
PAGE 15 OF 44
DEVICE CONFIGURATION
JAVS Notewise has the ability to record sessions as audio only or as audio with video. Audio recordings are
encoded using industry-standard M4A files containing 1 to 12 channels of audio. Video is encoded using
H.264 compression and stored using industry-standard MP4 files with audio as well as the M4A audio file
that is created for audio only recordings. Device Configuration consists of Audio and Video device settings,
these controls affect: devices used, channel configuration, monitoring, playback, and storage. Audio
configuration must be configured prior to utilizing Notewise. Additionally, access to Device Configuration is
disabled while recording to ensure uninterrupted audio and video recordings.
Figure 4.6.0.1

NOTEWISE 3.3 MANUAL
PAGE 16 OF 44
4.6.1 AUDIO
Select Audio Device: Select audio device from a list of
WASAPI input devices detected by Windows.
Select Audio Recording Size: Choose desired size of
recorded audio files. The default is large (See
Appendix C).
Playback Output: Choose output device to playback
audio, if no device is selected, Notewise will utilize
the existing Windows default.
Confidence Monitoring audio output: Choose output
for Confidence Monitoring, if no device is selected
Notewise will utilize the existing Windows default.
Start Confidence Monitoring by Default: Confidence
Monitoring will begin automatically when a recording
is started by selecting the Yes option.
Start Automatic Notes by Default: This option allows
the user the ability to set as default whether
Automatic Notes for each channel start or not during
a recording.
Primary Recording Path: Labeled as “Where on this
computer should we store your files?” will be set up
as a default file called
C:\ProgramData\Notewise_Client. The user will need
to change this if a different file path is wanted.
Secondary Recording Path: Labeled as “To where should we back up your team’s files?” The Backup
location can be on a network, secondary drive or nearly any other storage location and is where saved
sessions are duplicated after they have finished being written at the main location. Note that the
Secondary Recording Path is a live backup only, and if the location specified is disconnected or
otherwise unavailable the files will not be written to this location.
Available Audio Channels: The right side of the Audio Configuration displays available audio channels
based on the selected audio device (Figure 4.6.1.1).
The channel names are the default for new
recorded sessions. They may be changed by
clicking the white box containing the name
(see section 4.7 for more information about
channel naming). Furthermore, users may
customize the audio block color of each
channel.
Channels can be disabled by clicking the blue microphone icon to the right of the audio channel.
Disabled channels will not be removed from the record screen, no audio bars or automatic notes will
appear, and no audio will be recorded on those channels.
To review audio storage sizes, see Appendix C.
Figure 4.6.1.2
Figure 4.6.1.1

NOTEWISE 3.3 MANUAL
PAGE 17 OF 44
4.6.2 VIDEO
If the activated license includes support for video recording, a Video Recording Tab will be present as
shown.
Select video device: Select video device from a list of input devices detected by Windows.
Some video devices are not compatible with Notewise. These devices will display an error notification
if selected.
Select Video Quality: Choose quality of recorded video. Actual file size may vary based on local factors
such as hardware. Quality options may also vary based on selected device’s capabilities.
A video preview (not recording) will be displayed at the bottom of the screen.
To review video storage sizes, see Appendix D.
EDIT CHANNEL NAMES
The names of each channel can be changed from Device Configuration and anywhere session properties
can be modified.
By default, channels are named “Channel” followed by a number growing consecutively starting at 1.
These names can be changed at any time by clicking the naming area.
Changing names within settings at the Device Configuration screen means these names will be presented
as the default channel names throughout the rest of the application (Figure 4.7.0.1).
Figure 4.6.2.1
Device Configuration Screen
Figure 4.7.0.1
NOTEWISE 3.3 MANUAL
PAGE 18 OF 44
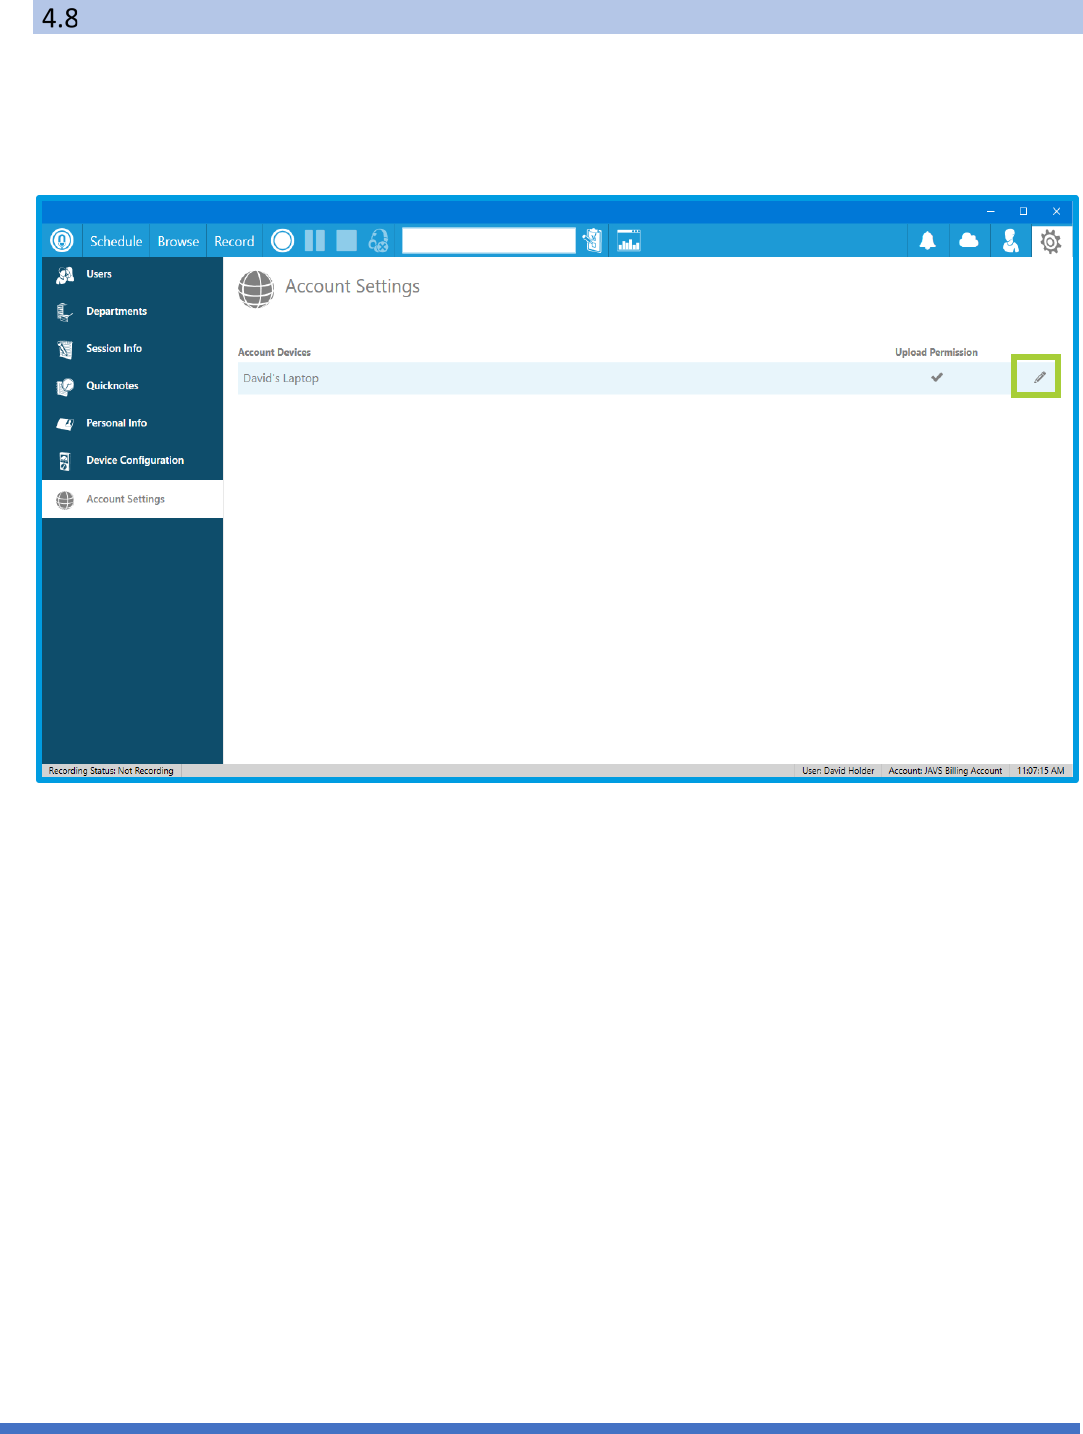
ACCOUNT SETTINGS (CLOUD LICENSING REQUIRED)
The account settings will show the list of devices that are able to access the cloud storage for recordings. If an
account device has upload permission, then it will be able to upload all recordings onto the account cloud storage.
To enable upload permission, click on the pencil icon associated with the device (Figure 4.8.0.1)
Figure 4.8.0.1

NOTEWISE 3.3 MANUAL
PAGE 19 OF 44
5. BROWSE TAB
The Browse Tab allows users to filter, edit, publish, print and watch previously recorded Sessions. A Session is
any recorded period of time saved by Notewise. Sessions include recorded media (audio or audio + video),
notes, metadata (Example: Title and Department), and automatic system notes (Example: Start and Pause
notifications).
FILTER OPTIONS
Sessions on the Browse Tab can be filtered by a combination of date range using the options below, as well
as by a custom keyword search.
• Recent (default) – Displays the 50 most recent sessions.
• Today – Displays all sessions recorded today.
• By Date – Upon clicking this filter the date selector will appear (Figure 5.1.0.1). After the desired
date range has been selected all sessions on and between those dates will be displayed.
Custom Keyword Search: A keyword search allows users to filter sessions based on user created keywords
or phrases. Session names, departments, custom fields, location and descriptions are searchable. Users
may enter one keyword or phrase at a time pressing enter after each.
Custom filters appear to the right of the Date filter options and may be selected at will (Figure 5.1.0.2: The
Keyword “assault and the Phrase “drug charge” have been added). Added keywords and phrases can be
removed by clicking the “X” next to each.
Custom filters are not stored or saved and will not be shown if the application is closed and re-opened.
Figure 5.0.0.1
Figure 5.1.0.1
Figure 5.1.0.2

NOTEWISE 3.3 MANUAL
PAGE 20 OF 44
SESSION OPTIONS (BROWSE)
Individual sessions, highlighted in grey (Figure 5.2.0.1), have multiple options available as indicated by the
icons to the right of their name: Play, Delete, Publish Recording, Print Report, Create New Recording Like,
and Create a New Schedule Like.
Continue
Recording Session
Allows for continued recording of a session from the current day. (Not
available for Cloud Storage Licensing accounts).
Play
Opens the Playback Window. (playback is not available for sessions actively
being recorded).
Viewer 8 View Recording in Viewer 8.
Delete Recording
Delete the selected session from only the original save location. The backup
will not be affected.
Publish Recording
Packages the media files, logs, and reports, then saves it to a specified
location.
Print Report Prints reports from selected session. (See Appendix A for a sample report)
Create New
Recording Like
Copies a session’s properties and pastes it into the “Start a New Recording”
fields on the Recording Tab (does not start recording).
Create New
Schedule Like
This One
Copies session’s properties and creates a new scheduled session.
Figure 5.2.0.1

NOTEWISE 3.3 MANUAL
PAGE 21 OF 44
5.2.1 MULTI-SELECT OPTIONS (BROWSE)
Multiple sessions may be selected by clicking the checkbox to the left of
each session (Figure 5.2.1.1). Multi-select Options will affect each
checked (selected) session.
All displayed sessions may be selected via the select all check-box to the
left of the Multi-select Options.
Publish Selected
Recordings
Packages the media files, logs, and reports, then saves them to a
specified location.
Delete Selected
Recordings
Delete the selected session from only the original save location. The
backup will not be affected.
Print Selected
Recordings
Prints reports from selected sessions onto one file. There will be a page
break between sessions from different dates
(
Example: see Appendix A
).
Batch Edit
Allows users to edit Name, Location, Department, Description and
Privacy of the selected sessions.
SESSION PROPERTIES
By clicking the Name of a Session, the Session Properties will be Displayed. This popup displays all
information attributed to that recorded session. All Session Property fields except for “Record Date” may
be edited. Changes will not be saved until the Save button is clicked.
The Speakers box will allow the user to
enter any people that will be present
and speaking during the recorded
session (Figure 5.3.0.2). Names must be
separated by a semi-colon. New names
can be entered while in a recording as
well.
Each speaker name can be associated
with a note that is entered in Notewise.
(See 10.3 Manual Notes)
Figure 5.3.0.2
Figure 5.2.1.1
Figure 5.3.0.1

NOTEWISE 3.3 MANUAL
PAGE 22 OF 44
5.4 PUBLISHING A SESSION
Packages a session’s media files and reports, then saves it to a specified location. Once a record is
published, Notewise maintains no control or security regarding the published session.
Upon publishing, Notewise will create a directory at the selected location in cascading order of year,
month, day, and session name. To publish a session, select one or multiple sessions and click the Publish
icon. This will create a new folder to the desktop that will resemble the diagram below.
5.5 BROWSE SCREEN REFRESH
On the browse screen. pressing “Refresh Screen” will refresh the data that is currently presented. Refreshing will
present users the most up to date list of Sessions.
Published sessions consist of 2 files and a folder:
Report (.pdf)
Contains annotations and basic
information about the session.
Recorded
Media
Video (.mp4) and/or audio (.m4a) files
are stored in a subfolder.
.ntwslog
XML file that saves session metadata.
Figure 5.4.0.1
Figure 5.6.0.1

NOTEWISE 3.3 MANUAL
PAGE 23 OF 44
6. SCHEDULE TAB
Schedule Tab allow users to create or import Schedules and edit their properties before recording. These
Schedules are displayed by default as upcoming sessions sorted by date. Additionally, schedules may be
filtered similarly to the Browse Tab (see section 5.1 Filter Options).
6.1 CREATE A SCHEDULE
Click Add Schedule, this will display the Schedule Properties popup. Once desired fields have been edited
users may click Save Schedule or Start Recording. Save Schedule, adds the schedule to the displayed list.
Start Recording, immediately begins recording a new session utilizing the created schedule’s properties.
Figure 6.0.0.1
Figure 6.1.0.1

NOTEWISE 3.3 MANUAL
PAGE 24 OF 44
6.2 IMPORT SCHEDULES
1) Start by clicking the Save a New Import Template icon
(Figure 6.2.0.1). This will save a “.csv” file to the users
chosen location. CSV files can be opened and edited by
many common programs, such as Microsoft Excel.
2) This file will contain premade columns for: Name, Description, Location, Department, Schedule, Date,
and any additional custom fields. Open the file and add information as needed, each of these rows will
import as a scheduled session. If no date is assigned the schedule imports will now default the
unassigned schedule dates to the current date. Save and close the file when done.
3) Import the edited “.csv” file by clicking the
Import Schedules icon (Figure 6.2.0.2). The
Schedule Import pop-up will appear (Figure
6.2.0.3), click Browse and select the edited “.csv”
file.
4) Detected schedules will be displayed (Figure 6.2.0.4). Select schedules by clicking the check-box and
then click Import.
Note: It is recommended to Save a New
Template before every planned import to
avoid session information mismatch.
Figure 6.2.0.1
Figure 6.2.0.2
Figure 6.2.0.3
Figure 6.2.0.4

NOTEWISE 3.3 MANUAL
PAGE 25 OF 44
6.3 SCHEDULE OPTIONS
Individual sessions, highlighted in grey (Figure 6.3.0.1), have multiple options available indicated by the
icons to the right of their name: Record Scheduled Session, Delete Schedule, and Create a New Schedule
like this one.
Record Scheduled
Session
Immediately starts recording this scheduled session.
Delete Schedule Deletes the schedule.
Create a new
Schedule like this one
Copies this schedule’s properties and creates a new schedule with the
same properties.
6.3.1 MULTI-SELECT OPTIONS (SCHEDULE)
Multiple sessions may be selected by clicking the check-box to the left of each
session (Figure 6.3.1.1). Multi-select Options will affect each checked
(selected) session.
All displayed sessions may be selected via the select all check-box to the left
of the Multi-select Options.
Delete Selected
Recordings
This deletes the selected schedules.
Batch Edit
Allows users to edit: Schedule Name, Location, Department,
Description, and Privacy. Sessions saved this way will have the same
edited properties.
Unable to convert Schedule Date field to future date. The recommended
format for dates is “mm/dd/year”.
Either no Department was specified, or the specified department could not
be found. Imported departments must match departments added to
Notewise (see section 4.2).
Schedule Imported Successfully.
Figure 6.3.0.1
Figure 6.3.1.1

NOTEWISE 3.3 MANUAL
PAGE 26 OF 44
7. RECORDING
There are multiple ways to begin recording in Notewise: Record Tab, Recording Tools, Session Options, and
Schedule Options.
7.1 RECORD TAB (NON-RECORDING)
While not recording, clicking this tab will open the Session Properties popup. This allows fields and
channels to be edited before recording begins. Once the desired fields have been edited, users may click
Start Recording or Save.
The Speakers box area is where the user can pre enter the names of individual speakers that will be
present during the recording process. These names will be utilized in the note taking process.
Start Recording immediately begins recording and the tab will change to the Recording Screen while
recording is in progress (see section 7.2).
Save will close the popup and maintain all edited information until the user decides to start recording or
change the added information.
Cancel will cancel out the popup without making any changes.
Figure 7.1.0.1
Figure 7.1.0.2

NOTEWISE 3.3 MANUAL
PAGE 27 OF 44
7.2 RECORD TAB (RECORDING)
Once recording has begun, clicking the Recording Tab will present the recording screen (Figure 7.2.0.1).
1 Annotations
System Notes, Quick Notes, and Automatic Notes are listed here with a time
stamp. This timestamp may be clicked to begin playback from that location (see
section 10).
2
Video Preview
Preview of video (will not appear if no video device selected).
3 Recording Tools
Record, Pause, or Stop session recording (see section 7.3), start or stop
confidence monitoring, and edit session information.
4 Quick Notes
Frequently used notes that may be added quickly to a session by double-
clicking or using an assigned hotkey (see section 10.3).
5 Audio Blocks
A visual representation of detected audio. This is generated when the audio
level on that channel rises above a specified threshold and stays above that
threshold for an extended period of time.
6 Speaker Box
The speaker can be selected from the speakers list or be manually entered. Any
name manually entered will be saved to the speakers list for this recording.
7.3 RECORDING TOOLS
These Tools are always accessible
from any screen within Notewise
and allows users to start, pause,
resume, stop recording, toggle
confidence monitoring, and edit
session properties.
3
5
4
1
2
Figure 7.2.0.1
Figure 7.3.0.1
6

NOTEWISE 3.3 MANUAL
PAGE 28 OF 44
7.4 AUDIO BLOCK REVIEW
Audio Blocks can be used as a tool while recording. Clicking on the Audio Blocks present on the timeline
will produce a preview window. This window will replay audio and video beginning with the start point of
the Audio Block chosen. To end the preview, click on the X in the top right-hand corner of the window. The
same functionality applies to Time Stamps, clicking on a time stamp next to a note will produce the same
preview window.
A new recording session may be started anytime by clicking the record button (Figure 7.4.0.1), if an
existing recording is not already in progress. A default name based on date and time will be generated and
recording will begin immediately. Regardless of where recording was initiated, the Recording Tools are the
control for recording.
Time Stamp Review
Figure 7.4.0.2
Audio Block Review
Figure 7.4.0.1

NOTEWISE 3.3 MANUAL
PAGE 29 OF 44
8. PLAYBACK WINDOW
The Playback window is very similar to the record screen in both look and functionality. Once the user has
browsed and chosen a session for review the screen below will appear as a popup independent of the primary
user interface. The functionality is explained through the numbered grid below.
1 Complete View
Displays the entire recording from start to finish, double-click to quickly jump
through playback.
2 Annotations
System Notes, Quick Notes, and Automatic Notes are listed here with a time
stamp. This timestamp may be clicked to begin playback from that location
(see section 10).
3 Speaker Note
Enter or select a speaker. Then enter a manual note that the speaker will be
associated with.
4 Playback Controls
Play/pause and skip commands. Skip buttons jump to the beginning of the
next upcoming Audio Block on any channel.
5
Skip
Jumps forwards or backwards through the Audio Blocks for that channel.
6 Audio Block
Double click to start playing at the beginning of that block’s location within
the timeline.
7
Volume/Mute
Allows users to change volume or mute playback.
8 Quick Notes
Frequently used notes that may be added quickly to a session by double-
clicking or using an assigned hotkey (see section 10.3).
Figure 8.0.0.1
1
4
5
7
2
8
6
3

NOTEWISE 3.3 MANUAL
PAGE 30 OF 44
9. PLAYER FIND
Player Find allows users the ability to find annotations in Playback that contain the searched word(s). Player
Find starts with the closest searched word(s) to the current playback position and once found will start playing
from that spot. The enter key or next button can be used to search through multiple instances of the searched
word(s).
To search through annotations, start by opening playback and locate the Play Find box at the top the Session
Notes.
In the search bar labeled “Find” type the word(s) that are being searched. Press Enter on the keyboard to search through
bookmarks.
Figure 9.0.0.2
Figure 9.0.0.3
Figure 9.0.0.1

NOTEWISE 3.3 MANUAL
PAGE 31 OF 44
10. ANNOTATIONS
Annotations reference notes within a session pointing to the time they occurred and what happened. They
could be a reference to a speaker change, recording started or the marking of exhibits. There are 3 types of
notes within Notewise: Quick, Automatic, and System Notes. Notes add another level of information to each
session. Any note may be deleted by clicking the “X” icon to the far right of each note.
10.1 SYSTEM NOTES
System notes are created automatically when the session is started, paused, resumed, or Completed.
Each system note is marked by a time-stamp and may not be edited like other notes
10.2 AUTOMATIC NOTES
If Automatic Notes are enabled for a channel, a generic time-stamped log entry will be made each time a
new Audio Block is created. See about audio blocks (section 7.4)
Automatic notes are not enabled by default and can be enabled by clicking the square with pencil icon
next to the desired channel.
The default channel name will be used as the default label for that automatic note, this may be changed
using the label dropdown (see section 4.7).
Figure 10.10.1.0.1
Figure 10.1.0.2
NOTEWISE 3.3 MANUAL
PAGE 32 OF 44
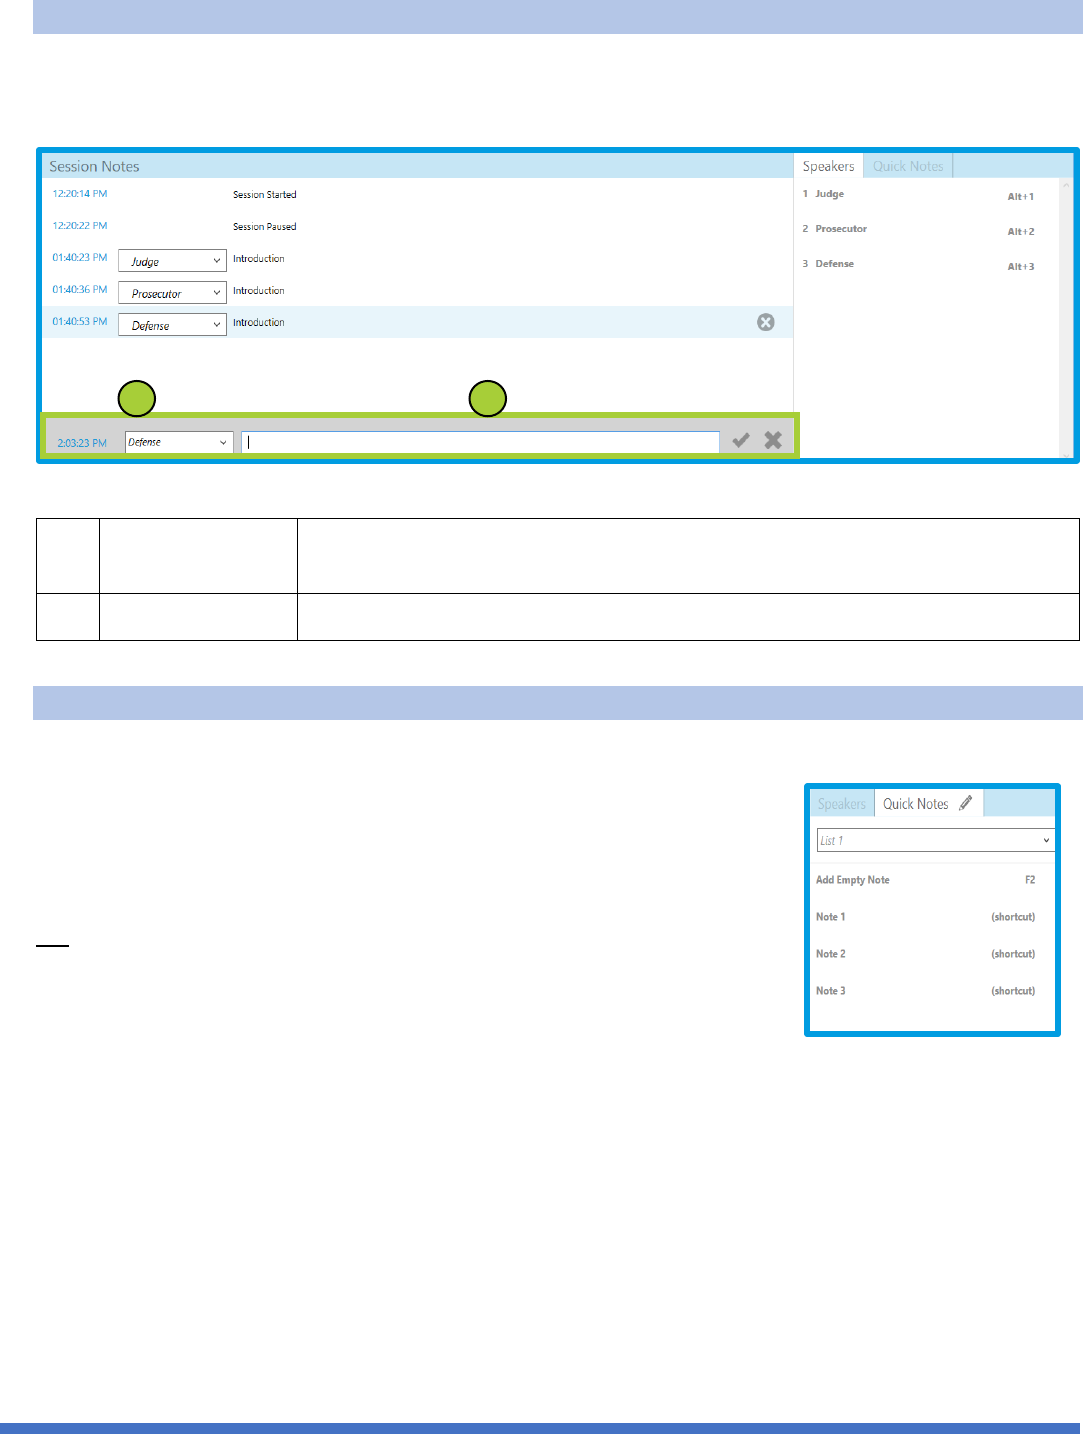
10.3 MANUAL NOTES
Manual Notes allow the addition of notes that have a speaker associated with it. The speaker can either be
selected from the speakers list or can be manually typed in. If a new speaker is manually added, the name
will be added to the speaker list for future use.
1 Speaker Selection The speaker can either be selected from the speaker list, or manually
entered. If a name is manually entered it will be added to the speaker list.
2 Manual Note This is a manual note that will be associated with the selected speaker.
10.4 QUICK NOTES
Quick Notes allow the manual addition of notes by utilizing Custom Quick Entry, double clicking the
desired Quick Note, or using the assigned shortcut. Quick Notes are setup in
configurable lists that may be switched based on a session’s needs.
Custom Quick Entry is found at the bottom of the Quick Notes window
(Figure 10.3.0.1). Typing a note here and pressing enter will add it to the
session log. The note timestamp will be based on when users started typing,
not when enter is pressed to keep a more accurate timeline.
Figure 10.3.0.1
Figure 10.2.0.1
1
2

NOTEWISE 3.3 MANUAL
PAGE 33 OF 44
Quick Notes may be added, edited, or removed by clicking the Pencil Icon next to Quick Notes on the
Record Tab or Playback Window.
1
Selected List
Currently selected (highlighted) list.
2
New List
Click to create a new list.
3
List Name
Current selected list’s name, click to edit.
4
Quick Note
Click to edit Quick Note text.
5
Reorder Icon
Click and drag the 4-directional arrow icon to reorder Quick Notes.
6
Add New Quick Note
Click to add a new Quick Note to the selected list.
7 Shortcut
Quick Notes may be set to activate using a shortcut, click to set a
function key or Ctrl + key combination. (Examples: F1, F2, Ctrl+N)
Not all keys can be assigned to a shortcut, these inactive keys include:
• CTRL+ -/+ (plus/minus) – used for zooming
• Alt+F4 – closes the app
•
Alt+Space – Opens shortcut menu
1
2
3
5
7
6
4
Figure 10.3.0.2

NOTEWISE 3.3 MANUAL
PAGE 34 OF 44
11. MIXER GAIN
When Notewise is connected to a JAVS audio hardware device such as the Nimble or P306, interactive controls
are available through the program’s interface. These controls can be accessed from the Adjust Mixer Gain
icon.
1 Gain Control
Click and drag this control up or down to increase or decrease the gain to
the corresponding microphone for that channel.
2
Gain Level
Numeric representation of gain level.
3 Tally Control
Click and drag this control up or down to increase or decrease the
sensitivity of the tally level to the corresponding microphone for that
channel.
4
Tally Level
Numeric representation of the tally level.
5
Microphone Polar
Pattern
Click down arrow to open a list of available microphone pickup patterns.
*Only for use with the P306B.
6
Polar Patterns
A list of different selectable microphone pickup patterns.
2
1
3
4
5
6
Figure 11.0.0.1

NOTEWISE 3.3 MANUAL
PAGE 35 OF 44
12. NOTIFICATIONS PANEL
Notewise has a notification panel which notifies the user about failed uploads and expiring licenses.
To check notifications, select the bell icon (labeled ‘Notifications’).
13. SPANISH TEXT CAPABILITY
Notewise supports Spanish Language Text. Spanish can be set as the default language by setting the
computer’s localization to Spanish or by using a Spanish Language Notewise shortcut.
To change Notewise to Spanish text right click the Notewise desktop icon, select “Properties” at the bottom of
the list of options, click on the tab labeled Shortcut, Under “Target:” go to the end of the text (including
quotations) and add “ -c es”, and click OK to save changes. Notewise will now open in Spanish.
Figure 12.0.0.1
Figure 13.0.0.1

NOTEWISE 3.3 MANUAL
PAGE 36 OF 44
14. INSTALLATION
14.1 MINIMUM SYSTEM REQUIREMENTS
Audio-only Recording
Audio and Video Recording
Operating System
Windows 7 and 10
Windows 7 and 10 x64
.Net Framework
4.6.1
4.6.1
Processor
Intel Core 2 Duo 2.2 GHz or better
Intel Core i5 4590 or better
RAM
4 GB or more
8 GB or more
Disk Space (Application)
250 MB
250 MB
Disk Space (Data)
Dependent on recording settings and
usage
Dependent on recording settings and
usage
Screen Resolution
1440x900 or higher 1440x900 or higher
14.2 INSTALLATION
Before starting, confirm all appropriate drivers are installed and updated for any audio or video input devices to be used
with Notewise. JAVS examples are the Nimble, P306, and P412, with JAVS P412 drivers should be 4.67 Multi-channel or
greater.
1) Navigate to www.JAVS.com/library and download “Notewise 3 Executable”
2) Run the downloaded installer, then click Install.
3) Click Next. Carefully read the License Agreement. This must be accepted by clicking the check box in
the bottom left before clicking Next to continue.
Figure 14.2.0.1
Figure 14.2.0.2
NOTEWISE 3.3 MANUAL
PAGE 37 OF 44
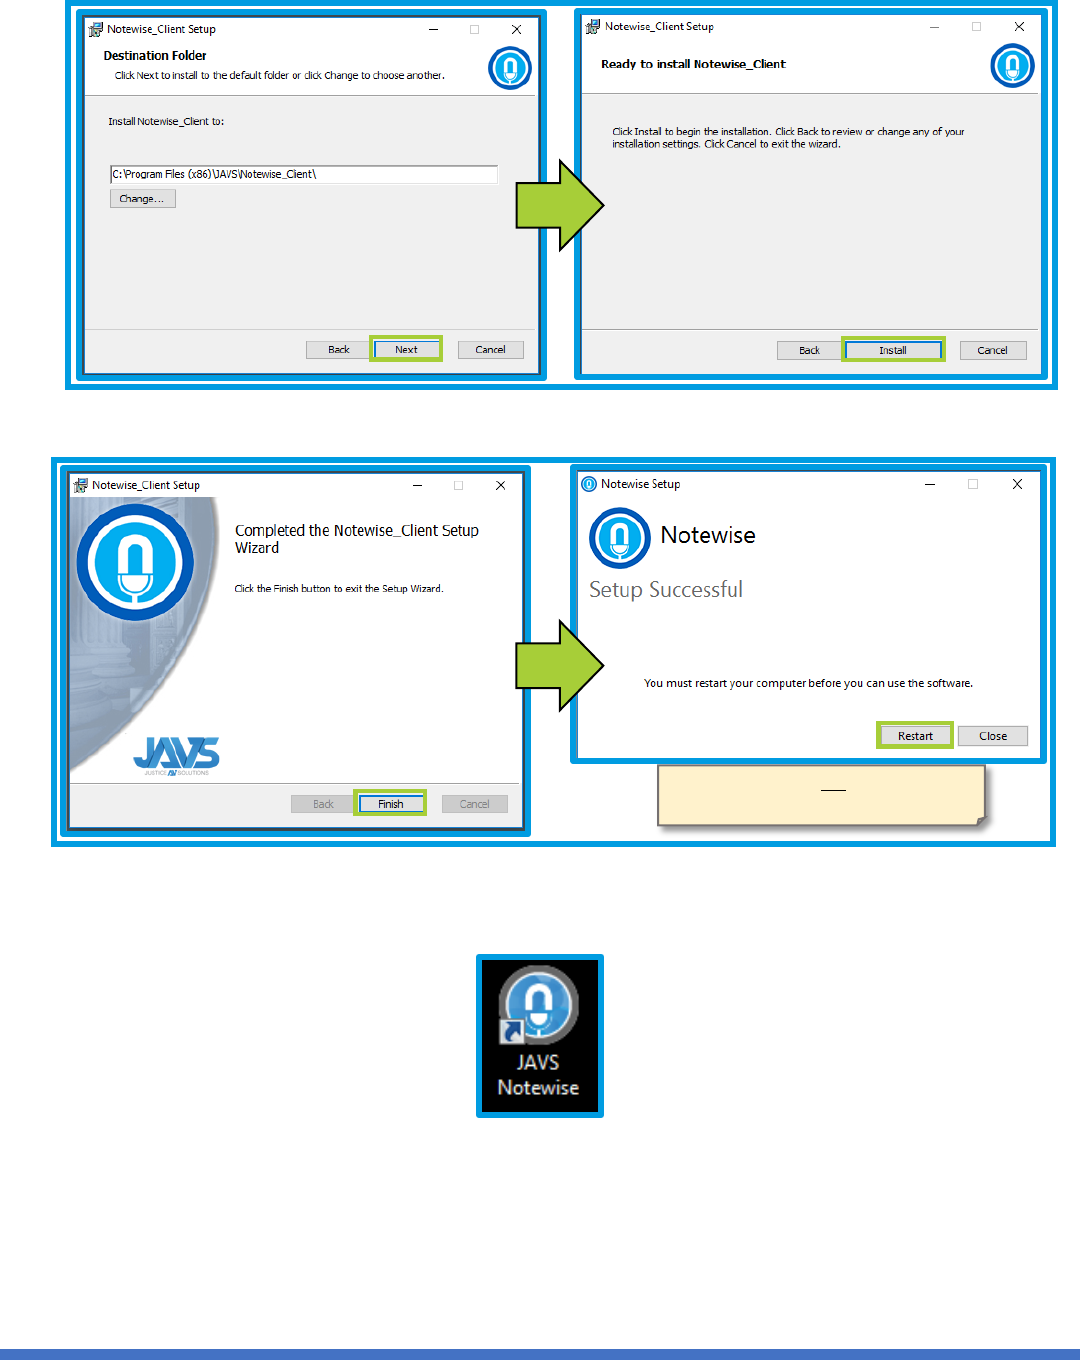
4) Click Next. Then click Install.
5) Click Finish. Then click Restart. Alternatively, clicking Close allows a user to restart later if they choose.
6) After computer restart, users may double-click the JAVS Notewise icon on the desktop or the standard
generated windows menu shortcut to begin using Notewise.
Note: Notewise will not be operational
until the computer has been restarted.
Figure 14.2.0.4
Figure 14.2.0.3
Figure 14.2.0.5

NOTEWISE 3.3 MANUAL
PAGE 38 OF 44
15. LOGGING IN FOR THE FIRST TIME
New users will receive an email from notifications@support.javs.com inviting them to join a specific billing
account. This email is generated when an Admin creates the new user. The new user will receive that
email with all the information needed to log in for the first time. If no email has been received, please
contact the account owner. Without this email, users will be unable to proceed past this point.
1) Click First time logging in?. Enter the Email and Registration Code received, click Submit to continue.
2) Create a password for the account. Click Submit when done.
15.1 LOGGING IN
Clicking on the Notewise desktop icon will open to the Login
Screen. Enter the email and password for the user account,
then click Login (Figure 15.1.0.1).
If the user has access to more than one Billing account, they
will be presented with a prompt asking which Billing
account to be used. After selecting desired Account, click
Login.
Password Requirements
Must combine at least two of the following:
• Upper case letters
• Lower case letters
• Numbers
• Symbols
Must not contain parts of your email address.
Must be at least 12 characters.
**************
Login
Figure 15.1.0.1
Figure 15.1.0.2
Submit
Figure 15.0.0.1
XXXXXXXX
************
************
Submit
Figure 15.0.0.2

NOTEWISE 3.3 MANUAL
PAGE 39 OF 44
16. ACTIVATION & EXPIRATION
Unlicensed, Notewise is a robust session browser and player. Users may add additional functionality by
purchasing and applying a license. Activating the software grants features like scheduling, publishing, logging
and recording.
1) Once logged in, Click the About icon in the top left corner.
2) The “Notewise Activation” pop-up will display. The computer must have access to the internet for
activation to occur. Choose the proper license type (Recording, Client, or All In One), enter the License
Key, and click Activate. Once complete, red text stating “Successfully Activated” will appear, if the text
indicates that an error has occurred, please check to ensure that the correct license type and number
are correct before contacting the JAVS Helpdesk.
Figure 16.0.0.1
XXXX-XXXX-XXXX-XXXX-
Note: Upon closing activation pop-up the license will be applied.
Therefore, it may take several seconds for the Schedule and Record tabs
All-In-One Device License
Activate
Figure 16.0.0.2

NOTEWISE 3.3 MANUAL
PAGE 40 OF 44
3) Post activation, the expiration of the software can be found by clicking the About icon in the top left
corner. If applicable, the expiration date will appear just above the activation link as shown below.
17. ADD-ON LICENSES
Cloud Storage is a feature that can be enabled with the Cloud Storage License and the Enterprise License.
Cloud Storage allows sessions to be stored on the Internet through a cloud computing provider. This allows
sessions to be delivered on demand, in real time. This eliminates the user having to purchase and manage
their own data storage infrastructure.
17.1 CLOUD STORAGE LICENSE
The Cloud Storage License allows users the ability to have sessions automatically backup all Session Data
and Media in the Cloud indefinitely, and to rely on that cloud storage as a central, accessible archive. Once
hardware with ‘Upload Permissions’ has finished recording, it automatically begins sending the Session’s
Data and Media to the Cloud. Once the upload has completed, any User with proper permissions can
access/download that session.
To download a session from a different device that has Cloud Storage License capabilities, start by logging
in to the enabled billing account that has a Cloud Storage License.
Figure 16.0.0.3
NOTEWISE 3.3 MANUAL
PAGE 41 OF 44
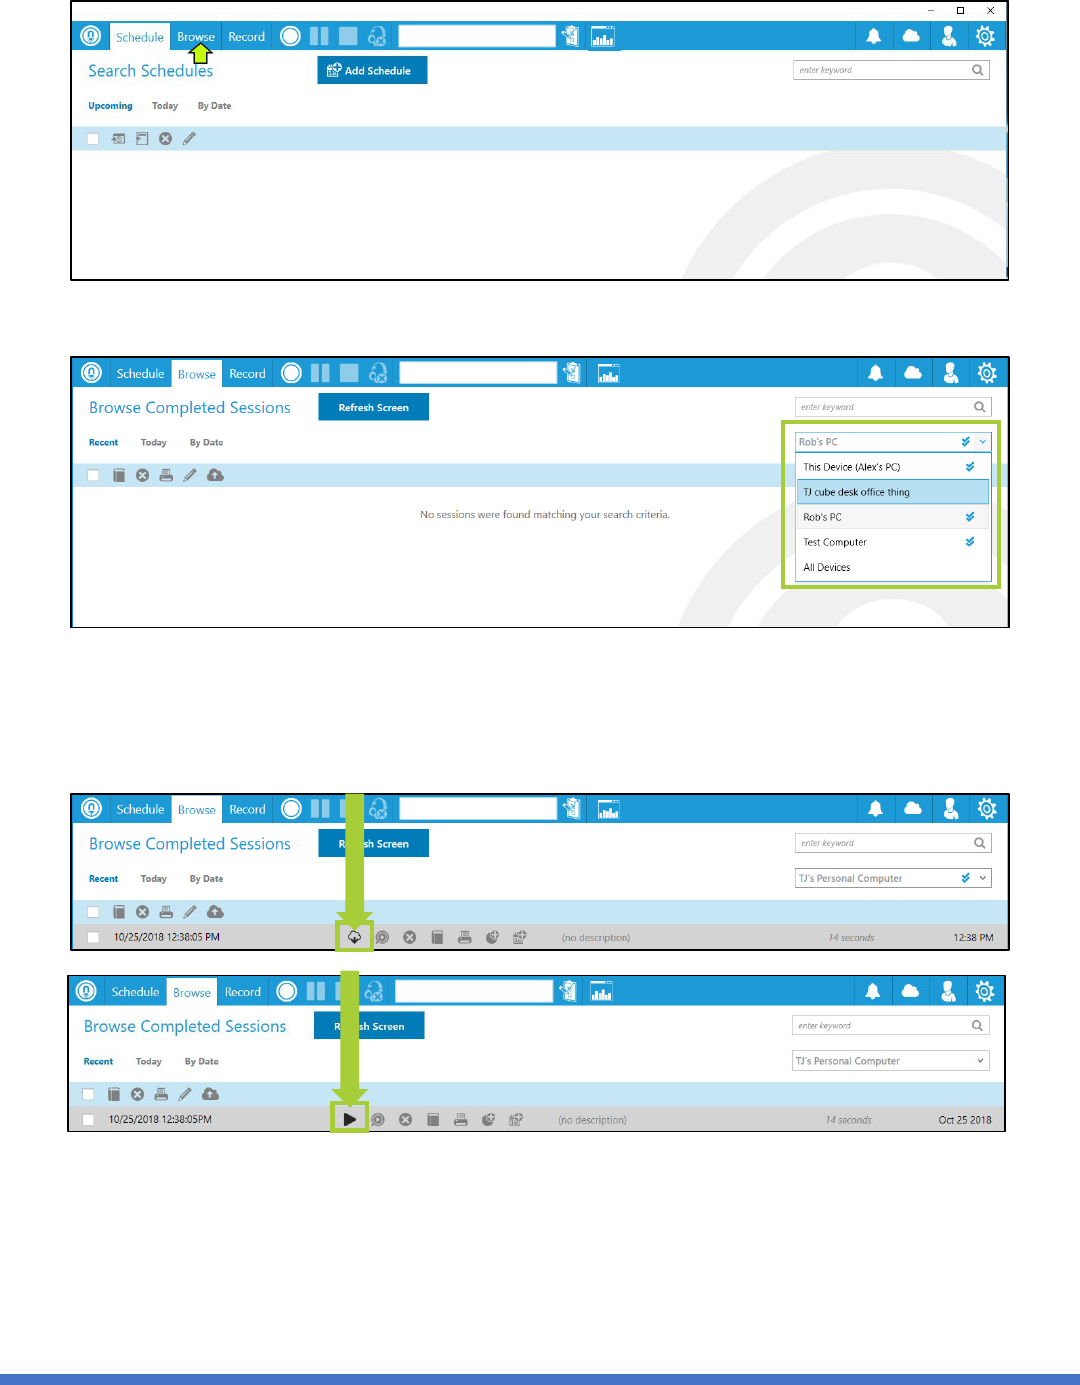
Select the browse tab at the top of Notewise.
Use the device search bar to select the device where the required session was recorded.
Select the cloud with a downward arrow icon (labeled Download) next to the required session. This will
download the session to the device and enable playback functionality. The download button will
“stick” and be visible until the session has completely downloaded. Once the download button has
changed to the play button icon (labeled play) the session is available for playback.

NOTEWISE 3.3 MANUAL
PAGE 42 OF 44
18. APPENDIX A - EXAMPLE REPORT

NOTEWISE 3.3 MANUAL
PAGE 43 OF 44
19. APPENDIX B - SUPPORTED DEVICES
Notewise has been designed to utilize many devices for both audio and video recording. Due to the large
variety of available devices, only those verified by JAVS are listed below. These lists will not comprise the
entire list of supported devices that may work with Notewise.
Audio Devices
Type
Device
JAVS Mixer
Nimble (1-6 microphones)
JAVS Mixer
P306 (1-6 microphones)
JAVS Mixer
P412/P412+ (1-12 microphones)
Integrated Microphone
Surface Pro 3 integrated mic
Integrated Microphone
HP ProBook 650 G2 mic
Notewise supports any integrated microphones that support a Microsoft Windows WASAPI interface are
supported.
Video Devices
Type
Device
USB Camera
Logitech c920 USB Webcam (video capable only)
USB Camera
Logitech c930 USB Webcam
USB Capture Device
Magewell USB Capture HDMI (both Gen1 and Gen2 tested)
USB Capture Device
Magewell USB Capture SDI (Gen2 tested)
Integrated Camera
Surface Pro 3 (both front and rear cameras)
Integrated Camera
HP ProBook 650 G2 webcam
Notewise utilizes the following parameters to record, these specific devices have been tested to work
successfully with cameras that support either a YUY2 or MJPEG interface and a 16:9 aspect ratio resolution of
either 640x360 (360p, Good), 960x540 (540p, Better), or 1280x720 (720p, Best).

NOTEWISE 3.3 MANUAL
PAGE 44 OF 44
20. APPENDIX C – AUDIO STORAGE SIZE
There are four sizes available for audio file storage, each corresponding to the figures detailed in the following
table:
21. APPENDIX D – VIDEO STORAGE SIZE
There are three sizes available for video file storage, each corresponding to the figures detailed in the
following table:
Video Storage Size
Size
Gb/hr
Pixels per Frame
Good
~1.05 Gb/hr
640x360
Better
~1.15 Gb/hr
960x540
Best
~1.25 Gb/hr
1280x720
22. APPENDIX E - SUPPORT
JAVS Help Desk
Monday through Friday from 8 a.m. to 5 p.m. and on call from 5 p.m. to 9:30 p.m. Eastern Standard Time
Audio Storage Size
Size
Mb/hr
Maximum
Approx. 175 Mb/hr
Large
Approx. 125 Mb/hr
Small
Approx. 75 Mb/hr
Tiny
Approx. 50 Mb/hr
