
1
CANVA GUIDE FOR NAF SOCIAL MEDIA ASSETS
WHAT IS CANVA?
Canva (www.canva.com) is a free online tool that can be used to design and share simple graphics on platforms
including Facebook, Twitter, and more. In addition to social media graphics, Canva can be used to make
documents such as fliers or presentations, blog graphics, and infographics. NAF developed a series of template
social graphics that you can use to customize social media outreach.
While Canva is great tool with tons of features, the basic instructional guide below will cover using the NAF assets
in Canva for social media. There are plenty of online tutorials that provide more in-depth instructions on utilizing
other aspects of Canva. For instance, Canva’s “design school” tutorials and other interactive guides
.
AVAILABLE ASSETS
The assets created specifically for Canva include two social grids
designs—a quote bubble and business recruitment message–with
different sizing options for Twitter or Facebook. Each social grid
template provides a white space footer for customization. When
using social grids in Canva, you can choose how to use the white
space box—to insert logos, add your URL, or insert additional
text.
Templates Sized for Facebook
Templates Sized for Twitter
Templates
1) Blank quote bubble
2) A selected NAF board member quote
3) Call to action directed at potential
internship providers

2
USING CANVA (THE BASICS)
STEP 1: CREATE YOUR ACCOUNT
Visit www.canva.com
and sign-up for a free account.
STEP 2: CHOOSE YOUR “DESIGN”
TEMPLATE
To get started, choose a “Design”
template. Under the header for Social
Media Posts, you should see templates
for creating a Twitter Post and
Facebook Post. For this example, we’ll
be creating a Facebook Post:
STEP 3: START DESIGNING
Once you’ve selected your template,
you’ll now be in your Canva editor
where you will design your graphic.
You can also name your design by
clicking on the title and typing in your
preferred name.
STEP 4: INCORPORATE THE NAF ASSETS
Start by adding the background. Since
you’ll be adding an image as the
background, you’ll need to first apply a
grid.
• Click on the “Elements” tab in the
object panel on the left side of your
screen
• Select the “Grids” icon and click the
grid without partitions
Next, add the NAF background image:
Save the “NAF Customizable Social Graphics” folder to your computer and
determine the assets you want to include in your Canva design. Once you’ve
selected the asset(s) you want to use, you’ll upload them into Canva.
First, select “Uploads” on the left panel, then click the “Uploads” picture
and choose “Upload your own images.”
3
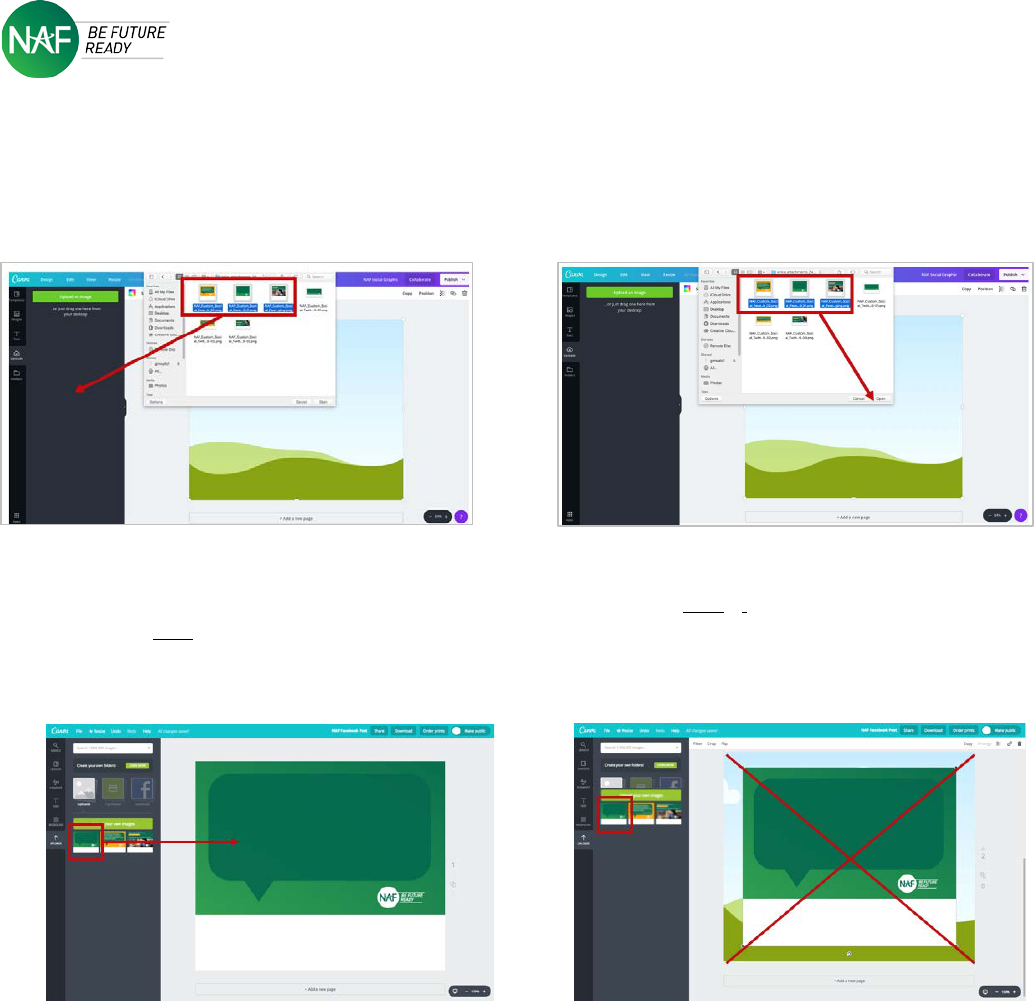
Next, navigate to the asset(s) on your computer that you’ve saved from the “NAF Customizable Social Graphics”
folder, select your desired file(s), and either drag directly into the Canva upload area (see figure 1), or select
“Open” from your computer’s dialogue box (see figure 2). Either method will bring your selected file(s) directly
into your Canva “Uploads” library:
Figure 1: Drag & drop method Figure 2: Dialogue box option
Finally, from your “Uploads” library, select the image you want to use and drag it into the grid:
It’s important to drag the image over into the grid (see figure 3). If you simply click on the image, it will not fully
populate into the Facebook sized specs in the grid and you’ll need to manually adjust it by moving the corners of
the image out to fit the grid (see figure 4):
Figure 3: CORRECT: drag the image
Figure 4: INCORRECT: don't click the image

4
STEP 5: ADD TEXT OR LOGOS
Once the background is set, you’re ready to customize!
The following steps will show you how to add text or logos using the example below. When determining how to
customize your own, you can decide whether to insert logos, add text/url, or use both to communicate your own
unique message. If you want to use a social tile, but still need more space to add additional context, keep in mind
that you can also include that text as a caption in your Facebook or Twitter post.
Adding Text or URL
Click the “Text” icon on the left panel. You
can choose to insert “heading,”
“subheading,” or “body text”
Once you click on one of three options, a
text box will appear directly on your
background. Click on the text box you’ve just
created, and manually move the text box on
the design into the quote box or white
footer. Then, click within the text box to
type in your copy.
Next, change the font and color to
maintain consisent branding:
The text boxes will automatically populate
with a generic font and color. We
recommned changing it to: Font = Archivo
Narrow. Color = White. Style = Bold.
To change the font to Archivo Narrow:
Navigate to the font dropdown menu on
the top left of the text edit banner. Choose
Archivo Narrow (not Archivo Black or any
other font).

5
Changing the color to white and bold:
Change the color by clicking the
colorwheel icon in the middle of the
text edit banner, and choose white
from the dropdown menu. Next, select
the B icon next to the colorwheel to
bold the text.
Once you have adjusted your colors and font, adjust the text box to the desired size and location.
• Manually adjust the size of the text box by moving the corners of the image to the desired size. To do so,
hover over the outside edges of the box and the icon will appear, click and drag to resize.
• To move the text box location, hover over your text and the icon should appear, click and drag the box to
the desired location within the social tile.
If you are using the text box for a quote text, please follow these additional steps.
• Change the font to italics by highlighting your text and selecting the I icon.
• After positioning the box within the quote box, use options for left-aligned and choose your font size. Some
quotes may be longer than others, so based on your quote length and optimal spacing within the box, select a
size-to-fit.
• For quote attribution, add a new text box and position it in the lower right hand corner of the quote box.
Then, use the text options to select right-aligned and change color and font to match options outlined above.
ADDING LOGOS
• Download the logo(s) that you’d like to add to the social title onto your computer. Once you’ve saved the
logo(s), you’ll upload to Canva using the same process detailed above from uploading the background image.
After uploading you desired file(s), you’ll be able to incorporate the logo(s) into the white footer.
• In this case, you can double click on the logo, and it will populate on top of the background graphic.
• Then, manually adjust it by moving the corners of the image to the desired size. To do so, hover over the
corner of the logo and the icon will appear, click and drag to manually adjust.
• To move the logo, hover over the logo and the icon should appear, click and drag the image to the desired
location in the white footer.
• To add multiple logos, you will need to individually add and adjust each image using the process detailed
above.

6
Optional: When adding multiple images,
use a hair line element to separate
logos.
• Click on the “Elements” tab in the
object panel on the left side of your
screen:
• Select the “Lines” icon and click the
straight light to add to the social title.
• Click on the line element and using
the icon rotate the line vertically,
then resize and move the hair line
element to separate each logo similar
to this example.
STEP 6: DOWNLOADING YOUR
COMPLETED DESIGN
Once you’ve completed your design,
you’ll be ready to download it:
• Hit the “Download” button on the top
right banner:
• You’ll see four file type options to
download from the dropbown. We
suggest following Canva’s
recommended PNG option. Then hit
the green “Download” button.
Once downloaded, navigate to the file on
your computer and you’ll have a
customized PNG ready to share on
Facebook! We recommend always
downloading the file from Canva and
manually uploading to your social
channels versus choosing the auto-post
option from Canva. Posting directly from
Canva will cause a Canva logo to be
embedded in your social post.
STEP 7: UPLOAD TO FACEBOOK AND
YOU’RE DONE!
