
Contents
Introduction
BriefDescription
Licensing
UpdatingtheProgram
RemovingtheProgram
TechnicalSupport
UsefulWebResources
EndUserLicenseAgreement
GettingStarted
QuickStartGuide
EffectGuide
UsingTemplates
ProgramInterface
TheMainWindow
ProgramSettings
TheContentPanel
The2DInspector
The3DInspector
Menus
KeyboardShortcuts
WorkingwithDocuments
Creating,OpeningandSavingDocuments
DocumentSettings
WorkingwithLayers
IntroductiontoLayersandObjects
ObjectSize,LocationandOrientation
TheListofLayers
MergingLayers
SplittingTextintoLetters
TheVectorShapeEditor
2
2DToolsandEffects
Introductionto2DEffects
TheTextEditor
TheFillEffect
ApplyingTextures
ApplyingMaterials
TheEditorofMaterials
ApplyingStroke
TheShadowEffect
TheGlowEffect
TheInnerShadowEffect
ApplyingMasks
Transformations
3DToolsandEffects
Introductionto3DEffects
TheTextEditor
ApplyingMaterials
CreatingMaterials
TheShadowEffect
TheDepthGradientEffect
TheGlowEffect
TheFocusEffect
ApplyingMasks
Transformations
The3DObjectSettings
ParallelProjection
ExportingandPrinting
Exporting
TransparentBackground
Printing
3

BriefDescription
TheArtTextapplicationisdesignedforcreatinguniquetextualgraphicsbyapplyingeffectstotextand
vectorshapes.YourworkcanbesavedinthenativeArtTextformatorincommongraphicfileformats.
ImagescreatedinArtTextcanbeusedinpublishingmaterials,onwebpages,orinotherapplications.
InArtText,youwillfind:
2Deffects(suchasshadow,glowandstroke)
3Deffects(suchasadjustablecolor,shapeandlight)
Transformations(geometricdeformationoftextorimages)
Librariesoftextures,backgroundsandothergraphiccontent
Theprogramissuppliedwithwell-tunedtemplatesandpresetswhichcanserveasastartingpointfor
yourdesigns.
SystemRequirements
MacOSXv10.10orlater
800MBofavailablediskspace
4

Licensing
Youcanfindyourlicensecodeinthepurchaseconfirmationemail.
Toenterthelicensecode:
1. Opentheapplication.
2. BringuptheLicensedialogbychoosingArtText3>License…inthemenu.
3. Enteryournameandlicensecode.
Itisrecommendedthatyoukeepthee-mailcontainingyourlicensecodeinasafeplaceincaseyou
re-installorupdatetheapplication.
TheunlicensedversionofArtTextisfullyoperational.Theonlylimitationisthatitaddsthe"Trial"text
overtheresultingimage.Toeliminatethistext,enteralicensecode.
Toupgradefromthetrialtolicensedversionoftheprogram,youneedtopurchaseandenteralicense
code.SeedetailsonBeLight’swebsite:
http://www.belightsoft.com/store/arttext.php
LicensingisnotneedediftheapplicationwaspurchasedontheMacAppStore.
5


RemovingtheProgram
Tocompletelyremovetheprogramandallofitscomponents,deletethefollowingfilesandfolders.
Programdownloadedfromthedeveloper'ssite:
/Applications/ArtText3.app
~/Library/Preferences/com.belightsoft.ArtText3.plist
~/Library/ApplicationSupport/BeLightSoftware/ArtText3
ProgramdownloadedfromMacAppStore:
/Applications/ArtText3.app
~/Library/Containers/com.belightsoft.ArtText3
“~”meanstheuser'sHomefolder.
Notethatfoldersmarkedwithboldfontcanstoreuser's2Dand3Dmaterials,andcustomshapes.
Don’tremovethesefoldersifyouaregoingtouseyourmaterialsorshapesinthefuture.
Toaccessanypathlistedabove,copyit.InFinder,chooseGo>GotoFolder(Cmd-Shift-G).Then
pastethepathintotheeditbox,andclicktheGobutton.
7

TechnicalSupport
ThedeveloperofArtTextoffersfreetechnicalsupport.
ByE-mail:
TechnicalsupportformonBeLight’swebsite:
http://www.belightsoft.com/support/support.php
ForumonBeLight’swebsite:
http://www.belightsoft.com/forum/
Whenreportingaproblem,pleasemakesuretospecify:
TheversionofArtTextyouareusing.
TheversionofOSXinstalledonyourcomputer.
Yourpreviousactionsthatcouldhaveledtotheproblem.
Iftheproblempersists,describehowtoreproduceit.
Whennecessary,illustrateyourreportwithscreenshots(pressCmd-Shift-3tosavea
screenshotonyourDesktop).
8


EndUserLicenseAgreement
THISLICENSINGAGREEMENT("AGREEMENT")ISALEGALAGREEMENTBETWEENYOU,EITHERAN
INDIVIDUALORASINGLEENTITY,ANDBELIGHTSOFTWARE("LICENSOR").IFYOUDONOTAGREE
TOEACHANDEVERYTERM,YOUARETOCLICK"DISAGREE"BUTTONANDNOTTOOPEN,USEOR
INSTALLTHESOFTWAREANDYOUMUSTDELETETHESOFTWAREFROMYOURCOMPUTERAND/OR
ANYOTHERDATASTORAGEDEVICE.
NOTE:MacAppStorecustomersshouldrefertothestandardAppStoreEULA.
1.GENERAL
ThesoftwareanddocumentationaccompanyingthisLicensewhetherondisk,onanyothermedia
(collectivelythe"Software")arelicensedtoyoubyBeLightSoftware("Licensor")foruseonlyunder
thetermsofthisLicense,andLicensorreservesallrightsnotexpresslygrantedtoyou.Therights
grantedhereindonotincludeanyotherpatentsorintellectualpropertyrights.
Titleandintellectualpropertyrightsinandtoanycontentdisplayedbyoraccessedthroughthe
Softwarebelongtotherespectivecontentowner.ThisLicensedoesnotgrantyouanyrightstouse
suchcontent.
2.LICENSE
LicensorherebygrantstoYou,andYouaccept,anon-exclusivelicensetoinstallanduseSoftwareand
Documentation,onlyasauthorizedinthislicense.YouagreethatYouwillnotassign,sub-license,
transfer,pledge,lease,rent,orshareYourrightsunderthislicense.Youmaynotreverseengineer,
decompileordisassembletheLicensedSoftwareforanypurposewhatsoever.
3.TRANSFER
YoumaynotdistributecopiesoftheSoftwaretoanythirdparty,normayyouuse,rent,loan,sub-
license,orleasetheSoftwaretothirdparties.Youmay,however,transferallyourrightstousethe
Softwaretoanotherpersonorlegalentityprovidedthat:(a)YoualsotransferthisAgreement,the
Softwareandallothersoftwarebundledorpre-installedwiththeSoftware,includingallcopies,
Updatesandpriorversions,tosuchpersonorentity;(b)Youretainnocopies,includingbackupsand
copiesstoredonacomputer;and(c)thereceivingpartyacceptsthetermsandconditionsofthis
AgreementandanyothertermsandconditionsuponwhichYoulegallyobtainedlicensetothe
Software.Notwithstandingtheforegoing,Youmaynottransferpre-releaseornotforresalecopiesof
theSoftware.
4.ILLEGALUSE
YouarenottousetheSoftware,whetherdirectlyorindirectly,foranyillegalpurposeunderthelaws
orordinancesofFederal,State,orlocalgovernments.ItisYoursoleresponsibilitytoknowand
understandthelawsand/orordinancesthatgoverntheuseoftheSoftware.IntheeventthatYou
violateanyFederal,StateorlocallaworordinancebydirectorindirectuseoftheSoftware,Youshall
takefulllegalresponsibilityforsuchillegaluse.YoushallholdLicensorharmlessandwithoutfaultand
otherwiseindemnifyLicensorforanydamage,costorliabilityincurredbyLicensorasaresultofany
use,whetherornotsuchuseiswithinthescopeofthelicensesetforthherein.
5.UPDATES
YoumaycontinuetousethepreviousversionoftheSoftwareonyourcomputerafterYoureceivethe
UpdatetoassistYouinthetransitiontotheUpdate,providedthat:theUpdateandtheprevious
versionareinstalledonthesamecomputer;thepreviousversionorcopiesthereofarenottransferred
toanotherpartyorcomputerunlessallcopiesoftheUpdatearealsotransferredtosuchpartyor
computer;andYouacknowledgethatanyobligationBeLightSoftwaremayhavetosupportthe
previousversionoftheSoftwaremaybeendeduponavailabilityoftheUpdate.
10
6.LICENSOR'SRIGHTS
YouacknowledgeandagreethattheSoftwareandDocumentationconsistsofproprietary,published
andunpublishedpropertyofLicensor.Youfurtheracknowledgeandagreethatallright,title,and
interestinandtotheSoftwareandDocumentationareandshallremainwithLicensor.Thislicense
conveystoYoutherighttoinstallandusetheSoftwareandDocumentationinaccordancewiththe
termsofthislicense.AllrightsnotexpresslygrantedherearereservedbyBeLightSoftware.The
Licensorwillnottransmityourpersonalinformationtoanythirdpartywithoutyourexpressconsent.
7.TERMINATION
ThislicenseiseffectiveuponYourinstallingthesoftwareonanymachine,andshallcontinueuntil
terminated.YoumayterminatethisAgreementatanytime.TheLicensormayimmediatelyterminate
thisLicenseAgreementifyoubreachanyrepresentation,warranty,agreementorobligationcontained
orreferredtointhisLicenseAgreement.Upontermination,youmustdisposeoftheSoftwareandall
copiesorversionsoftheSoftwarebydestroyingtheSoftware.
8.LIMITEDWARRANTY
BeLightSoftwareprovidesathirty(30)daymoney-backguaranteeontheSoftware.If,duringthis
period,youaredissatisfiedwiththeSoftwareforanyreason,BeLightSoftwarewillrefundyourmoney
ifyoureturntheSoftwareandallcopiestotheplaceofpurchasewithinthirty(30)daysofthedateof
theoriginalpurchase.THEFOREGOINGISTHESOLEANDEXCLUSIVEWARRANTYOFFEREDBY
BELIGHTSOFTWARE.BELIGHTSOFTWAREDISCLAIMSALLOTHERWARRANTIES,EXPRESSOR
IMPLIED,INCLUDINGBUTNOTLIMITEDTOTHEIMPLIEDWARRANTIESOFMERCHANTABILITYAND
FITNESSFORAPARTICULARPURPOSE,WITHREGARDTOTHELICENSEDSOFTWAREANDALL
ACCOMPANYINGMATERIALS.BELIGHTSOFTWAREANDITSAGENTSDONOTANDCANNOTWARRANT
THEPERFORMANCEORRESULTSYOUMAYOBTAINBYUSINGTHESOFTWARE.
9.LIMITATIONOFLIABILITY
INNOEVENTWILLBELIGHTSOFTWAREORITSAGENTSBELIABLETOYOUFORANYDAMAGES,
CLAIMSORCOSTSWHATSOEVERORANYCONSEQUENTIAL,INDIRECT,INCIDENTALDAMAGES,OR
ANYLOSTPROFITSORLOSTSAVINGS.BELIGHTSOFTWARE'SAGGREGATELIABILITYANDTHATOF
ITSAGENTSUNDERORINCONNECTIONWITHTHISAGREEMENTSHALLBELIMITEDTOTHEAMOUNT
PAIDFORTHESOFTWARE,IFANY.
10.FEES
YoumayregisteryourcopyoftheSoftwarebypurchasingaLicenseCodeforthedownloadversionat:
http://www.belightsoft.com/store/store.php
YoumaynotdistributetheLicenseCode.Byclicking"Agree",youacknowledgethatyouhavepaidthe
LicensorallapplicablelicensefeesfortheSoftware.
11.SEVERABILITY
Shouldanytermofthislicensebedeclaredvoidorunenforceablebyanycourtofcompetent
jurisdiction,suchdeclarationshallhavenoeffectontheremainingtermshereof.
12.GENERALPROVISIONS
ThisLicenseAgreementispersonalbetweenYouandBeLightSoftware.Itisnottransferableandany
attemptbyYoutorent,lease,sublicense,assignortransferanyoftherights,dutiesorobligations
hereunder.YOUACKNOWLEDGETHATYOUHAVEREADTHISAGREEMENT,UNDERSTANDITAND
AGREETOBEBOUNDBYITSTERMSANDCONDITIONS.YOUFURTHERAGREETHATITISTHE
COMPLETEANDEXCLUSIVESTATEMENTOFTHEAGREEMENTBETWEENYOUANDBELIGHTSOFTWARE
WHICHSUPERSEDESANYPROPOSALORPRIORAGREEMENT,ORALORWRITTEN,ANDANYOTHER
COMMUNICATIONSBETWEENYOUANDBELIGHTSOFTWAREORBELIGHTSOFTWARE'SAGENT(S)
RELATINGTOTHELICENSEDSOFTWARE.
IfyouhaveanyquestionsregardingthisAgreementorifyouwishtorequestanyinformationfrom
BeLightSoftware,pleaseusetheaddressandcontactinformationincludedwiththisproducttocontact
11
BeLightSoftware.
©2018BeLightSoftware,Ltd.AllRightsReserved.BeLightSoftwareandArtTextaretrademarksof
BeLightSoftware,Ltd.Mac,theMaclogo,MacOSX,iPhoto,Photos,andMacintosharetrademarksof
AppleComputer,Inc.Allothertrademarks,registeredtrademarks,productand/orbrandnamesare
thesolepropertyoftheirrespectiveowners.
12

Quick Start Guide
This guide will give you an idea of how you can create a new design in Art Text. There are
many possible ways to do that. Here, we are going to learn a simple method. Although the
guide comprises a sequence of steps, you can change their order, skip some of them, or
add new ones.
For a better understanding of the location and names of the program controls, it is
recommended that you look through The Main Window section beforehand. An image
below shows the most important parts of the main window.
1 – Libraries of templates, backgrounds, icons and shapes.
2 – The list of layers.
3 – The canvas.
13

4 – The Inspector.
5 – Sets of tools. To expand a set of tools, click on its title. Some tools have an On/Off
switch or a choice of presets next to the title.
6 – Add a new 2D or 3D object.
7 – The Document Size button opens settings such as the size and measurement units.
8 – The zoom tool.
9 – Export to the Clipboard or file.
To learn the program, you may find it useful to open a finished design and try to modify it
or explore what kind of objects it is made of. To browse sample designs, choose Window
> Art Text Welcome Window from the menu. Then click on the Sample Browser button.
Step 1: Opening a new document
To open a new Art Text document, choose File > New. New documents have a text object
by default. You can either replace it with your own, or delete it in order to begin with a
blank document. To do this, open the layer list in the Content panel, and click the minus
button.
For quick start, you can open a template from the library and then modify it.
Step 2: Setting up the document size
The document size defines the image dimensions when you export your design to a
graphic file. To set up the document size, click the Document Size button below the
canvas. In the Document Size dialog, you can also select the measurement units.
14

You can change the document size later at any time.
Step 3: Adding text and images
To create a design based on a template, open the leftmost tab in the Content panel and
select one of categories. Then drag and drop a template you like to your document.
To add text with the default style, click the plus button in the bottom left corner of the
canvas and choose either 2D or 3D Text.
In order to add images, open a collection of backgrounds in the Content panel:
or a library of shapes and icons:
15

Finally, drag one you like to your design.
Both text and images can be also called in the program "objects" and "layers" depending
on the context.
Step 4: Moving and resizing objects
To move an object (text or image), just drag it with the mouse on the canvas.
In order to change the object size, select the object and move a handle on the object's
boundary.
Step 5: Editing text
To edit text, select it on the canvas. Then click on the Text title in the Inspector to open the
text editor. Modify your text in the text editing box.
Step 6: Applying effects
Applying effects is what Art Text documentation is all about, so we will not discuss any
particular effect in this guide. Most of the effects and tools are grouped in the Inspector as
sections. To open a section, just click on its title.
Note that 2D and 3D objects (you had to choose either 2D or 3D type in Step 3) let you use
only those effects which are compatible with the object type.
The Effect Guide lists the effects available in Art Text.
Step 7: Organizing layers in your document
When referring to layers, we mean that any object can appear on the canvas above or
below other objects. All layers of your document are listed in the Content panel. A layer at
16

the top corresponds to an object which is in front of others. To change this order, just drag
a layer to a new position. In order to create a background, add an image and make sure it
is at the bottom of the list.
Apart from the possibility of rearranging layers, the layer list lets you add and delete layers
using the plus and minus buttons correspondingly.
Step 8: Saving your document
To save your document, choose File > Save from the menu.
Step 9: Exporting the final image
To export your design to a graphic file, click the Export button in the bottom right corner of
the canvas. Then, choose either Clipboard or File.
The resolution for the Clipboard can be set in the Preferences dialog.
When you export to a file, you can choose the graphic format, resolution, and type a file
name in the Export dialog.
17

EffectGuide
Inthisguide,youcanfindoutthetypesofgraphiceffectsthatareavailableinArtText.
Notethat2Dand3Dobjectshaveindividualsetsofeffects.Usually,youcanapplyseveraleffectsto
thesameobject,buttheymustbelongtothesame2Dor3Dgroup.
2DEffects
Effect SampleImage RelatedTopic
ColorFill TheFillEffect
Gradient
Fill
TheFillEffect
Texture ApplyingTextures
Shading ApplyingMaterials
Stroke TheStrokeEffect
Shadow TheShadowEffect
18


UsingTemplates
ArtTextprovidesalibraryoftemplateslocatedintheContentpanel.Atemplatecanbeapieceoftext
withappliedeffects,orasimpledesign.
Touseatemplate,dragittoyourdesign.Thenedittextoradjusteffects,ifnecessary.
Templatesaregroupedintoseveralcategories.Youcanchooseacategoryfromthedrop-downlistat
thetopofthepanel.
21

TheMainWindow
1–Librariesoficons,backgroundsandtemplates.
Relatedsubtopics:TheContentPanel
2–Listoflayers.Hereyoucanaccessalloftheobjectsinyourdocumentbytheirnamesor
thumbnails.
Relatedsubtopics:TheListofLayers
3–Canvas.Thisistheareawhereyoupreviewandworkwiththedesign.
4–Inspector.Dependingontheselectedobjecttype,theInspectorshowseither2Dor3Dtoolsand
effects.
Relatedsubtopics:
The2DInspector
The3DInspector
22
5–Toolsaregroupedintosections.Onlyonesectioncanbeopenatatime.Todisplayhiddentools,
clickonthetitleofthecorrespondingsection.Thetitlebarofsomesectionshasaswitchtoactivateor
deactivatetheeffect,oradrop-downmenuwithpresets.
6–Addanew2Dor3Dobject,orabackground.
7–TheDocumentSizebuttonopenssettingssuchasthesizeandmeasurementunits.
Relatedsubtopics:DocumentSettings
8–Thezoomtool.
9–ExporttotheClipboardorfile.
Relatedsubtopics:Exporting
23

ProgramSettings
Toopenprogramsettings,usetheArtText3>Preferencesmenu.
1–OpentheWelcomeWindowwhentheprogramstarts.Thiswindowgivesyouaccesstosample
documentsandtoonlineresourcesrelatedtotheprogram.
2–Resolutionofimagesexportedtotheclipboard.Itisimportantwhenyoucopythefinalimageto
anotherapplication.
3–Automaticallyalignanobjecttootherobjectswhenyoumoveorresizeit.
4–Chooseeitherasolidcolorforthedocumentbackgroundorthechessboard.Theselectedtypeof
thebackgroundappearsonlyonthecanvasandwillnotbeexported.
5–Changetheappearanceofthecanvasaroundthedocument.
6–Specifieswhethertheprogramautomaticallychecksforupdates.Tocheckforupdatesmanually,
chooseArtText3>CheckforUpdates…UsersoftheMacAppStoreversionoftheprogramshould
useAppStore.apptocheckforupdates.
24

TheContentPanel
TheContentpanelislocatedtotheleftofthecanvas.Itconsistsofthreelibrariesdescribedbelowand
theListofLayers.
ToshoworhidetheContentpanel,usetheView>ContentPanelmenu.
Toaddanyitemfromthelibrarytoyourdesign,dragitanddropitontothecanvas.
TemplateLibrary
TheTemplateslibraryincludes2Dand3Dpredesignedtemplates.Howtousetemplatesisdescribedin
UsingTemplates.
25

BackgroundsandLightEffects
ImagesfromtheBackgroundssectionareintendedtobeusedasabackgroundinyourdesign.
Whenyouaddabackgroundtoyourdocument,theprogramautomaticallyplacesitbehindother
objects,andfitstheimagetothedocumentdimensions.Ifyouwishtoplaceanaddedimageaboveor
belowaparticularobject,changethelayerorderinTheListofLayers.Tomakethebackgroundimage
tiled,choosethisoptionintheTexturesectionoftheFillsetoftools.
Toaddabackgroundfromthelibrary,youcaneitherclickontheimagepreviewordragtheimageto
thedocument.Ifyouhavealreadyaddedabackgroundtoyourdesign,clickingonanewonewill
replacetheoldbackground.Draganddroppingalwaysaddsonemoreimagetoyourdesign.
ImagesfromtheLightEffectssectioncanbeusedtoenhancethe3Dandilluminationeffectsinyour
design.Theseimagesareintendedtobeusedwithdarkbackgrounds.
Onemorecategoryinthedrop-downlistisPhotos.Thisisnotapartofthelibrary,butaquickwayto
accesspicturesinyourphotolibrary.
SmartShapesandIcons
SmartShapesandiconsarevectorimages.Therefore,youcanresizethemwithoutthelossofquality.
Youcanalsoedittheminthevectoreditorwhichopensupbydouble-clickingonavectorimageonthe
canvas.
26

Thedrop-downlistatthetopletsyouchooseoneofthestandardcategoriesaswellastheCustom
Folderoption.Thelatterallowsyoutoaccessyourownimageslocatedontheharddisk.
YoucanstoremodifiedornewvectorobjectsintheCustomShapescategory.Toaddanobjecttothe
library,selectitonthecanvasandclicktheplusbuttonintheContentpanel.Todeleteacustom
objectfromthelibrary,selectitonthepanelandclicktheminusbutton.
27

The2DInspector
The2DInspectorgathersalltoolsandeffectsthatarespecificfor2Dobjects.TheInspectorswitches
to2Dtoolsautomaticallyassoonasyouselecta2Dobject.
Thetoolsaregroupedintosections.Toopenasection,clickonitstitle.
Somesectionshaveaswitchinthetitlebarallowingyoutoactivateordeactivatetheeffectwithout
needtoopenthesection.
Text
TheTextsectioncontainsatexteditorandformattingtools.Thissectionisavailableonlyifaselected
objectistext.
Moredetails:TheTextEditor
Fill
TheFillsectionincludesthreedifferenttools.Here,youcanchoosetofillanobjectwithaplaincoloror
gradient.Asecondoptionistoapplyatexturetoanobject.Thelastoptionletsyouapplyashading
materialtoanobjectgivingita3Dlook.
Moredetails:
TheFillEffect
ApplyingTextures
28
ApplyingMaterials
Stroke
Inthissection,youcanaddstrokesandcontroltheirproperties.
Moredetails:ApplyingStroke
Effects
TheEffectssectioncontainsthreeindependenttools.Here,youcanactivateandsetuptheShadow
andGloweffects.Youcanalsochangetheobject'sopacityandactivateoneoftheblendmodes.
Moredetails:
TheShadowEffect
TheGlowEffect
Mask
TheMasksectionletsyouapplymaskstoobjects.
Moredetails:ApplyingMasks
Geometry
IntheGeometrysection,youcanfindtoolstosetuptheobject'sdimensionsandangle.Therearealso
toolstoapplygeometrictransformationstoobjects.
SomeSmartShapeshaveoneortwoparametersintheSmartShapessection.Theseparameterslet
youchangetheshapeoftheimagesuchaschangingthenumberofsides.
Moredetails:
ObjectSize,LocationandOrientation
Transformations
29

The3DInspector
The3DInspectorgathersalltoolsandeffectsspecificfor3Dobjects.TheInspectorswitchesto3D
toolsautomaticallyassoonasyouselecta3Dobject.
Thetoolsaregroupedintosections.Toopenasection,clickonitstitle.
Text
TheTextsectioncontainsatexteditorandformattingtools.Thissectionisavailableonlyifaselected
objectistext.
Moredetails:TheTextEditor
Material
TheMaterialsectionletsyouapplymaterialsto3Dobjects.Youcantweakthematerialproperties,or
youcanchooseapredesignedmaterialfromthelibrary.Toopenthelibraryofpredesignedmaterials,
clickonPresetnearthesectiontitle.
Moredetails:
ApplyingMaterials
CreatingMaterials
Effects
IntheEffectssection,youcanfindtoolstocreatetheshadow,glowandfocuseffects.Youcanalso
changetheobject'sopacityandactivateoneoftheblendmodes.
30

Menus
ArtText3
File
Edit
View
Layers
Format
Window
Help
The"ArtText"Menu
AboutArtText Displaythedialogwithinformationabouttheprogram.
License…
Opentheregistrationdialogbox.(Notavailableintheapplicationpurchasedon
theMacAppStore.)
Checkfor
Updates…
CheckforthelatestupdateontheInternet.(Notavailableintheapplication
purchasedontheMacAppStore.)
Preferences…
(Cmd-",")
Bringuptheprogrampreferencesdialog.
QuitArtText
(Cmd-Q)
Quittheapplication.
The"File"Menu
New(Cmd-N) Createanewdocument.
Open…(Cmd-O) Openadocument.
OpenRecent> Openoneoftherecentlyediteddocuments.
Close(Cmd-W) Closetheopendocumentwindow.
Save…(Cmd-S) Savethecurrentdocument.
Duplicate(Cmd-
Shift-S)
Createacopyofthecurrentdocument.
Rename… Renamethecurrentdocument.
MoveTo… Movethecurrentdocumenttoanotherlocation.
RevertTo
Cancelallofthechangesinthecurrentdocumentthatweremadeafterthelast
save.
Export…(Cmd-E) Exportthecurrentdocumenttoagraphicfile.
PageSetup…
(Cmd-Shift-P)
OpenthestandardPageSetupdialogforchangingthesize,orientationand
otherparametersofthepage.
Print…(Cmd-P) BringupthestandardPrintdialog.
32

The"Edit"Menu
Undo(Cmd-Z) Reversethelastoperationthatyouperformed.
Redo(Cmd-Shift-
Z)
ReversethelastUndooperation.
Cut(Cmd-X) Cutselectedtext(inthetexteditoronly)totheClipboard.
Copy(Cmd-C) Copyselectedlayer(s)totheClipboard.
Paste(Cmd-V) PastethecontentoftheClipboardtothedocument.
Duplicate(Cmd-
D)
Duplicatetheselectedlayer(s).
Delete
(Backspace)
Deletetheselectedlayer(s).
SelectAll(Cmd-
A)
Selectalllayersifthemainwindowisactivated.
Selectalltextinthetexteditorwhentexteditingisactivated.
DocumentSize…
(Cmd-Y)
OpentheDocumentSizedialogbox.
StartDictation…
(fnfn)
Dictateyourtext.
Emoji&Symbols
(Cmd-Ctrl-Space)
OpentheEmoji&Symbolspanel.
The"View"Menu
ZoomIn(Cmd-=) Zoominthecurrentview.
ZoomOut(Cmd-
"-")
Zoomoutthecurrentview.
ZoomtoFit Zoomthecurrentviewtofitthewindow.
ActualSize(Cmd-
0)
Displaytheactualdocumentsize.
ContentPanel>
Show/Hide
ShoworhidetheContentpanel.
ContentPanel>
Templates
OpentheTemplateslibrary.
ContentPanel>
Images
Openthelibraryofbackgroundsandlighteffects.
ContentPanel>
Shapes
OpenthelibraryofSmartShapes,iconsandvectorimages.
ContentPanel>
Layers
Openthelistoflayers.
Show/Hide
Inspector
ShoworhidetheInspector.
33

EnterFullScreen
/ExitFullScreen
(Cmd-Shift-F)
Activateordeactivatethefullscreenmode.
The"Layers"Menu
Add2DLayer
(Cmd-Shift-L)
Addanewlayerwitha2Dobjectatthetopoftheotherlayers.
Add3DLayer
(Cmd-L)
Addanewlayerwitha3Dobjectatthetopoftheotherlayers.
AddBackground Addabackgroundimagebehindtheotherlayers.
RemoveLayer Deletetheselectedlayer(s).
Union MergelayersusingtheUnionoperation.
Subtract MergelayersusingtheSubtractoperation.
Intersect MergelayersusingtheIntersectoperation.
Exclude MergelayersusingtheExcludeoperation.
SplitintoLetters
(Cmd-Ctrl-Alt-T)
Puteachcharacteroftheselectedtextlayerintoaseparatelayer.
Edit Openaselectedimageinthevectoreditor,oropentextinthetexteditor.
SelectNextLayer
(Alt-])
Selectthenextlayerinfrontofthecurrentone.
SelectPrevious
Layer(Alt-[)
Selectthenextlayerbehindthecurrentone.
BringForward
(Cmd-])
BringtoFront
(Cmd-Shift-])
SendBackward
(Cmd-[)
SendtoBack
(Cmd-Shift-[)
Movetheselectedobjectinfrontoforbehindotherobjects.
Convertto2D/3D Converttheselectedobjecttothe2Dor3Dtype.
34

The"Format"Menu
Font>Show/Hide
Fonts(Cmd-T)
OpenorclosetheFontspanel.
Font>Bold
(Cmd-B)
Font>Italic
(Cmd-I)
Modifythepropertiesoftheselectedtext.
Font>Bigger
Font>Smaller
Increase/decreasethesizeoftheselectedtext.
Font>Kern
Font>Ligature
Font>Baseline
Modifythepropertiesoftheselectedtext.
Text>AlignLeft
(Cmd-{)
Text>Center
(Cmd-|)
Text>AlignRight
(Cmd-})
Text>Justify
Aligntexttotheleft,right,centerorjustifyit.
MovetoCenter
(Horizontally)
(Cmd-Shift-H)
Centertheselectedobject.
MovetoCenter
(Vertically)
(Cmd-Shift-V)
FittoDocument Fittheselectedobjecttothedocumentsizeconstrainingproportions.
Resizeto
Document
Fittheselectedobjecttothedocumentsizewithoutconstrainingproportions.
Show/HideColors
(Cmd-Shift-C)
DisplaytheColorspanel.
The"Window"Menu
Minimize(Cmd-M) Minimizethecurrentlyactivewindow.
Zoom Fittheprogramwindowtothescreensize.
ArtTextWelcome
Window
ShoworhidetheWelcomeWindowwhichgivesyouaccesstoonlineresources
andsampledesigns.
SampleBrowser Showthelibraryofsampledesigns.
BringAlltoFront ShowwindowsofArtTextinfrontofothers.
35

The"Help"Menu
ArtTextHelp OpenHelpdocumentationdeliveredwiththeapplication.
Technical
Support…
Opentheonlinesupportform.
SendFeedback… Allowsyoutosendfeedbacktothedevelopersbyemail.
Online
Registration…
Opentheonlineregistrationform.
36

KeyboardShortcuts
Documents
WindowsandPanels
LayersandObjects
TextEditingandFormatting
VectorEditor
Documents
Cmd-S Savethecurrentdocument.
Cmd-Shift-S Createacopyofthecurrentdocument.
Cmd-O Openadocument.
Cmd-N Createanewdocument.
Cmd-E Exportthecurrentdocumenttoagraphicfile.
Cmd-W Closetheactivedocumentwindow.
Cmd-Q Exittheapplication.
Cmd-Z Reversethelastoperationyouperformed.
Cmd-Shift-Z ReversethelastUndooperation.
Cmd-= Zoominthecurrentview.
Cmd-“-” Zoomoutthecurrentview.
Cmd-0 Displaytheactualdocumentsize.
Cmd-Y OpentheDocumentSizedialogbox.
WindowsandPanels
Cmd-“,” BringupthePreferencesdialog.
Cmd-Shift-C DisplaytheColorspane.
Cmd-M Minimizethecurrentlyactivewindow.
Cmd-Shift-F Activateordeactivatethefullscreenmode.
Cmd-Shift-P
OpenthestandardPageSetupdialogforchangingthesize,orientationand
otherparametersofthepage.
Cmd-P BringupthestandardPrintdialog.
37

LayersandObjects
Cmd-Shift-L Addanew2Dlayertothetopoflayerstack.
Cmd-L Addanew3Dlayertothetopoflayerstack.
Backspace Deletetheselectedlayer.
Cmd-C Copyselectedlayer(s)intotheClipboard.
Cmd-V PastethecontentoftheClipboardintoanewlayer.
Cmd-X Cutselectedlayer(s).
Cmd-A Selectalllayers.
Cmd-D Duplicatethecurrentlayer.
Cmd-Shift-H Centertheselectedobjecthorizontally.
Cmd-Shift-V Centertheselectedobjectvertically.
Cmd
whilemovingan
object
Disablethesnapfunction.
Alt-] Selectthenextlayerinfrontofthecurrentone.
Alt-[ Selectthenextlayerbehindthecurrentone.
Cmd-] BringForward.
Cmd-Shift-] BringtoFront.
Cmd-[ SendBackward.
Cmd-Shift-[ SendtoBack.
Cmd-Ctrl-Alt-T Puteachcharacteroftheselectedtextlayerintoaseparatelayer.
TextEditingandFormatting
Cmd-V PastetextfromtheClipboardintotheeditbox.
Cmd-A SelectalltextinthetexteditoroftheLayerContentwindow.
Cmd-{ Alignleft.
Cmd-| Centertext.
Cmd-} Alignright.
Cmd-T DisplaytheFontpanel.
38

Cmd-B Maketextbold.
Cmd-I Turntexttoitalic.
fnfn Dictateyourtext.
Cmd-Ctrl-Space OpentheEmoji&Symbolspanel.
VectorEditor
Alt-L ActivatetheStraightSegmenttool.
Alt-C ActivatetheCurvedSegmenttool.
Alt-R ActivatetheRectangletool.
Alt-O ActivatetheEllipsetool.
Alt-+ Addapoint.
Backspace Removeapoint.
Alt-Space Removeall.
Cmd-A Selectall.
39

Creating,OpeningandSavingDocuments
Tocreateanewdocument,chooseFile>Newfromthemenu.
Toopenanexistingdocument,selectFile>Openandnavigatetoyourdocument.Ordouble-clickon
thisdocumentinFinder.
Tosaveadocument,chooseFile>Saveinthemenu.
40
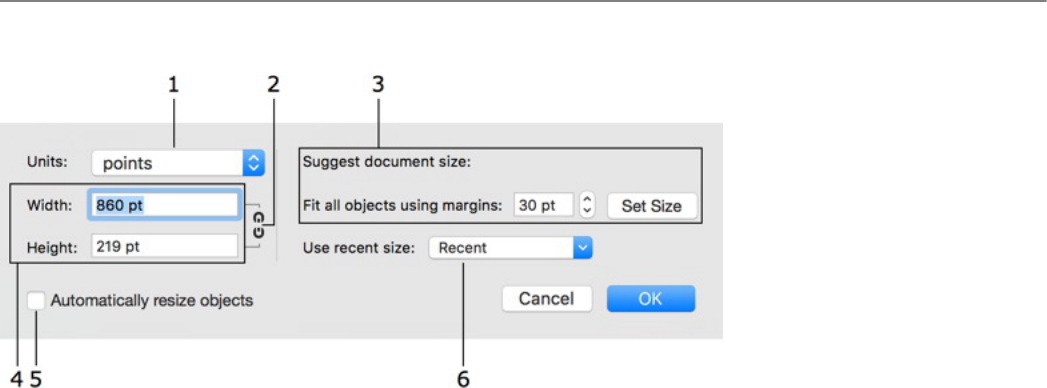
DocumentSettings
Tobringupthedocumentsettings,chooseEdit>DocumentSize…fromthemainwindow.
1–Measurementunitsaffectthewholeapplication.
2–Maintainaspectratio.
3–TheSetSizebuttonchangesthedocumentsizesothatallvisibleobjectsfitthedocument.The
amountofblankspacealongthedocumentbordercanbesetbychangingmargins.Ifanyobjectorits
partappearsoutsideoftheimagearea,thisobjectwillbetrimmedatexport.TheSetSizebuttonis
usedtofixthis.
4–Documentsize.
5–ByactivatingAutomaticallyresizeobjects,youallowtheprogramresizethedesignwhenyou
changethedocumentsize.Theaspectratioofthedesignwillbeconstrained.
6–Alistofpreviousdocumentsizes.
Asthedefaultsizefornewdocuments,theprogramusesthelastappliedwidthandheight.
41

IntroductiontoLayersandObjects
Anydesignonthecanvasconsistsofobjectssuchasimages,icons,textandsoon.Everyobjectis
locatedonitsownlayersincetheprogramallowsonlyoneobjectperlayer.Sotheobjectandlayer
termsaremostlyequivalentinthisdocumentation.Addingorremovinganobjectautomaticallymeans
addingorremovingalayer.
Wewillsay"object"whenitisgoingaboutapplyingeffects.The"layer"termwillbeusedtodescribe
howobjectsinteractwitheachother.
ThereisalistoflayersintheContentpanelwhereyoucanselectlayers,changetheirorderand
performsomeotheractions.
GraphicandtextualobjectsinArtTextcanbeoneoftwotypes:2Dand3D.Theyhavedifferentsetsof
properties,andconsequently,therearetoolswhichworkwithonlyoneofthesetypes.Intheobject's
contextmenu,youcanchoosetoconvertfromonetypetoanother.Thiswillenablethetoolsand
settingsofthenewtype,buttheobjectwilllosetheeffectsthatyouhavealreadyapplied.
42

ObjectSize,LocationandOrientation
Toresizeorrotateanobject,youcanuseitshandlesonthecanvas.Justdragoneofthemtowardsthe
directioninwhichtheobjectshouldincreaseorrotate.Thehandlesaredisplayedwhentheobjectis
selected.
Tosettheobjectdimensions,coordinatesorrotationangleprecisely,usetheGeometrysectioninthe
Inspector.Thesizeandlocationaremeasuredinpixels.2Dand3Dobjectshaveidenticalsettings.
ObjectSize
Toresizeanobject,selectitonthecanvasanddragitscornerorsidehandle.Makesurethatthe
cursorhasturnedintoatwo-sidedstraightarrow.Toresizewithoutpreservingtheaspectratio,draga
cornerhandleholdingdowntheCmdkey,ordragasidehandle.
Theprogramalsoletsyousetuptheobjectsizeinrelationtothedocumentsize.
TheFormat>FittoDocumentmenucommandresizesanobjectproportionallysothatitsbigger
sizefitsthedocument.
TheFormat>ResizetoDocumentmenucommandworkswithoutconstrainingtheproportion.
ObjectLocation
Tomoveanobjecttoanotherlocation,dragitwiththemouse.
Whileyouaremovinganobjectaround,guidelinescanappearshowingthattheobjecthasbeen
alignedtoanotherobjectortothecenterofthedocument.Theobjectyoumovesnapstothese
positions.YoucanturnthisfeatureonandoffintheprogramPreferences.Fortemporarilydisabling
thesnapfunction,holdtheCmdkeydownwhileyouaremovinganobject.
Tomoveaselectedobjectthatlaysbehindothers,pressandholdtheAltkeybeforeyoustartmoving
theobject.Thiswillpreventtheoccasionalselectionofanotherobject.
43

ObjectOrientation
Torotateanobject,movethemousecursoraroundanycornerhandleuntilitturnsintoarounded
arrow.Then,dragthehandletothedesireddirection.Toinputanumericvaluefortherotationangle,
usetheGeometrysectionintheInspector.
Torotatea3Dobjectinalldimensions,usetherotationtoollocatedatthebottomoftheobjectina
circle.
YoucanalsocenteranobjectinthedocumentbychoosingoneoftheMovetoCentercommands
fromtheFormatmenu.
44
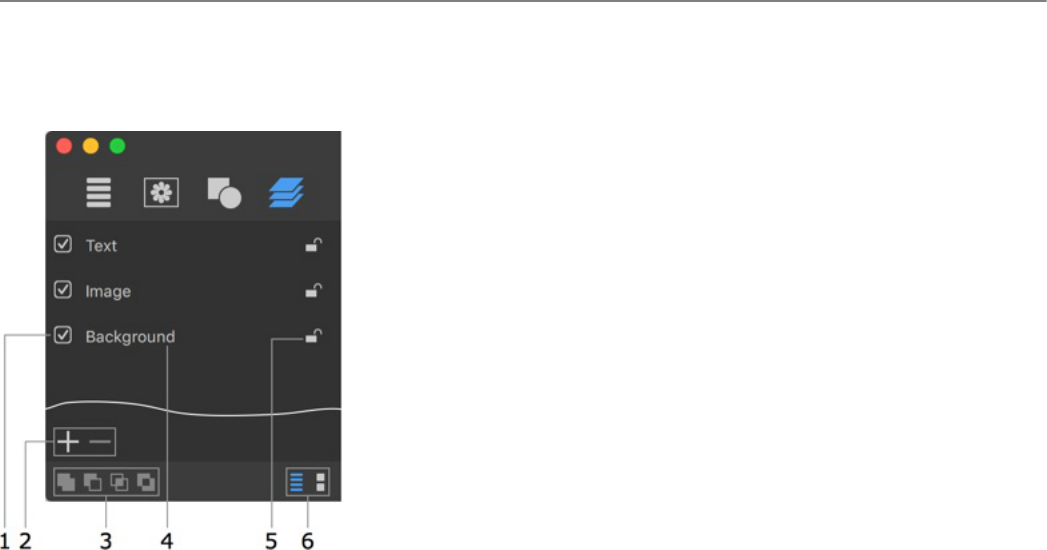
TheListofLayers
ThelistoflayersislocatedintheContentpanel.Itallowsyoutoaccesslayersdisregardingtheir
visibilityonthecanvas.Alsoyoucanchangetheorderoflayers,andcontrolsomeoftheirproperties.
TheotherpropertiessuchastheOpacityorBlendModecanbefoundintheInspector.
1–Displayorhidethelayercontent.
2–Addorremovelayers.
3–Booleanoperations:Union,Subtract,IntersectandJoin.Fordetails,seeMergingLayers.
4–Thelayername.
5–Lockorunlockalayer.Lockinglayerspreventsthemfrommovementandmodification.
6–Displaythelayernamesorthumbnails.
Youcanadjusttheparametersofseverallayerssimultaneously.Todothis,selecttheselayersmaking
surethattheyareofthesametype(either2Dor3D).Thenapplythedesiredeffectandsetupits
parameters.Toselectseverallayers,clickontheirnamesholdingdowntheCmdorShiftkey.
RenamingLayers
Tochangethelayername,double-clickonitinthelist.
ChangingtheLayerOrder
Theorderoflayernamesinthelistreflectsthelayerstackingorderinthedesign.Thelayerlocatedat
thetopofthelistisatoptheothersonthecanvas.Thelayeratthebottomofthelistisbehindallof
theotherlayers.
Tochangethestackingorder,dragalayertoanewpositioninthelist.
45
AddingandRemovingLayers
Clickthe"plus"buttontoaddanewlayer.
Tocreateacopyofaselectedlayer,chooseEdit>Duplicatecommandfromthemainmenu.
Clickthe"minus"buttontoremovetheselectedlayer.
46

MergingLayers
YoucanapplyBooleanoperationstotwoormorelayersinordertocreateanewcombinedshape.You
canfindoutwhateachoperationdoesbelow.
1–Union
2–Subtract
3–Intersect
4–Exclude
Tomergelayers,selecttwoormoreofthemandchooseoneofthelayermergingtools.
Theconfigurationofanewshapedependsonthesizeandlocationoftheoverlappingareas,butit
doesn'tdependoncolororgradientfill,texture,shadoworothereffectsappliedtotheoriginalobjects.
Iftheoriginalobjectsareinavectorformat,vectorpathsintheseobjectswillbeused.Incaseofa
rasterimage,theprogramwilluseitsrectangularoutlineasthepath.Thealphachannel
(transparency)willbeignoredaswell.
Thenewshapeautomaticallytakespropertiesandeffectswhichwereappliedtothelowestofthe
originallayers.Afterthecreationofthenewlayer,theoriginaloneswillberemoved.Consequently:
Thereisnoreasontoapplyeffectstoupperlayersyouaregoingtomerge.
Ifyouwishtokeeptheoriginallayersinyourdesignintact,createcopiesofthem.
Union
Theresultinglayershapeissumofmergedlayersshapes.
47

Originallayers:
Resultinglayer:
Subtract
Theshapeoftheobjectonthelowestlayeristhebasisforanewshape.Theotherobjectsdetermine
thearea(s)thatwillbecutoff.Theresultisapartofthelowestobjectthatisnotoverlaidbyother(s).
Iftheobjectsdon'toverlay,theresultlookslikethelowestobject.
Originallayers:
48

Resultinglayer:
Intersect
Theresultisthearea(s)wherealloftheselectedlayersoverlap.Iftherearenosuchareas,the
programdoesn'tmodifythedocument.
Originallayers:
Resultinglayer:
49

Exclude
Iftheobjectsoverlay,theoverlappingareabecomesexcluded(transparent).Withoutoverlaying,the
resultissimilartotheunionoperation.
Originallayers:
Resultinglayer:
50

SplittingTextintoLetters
Yourdesignideamayrequireapplyingdifferenteffectstodifferentpartsoftext.Sinceeffectscan
changeonlythewholetext,youhavetoputpiecesoftextontoseparatelayerstomodifythemin
differentways.
Theprogramcanhelpyoucreatemultiplelayersoutofasingletextpreservingthepositionofthe
letters.Eachletterwillbeplacedonaseparatelayer.Tousethisfeature,selectLayers>Splitinto
Lettersinthemenu.
Notethatyoucannotmergetheresultinglayersbacktocreateonetextlayer(exceptusingtheEdit>
Undocommand).Tojoinlettersintoasingleobject,youcanusetheLayers>Unioncommand,but
thecreatedobjectwillbenottextbutanimage.
51

TheVectorShapeEditor
Thebuilt-ineditorofvectorshapesletsyoumodifyiconsandshapesprovidedinthecontentlibrary
andcreatenewvectorimages.
Toopenthevectoreditor,double-clickonashapeoricononthecanvas.Inthisway,youcanopenan
objectintheeditorandmodifyit.Thevectoreditoralsoopensupwhenyoucreateacustomshape.
Tocreateacustomshape,opentheShapessectionintheContentpanelandselectCustomShapes…
inthedrop-downmenu.Thenclicktheplusbuttonatthebottomofthepanel.
ToaddashapefromcanvastotheCustomShapeslibrary,selectthisshapeandclicktheplusbutton
belowthelistofcustomshapes.Thevectoreditorwillopen.Thenyoucanmodifytheshape,orclick
OKrightawaytoaddtheshapewithnochanges.
52

Toolsinthevectoreditor:
1–Theselectiontoolisusedtoselectormovepoints.
2–Thestraightsegmenttool(Opt-L).
3–Thecurvedsegmenttool(Opt-C).
4–Therectangletool(Opt-R).
5–Theellipsetool(Opt-O).
6–Addananchorpoint.
7–Deleteananchorpoint.
8–Changetheanchorpointtype.
9–Clearthecanvas(Opt-Space).
10–Showorhidethegrid.
PointsandPaths
Avectorshapecomprisesanchorpointsandlinesthatconnectthem.Anchorpointsmarkthebeginning
andendofeachline(orsegment).Byaddingonelineafteranother,youcreateapath.Thepathmust
beclosed.Thismeansthatitbeginsandendsatthesamepoint.
Anchorpointscanbeoftwotypes:cornerpointandsmoothpoint.Whenyouchangethetypeofa
point,adjoininglinesmaychangefromcurvedtostraightandviceversa.
53

1–Cornerpoint.Atacornerpoint,apathabruptlychangesitsdirection.Acornerpointmayjoin
eitherstraightorcurvedlinesinanycombination.Acornerpointwithtwostraightlinesdoesn'thave
thedirectionlines.
2–Straightsegment.
3–Smoothpoint.Atasmoothpoint,apathcontinuesfollowingthesamedirection.Asmoothpoint
joinsonlytwocurvedsegments.
4–Directionline.
5–Directionpoint.Itisahandleontheendofadirectionline.Movingadirectionpoint,youcan
changethelengthandangleofthecorrespondingdirectionline.
6–Curvedsegment.
7–Cornerpoint.
Thedirectionofacurvedpathinasmoothanchorpointcoincideswiththedirectionofthedirection
line.Leavingtheanchorpoint,thepathbranchesofffromthedirectionline.Thelongerthedirection
lineis,thelongerthepaththatpassesnearit.
Bydefault,thedirectionlinesofthesamesmoothpointrotatetogetherpreservinga180degreeangle
betweenthem.Bychangingthisangle,youcancreateacornerpointfromasmoothpoint.Todothis,
dragoneofthedirectionpointsholdingdowntheShiftkey.Tomaketwodirectionlinesrotate
togetheragain,restorea180degreeanglebetweenthem.
DrawingaShape
Selectthestraightsegment orcurvedsegment tool.Clickonthecanvastoaddasmany
54

anchorpointsasyouneed.Makethelastclickonthefirstpointofthepathtomakeitclosed.Youcan
finishdrawingbyactivatingtheselectiontool.Inthiscase,theprogramwillclosethepath
automatically.
Imagesthatyoucreateherearesolidshapes,notcontours.
Thedirectionthatyoudrawapathmatterswhenoneshapehasbeendrawnoveranother.Inthe
picturebelow,shapesAandBweredrawnintheclockwisedirection.Cwasdrawninthecounter-
clockwisedirection.Theareaswheretheshapesoverlaparedifferent.TheintersectionareaofAandB
remainssolid,whiletheintersectionofAandCisahole.
AddingAnchorPoints
Youaddanchorpointswhenyoudrawapath.
Toaddmoreanchorpoints,activatetheaddingtool andclickonapathsegment.
DeletingAnchorPoints
Todeleteananchorpoint,selectitandclickthedeletebutton .
ChangingtheTypeofAnchorPoints
Tochooseadifferenttypeofanchorpoint,clickthetypebutton .
MovingAnchorPoints
Tomoveananchorpoint,dragitwiththemouse.Astraightsegmentattachedtothispointwillchange
itsdirection.Acurvedsegmentwillchangethedirectionandshape.
Toswitchoffthesmartguidesandsnapfunctionwhenyoumoveananchorpoint,pressandholdthe
Cmdkey.
55

Introductionto2DEffects
Thissectiondescribestoolsandeffectscompatiblewith2Dtypeobjects.
Originally,a2Dobjectcanbeavectororrasterimage,ortextwhichisvectorbyitsnature.Effects
canalsobedividedintovector(e.g.Transformation)andrasterones(e.g.Gradientor3DEffect).If
youactivateavectoreffectsuchasTransformationforarasterimage,theprogramwillapplythe
effecttotherectangularboundoftheimage.Inthecaseofavectorcontent,vectoreffectsworkwith
theshapeofletters,iconsetc.
Bydefault,alllibraryobjects(exceptfor3Dobjecttemplates)andimagesyouimportarebeingadded
toyourprojectas2Dobjects.Youcanconverta2Dobjecttothe3Dtypebyright-clickingonitonthe
canvasandchoosingtheConvertto3Dcommand.Youcanconvertfromthe3Dto2Dtypeinthe
sameway.Changingtheobjecttypedeactivatesallthe2Dor3Deffectsthatyouhaveappliedtothe
object.
56

TheTextEditor
Theprogramdoesn'tallowyoutoedittextdirectlyonthecanvas.Youshouldusethetexteditor.Itis
locatedintheTextsectionoftheInspector.The2Dand3Dtexteditorsareidentical.
Thealignmentbuttonsaffectthewholetext.
TheFontbuttonopensthestandardFontpanel.Youcanchangethefontofthewholetextoranyofits
parts.YoushouldknowthattheSizecontrolsintheFontspanelarenotintendedtoadjustthesizeof
atextobjectinyourdocument.Usethesecontrolstocreatedifferentpartsofatextwithdifferentsize
ofletters.
Linespacingcanbeappliedtoselectedtextlinesortothewholetext.
Kerningchangesthedistancebetweenlettersoftheselectedtext.
Becarefulwithfontsthathavejaggedcharacters.Theyusuallytakelongertorendergraphiceffects.
Someofthesefontscanevencauseunexpectedresultswhenyouapplyshadingor3Deffects.
57

TheFillEffect
TheFilltoolsarelocatedintheFillsectionoftheInspector.Youcanchoosetofillanobjectwitha
color,textureorshadingeffectbyclickingontheColor,TextureorShadingbuttonatthetop.The
TextureandShadingtoolsaredescribedinseparatesectionsofthedocumentation.
1–TurntheFilleffectonoroff.
2–ThePlainColortool.
3–TheGradienttool.Itssettingsarelocatedbelow.
4–Theangleofthegradienteffect.
58

5–Gradienttype:Linear,RadialorOval.ThedifferencebetweenRadialandOvalgradientsis
noticeablewhenthegradientisappliedtoarectangle.The"sphere"createdbythegradientiscropped
withtheRadialtypeanddeformedwiththeOvaltype.
Radialgradient:
Ovalgradient:
6and9–Thebasicgradientcolors.Thecirclesarehandles.Tochangeacolor,clickonthe
correspondinghandle.Tomakeoneofbasiccolorstakemorespaceintheobject,movethehandle
towardsthemiddleofthegradient.
7–Swapthebasiccolors.
8–Themiddlegradientcolor.Tochangethelocationofthemiddlecolor,movethehandletowards
oneofthebasiccolors.
10–Thelibraryofpre-designedgradients.
11–Addordeleteintermediatecolors.Thesecolorsappearbetweenthetwobasicones.
59

ApplyingTextures
ArtTextcanapplytexturestotextandvectorimagessuchasiconsorshapes.Applyingtexturesto
rasterimagesusuallymakesnosense.Youcanusetexturesfromthebuilt-inlibrarybychoosingone
ofcategories.ItisalsopossibletoimporttexturesfromyourharddrivebyselectingtheMyTextures
category.Toopenthetexturelibrary,chooseTextureintheFillsection.
Toapplyatexture,selectanobjectandclickonthetextureinthelibrary.
ThePlacementoptiondefineshowthetextureshouldfittheobject.
Theoriginalobjecttowhichatexturewillbeapplied.
60

Theoriginalimageusedasatexture.
TheFitoptionmatchesthetexturetothelargershapesize.Ifthetextureandobjecthavedifferent
aspectratios,thetexturecanbecropped.
TheStretchoptiondeformsthetexturetofittheshape.
TheTileoptionletsyouadjustthetexturesize,angleandpositioninsidetheshape.Thetexturewill
notbedeformed.
Scaleresizesthetexture.Theroundandsquarecontrolsletyourotateandmovethetexturearound.
TheseoptionsareavailablewhenthePlacementissettoTile.
TheColorbuttonletsyouchangetexturecolors.ItseffectisacombinationoftheHue,Saturationand
Brightnesscolorproperties.YoucanswitchtheColorspanetotheHSBSlidersmodetobeableto
adjusttheslidersseparately.
TheResetbuttonrestorestheoriginaltexturecolor.
61

62

ApplyingMaterials
ShadingmaterialsareusedinArtTexttocreate3Dlookingtextandimages,togiveaglassy,metal,
orplasticlooktoobjects,andforothereffects.
Toopentheshadingmateriallibrary,chooseShadingintheFillsection.
Toapplytheeffect,clickonashadingmaterialpreviewinthelibrary,andadjusttheproperties.
1–Materialcategories.
2–Previewofmaterials.
3–Depthistheamountofthebeveleffect.
4–Theangleoftheappliedeffect.For3Dlookingobjects,thiscontrolmoveslightspotsaroundthe
centeroftheobject.
5–The3Dshape(bevel)selector.Itisnotavailableforimage-basedeffects.
6–Thecolor.
Theprogramcreatesthe3Deffectusingtheshadertechnologywhenthe3Dlookisgeneratedbased
uponsomecolorandlightspotparameters.Alternatively,theeffectcanbeimage-based.Thismeans
thatanimageisusedtodefinelightspotsandanobject'scolor.Bothtypesofeffectsarepresentin
thelibraryinseparatecategories.Themajorityofitemsinthelibraryareshader-based.
63

Materialsareusuallyappliedtovectorobjects.Inthiscase,theeffectisappliedtotheareainsidethe
object'soutline.Ifyourobjectisarasterimage,theshaderwillusethetransparencytodefinethe
amountoftheeffecttoapply.Themoreopaquetheobjectpartsare,thestrongerthe3Deffectwillbe.
Withnotransparencyinarasterimage,theeffectwillbeappliedtotherectangularboundofaraster
imageinsteadoftheimagedetails.
YoucancustomizematerialsusingtheTheEditorofMaterials.
BevelShape
Dome-shaped Straight Concave
Notethatstraightandconcaveshapescanproducesimilarresults.Theylookdifferentwithshaders
whichhavealightspotnearthecenter.
Light
TheLightcontrolmovesthelightspotsaroundthecenter.Thisletsyouchangethelocationofa
virtuallightsource.
Whenyourdesignconsistsofseveral3Dobjects,youcanadjustthelocationoflightspotsasifthey
appearedfromthesamelightsource.
Depth
Atlowervalues,youwillgetanobjectlookingalmostflat.Theslidercoversthemostappropriaterange
ofvalues1–30.Tosetgreatervalues,usetheeditbox.Below,youcanseecircleswiththeDepth
parametersetto7,15and30.
AtthesameDepthvalue,theresultalsodependsonthesizeoftheobject.Atsomepoint,increasing
Depthwillnotchangethefinalimage.Smallobjectscanlosea3Dlookatvaluesthataretoolarge.
Thisshowshowcirclesof50x50,100x100and150x150pixelslookatDepth=15.
64

Color
TheColorcontrolchangesallcolorsinawaysimilartotheHueparameterinthestandardColors
panel.Black,whiteandgrayscalecolorswillstayunchanged.
65

TheEditorofMaterials
ThematerialeditorcanbeaccessedthroughthemateriallibrarybychoosingShadingintheFill
section.Youcaneithercreateanewmaterialorcustomizeoneofmaterialsinthelibrary.
Tocreateanewmaterial,selectCreateaMaterial…inthedrop-downlistofcategories.
Toeditastandardorcustommaterial,double-clickonitspreview.Customizedandnewmaterialswill
besavedintheMyMaterialscategory.
Thewindowofthematerialeditorshowsalistofcustommaterialstotheleft.Buttonsbelowthelistlet
youadd,removeandmakeacopyoftheselectedmaterial.Themiddlepartofthewindowshows
parametersoftheselectedmaterial.Samplesofanappliedmaterialaredisplayedontheright.
Thematerialeditorletsyoucreatematerialsbasedonshadersandbasedonimages.
MaterialsBasedonShaders
Themainpropertiesofashader-basedmaterialaretheAmbient,DiffuseandSpecularcolorsand
adjustablelightsources.
66
TheAmbient,DiffuseandSpecularcolorsdefinehowobject'spartslookunderdifferenttypesof
lighting.TheAmbientcoloristheobject'scolorinadeepshadow.TheDiffusecoloristheobject'scolor
inpoorlydissipatedwhitelight.It'susuallythenaturalcoloroftheobject.Finally,theSpecularcolor
letsyousimulateareflectionfromalightsourcedirectedtotheobject.Onespecularlightsourceis
alwayspresent(let'scallitthe"main"one).Ifnecessary,youcanaddmore.
ParametersofLightSources
Thepositionofeachlightsourceisdisplayedonthesphereasawhitecircle,ifthelightison,anda
blackcircle,ifthelightisoff.Youcanmovelightsourcesbydraggingthecorrespondingcircles.If
therearenocirclesonthesphere,selecttheShowspotlightcontrolscheckbox.Themainlight
sourcecanalsoberelocatedusingtheAzimuthandElevationcontrols.
SpotSizedefinesthesizeofthereflection.Usingthisparameter,youcanmakethelightbemoreor
lessdirected.
Shininessblursthelightspot,makingitsedgemoreorlesssharp.
Together,SpotSizeandShininessletyoumaketheobjectlookmatteorglossy.Asarule,areflex
fromthesamelightsourceisbigandblurredonamatteobject,andsmallandsharponaglossy
object.
Bordercontrolshowquicklythelightfadesneartheedgeofthelightspot.
MaterialsBasedonImages
Usingimages,youcancreatematerialssimilartoshadingmaterialsorsomethingcompletelydifferent.
Animagewillbemappedontheobject'ssurface.Therearenosettingsforimage-basedmaterials
exceptforthepossibilityofrotatingthem.
Tocreateanewmaterial,clicktheCreatefromImagebuttonandchooseagraphicfile.Anyfurther
adjustmentscanbemadeinthemainwindow.
67

ApplyingStroke
Addingastrokeoutlinestextandvectorshapes.Ifyouapplythetooltoarasterimage,itsrectangular
edgewillbecomeoutlined.
TheStroketoolislocatedintheStrokesectionoftheInspector.
1–Strokecolor.
2and3–AddandRemovestrokes.
4and5–Thestrokewidth.
6–Thestrokepatternsuchassolidordotted.
Youcanaddmultiplelineswithdifferentwidthsandcolors.
Ifspacesbetweenlettersaretoosmallafteraddingstrokes,increasetheKerningparameterinthe
Textsection.
68
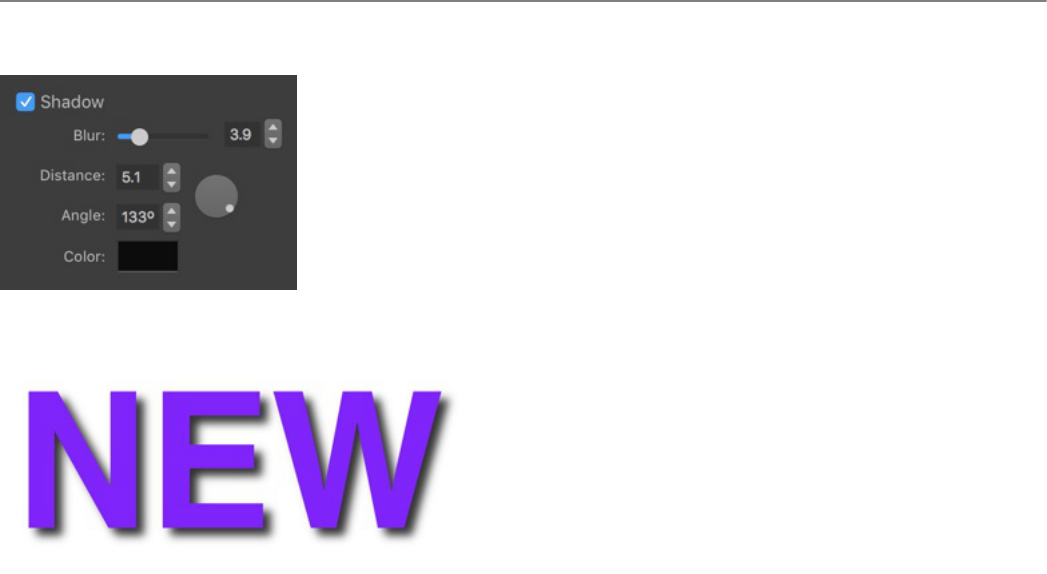
TheShadowEffect
TheShadowtoolislocatedintheEffectssectionoftheInspector.
TheBlurparameterdefinesthedensityofthedropshadow.
TheDistanceparameterdefinestheoffsetbetweentheobjectandshadowwhichvisuallylookslike
thedistancebetweentheobjectandsurfacebehindit.
Theangleoftheshadowchangesthelocationofthevirtuallightsource.
TheroundcontrolnearDistanceandAngleletsyouadjustthesetwoparametersatonce.Dragthe
handleoffthecenter.
TheColorparameterjustgivesyouanoptiontomaketheshadowotherthangray.
69

TheGlowEffect
TheGlowtoolislocatedintheEffectssectionoftheInspector.
TheSizeparameterdefinesthewidthoftheglow.
TheSpreadparameterdefinestheamountofthenon-transparentareawithinthewidthoftheglow.
Thegloweffectletsyousetuponeortwocolors.WhentheTintcolorisenabled,asecondcolor
outlinesthemainglow.Inthepicturebelow,1isthemaincolorand2isthetintcolor.
70

TheInnerShadowEffect
TheInnerShadowtoolislocatedintheEffectssectionoftheInspector.
TheSizeparameterdefinesthewidthoftheinnershadow.
TheSpreadparameterdefinestheamountofthenon-transparentareawithinthewidthoftheinner
shadow.
TheDistanceparameterdefinestheoffsetbetweentheobjectandinnershadow.
TheBlendModeoptiondefineshowthecolorsoftheobjectandinnershadowinteractwitheach
other.TheNormaloptionworkswellwithmostcombinationsoftheobjectandinnershadowcolors.
Multiplytakeseffectwhentheshadowisdarkerthantheobject.UseScreenwhentheobjectisdarker
thantheshadow.
OneofpossibleusesoftheInnerShadowtoolistocreatetheconcavesurfaceeffect.
71

ApplyingMasks
TheMaskeffectcreatestransparentareasonanobject.Maskscanbeusedtomakeapartofanobject
invisibleortocombineseveralobjects.
Toapplyamask,usetheMasksectionintheInspector.
Masksinthelibraryareblackandwhiteimages.Blackareasinamaskcreatetransparentareasonan
object.
1–Thelibraryofmasks.Clickonittobringupthelistofmasks.
2–Theoffsetofthemaskinrelationtotheobject.
3–Therotationangle.
4–Inverseofthemask.
5–Thescaleofthemask.Themaskwillbetiledifyoumakeitsmallerthantheobject.
6–Thebrightnessofthemask.Thisparametermakesthewholeobjectmoreorlessopaque.
7–Thecontrastofthemask.
TheBrightnessandContrastparametersarehelpfulwhenyouuseacoloredimageasamask.In
thiscase,thesetwoparametersletyousetupthethresholdbetweenthetransparentandopaque
areas.
72
Theprogramappliesamasktoyourobjectafterapplyingothereffectssuchastransformation.This
meansthatifyoudistortanobject,themaskwillnotbeaffected.
73

Transformations
Transformationeffectscreategeometricdistortionoftextorvectorimages(suchasshapesoricons
fromtheinternallibrary).Transformationscannotdeformrasterimages.Ifyoutransformavector
shapewithanappliedtexture,thetexturewillnotbedeformed.
TheTransformationtoolsarelocatedintheGeometrysectionoftheInspector.
Totransformanobject,clickontheTransformboxtobringupthelistoftransformationtools.Then
clickonatooltoapplyit.Finally,adjustthedistortionusingasliderbelowthelist.
Torestorethedefaultstateofanobject,clicktheResetbutton.
Whenseveralobjectsareselected,youcanuseonlygeometrictransformations.
ThereareGeometrictransformationswhicharebasedonpatterns,andSplinetransformationswhich
distortobjectsalongcurves.Iconsofsplinetransformationsinthelisthavesmallcircles.
74

GeometricTransformations
Geometrictransformationsarelocatedatthetopofthelist.
Eachoftransformationshasoneortwoparameters.Toadjustthem,usetheslidersbelowthelist.
SplineTransformations
Splinetransformationsareprimarilyintendedtodistorttext.Textgoesalongasplinewhichisstraight
bydefault.Todistortit,youshouldcurvethesplinebydraggingitshandlesonthecanvas.
NotethattheCurvedTexttransformationmakesnochangetoasingleletteroranimage.Youshould
applyittoatleastseveralletters.
75

Introductionto3DEffects
Thissectiondescribestoolsandeffectscompatiblewith3Dtypeobjects.
The3Dtoolscanbeeffectivelyusedonlywithtextandvectorobjects.Anyrasterimageturnedintoa
3Dobjectwilllookthesameway,likearectangularprism.
Whena3Dobjectisselected,ithasa3Drotationtoolonthecanvasinadditiontoregularresizeand
rotationhandles.Torotatetheobject,clickontherotationtoolanddragaside.
Youcanconverta2Dobjecttothe3Dtypebyright-clickingonitonthecanvasandchoosingthe
Convertto3Dcommand.Inthesameway,youcanconvertfromthe3Dto2Dtype.Changingthe
objecttypedeactivatesallthe2Dor3Deffectsthatyouhaveappliedtotheobject.
76

TheTextEditor
Theprogramdoesn'tallowyoutoedittextdirectlyonthecanvas.Youshouldusethetexteditor.Itis
locatedintheTextsectionoftheInspector.The2Dand3Dtexteditorsareidentical.
Thealignmentbuttonsaffectthewholetext.
TheFontbuttonopensthestandardFontspanel.Youcanchangethefontofthewholetextoranyof
itsparts.YoushouldknowthattheSizecontrolsintheFontspanelarenotintendedtoadjustthesize
ofatextobjectinyourdocument.Usethesecontrolstocreatedifferentpartsofatextwithdifferent
sizeofletters.
Linespacingcanbeappliedtoselectedtextlinesortotheentiretext.
Kerningchangesthedistancebetweenlettersoftheselectedtext.
Becarefulwithfontswithjaggedcharacters.Theyusuallytakelongertorendergraphiceffects.Some
ofthesefontscanevencauseunexpectedresultswhenyouapplyshadingor3Deffects.
77

ApplyingMaterials
Theprogramhasalibraryofpre-designedmaterials.Itletsyouapplymaterialsinafewclicks.
Additionally,youcancustomizeanyoflibrarymaterials.
Toapplyamaterial,clickthePresetbuttonneartheMaterialsectiontitle.Thenchooseoneofthe
categoriesandclickonamaterial.
78

CreatingMaterials
Tocreateanewmaterial,youcanmodifyadefaultone.Ifanyofthelibrarymaterialsissimilarto
whatyouwanttocreate,startfromthispredesignedmaterial.
Toadjustthematerialproperties,opentheMaterialsectionintheInspector.
79

Texture
Toopenthetexturelibrary,clickonthepreviewofthecurrenttexture.Inthetexturelibrary,youcan
choosetexturesfromcategories,orselectaplaincoloratthetopofthelibrary.
TheColorbuttonatthetoprightcornerletsyouchangetexturecolors.Itseffectisacombinationof
theHue,SaturationandBrightnesscolorproperties.YoucanswitchtheColorspanetotheHSBSliders
modetobeabletoadjusttheslidersseparately.
Theroundandsquarecontrolsinthemiddlechangetheangleandoffsetofthetexture.
Scaleletsyoumagnifythetexture.
BumpMap
TheBumpMaptooladdsmorevolumetothetexturedetails.
Strengthcontrolstheamountofroughnesscreatedbythetool.
80

Smoothmakestheeffectsmooth.
BumpMapoff:
BumpMapon:
TheBumpMaptoolrequiresthatatexturehascontrastelements.Notalltexturescanproduceagood
resultwiththiseffect.
Bydefault,theBumpMaptoolusesthetextureitselfasabumpmap.Toselectadifferentbumpmap,
chooseatextureinthepop-uplibraryoftheBumpMapsection.
EnvironmentTexture
TheEnvironmentTexturetoolextendsthelightingeffectcreatedbytheLightSourcesproperties.By
applyinganenvironmenttexture,youcansimulatereflexesfromparticularlightsourcessuchas
windows.
TheColorbuttonworksthesamewayastheoneintheTexturesection.
81

Aroundcontrolrotatesthetexture.
TheOpacityparameterchangestheamountoftheeffectappliedtotheobject.Thisisusefulwhenyou
needtomixtheEnvironmentTextureeffectwithothers.
Smoothisintendedtomaketheobjectmattorglossy.Whenyoumovetheslidertotheright,the
objectbecomesmatt.
TheBlendModedefineshowthecolorsofthemainandenvironmenttexturesmixwithcolorsofother
effects.
LightSources
Theprogramletsyousetupfourlightsources.Inthepreview,eachofthemispresentedasacircleon
asphere.Abluecirclemeansthatthelightisturnedon,andagrayoneindicatesthatthelightisoff.
Smallercirclesshowthelocationoflightsourcesbehindthesphere.
Ifalightsourceison,itcastslightonthesphere.
Youcanchoosethelightsourcecolorintheboxtotherightfromthesphere.
TheShadowoptionallowsobjectpartstocastshadowsontheobjectitself.UnliketheShadoweffect
intheEffectssection,thisoptionhasnoconnectiontotheshadowthatiscastonthebackgroundor
otherobjects.
MaterialFinishandColors
Thisgroupofmaterialpropertiesisresponsibleforhowlightingaffectstheobject.Youshouldadjust
theparametersbelowtogetherwiththelightsources.
Glossinessmakestheobjectlookmoreorlessglossy.
Ambient,DiffuseandSpecularcolorsletyouadjustthelookofshadowedandlitpartsoftheobject.
Itiseasiertolearnhowthesecolorsappearontheobjectwhenonlyonelightsourceison,aplain
colorisusedasatextureandtheBumpMapandEnvironmentTexturetoolsaredeactivated.
Ambientistheobject'scolorwhenthereisnolightatall.Itcanbeblack,ormoreoftenadarker
versionoftheDiffusecolor.
Diffuseistheobject'scolorunderdiffuselight.Inmanycases,itcoincideswiththenaturalcolorof
theobject.
TheSpecularcolorisusedtocreateareflectionofadirectlightsource.Themorematttheobjectis,
thebiggerandlesssharpthelightspotis.Tocontrolthis,usetheGlossinessslider.
82
SavingCustomMaterials
Assoonasyouarehappywiththecustomizedmaterial,youcansaveitintheCustomcategoryofthe
materiallibrary.Todothis,selectanobjectwiththatmaterialapplied,clickthePresetbutton,and
thenclickonplusatthebottomofthemateriallibrary.
Torenameacustommaterial,double-clickonitsname.
Todeleteacustommaterial,selectitinthelibraryandclickonminus.
83

TheShadowEffect
ToaccesstheShadowtool,opentheEffectssectionintheInspector.
ThePositionletsyoumovetheshadowaroundbychangingthedirectionandhowfartheshadow
spreadsfromtheobject.Bydraggingthehandle,youchangethelocationofavirtuallightsource.
TheAttenuationparametervarieshowquicklytheshadowfadesout.
Blurmakestheshadowmoreorlesssoft.
TheColorbuttonletsyouchangethecoloroftheshadow.
84

TheDepthGradientEffect
ToaccesstheDepthGradienttool,opentheEffectssectionintheInspector.
TheDepthGradienteffectisintendedtoapplyagradientorsolidcolortothe3Dobjectsides.This
effectcanbeusedtoemphasizethetransitionfromthelituptoshadowedobjectparts.
Inordertoopenthegradientpanelandsetupthecolors,clickonthegradienticon.Thegradientpanel
controlsaredescribedintheTheFillEffectsection.
TheOverlayoptionappliestheDepthGradienteffectoverothereffectslocatedintheMaterialtab.
TheBlendModeoptionsdefinehowtomixthegradientcolorswithcolorsproducedbyothereffects.
BychangingtheOpacity,youcanmaketheeffectmoreorlessstrong.
Ifyouswapthepositionsofthedarkandlightcolorsinthedefaultgradient,youcancreatethe
backlighteffect.
85

TheGlowEffect
ToaccesstheGlowtool,opentheEffectssectionintheInspector.
TheBrightnessparametercontrolstheamountofglow,mostlyconsideringthepositionoftheobject
inrelationtolightsources.Inthepicturebelow,theglowisonlyaroundtheletter"S"becauseitis
turnedtothelightsourcethemost(duetotransformationand3Drotation).
IncreasingBrightnessmakestheeffectspreadovertheotherletters.
Blurmakestheglowmoreorlesssoft,andconsequentlytakemoreorlessspacearoundtheobject.
OpacityletsyoucontroltheamountoftheeffectbutinawaythatisdifferentfromBrightness.Here,
youmakethewholeglowmoreorlessstrongthroughitstransparency.
TheGloweffectlooksbestwithdarkbackgrounds.
TheGloweffecthighlightsonlythebrightpartsofanobject.Thismakesitdifferentfromthe2DGlow
86

whichappearsaroundthewholeobject.
Glowisoff:
Glowison:
87

TheFocusEffect
ToaccesstheFocustool,opentheEffectssectionintheInspector.
TheFocuseffecthastwosettingsLengthandBlur.
TheFocalLengthparameterdefinesthedistancetothepointinfocus.
Blurcontrolshowblurredtheobject'spartswhicharenotinfocuswillbe.
TheFocuseffectworkswellifanobjectisrotatedhorizontallyusingthe3Drotationtoolastheobject
wasinperspective.
88

ApplyingMasks
Toapplyamasktoa3Dobject,usetheMasksectionintheInspector.Theeffecthasexactlythesame
setofpropertiesasthe2Dmask.
Theprogramappliesamasktoyourobjectafterapplyingothereffectssuchastransformationor3D
rotation.Thismeansthatifyoudistortanobject,themaskwillnotbeaffected.
Inordertoachieveinterestingeffects,youcancombineamaskedlayerwithanotherlayerinthe
backgroundandhavethegapsfilledwithsomecolor.
89

Transformations
Transformationeffectscreategeometricdistortionof3Dobjects.Thesetoolsarelocatedinthe
GeometrysectionoftheInspector.
Totransformanobject,clickontheTransformboxtobringupthelistoftransformations.Thenclick
onatransformationtoapplyit.Finally,adjustthedistortionusingtheslidersbelowthelist.
Torestorethedefaultstateofanobject,clicktheResetbutton.
Youcantransformseveralselected3Dobjectsatthesametime.
90

The3DObjectSettings
Toaccessthe3Dobjectsettings,opentheGeometrysectionintheInspector.Theseparameterslet
youcontrolthebasic3Dobjectappearance.
TheDepthparametermakestheobjectmoreorlessflat.
Thicknessmakestheobject'spartsthicker.Withtext,itmaylookasifyoumadeitbold.Solidobjects
suchasbricksjustbecomeslightlybigger.
Chamfercanmaketheobject'sedgeroundedorsharp.Youcanalsochoosetheshapeofthechamfer.
91
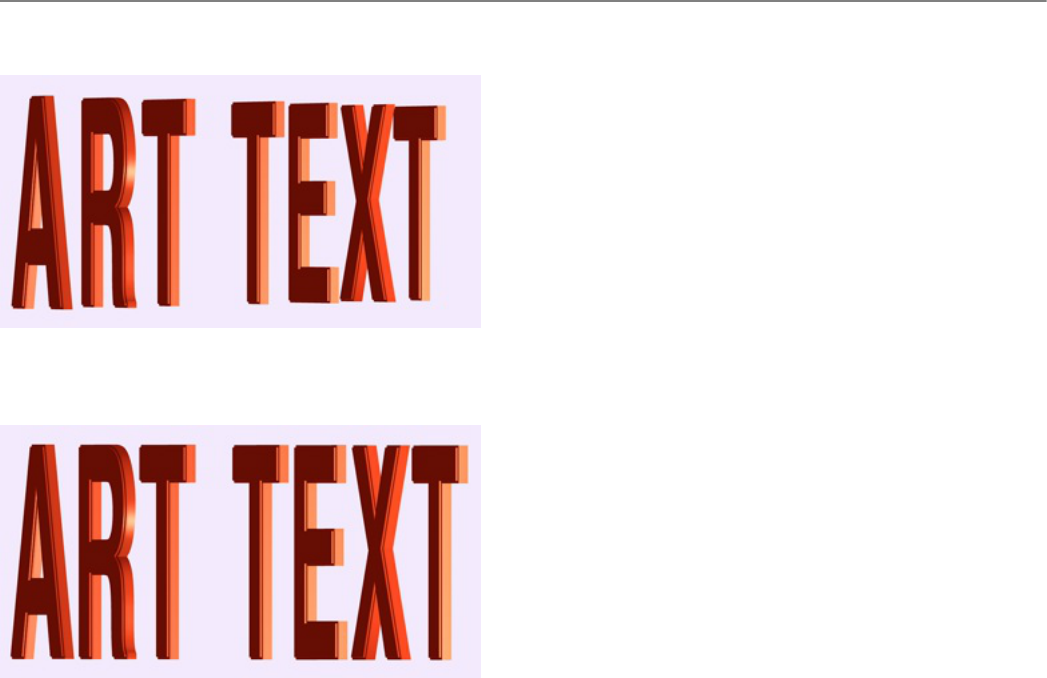
ParallelProjection
Whenyouapplythe3Drotationtoanobject,theprogramshowsitinperspectivebydefault.
Ifyouaregoingtocreateatitleforawebsiteoranarticle,youmaywantallletterstohavethesame
height.Todothis,activatetheParallelProjectionoptionintheGeometrysectionoftheInspector.
92

Exporting
YoucanexportyourdesigntoagraphicfileorcopyittotheClipboard.
Toexportyourdocumenttoagraphicfile:
1. SelectFile>Exportinthemainmenu,orclicktheExportbuttonatthebottomrightcornerof
thecanvasandchooseFile…
2. Typeafilenameandchooseadestinationfolder.
3. SelectanimageformatintheFormatdrop-downlist.
4. Setuptheavailablesettings.
5. ClicktheSavebutton.
ExportingtotheClipboard
TocopyyourdesigntotheClipboard,clicktheExportbuttonatthebottomofthecanvasandchoose
Clipboard.
YourdesignwillbeexportedinthePDFformat.IntheprogramPreferences,youcansetuptheimage
resolutionforrastergraphicstobecopiedtotheClipboard.
TheExportbuttoninthemainwindowallowsyoutoshareyourdesign.Insteadofsavingthedesign
ontheharddrive,itwillbesenttoaparticularapplicationorservice.Thisfunctionrequiresthatyou
haveinstalledandsetuptherespectiveapplication,orhaveanaccountfortheservicethatyouwishto
use.
Sharing
UponclickingtheExportbuttonbelowthecanvas,youcanfindseveralsharingoptions.Tousethem,
youshouldcreateauseraccountfortherespectiveserviceandhaveyourcomputerconnectedtothe
Internet.
93

TransparentBackground
Youcanexportyourdesignasanimagewithatransparentbackground.Tomakeitpossible,the
followingconditionsshouldbemet:
Yourdesignshouldhavethetransparentbackground.Tocheckthisout,selecttheChessboard
backgroundintheprogramPreferences.Thechessboardwillbeseenthroughalltransparent
partsofyourdesign.
Exporttoafileformatthatsupportstransparency(alphachannel).Theseare:PDF,TIFF,PNG
andGIF(activateIncludeTransparencyintheExportdialog).
Itdoesn'treallyconcernArtText,butyoushouldknowthis.Applicationsthatwillreceivean
image,whichyouexportedorcopiedviatheclipboard,shouldalsosupportthealphachannel.If
animagehaswhiteorblackbackgroundinathirdpartyprogram,trytoexportfromArtText
usingadifferentfileformat.
94

Printing
Toprintyourdocument:
1. SelectFile>Printinthemainmenu.
2. Setuptheprintingoptions.
Makesurethatthecorrectprinterandpaperformatareselected.
Youshouldalsocheckthesettingsinthe"ColorandQuality"aswellasFinishingsections.These
sectionsmayhavedifferentnamesdependingonthetypeofprinter.
Refertotheprinter'sdocumentationformoredetails.
3. Checkifthedesignlookscorrectinthepreview.
4. ClickthePrintbutton.
95
Table of Contents
Contents 2
Brief Description 4
System Requirements 4
Licensing 5
Updating the Program 6
Removing the Program 7
Technical Support 8
Useful Web Resources 9
End User License Agreement 10
Quick Start Guide 13
Effect Guide 18
Using Templates 21
The Main Window 22
Program Settings 24
The Content Panel 25
Template Library 25
Backgrounds and Light Effects 26
Smart Shapes and Icons 26
The 2D Inspector 28
The 3D Inspector 30
Menus 32
Keyboard Shortcuts 37
Creating, Opening and Saving Documents 40
Document Settings 41
Introduction to Layers and Objects 42
Object Size, Location and Orientation 43
The List of Layers 45
Merging Layers 47
Union 47
Subtract 48
Intersect 49
Exclude 50
Splitting Text into Letters 51
The Vector Shape Editor 52
Points and Paths 53
Drawing a Shape 54
Adding Anchor Points 55
Deleting Anchor Points 55
Changing the Type of Anchor Points 55
Moving Anchor Points 55
Introduction to 2D Effects 56
The Text Editor 57
The Fill Effect 58
96
Applying Textures 60
Applying Materials 63
The Editor of Materials 66
Materials Based on Shaders 66
Materials Based on Images 67
Applying Stroke 68
The Shadow Effect 69
The Glow Effect 70
The Inner Shadow Effect 71
Applying Masks 72
Transformations 74
Geometric Transformations 75
Spline Transformations 75
Introduction to 3D Effects 76
The Text Editor 77
Applying Materials 78
Creating Materials 79
The Shadow Effect 84
The Depth Gradient Effect 85
The Glow Effect 86
The Focus Effect 88
Applying Masks 89
Transformations 90
The 3D Object Settings 91
Parallel Projection 92
Exporting 93
Transparent Background 94
Printing 95
97
