
R U T H L E S S K N I T T I N G
Vintage Santa Stocking Pattern
Original color pattern insert
This vintage pattern from Bernat was once quite popular, and many families
(including my own) have collections of Santa stockings with the names of
each family member on top. I reproduce the pattern and charts here so that
contemporary knitters can enjoy making Santa stockings for their own
families — or do some catch-up knitting for new family members!
Terms of Use
I am making this pattern and the associated charts available with permission
from Bernat, which retains all rights to these materials. You may download a
copy of this pattern for your own personal use, but you may not distribute or
sell it, nor may you sell stockings created from the pattern.
Contact Me
I’d be happy to answer any questions you may have about the pattern, as
well as to see pictures of your finished stockings. You can write to me at
ruthlesskni[email protected].
Vintage Santa Claus Stocking, p. 2
Helpful Tips
Materials
Any worsted-weight yarn may be substituted for the original Bernat yarn
specified. You will need approximately 100 yards of white, 90 yards of
green, and 70 yards of red for one stocking, as well as small amounts of
pink, peach, or brown (for Santa’s face), black (for the four eye stitches),
and white angora or an angora blend (for the fuzzy beard). I found that
Cascade 220 comes in excellent Christmas-y red (9404), green (8267), and
white (8010), and they also have a good pink (9477). I used Takhi Jolie (an
angora blend) for the beard and some leftover black alpaca for the eyes.
I work my stockings on straight needles (US size 7) all the way down to the
foot, changing to double-pointed needles for the final green and red stripes.
Reading the Chart
The key to the chart symbols is as follows: red = solid square; white angora
= plus sign; face color = empty inverted triangle; black eyes = solid
triangle.
The photographs should be used as a guide to interpreting the charts. The
cast-on row and first eight rows of ribbing are not depicted on the chart,
though they are included in the pattern instructions. The solid line below row
10 does not indicate a color change: it is there only to indicate that the
letters must fit on the chart between row 1 and row 10. Note that the
background color of the stocking changes from white to green gradually on
rows 17-31, and then it changes back to white on row 71, where there is a
double line. The pattern does not indicate what decreases to use on rows 39,
49, 59, and 69; I pair SSK on the first two stitches with K2tog on the final
two stitches.
Color Work
Most of the color work on the stocking should be done in intarsia, although
some small sections can be stranded. Keep in mind that red will show
through if carried behind white, so each of the letters in the name at the top
of the stocking must be done with separate bobbins or strands of yarn —
colors should not be carried between letters. Likewise, the two candy canes
at the bottom of the stocking will require separate bobbins or strands of red
yarn.
I find that it works better to do the eyes, nose, and mouth in duplicate stitch
after the Santa heads have been completed than to try to work intarsia in
five colors at once.
Bell placement
The pattern does not indicate where the bells ought to go, what size they
Vintage Santa Claus Stocking, p. 3
are, or how many there are. On the stockings my grandmother made, she
placed three bells on the transition points between the green and white in
the top third of the stocking: one each on the first stitch of green, and one
on the lowest white stitch before the Santa heads. The bells are each about
the size of a dime.
Decreases
Where the pattern indicates slip 1, K 1, psso, I use SSK instead.
Skill Level
This is an intermediate or advanced intermediate pattern. If you have made
a sock before and understand the basics of intarsia, it should be well within
your grasp.
Original Pattern Text
This pak contains 3 ounces of Bernat Knitting Worsted, 100% Virgin Wool
Worsted, sufficient to make one Santa Claus Stocking in design as illustrated
and charted. The pak also contains sufficient Bernat Super Angora and bells
to decorate stocking as indicated.
Materials
1 Santa Claus Stocking Pak
1 set d p needles
No. 6 Bobbins
Gauge: 5 sts = 1 inch; 7 rows or rounds = 1 inch
Abbreviations
d p . . . double point
K . . . knit
P . . . purl
psso . . . pass slipped st over knit st
sl . . . slip
st(s) . . . stitch(es)
tog . . . together
Notes
Please read carefully before starting work.
–Be sure to check your stitch gauge. If you do not obtain the correct gauge
with the size needles suggested, change to a larger or smaller size as your
knitting requires. The important thing to remember is that the size needles
used does not matter, as long as your stitch gauge is correct.
–Be sure to work the colors exactly as designated in the chart, as there is
Vintage Santa Claus Stocking, p. 4
sufficient yarn for your stocking if the chart is followed carefully.
–When changing colors, always hold the color, which has just been worked,
to the left and pick up the new color from underneath. This twists colors, so
there are no holes.
–Use a separate bobbin for each color change, except where the color is
used again after one or two stitches of another color. In these cases the
color may be carried loosely across the back of work.
–To personalize this stocking, work desired name in first White stripe. Using
alphabet chart as a guide, block in name on chart before starting work.
Directions
Using two d p needles and Red, cast on 60 sts. K 2, P 2 in ribbing for 8 rows,
inc 1 st at end of last row. Join White and, following chart, work in
stockinette st, changing color where indicated and working even until 38
rows of chart have been completed. On the next row dec 1 st each end of
needle and repeat this dec every 10th row 3 times more. Work even on 53
sts until 84 rows of chart are completed.
INSTEP: Following chart, K 40 sts, sl last 13 sts on a holder. Turn and P 27
sts, sl remaining 13 sts on another holder. Continue to work in stockinette st
on 27 sts of instep until chart is completed, dec 1 st at end of last row. Sl
these 26 sts on a holder. Sl 13 sts of each side of heel onto one needle, so
that outer edges of sock are joined at centre of heel.
HEEL: With right side facing you, join White and work in stockinette st on 26
sts for 13 rows.
TURN HEEL: P 15, P 2 tog, P 1, turn; sl 1, K 5, sl 1, K 1, psso, K 1, turn; sl 1,
P 6, P 2 tog, P 1, turn; sl 1, K 7, sl 1, K 1, psso, K1, turn; sl 1, P 8, P 2 tog,
P 1, turn. Continue in this manner, working 1 st more each time until all sts
hve been worked, ending with a K row — 16 sts on needle. Break off yarn.
Join yarn at to right side of heel piece. Pick up and K 12 sts along side of
heel piece; K across 16 sts of heel; pick up and K 12 sts along other side of
heel piece — 40 sts.
SHAPE HEEL GUSSET: Row 1: Purl. Row 2: K1, sl 1, K 1, psso, K to last 3 sts, K
2 tog, K 1. Repeat these 2 rows until there are 26 sts on needle, ending with
a K row.
FOOT: Sl last 13 sts just worked, from heel needle onto first needle; on
second needle K across instep sts; on third needle K remaining 13 sts.
Centre of heel is now at the beg of each round. Join Red, and K round and
round for 16 rounds. Join Green and K 8 rounds.
Vintage Santa Claus Stocking, p. 5
SHAPE TOE: Round 1: on first needle K to last 3 sts, K 2 tog, K 1; on second
needle K 1, sl 1, K 1, psso, K to last 3 sts, K 2 tog, K 1; on third needle K 1,
sl 1, K 1, psso, K to end of round. Round 2: Knit. Repeat these 2 rounds
until there are 3 sts on each heel needle, ending with first needle. Break off
yarn, leaving a 12 inch end. Weave heel and instep sts tog.
FINISHING: Sew on bells. Seam back and sides of instep. Using 1 strand of
each of three colors, make a chain 9 inches long for cord. Sew cord at back
seam.
To Weave Stitches
Thread yarn in a tapestry needle and hold the two d p needles tog, wrong
sides touching. * Insert tapestry needle as if to K into first st of front needle,
draw yarn through this st and slip off the d p needle; insert tapestry needle
as if to P into next st of front needle, draw yarn through this st and let st
remain on d p needle; insert tapestry needle as if to P into first st of back
needle, draw yarn through this st and slip this st off the d p needle; insert
tapestry needle as if to K into next st of back needle, draw yarn through this
st and let st remain on needle; repeat from * until all sts have been worked
off d p needle. Draw up all sts to same tension as knitted sts. Fasten off.

Vintage Santa Claus Stocking, p. 6

Vintage Santa Claus Stocking, p. 7
Larger versions of all charts can be downloaded via Flickr. Links are available
from my website at http://ruthlessknitting.ruthlessediting.com/vintage-
santa-stocking-pattern.

Vintage Santa Claus Stocking, p. 8

Vintage Santa Claus Stocking, p. 9
Vintage Santa Claus Stocking, p. 10
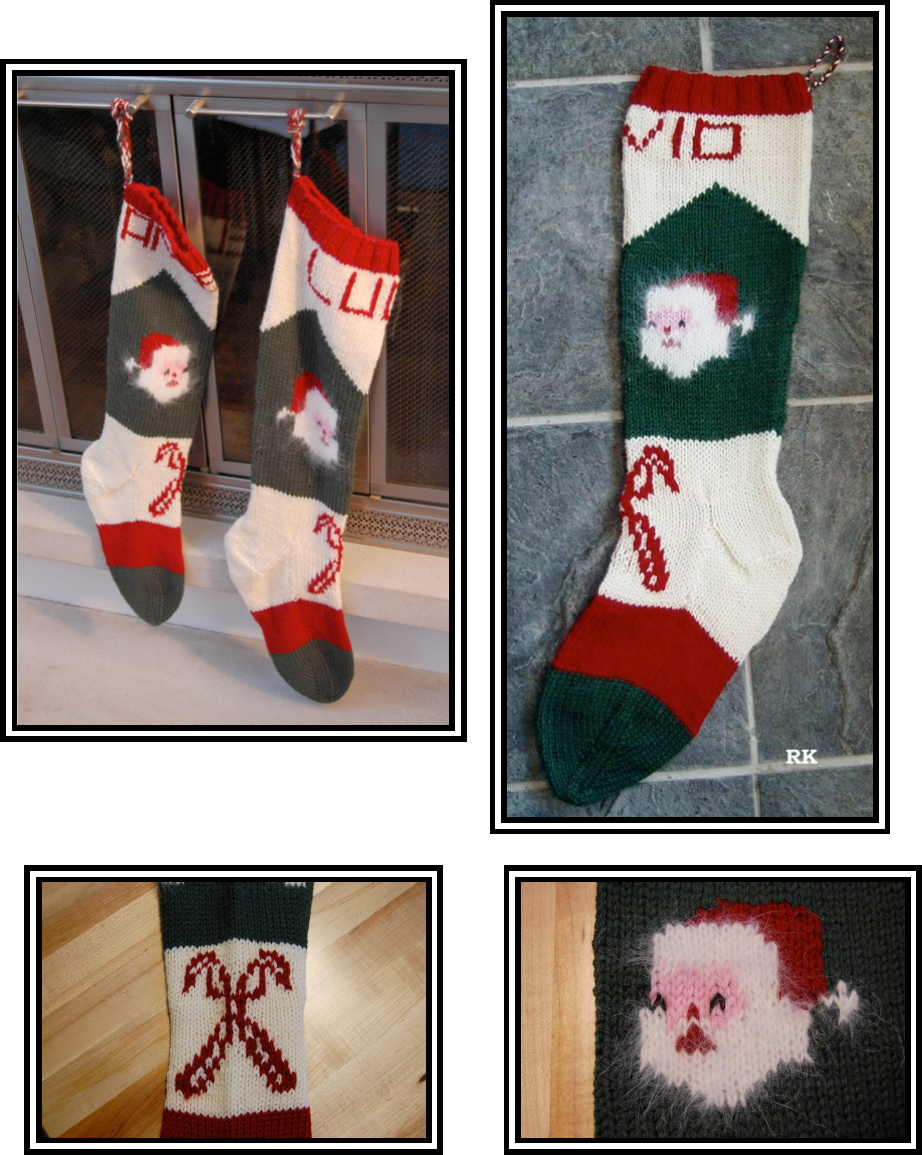
Finished Stockings and Detail Photographs
