ASSEMBLY ON RESPIRATORY STRUCTURE AND FUNCTION
EARLY CAREER PROFESSIONALS WORKING GROUP
Poster Presentation Guidelines
For the American Thoracic Society International Conference
Poster presentations are the most common form of presenting your work at the ATS
International Conference. RSF poster sessions are Thematic Poster sessions, Poster
Discussion sessions or Rapid Poster Discussion sessions. In this document we will
provide some advice on how to approach the development of your poster for
maximum impact and exposure, as well as how to prepare yourself for the various
poster session types.
Presentation using a Poster format is a way of showing results in a concise manner
to a large audience. The poster should summarize your research findings succinctly
and attract attention to generate stimulating discussion. The written information
(text, figures, tables) should allow the audience to read the poster and understand
the content without needing an oral explanation.
Where to start?
• Read your abstract. It has been several months since submission of the
abstract, and your focus may have changed since then. Remind yourself of
the original research question, hypothesis and aim. The content of your
abstract can be expanded on in the poster and updates to results can be
incorporated. If new data show changes in results, the title can be updated,
but be aware that the abstract title is listed in the program, and viewers may
have trouble finding you. The abstract itself does not need to be included in
the poster.
• What is the key message you want to convey? Formulate the key findings of
your research, rank them and focus on the top few items. Details and lower
ranked items can be used for discussion.
• What visual information can you use? Do you have figures, charts, images
and diagrams that can help you tell your story quickly? Often a good figure
can replace a large paragraph of text, but a bad figure or badly labeled one
can confuse viewers and take attention away from your central message.
• Gather your data, your text and play with layouts. You can use the text from
the sections in your abstract to start with, together with figures, pictures and
diagrams you might want to use. Either digitally in your preferred software or
physically using printouts, organize your sections and figures in different
ways to see what order and what placement is best. Most posters will have a
landscape columned format with 3-4 columns, but many variations are
possible. Breaking from the standard layout may help in standing out from
the crowd but may also result in a cluttered mess. Look at examples online, in
your lab, etc. Regardless of which layout you choose, design your poster to

be read by column (left to right) and not across. This will facilitate a smooth
and organized flow of the traffic through your poster.
Some example Layouts:
• Get outsider input! After you finalize your text, figures and layout, get other
people, both from within and outside your field, to have a look at your poster
to see if they understand the key message without explanation, whether
their interest is drawn to the right sections and whether you might have
missed some key information.
Tips and tricks to optimize your poster:
• The poster can be divided into sections similar to those in your abstract, but does
not necessarily have to be labelled as such:
• Title
The title should be simple, concise and provide an accurate description of
the data being presented. A good title is essential and a good way to ‘sell’
your work – think of it as a newspaper headline.
• Authors and affiliations
• Background/Rationale
The background/rationale should highlight important points relevant to
your hypothesis and aim.
▪ Hypothesis and/or Aim
▪ Methods

The methods should be succinct and provide enough detail to allow the
audience to understand how the study was performed. A short
description of the statistical methods used may be outlined.
▪ Results
Organize your data to optimize flow. If you employ a 3-4 column format
with figures in the middle, the figures with legends could be your entire
results section, provided that your legends are fully self-explanatory.
▪ Conclusion/Discussion
The conclusion/discussion should provide a short summary of the results
and provide a meaningful interpretation of the results. Future directions
could be included too.
▪ Acknowledgements (not essential)
▪ References (not essential)
• Do not use more than 3 fonts:
o Sans Serif fonts for titles, labels and headings
o Serif fonts for body text
Serif fonts are easier to read for paragraph text, while sans serif looks
cleaner for titles etc. Count Bold, or italic as separate fonts, too many
styles give a messy appearance.
o Do not Underline, it makes text hard to read
• Use large enough fonts so that your poster can be read from 5 feet away.
You want multiple people to be able to read the poster at the same time.
Ideally your smallest font should be 24pt.
• Keep at least 30-40% white space: cramming too much information and text
onto a poster is discouraging to the viewer and likely leads to less adsorption
of the key information.
• Add some color, but don’t go overboard. Have a look at poster templates,
make sure that the contrast between text and background is sufficient, and
that the background is not too busy. You can highlight the most important
elements of your poster with color but be careful for the Tabloid look: glaring
bright headlines with saturated pictures make the poster look
unprofessional. In using colors, consider some people are color blind, which
most commonly results in not being able to distinguish between red and
green (5% of the male population).
• Uniform look for Figures and pictures: try to have a uniform color scheme
for your figures and a uniform style for your pictures.
• Resolution: make sure your viewers don’t see pixels, a minimum of 300 dpi
image resolution is needed, ideally 600 dpi.
• Be careful with sourced images: Are you allowed to use the image? What
referencing requirement does the creator have? If you can’t find this
information, assume you can’t use the image, or contact the creator!
• Labels, labels, labels: make sure everything is properly labelled: axes, plot
lines etc. in your figures, does A) B) C) labelling correspond with your
legends? Is each image labelled? Many viewers will just scan the figures and
legends to gauge their interest in a poster, so these need to be able to be
self-explanatory and interesting.
• Who is your audience? In Thematic Poster sessions you will not always be at
your poster, so your poster should be understandable without further
explanation. Also, as there are many more posters in Thematic Poster
sessions especially, you might need to put extra effort in catching the viewers
eye. In RAPiD sessions you can get people’s attention with your initial 60
second presentation, and you are sure to be present during the viewing. This
means you can get away with a bit more detail in your poster, as long as the
broad strokes of your research remain clear.
Information specific to RAPiD Poster Discussion (modified from ATS)
• The session begins with each author orally presenting a 60-90 second
summary of their research with the use of 1 PowerPoint slide followed by the
traditional poster display/viewing period and discussion of the poster
themes.
• Therefore, in addition to preparing a poster of your research for display and
presentation as outlined above, you will also need to prepare 1 PowerPoint
slide containing:
o Your name as the presenting author and your poster board number
for the session
o A brief summary of your poster highlights containing the most
exciting piece of data (figure or diagram, etc.) that will attract the
attendees to come see your poster
o Do not include methodology in this slide
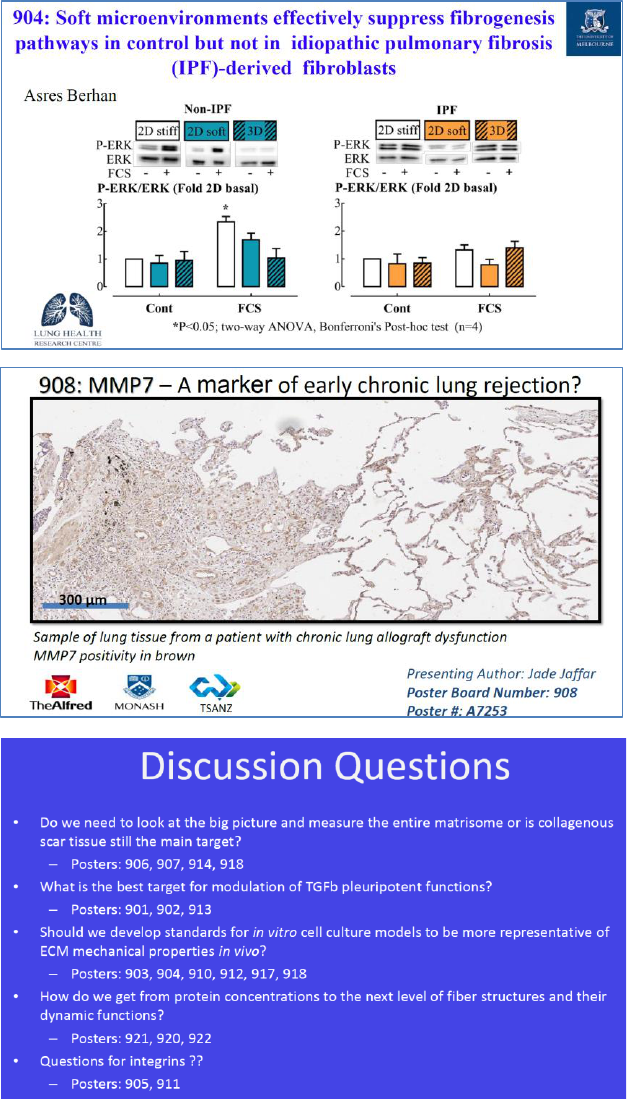
o See below two examples of presentation slides from a 2017 RAPiD
Poster Discussion session.
• Prepare a 60-90 second oral summary of your poster to present along with
the slide
o It is imperative that your oral presentation runs no longer than 90
seconds. Authors going over the 90-second time will be stopped by
the Chair.
• Email your PowerPoint slide to the session Chair by the date specified in your
notification of acceptance email.
• Authors failing to submit their PowerPoint slide and prepare their oral
presentation will not present.
• The Session Moderator(s) will run the discussion. Focus of the discussion
will not be on individual posters but on the overall theme.
• The presenters will be given specific questions that will be discussed during
the session. See below an example of Discussion Question Slide from a 2017
RAPiD Poster Discussion.
Regular poster discussion sessions
In regular Poster Discussion session there is no initial presentation, and chairs may or
may not provide questions upfront. Your poster would likely look the same as for a
RAPiD session. The session starts with a poster viewing timeslot, during which you
will have to be present at your poster. The second period of the Poster Discussion
session is used for centralized discussion where themes related to the posters are
addressed, but individual posters are not addressed.

Acknowledgements
This poster development guide was developed by the Early Career Professionals
Working Group of the Respiratory Structure Function Assembly. With special thanks
to Dr. Katrina Tonga, Dr. Gijs Ijpma, Dr. Tillie Hackett and Dr. Blanca Camoretti-
Mercado, and to Dr. Asres Berhan and Jade Jaffar for sharing their slides.
Elements of this guide were inspired by a number of external sources. For more
information on poster development and design we strongly recommend having a
look at these:
https://guides.nyu.edu/posters
http://www.personal.psu.edu/drs18/postershow/
The last one is particularly useful for example posters with style critique:
http://betterposters.blogspot.ca/
