
Shreddage 3.5 Hydra
An Impact Soundworks Instrument
for Kontakt Player 6.7
Instrument Version 2.0.0
Product Manual

Introduction
Shreddage 3.5 Hydra is the culmination of everything we at Impact Soundworks have learned in 10
years of creating virtual guitars. This is our vision of what a no-compromises, maximum-quality 8-string
guitar should be. Our internal bar of quality was so high that we recorded the entire sample set
three
times
in our pursuit of the perfect performances and tone.
Now it's finally done, and you can enjoy the ultimate rock & metal virtual guitar in your music.
We selected an ‘Iron Label’ RGIF8, drop-tuned to low E, and equipped it wit h Fishman Fluence Tosin
Abasi Signature pickups. These pickups put Shreddage 3.5 Hydra in its own class, even compared to
our other instruments. Not only do they have distinct and useful tones in both the neck & bridge
positions, but their clarity and low noise floor is unmatched: some open-string sustain notes ring out for
over 40 seconds!
Thanks to exhaustive sampling of all useful articulations, dynamics, RR variations, and layers, Hydra
gives you all the tools you need to create absolutely incredible guitar tracks. With the right writing, you
can make rhythm parts, chords, and leads that will drop jaws with their sound and realism.
Naturally this is a killer guitar for rock and metal music, particularly heavier subgenres and progressive
variations. But as you can hear in our walkthrough video and demos, the clean tone possibilities are just
as impressive! The clarity and sustain of the pickups make Hydra a great choice for any kind of 'gaze'
style of music, too.
Whatever style or genre of music you like to make, we know that Shreddage 3.5 Hydra will become an
essential part of your production workflow. It certainly has for us!
2

Installation
1. Download and install t he Native Instruments Kontakt Player, which will also install an auxiliary
Kontakt library management software called Native Access:
If your Native Access looks like the above (
i.e.
, it is in ‘dark mode’), you have Native Access 2.
Please continue on with our online installation guide.
If it does not (
i.e.
, it is in ‘light mode’), you have Native Access 1; continue with the installation
steps below.
2. Next, install the Pulse Downloader.*
3. Once Pulse is installed, open it and enter your Shreddage 3.5 Hydra product code, which is also
its serial number (
e.g.,
A1B2C-3D4E5-F6G7H-8I0J1-K2L3M). Follow the instructions to download
and install the library.
If you wish to move the library to an external drive [for example], then do
this before moving on to step 4, below.)
4. Open Native Access, click 'Add a Serial', and input that same product code to activate the library.
5. Once Native Access has activated your library, click 'View Products Not Installed'.
6. Find Shreddage 3 Hydra** in this list and click the 'Add Library' button to the right.
7. Select the folder where Pulse downloaded the library (or, if you moved it in step 3, the folder
where it currently resides).
This completes the installation process!
* Pulse is a cross-platform desktop app that lets you download and install your libraries with blazing
speed! You’ll need to create a Pulse account, but once you do, you can access your purchases from any
developers using Pulse, anytime, from any computer.
** Thanks to the way Native Access works behind-the-scenes, this library will appear in Native Access as
‘Shreddage 3 Hydra’, not ‘Shreddage 3.5 Hydra’.
3

The Shreddage 3.5 Performance Engine
As with all Shreddage 3.5 instruments, Shreddage 3.5 Hydra features recordings of every string, from
the ‘open’ position all the way up the neck. This means many pitches are sampled multiple times on
different strings, which yields a different tone depending on which string is played.
The Shreddage 3.5 engine features an advanced algorithm that emulates how a real guitarist would
perform notes across different strings and fret positions. When a MIDI note is received, Shreddage 3.5
will evaluate a number of factors to determine the best string & fret to place that note. These factors,
which are weighted differently depending on your performance settings, include things like:
➔ What other strings are being held at the same time
➔ Whether the new note is played legato or not (and if so, the legato settings)
➔ The
virtual hand
position [see the next paragraph, below]
➔ Any ‘force string’ settings
➔ Fretting Mode selection
Shreddage 3.5 uses a virtual ‘hand’ to guide fret & string selection. This generally means if you are
playing on the lower frets, new notes will
also
be placed on lower frets. If you are playing high up on the
neck, new notes will
also
end up in that range.
However, for most users, you don’t have to worry too much about any of this, outside of selecting the
Performance Style you want and possibly moving the Hand Position as desired.
4

Using Shreddage 3.5 Hydra
Snapshots & Script Tabs
Shreddage 3.5 uses Kontakt’s native ‘Snapshots’ feature to handle various types of presets. We’ve
extended this feature allowing you to save and load specific types of Snapshots without over writing
your entire patch.
Data is loaded and saved in three areas:
A. Shreddage Engine (first bottom-left tab), which contains the main engine performance settings;
B. Console (second bottom-left tab), which contains all FX and mixer settings;
C. Articulations (top tab in Shreddage Engine UI, which contains all articulation mapping info.
5

It is important to note that
each of these tabs can save or load its data independently
!
For example, you can load a guitar tone from Console without affecting your mapping, or load a specific
performance preset without affecting your tone.
At the bottom of each tab’s UI, you’ll see two icons: a Lock (lower-left) and a Camera (lower-right):
When the Lock icon is
enabled
(white), the contents of that tab will not be overwritten when you load a
new Snapshot.
When the Camera icon is
enabled
(white), the contents of that tab will be saved when you save a
Snapshot.
Snapshots included with Hydra are saved for the Console tab by default, meaning t hey will
not
affect
your mapping or performance settings. However, you can save your
own
Snapshots using whatever
combination of tabs you’d like. Make sure to check your Lock & Camera settings when saving and
loading!
6

View 1 Shreddage Engine
Tab 1 Main
IMPORTANT Virtually every knob on the interface can be MIDI learned! Simply right click and then
move the desired MIDI CC to create a link. Also, you can hover over any control to see help text at the
very bottom of the Kontakt UI.
See section Setup & Tweaking for more details)
7

Tone & Signal Controls
These controls (with the exception of ‘Lite Mode’) behave very similarly to the control setup found on a
physical guitar:
Volume
Controls the overall pre-FX gain of the instrument.
Tone
Controls a gentle pre-FX lowpass filter on the entire instrument. Maximum value is ‘wide-open’, while a
lower value results in a darker tone.
Signal Switch
Switches the signal between 1st position (bridge), 2nd position (middle,
i.e.,
bridge + neck), and 3rd
position (neck).
Lite Mode Leaf Icon]
When
enabled
, time stretching is disabled for slides and tremolos, freeing up a good amount of RAM
and reducing CPU usage.
8

Performance Controls
Performance Style
This drop-down menu selects from various preset styles that determine how the virtual guitarist
decides which strings and fret positions to play:
Standard
Plays lower on the neck and prefers open strings.
Mono Lead
Mid/High)
Plays mid or high on the neck in ‘mono’ mode, perfect for lead parts.
Poly Lead
Mid/High)
Also plays mid or high on the neck, but has Poly Input enabled and mono OFF,
making it easier to play realistic chords and strums in between riffs.
Rhythm
Plays with automatic fretting position determined by algorithm.
No Legato
Natural/Poly)
Plays without legato, with automatic fretting position determined by algorithm.
Workstation
Activates Keyboard Mode (below) and disengages the Legato keyswitch.
Custom
Allows you to set your own preferences.
Keyboard Mode
When enabled, the regular string/fret selection algorithm is disabled. You can
play unlimited notes ‘per string’, and every MIDI note is pre-assigned to a
specific string/fret. In other words, the instrument will behave like a traditional
workstation keyboard patch, which may be more useful in some situations.
Mono
When enabled, only one note can be played at a time. Overlapping notes will always trigger legato.
9

Bite
Applies an EQ to all signals pre-FX, adding more brightness and removing some low-mid ‘body’ from the
sound. The resulting tone becomes more and more aggressive as the knob value is increased.
Extra Attack
Adds an emphasized pre-transient pluck noise to notes. This scales with velocity, so playing softly will
result in quieter attacks. This is useful for emphasizing some notes and not others.
Pitch Bend Range
Changes the maximum range for the MIDI pitch bend message, defaulting to +/- 2 semitones. This
means that when your pitch controller (hardware, or in automation) is at maximum or minimum values,
the instrument will be shifted down or up 2 semitones.
Unison Bend
When moving this knob above minimum value, the LOWEST held note will be pitch bent, as long as the
lowest note is no more than a perfect four th away from the higher note.
Vibrato Amount
Introduces pitch modulation (vibrato) into the sample. The specific vibrato settings can be adjusted by
clicking the gear icon:
Controller
Selects from either modwheel (CC1) or aftertouch to trigger vibrato.
Mode
Selects between
Emulated
(most flexible & lightest on CPU; uses an LFO to
modulate pitch),
Fingered
(most realistic; live-recorded samples of vibrato
playing), and
Whammy
(alternative, live-recorded vibrato performed with the
whammy bar).
Speed
The rate of the oscillation.
Time-stretches in
Fingered
&
Whammy
modes.
Depth
The maximum intensity of the vibrato in Emulated mode.
10

Multi-Tracking
Sets which virtual guitar track(s) should be used. Each virtual guitar uses a different sequence of
samples during playback. For example, if guitars 1 & 2 are enabled, two unique sets of samples will be
played back with extra stereo panning.
If you would prefer to use multiple NKIs for double/quad-tracking (in order to use more channels in your
host), you can always enable a single guitar at a time for each NKI. You can do this by enabling the
guitar of choice (e.g. Guitar 2 and then disabling any other guitars in that NKI.
NB: It is important, if using multiple NKIs for multi-tracking, to set the anti-repetition parameters to be
identical in each instance. Otherwise, phasing will occur as different NKIs may trigger the same sample
in differing track numbers.
Responsiveness
Controls the sample playback offset for all groups. Note that all samples were edited to preserve a
certain amount of finger pluck and ‘pre-pluck’ sound, so while increasing this value makes the
instrument more responsive (as the sound becomes more ‘immediate’), doing so will also decrease the
amount of realistic performance noise in each sample.
This offset value is mixed with ot her offsets for
specific articulations and strokes.
Poly Input Latency
When this knob is above 0ms, a small amount of latency (controlled by the knob) is introduced before
sample playback. The S3.5 Engine will capture any notes played within that latency window and create
more realistic voicing for playback. Think of this as a ‘Lookahead’ that results in better performances
when playing chords or other polyphonic parts.
➔ Poly Input Latency
does
apply to t he following: playable range guitar notes when strum mode is
OFF; thrash notes; slide notes; full strums; partial strums; and individual string plucks; in other
words, any key-triggers that actually play sounds.
➔ Poly Input Latency does
not
apply to the following: playable range guitar notes when strum mode
is ON (
e.g.,
to set the voicing); MIDI CC changes; MIDI pitch bends; TACT keyswitches;
Shreddage 3.5 custom keyswitches; and strum mode keyswitches; in other words, any
key-triggers that do
not
directly result in sounds.
Note 1
For
very fast
guitar parts, we recommend setting the latency either very low or at 0ms!
The polyphonic fretting placement will interfere with the natural fretting of the
algorithms and fast passages will quickly devolve into fretting placements t hat jump
around the fretboard, which is anatomically impossible and creates an unnatural tone.
For reference, 16th notes performed at 120 BPM are
125ms apart
. Playing passages at
(or faster than) 120 BPM 16th notes at a latency of
125ms will
result in a malfunctioning
fret selection.
11

Note 2
Even when latency is set to 0ms, Shreddage 3.5 is programmed to always process with
a tiny default latency of 50μs (
i.e.,
0.05ms) so t hat chords ‘blocked in’ plainly in your
MIDI editor will still work perfectly! Try with
Strum On Poly
for very quick and easy
realistic chord parts with effectively no latency.
Additionally, this default latency enables processing of features listed above (such as
keyswitches) before latency features (like note playback and strums). This means you
can always place a keyswitch at the same grid position as a note, or in strum mode,
you can place a chord voicing at the same grid position as a strum trigger. This is
intended as a quality of life improvement for MIDI editing so that the user isn’t required
to nudge keyswitches or chord voicings behind the grid.
Finally, it is recommended to program the DAW track’s offset to negate the Poly Input
Latency. In other words, if the latency is set to 50ms, programming the DAW track
offset to -50ms will allow the user to compose on the DAW grid with great confidence
in timing accuracy.
12

Fretting Controls
The Fretboard
Shows what notes are being played on which strings and frets. Note that you can drag horizontally
across the fretboard to set a virtual capo position, which changes how t he fretting and playback engine
will select notes realistically.
Capo Position
Guitar-style transposing by placing a ‘virtual clamp’ in the shape of a wooden or metal bar on a
particular fret. This can be MIDI-learned and automated by right-clicking. If Capo Position parameter
has a larger value t han Hand Position, Hand Position is disregarded. The Capo is used to allow a
transposed set of open strings.
Fretting Mode
Selects which performance algorithm should be used. The factors described above will be evaluated
differently depending on which of these modes you select:
Natural
This mode is the most common usage for leads and leads mixed with chords
created by polyphonic input. The fretting follows the hand size, where a
guitarist will ascend up and down strings to play notes at a static hand position.
Sweep
This mode is very similar to Natural fretting, with the sole exception t hat it will
slightly prioritize playing notes on adjacent strings a little more to simulate the
sweep picking technique used in fast guitar playing.
Moving Lead
This mode is similar to Natural fretting but ascends the hand slightly when
moving to strings upward in pitch. This allows a three-octave range for scales
at a static hand position from bottom string to top string instead of about two.
The same range played in Natural mode would play the last octave all on the
last string, which is not ideal.
Polyphonic
Prioritizes using as many strings as possible simultaneously. This is ideal for any
kind of chordal playing, ensuring that each note of your chord is played (as
opposed to triggering legato, fret changes, etc.)
13
Picking Mode
Selects how pick direction is determined for each note press. 'Up' and 'Down' will use ONLY up or down
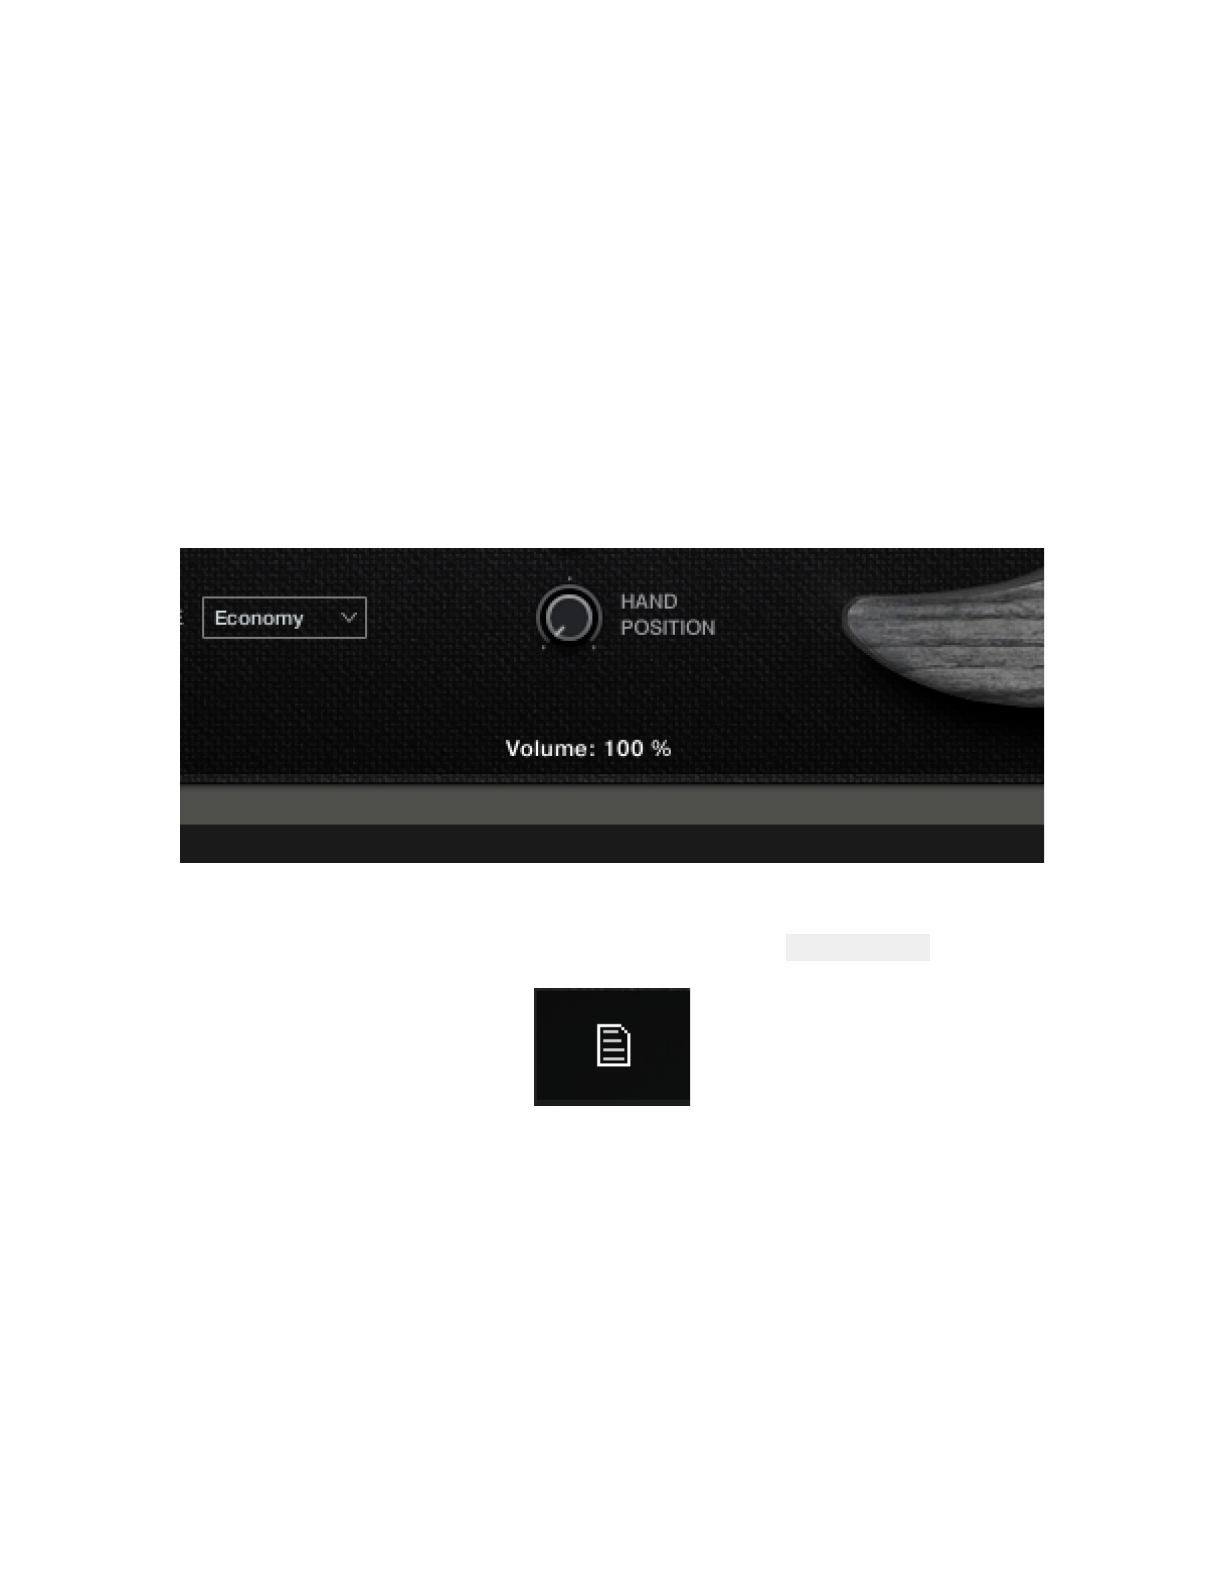
strokes, respectively; 'Alternate' will switch back and forth between down/up per press; 'Economy' uses
a consistent stroke direction when crossing strings.
Force String
Selects a single string that will be used for ALL played notes, if possible. The ‘forced’ string will be
highlighted on the fretboard.
Hand Position
Sets the fret at which the hand starts its reach to other frets (taking Hand Size into account). Notes that
don’t fit into this hand position and size will play outside of the range, but will not move the virtual hand
from this position.
Current Parameter Display
Parameter Display
Displays the most recently-active knob or control and its value (
e.g.
, Volume: 100%).
Articulation Display Option
When this option is enabled (white; disabled is grayed out), displays the most recently-active
articulation in the Parameter Display area.
14

Tab 2 Strumming
This feature allows you to easily play realistic-sounding strummed chords without finicky MIDI input or
pixel-perfect sequencing. There is now a dedicated ‘Strumming Mode’, but all strumming features (with
the exception of
Strum Audition
) can be used even in regular performance mode!
Before we go over the strumming controls, let's take a look at the dedicated strumming keyswitches
(multi), picking keyswitches (light blue), and other performance keyswitches (berry/magenta) located
above the instrument’s normal playable range:
Strumming Keyswitches
F♯5
Toggles Strumming Mode to the
opposite
of what is currently set in the GUI when
pressed down, and returns to the previously-selected setting when released. This is
used in either mode to quickly and temporarily switch modes.
Only available if
Strumming Mode is set to ‘Keyswitchable’)
G5
Toggles Strumming Mode on or off.
Only available if Strumming Mode is set to
‘Keyswitchable’)
G♯5
Plays a down-strum (
i.e.
, all downstrokes). The strummed notes will be whatever is
currently being held in the normal playable range. The speed and dynamic of the
stroke is based on the control settings on the Strumming page (see below).
A5
Plays an up-strum (all upstrokes), again based on what is being held in the normal
range.
A♯5
Plays a partial down-strum. This plays an down-strum starting from the bottom string,
with the engine selecting the number of strings traveled based on the Strum Distance
setting (see below).
B5
Plays a partial up-strum. This plays an up-strum starting from the top string, with the
engine selecting the number of strings traveled based on the Strum Distance setting
(see below).
C6
Temporarily toggles strums to muted strums.
C#6
Temporarily toggles strums to choked strums.
15

Picking Keyswitches
Starting with E6 and moving up chromatically to B6, each note here corresponds to one of the eight
guitar strings, starting with the lowest string (lowest E. Playing one of these notes will ‘pick’ the note
that is being voiced on t hat string. If no note is ‘voiced’ on the selected string, the algorithm chooses
another valid string to play, so that all pick keys will ensure that a note is performed. This allows you to
retain the same picking patterns in MIDI data while changing the chords that are voiced on the strings,
which is a common way of playing guitar in many pop and rock songs.
In general, this is a very useful
and musical way of triggering notes from a chord: give it a try!
Other Performance Keyswitches
C7
Sets Picking Mode to ‘Up’.
C♯7
Sets Picking Mode to ‘Down’.
D7
Sets Picking Mode to ‘Alternate’.
D♯7
Sets Picking Mode to ‘Economy’.
F♯7
Sets Fretting Mode to ‘Natural’.
G7
Sets Fretting Mode to ‘Sweep’.
G♯7
Sets Fretting Mode to ‘Moving Lead’.
A7
Sets Fretting Mode to ‘Polyphonic’.
Strumming Controls
Strumming Mode
When Strumming Mode is
enabled
, playable range notes no longer result in sound playback. Instead,
the fretboard algorithm will visually display the most recent notes held together (up to the number of
available strings), re-calculating the shown voicing on every new note to select the best and most
‘natural’ way to play t he chord. This voicing is stored in perpetuity, so all string picks and strum triggers
will act on this voicing.
16

Strum on Poly Input
When Strumming Mode is
disabled
, notes played within the Poly Input Latency window will activate a
full down-strum following the strum mappings for timings and velocities.
Using this option, you can
seamlessly mix strummed chords and lead/melody parts without doing any keyswitching at all!
Strum Speed Map
Selects how the speed of strums is modified (velocity or MIDI CC.
Strum Speed CC
This CC is used for calculating strum speed when ‘CC’ is selected in the Strum Speed Map menu.
Strum Speed Invert
Inverts the input values when calculating strum speed.
Strum Volume Map
Selects how the volume of strums is modified (velocity or MIDI CC.
Strum Volume CC
This CC is used for calculating strum volume when ‘CC’ is selected in the Strum Speed Map menu.
Strum Volume Invert
Inverts the input values when calculating strum volume.
Strum Distance Map
Selects how the distance of partial strums is modified (velocity or MIDI CC.
Strum Distance CC
This CC is used for calculating partial strum distance when ‘CC’ is selected in the Strum Speed Map
menu.
Strum Distance Invert
Inverts the input values when calculating partial strum distance.
Strum Audition Mode
Setting this to ‘New Note’ will play new individual notes in the playable range. Setting this to ‘All Notes’
will play all current stored notes in the set voicing on every new note.
Hint:
When this is set to ‘New Note’, you can essentially play notes in the playable range with full
confidence that they will be voiced polyphonically and as close to the actual played voicing as possible.
This can be just as effective—if not more so—than the Polyphonic fretting mode!
Keyswitchable
This control will activate the keyswitches that can toggle Strumming Mode on or off.
Deactivated by
default to prevent accidentally swapping modes.
17

Tab 3 Articulations
Our ‘Total Control Articulation Control’ TACT technology has been upgraded to Version 3 in this
product, offering more convenience and power than ever in a single UI!
TACT Overview
Enabling / Disabling Articulations
Any articulation can be disabled or enabled by
alt
+
clicking
or by pressing the power button in the
Sound tab (located at the bottom of the UI. Disabled articulations will not trigger, and will be purged
from memory (thereby freeing up RAM.
Selecting an Articulation
To select an articulation for editing, simply
click
on it. The selected articulation will be
highlighted
with
a red border. If you are using
latching keyswitches
(see next page for more details) for articulation
selection (which is the default setting),
click
ing on an articulation will also
activate
your corresponding
keyswitch, blotching it fully red.
This functionality makes quickly auditioning articulations a snap!
Multi Selection
To select more than one articulation at once: hold
Control
or
Shift
, and
click
the articulations you want
to select. When multiple articulations are selected, adjustments made to the Sound tab will be applied to
all of the selected articulations.
Mappings (made in the Map tab; more information below) cannot be applied to multiple articulations
simultaneously.
18

Mapping Info
The text in each articulation box (such as Vel 1 - 27 or KS (L) C-2) shows the current mapping for
that articulation.
The current mapping section shows how the articulation is currently triggered. Here are the relevant
abbreviations:
KS
Keyswitch. Press the listed key (in this example, C-2) to trigger the articulation.
(L)
Latching. A latching keyswitch does not need to be continually held down to work.
C-2
The MIDI note that will trigger the articulation. (C-2 is the lowest MIDI note.)
Here are some other examples of mapping abbreviations you might see:
Vel 1 - 19
Articulation must be played at MIDI velocities 1 and 19 to trigger.
CC1 12-127
MIDI Controller 1 (CC1) must be between values 12 and 127 for the articulation to
trigger.
PW 1024-8192
The Pitch Wheel controller must be between values 1024 and 8192 to trigger.
(NB: The minimum Pitch Wheel value is
-8192
.)
Key C4 - C5
The articulation will only trigger on MIDI notes between C4 and C5.
(NB This is NOT a KS; this refers to actual playable notes that make sound.)
Ped Down / Up
The Sustain Pedal (CC64) must be down (or up) for the articulation to trigger.
Legato Toggle Button
This button can be
clicked
to enable, for certain articulations. When disabled, a ... symbol will
instead appear, and that articulation will not trigger legato or portamento transitions.
19

The Sound Tab
Each articulation has slightly different controls in the Sound Tab. These include:
SUSTAIN
Volume
Controls the overall volume of the articulation.
Offset
Controls the sample start offset. At 0, the sample will be played back from its natural beginning. For
values above 0, the early part of the recording will be ‘cut off’.
Vel → Vol
Controls the degree to which velocity affects the volume of this articulation. At 0, velocity will have no
impact on volume (but will still be used to switch which dynamic [’velocity’] layer is selected.)
Velocity Layer
For short articulations with multiple dynamics (such as
Sustain
, shown above) this table can be used to
assign the dynamic levels to be triggered within certain MIDI velocities:
➔ The X-axis of the table is the MIDI velocity, so the leftmost side is velocity 1, and the rightmost
side is velocity 127.
➔ The Y-axis is the dynamic level, with the lowest at the bottom and the highest at the top. This
will automatically ‘snap’ into place.
20

This can be useful if, for example, you’re writing a very quiet piece and don’t want to use the recordings
of the top sustain dynamic. You could use your mouse to draw the Velocity Layer table such that t he
2nd ‘step’ extends all the way to the right, like so:
Or, if you want the highest dynamic to require a very hard key press (that is to say, a very high velocity),
you could draw t his table like this:
ADSR Volume) Envelope
Controls the volume envelope triggered each time the articulation is played.
21

MUTE
Tightness
Adjusts how quickly palm mutes decay. This is basically a combination of adjusting the Decay and
Sustain controls on the ADSR envelope.
Vel → Tightness
When enabled, lower velocities will decay even faster than normal.
LEGATO HAMMER/PULL
Range
Sets the max distance in semitones that hammer/pulls can trigger.
Defaults to 2 semitones
.
Force Same-String
Enabled by default. When
dis
abled, the engine will allow triggering hammer/pulls from one string to
another, which isn’t technically realistic but may ‘feel’ better in certain situations.
Realistic Volume
When enabled, the volume of hammer/pulls will scale down over time until you strike a new non-legato
note.
22

LEGATO SLIDE
Speed
Time stretches or compresses the slide transition samples to make slide transitions faster or slower
overall.
Not available when ‘Lite’ is enabled.
Vel → Speed
When enabled, higher velocities will trigger faster slides.
Realistic Volume
When enabled, the volume of slides will scale down over time until you strike a new ‘non-legato’ note.
XFade
Note that in the
Legato Slide)
image above, there is a third tab in the top-right corner of this area of
the UI X-Fade. This tab only appears for
Legato Slide)
articulations, and is covered in the section
directly below.
23

The Special, Additional
Legato Slide)
Tab: X-FADE
This tab is only available for the Slide articulation and should generally only be used by advanced users!
NB For the purposes of describing these controls, we will use an example interval of
C3
(the ‘source’)
transitioning to
G3
(the ‘destination’). The controls are described from left to right, starting with the
Source
knob.
Source Fade-Out Time]
When a legato transition is detected, the source note (C3) will be faded out over this much time.
Transition Fade-In Time]
The transition recording (C3 to G3) will be faded in over this much time.
Transition Length]
The amount of time the transition recording will be played for before fading out.
Transition Fade-Out Time]
After the transition length, the amount of time before the transition fades out completely.
Destination Fade-In Time]
The destination note (G3) will be faded in over t his much time.
24

The Map Tab
Each articulation can have up to three ‘rules’, or conditions under which that articulation may trigger.
In the example image above,
Sustain
will trigger if the keyswitch C-1 is pressed. The Latch button is
enabled
, meaning the keyswitch will stay down even if you were to release the keyswitch.
Multiple articulations can share the same keyswitch or velocity range. However, if you do this, the UI
may show a conflict,
e.g.
,:
Here,
Sustain
and
Rake
are both set to trigger on the keyswitch C-1. Note the warning triangle ⚠ and
the red fill in both the
Sustain
and
Rake
articulations.
If you encounter such a conflict, you must then add an additional, unique rule to each of these
articulations to tell the engine when and how to play them, and thereby remove the conflict.
In this instance, for example, you could assign an additional rule to
Rake
to be triggered via velocity
values 120 through 127, and a complementary rule to
Sustain
to be triggered only via velocity values 1
through 119. This way, though they share the same C-1 keyswitch, they are uniquely situated in their
velocity ranges, and thus no longer have a conflict.
25

Tab 4 Advanced
In this tab, you can easily control a number of engine playback parameters.
Transpose
Shifts all MIDI input up to +/- 12 semitones.
MIDI Guitar Mode
When enabled, the patch is enabled for use with MIDI guitars or pickups that send MIDI messages on
different channels for each string of the guitar. The highest string corresponds to MIDI ch. 1; the
next-highest string corresponds to MIDI ch. 2; and so on.
You MUST first set the patch to OMNI MIDI
input in Kontakt for this to work!
NB: If your MIDI guitar has 6 strings, you will not be able to access the lowest 2 strings in this fashion.
Invert MIDI Channels
When MIDI Guitar Mode is enabled, this simply flips the expected channel input: the
lowest
string
corresponds to MIDI ch. 1; the next-lowest string corresponds to MIDI ch. 2; and so on.
You may need to
do this depending on the configuration of your MIDI-equipped guitar.
NB: If your MIDI guitar has 6 strings, you will not be able to access the highest 2 strings in this fashion.
26

Curve Dropdown Menu]
There are two options, which select which engine curve the graphical curve (and its controls, outlined
below) currently controls:
Velocity Curve
This curve maps input velocity for the Velocity → Volume processing.
Lower values result in quieter samples at the chosen velocity, while higher
values are louder. The degree of the effect is controlled personally by each
articulation in the TACT tab on the second parameter page.
See the TACT
manual for more information.)
Strum Speed Curve
This curve maps input velocity to select different dynamic layers. Due to
different articulations having a different number of layers, it is a general
curve from 1 to 127.
Curve Minimum Value (left vertical slider)
Adjusts the value at which the velocity curve starts. Holding Alt Option] will also move the maximum
value at the same time, making it a fixed value across the whole velocity range.
Curve Maximum Value (right vertical slider)
Adjusts the value at which the velocity curve ends. Holding Alt Option] will also move the minimum
value at the same time, making it a fixed value across the whole velocity range.
Curve Curvature (bottom horizontal slider)
Adjusts the curvature of the velocity curve, from concave → linear → convex.
27

Keyswitch Functions
These dropdown menus let you specify keyswitches for specific engine functions. You must ensure
these don’ t conflict, as they exist outside of TACT and have no built-in conflict detection. The keyswitch
notes created by these menus are all latching.
Force String
Sets up a keyswitch note for each string, plus a note to disable ‘Force String’. When
enabled, all notes will be played on the desired string if at all possible.
Set Hand
Sets up a keyswitch note that, when pressed, sets the current
hand position
. The
hand position selected equals the velocity of the keyswitch note (velocity 1 = fret
position 1, velocity 2 = position 2, etc.)
Picking Mode
Sets up a keyswitch note for each possible picking mode.
Fretting Mode
Sets up a keyswitch note for each possible fretting mode.
28

Shred Window
The maximum amount of milliseconds between subsequent notes to trigger Shred processing.
Shred processing uses a combination of sample offset and low-pass filtering to reduce pick energy
during fast passages and create much smoother lines.
This functionality is one of the latest
developments towards the namesake of this series!
Shred Offset
The amount of sample offset to use during Shred processing.
↓ Stroke Offset
Increases the sample offset for all articulations’ downstroke RRs.
↑ Stroke Offset
Increases the sample offset for all articulations’ upstroke RRs.
Anti-Repetition On/Off
When
enabled
, the instrument will randomly use neighboring samples during playback to create more
variation.
Anti-Repetition] Chance
Sets the probability that neighboring samples will be used during playback, when Anti-Repetition is
enabled.
29

Ringing
When enabled, the virtual guitarist will occasionally ‘flub’ a note, touching an adjacent open string or
two.
Useful for adding extra ‘dirtiness’ and overtones to your parts, but it does cost extra CPU, so be
careful!
Chance
Controls % chance of
Ringing
occurring per note.
Volume
Controls the volume of the
Ringing
resonance.
DI Line Noise
Increases the volume of constant line noise. The noise will start when you start playing, and will fade
out when you finish.
30

Hand Reset Time
Once all notes are released, the engine will reset the virtual hand position after this much time has
passed. If you are using a forced hand position, this does nothing.
Hand Reset] On Daw Star t
When enabled, the hand position will reset on DAW transport start.
Release On Hand Move
When enabled, if the virtual hand moves to a new position, all held notes will be released.
Release On Chord Change
When enabled and strum mode is activated, all held notes will be released when new notes are entered
into the playable (
i.e.
, blue range), changing the chord voicing.
Poly Release Retrigger
When enabled, released notes will retrigger legato-style just as in Mono Lead Mode. Unlike Mono Lead
Mode, however, this behavior is constrained to each individual string.
31

Articulations
Sustain
C1
Standard picked single notes that ring out fully. Simple!
Defaults to velocities
1119.
Rake
C1
Similar to a Choke, this is a very fast strum across muted strings.
Defaults to
velocities 120127.
NB: This articulation plays before whatever articulation it is layered with, such
as Sustain. It’s ideal to emphasize lead notes while playing a melody.
Mute
C♯1
Palm-muted single notes recorded with multiple degrees of palm-muting, from
‘very muted’ to ‘half-muted’.
The amount of palm-muting is controlled by
velocity.
Staccato
D1
Short, unmuted notes.
Power Chord
Sustain
D♯1
Sustained power chords (root, fifth, octave).
Power Chord
Mute
E1
Palm-muted power chords (root, fifth, octave).
Power Chord
Staccato
F1
Short, unmuted power chords (root, fifth, octave).
Tremolo
F♯1
Rapid picking of a single note on a single string, looping endlessly.
Choke
G1
Quick, short strums on one string, significantly muted to the point where there
is very little pitch-content.
Tapping
G♯1
All notes are played as hammer-on, ringing out fully. No picked notes here!
Harmonics
A1
Natural harmonics, triggered via pick, that ring out fully.
Pinch
Harmonics
A♯1
Pinch squeals (heavy harmonics with vibrato), triggered via pick, that ring out
fully.
FX
B1
Various decorative performances to sprinkle in for added realism.
32

About Legato Articulations
Legato articulations are generally triggered when one note is held and another note within 12 semitones
is played simultaneously (that is, their MIDI in the piano roll is overlapping). To ensure that you trigger
legato only when intended, and not in the place of chord strums, remember to use
Poly Input
.
Hammer-On &
Pull-Off
Brief transitions that end on a sustained note.
Hammer-On
s are triggered when
playing within the Hammer-On Range on the same string while ascending in
pitch; one finger is used to ‘hammer’ the fret a semitone higher.
Pull-Off
s are
triggered the same way, but
descending
in pitch by one semitone, and have a
softer attack. With the Force Hammer-On button
disabled
, this articulation will
not play on strings that have not yet been picked.
Slide
Also known as
portamento
, this is a slide from one fret to another. The virtual
hand will move to the new note as if the exact same finger had been on both
the source and destination notes.
In Shreddage 3.5, the Slide transition is
limited to 12 semitones (t hat is, one octave).
Power Chord Slide
Just like Slide, but for power chords!
This is limited to 12 semitones.
About Release Articulations
As the name suggests, Release articulations trigger when a MIDI note is released (note-off message).
These are incredibly useful for making your virtual guitar parts sound more realistic by automatically
adding scrapes, squeaks, and other little noises t hroughout the performance.
Pitched Release
The sound of a string being released on a given pitch.
Power Chord
Pitched Release
The sound of a power chord being released quickly.
Unpitched Release
All sorts of non-tonal scrapes, squeaks, and pick movement inherent to natural
and realistic playing.
33

Keyswitches
FX & FX Keyswitches
C0
Dedicated ‘slide’ keyswitch. Performs a slide transition between the current note
and the next note.
C♯0
Dedicated ‘fret noise’ keyswitch.
D0
'Slide note' keyswitch: If activated
before
a note, performs a slide from the end of
the fretboard up to that note. If activated
during
a note, performs a slide from that
note down to the end of the fretboard.
D♯0
'Thrash note' keyswitch: Re-triggers the last-played note, allowing you to easily
riff between t his and another note for fast patterns!
Behavioral Keyswitches
C2
thru
F2
‘Force string’ keyswitch: C2 forces lowest E string (string 6; each subsequent
key forces each subsequent string, respectively.
F♯2
Disables ‘force string’ behavior.
A♯2
‘Force hand position’ keyswitch.
Hand position corresponds to MIDI velocity on
this keyswitch such that higher velocities trigger higher hand positions.
B2
Disables ‘force hand position’ behavior.
Hand position is now AUTO.
F♯8
Legato ON.
This is the default.
G8
Legato OFF.
This forces Legato OFF despite whether Legato articulations are
active in the
Articulations
tab.
(NB: The performance styles which disable legato do it via this keyswitch!
NB: for
Strumming
,
Picking
, and other
Performance
Keyswitches, see the
Tab 2 Strumming
section
(starting page 15.
34


Setup & Tweaking
Tips for Getting the Most out of the User Interface
➔ Almost all controls can be MIDI-learned by 1 right-clicking the UI and 2 selecting ‘MIDI Learn’.
You will then need to move the control of your choice (
i.e.
, fader, knob,
et al.
) on your MIDI
control surface or in your DAW to establish the link.
Pro tip: Once you MIDI-learn something, you should save your modified version of that NKI so
you won’t have to do it again!
➔ You can view Help Text by hovering over controls in the Shreddage 3.5 Hydra UI. The Help Text
will appear at the bottom-left of the Kontakt UI plug-in window. You can go to the Panels
drop-down menu by clicking the . Panels) icon at the top-right of the plug-in window and
ensure ‘Info’ is checked:
➔ The colorful Kontakt virtual keyboard, seen in our videos, is a Kontakt feature and not specific to
Shreddage 3.5 Hydra. To enable the virtual keyboard, simply press F3 on your computer (
not
MIDI! keyboard. Alternatively, you can go to the Panels drop-down menu by clicking the
Panels) icon at the top-right of the plug-in window and ensure ‘Keyboard’ is checked:
➔ Shreddage 3.5 Hydra is fully NKS Compatible and features quite a few existing
host-automatable controls. If you have a Komplete Kontrol keyboard or use the Komplete Kontrol
application, you will be able to benefit from this functionality!
36

Tips for More Realistic Mockups
As with many aspects of music creation, t hink of these as guidelines, not hard-and-fast rules that can
never be broken!
Recording Live vs. Sequencing
If you have decent keyboard skills, it’s a good idea to try performing your guitar parts one at a time,
recording the MIDI data. The natural variations in timing and expression will often lead to a better result.
Stay Off t he Grid
For guitar, keeping every single hit 100% quantized to the grid will not sound very natural. Guitarists
usually push and pull with the beat to add emotion and musical ‘direction’.
If you’re quantizing your live playing, try using a 50% to 75% quantization value instead of 100%.
If you’re clicking in notes with a mouse, try manually making very slight adjustments to certain notes!
Use Dynamics
It’s tempting to gravitate toward very high dynamics, particularly when you are writing heavy rock &
metal tracks. But even in these ‘high-octane’ genres, real guitarists do not play at 100% maximum
energy at all times, and this sound can quickly fatigue the ear. Even for very heavy parts, try using a
spread of velocities within the same (albeit ‘high’) range.
Another possibility to make sure you retain volume/power in a loud mix is to decrease the values of
Velocity → Volume on the Advanced page, then using a wider range of MIDI input velocities. This
method acts somewhat like a compressor, pushing the maximum and minimum dynamic layer volumes
closer together while maintaining timbral variety.
Finally, ensuring that you’re monitoring your music at an appropriate level to begin with (not too quietly,
not too loudly) will help you make correct, informed decisions about dynamic performance and dynamic
range—not just for your guitar parts, but for each element in your mix!
37

More Musical Tips for Mockups
➔ You can make the guitar sound deeper, darker, and larger than it actually is by
lowering
the
Tune knob of the Kontakt instrument slot itself by about 5 semitones, then
increasing
the
Transpose knob within the S3.5 UI by the same 5 semitones. The result is the same pitch but
with a more robust tone.
This is also a handy tool for creating even more convincing
double-tracks. You can try less OR more extreme values as well!
➔ To mimic the bright, articulate single coil sound found in modern progressive music for clean and
crunch tones, load an Analog EQ into Console and click the ‘Presets’ dropdown menu at t he top
right of the FX parameter pane. Select ‘Load FX Preset’, and navigate to the Shreddage 3.5
Hydra ‘Data’ folder where you installed the librar y and load the Analog EQ Single Coil Mod.nka
file.
Best used on the neck pickup!
➔ Switching the Fretting Mode of the instrument can dramatically change the tone and character
of your performances. If you aren’t 100% pleased with the voicing of your parts, tr y simply
changing modes; you may discover that you do not need to do any automation or MIDI tweaking
whatsoever to get your ideal result!
➔ As with the physical guitar, the Pickup Selector Switch of Shreddage 3.5 Hydra gives you an
enormous range of tone options. Merely changing pickups from Neck → Neck + Bridge → Bridge
will give you very different sounds, both clean and when driven through an amp/cabinet. When
you factor in per-pickup EQ and FX within Console, the options are truly limitless! (
Hint: try
panning the two pickups differently!
You can also set each pickup to a separate DAW output within Kontakt to process each of the
channels within your
own
FX processing workflow.
➔ When mixing and mastering rock and metal (or any other genre where strict rhythmic precision is
paramount) using Shreddage 3.5 instruments, offset the guitar tracks backwards (in other
words, apply a negative track offset) of 20ms to 30ms. If you are using poly input latency, add that
number of milliseconds to that offset amount. If you are using global sample offset, subtract that
number of milliseconds from that offset amount.
Applying this negative delay offset will dramatically reduce the audible delay of the guitar
transients against (the grid-quantized) drum sounds. The guitars will ‘pop’ better: drum
transients hitting a master compressor will compress guitar notes that arrive with or after them,
whereas guitar transients that arrive
before
the compression has fully kicked in will have a
chance to be lively and sound with better detail.
38

Tips for CPU & Memory Optimization
If you experience high CPU and memory usage with Shreddage 3.5 Hydra, there are a number of things
you can do to mitigate the issue.
Save memory and CPU by disabling unused pickup channels
If you are not using certain pickups, for example the Bridge position, consider disabling these
altogether on the Console tab. Doing this will reduce both memory usage and voice count.
Balance memory and CPU with DFD preload settings
Kontakt does not load all samples fully into memory; it only loads (or buffers) a small chunk of each one.
By clicking on the wrench icon next to a loaded patch, clicking Instrument Options, and going to the
DFD tab, you can adjust this preload buffer amount.
A higher buffer means less CPU usage but more RAM usage. A lower buffer means higher CPU usage
but less RAM usage.
It’s up to you to determine which setting is best for you.
Save CPU and memory by quitting unnecessary applications
For experienced users, this may seem obvious, but it’s easy to lose track of how much computing power
is being used by seemingly-innocuous applications. For example, it’s not uncommon to have a Chrome
browser, Discord, Slack, Skype, Zoom, and Dropbox all running at the same time. All of these not only
take up RAM, but can also interfere with real-time audio playback by causing pops & crackles.
So, anytime you work on a very intensive DAW project, it’s a good idea to close all applications and
services you don’t need - even if they just run in the background.
Avoid pops and crackles with a higher buffer size
This applies to your DAW settings in general. Typically, every DAW’s audio settings allow you to change
the ‘buffer size’ of the playback drivers. Sometimes, this may only be changeable in a separate
application, such as with some RME products.
The buffer size (measured in milliseconds or samples, like 8ms / 512 samples) determines the amount of
latency in DAW output and input, inversely correlated to CPU usage. In other words, lower buffer sizes
are much more demanding on your CPU than higher ones.
Though it feels great to perform and record MIDI at very low buffer sizes, this is also most taxing on
your CPU. Consider increasing your buffer size once you’re out of the MIDI recording phase, and on to
editing, mixing, and mastering.
39

Credits & Acknowledgements
Executive Producer: Andrew Aversa
Programming: Nabeel Ansari, Mario Krušelj, Sarah Mancuso
UI Design: Dickie Chapin, Paulo Nunes
Recording & Performance: Anthony Mena, Michael Henson, Joey Callahan
Pre-Production: Patrick Windsor, Connor Louiselle
Editing: Andrew Aversa, Anthony Mena
Marketing: Lauren Liebowitz
User Manual: Kent Kercher
Quality Assurance: Fredrik Häthén
Troubleshooting
Having trouble with Shreddage 3.5 Hydra? Use it in a project you want to tell us about? Drop us a line
via our Contact page (but be sure to read the FAQ first!
40

Copyright & License Agreement
License Agreement
The following license is granted non-exclusively to all purchasers of our products. This version (updated
20 December 2022 supersedes any prior printed or digital versions of our license.
Overview
All sound recordings, performances, scripting and/or code contained in this product is the intellectual
property of Impact Soundworks LLC (‘ISW’) unless otherwise noted, and remains the property of ISW
after the product is purchased. When purchasing an ISW product, you are purchasing a non-exclusive
license to use, edit, perform, or otherwise utilize the contained recordings, performances, scripting
and/or code for commercial and non-commercial purposes as defined below.
Authorized Users
Depending on the type of customer and usage scenario, authorized users of this license will vary.
ALL purchases fall into category A or B:
A. Individual Purchase
This license is extended to customers who are purchasing as the primary user of the product, OR are
purchasing on the behalf of another primary user (i.e. as a gift). The licensee (primary user) MAY install
the product on as many computer systems as they have access to. However, ONLY the licensee may
use the product. No other users are authorized.
B. Corporate/Academic/Institutional Purchase
This license is extended to customers who are purchasing for a multi-user setting, such as a shared
studio, networked workstation, computer lab, etc. In this case, the licensee is the institution and not any
one user. In contrast with individual purchases, an institutional license applies to ONE computer /
workstation. All users of that workstation who belong to the purchasing institution (licensee) shall be
considered ‘aut horized users’. However, at no point may multiple authorized users access one license
simultaneously. Multiple licenses must be purchased if the product is to be used by multiple users
simultaneously.
Scope of License Virtual Instruments, Sample Libraries)
The licensee is entitled to t he use and unlimited editing of the Product within the scope of music
production, performance, recording, and composition. This includes both non-commercial and
commercial usage of all types, including, but not limited to, film scores, television scores, music
libraries, video game soundtracks, digital and physical music releases, albums, compilations, etc.
The licensee is entitled to distribute, sub-license, sell, stream, edit, monetize, or otherwise utilize any
music created with the Product.
Exceptions to this scope are listed below.
41

The licensee MAY NOT use the Product in the production of any other sample library or virtual
instrument products.
The licensee MAY NOT sell
individual sounds
from the Product in any audio marketplace (e.g. stock
audio websites, sound effect libraries, etc.)
For clarity: The licensee MAY use sounds from the Product to create individual sound effects SFX for
use in film, TV, advertising, and video games. The limitation is strictly on selling
individual sounds
in a
marketplace, SFX library, or similar.
Ownership, Resale and Transfer
Redistributing, reselling, electronically transmitting, uploading, sharing, or renting the Product in any
way, shape, or form is prohibited by law. The licensee may create a physical backup copy of any
digitally purchased and downloaded Product. This backup copy is subject to the same limitations as the
original copy of the Product, and may not be transferred to any other individual for any reason.
Copyright © 2023 Impact Soundworks, LLC. All Rights Reserved.
42
