
User’s Manual
© 2024 All rights reserved.
For the most recent version of this manual please visit
http://www.primera.com/EddieDownloads
2
Notices: The information in this document is subject to change without notice. NO WARRANTY OF ANY KIND IS
MADE WITH REGARD TO THIS MATERIAL, INCLUDING, BUT NOT LIMITED TO, THE IMPLIED WARRANTIES OF
MERCHANTABILITY AND FITNESS FOR A PARTICULAR PURPOSE. No liability is assumed for errors contained herein
or for incidental or consequential damages in connection with the furnishing, performance, or use of this material.
This document contains proprietary information that is protected by copyright. All rights are reserved. No part of
this document may be photocopied, reproduced, or translated into another language without prior written
consent.
Trademark Acknowledgments: Primera and Primera Eddie are registered trademarks of Primera Technology, Inc.
Windows is a registered trademark of Microsoft Corporation. All other trademarks are the property of their
respective owners.
Revision History
Edition 1.2, Copyright 2024, All rights reserved.
FCC Compliance Statement: This device complies with part 15 of the FCC rules. Operation is subject to the
following two conditions: (1) this device may not cause harmful interference, and (2) this device must accept any
interference received, including interference that may cause undesired operation.
For Users in the United States: This product is intended to be supplied by a UL listed Direct Plug-In Power Supply
marked “Class 2” or a UL listed ITE Power Supply marked “LPS” with output rated 12VDC, 3A or higher. This
equipment has been tested and found to comply with the limits for a Class A digital device, pursuant to Part 15 of
the FCC Rules. In a domestic environment, this product may cause radio interference, in which case the user may
be required to take adequate measures. This equipment generates, uses, and can radiate radio frequency energy
and, if not installed and used in accordance with the instructions, may cause harmful interference to radio
communications. However, there is no guarantee that interference will not occur in a particular installation. If this
equipment does cause harmful interference to radio or television reception, which can be determined by turning
the equipment off and on, the user is encouraged to try to correct the interference by one or more of the following
measures:
• Re-orient or relocate the receiving antenna.
• Increase the separation between the equipment and receiver.
• Connect the equipment into an outlet on a circuit different from that to which the receiver is connected.
• Consult the dealer or an experienced radio/TV technician for help.
Use of shielded cables is required to comply with the Class A limits of Part 15 of the FCC Rules. You are cautioned
that any changes or modifications not expressly approved in this manual could void your authority to operate
and/or obtain warranty service for this equipment.
For Users in Canada: This digital apparatus does not exceed the Class A limits for radio noise for digital apparatus
set out on the Radio Interference Regulations of the Canadian Department of Communications. Le present appareil
numerique n'emet pas de bruits radioelectriques depassant les limites applicables aux appareils numeriques de la
class A prescrites dans le Reglement sur le brouillage radioelectrique edicte par le ministere des Communications
du Canada.
031524
3
Table of Contents
Section 1: Getting Started ............................................................................................................................. 5
1A Choosing a Good Location ................................................................................................................... 5
1B Unpacking and Inspection.................................................................................................................... 6
1C Setup the Printer .................................................................................................................................. 7
1D Identifying the Parts .......................................................................................................................... 20
1E Button/LED Panel Operation .............................................................................................................. 23
1E1 Calibrate the Carousel Platter ...................................................................................................... 24
1E2 Demo Mode ................................................................................................................................. 24
1E3 Move the Carousel Two Spaces ................................................................................................... 25
1F Cartridge Life/Best By Date ................................................................................................................ 26
1G Ethernet Connection Information (PC Only) ..................................................................................... 27
Section 2: Print Item and Cartridges ........................................................................................................... 31
2A Cookie / Print Item Specifications ..................................................................................................... 31
1-Carousel Attached – Multiple Cookie Mode .................................................................................... 31
2-Manual Mode – Carousel Detached – Single Cookie mode............................................................. 33
3-Using the Platform Kit for up to 2” (50.8mm) high Cookies/Items. ................................................ 35
4-Print Surface Specifications for Best Print Quality .......................................................................... 36
2B Installing / Replacing the Ink Cartridge .............................................................................................. 37
2C Loading the Print Item ....................................................................................................................... 40
Section 3: Primera PrintHub ....................................................................................................................... 41
3A Using the Cost Estimator ................................................................................................................... 42
3B PrintHub Settings ............................................................................................................................... 43
3C PrintHub Advanced Printer Settings .................................................................................................. 44
3D General Settings / Multiple Printers Support .................................................................................... 46
3E Cartridge Maintenance Settings ........................................................................................................ 46
3F Advanced Eddie Settings – Scan Large Print Area.. ............................................................................ 47
3G Centering Alignment Tab ................................................................................................................... 48
Section 4: Printing ....................................................................................................................................... 49
4A Using BarTender ................................................................................................................................ 50
4B Add Text and Graphics to a BarTender Design .................................................................................. 58
4
4C Removing Image background with Paint 3D ...................................................................................... 59
4D Printing from Other Programs ........................................................................................................... 61
4E Printer Driver Settings (Print Quality and Ink Saturation) ................................................................. 62
4F Print Image Centering and Alignment ................................................................................................ 65
Section 5: Printing from a Mac ................................................................................................................... 67
5A Print Utility Settings (Eddie Config Utility) ......................................................................................... 67
5B Adjusting Print Alignment (Centering) ............................................................................................... 69
5C Advanced Eddie Settings. ................................................................................................................... 70
5D Printing from Swift Publisher............................................................................................................. 72
5E Creating a Custom Page Size .............................................................................................................. 79
5F Printer Driver Settings ........................................................................................................................ 81
Section 6: Troubleshooting/Maintenance .................................................................................................. 86
6A Solving Print Alignment Problems ..................................................................................................... 86
6B Maintenance/ Cleaning ...................................................................................................................... 87
6B1 The Carousel Platter ..................................................................................................................... 87
6B2 Crumb Catcher ............................................................................................................................. 88
6B3 The Carousel ................................................................................................................................ 90
6B4 Ink Trough – Clean Weekly .......................................................................................................... 91
6B5 The Cookie Height Sensor – Clean Weekly .................................................................................. 93
6B6 Exterior and Interior of Printer – Stainless Steel Surfaces ........................................................... 94
6B7 The Cookie Platform .................................................................................................................... 95
6B8 Ink Maintenance Area (Wiper and Cap) ...................................................................................... 96
6C Replacing the Ink Filters ..................................................................................................................... 97
6D Poor Print Quality – Cleaning the Cartridge .................................................................................... 101
6E Manual Feed Mode .......................................................................................................................... 105
6F Error Messages (Knowledgebase). ................................................................................................... 106
6G Interpreting LED Indicator Lights (Flashing Lights). ......................................................................... 106
6H Technical Support. ........................................................................................................................... 107
Section 7: Technical Specifications ........................................................................................................... 108
Section 8: Recipes ..................................................................................................................................... 109
Section 9: Certifications and Environmental Policy .................................................................................. 111
5
Section 1: Getting Started
THANK YOU…
...for choosing Eddie the Edible Ink Printer. Eddie will print vibrant colors and stunning photo-
realistic photographs directly onto cookies and other approved print items.
This User’s Manual is your complete step-by-step guide to quickly and easily setting up and
printing with your new Edible Ink Printer!
1A Choosing a Good Location
• Place the Printer on a flat surface in a location with adequate air circulation to prevent
internal heat build-up.
• Do not place the Printer near heat sources such as radiators or air ducts, or in a place
subject to direct sunlight, excessive dust, mechanical vibration, or shock.
• Allow for 3” of clearance behind the Printer to accommodate cables and ink overspray
venting. Ink build-up may occur on surfaces close to the back of the Printer if ink filters
are not cleaned regularly.
• Allow for adequate overhead clearance for opening the top section to allow easy access
to the interior for cleaning. The Printer will require 10” (25.4 cm) of additional space
above to completely open the top section (Total = 17” or 43.18 cm).

6
1B Unpacking and Inspection
While unpacking your Printer, inspect the carton to ensure that no damage has occurred during
shipping. Make sure that all supplied accessories are included with your unit. The following
items are included in the supply box:
1. Power Adapter, Cord, and Adapters
2. 6’ USB Cable (If another USB cable is used, it must be 6’ (2 M) or less)
3. Color Edible Ink Cartridge
4. Printer
5. Crumb Catcher with preinstalled Ink Filter (Stainless Steel)
6. Carousel Base with six-pin mini din cable
7. Carousel Platter (with triangle spacers)
documentation
1
2
3
4
5
6
7
8
Ink Filter – Do not Discard!
Spacer Preinstalled

7
1C Setup the Printer
Some assembly is required to set up your Printer.
1. Install the clear top cover aligning the pins with the holes on the top section of the
Printer. Install one side and then bend the cover gently to allow the second pin to reach
the hole on the opposite side.
Pins
Clear Cover
8
2. Open the top of the Printer and remove the foam shipping insert. Keep it along with the
other boxing material.
9
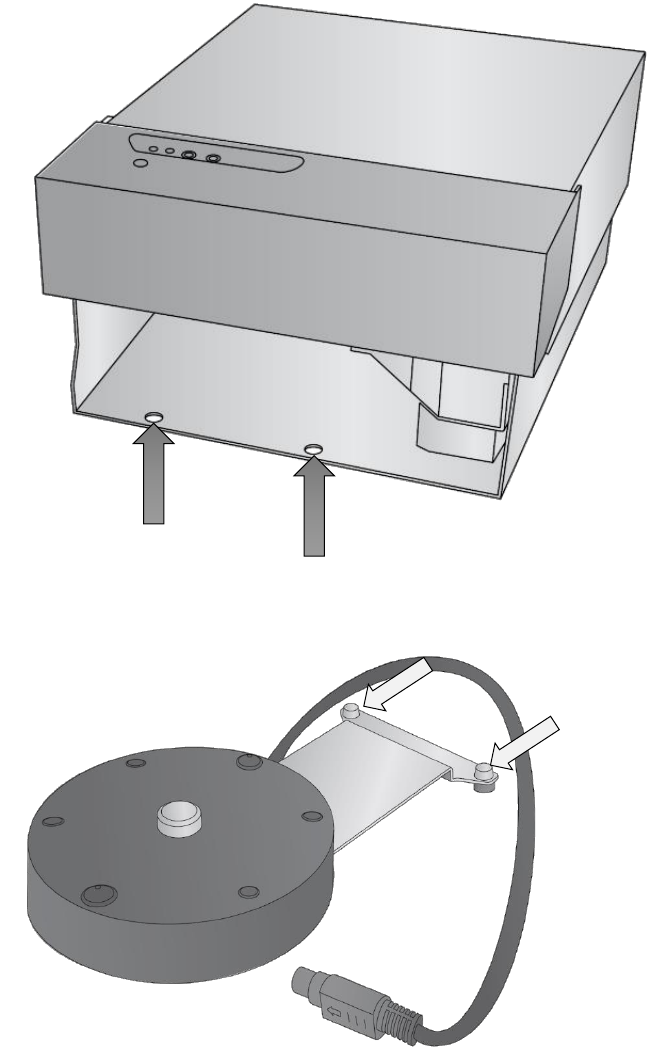
3. Locate the Carousel positioning holes in the base.
4. Locate the Carousel Base. Locate the position pins.

10
5. Lift the base of the Printer slightly and slide the carousel base underneath. Align the
holes with the pins and lower the Printer into place.

11
6. Locate the 8 Pin Mini Din Cable attached to the Carousel Base. Route the cable along
the left side of the unit until it reaches the back of the Printer. Open the Top Cover.
8 Pin Mini Din Cable
Carousel Base
Route Cable Here
Cover Open

12
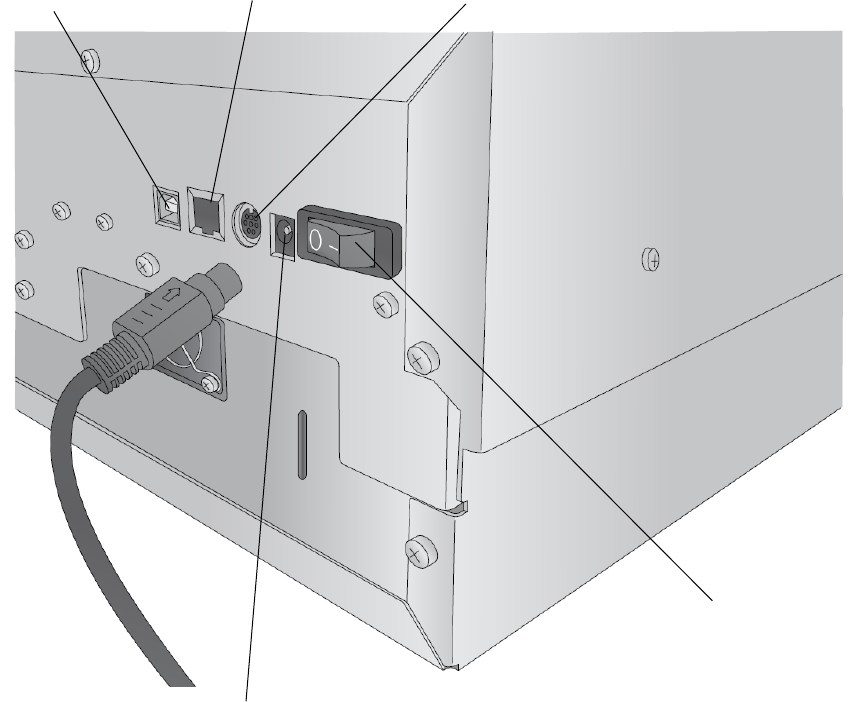
7. Connect the 8 Pin Mini Din Cable to the round port on the back of the Printer.
8. Locate the Power Supply.
Cable Specifications:
Serial RS-232 Mini DIN8

13
9. Install the appropriate adapter by aligning the tabs on the plug to the slots in the power
adapter. Rotate the plug until it snaps into place.
10. Connect the Power Brick to a wall outlet and the round barrel connector to the back of
the Printer.
Slots
Release Tab

14
11. Switch on the Power Switch.
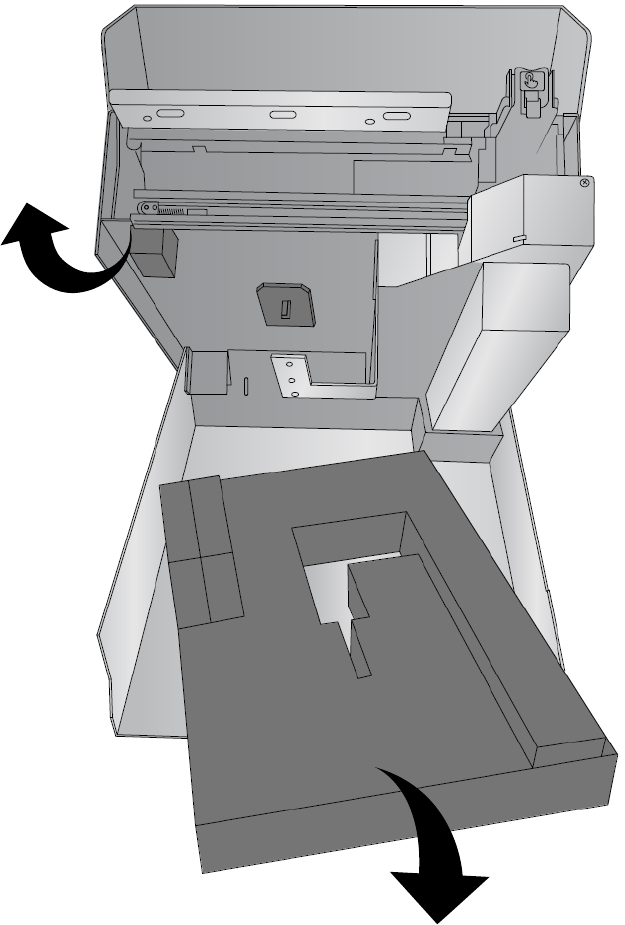
12. Lift up on the top section of the Printer just under the control panel.
Lift Here
Control Panel

15
13. The top section of the Printer will open and stay open with a gas spring. As long as the
power is on, the cookie platform will move up and out of the way, so you may install the
Crumb Catcher.
Cookie Platform

16
14. Locate the Crumb Catcher. There are hooks on the back that correspond to slots on the
back of the Printer.
Hooks
Slots
Ink Filter – Do not Discard!

17
15. Install the Crumb Catcher by inserting the hooks into the slots. You will see the hooks
through the slots on the back of the Printer. Align the front Crumb Catcher tabs on
either side of the Carousel Base connection bracket.
16. Lower the Top Section of the Printer.
Tabs
Crumb Catcher
Carousel Base
Back View
Hooks

18
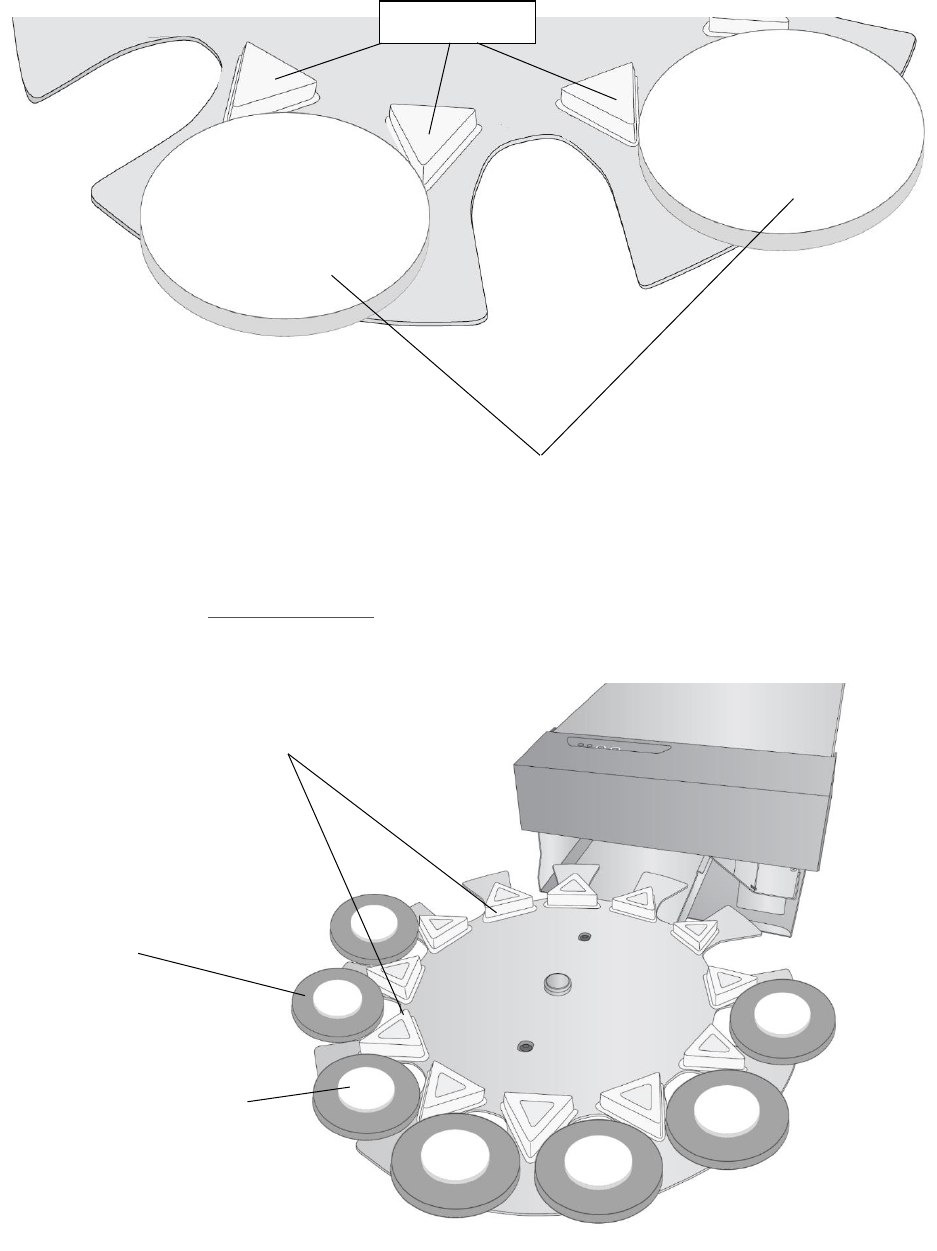
17. Locate the Carousel Platter. Note the location of the alignment holes and the Center
hole.
18. Install the platter by aligning the center hole with the center Hub on the Carousel
platter base. Rotate the platter by hand until the holes in the platter are aligned with
the pegs on the base.
Center Hole
Alignment Holes
Center Hub
Alignment Pegs

19
19. Lower the top cover.

20
1D Identifying the Parts
Assembled View
Control Panel
Top Cover
Carousel Platter
Placement Pegs
(Outer Triangles should be
installed for most Cookies)
Cookie Slots

21
Interior Carriage View
Control Panel
Cookie Height/Diameter Sensor
Cookie Platform
Encoder Strip
Cartridge Carrier
Cartridge Lid

22
Under Carriage View
Crumb Catcher
Filter
Crumb Catcher
Carousel Base
Ink Trough
23
Back View
USB Port
Ethernet Port
8 PinMini Din Port
Power Port
Power Switch

24
1E Button/LED Panel Operation
The button/LED Panel allows you pause the printer, load or unload a cookies and determine ink and
power status.
1E1 Calibrate the Carousel Platter
If cookie lifting and placement is out of alignment, you can do a calibration manually.
Press and hold the Load/Unload button and the Pause button simultaneously for 3 seconds. The
Carousel Platter will make a 1 and ¼ revolution. The calibration is now complete.
To check for proper calibration, you can press the Load/Unload button to attempt to lift the next cookie.
The cookie platform should rise exactly between the access slot on the carousel platter.
1E2 Demo Mode
To place the Printer in demo mode, press momentarily press both the Load/Unload and Pause buttons
simultaneously.
Demo mode will lift cookies, retract them for printing and go through the motions of printing (but not
print on them), and then immediately replace them on the platter continuously until you press the
pause button.
+
Hold for 3 seconds
+
Momentarily
Platter Calibration
Press to Resume printing in
manual mode or Pause any in
print in progress
Press to move the platter in/out
in manual mode or pick/place
from/to the next carousel space
Indicates Low Ink

25
1E3 Move the Carousel Two Spaces
Press Load/Unload for two seconds to move the carousel two spaces. This will allow you to more easily
remove the last printed cookie from the carousel. (Make sure you have firmware version 1.47 or higher
to enable this feature)
Hold for 2 seconds

26
1F Cartridge Life/Best By Date
Best By Date: Sealed cartridges are best for Two years after the manufacture date. The best by
date is printed on the cartridge box. FDA regulations require a best by date on the packaging.
Keep in mind, expiration dates and best by dates have very different meanings.
Expiration dates tell consumers the last day a product is safe to consume. On the other hand,
best by date tells you that the food is no longer in its perfect condition from that date. It may
just lose its freshness, taste, aroma, or nutrients. The best by date is essentially a quality
indicator. Since Primera Eddie ink is similar to food coloring, it has no nutritional value or taste
to contribute to the overall food product. You can be assured that using the ink beyond the
best by date is safe as long as the ink is still sealed in its foil packaging.
Expiration Date: Once opened, cartridges last for six months. PrintHub will start tracking the
six months from the first time they are used in the Printer. Hover over the ink levels to see the
remaining life after opening. Once you pass the six-month opened point, the PrintHub software
will warn you every time you print that your cartridge is expired and should be replaced.
Note: Two types of Eddie Edible Ink are available; one is approved for use in the USA and
Canada (053507) and the other for the European Union (EU) (053499). Cyan and Yellow are
identical in all ink formulations. Magenta is different. Please check with your local authorities
first to learn which Magenta ink is best for use in countries other than the USA and Europe. Or,
contact us at Primera. We may have additional information available that is specific to your
country.

27
1G Ethernet Connection Information (PC Only)
During the initial software setup, you may connect via USB or Ethernet. Depending on what
you choose, different options will appear in the setup application. The instructions below
explain how to install via Ethernet. Before continuing, connect only the Ethernet cable to your
Eddie. (You cannot connect both the USB cable and Ethernet)
1. If you choose Ethernet, the installer will automatically search your network for the printer
using the most common IP address range for simple networks (10.10.10.1-254 and
192.168.1.1-254). The IP address is the unique identifier that your network will
automatically assign to Eddie when you connect it to your router or wall jack.
2. If no printers are found, you will be able to adjust the IP address you are searching for – IP
Range to Sweep. In this example, we are searching for 10.10.8-11.1-254. It is searching
for 1,016 IP addresses. There are 4 digits to any IP address that can equal 0-254. The dash
in the 3
rd
and 4
th
digit indicates that the installer will search between 8 and 11. This means
it will search for 8, 9, 10, or 11. In the 4
th
digit, the installer will search for 1 through 254.

28
3. If you don’t know where to search, your own computer can guide you if it is connected to
the same network as your printer. Search for “Command Prompt” on your Windows
Search Bar. Click it to open.
4. Now type ipconfig on the prompt and press Enter.
5. Look for your IPv4 or IPv6 address. In this example, the address is 10.10.10.123. This is my
computers IP address. It tells me that we are using a 10.10. network, so the Eddie printer
is probably on the same network. Now I can edit my IP Range to Sweep to include values
in the 10.10.10.1-254 range. Depending on the number of devices on your network, you
may need to expand that range. Click Search again.
6. This printer was found on 10.10.11.46. Once it is found, click Install to install the printer
driver. You can verify the printer found is the one you expect by checking the serial
number displayed. If the printer is not found, make sure you see lights Green and Amber
lights on the ethernet port on the back of the printer. If no lights are present, you may
have a defective cable or a defective port on your printer or router/wall jack.

29
7. By default, the Printer Hostname method of installing the driver is checked. In most cases,
this will work fine. If it fails for any reason, restart the installer and check DHCP address.
The Reserved IP Address or static method is for advanced users. Click Create Hostname
Printer.
8. It should only take a few moments to install the driver. If the installer stays on this screen
for several minutes, click Cancel to be brought back to the previous screen.
9. You will see the following when the printer is ready to be installed. You may choose to
describe the location of the printer if you have multiple printers on your network. In this
example, we chose “Tech Support”. Click Set Description and then click Install.

30
10. Congratulations! You have successfully connected your printer to Ethernet.
Note 1: If you want to change your connection type or change Ethernet connection settings,
run the installer again and change the settings. There is no place to adjust these settings in
Print Hub. To find the installer, visit www.primera.com/eddiedownloads.
Note 2: The mac address will be printed on a label affixed to the back of your printer. The mac
address may be necessary for reserved (static) IP address installations.
Note 3: If you have both USB and Ethernet connected, USB will be the default communication
channel. To use Ethernet, you must disconnect the USB cable.
Note 4: It is possible to install both a USB driver and Ethernet driver so you may print using
whatever method is connected.
• USB driver name: Edible Ink Printer.
• Ethernet driver name: Edible Ink Printer
(PTI-[Unique ID]).
If connected via Ethernet, you may type in the
printer IP address to display information about the
printer. To find the IP address open PrintHub – Go
to Printer Settings – Click on Network Information.

31
Section 2: Print Item and Cartridges
2A Cookie / Print Item Specifications
The cookie size and shape you can print depends on whether or not you are using the
Carousel and other settings. You have more flexibility in Manual Mode/Single Cookie
mode. There are several modes available. See the specifications for each below.
1-Carousel Attached – Multiple Cookie Mode
0.08” to 0.75” - Height for
any print object loaded on
the carousel.
Outer Triangle Spacer Installed (Recommended)
Width: 2.5” – 3.85”
Height: 0.08 - 0.75" (Taller objects may be knocked of the tray/tongue by the
carousel as it is printing)
Shapes: Works with round, square, or other uniform shapes such as triangles,
hexagons or octagons work best in this mode.
Outer Triangle Spacer Removed
Width: 3.5” – 4.375” **
see note on next page
Height: 0.08 - 0.75" (Taller objects may be knocked of the tray/tongue by the carousel)
Shape: Round, square or other uniform shapes such as
triangles, hexagons or octagons work best in this mode.
Outer Triangle Spacer (Width: 2.5” – 3.85”)
Remove Outer Triangle Spacer for sizes larger
than 3.85”. Only every other slot can be used!
Note: Eddie will perform best in carousel mode with
the outer triangle spacers installed. If your cookie hits
the printer when the tray is rotated, remove the outer
triangle spacers and reposition your cookies.
Knowledgebase Article
32
**Outer Triangle Spacer Removed requires placing print items in every other space for items
larger than 3.42” (98mm). Otherwise, the items will touch one another, and you will not be
able to place them, so they are touching the fixed spacers.
Width 1” – 2.5” (Outer Triangle Spacer Installed)
• requires 3.5” Macaron Adapters or similar silicone coaster (min .08” high) Place the
coaster/adapter on the carousel plater and center the cookie on the coaster/adapter.
Adapter or Coaster
Cookie Centered
Every Other Space
Skip
Fixed Spacers
Skip
Adapters require installation of
outer triangle spacers

33
2-Manual Mode – Carousel Detached – Single Cookie mode (See section 6E)
With Cookie Centering Scan Enabled (See Section 3E).
Cookie Size: Any shape that does not exceed 4.5” x 4.5” x 1”
4.5” Length
4.5” Width
1.0”
Height
The cookie sensor must “see” a
cookie or coaster at the center
position of the platform/tongue
to start the scanning process.
First it scans for height, It will
then scan for length if centering
scan is selected.
Starts Printing Here

34
With Cookie Centering Scan Disabled – Recommend when using Custom Trays (See Section 3E).
Cookie Size: 4.5” wide x 1” thick x up to 8” inches long. Any shape or size that doesn’t fall off
the tray will work. The centering scan has a 4.5” max scan area. When Cookie Centering Scan is
disabled, you can use horizontal and vertical offsets to move the image. This is recommended
when using custom trays.
8” Length
.08” - 1.0”
Height
4.5” Width
The cookie sensor must “see” a cookie or coaster at
the center position of the platform/tongue to start
the scanning process.
Printable Area: 4.72” x 4.72”

35
3-Using the Platform Kit for up to 2” (50.8mm) high Cookies/Items.
The Eddie Platform Kit SKU 053255 contains a platform tray for items 1” (25.4mm) - 2”
(50.8mm) high and includes two risers for items under 1” (25.4mm) high. Print on donuts,
bagels, bars, or other larger treats! Maximum item size is 4.5” (114.3mm) wide x 8” long x 2”
(50.8mm) high.
Note: The Platform kit with a single riser installed can be used for printing using custom trays,
the carousel, or in manual mode. With the riser in place the same specs from 2A1 and 2A2
would apply.
The following print object size specifications apply to Platform kit in No Riser Mode.
Cookie Size = 4.5”W x 8”L x 1”-2”H
Printable Area = 4.72” x 4.72”.(Printable area is larger than cookie size to allow for full cookie
printing.)
Note: If you print over 4.5” length, the print will not cover the entire length.
8” Length
4.5” Width
1.0”-2.0”
Height
Printable Area: 4.72” x 4.72”

36
4-Print Surface Specifications for Best Print Quality
• The surface of each cookie should be frosted with the Primera recommended icing or
similar, or use the recipe printed in this manual.
• The surface should be as smooth as possible
• The surface should be hard to the touch and completely dry. To dry the surface, use
cornstarch, a dehydrator, a heat gun or wait 24 hours before printing.
• The color of the icing should be bright white for best quality and accurate colors. The
white surface makes the Cyan, Magenta, and Yellow colors match as close as possible to
the image on your computer screen. It also creates a vibrant bright image.
• Other surfaces can be printed, but colors may not match. For these, it is best to print
dark monotone colors that will stand out on darker surfaces.
Examples ---Video
• Sugar cookies
• Macarons
• Graham crackers (dark images/text work best for non-white print surfaces)
• Marshmallows
• Cake Pops
• Gold Powder Cookies
• Royal Transfers Toppers added to Cookies
1. Example 1 (Custom Cookies by Karen)
2. Example 2 (Custom Cookies by Karen)
3. Fancy Yancy
• Royal Transfers added to Cupcakes
• Any shape frosted cookies
• White chocolate-covered cookies/Oreos (wipe oil from the surface before printing)
• Molded white chocolate toppers (wipe oil from the surface before printing)
• White chocolate buttons (DTM Adapter)
• Candy such as M&Ms and Mentos (DTM/Milton/Sassy adapter)
• Fondant (wipe oil from the surface before printing)
Many of these items work best in manual printing mode using a custom Tray such as DTM Tray, Milton
Tray or Sassy Tray.

37
2B Installing / Replacing the Ink Cartridge
You can replace cartridges at any time or wait for the Low Ink Warning to prompt you to
replace cartridges. You will receive low ink warnings at 10% and 0%. Press the Load/Feed
button to continue printing after you receive this warning.
To change a cartridge, follow this procedure:
1. Open the front cover. That cartridge will automatically move to the right side if it is not
already there.
Three types of Eddie Edible Ink are available; two are approved for use in the USA and Canada,
and the other for the European Union (EU). Cyan and Yellow are identical in all ink formulations.
There are two magenta ink options for cartridges approved for use in the USA and Canada. The
Original Magenta prints more of an orange-ish red unless the artwork is adjusted in software.
The New Magenta ink prints more of a fire engine red without requiring software adjustment.
The EU Magenta already produces a great fire engine red but contains carmoisine, which the
USA’s FDA prohibits in food colorings.
SKU
NAME
53498
Original Magenta for USA and Canada
53507
Magenta+ for USA and Canada
53499
Edible Ink Cartridge for Europe

38
2. Press or pinch the tab on the front of the cartridge holder.
3. Remove the cartridge.
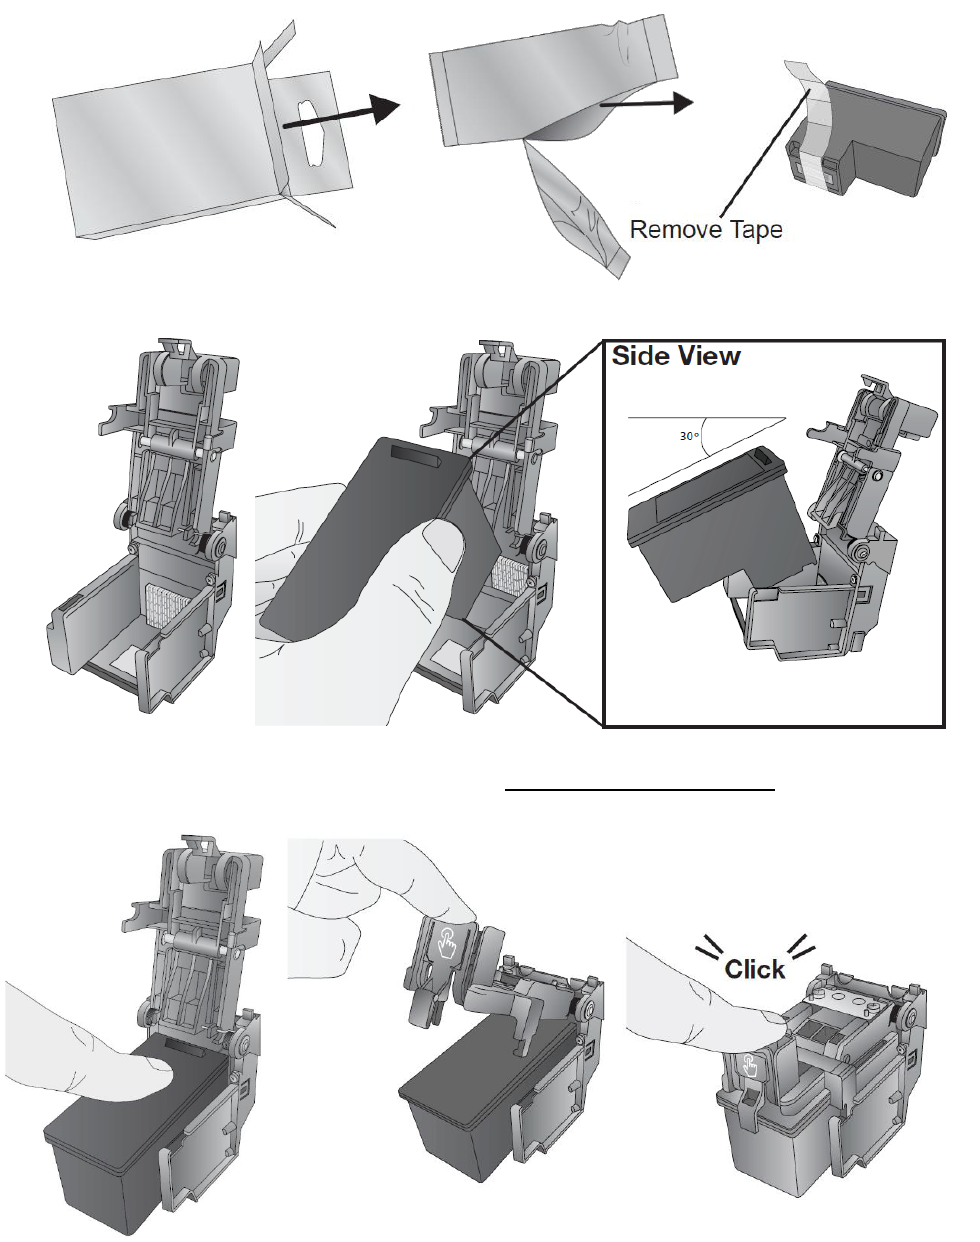
4. Locate a new cartridge and remove it from its packaging. Remove the foil outer package
and the tape covering the nozzles.
39
5. Place the new cartridge into the empty carriage. Note: When installing the cartridge, tilt
the cartridge at a slight backward angle of approximately 30 degrees.
6. Make sure the cartridge is pushed back far enough, so the ridge on the cartridge is
behind the spring-loaded pusher on the lid. Push down on the cartridge. Close the lid
on the cartridge by lightly pressing down from the top until you hear a click.

40
2C Loading the Print Item
Up to 12 cookies or print items can be loaded on the carousel platter. You can load the cookies
near the front first and then work your way to the back. To access the areas under the cover,
either lift the cover to place the cookie or press the load/feed button to rotate the platter
clockwise until an open slot is accessible. To prevent offset printing and/or the cookie falling
off the platter or the cookie platform, the edge of each cookie must touch two of the
placement pegs.
Cookie must be touching
placement pegs
Press Load/Unload to
rotate Carousel Platter
clockwise
Important Note: By default, the
printer will stop printing after 12
items or one complete revolution.
This is to prevent already printed
items from being printed on again.
This setting can be adjusted in printer
settings in PrintHub. See section 3E.

41
Section 3: Primera PrintHub
Primera PrintHub is used to interact with the Printer for gathering ink levels, maintenance,
alignment, cost calculation, and several other functions. You can use it to manage these
functions on multiple Eddie printers and other Primera label printer models. PrintHub
automatically installs with your printer driver and can be accessed through the printer driver
preferences or as a program on your Windows start menu.
1. Connect the Printer via USB and turn on the power. The PrintHub accesses most of the
information it uses from the Printer itself so the Printer must be turned on and
communicating for the program to be useful.
2. Go to Start - Programs - Primera Technology - Primera PrintHub.
A. View the print queue, alignment settings, and printer settings.
B. If you have multiple Primera printers connected, they will be listed here.
C. Past jobs will show the last five jobs along with cost information. Click the document
icon to view a cost report.
D. Application Settings
E. Current Mode. With the carousel connected no text will appear.
F. Current Ink Levels (Ink is displayed in 10% increments. Example 100% to 90% to 80%
etc.)
G. Change Cartridge instructions. Print a Clean/Test Print.
H. Order Link

42
3A Using the Cost Estimator
The cost estimator is found under the queue section on the first tab of the PrintHub. The last
five job costs are stored in the list. Each job will show the cost per label based on the cost per
cartridge entered below the list. Enter the actual cost of the cartridge you paid. Prints
remaining on the currently installed cartridge and total prints on the new cartridge are both
displayed.
To see a printable/savable report click on the document icon next to the job you
want to see. A report will display the information. You can print or save the report
from this screen. You can also change the currency using the drop down, change the
job name or adjust the cost from this screen.
Note: A 3.5” round cookie with 50% coverage will cost approximately $0.06 per cookie. However, this is
a rough estimate since there are so many variables. There are two reasons. First, there is a +/-
tolerance of about 5% in the ink filling process, and second, there are no fill-level sensors in the ink
cartridge. The printer firmware counts down “spits” of ink which can be depleted somewhat faster if
you do a lot of short runs of 25-30 or less cookies at a time. To keep the print head ready for printing,
the software does a cleaning cycle maintenance spit into the ink trough at the beginning of each print
run. Also, the Printer will do periodic maintenance while it is idle but plugged in and switched on.
Finally, you can almost always go past 0% since we are very conservative in estimating how much ink is
initially in the cartridges. We typically overfill cartridges slightly to make sure you receive all the ink you
are paying for.

43
3B PrintHub Settings
General application settings that apply to the software and all printers can be found by clicking
the blue “Settings” button in the lower left. Printer-specific settings can be found on the
“Printer Settings” Tab. See next section.
Language. Typically, the language is set to match the language setting in the operating system.
However, you can override currency settings on the Language Tab.
Automatic Updates. Automatic Updates will update PrintHub, the printer driver, and the
printer firmware. Every seven days, you will be prompted to update the software if there are
any newer versions. You can choose to increase or decrease that automatic check. You can
also perform a check for updates immediately by clicking the “Check for Updates” button.
Finally, if you would like to receive beta software, check the “Check for Beta updates” box
Printing Preferences. You can choose to close PrintHub after printing completes by checking
the “Close this application after printing completes” box. PrintHub automatically opens
whenever you send a print job to the Printer. If you do not want PrintHub to open in front of
other programs, you can check the “Launch minimized during print” option.
Support. Click the “Generate Support Report” button to generate a zip file on your desktop
containing all recent log files. Send this to tech support so they can help solve any printing
problems.
Advanced. Check the “Generate Printer Status XML” box to create an XML at
"C:\ProgramData\PTI\PrintHub\PrinterStatus.xml".
Software developers can use this file to display status information such as error messages and
ink levels in 3rd party applications.

44
3C PrintHub Advanced Printer Settings
Printer settings can be found in Primera PrintHub on the Printer Settings Tab for Eddie.
This section displays all current driver, software, and firmware versions.

45
Advanced Setting Button. Click the Advanced Settings button to view the following settings.
46
3D General Settings / Multiple Printers Support
You can install multiple printers to the same computer and use them simultaneously. To do so,
you will need to change the USB serial number identifier of one of the two printers, two of
three printers, three of four printers etc. To change serial numbers:
1. Connect each new Printer one at a time. The current USB Serial Number will be
displayed.
2. Click Generate. It will find the next available USB Serial Number based on the currently
connected printers. For the first one, it should set it to 2 and for the next printer 3 and
so on.
3. Click Set. You will hear the Printer reset, and the settings window will turn gray. After it
resets, you will be able to see the settings window again. Keep the Printer connected.
4. Now you can connect to the next Printer. Windows will automatically install a new
driver for that new Printer and name it Edible Ink Printer (Copy 1). You can rename it
later by editing the printer properties in the Windows printer list.
5. You will now see a second printer appear in the left column – Edible Ink Printer (Copy 1).
Click on it to display information about this Printer. If this is the last Printer, you will
connect you are done. If you wish to connect additional printers, follow through steps
2-4.
Restore Factory Defaults. This will set all Print alignment and other calibration settings back to
factory defaults.
3E Cartridge Maintenance Settings
Here you can adjust the frequency of certain maintenance operations.
Increasing the value of “Seconds between Maintenance Spits” will decrease ink usage but could
also cause poor quality printing.
Increasing or Pages between Maintenance Wipes will speed up printing but could also cause
poor quality printing.
Click on the Wiper Maintenance button to reveal instructions for cleaning the ink wiper.

47
3F Advanced Eddie Settings – Scan Large Print Area..
• Feed Speed. This controls the speed of the initial height and size scan of each cookie
before it is printed. If you have smaller or lighter cookies, lower this value to prevent
the cookie from moving during the scan process, causing off-center prints. Set this the
same as Reverse Speed.
• Reverse Speed. This controls the speed of the initial height and size scan of each
cookie before it is printed. If you have smaller or lighter cookies, lower this value to
prevent the cookie from moving during the scan process, causing off-center prints.
Set this the same as Feed Speed.
• Top of Cookie Lift Offset. This controls the height of the print head. Increase the value
to move the print head closer to the print item (It increases the height of the
platform/tongue, which brings the cookie closer to the print head. The print head does
not actually move). Decrease the value to lower the cookie and move the printhead
away from the object. As you move the printhead away from the print item, the
sharpness of the print decreases. As you move the printhead closer to the object, the
image will become sharper, but there will be a danger that the printhead will hit the
cookie, or the cookie out error will appear. For best results, clean the cookie sensor
before adjusting this setting.
• Horizontal Offset. (Moved to Alignment Tab) This is the right/left offset. Increase
values positive to move the print image to the printer's left side (cartridge dock side).
Decrease values to move the print image to the Printer’s right side.
• Vertical Offset. (Moved to Alignment Tab) This is the vertical offset. Decrease values
positive to move the print image toward the front of the Printer. Increase values to
move the print item away from you toward the back of the Printer.
• Tray Rotation. Increase or decrease the accuracy of the carousel platter rotation. To
center the tongue between the carousel slots, change the value positive to move the
carousel platter to the left (counter clockwise). Change the value negative to move
right (clockwise). Since one degree of rotation equals a value of 54 you may need to
adjust by up to 50 – 60 to achieve a centered position.
• Cookies per Carousel. The standard carousel has 12 cookies. Large Tray adapters such
as The Sassy Tray or large cookies may occupy 2 slots. In this case, modifying the
number of tray position to six is recommened.
• Pause Printing After X Cookies. By default, the Printer will pause printing after 12 items
or one complete revolution. This is meant to allow time to remove the printed items
and replace them with blank items. This prevents already printed items from being
printed on again. To continue printing, press the pause button to continue printing for
another 12 items. Uncheck this setting to disable this feature. Increase or decrease the
number to pause after that many items. We recommend that this feature is only
disabled if an operator is watching the machine and reloading blank items while they
are removing printed items. After setting this value, power off/on the printer to apply
it.

48
• Cookie Centering Scan. (Moved to Alignment Tab) Check to scan the front and back
edge of the print item to adjust the print start position. This is recommended for items
that have size variability. It will cause slightly longer delays between printing. Uncheck
this box to enable manual centering of a print object. This could be useful if your
cookies are occasionally not printing centered or you have inconsistent print start
positions. The Printer will no longer perform the scan. Instead, it will start in a fixed
position. To adjust centering, you will need to manually adjust the Horizontal Offset
and Top of Cookie Offset on the settings tab. See section 5B.
• Initialize Carousel on Power Reset. When powering on, the Carousel will move one-
quarter turn to ensure proper calibration of the carousel platter.
• Scan large print area for multiple objects. Enable this setting if you have DTM
templates, Milton Tray, Sassy Tray or other custom trays and there is no print object in
the center of the tray (Section 2A pg 31) or if the print carrier is hitting the cookie. With
this setting enabled, Eddie will scan the entire print surface for cookie height. This will
take longer but it will ensure taller cookies are not knocked off the tray when
printing. It is also useful if the top of your cookies has an uneven surface. The
topmost height of the cookie will be used to set the height of the platform and the
distance between the cookie and the print head. This setting can be used in any mode
including: manual mode, with the carousel or with centering scan enabled.
Note: Lower sections may not print as sharp since the print head is further away.
With this setting disabled, the initial scan for cookie height and size scans one section in
the middle of the cookie platform for height cookie will be used to set the height of the
platform and how close the cookie comes to the print head.
• Enable Half-Speed Printing. Enable this setting to increase print quality. This is
especially useful if your cookie is rocking during the printing process. This reduces the
chance of cookie movement during printing.
• LED Settings. Brightness, Flash behavior, and Color can be adjusted here.
3G Centering Alignment Tab
The alignment tab in PrintHub is used to enable/disable the centering scan. When centering
scan is disable you may adjust the horizontal and vertical alignment.
For more information visit the Knowledgebase Article.

49
Section 4: Printing
Any program can be used to print to Eddie. In the following sections, we provide information
on how to print using BarTender. Please note the print behavior below for any print from any
program.
• By default, the Printer will pause printing after 12 items or one complete revolution.
This is meant to allow time to remove the printed items and replace them with blank
items. This prevents already printed items from being printed on again. To continue
printing, press the pause button to continue printing for another 12 items. See section
3E to disable or adjust this setting. We recommend that this feature is only disabled if
an operator is watching the machine and reloading blank items as they are removing
printed items.
• The Printer will retract the print item and scan the height to determine the optimal print
nozzle distance from the print item. The closer the nozzles are to the print item, the
sharper the image will print.
• By default, the Printer will scan the front and back edges of the print item to determine
the size of the print item. Once this is determined, the image sent to the Printer is
automatically centered over the item to be printed. It will not reduce the size. For
example: if the image is 3.5” round, but the print item is 3.0” round, it will center the
image over this causing a .25” over print. Over time this can cause ink build-up, but it is
not a large concern considering this build-up should be cleaned up during regular daily
cleaning.
Press Pause to Continue Printing

50
4A Using BarTender
Primera Special Edition BarTender UltraLite is included with Eddie. You can download it at the
link below. Use the code below when prompted after installation.
Download: https://portal.seagullscientific.com/downloads/bartender
Code: Z3T0-7ZJY-JFD1-3J9P
Other programs can be used to print. If printing from other programs, please follow the
guidelines in Section 4D.
Use the following instructions as a guide through the wizard setup process.
Choose “Start a new BarTender document...”

51
1. Select “Blank Template”. Click “Next”.
2. Select “Edible Ink Printer”. Click “Next”.

52
3. Select “Specify Custom Settings”. Click “Next”.
4. Set the page size to one of the options in the drop-down menu.
Or click User defined Size to set your own size up to 4.72” x 4.72” (120mm). This size
should be as large or larger than your cookie. Measure the cookie, not the cookie
cutter. If you are using an adapter or coaster, set the size to match the adapter/coaster.

53
5. Select “One or more items per page”.
6. Select your label shape. This should be a circle if you are printing circular cookies.

54
7. Set all of the margins to zero. Click Next.
8. Set Template Size to be the same as page size set in step 5. Click Next.

55
9. Check the “Picture” box to add a background photo or graphic to your label. Click
“Next”. If you click “Finish”, the remaining default wizard options will be set, and no
picture will be added. Adding the picture as a background as it will automatically crop
any square you add to the design to fit inside the circle, and ONLY the portion inside the
circle will print. If you want more control of your image placement, uncheck this box
and use the image tool to place your image. However, the image will not be
cropped to the shape you selected.
10. If you check Picture, you will see the next screen. Select “Embedded Picture”. Click the
“File” Button to browse to the location of your photo/graphic file. Set the Size Method
to “Stretch”. Note the preview to the right. Click “Next” if you are satisfied with the
layout of the photo or graphic. Otherwise, you may try one of the other Size Methods in
the drop-down menu.

56
11. Click Finish to open the template.
You can edit any of these initial settings by going to the File Menu and selecting “Page
Setup” or click the Page Setup Icon. Basic and advanced settings are available on the
various tabs.
12. When you are ready to print, click the printer icon or go to file print.

57
Important Note: The first time you print or any time you print
after you power on the printer, the carousel will move one quarter
turn and skip 3 cookies before printing. This is to ensure proper
calibration of the carousel platter.

58
4B Add Text and Graphics to a BarTender Design
Once you have created your label size, you can add text, a barcode and/or graphics. This can be
done using one of the buttons on the button bar at the top of the screen.
Add Text. Click the Text button.
Now click anywhere on your label.
"Sample Text" will appear. Edit the
text on screen or double click it to
open up text settings to change
font, size and other settings.
Add Graphic. Click the Image
button. Now click anywhere on
your label. An Image icon will
appear. Double-click it to open up
image settings and browse to the
image/graphic that you would like
to insert.
Align Objects. Choose any of
these icons to align objects to one
another or the page.
Page Setup. Click the Page Setup
button to change your label size,
adjust corner radius or change the
shape.
Tip! Double-click any object to open settings for that object.
Tip! Go to the Help menu to access the BarTender Manual and Tutorials.

59
4C Removing Image background with Paint 3D
Paint 3D is a free program that comes with Windows 10.
1. Choose an image and open it in Windows Photo Viewer. You can choose any image that
you would like to remove the background from. Simply click on the image to open it
automatically with Windows Photo Viewer.
Note: There are some images that work better for this than others, particularly images
that have a distinct difference between the background image and the foreground
image.
2. Click on “Get Creative with this image” This
is effectively the Edit image button. Click on
the icon in the upper right and select “Edit
with Paint 3D”.
3. Edit the Image with Magic Select. When
your image opens in Paint 3D, choose
“Magic Select” in the upper left of the
toolbar. When this is chosen, a crop box
will appear around your image. Drag the
crop box around the image you selected to
be removed from the background. When
you are done, choose “next” in the side panel on the right.

60
4. Refine the part of the image you would like. After pressing next in step 3, you will see
that the outside edges of your image are now highlighted. Sometimes the software
(depending on how complex/busy the background is) will take more or less image than
you want and highlight that as well, such as extra space around the shoulder of the
person in the image. If this is the case, you can use the remove tool in the sidebar on
the right to “draw” the
spots that you do not
want included in the
image out of the
highlighted area. The
line drawn over the
yellow shirt will remove
it from the crop in the
example below. Once
you are happy with the
selection, click Done.
5. Remove the image from the background and copy it. After pressing next in the last step,
your image will pop out of the background, and it will be free to be copied. Right-Click
on the selected image and select copy or select copy from the side menu to set the
image up to be pasted into a different image or program. (Such as a Bartender cookie
template)
6. Paste the image into your bartender template.

61
4D Printing from Other Programs
Since this Printer uses a standard Windows printer driver you can print from any application
you would like. There are just a few things to remember that will make it much easier.
1. Set the Page/Label Size in the Driver. BarTender automatically prompts you for the size
of the print. When printing from any other program, you must do this manually. Before
you print, simply set the custom page size just as you would set print quality in the
printing preferences. In the example below, the label size is 3.3” x 3.3” so the custom
page size is set to 330 x 330 (displayed in .01 inch units).
2. Check the image or document size. The image size or document size set in Illustrator
should match the Page Size set in the driver. If you have set your page size to 3” x 3”
but your image is actually 4” x 3” the printer driver will automatically shrink your image
to fit inside the 3” x 3” space. The result is that the actual printed label is 3” x 2.25”.
Avoid this by setting your document size or image size to match the label size.
3. Choose the right printing program. There are many different applications that are
capable of printing to the Eddie. However, there are only a few that are ideal printing
applications. For example, Adobe Illustrator is an excellent design program but is not
always the best printing program.

62
4E Printer Driver Settings (Print Quality and Ink Saturation)
Once the printer driver has been successfully installed, you will need to set up the driver with
the appropriate print options. Refer to the following steps to change or verify your default
printer driver preferences. These settings will apply to all new designs created in BarTender or
other programs after the preferences are changed. Existing labels saved in BarTender will not
be affected since the preferences are saved with the label. To change these preferences, you
will have to change printer preferences through BarTender. (File Menu - Printer Settings)
Click the Start button, search for “Printers”. Select Printers and Scanners. Select the Edible Ink
Printer. Choose Manage. Select Printing preferences.
63
Note on PC Settings:
Most applications allow you to change these same printer driver options from their “Print”
and/or “Printer Setup” screens. Some applications such as BarTender save your settings with
the label, others use settings only for the current print job just sent to the Printer.
Paper Size
If you are using BarTender, this setting is adjusted during the setup wizard. If you are using a
program other than BarTender, you will need to set this to the dimensions of your print. There
are several preset sizes to choose from. However, you may also choose your own custom page
size. Note: The driver page size will NOT crop a square into a circle automatically. You must
use software such as BarTender to crop the circle. Page height and width can be from 1” to
4.72”.
Orientation
There are two settings for orientation, Portrait, and Landscape. If your text and graphics print
left to right or as shown on the screen, select portrait. If you wish your printing to rotate 90
degrees from what you see on the screen so it is printing horizontally, select landscape as your
orientation. Remember, this does not change the width and height Paper Size. It is only a tool
for viewing a design upright on screen that will be printed sideways on the Printer.
Print Quality
There are 4 levels of print quality in the driver. The lower the quality, the faster the print.
Quality 1 provides the fastest print available while Quality 4 provides the best quality. It is
recommended that you experiment with the different levels when designing your label to find a
good balance between print quality and print speed. Quality 2 is the default.
Color Matching
Vivid Graphics mode is best used for graphical images where accurate color reproduction is not
as essential. Images printed in this mode will look more vibrant because more ink is being used
to produce them. However, printing images of people may produce skin tones that have a
reddish tint.
Vivid Photos mode is best used for photographic images where accurate color reproduction is
very essential. Images printed in this mode will look lighter than those printed in Vivid Graphics
mode. Skin tones especially will look more natural in this mode.
ICC Profile 1-4 Select the setting that matches your screen the best. Note: ICC monitor
calibration and additional setup is required for this option to work.
-NONE- will use no color matching.
Ink Saturation
This option controls the amount of ink used when printing an image. The default setting is
100%, which will provide the most accurate color matching. If the ink is not drying fast enough
or “bleeding”, you can decrease the Ink Saturation to lessen the amount of ink that is applied to
the label.
64
Enable Bi-di
Set to “Yes” for fastest print speed. This requires an alignment print after every cartridge
change. Set to “No” for better quality print (in some cases).
Launch PrintHub
This setting will open the Primera PrintHub application.
Details
Select this setting to see current firmware and driver version information and other printer
settings.

65
4F Print Image Centering and Alignment
Eddie will center print images on your cookies automatically. Auto Centering works best on
perfectly round cookies when using the carousel. If your cookies are not centered, you can
adjust the print position right or left or up and down using horizontal and vertical offset
settings on the alignment tab of Print Hub or the Mac Config Utility (See the screen capture
below).
Centering Scan Enabled/Checked. Horizontal and vertical offset affect the print position with
the Centering Scan checked OR unchecked. The difference is that with Centering Scan
enabled, Eddie attempts to find the start position automatically. You can then add or
subtract from that print start position using Horizontal or Vertical Offsets.
----Recommended for Circular cookies
Centering Scan Disabled/Unchecked. The printer will no longer perform the centering scan
with this setting unchecked. The start position is whatever the factory calibrated zero point
is. You can then add or subtract from that print start position using Horizontal or Vertical
Offsets. It can be more reliable because the printer doesn't try to interpret your cookie
size, but you must ensure that the cookie is placed in the exact same position every time. The
carousel will do this for you. If you cannot use the carousel due to your cookie size or shape,
you will need to switch to manual mode by disconnecting the carousel and, most likely, using
a custom tray. See the tips below.
----Recommended for Non-circular and non-uniform-shaped cookies.
Tips for Centering Scan Unchecked.
1. When you turn off the centering scan, you must place the cooking in the exact same
place on the tongue/platform every time. This is hard to do by just eyeballing the
position on the tongue. When the cookie is not placed in the same place (either left to
right or front to back) every time, it will look like the image is not centered and jumping
around inconsistently.
2. The Milton tray or a DTM tray will help you place the cookie in the same spot every
time. Please review this tutorial on how to print centered every time using a custom
tray.
3. The cookies should be a consistent size for this option to work.
4. If you do not have a tray, you can attach a piece of thick (.08" or thicker) cardboard to
the platform/tongue that is larger than your cookie size. Make sure it is attached firmly,
so it will not move around. Print your design with no cookie in place. Note the location
of the print on the piece of cardboard. Now place your cookie centered on the print
location. Print again.


67
Section 5: Printing from a Mac
5A Print Utility Settings (Eddie Config Utility)
The Eddie Config Utility is used to interact with the Printer for gathering ink levels,
maintenance, alignment, and several other functions.
To Find Eddie Config Utility:
The Eddie Config Utility automatically installs with your printer driver and can be
accessed through the Printer & Scanners in Mac under Apple Icon – System
Preferences.
1. Connect the Printer via USB and turn on the power. The Eddie Config Utility
accesses most of the information it uses from the Printer itself, so the Printer must
be turned on and communicating for the program to open.
2. Go to the Apple Icon – System Preferences - Printers and Scanners, select the PTI
Color_Cookie, click on, Options & Supplies, and Open Printer Utility. Or you may
simply print to the Printer, and the Utility will open.

68
3. The Eddie Config Utility has four tabs that are arranged on the top of the
window. Each tab opens a screen that has various similar functions.
- Status Tab (First Tab). Displays ink levels, print counter, cost per cookie and any
error messages.
- Cartridge Tab (Second Tab). Use for aligning the cartridge, cleaning the
cartridge, and changing the cartridge.
- Alignment Tab (Third Tab). Adjusts vertical and horizontal print alignment.
Changes the Stock Sensor Mode and toggles the Output/Cut Mode, and set
other advanced settings.
- Settings Tab (Fourth Tab). Displays printer information including firmware
version, driver version, and software version. Check for updates.

69
5B Adjusting Print Alignment (Centering)
Eddie comes from the factory calibrated to print exactly to the edge of Primera
Cookies. Eddie senses the beginning of the print object height and the front and back
edge of the print object with an optical sensor. However, due to variability, it may be
necessary to fine-tune these settings.
Adjust print alignment using the Eddie Config Utility. Click on the Alignment Tab (Third
Tab).
Two items can be adjusted here:
Horizontal. This value moves the printed image left or right. Add to the current
value to move the printed image to the right. Subtract from the current value to
move the printed image to the left. After adjusting the value, click the Set Offsets
button to send the value to the Printer.
Vertical. This value moves the print start position up or down on the print object.
Add to the current value to move the printed image down or toward the Printer.
Subtract from the current value to move the printed image up or away from the
Printer. After adjusting the value, click the Set Offsets button to send the value to
the Printer.
You may have to make several adjustments to one or more of these values. After each
adjustment, you can click the Test button to print a small test pattern on the print
object. This will help you find the proper alignment value.

70
5C Advanced Eddie Settings.
Advanced settings are split into two sections.
Advanced Eddie Settings
• Cookie Centering Scan. Check to scan the front and back edge of the print item to adjust
the print start position. This is recommended for items that have size variability. It will
cause slightly longer delays between printing. Uncheck this box to enable manual
centering of a print object. This could be useful if your cookies are occasionally not
printing centered or you have inconsistent print start positions. The Printer will no
longer perform the scan. Instead, it will start in a fixed position. To adjust centering,
you will need to manually adjust the Horizontal Offset and Top of Cookie Offset on the
settings tab. See section 5B
• Scan large print area for multiple objects. Enable this setting if you have DTM
templates, Milton Tray, Sassy Tray or other custom trays and there is no print object in
the center of the tray (Section 2A pg 31) or if the print carrier is hitting the cookie. With
this setting enabled, Eddie will scan the entire print surface for cookie height. This will
take longer but it will ensure taller cookies are not knocked off the tray when
printing. It is also useful if the top of your cookies has an uneven surface. The
topmost height of the cookie will be used to set the height of the platform and the
distance between the cookie and the print head. This setting can be used in any mode
including: manual mode, with the carousel or with centering scan enabled. Note:
Lower sections may not print as sharp since the print head is further away.
With this setting disabled, the initial scan for cookie height and size scans one section in

71
the middle of the cookie platform for height cookie will be used to set the height of the
platform and how close the cookie comes to the print head.
• Initialize Carousel on Power Reset. When powering on, the Carousel will move one-
quarter turn to ensure proper calibration of the carousel platter.
• Enable Half-Speed Printing. Enable this setting to increase print quality. This is
especially useful if your cookie is rocking during the printing process. This reduces the
chance of cookie movement during printing.
• Feed Speed. This controls the speed of the initial height and size scan of each cookie
before it is printed. If you have smaller or lighter cookies, lower this value to prevent
the cookie from moving during the scan process, causing off-center prints. Set this the
same as Reverse Speed.
• Reverse Speed. This controls the speed of the initial height and size scan of each
cookie before it is printed. If you have smaller or lighter cookies, lower this value to
prevent the cookie from moving during the scan process, causing off-center prints.
Set this the same as Feed Speed.
• Top of Cookie Lift Offset. This controls the height of the print head. Increase the value
to move the print head closer to the print item (It increases the height of the
platform/tongue which brings the cooking closer to the print head. The print head does
not actually move). Decrease the value to lower the cookie and move the printhead
away from the object. As you move the printhead away from the print item, the
sharpness of the print decreases. As you move the printhead closer to the object, the
image will become sharper, but there will be a danger that the cookie out error will
appear. Using this setting, the printer will not let the print head hit the object.
However, If the sensor is dirty it is still possible for a collision to occur.
• Tray Rotation. Increase or decrease the accuracy of the carousel platter rotation. To
center the tongue between the carousel slots, change the value positive to move the
carousel platter to the left (counter clockwise). Change the value negative to move
right (clockwise). Since one degree of rotation equals a value of 54 you may need to
adjust by up to 50 – 60 to achieve a centered position.
• Pause Printing After X Cookies. By default, the Printer will pause printing after 12 items
or one complete revolution. This is meant to allow time to remove the printed items
and replace them with blank items. This prevents already printed items from being
printed on again. To continue printing, press the pause button to continue printing for
another 12 items. Uncheck this setting to disable this feature. Increase or decrease the
number to pause after that many items. We recommend that this feature is only
disabled if an operator is watching the machine and reloading blank items while they
are removing printed items.
LED Settings. Brightness, Flash behavior, and Color can be adjusted here.

72
5D Printing from Swift Publisher
Swift Publisher is an inexpensive software that can be used to design/layout and print your
images. Below is a tutorial on how to setup a print using Swift Publisher by Belight.
When you open the software for the first time you will be asked to choose a Template.
Select Label – Blank. Select New Label… Click Choose.
Download a Free Trial Here:
https://www.swiftpublisher.com/

73
1. Hundreds of templates are available. Locate the Search box near the bottom.
2. Type “Primera” in the search box. Choose one of the predefined circular templates if it
is the correct size. Click OK. Otherwise, with one of the circular templates selected,
click the Customize button to create a different size.

74
3. Name the custom layout and set the items highlighted and noted below. Click OK
- Page Size: Set to Other. Size should match the label size.
- Width: Match Page Size
- Height: Match Page Size
- Corner Radius: This should always equal half the Width or Height.
- Margin: Leave at the default of zero
- Spacing: Leave at the default of zero
- Columns/Rows: Leave at the default of 1

75
4. You will be able to choose this template again from the custom tab of the templates
window. Click OK to select it.
5. You can now create your design. Add Text, Barcodes, shapes and images to your design.
Add Text
Add Shapes
Add Image
Toggle Page Setup
menu visibility
Change Font

76
6. For this example, we will add an image that we created in another design application. It
does not need to be formatted as a circle. The template will crop it as a circle. Click the
insert Icon and choose image from file….
Note: You can also add images from the Backgrounds menu
included with Swift Publisher. Simply drag them to your template.

77
7. Once your image is imported into your template, you will need to adjust the size to fill
the entire template (if that is your intention). Adjust the size by clicking the ruler icon in
the Inspector with the image selected. Check the “Fit aspect ratio” box and then type in
your size.
8. Now center the image by clicking both the horizontal and vertical centering buttons.
Image Selected

78
9. You are now ready to print. Click the Print icon to open the print dialog box.
10. Select Printer Features from the drop-down menu. Adjust the settings if desired. Click
Print.

79
5E Creating a Custom Page Size
In many programs such as Adobe Illustrator, Photoshop or Acrobat Reader you will need to
choose your label/page size before you print. If the label size you need to use is not already
on the list of available pages sizes you will need to create a new custom size on the print
screen of the program you are using to print.
1. Click the Paper Size drop down menu. Choose Manage Custom Sizes.

80
2. Click the + to create a new size.
3. Enter the height and width as the same.
4. Set all margins to zero.
5. Rename the size to the same as the width and height.
6. Your custom size will now appear at the bottom of the preset size list in this application
and any other application on this Mac.
Set Width and Height
Rename
Set all Margins to zero
Click “+” to start create a new size

81
5F Printer Driver Settings
Printer driver settings are accessible on the print window of any application right
before you click print.
Printing from Swift Publisher
Click on the Swift Publisher 5 drop-down menu and choose Printer Features.

82
Printing from Preview:
Click on the Preview drop-down menu and choose Printer Features.

83
Printing from Adobe Reader
1. First click on Page Setup to set your page size.
2. Next click on Printer... to access settings. Click on the Layout drop-down menu and
choose Printer Features.

84
Print Quality
There are 4 levels of print quality in the driver. The lower the Quality, the faster the
print. Quality 1 provides the fastest print available while Quality 4 provides the best
1
3
2
85
quality. It is recommended that you experiment with the different levels when
designing your label to find a good balance between print quality and print speed.
Color Matching
Best for Graphics mode is best used for graphical images where accurate color
reproduction is not as essential. Images printed in this mode will look more vibrant
because more ink is being used to produce them. However, printing images of people
may produce skin tones that have a reddish tint.
Best for Photos mode is best used for photographic images where accurate color
reproduction is very essential. Images printed in this mode will look lighter than those
printed in Photo mode. Skin tones especially will look more natural in this mode.
Note: Exact color matching of the printed labels to the screen may never be possible
since there are factors that affect this out of the drivers control. The surface of
the label reacts with the ink in the cartridge to produce the color. For this reason,
when printing the same image to different types of labels with different surfaces
the printed output can look entirely different.
Ink Saturation
This option controls the amount of ink used when printing an image. The default
setting is 100%, which will provide the most accurate color matching. If the ink is not
drying fast enough or is bleeding, you can decrease the Ink Saturation to lessen the
amount of ink that is applied to the label.
Enable Bidi (Bidirectional) Printing
Set to “Yes” for fastest print speed. Requires an alignment print after every cartridge
change. Set to “No” for better quality print (in some cases).

86
Section 6: Troubleshooting/Maintenance
6A Solving Print Alignment Problems
Normally the Printer scans the size and height of the cookie and adjusts accordingly. If you find
that alignment is still off you it can be adjusted in the Advanced printer settings area.
Click on the Printer Settings Tab – Advanced Settings button.
Two Offset settings apply to right/left and front/back alignment.
Horizontal Offset – This is the right/left offset. Increase values positive to move the print image to the
printers left side (cartridge dock side). Decrease values to move the print image to the Printer’s right
side.
Top of Cookie Offset – This is the vertical offset. Increase values positive to move the print image
toward the front of the Printer. Decrease values to move the print item away from you.

87
6B Maintenance/ Cleaning
Eddie is made of stainless steel to facilitate easy cleaning. Each of the part has its own cleaning schedule
and procedure. Refer to the following subsections for more information.
What to use: All stainless-steel parts can be hand-cleaned on the Printer with mild detergent
such as Dawn™ dishwashing soap or any automatic dishwasher soap. Other parts noted below
can be cleaned with water.
6B1 The Carousel Platter
This can be removed from the Printer in fully submerged in water to clean or cleaned in a
dishwasher.
Cleaning Frequency: Clean Daily

88
6B2 Crumb Catcher
This can be removed from the Printer in fully submerged in water to clean or cleaned in a dishwasher.
First Remove the filter. Wash separately by hand.
Cleaning Frequency: Clean Daily.
Crumb Catcher Filter

89
To remove the Crumb Catcher from the Printer first remove the Carousel Platter and then lift
up on the top section of the Printer. Power should be connected at this point, so the Cookie
Platform is moved out of the way. Now you may access the Crumb Catcher. Lift near the back
to disengage the hooks that secure it to the back of the Printer.
Lift Here
Crumb Catcher
Hooks
1
2
3
4
Cookie Platform

90
6B3 The Carousel
This Carousel cannot be submerged in water. Disconnect it from the back of the Printer.
Submerge a soft cloth in a dishwashing soap/water mixture. Wring the cloth until it is damp,
but no dripping water is present. Wipe the Carousel clean with a damp cloth. Repeat the
process if necessary. Before connecting the power, ensure that the Carousel is completely dry.
Cleaning Frequency: Clean Weekly.

91
6B4 Ink Trough – Clean Weekly
Eddie will do periodic maintenance to ensure the nozzles are clear and ready for
printing. This ink is deposited in the washable/replaceable filters and in the Ink Trough.
The ink trough will need frequent cleaning to prevent overfilling and leaking. Please watch
the cleaning video for filter and ink trough cleaning instructions
The Ink Trough can be accessed by lifting up on the top section of the Printer. Squeeze the
steel together near the top to disengage the locking tabs. This item can be placed in a
dishwasher.
Cleaning Frequency: Clean Every Cartridge Change.
Ink Trough
Ink will be
deposited here.

92
Ink Trough Guides
Note: To remove or insert the ink
trough squeeze the ink trough not
the tabs.
Locking Tabs

93
6B5 The Cookie Height Sensor – Clean Weekly
Ink overspray mist may be interfering with the cookie height size sensor. Clean the cookie
sensor with a damp cloth. It may also be beneficial to clean the filters, as shown in Section
6C. A clogged filter can cause ink overspray mist to build up more quickly.
Cleaning Frequency: Clean Weekly or if the print head hits the cookie. (This video shows how
to clean it)
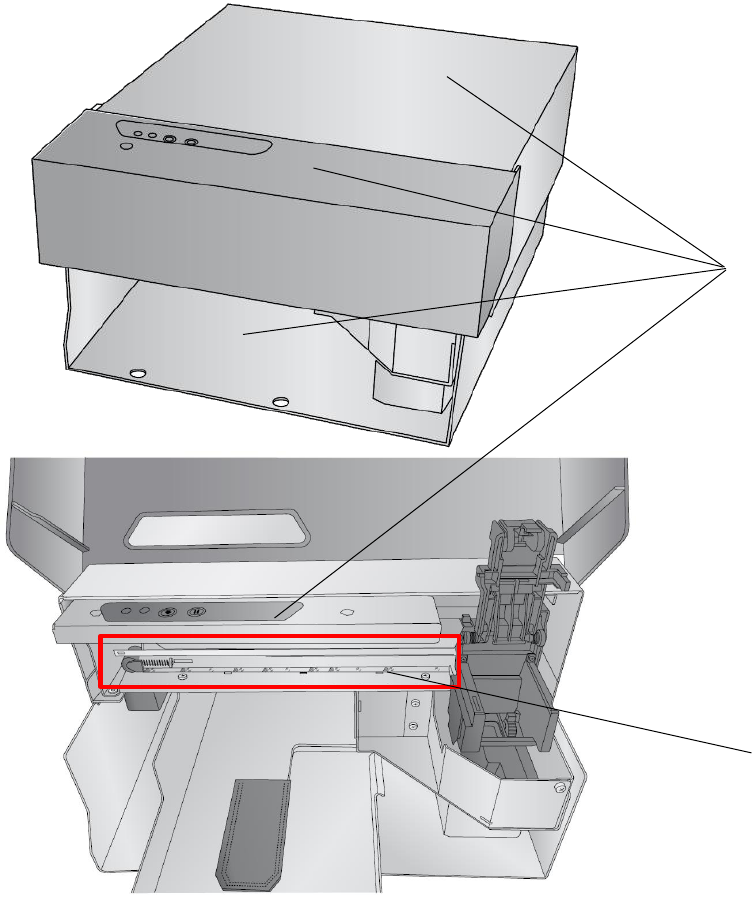
94
6B6 Exterior and Interior of Printer – Stainless Steel Surfaces
These items cannot be submerged in water. Disconnect power from the back of the Printer.
Submerge a soft cloth in a dishwashing soap/water mixture. Wring the cloth until it is damp,
but no dripping water is present. Wipe the areas clean with a damp cloth. Repeat the process
if necessary. Before connecting power ensure that the all surfaces are completely dry. Avoid
cleaning or touching the encoder strip and the drive belt area.
Cleaning Frequency: Clean as needed.
Clean these areas
with a damp cloth
Avoid this area when cleaning.
The metal shaft and frame are
lubricated with white lithium
grease. It is normal to see this
white substance.

95
6B7 The Cookie Platform
The Cookie Platform will accumulate crumbs and edible ink overspray. Occasionally brush the
crumbs from the platter into the Crumb Catcher below. This will ensure that cookies are lifted,
moved properly, level, and in the correct position for printing. If more thorough cleaning is
necessary, disconnect the power from the back of the Printer. Remove the Cookie Platform by
lifting up slightly on the back of the platform and then pulling out. The Cookie Platform can be
placed in the dishwasher. It can withstand boiling temperatures of 212 degrees, but it should
be kept away from any heating elements near the base of the dishwasher.
Cleaning Frequency: Inspect/Clean Daily. Inspect the area. If no crumbs or frosting is visible,
cleaning is not required.
Pull Straight Out
Cookie Platform
Grasp Here

96
6B8 Ink Maintenance Area (Wiper and Cap)
This area should be cleaned with water and a cotton-tipped cleaner. Open the cartridge lid and
remove the cartridge. This will expose the black rubber cartridge cap.
To access the wiper, open the top lid, press and hold the Pause button for 3 seconds. The
cartridge cap will be retracted, and the wiper will be exposed. The wiper will stay in this
position for 10 minutes or until you press the Pause button again. Usually the wiper is hidden
away under a small plastic housing at the front of the Printer. To see a picture of the wiper,
within Print Hub click on Printer Settings – Advanced Settings – Wiper Maintenance.
Clean with a cotton tip cleaner and water. Dry thoroughly.
Cleaning Frequency: Clean/Inspect weekly. Inspect the area. If no ink is visible, cleaning is not
required. Cleaning will prevent poor print quality and mixed color in your cartridge!
Cap/Wiper location

97
6C Replacing the Ink Filters
There are two ink filters that capture ink overspray that naturally occurs during printing. These
filters can be cleaned or replaced. Filters are available on Primera’s website.
Filter Pack. SKU 740123 - Contains ink trough filter, and Crumb Catcher filter set.
Crumb Catcher Filter Replacement
The filter can be removed from the Printer in fully submerged in water to clean. Video.
Replacement/Cleaning Frequency: Clean every cartridge change. Replace every six months

98
Ink Trough Filter Replacement
The Ink Trough can be accessed by lifting up the top section of the Printer. Squeeze the steel
together near the top to disengage the locking tabs. Once the trough is removed, the filter can
be accessed near the back of the Printer.
Replacement/Cleaning Frequency: Clean every cartridge change. Replace every six months.
Ink Trough

99
Release Tabs
Ink Trough Filter
Pull near the top to
pivot the filter out
Ink Trough Filter
Ink Trough Guides
Note: To remove or insert the ink
trough squeeze the ink trough not
the tabs.
Insert this end first
toward the back of
the printer
This is the side of the
filter you see when it
has been installed

100
Cleaning/Replacement Checklist
Date
Carousel
Platter
Crumb
Catcher
Cookie
Platform
Ink
Trough
Carousel
Maintenance
Area
Filter
Cleaning
Daily
Daily
Daily
Cartridge
Weekly
Weekly
Cartridge
☐
☐
☐
☐
☐
☐
☐
☐
☐
☐
☐
☐
☐
☐
☐
☐
☐
☐
☐
☐
☐
☐
☐
☐
☐
☐
☐
☐
☐
☐
☐
☐
☐
☐
☐
☐
☐
☐
☐
☐
☐
☐
☐
☐
☐
☐
☐
☐
☐
☐
☐
☐
☐
☐
☐
☐
☐
☐
☐
☐
☐
☐
☐
☐
☐
☐
☐
☐
☐
☐
☐
☐
☐
☐
☐
☐
☐
☐
☐
☐
☐
☐
☐
☐
☐
☐
☐
☐
☐
☐
☐
☐
☐
☐
☐
☐
☐
☐
☐
☐
☐
☐
☐
☐
☐
☐
☐
☐
☐
☐
☐
☐
☐
☐
☐
☐
☐
☐
☐
☐
☐
☐
☐
☐
☐
☐
☐
☐
☐
☐
☐
☐
☐
☐
☐
☐
☐
☐
☐
☐
☐
☐
☐
☐
☐
☐
☐
☐
☐
☐
☐
☐
☐
☐
☐
☐
☐
☐
☐
☐
☐
☐
☐
☐
☐
☐
☐
☐
☐
☐
☐
☐
☐
☐
☐
☐
☐
☐
☐
☐
☐
☐
☐
☐
☐
☐
☐
☐
☐
☐
☐
☐
☐
☐
☐
☐
☐
☐
☐
☐
☐
☐
☐
☐
☐
☐
☐
☐
☐
☐
☐
☐
☐
☐
☐
☐
☐
☐
☐
☐
☐
☐
☐
☐
☐
☐
☐
☐
☐
☐
☐
☐
☐
☐
☐
☐
☐
☐
☐
☐
☐
☐
☐
☐
☐
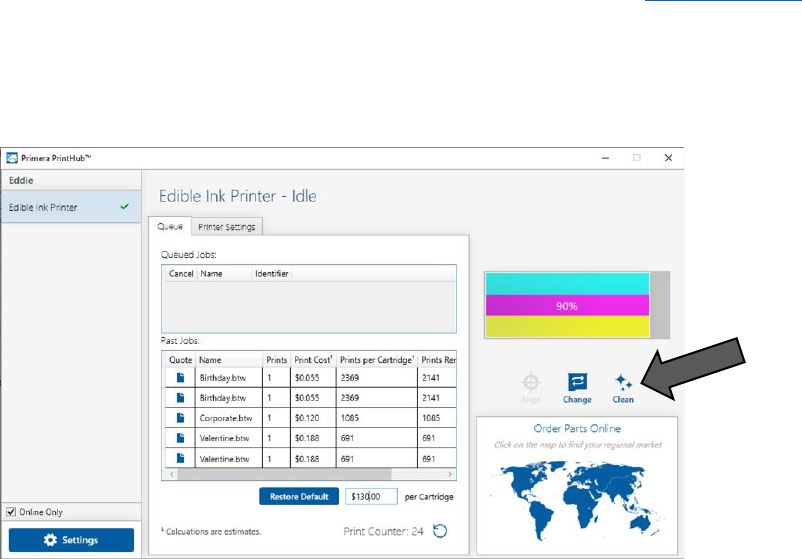
101
6D Poor Print Quality – Cleaning the Cartridge
It may be necessary to clean the ink cartridge nozzles if you notice reduced print quality, or if
you suspect a cartridge nozzle has become slightly dried out or clogged. If the cartridge has
been left out of the Printer more than 30 minutes, the ink in the print head nozzles may have
dried. If you are having print quality problems, follow the steps below or watch the video:
1. Before moving on to the next step, ensure that the ink level of the color cartridge is
more than 10%. If the ink level is lower than 10%, replace the cartridge.
2. Try cleaning the cartridge using the clean function in PrintHub.
3. Determine if printing is now acceptable by printing your image. If the sample has
missing colors or voids within a color strip, remove the cartridge from the Printer and
proceed to step 4.
4. Prepare items needed for procedure

102
5. Soak the paper towels in water for 5 seconds.
6. Place one paper towel on cartridge nozzles. Gently press the paper towel with your
finger. Leave the paper towel on the nozzles for 30-40 seconds.

103
7. Wipe the nozzles.
a. Place second paper towel on flat/hard surface.
b. Press the nozzles into the paper towel.
c. Firmly tap the top of the cartridge three times to
force the ink out.
d. Wipe/Drag the cartridge in the direction indicated.
e. Repeat until all colors are seen on the paper towel.
After wiping the nozzles, the paper towel should
show all three colors. If all three colors are present,
proceed to step 8. If the paper towel doesn’t show
all three colors, then repeat step 7. If paper towel
still doesn’t show all three colors repeating step 7,
then replace the cartridge.
8. Dry the cartridge.

104
9. Verify cartridge is now functioning properly by printing your image.
Dry excess water from cartridge.
Ensure cartridge contacts are
completely dry. Printer damage
may result if cartridge contacts are
not completely dry.

105
6E Manual Feed Mode
Manual feed mode allows you to load cookies by hand directly to the print platform. This can
be used for oversized or irregular-shaped cookies that don’t fit well on the carousel platter. For
complete specifications, see section 2A.
To enable manual feed:
1. Update to the latest firmware 1.25 or higher. To update firmware, open PrintHub -
choose settings - Click the Update tab.
2. Once the firmware has been updated,
power off the Printer.
3. Disconnect the carousel platter 8 pin mini
din cable in the back of the Printer. (You
do not need to detach the
Carousel. However, you may find it easier
to remove the platter.)
4. Power on the Printer. When the Printer is
powered on with no carousel detected, it will automatically go into manual feed mode.
Carousel is Disconnected – Manual Mode Enabled will be displayed in Print Hub.
5. Now send a print (or multiple prints).
6. The platform presents itself.
7. Load the print object/cookie.
8. Press the Pause button.
9. The item is then printed and presented.
10. Load the next item and press Pause again to print it and
repeat the process.
Press Pause to Start Printing

106
6F Error Messages (Knowledgebase).
1. Platform Feed Obstruction
2. Cookie Out Error
3. Trouble Finding Cookie / Remove Cookie
4. Ink is Expired
5. Carrier Stall
6. Cookie is not printing Centered – How to Overbleed
6G Interpreting LED Indicator Lights (Flashing Lights).
Most error messages will appear on your computer screen via the PrintHub application or the Printer
Utility (Mac). However, if the error prevents communication with the computer, the LED lights may be
used to help diagnose the problem.
LED
Status
Explanation
Power LED
Solid
Printer is connected to Power and in Idle/Ready state
Power LED
Slow Flash during
printer movement
Printer is going through the startup sequence, printing or
calibrating. This will occur any time the carousel or cookie
platform is moving.
Power LED
Fast Flash – no
printer movement
Error is present which prevents printing. Please open PrintHub
or Config Utility(Mac) for more information. Light will blink
with internal LEDs if enabled.
Ink LED
Flashing
Ink is low - Replace the ink Cartridge
Internal
Blue and
Green LEDs
Flashing no printer
movement
An Error is present –Flash only occurs if set to flash in the
advanced settings. You can turn this off! (See Section 3E -PC
and 5D-Mac)
Internal
Blue and
Green LEDs
Flashing while
printing
Alternate between blue and green during printing if set to flash
in the advanced setting. – You can turn this off! (See Section 3E
-PC and 5D - Mac)

107
6H Technical Support.
If you have difficulties operating your Printer, contact technical support using one of the
methods listed below.
Source
Location
Primera Knowledge Base
www.primera.com/kb
Email Support
www.primera.com/customer-support
Phone Support
763-475-6669 (Mon - Fri 7 a.m. - 10 p.m CST
and Saturday 11 a.m. – 8 p.m.)
Chat
www.primera.com – see chat icon in lower
right corner (Mon - Fri 7 a.m. - 10 p.m CST
and Saturday 12 noon – 9 p.m.)

108
Section 7: Technical Specifications
PRINT SPEED
5-6 cookies per minute, varies by size and print
PRINT RESOLUTION
Up to 4800 x 1200 dpi
PRINT TECHNOLOGY
Thermal Inkjet
INK TYPES
Edible Ink
STANDARD CONNECTIVITY
USB 2.0 (USB 3.0 compatible) Ethernet 10/100
Max Print Width
See Section 2A
Min Print Width
See Section 2A
Min/Max Print item Width
See Section 2A
Maximum Print item Width
See Section 2A
Standard Sizes
1", 3", 3.5", 4", 4.5"
Minimum Thickness:
.08" (2mm)
Maximum Thickness
1” thickness for 1.5” max dimeter objects such as Macarons.
For all other sizes, .75” (20mm) is max
Operating System
Windows 7, 8 or 10 Mac OS 10.11 +
DIMENSIONS
• Printer
• Carousel
• Total Assembled
12.47” (317mm) W x 7.12” (181mm) H x 14.78” (375mm) L
16” (406mm) W x 2.77” (70.3mm) H
16” (406mm) W x 7.12” (181mm) H x 30” (762mm) L
WEIGHT
24.9 Lbs (11.3 kg)
POWER
Input: 100 – 240 VAC, 50/60 Hz, 36 watts, Output: 12 volt 3amp
Model : PT-E763-001 SKU 074110
WARRANTY
One-year parts and labor; lifetime phone, chat and email
support
Operating Temperature
50 to 95º F (10 to 35º C)
Recommended Operating
Temperature
61 to 87º F (16 to 32º C)
Storage Temperature
-4 to 140º F (-20 to 60º C)
Operating Humidity
10 to 60% RH (non-condensing)
Storage Humidity
10 to 80% RH (non-condensing)
REPLACEMENT INK
CARTRIDGES
Edible Ink SKU -53498
Filter Pack
SKU 740123
Certifications
See the following page
109
Section 8: Recipes
Recipe for Printable Iced Sugar Cookies
Milad Audi, 12/20/2019
Sugar Cookies
The key to making these cookies is to use cold butter, no leavening, and add cornstarch to the dough.
This will result in cookies that do not spread or rise during baking. It is crucial that the dough is rolled out
perfectly flat (use rolling pin rings) and cut out carefully so that the finished cookies will have a flat
surface for printing.
• 1 cup (2 sticks) cold unsalted butter, cubed
• 1 cup granulated sugar
• 2 large eggs
• 2 tsp. vanilla and/or almond extract
• 3 ½ cups all-purpose flour
• ½ cup cornstarch
• ¾ tsp. salt
Step 1: Preheat oven to 375°
Step 2: Cream the butter and sugar until combined and mostly smooth.
Step 3: Mix in eggs and vanilla extract until incorporated.
Step 4: Add the flour, cornstarch, and salt. Mix on low speed for 3-5 minutes until it becomes a
workable dough, it should gather itself into a ball and pull away cleanly from the sides of the bowl.
Step 5: Roll the dough on parchment paper to ¼ in thick using rolling pin rings to get a consistent
thickness. Use a round cookie cutter to cut into desired size circles (recommended 3.2 in). Keep the
remaining dough in the refrigerator until you are ready to use it.
Step 6: Bake at 375° for 9-11 minutes on a rack in the middle of the oven. Be careful not to over bake
because the dough will dry out quickly.
Step 7: Let cool completely on the cookie sheets or remove to a cooling rack. Flood with royal icing, see
recipe below.
110
Royal Icing
The key to making this icing is adding meringue powder to get an icing that will harden well and have a
little air in it to absorb ink. It is crucial to get the consistency right so that the icing will flood well and
give a smooth and flat surface for printing, but not so thin that it takes too long to dry.
• 3 Tbsp. meringue powder
• ⅜ cup warm water
• 3 ¾ cup confectioner’s sugar, sifted
• 1 ½ tsp. vanilla or almond extract
Step 1: Combine meringue powder and warm water in a bowl. Wisk for 2-3 minutes until the mixture is
frothy.
Step 2: Add confectioner’s sugar and mix for about 2 minutes until the icing is smooth. Add vanilla or
other flavoring and mix well.
Step 3: Add additional warm water or confectioner’s sugar in small increments to achieve the desired
consistency for flooding the cookies. Adding water will make the icing thinner, adding sugar will make it
thicker. Add enough water that the cookies will flood with a smooth surface, but not so much that the
icing takes too long to harden completely.
Step 4: Use a piping bag to flood the cookies. Start by outlining the cookie and then fill in the middle.
Make sure the surface is smooth and completely filled. Let them sit out until the icing is completely
hardened. Do not store in a package that allows moisture build-up (like sealed plastic bags) as it could
damage the smooth hardened surface of the frosting.

111
Section 9: Certifications and Environmental Policy
Food Equipment:
• NSF/ANSI STANDARD 18 MANUAL FOOD AND BEVERAGE DISPENSING EQUIPMENT
Safety NA/USA/Canada:
• UL 763 STANDARD FOR MOTOR-OPERATED COMMERCIAL FOOD PREPARING MACHINES
- Edition 5 - Issue Date 2018/02/28
• CSA C22.2 NO. 195-16 MOTOR-OPERATED FOOD PROCESSING APPLIANCES
(HOUSEHOLD AND COMMERCIAL) - Edition 2 - Issue Date 2016/06/01
Safety Europe:
• IEC 60335-2-64 HOUSEHOLD AND SIMILAR ELECTRICAL APPLIANCES -- SAFETY. PT. 2-64,
PARTICULAR REQUIREMENTS FOR COMMERCIAL ELECTRIC KITCHEN MACHINES - Edition
3.2 Issue Date 06/2017
• IEC 60335-1 HOUSEHOLD AND SIMILAR ELECTRICAL APPLIANCES -- SAFETY. PT. 1,
GENERAL REQUIREMENTS - Edition 5, Amendment 2 - Revision Date 05/2016
• CENELEC EN 60335-1 HOUSEHOLD AND SIMILAR ELECTRICAL APPLIANCES SAFETY PART
1: GENERAL REQUIREMENTS - Amendment A2 - Revision Date 2019
EMC: Class A
FCC:
NOTE: This equipment has been tested and found to comply with the limits for a Class A digital
device, pursuant to part 15 of the FCC Rules. These limits are designed to provide reasonable
protection against harmful interference when the equipment is operated in a commercial
environment. This equipment generates, uses, and can radiate radio frequency energy and, if
not installed and used in accordance with the instruction manual, may cause harmful
interference to radio communications. Operation of this equipment in a residential area is likely
to cause harmful interference in which case the user will be required to correct the interference
at his own expense.

112
Environmental Policy
The European Union (EU) has developed the WEEE (Waste Electrical and Electronic Equipment) Directive
(WEEE Directive 2012/19/EU) to ensure that systems for collection, treatment, and recycling of
electronic waste will be in place throughout the European Union.
Electrical and electronic equipment (EEE) contains materials, components, and substances that may be
hazardous and present a risk to human health and the environment when waste and electronic
equipment (WEEE) is not handled correctly.
Equipment marked with the below crossed-out wheeled bin is Electrical and electronic equipment (EEE).
The crossed-out wheeled bin symbol indicates that the product is EEE and must be collected separately,
in accordance with the WEEE Directive 2012/19/EU.
Users of EEE must not discard WEEE together with household waste. Users must follow local recycling
regulations to reduce adverse environmental impacts in connection with disposal of WEEE and to
increase opportunities for reuse, recycling, and recovery of WEEE. As a user of this EEE, you have an
important role in recycling this equipment and contributing to the protection of the environment and
the conserving of natural resources.
When a product reached its end of life, contact us at environment@primera.com or +1-763-475-6676 to
arrange its recycling. Primera will work with you to arrange for the recycling of the product.
