
Legal Notice
©
Cloudera Inc. 2024. All rights reserved.
The documentation is and contains Cloudera proprietary information protected by copyright and other intellectual property
rights. No license under copyright or any other intellectual property right is granted herein.
Unless otherwise noted, scripts and sample code are licensed under the Apache License, Version 2.0.
Copyright information for Cloudera software may be found within the documentation accompanying each component in a
particular release.
Cloudera software includes software from various open source or other third party projects, and may be released under the
Apache Software License 2.0 (“ASLv2”), the Affero General Public License version 3 (AGPLv3), or other license terms.
Other software included may be released under the terms of alternative open source licenses. Please review the license and
notice files accompanying the software for additional licensing information.
Please visit the Cloudera software product page for more information on Cloudera software. For more information on
Cloudera support services, please visit either the Support or Sales page. Feel free to contact us directly to discuss your
specific needs.
Cloudera reserves the right to change any products at any time, and without notice. Cloudera assumes no responsibility nor
liability arising from the use of products, except as expressly agreed to in writing by Cloudera.
Cloudera, Cloudera Altus, HUE, Impala, Cloudera Impala, and other Cloudera marks are registered or unregistered
trademarks in the United States and other countries. All other trademarks are the property of their respective owners.
Disclaimer: EXCEPT AS EXPRESSLY PROVIDED IN A WRITTEN AGREEMENT WITH CLOUDERA,
CLOUDERA DOES NOT MAKE NOR GIVE ANY REPRESENTATION, WARRANTY, NOR COVENANT OF
ANY KIND, WHETHER EXPRESS OR IMPLIED, IN CONNECTION WITH CLOUDERA TECHNOLOGY OR
RELATED SUPPORT PROVIDED IN CONNECTION THEREWITH. CLOUDERA DOES NOT WARRANT THAT
CLOUDERA PRODUCTS NOR SOFTWARE WILL OPERATE UNINTERRUPTED NOR THAT IT WILL BE
FREE FROM DEFECTS NOR ERRORS, THAT IT WILL PROTECT YOUR DATA FROM LOSS, CORRUPTION
NOR UNAVAILABILITY, NOR THAT IT WILL MEET ALL OF CUSTOMER’S BUSINESS REQUIREMENTS.
WITHOUT LIMITING THE FOREGOING, AND TO THE MAXIMUM EXTENT PERMITTED BY APPLICABLE
LAW, CLOUDERA EXPRESSLY DISCLAIMS ANY AND ALL IMPLIED WARRANTIES, INCLUDING, BUT NOT
LIMITED TO IMPLIED WARRANTIES OF MERCHANTABILITY, QUALITY, NON-INFRINGEMENT, TITLE, AND
FITNESS FOR A PARTICULAR PURPOSE AND ANY REPRESENTATION, WARRANTY, OR COVENANT BASED
ON COURSE OF DEALING OR USAGE IN TRADE.
Cloudera Runtime | Contents | iii
Contents
Apache Hive 3 tables................................................................................................5
Locating Hive tables and changing the location..................................................................................................6
Refer to a table using dot notation...................................................................................................................... 7
Understanding CREATE TABLE behavior.........................................................................................................7
Creating a CRUD transactional table...................................................................................................................9
Creating an insert-only transactional table...........................................................................................................9
Creating, using, and dropping an external table................................................................................................10
Creating an Ozone-based external table.............................................................................................................11
Accessing Hive files in Ozone...........................................................................................................................12
Recommended Hive configurations when using Ozone....................................................................................14
Converting a managed non-transactional table to external................................................................................15
External tables based on a non-default schema.................................................................................................15
Using your schema in MariaDB............................................................................................................ 15
Using your schema in MS SQL.............................................................................................................16
Using your schema in Oracle.................................................................................................................17
Using your schema in PostgreSQL........................................................................................................18
Using constraints.................................................................................................................................................19
Determining the table type.................................................................................................................................21
Apache Hive 3 ACID transactions........................................................................21
Apache Hive query basics......................................................................................24
Querying the information_schema database...................................................................................................... 24
Inserting data into a table...................................................................................................................................26
Updating data in a table.....................................................................................................................................27
Merging data in tables........................................................................................................................................27
Deleting data from a table..................................................................................................................................28
Creating a temporary table.................................................................................................................................28
Configuring temporary table storage......................................................................................................28
Using a subquery................................................................................................................................................29
Subquery restrictions.............................................................................................................................. 29
Use wildcards with SHOW DATABASES....................................................................................................... 30
Aggregating and grouping data..........................................................................................................................30
Querying correlated data.................................................................................................................................... 30
Using common table expressions.......................................................................................................................31
Use a CTE in a query............................................................................................................................ 31
Comparing tables using ANY/SOME/ALL....................................................................................................... 32
Escaping an invalid identifier.............................................................................................................................32
CHAR data type support....................................................................................................................................33
ORC vs Parquet formats.....................................................................................................................................33
Creating a default directory for managed tables................................................34
Generating surrogate keys.....................................................................................35
Partitions and performance...................................................................................36
Repairing partitions manually using MSCK repair........................................................................................... 37
Query scheduling.................................................................................................... 38
Enabling scheduled queries................................................................................................................................ 38
Enabling all scheduled queries...........................................................................................................................39
Periodically rebuilding a materialized view.......................................................................................................39
Getting scheduled query information and monitor the query............................................................................40
Materialized views.................................................................................................. 42
Creating and using a materialized view.............................................................................................................43
Creating the tables and view..................................................................................................................43
Using optimizations from a subquery....................................................................................................44
Dropping a materialized view................................................................................................................ 45
Showing materialized views...................................................................................................................45
Describing a materialized view..............................................................................................................46
Managing query rewrites........................................................................................................................48
Purposely using a stale materialized view.............................................................................................48
Creating and using a partitioned materialized view...............................................................................48
Using JdbcStorageHandler to query RDBMS.....................................................51

Cloudera Runtime Apache Hive 3 tables
Apache Hive 3 tables
Table type definitions and a diagram of the relationship of table types to ACID properties clarifies Hive tables. The
location of a table depends on the table type. You might choose a table type based on its supported storage format.
You can create ACID (atomic, consistent, isolated, and durable) tables for unlimited transactions or for insert-
only transactions. These tables are Hive managed tables. Alternatively, you can create an external table for non-
transactional use. Because Hive control of the external table is weak, the table is not ACID compliant.
The following diagram depicts the Hive table types.
The following matrix includes the types of tables you can create using Hive, whether or not ACID properties are
supported, required storage format, and key SQL operations.
Table Type ACID File Format INSERT UPDATE/DELETE
Managed: CRUD
transactional
Yes ORC Yes Yes
Managed: Insert-only
transactional
Yes Any Yes No
Managed: Temporary No Any Yes No
External No Any Yes No
Although you cannot use the SQL UPDATE or DELETE statements to delete data in some types of tables, you can
use DROP PARTITION on any table type to delete the data.
Table storage formats
The data in CRUD tables must be in ORC format. Implementing a storage handler that supports AcidInputFormat and
AcidOutputFormat is equivalent to specifying ORC storage.
Insert-only tables support all file formats.
The managed table storage type is Optimized Row Column (ORC) by default. If you accept the default by not
specifying any storage during table creation, or if you specify ORC storage, you get an ACID table with insert,
update, and delete (CRUD) capabilities. If you specify any other storage type, such as text, CSV, AVRO, or JSON,
you get an insert-only ACID table. You cannot update or delete columns in the insert-only table.
5

Cloudera Runtime Apache Hive 3 tables
Transactional tables
Transactional tables are ACID tables that reside in the Hive warehouse. To achieve ACID compliance, Hive has
to manage the table, including access to the table data. Only through Hive can you access and change the data in
managed tables. Because Hive has full control of managed tables, Hive can optimize these tables extensively.
Hive is designed to support a relatively low rate of transactions, as opposed to serving as an online analytical
processing (OLAP) system. You can use the SHOW TRANSACTIONS command to list open and aborted
transactions.
Transactional tables in Hive 3 are on a par with non-ACID tables. No bucketing or sorting is required in Hive 3
transactional tables. Bucketing does not affect performance. These tables are compatible with native cloud storage.
Hive supports one statement per transaction, which can include any number of rows, partitions, or tables.
External tables
External table data is not owned or controlled by Hive. You typically use an external table when you want to access
data directly at the file level, using a tool other than Hive.
Hive 3 does not support the following capabilities for external tables:
• Query cache
• Materialized views, except in a limited way
• Automatic runtime filtering
• File merging after insert
• ARCHIVE, UNARCHIVE, TRUNCATE, MERGE, and CONCATENATE. These statements only work for Hive
Managed tables.
When you run DROP TABLE on an external table, by default Hive drops only the metadata (schema). If you want the
DROP TABLE command to also remove the actual data in the external table, as DROP TABLE does on a managed
table, you need to set the external.table.purge property to true as described later.
Locating Hive tables and changing the location
You need to know where Hive stores tables on your object store or file system. Also, right after installing Hive-on-
Tez, you might also want to change the warehouse location.
About this task
New tables that you create in CDP are stored in either the Hive warehouse for managed tables or the Hive warehouse
for external tables. The following default warehouse locations are in the HDFS file system:
• /warehouse/tablespace/managed/hive
• /warehouse/tablespace/external/hive
Managed tables reside in the managed tablespace, which only Hive can access. By default, Hive assumes external
tables reside in the external tablespace.
To determine the managed or external table type, you can run the DESCRIBE EXTENDED table_name command.
You need to set Ranger policies to access external tables in the object store or file system, such as HDFS.
The capability to change the location of the Hive warehouse is intended for use immediately after installing the
service. You can change the location of the warehouse using the Hive Metastore Action menu in Cloudera Manager
as described in the following steps:
6

Cloudera Runtime Apache Hive 3 tables
Procedure
1.
In Cloudera Manager, click Clusters Hive Action Menu Create Hive Warehouse Directory .
2.
In Cloudera Manager, click Clusters Hive (the Hive Metastore service) Configuration , and change the hive.met
astore.warehouse.dir property value to the path for the new Hive warehouse directory.
3.
Click Hive Hive Action Menu Create Hive Warehouse External Directory .
4.
Change the hive.metastore.warehouse.external.dir property value to the path for the Hive warehouse external
directory.
5.
Configure Ranger Hadoop SQL policy to access the URL of the directory on the object store, such as S3 or
Ozone, or file system, such as HDFS.
Refer to a table using dot notation
Hive 3.1 changes to table references using dot notation might require changes to your Hive scripts.
About this task
Hive 3.1 in CDP includes SQL compatibility (Hive-16907), which rejects `db.table` in SQL queries. The dot (.) is not
allowed in table names. To reference the database and table in a table name, enclosed both in backticks as follows:
`db`.`table`
Understanding CREATE TABLE behavior
Hive table creation has changed significantly since Hive 3 to improve useability and functionality. If you are
upgrading from CDH or HDP, you must understand the changes affecting legacy table creation behavior.
Hive has changed table creation in the following ways:
• Creates ACID-compliant table, which is the default in CDP
• Supports simple writes and inserts
• Writes to multiple partitions
• Inserts multiple data updates in a single SELECT statement
• Eliminates the need for bucketing.
If you have an ETL pipeline that creates tables in Hive, the tables will be created as ACID. Hive now tightly controls
access and performs compaction periodically on the tables. Using ACID-compliant, transactional tables causes no
7

Cloudera Runtime Apache Hive 3 tables
performance or operational overload. The way you access managed Hive tables from Spark and other clients changes.
In CDP, access to external tables requires you to set up security access permissions.
You must understand the behavior of the CREATE TABLE statement in legacy platforms like CDH or HDP and how
the behavior changes after you upgrade to CDP.
Before upgrading to CDP
In CDH 5, CDH 6, and HDP 2, by default CREATE TABLE creates a non-ACID managed table in plain text format.
In HDP 3 and CDP 7.1.0 through 7.1.7.x, by default CREATE TABLE creates either a full ACID transactional table
in ORC format or insert-only ACID transactional tables for all other table formats.
After upgrading to CDP
• If you are upgrading from HDP 2, CDH 5, or CDH 6 to CDP 7.1.0 through CDP 7.1.8, by default CREATE
TABLE creates a full ACID transactional table in ORC format or insert-only ACID transactional tables for all
other table formats.
• If you are upgrading from HDP 3 or CDP 7.1.0 through 7.1.7.x to CDP 7.1.8, the existing behavior persists and
CREATE TABLE creates either a full ACID transactional table in ORC format or insert-only ACID transactional
tables for all other table formats.
Now that you understand the behavior of the CREATE TABLE statement, you can choose to modify the default table
behavior by configuring certain properties. The order of preference for configuration is as follows:
Modify the default CREATE TABLE behavior
Override default behavior when creating the table
Irrespective of the database, session, or site-level settings, you can override the default table
behavior by using the MANAGED or EXTERNAL keyword in the CREATE TABLE statement.
CREATE [MANAGED][EXTERNAL] TABLE foo (id INT);
Set the default table type at a database level
You can use the database property, defaultTableType=EXTERNAL or ACID to specify the default
table type to be created using the CREATE TABLE statement. You can specify this property when
creating the database or at a later point using the ALTER DATABASE statement. For example:
CREATE DATABASE test_db WITH DBPROPERTIES ('defaultTableType'='E
XTERNAL');
In this example, tables created under the test_db database using the CREATE TABLE statement
creates external tables with the purge fucntionality enabled (external.table.purge = 'true').
You can also choose to configure a database to allow only external tables to be created and prevent
creation of ACID tables. While creating a database, you can set the database property, EXTER
NAL_TABLES_ONLY=true to ensure that only external tables are created in the database. For
example:
CREATE DATABASE test_db WITH DBPROPERTIES ('EXTERNAL_TABLES_ONLY
'='true');
Set the default table type at a session level
You can configure the CREATE TABLE behavior within an existing beeline session by setting
hive.create.as.external.legacy to true or false. Setting the value to true results in configuring the
CREATE TABLE statement to create external tables by default.
When the session ends, the default CREATE TABLE behavior also ends.
Set the default table type at a site level
8

Cloudera Runtime Apache Hive 3 tables
You can configure the CREATE TABLE behavior at the site level by configuring the hive.create.
as.insert.only and hive.create.as.acid properties in Cloudera Manager under Hive configuration.
When configured at the site level, the behavior persists from session to session. For more
information, see Configuring CREATE TABLE behavior.
If you are a Spark user, switching to legacy behavior is unnecessary. Calling ‘create table’ from SparkSQL, for
example, creates an external table after upgrading to CDP as it did before the upgrade. You can connect to Hive using
the Hive Warehouse Connector (HWC) to read Hive ACID tables from Spark. To write ACID tables to Hive from
Spark, you use the HWC and HWC API. Spark creates an external table with the purge property when you do not use
the HWC API. For more information, see Hive Warehouse Connector for accessing Spark data.
Related Information
Configuring legacy CREATE TABLE behavior
Creating a CRUD transactional table
You create a CRUD transactional table having ACID (atomic, consistent, isolated, and durable) properties when you
need a managed table that you can update, delete, and merge. You learn by example how to determine the table type.
About this task
In this task, you create a CRUD transactional table. You cannot sort this type of table. To create a CRUD
transactional table, you must accept the default ORC format by not specifying any storage during table creation, or by
specifying ORC storage explicitly.
Procedure
1.
Start Hive.
2.
Enter your user name and password.
The Hive 3 connection message, followed by the Hive prompt for entering SQL queries on the command line,
appears.
3.
Create a CRUD transactional table named T having two integer columns, a and b:
CREATE TABLE T(a int, b int);
4.
Confirm that you created a managed, ACID table.
DESCRIBE FORMATTED T;
The table type says MANAGED_TABLE and transactional = true.
Related Information
HMS storage
Creating an insert-only transactional table
You can create a transactional table using any storage format if you do not require update and delete capability. This
type of table has ACID properties, is a managed table, and accepts insert operations only. The storage format of an
insert-only table is not restricted to ORC.
About this task
In this task, you create an insert-only transactional table for storing text. In the CREATE TABLE statement,
specifying a storage type other than ORC, such as text, CSV, AVRO, or JSON, results in an insert-only ACID table.
You can explicitly specify insert-only in the table properties clause.
9

Cloudera Runtime Apache Hive 3 tables
Procedure
1.
Start Hive.
2.
Enter your user name and password.
The Hive 3 connection message, followed by the Hive prompt for entering SQL queries on the command line,
appears.
3.
Create a insert-only transactional table named T2 having two integer columns, a and b:
CREATE TABLE T2(a int, b int)
STORED AS ORC
TBLPROPERTIES ('transactional'='true',
'transactional_properties'='insert_only');
The 'transactional_properties'='insert_only' is required; otherwise, a CRUD table results. The STORED AS ORC
clause is optional (default = ORC).
4.
Create an insert-only transactional table for text data.
CREATE TABLE T3(a int, b int)
STORED AS TEXTFILE;
The 'transactional_properties'='insert_only' is not required because the storage format is other than ORC.
Related Information
HMS storage
Creating, using, and dropping an external table
You use an external table, which is a table that Hive does not manage, to import data from a file on a file system
into Hive. In contrast to the Hive managed table, an external table keeps its data outside the Hive metastore. Hive
metastore stores only the schema metadata of the external table. Hive does not manage, or restrict access, to the actual
external data.
Before you begin
You need to set up access to external tables in the file system or object store using Ranger.
About this task
In this task, you create an external table from CSV (comma-separated values) data stored on the file system. Next,
you want Hive to manage and store the actual data in the metastore. You create a managed table and insert the
external table data into the managed table.
This task demonstrates the following Hive principles:
• The LOCATION clause in the CREATE TABLE specifies the location of external table data.
• A major difference between an external and a managed (internal) table: the persistence of table data on the files
system after a DROP TABLE statement.
• External table drop: Hive drops only the metadata, consisting mainly of the schema.
• Managed table drop: Hive deletes the data and the metadata stored in the Hive warehouse.
After dropping an external table, the data is not gone. To retrieve it, you issue another CREATE EXTERNAL
TABLE statement to load the data from the file system.
10

Cloudera Runtime Apache Hive 3 tables
Procedure
1.
Create a text file named students.csv that contains the following lines.
1,jane,doe,senior,mathematics 2,john,smith,junior,engineering
2.
Move the file to HDFS in a directory called andrena, and put students.csv in the directory.
3.
Start the Hive shell.
For example, substitute the URI of your HiveServer: beeline -u jdbc:hive2://myhiveserver.com:10000 -n hive -
p
4.
Create an external table schema definition that specifies the text format, loads data from students.csv in /user/
andrena.
CREATE EXTERNAL TABLE IF NOT EXISTS names_text(
student_ID INT,
FirstName STRING,
LastName STRING,
year STRING,
Major STRING)
COMMENT 'Student Names' ROW FORMAT DELIMITED FIELDS TERMINATED BY ','
STORED AS TEXTFILE LOCATION '/user/andrena';
5.
Verify that the Hive warehouse stores the student names in the external table.
SELECT * FROM names_text;
6.
Create the schema for a managed table.
CREATE TABLE IF NOT EXISTS Names(
student_ID INT,
FirstName STRING,
LastName STRING,
year STRING,
Major STRING)
COMMENT 'Student Names';
7.
Move the external table data to the managed table.
INSERT OVERWRITE TABLE Names SELECT * FROM names_text;
8.
Verify that the data from the external table resides in the managed table, and drop the external table, and verify
that the data still resides in the managed table.
SELECT * from Names; DROP TABLE names_text; SELECT * from Names;
The results from the managed table Names appears.
9.
Verify that the external table schema definition is lost.
SELECT * from names_text;
Selecting all from names_text returns no results because the external table schema is lost.
10.
Check that the students.csv file on the file system or object store remains intact.
Related Information
HMS storage
HDFS ACLS
Creating an Ozone-based external table
You use the LOCATION clause in the CREATE EXTERNAL TABLE statement to create an external table having
source data in Ozone.
11

Cloudera Runtime Apache Hive 3 tables
About this task
In this task, you create an external table and load data from a .csv file that is stored in Ozone. You can use the
LOCATION clause in the CREATE EXTERNAL TABLE statement to specify the location of the external table data.
The metadata is stored in the Hive warehouse.
Before you begin
• If you are running an insecure cluster, ensure that you set up the necessary policies and permissions in Ranger to
give user access to Hive external files in Ozone.
• You must have created a volume and bucket in Ozone. For example:
ozone sh volume create vol1
ozone sh bucket create vol1/bucket1
• It is recommended that you set certain Hive configurations before querying Hive tables in Ozone.
Procedure
1.
Create a text file named employee.csv that contains the following records.
1,Andrew,45000,Technical Manager
2,Sam,35000,Proof Reader
2.
Move the employee.csv file to a directory called employee_hive in the Ozone filesystem.
3.
Connect to the gateway node of the cluster and on the command line of the cluster, launch Beeline to start the
Hive shell.
beeline -u jdbc:hive2://myhiveserver.com:10000 -n hive -p
The Hive 3 connection message appears, followed by the Hive prompt for entering queries on the command line.
4.
Create an external table schema definition that specifies the text format and loads data from employee.csv in ofs://
ozone1/vol1/bucket1/employee_hive.
CREATE EXTERNAL TABLE IF NOT EXISTS employee(
employee_ID INT,
name STRING,
salary DOUBLE,
designation STRING)
ROW FORMAT DELIMITED FIELDS TERMINATED BY ','
STORED AS TEXTFILE
LOCATION 'ofs://ozone1/vol1/bucket1/employee_hive';
5.
Verify that the Hive warehouse stores the employee.csv records in the external table.
SELECT * FROM employee;
Related Information
Setting up Ranger policies to access Hive files in Ozone
Commands for managing Ozone volumes and buckets
Recommended Hive configurations when using Ozone
Accessing Hive files in Ozone
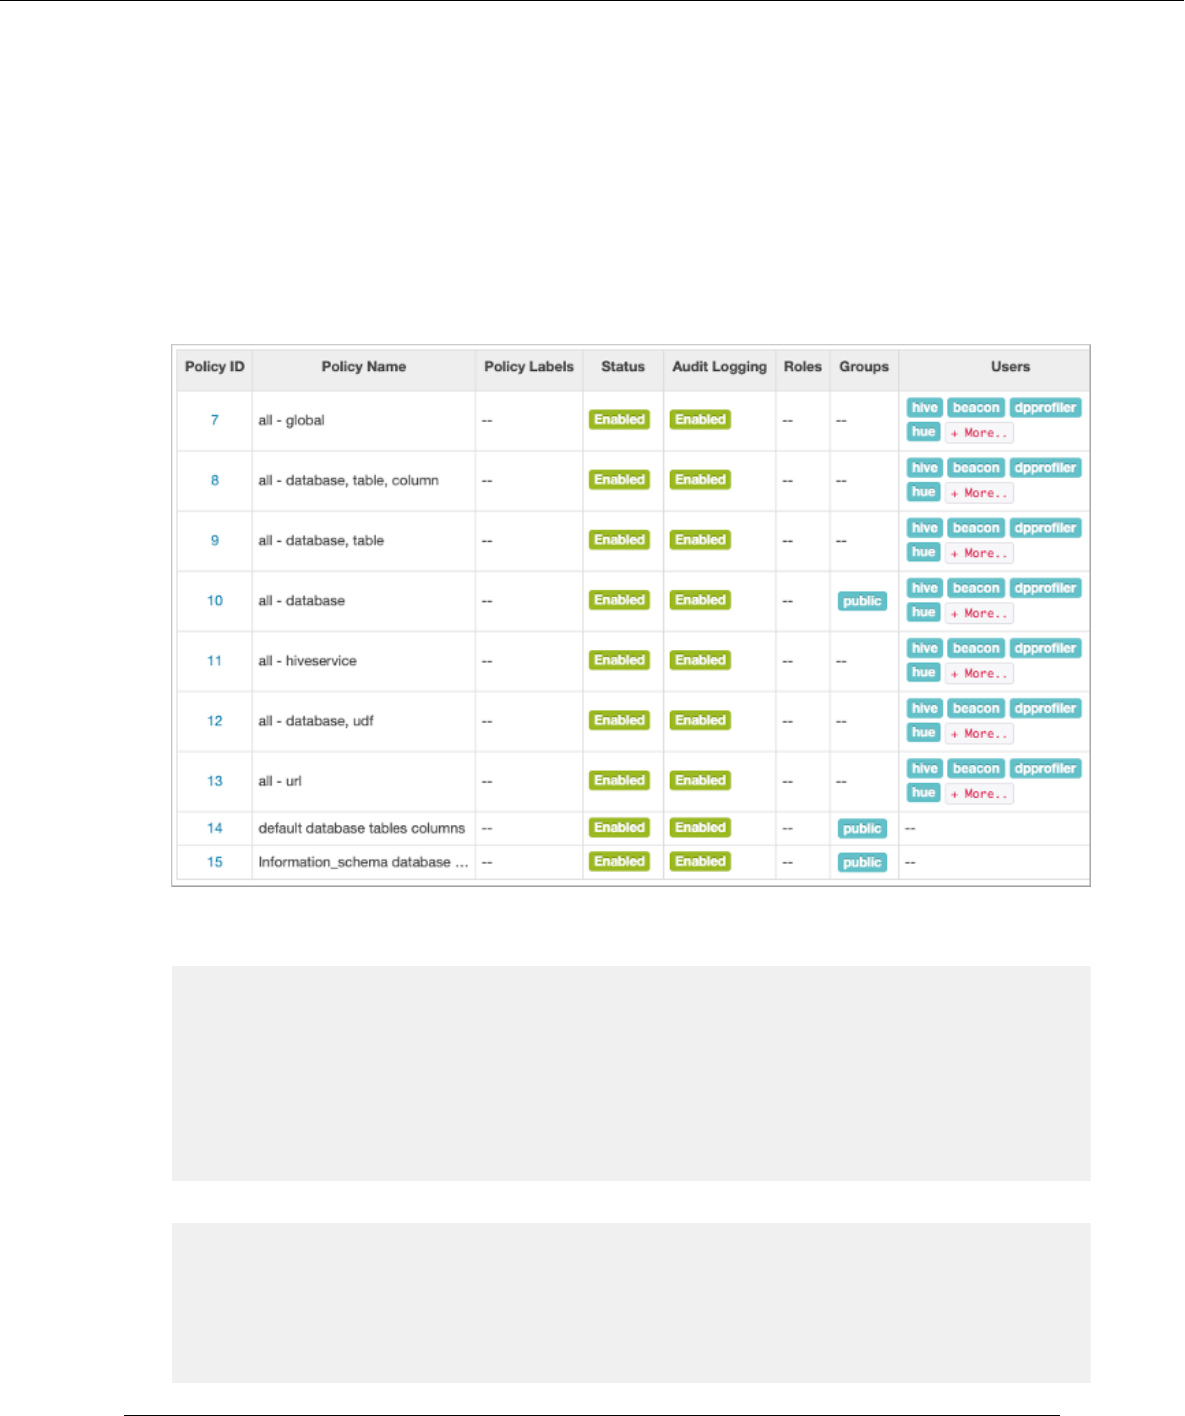
Learn how to set up policies to give users access to Hive external files in Ozone. For example, if Ozone users are
running SparkSQL statements that query Hive tables, you must set up an Ozone access policy and Ozone file system
access policy.
12

Cloudera Runtime Apache Hive 3 tables
About this task
When Ranger is enabled in the cluster, any user other than the default admin user, "om" requires the necessary Ranger
permissions and policy updates to access the Ozone filesystem. To create a Hive external table that points to the
Ozone filesystem, the "hive" user should have the required permissions in Ranger.
In this task, you first enable Ozone in the Ranger service, and then set up the required policies.
Procedure
1.
In Cloudera Manager, click Clusters Ozone Configuration to navigate to the configuration page for Ozone.
2.
Search for ranger_service, and enable the property.
3.
Click Clusters Ranger Ranger Admin Web UI , enter your user name and password, then click Sign In.
The Service Manager for Resource Based Policies page is displayed in the Ranger console.
4.
Click the cm_ozone preloaded resource-based service to modify an Ozone policy.
5.
In the cm_ozone policies page, click the Policy ID or click Edit against the "all - volume, bucket, key"
policy to modify the policy details.
6.
In the Allow Conditions pane, add the "hive" user, choose the necessary permissions, and then click Save.
13

Cloudera Runtime Apache Hive 3 tables
7.
Click the Service Manager link in the breadcrumb trail and then click the Hadoop SQL preloaded resource-based
service to update the Hadoop SQL URL policy.
8.
In the Hadoop SQL policies page, click the Policy ID or click Edit against the "all - url" policy to modify
the policy details.
By default, "hive", "hue", "impala", "admin" and a few other users are provided access to all the Ozone URLs.
You can select users and groups in addition to the default. To grant everyone access, add the "public" group to the
group list. Every user is then subject to your allow conditions.
What to do next
Create a Hive external table having source data in Ozone.
Also, it is recommended that you set certain Hive configurations before querying Hive tables in Ozone.
Related Information
Using Ranger with Ozone
Creating an Ozone-based Hive external table
Creating partitions dynamically
Recommended Hive configurations when using Ozone
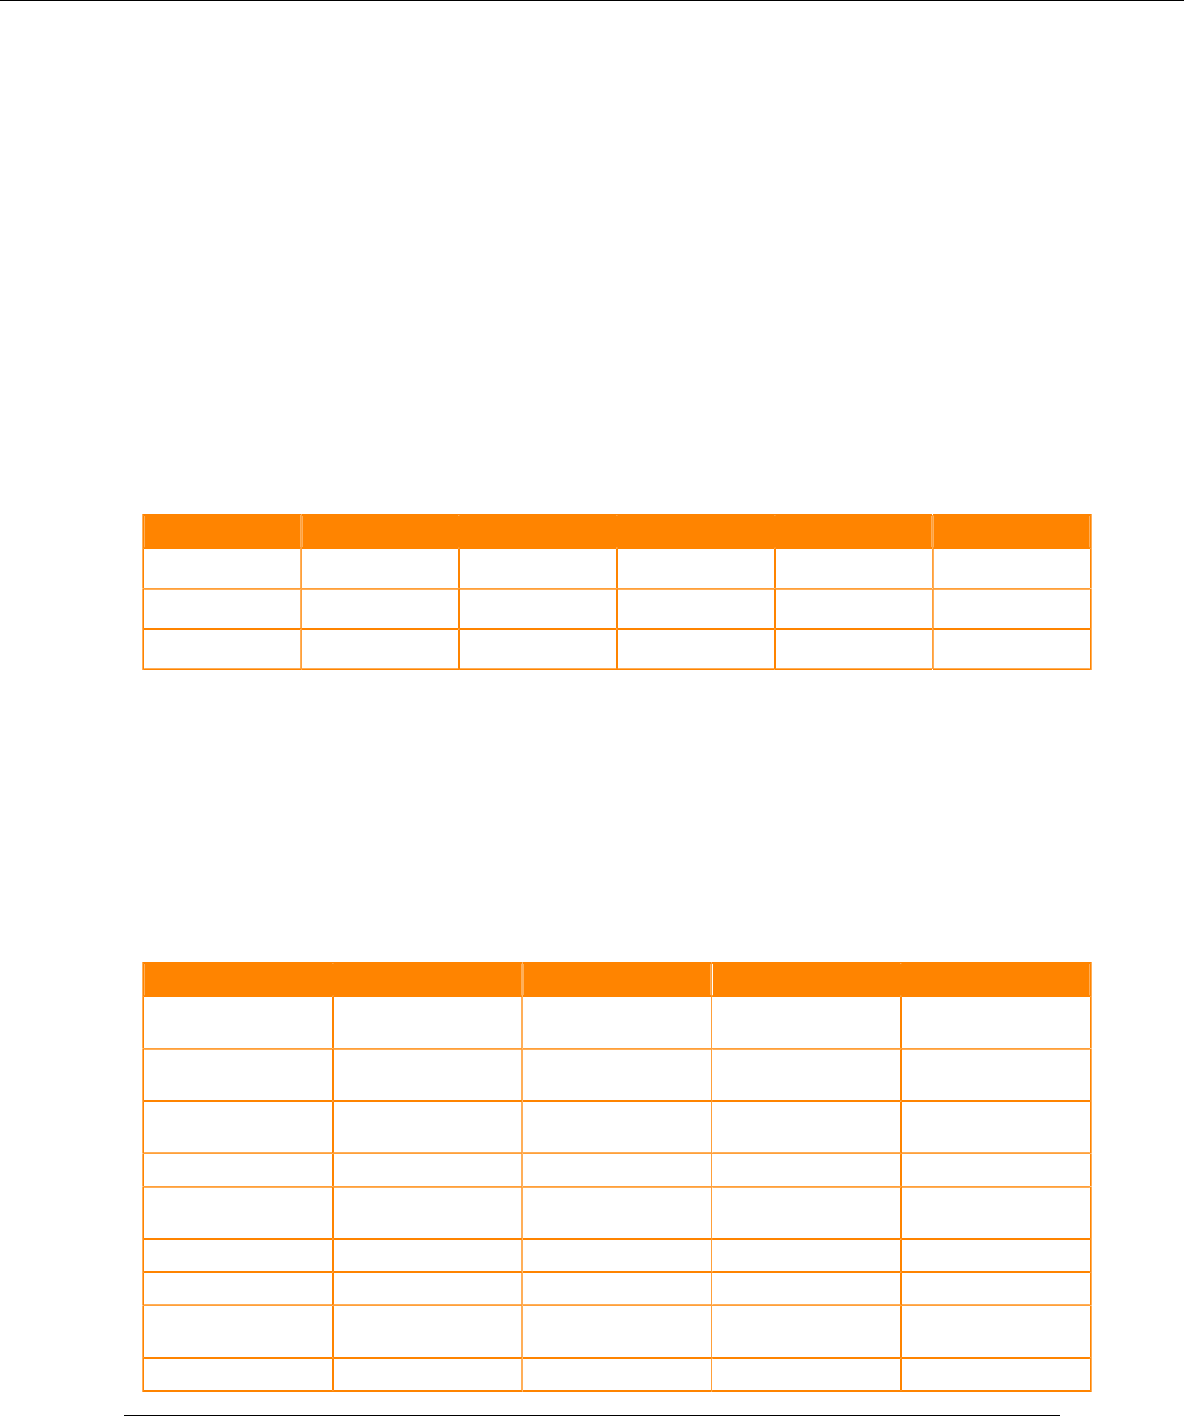
Recommended Hive configurations when using Ozone
It is recommended that you configure certain Hive properties if you are querying Hive tables in Ozone.
Configurations
The following configurations can be specified through Beeline during runtime using the SET command. For example,
SET key=value;. The configuration persists only for the particular session or query. If you want to set it permanently,
then specify the properties in hive-site.xml using the Cloudera Manager Safety Valve:
Table 1:
Configuration Value
hive.optimize.sort.dynamic.partition true
hive.optimize.sort.dynamic.partition.threshold 0
hive.query.results.cache.enabled false
hive.acid.direct.insert.enabled true
hive.orc.splits.include.fileid false
14

Cloudera Runtime Apache Hive 3 tables
Important: If you notice that some queries are taking a longer time to complete or failing entirely (usually
noticed in large clusters), you can choose to revert the value of hive.optimize.sort.dynamic.partition.threshold
to "-1". The performance issue is related to HIVE-26283.
Related Information
Creating an Ozone-based Hive external table
Setting up Ranger policies to access Hive files in Ozone
Converting a managed non-transactional table to external
You can easily convert a managed table, if it is not an ACID (transactional) table, to external using the ALTER
TABLE statement. You might have a non-ACID, managed table after an upgrade from Hive 1 or 2.
About this task
The following pseudo-code changes a managed table, if it is not transactional, to external. The data and metadata is
dropped when the table is dropped.
ALTER TABLE ... SET TBLPROPERTIES('EXTERNAL'='TRUE','external.table.purge'='
true')
Related Information
Before and After Upgrading Table Type Comparison
External tables based on a non-default schema
If you define a schema for external tables, you need to know how to create the table using the hive.sql.schema table
property to prevent problems with client connections to the tables. Examples for widely-used databases show you
how to create such tables.
The handling of schema differs from DBMS to DBMS. In this task, you follow examples to create external tables that
the following databases can understand.
• MariaDB
• MS SQL
• Oracle
• PostgreSQL
Using your schema in MariaDB
You follow an example of how to create an external table in MariaDB using your own schema.
Before you begin
GRANT INSERT ANY TABLE TO bob;
GRANT INSERT ANY TABLE TO alice;
Procedure
Using MariaDB, create an external table based on a user-defined schema.
CREATE SCHEMA bob;
CREATE TABLE bob.country
(
id int,
name varchar(20)
);
15

Cloudera Runtime Apache Hive 3 tables
insert into bob.country
values (1, 'India');
insert into bob.country
values (2, 'Russia');
insert into bob.country
values (3, 'USA');
CREATE SCHEMA alice;
CREATE TABLE alice.country
(
id int,
name varchar(20)
);
insert into alice.country
values (4, 'Italy');
insert into alice.country
values (5, 'Greece');
insert into alice.country
values (6, 'China');
insert into alice.country
values (7, 'Japan');
Using your schema in MS SQL
You follow an example of how to create an external table in MS SQL using your own schema.
Procedure
1.
Using MS SQL, create an external table based on a user-defined schema.
CREATE DATABASE world;
USE world;
CREATE SCHEMA bob;
CREATE TABLE bob.country
(
id int,
name varchar(20)
);
insert into bob.country
values (1, 'India');
insert into bob.country
values (2, 'Russia');
insert into bob.country
values (3, 'USA');
CREATE SCHEMA alice;
CREATE TABLE alice.country
(
id int,
name varchar(20)
);
insert into alice.country
values (4, 'Italy');
insert into alice.country
values (5, 'Greece');
insert into alice.country
values (6, 'China');
insert into alice.country
values (7, 'Japan');
16

Cloudera Runtime Apache Hive 3 tables
2.
In MS SQL, create a user and associate them with a default schema.
CREATE LOGIN greg WITH PASSWORD = 'GregPass123!$';
CREATE USER greg FOR LOGIN greg WITH DEFAULT_SCHEMA=bob;
3.
Allow the user to connect to the database and run queries. For example:
GRANT CONNECT, SELECT TO greg;
Using your schema in Oracle
You follow an example of how to create an external table in Oracle using your own schema.
About this task
In Oracle, dividing the tables into different namespaces/schemas is achieved through different users. The CREATE
SCHEMA statement exists in Oracle, but has different semantics from those defined by SQL Standard and those
adopted in other DBMS.
To create "local" users in Oracle you need to be connected to the Pluggable Database (PDB), not to the Container
Database (CDB). The following example was tested in Oracle XE edition, using only PDB -- XEPDB1.
Procedure
1.
Using Oracle XE edition, connect to the PDB.
ALTER SESSION SET CONTAINER = XEPDB1;
2.
Create the bob schema/user and give appropriate connections to be able to connect to the database.
CREATE USER bob IDENTIFIED BY bobpass;
ALTER USER bob QUOTA UNLIMITED ON users;
GRANT CREATE SESSION TO bob;
CREATE USER bob IDENTIFIED BY bobpass;
ALTER USER bob QUOTA UNLIMITED ON users;
GRANT CREATE SESSION TO bob;
3.
Create the alice schema/user, give appropriate connections to be able to connect to the database, and create an
external table.
CREATE USER alice IDENTIFIED BY alicepass;
ALTER USER alice QUOTA UNLIMITED ON users;
GRANT CREATE SESSION TO alice;
CREATE TABLE alice.country
(
id int,
name varchar(20)
);
insert into alice.country
values (4, 'Italy');
insert into alice.country
values (5, 'Greece');
insert into alice.country
values (6, 'China');
insert into alice.country
values (7, 'Japan');
17

Cloudera Runtime Apache Hive 3 tables
4.
Grant the SELECT ANY privilege to client users.
Without the SELECT ANY privilege, a user cannot see the tables/views of another user. When a user connects
to the database using a specific user and schema it is not possible to refer to tables in another user/schema --
namespace.
GRANT SELECT ANY TABLE TO bob;
GRANT SELECT ANY TABLE TO alice;
5.
Allow the users to perform inserts on any table/view in the database, not only those present on their own schema.
GRANT INSERT ANY TABLE TO bob;
GRANT INSERT ANY TABLE TO alice;
Using your schema in PostgreSQL
You follow an example of how to create an external table in PostgreSQL using your own schema.
Procedure
1.
Using Postgres, create external tables based on a user-defined schema.
CREATE SCHEMA bob;
CREATE TABLE bob.country
(
id int,
name varchar(20)
);
insert into bob.country
values (1, 'India');
insert into bob.country
values (2, 'Russia');
insert into bob.country
values (3, 'USA');
CREATE SCHEMA alice;
CREATE TABLE alice.country
(
id int,
name varchar(20)
);
insert into alice.country
values (4, 'Italy');
insert into alice.country
values (5, 'Greece');
insert into alice.country
values (6, 'China');
insert into alice.country
values (7, 'Japan');
2.
Create a user and associate them with a default schema <=> search_path.
CREATE ROLE greg WITH LOGIN PASSWORD 'GregPass123!$';
ALTER ROLE greg SET search_path TO bob;
3.
Grant the necessary permissions to be able to access the schema.
GRANT USAGE ON SCHEMA bob TO greg;
GRANT SELECT ON ALL TABLES IN SCHEMA bob TO greg;
18

Cloudera Runtime Apache Hive 3 tables
Using constraints
You can use SQL constraints to enforce data integrity and improve performance. Using constraints, the optimizer can
simplify queries. Constraints can make data predictable and easy to locate. Using constraints and supported modifiers,
you can follow examples to constrain queries to unique or not null values, for example.
Hive enforces DEFAULT, NOT NULL and CHECK only, not PRIMARY KEY, FOREIGN KEY, and UNIQUE.
You can use the constraints listed below in your queries. Hive enforces DEFAULT, NOT NULL and CHECK only,
not PRIMARY KEY, FOREIGN KEY, and UNIQUE. DEFAULT even if enforced, does not support complex types
(array,map,struct). Constraint enforcement is limited to the metadata level. This limitation aids integration with third
party tools and optimization of constraints declarations, such as materialized view rewriting.
CHECK
Limits the range of values you can place in a column.
DEFAULT
Ensures a value exists, which is useful in offloading data from a data warehouse.
PRIMARY KEY
Identifies each row in a table using a unique identifier.
FOREIGN KEY
Identifies a row in another table using a unique identifier.
UNIQUE KEY
Checks that values stored in a column are different.
NOT NULL
Ensures that a column cannot be set to NULL.
Supported modifiers
You can use the following optional modifiers:
ENABLE
Ensures that all incoming data conforms to the constraint.
DISABLE
Does not ensure that all incoming data conforms to the constraint.
VALIDATE
Checks that all existing data in the table conforms to the constraint.
NOVALIDATE
Does not check that all existing data in the table conforms to the constraint.
ENFORCED
Maps to ENABLE NOVALIDATE.
NOT ENFORCED
Maps to DISABLE NOVALIDATE.
RELY
Specifies abiding by a constraint; used by the optimizer to apply further optimizations.
NORELY
Specifies not abiding by a constraint.
19

Cloudera Runtime Apache Hive 3 tables
You use modifiers as shown in the following syntax:
( ( ( (ENABLE | DISABLE) (VALIDATE | NOVALIDATE) ) | ( ENFORCED | NOT ENFORC
ED ) ) (RELY | NORELY) )
Note: For external tables, the RELY constraint is the only supported constraint.
Default modfiers
The following default modifiers are in place:
• The default modifier for ENABLE is NOVALIDATE RELY.
• The default modifier for DISABLE is NOVALIDATE NORELY.
• If you do not specify a modifier when you declare a constraint, the default is ENABLE NOVALIDATE RELY.
The following constraints do not support ENABLE:
• PRIMARY KEY
• FOREIGN KEY
• UNIQUE KEY
To prevent an error, specify a modfier when using these constraints to override the default.
Constraints examples
The optimizer uses the constraint information to make smart decisions. The following examples show the use of
constraints.
The following example shows how to create a table that declares the NOT NULL in-line constraint to constrain a
column.
CREATE TABLE t(a TINYINT, b SMALLINT NOT NULL ENABLE, c INT);
The constrained column b accepts a SMALLINT value as shown in the first INSERT statement.
INSERT INTO t values(2,45,5667);
...
----------------------------------------------------------
1 row affected ...
The constrained column b will not accept a NULL value.
INSERT INTO t values(2,NULL,5667);
Error: Error running query: org.apache.hadoop.hive.ql.exec.errors.Dat
aConstraintViolationError: /
Either CHECK or NOT NULL constraint violated! (state=,code=0)
The following examples shows how to declare the FOREIGN KEY constraint out of line. You can specify a
constraint name, in this case fk, in an out-of-line constraint
CREATE TABLE Persons (
ID INT NOT NULL,
Name STRING NOT NULL,
Age INT,
Creator STRING DEFAULT CURRENT_USER(),
CreateDate DATE DEFAULT CURRENT_DATE(),
PRIMARY KEY (ID) DISABLE NOVALIDATE);
CREATE TABLE BusinessUnit (
20

Cloudera Runtime Apache Hive 3 ACID transactions
ID INT NOT NULL,
Head INT NOT NULL,
Creator STRING DEFAULT CURRENT_USER(),
CreateDate DATE DEFAULT CURRENT_DATE(),
PRIMARY KEY (ID) DISABLE NOVALIDATE,
CONSTRAINT fk FOREIGN KEY (Head) REFERENCES Persons(ID) DISABLE NOVA
LIDATE
);
Determining the table type
You can determine the type of a Hive table, whether it has ACID properties, the storage format, such as ORC, and
other information. Knowing the table type is important for a number of reasons, such as understanding how to store
data in the table or to completely remove data from the cluster.
Procedure
1.
In the Hive shell, get an extended description of the table.
For example: DESCRIBE EXTENDED mydatabase.mytable;
2.
Scroll to the bottom of the command output to see the table type.
The following output says the table type is managed. transaction=true indicates that the table has ACID properties:
...
| Detailed Table Information | Table(tableName:t2, dbName:mydatabase, o
wner:hdfs, createTime:1538152187, lastAccessTime:0, retention:0, sd:Stor
ageDescriptor(cols:[FieldSchema(name:a, type:int, comment:null), FieldSc
hema(name:b, type:int, comment:null)], ...
Related Information
HMS storage
Apache Hive 3 ACID transactions
Hive 3 achieves atomicity and isolation of operations on transactional tables by using techniques in write, read, insert,
create, delete, and update operations that involve delta files. You can obtain query status information from these files
and use the files to troubleshoot query problems.
Write and read operations
Hive 3 write and read operations improve the ACID qualities and performance of transactional tables. Transactional
tables perform as well as other tables. Hive supports all TPC Benchmark DS (TPC-DS) queries.
Hive 3 and later extends atomic operations from simple writes and inserts to support the following operations:
• Writing to multiple partitions
• Using multiple insert clauses in a single SELECT statement
A single statement can write to multiple partitions or multiple tables. If the operation fails, partial writes or inserts are
not visible to users. Operations remain fast even if data changes often, such as one percent per hour. Hive 3 and later
does not overwrite the entire partition to perform update or delete operations.
Hive compacts ACID transaction files automatically without impacting concurrent queries. Automatic compaction
improves query performance and the metadata footprint when you query many small, partitioned files.
Read semantics consist of snapshot isolation. Hive logically locks in the state of the warehouse when a read operation
starts. A read operation is not affected by changes that occur during the operation.
21

Cloudera Runtime Apache Hive 3 ACID transactions
Atomicity and isolation in insert-only tables
When an insert-only transaction begins, the transaction manager gets a transaction ID. For every write, the transaction
manager allocates a write ID. This ID determines a path to which data is actually written. The following code shows
an example of a statement that creates insert-only transactional table:
CREATE TABLE tm (a int, b int) TBLPROPERTIES
('transactional'='true', 'transactional_properties'='insert_only')
Assume that three insert operations occur, and the second one fails:
INSERT INTO tm VALUES(1,1);
INSERT INTO tm VALUES(2,2); // Fails
INSERT INTO tm VALUES(3,3);
For every write operation, Hive creates a delta directory to which the transaction manager writes data files. Hive
writes all data to delta files, designated by write IDs, and mapped to a transaction ID that represents an atomic
operation. If a failure occurs, the transaction is marked aborted, but it is atomic:
tm
___ delta_0000001_0000001_0000
### 000000_0
___ delta_0000002_0000002_0000 //Fails
### 000000_0
___ delta_0000003_0000003_0000
### 000000_0
During the read process, the transaction manager maintains the state of every transaction. When the reader starts, it
asks for the snapshot information, represented by a high watermark. The watermark identifies the highest transaction
ID in the system followed by a list of exceptions that represent transactions that are still running or are aborted.
The reader looks at deltas and filters out, or skips, any IDs of transactions that are aborted or still running. The reader
uses this technique with any number of partitions or tables that participate in the transaction to achieve atomicity and
isolation of operations on transactional tables.
Atomicity and isolation in CRUD tables
You create a full CRUD (create, retrieve, update, delete) transactional table using the following SQL statement:
CREATE TABLE acidtbl (a INT, b STRING);
Running SHOW CREATE TABLE acidtbl provides information about the defaults: transactional (ACID) and the
ORC data storage format:
+----------------------------------------------------+
| createtab_stmt |
+----------------------------------------------------+
| CREATE TABLE `acidtbl`( |
| `a` int, |
| `b` string) |
| ROW FORMAT SERDE |
| 'org.apache.hadoop.hive.ql.io.orc.OrcSerde' |
| STORED AS INPUTFORMAT |
| 'org.apache.hadoop.hive.ql.io.orc.OrcInputFormat' |
| OUTPUTFORMAT |
| 'org.apache.hadoop.hive.ql.io.orc.OrcOutputFormat' |
| LOCATION |
| 's3://myserver.com:8020/warehouse/tablespace/managed/hive/acidtb
l' |
| TBLPROPERTIES ( |
22

Cloudera Runtime Apache Hive 3 ACID transactions
| 'bucketing_version'='2', |
| 'transactional'='true', |
| 'transactional_properties'='default', |
| 'transient_lastDdlTime'='1555090610') |
+----------------------------------------------------+
Tables that support updates and deletions require a slightly different technique to achieve atomicity and isolation.
Hive runs in append-only mode, which means Hive does not perform in-place updates or deletions. Isolation of
readers and writers cannot occur in the presence of in-place updates or deletions. In this situation, a lock manager or
some other mechanism, is required for isolation. These mechanisms create a problem for long-running queries.
Instead of in-place updates, Hive decorates every row with a row ID. The row ID is a struct that consists of the
following information:
• The write ID that maps to the transaction that created the row
• The bucket ID, a bit-backed integer with several bits of information, of the physical writer that created the row
• The row ID, which numbers rows as they were written to a data file
Instead of in-place deletions, Hive appends changes to the table when a deletion occurs. The deleted data becomes
unavailable and the compaction process takes care of the garbage collection later.
Create operation
The following example inserts several rows of data into a full CRUD transactional table, creates a delta file, and adds
row IDs to a data file.
INSERT INTO acidtbl (a,b) VALUES (100, "oranges"), (200, "apples"), (300, "b
ananas");
This operation generates a directory and file, delta_00001_00001/bucket_0000, that have the following data:
ROW_ID a b
{1,0,0} 100 "oranges"
{1,0.1} 200 "apples"
{1,0,2} 300 "bananas"
Delete operation
A delete statement that matches a single row also creates a delta file, called the delete-delta. The file stores a set of
row IDs for the rows that match your query. At read time, the reader looks at this information. When it finds a delete
23

Cloudera Runtime Apache Hive query basics
event that matches a row, it skips the row and that row is not included in the operator pipeline. The following example
deletes data from a transactional table:
DELETE FROM acidTbl where a = 200;
This operation generates a directory and file, delete_delta_00002_00002/bucket_0000 that have the following data:
ROW_ID a b
{1,0,1} null null
Update operation
An update combines the deletion and insertion of new data. The following example updates a transactional table:
UPDATE acidTbl SET b = "pears" where a = 300;
One delta file contains the delete event, and the other, the insert event:
The reader, which requires the AcidInputFormat, applies all the insert events and encapsulates all the logic to handle
delete events. A read operation first gets snapshot information from the transaction manager based on which it selects
files that are relevant to that read operation. Next, the process splits each data file into the number of pieces that each
process has to work on. Relevant delete events are localized to each processing task. Delete events are stored in a
sorted ORC file. The compressed, stored data is minimal, which is a significant advantage of Hive 3. You no longer
need to worry about saturating the network with insert events in delta files.
Apache Hive query basics
Using Apache Hive, you can query distributed data storage. You need to know ANSI SQL to view, maintain, or
analyze Hive data. Examples of the basics, such as how to insert, update, and delete data from a table, helps you get
started with Hive.
Hive supports ANSI SQL and atomic, consistent, isolated, and durable (ACID) transactions. For updating data, you
can use the MERGE statement, which meets ACID standards. Materialized views optimize queries based on access
patterns. Hive supports tables up to 300PB in Optimized Row Columnar (ORC) format. Other file formats are also
supported. You can create tables that resemble those in a traditional relational database. You use familiar insert,
update, delete, and merge SQL statements to query table data. The insert statement writes data to tables. Update and
delete statements modify and delete values already written to Hive. The merge statement streamlines updates, deletes,
and changes data capture operations by drawing on co-existing tables. These statements support auto-commit that
treats each statement as a separate transaction and commits it after the SQL statement is executed.
Related Information
ORC Language Manual on the Apache wiki
Querying the information_schema database
Hive supports the ANSI-standard information_schema database, which you can query for information about tables,
views, columns, and your Hive privileges. The information_schema data reveals the state of the system, similar to
24
Cloudera Runtime Apache Hive query basics
sys database data, but in a user-friendly, read-only way. You can use joins, aggregates, filters, and projections in
information_schema queries.
About this task
One of the following steps involves changing the time interval for synchronization between HiveServer and the
policy. HiveServer responds to any policy changes within this time interval. You can query the information_schema
database for only your own privilege information.
Procedure
1.
Open Ranger Access Manager, and check that the preloaded default database tables columns and information_
schema database policies are enabled for group public.
The information schema database is synchronized every half hour by default.
2.
Start Hive, and check for the information_schema database:
SHOW DATABASES;
...
+---------------------+
| database_name |
+---------------------+
| default |
| information_schema |
| sys |
+---------------------+
3.
Use the information_schema database to list tables in the database.
USE information_schema;
...
SHOW TABLES;
...
+--------------------+
| tab_name |
+--------------------+
25

Cloudera Runtime Apache Hive query basics
| column_privileges |
| columns |
| schemata |
| table_privileges |
| tables |
| views |
+--------------------+
4.
Query the information_schema database to see, for example, information about tables into which you can insert
values.
SELECT * FROM information_schema.tables WHERE is_insertable_into='YES' l
imit 2;
...
+--------------------+-------------------+-----------------
|tables.table_catalog|tables.table_schema|tables.table_name
+--------------------+-------------------+-----------------
|default |default |students2
|default |default |t3
Inserting data into a table
To insert data into a table you use a familiar ANSI SQL statement. A simple example shows you have to accomplish
this basic task.
About this task
To insert data into an ACID table, use the Optimized Row Columnar (ORC) storage format. To insert data into a non-
ACID table, you can use other supported formats. You can specify partitioning as shown in the following syntax:
INSERT INTO TABLE tablename [PARTITION (partcol1=val1, partcol2=val2 ...)] VALUES values_row [, valu
es_row...]
where
values_row is (value [, value]) .
A value can be NULL or any SQL literal.
Procedure
1.
Create an ACID table to contain student information.
CREATE TABLE students (name VARCHAR(64), age INT, gpa DECIMAL(3,2));
2.
Insert name, age, and gpa values for a few students into the table.
INSERT INTO TABLE students VALUES ('fred flintstone', 35, 1.28), ('barney rubble', 32, 2.32);
3.
Create a table called pageviews and assign null values to columns you do not want to assign a value.
CREATE TABLE pageviews (userid VARCHAR(64), link STRING, origin STRING)
PARTITIONED BY (datestamp STRING) CLUSTERED BY (userid) INTO 256 BUCKETS;
INSERT INTO TABLE pageviews PARTITION (datestamp = '2014-09-23') VALUES ('
jsmith', 'mail.com', 'sports.com'), ('jdoe', 'mail.com', null);
INSERT INTO TABLE pageviews PARTITION (datestamp) VALUES ('tjohnson', '
sports.com', 'finance.com', '2014-09-23'), ('tlee', 'finance.com', null,
'2014-09-21');
The ACID data resides in the warehouse.
26

Cloudera Runtime Apache Hive query basics
Updating data in a table
The syntax describes the UPDATE statement you use to modify data already stored in a table. An example shows
how to apply the syntax.
About this task
You construct an UPDATE statement using the following syntax:
UPDATE tablename SET column = value [, column = value ...] [WHERE expression];
Depending on the condition specified in the optional WHERE clause, an UPDATE statement might affect every row
in a table. The expression in the WHERE clause must be an expression supported by a SELECT clause. Subqueries
are not allowed on the right side of the SET statement. Partition columns cannot be updated.
Before you begin
You must have SELECT and UPDATE privileges to use the UPDATE statement.
Procedure
Create a statement that changes the values in the name column of all rows where the gpa column has the value of 1.0.
UPDATE students SET name = null WHERE gpa <= 1.0;
Merging data in tables
A sample statement shows how you can conditionally insert existing data in Hive tables using the ACID MERGE
statement. Additional merge operations are mentioned.
About this task
The MERGE statement is based on ANSI-standard SQL.
Procedure
1.
Construct a query to update the customers' names and states in customer target table to match the names and states
of customers having the same IDs in the new_customer_stage source table.
2.
Enhance the query to insert data from new_customer_stage table into the customer table if none already exists.
Update or delete data using MERGE in a similar manner.
MERGE INTO customer USING (SELECT * FROM new_customer_stage) AS sub ON s
ub.id = customer.id
WHEN MATCHED THEN UPDATE SET name = sub.name, state = sub.state
WHEN NOT MATCHED THEN INSERT VALUES (sub.id, sub.name, sub.state);
Note: You can map specific columns in the INSERT clause of the query instead of passing values
(including null) for columns in the target table that do not have any data to insert. The unspecified
columns in the INSERT clause are either mapped to null or use default constraints, if any.
For example, you can construct the INSERT clause as WHEN NOT MATCHED THEN INSERT VAL
UES (customer.id=sub.id, customer.name=sub.name, customer.state=sub.state) instead of WHEN
NOT MATCHED THEN INSERT VALUES (sub.id, sub.name, 'null', sub.state).
Related Information
Merge documentation on the Apache wiki
27

Cloudera Runtime Apache Hive query basics
Deleting data from a table
You use the DELETE statement to delete data already written to an ACID table.
About this task
Use the following syntax to delete data from a Hive table. DELETE FROM tablename [WHERE expression];
Procedure
Delete any rows of data from the students table if the gpa column has a value of 1 or 0.
DELETE FROM students WHERE gpa <= 1,0;
Creating a temporary table
In CDP Private Cloud Base, you can create a temporary table to improve performance by storing data temporarily for
intermediate use, or reuse, by a complex query.
About this task
Temporary table data persists only during the current Apache Hive session. Hive drops the table at the end of the
session. If you use the name of a permanent table to create the temporary table, the permanent table is inaccessible
during the session unless you drop or rename the temporary table. You can create a temporary table having the same
name as another user's temporary table because user sessions are independent. Temporary tables do not support
partitioned columns and indexes.
CDP Private Cloud Base only
Procedure
1.
Create a temporary table having one string column.
CREATE TEMPORARY TABLE tmp1 (tname varchar(64));
2.
Create a temporary table using the CREATE TABLE AS SELECT (CTAS) statement.
CREATE TEMPORARY TABLE tmp2 AS SELECT c2, c3, c4 FROM mytable;
3.
Create a temporary table using the CREATE TEMPORARY TABLE LIKE statement.
CREATE TEMPORARY TABLE tmp3 LIKE tmp1;
Related Information
Create/Drop/Truncate Table on the Apache wiki
Configuring temporary table storage
In CDP Private Cloud Base, you can change the storage of temporary table data to meet your system requirements.
About this task
By default, Apache Hive stores temporary table data in the default user scratch directory /tmp/
hive-[***USERNAME***]. Often, this location is not set up by default to accommodate a large amount of data such
as that resulting from temporary tables.
CDP Private Cloud Base only
28

Cloudera Runtime Apache Hive query basics
Procedure
1.
Configure Hive to store temporary table data either in memory or on SSD by setting hive.exec.temporary.table.st
orage.
• Store data in memory. hive.exec.temporary.table.storage to memory
• Store data on SSD. hive.exec.temporary.table.storage to ssd
2.
Create and use temporary tables.
Results
Hive drops temporary tables at the end of the session.
Using a subquery
Hive supports subqueries in FROM clauses and WHERE clauses that you can use for many Apache Hive operations,
such as filtering data from one table based on contents of another table.
About this task
A subquery is a SQL expression in an inner query that returns a result set to the outer query. From the result set, the
outer query is evaluated. The outer query is the main query that contains the inner subquery. A subquery in a WHERE
clause includes a query predicate and predicate operator. A predicate is a condition that evaluates to a Boolean value.
The predicate in a subquery must also contain a predicate operator. The predicate operator specifies the relationship
tested in a predicate query.
Procedure
Select all the state and net_payments values from the transfer_payments table if the value of the year column in the
table matches a year in the us_census table.
SELECT state, net_payments
FROM transfer_payments
WHERE transfer_payments.year IN (SELECT year FROM us_census);
The predicate starts with the first WHERE keyword. The predicate operator is the IN keyword.
The predicate returns true for a row in the transfer_payments table if the year value in at least one row of the
us_census table matches a year value in the transfer_payments table.
Subquery restrictions
To construct queries efficiently, you must understand the restrictions of subqueries in WHERE clauses.
• Subqueries must appear on the right side of an expression.
• Nested subqueries are not supported.
• Subquery predicates must appear as top-level conjuncts.
• Subqueries support four logical operators in query predicates: IN, NOT IN, EXISTS, and NOT EXISTS.
• The IN and NOT IN logical operators may select only one column in a WHERE clause subquery.
• The EXISTS and NOT EXISTS operators must have at least one correlated predicate.
• The left side of a subquery must qualify all references to table columns.
• References to columns in the parent query are allowed only in the WHERE clause of the subquery.
• Subquery predicates that reference a column in a parent query must use the equals (=) predicate operator.
• Subquery predicates may refer only to columns in the parent query.
• Correlated subqueries with an implied GROUP BY statement may return only one row.
• All unqualified references to columns in a subquery must resolve to tables in the subquery.
• Correlated subqueries cannot contain windowing clauses.
29

Cloudera Runtime Apache Hive query basics
Use wildcards with SHOW DATABASES
In a SHOW DATABASES LIKE statement, you can use wildcards, and in this release of Hive, specify any character
or a single character.
About this task
SHOW DATABASES or SHOW SCHEMAS lists all of the databases defined in Hive metastore. You can use the
following wildcards:
%
Matches any single character or multiple characters
_
Matches any single character
|
Matches either the part of the pattern on the left or the right side of the pipe.
For example, 'students', 'stu%', 'stu_ents' match the database named students.
Aggregating and grouping data
You use AVG, SUM, or MAX functions to aggregate data, and the GROUP BY clause to group data query results in
one or more table columns..
About this task
The GROUP BY clause explicitly groups data. Hive supports implicit grouping, which occurs when aggregating the
table in full.
Procedure
1.
Construct a query that returns the average salary of all employees in the engineering department grouped by year.
SELECT year, AVG(salary)
FROM Employees
WHERE Department = 'engineering' GROUP BY year;
2.
Construct an implicit grouping query to get the highest paid employee.
SELECT MAX(salary) as highest_pay,
AVG(salary) as average_pay
FROM Employees
WHERE Department = 'engineering';
Querying correlated data
You can query one table relative to the data in another table.
About this task
A correlated query contains a query predicate with the equals (=) operator. One side of the operator must reference at
least one column from the parent query and the other side must reference at least one column from the subquery. An
uncorrelated query does not reference any columns in the parent query.
30

Cloudera Runtime Apache Hive query basics
Procedure
Select all state and net_payments values from the transfer_payments table for years during which the value of the
state column in the transfer_payments table matches the value of the state column in the us_census table.
SELECT state, net_payments
FROM transfer_payments
WHERE EXISTS
(SELECT year
FROM us_census
WHERE transfer_payments.state = us_census.state);
This query is correlated because one side of the equals predicate operator in the subquery references the state column
in the transfer_payments table in the parent query and the other side of the operator references the state column in the
us_census table.
This statement includes a conjunct in the WHERE clause.
A conjunct is equivalent to the AND condition, while a disjunct is the equivalent of the OR condition The following
subquery contains a conjunct:
... WHERE transfer_payments.year = "2018" AND us_census.state = "california"
The following subquery contains a disjunct:
... WHERE transfer_payments.year = "2018" OR us_census.state = "california"
Using common table expressions
Using common table expression (CTE), you can create a temporary view that repeatedly references a subquery.
A CTE is a set of query results obtained from a simple query specified within a WITH clause that immediately
precedes a SELECT or INSERT keyword. A CTE exists only within the scope of a single SQL statement and not
stored in the metastore. You can include one or more CTEs in the following SQL statements:
• SELECT
• INSERT
• CREATE TABLE AS SELECT
• CREATE VIEW AS SELECT
Recursive queries are not supported and the WITH clause is not supported within subquery blocks.
Use a CTE in a query
You can use a common table expression (CTE) to simplify creating a view or table, selecting data, or inserting data.
Procedure
1.
Use a CTE to create a table based on another table that you select using the CREATE TABLE AS SELECT
(CTAS) clause.
CREATE TABLE s2 AS WITH q1 AS (SELECT key FROM src WHERE key = '4') SELECT
* FROM q1;
2.
Use a CTE to create a view.
CREATE VIEW v1 AS WITH q1 AS (SELECT key FROM src WHERE key='5') SELECT *
from q1;
3.
Use a CTE to select data.
WITH q1 AS (SELECT key from src where key = '5')
31

Cloudera Runtime Apache Hive query basics
SELECT * from q1;
4.
Use a CTE to insert data.
CREATE TABLE s1 LIKE src;
WITH q1 AS (SELECT key, value FROM src WHERE key = '5') FROM q1 INSERT OV
ERWRITE TABLE s1 SELECT *;
Comparing tables using ANY/SOME/ALL
You learn how to use quantified comparison predicates (ANY/SOME/ALL) in non-correlated subqueries according to
the SQL standard. SOME is any alias for ANY.
About this task
You can use one of the following operators with a comparison predicate:
• >
• <
• >=
• <=
• <>
• =
ALL:
• If the table is empty, or the comparison is true for every row in subquery table, the predicate is true for that
predicand.
• If the comparison is false for at least one row, the predicate is false.
SOME or ANY:
• If the comparison is true for at least one row in the subquery table, the predicate is true for that predicand.
• If the table is empty or the comparison is false for each row in subquery table, the predicate is false.
If the comparison is neither true nor false, the result is undefined.
For example, you run the following query to match any value in c2 of tbl equal to any value in c1 from the same tbl:
select c1 from tbl where c1 = ANY (select c2 from tbl);
You run the following query to match all values in c1 of tbl not equal to any value in c2 from the same tbl.
select c1 from tbl where c1 <> ALL (select c2 from tbl);
Escaping an invalid identifier
When you need to use reserved words, special characters, or a space in a column or partition name, enclose it in
backticks (`).
About this task
An identifier in SQL is a sequence of alphanumeric and underscore (_) characters enclosed in backtick characters. In
Hive, these identifiers are called quoted identifiers and are case-insensitive. You can use the identifier instead of a
column or table partition name.
Before you begin
You have set the following parameter to column in the hive-site.xml file to enable quoted identifiers:
32
Cloudera Runtime Apache Hive query basics
Set the hive.support.quoted.identifiers configuration parameter to column in the hive-site.xml file to enable quoted
identifiers in column names. Valid values are none and column. For example, in Hive execute the following
command: SET hive.support.quoted.identifiers = column.
Procedure
1.
Create a table named test that has two columns of strings specified by quoted identifiers:
CREATE TABLE test (`x+y` String, `a?b` String);
2.
Create a table that defines a partition using a quoted identifier and a region number:
CREATE TABLE partition_date-1 (key string, value string) PARTITIONED BY (`dt+x` date, region int);
3.
Create a table that defines clustering using a quoted identifier:
CREATE TABLE bucket_test(`key?1` string, value string) CLUSTERED BY (`key?1`) into 5 buckets;
CHAR data type support
Knowing how Hive supports the CHAR data type compared to other databases is critical during migration.
Table 2: Trailing Whitespace Characters on Various Databases
Data Type Hive Oracle SQL Server MySQL Teradata
CHAR Ignore Ignore Ignore Ignore Ignore
VARCHAR Compare Compare Configurable Ignore Ignore
STRING Compare N/A N/A N/A N/A
ORC vs Parquet formats
The differences between Optimized Row Columnar (ORC) file format for storing data in SQL engines are important
to understand. Query performance improves when you use the appropriate format for your application.
ORC and Parquet capabilities comparison
The following table compares SQL engine support for ORC and Parquet.
Table 3:
Capability Data Warehouse ORC Parquet SQL Engine
Read non-transactional
data
Apache Hive # # Hive
Read non-transactional
data
Apache Impala # # Impala
Read/Write Full ACID
tables
Apache Hive # Hive
Read Full ACID tables Apache Impala # Impala
Read Insert-only managed
tables
Apache Impala # # Impala
Column index Apache Hive # # Hive
Column index Apache Impala # Impala
CBO uses column
metadata
Apache Hive # Hive
Recommended format Apache Hive # Hive
33

Cloudera Runtime Creating a default directory for managed tables
Capability Data Warehouse ORC Parquet SQL Engine
Recommended format Apache Impala # Impala
Vectorized reader Apache Hive # # Hive
Read complex types Apache Impala # # Impala
Read/write complex types Apache Hive # # Hive
Creating a default directory for managed tables
You can specify a top-level directory for managed tables when creating a Hive database.
About this task
Create a default directory for managed tables only after limiting CREATE DATABASE and ALTER DATABASE
statements to users having the Admin role, which has hive service user permissions. Permissions to the managed
directory must be limited to the hive service user. In addition to restricting permissions to the hive user, you can
further secure managed tables using Ranger fine-grained permissions, such as row-level filtering and column
masking.
As Admin, you specify a managed location within the default location specified by the hive.metastore.warehouse.dir
configuration property to give managed tables a common location for governance policies. The managed location
designates a single root directory for all tenant tables, managed and external.
Use the following syntax to create a database that specifies a location for managed tables:
CREATE (DATABASE|SCHEMA) [IF NOT EXISTS] database_name
[COMMENT database_comment]
[LOCATION external_table_path]
[MANAGEDLOCATION managed_table_directory_path]
[WITH DBPROPERTIES (property_name=property_value, ...)];
Do not set LOCATION and MANAGEDLOCATION to the same file system path.
Use the following syntax to set or change a location for managed tables.
ALTER (DATABASE|SCHEMA) database_name SET MANAGEDLOCATION [managed_table_dir
ectory_path];
Procedure
1.
Create a database mydatabase that specifies a top level directory named sales for managed tables.
CREATE DATABASE mydatabase MANAGEDLOCATION '/warehouse/tablespace/managed/
hive/sales';
2.
Change the abc_sales database location to the same location as mydatabase.
ALTER DATABASE abc_sales SET MANAGEDLOCATION '/warehouse/tablespace/mana
ged/hive/sales';
34

Cloudera Runtime Generating surrogate keys
Generating surrogate keys
You can use the built-in SURROGATE_KEY user-defined function (UDF) to automatically generate numerical Ids
for rows as you enter data into a table. The generated surrogate keys can replace wide, multiple composite keys.
Before you begin
Hive supports the surrogate keys on ACID tables only, as described in the following matrix of table types:
Table Type ACID Surrogate Keys File Format INSERT UPDATE/DELETE
Managed: CRUD
transactional
Yes Yes ORC Yes Yes
Managed: Insert-only
transactional
Yes Yes Any Yes No
Managed: Temporary No No Any Yes No
External No No Any Yes No
The table you want to join using surrogate keys cannot have column types that need casting. These data types must be
primitives, such as INT or STRING.
About this task
Joins using the generated keys are faster than joins using strings. Using generated keys does not force data into
a single node by a row number. You can generate keys as abstractions of natural keys. Surrogate keys have an
advantage over UUIDs, which are slower and probabilistic.
The SURROGATE_KEY UDF generates a unique Id for every row that you insert into a table. It generates keys
based on the execution environment in a distributed system, which includes a number of factors, such as internal data
structures, the state of a table, and the last transaction id. Surrogate key generation does not require any coordination
between compute tasks.
The UDF takes either no arguments or two arguments:
• Write Id bits
• Task Id bits
Procedure
1.
Create a students table in the default ORC format that has ACID properties.
CREATE TABLE students (row_id INT, name VARCHAR(64), dorm INT);
2.
Insert data into the table. For example:
INSERT INTO TABLE students VALUES (1, 'fred flintstone', 100), (2, 'barney
rubble', 200);
3.
Create a version of the students table using the SURROGATE_KEY UDF.
CREATE TABLE students_v2
(`ID` BIGINT DEFAULT SURROGATE_KEY(),
row_id INT,
name VARCHAR(64),
dorm INT,
PRIMARY KEY (ID) DISABLE NOVALIDATE);
35

Cloudera Runtime Partitions and performance
4.
Insert data, which automatically generates surrogate keys for the primary keys.
INSERT INTO students_v2 (row_id, name, dorm) SELECT * FROM students;
5.
Take a look at the surrogate keys.
SELECT * FROM students_v2;
+-----------------+---------------------+-------------------+-----------
--------+
| students_v2.id | students_v2.row_id | students_v2.name | students_v2.
dorm |
+-----------------+---------------------+-------------------+-----------
--------+
| 1099511627776 | 1 | fred flintstone | 100
|
| 1099511627777 | 2 | barney rubble | 200
|
+-----------------+---------------------+-------------------+-------------
------+
6.
Add the surrogate keys as a foreign key to another table, such as a student_grades table, to speed up subsequent
joins of the tables.
ALTER TABLE student_grades ADD COLUMNS (gen_id BIGINT);
MERGE INTO student_grades g USING students_v2 s ON g.row_id = s.row_id
WHEN MATCHED THEN UPDATE SET gen_id = s.id;
Now you can achieve fast joins on the surrogate keys.
Partitions and performance
A brief description of partitions and the performance benefits includes characters you must avoid when creating
a partition. Examples of creating a partition and inserting data in a partition introduce basic partition syntax. Best
practices for partitioning are mentioned.
A table you create without partitioning puts the data in a single directory. Partitioning divides the data into multiple
directories. Queries of one or more columns based on the directories can run faster. Lengthy full table scans are
avoided. Only data in the relevant directory is scanned. For example, a school_records table partitioned on a year
column, segregates values by year into separate directories. A WHERE condiition such as YEAR=2020, YEAR IN
(2020,2019), or YEAR BETWEEN 2001 AND 2010 scans only the data in the appropriate directory to resolve the
query. Using partitions typically improves query performance.
In a SQL query, you define the partition as shown in the following example:
CREATE TABLE sale(id in, amount decimal) PARTITIONED BY (xdate string, state
string);
To insert data into this table, you specify the partition key for fast loading:
INSERT INTO sale (xdate='2016-03-08', state='CA') SELECT * FROM staging_tabl
e WHERE xdate='2016-03-08' AND state='CA';
You do not need to specify dynamic partition columns. Hive generates a partition specification if you enable dynamic
partitions.
36

Cloudera Runtime Partitions and performance
Examples of a query on partitioned data
INSERT INTO sale (xdate, state)
SELECT * FROM staging_table;
Follow these best practices when you partition tables and query partitioned tables:
• Never partition on a unique ID.
• Size partitions to greater than or equal to 1 GB on average.
• Design queries to process not more than 1000 partitions.
Invalid Characters in a Partition Name
When you create a partition, do not use the following characters in a partition name:
• colon
• question mark
• percent
If you use these characters in a partition name, your directories will be named using the URL encoding of these
characters, as described in "Why some special characters should not be used in a partition name in Hive/Impala."
Related Information
Why some special characters should not be used in a partition name in Hive/Impala
Repairing partitions manually using MSCK repair
The MSCK REPAIR TABLE command was designed to manually add partitions that are added to or removed from
the file system, but are not present in the Hive metastore.
About this task
This task assumes you created a partitioned external table named emp_part that stores partitions outside the
warehouse. You remove one of the partition directories on the file system. This action renders the metastore
inconsistent with the file system. You repair the discrepancy manually to synchronize the metastore with the file
system.
Procedure
1.
Remove the dept=sales object from the file system.
2.
From the Hive command line, look at the emp_part table partitions.
SHOW PARTITIONS emp_part;
The list of partitions is stale; it still includes the dept=sales directory.
+----------------+
| partition |
+----------------+
| dept=finance |
| dept=sales |
| dept=service |
+----------------+
3.
Repair the partition manually.
MSCK REPAIR TABLE emp_part DROP PARTITIONS;
37

Cloudera Runtime Query scheduling
Query scheduling
Apache Hive scheduled queries is a simple, secure way to create, manage, and monitor scheduled jobs. For
applications that require OS-level schedulers like cron, Apache Oozie, or Apache Airflow, you can use scheduled
queries.
Using SQL statements, you can schedule Hive queries to run on a recurring basis, monitor query progress, and
optionally disable a query schedule. You can run queries to ingest data periodically, refresh materialized views,
replicate data, and perform other repetitive tasks. For example, you can insert data from a stream into a transactional
table every 10 minutes, refresh a materialized view used for BI reporting every hour, and replicate data from one
cluster to another on a daily basis.
A Hive scheduled query consists of the following parts:
• A unique name for the schedule
• The SQL statement to be executed
• The execution schedule defined by a Quartz cron expression.
Quartz cron expressions are expressive and flexible. For instance, expressions can describe simple schedules such as
every 10 minutes, but also an execution happening at 10 AM on the first Sunday of the month in January, February in
2021, 2022. You can describe common schedules in an easily comprehensible format, for example every 20 minutes
or every day at ‘3:25:00’.
Operation
A scheduled query belongs to a namespace, which is a collection of HiveServer (HS2) instances that are responsible
for executing the query. Scheduled queries are stored in the Hive metastore. The metastore stores scheduled queries,
the status of ongoing and previously executed statements, and other information. HiveServer periodically polls
the metastore to retrieve scheduled queries that are due to be executed. If you run multiple HiveServer roles, the
metastore guarantees that only one of them executes a certain scheduled query at any given time.
You create, alter, and drop scheduled queries using dedicated SQL statements.
Related Information
Apache Hive Language Manual--Scheduled Queries
Enabling scheduled queries
You need to know how to enable and disable scheduled queries and understand how the default state can prevent you
from running a query unintentionally.
About this task
Scheduled queries are created in disabled mode by default in CDP. This default helps prevent you from running new
scheduled queries inadvertantly. You must explicitly enable new scheduled queries. A scheduled query can keep
the cluster awake at the wrong time. To enable a particular schedule, for example schedule1, you run the ALTER
SCHEDULED QUERY statement:
ALTER SCHEDULED QUERY schedule1 ENABLE;
To disable this schedule: ALTER SCHEDULED QUERY schedule1 DISABLE;
Related Information
Apache Hive Language Manual--Scheduled Queries
38

Cloudera Runtime Query scheduling
Enabling all scheduled queries
You can enable a single scheduled query using a SQL command, but to enable multiple scheduled queries you need
perform a few steps in Cloudera Manager.
About this task
To enable all newly created schedules in CDP Private Cloud Base, follow these steps:
Procedure
1.
In Cloudera Manager, click Clusters Hive on TEZ Configuration
2.
In Search, enter safety.
3.
In Hive Service Advanced Configuration Snippet (Safety Valve) for hive-site.xml HIVE_ON_TEZ-1 (Service-
Wide), click + and add the following property: hive.scheduled.queries.create.as.enabled
4.
Set the value to true.
5.
Save and restart Hive on Tez.
Periodically rebuilding a materialized view
Using materialized views can enhance query performance. You need to update materialized view contents when new
data is added to the underlying table. Instead of rebuilding the materialized view manually, you can schedule this task.
Automatic rebuilding then occurs periodically and transparently to users.
About this task
This task assumes you created the following schemas for storing employee and departmental information:
CREATE TABLE emps (
empid INTEGER,
deptno INTEGER,
name VARCHAR(256),
salary FLOAT,
hire_date TIMESTAMP);
CREATE TABLE depts (
deptno INTEGER,
deptname VARCHAR(256),
locationid INTEGER);
Imagine that you add data for a number of employees to the table. Assume many users of your database issue queries
to access to data about the employees hired during last year including the department they belong to.
You perform the steps below to create a materialized view of the table to address these queries. Imagine new
employees are hired and you add their records to the table. These changes render the materialized view contents
outdated. You need to update its contents. You create a scheduled query to perform this task. The scheduled
rebuilding will not occur unless there are changes to the input tables. You test the scheduled query by bypassing the
schedule and executing the schedule immediately. Finally, you change the schedule to rebuild less often.
Procedure
1.
To handle many queries to access recently hired employee and departmental data, create a materialized view.
CREATE MATERIALIZED VIEW mv_recently_hired AS
SELECT empid, name, deptname, hire_date FROM emps
JOIN depts ON (emps.deptno = depts.deptno)
39

Cloudera Runtime Query scheduling
WHERE hire_date >= '2020-01-01 00:00:00';
2.
Use the materialized view by querying the employee data.
SELECT empid, name FROM emps
JOIN depts ON (emps.deptno = depts.deptno)
WHERE hire_date >= '2020-03-01 00:00:00' AND deptname = 'finance';
3.
Assuming new hiring occurred and you added new records to the emps table, rebuild the materialized view.
ALTER MATERIALIZED VIEW mv_recently_hired REBUILD;
The rebuilding updates the contents of the materialized view.
4.
Create a scheduled query to invoke the rebuild statement every 10 minutes.
CREATE SCHEDULED QUERY scheduled_rebuild
EVERY 10 MINUTES AS
ALTER MATERIALIZED VIEW mv_recently_hired REBUILD;
A rebuild executes every 10 minutes, assuming changes to the emp table occur within that period. If a materialized
view can be rebuilt incrementally, the scheduled rebuild does not occur unless there are changes to the input
tables.
5.
To test the schedule, run a scheduled query immediately.
ALTER SCHEDULED QUERY scheduled_rebuild EXECUTE;
6.
Change the frequency of the rebuilding.
ALTER SCHEDULED QUERY scheduled_rebuild EVERY 20 MINUTES;
Related Information
Apache Hive Language Manual--Scheduled Queries
Getting scheduled query information and monitor the query
After you create a scheduled query you can access information about it in the scheduled_queries table of the Hive
information schema. You can also use the information schema to monitor scheduled query execution.
Procedure
1.
Query the information schema to get information about a schedule.
SELECT *
FROM information_schema.scheduled_queries
40

Cloudera Runtime Query scheduling
WHERE schedule_name = 'scheduled_rebuild';
The following information appears about the scheduled query:
scheduled_query_id
Unique numeric identifier for a scheduled query.
schedule_name
Name of the scheduled query.
enabled
Whether the scheduled query is currently enabled or not.
cluster_namespace
Namespace that the scheduled query belongs to.
schedule
Schedule described as a Quartz cron expression.
user
Owner of the scheduled query.
query
SQL query to be executed.
next_execution
When the next execution of this scheduled query is due.
2.
Monitor the most recent scheduled query execution.
SELECT *
41

Cloudera Runtime Materialized views
FROM information_schema.scheduled_executions;
You can configure the retention period for this information in the Hive metastore.
scheduled_execution_id
Unique numeric identifier for a scheduled query execution.
schedule_name
Name of the scheduled query associated with this execution.
executor_query_id
Query ID assigned to the execution by HiveServer (HS2).
state
One of the following phases of execution.
• STARTED. A scheduled query is due and a HiveServer instance has retrieved its information.
• EXECUTING. HiveServer is executing the query and reporting progress in configurable
intervals.
• FAILED. The query execution was stopped due to an error or exception.
• FINISHED. The query execution was successful.
• TIMED_OUT. HiveServer did not provide an update on the query status for more than a
configurable timeout.
start_time
Start time of execution.
end_time
End time of execution.
elapsed
Difference between start and end time.
error_message
If the scheduled query failed, it contains the error message associated with its failure.
last_update_time
Time of the last update of the query status by HiveServer.
Related Information
Apache Hive Language Manual--Scheduled Queries
Materialized views
A materialized view is a Hive-managed database object that holds a query result you can use to speed up the
execution of a query workload. If your queries are repetitive, you can reduce latency and resource consumption by
using materialized views. You create materialized views to optimize your queries automatically.
Using a materialized view, the optimizer can compare old and new tables, rewrite queries to accelerate processing,
and manage maintenance of the materialized view when data updates occur. The optimizer can use a materialized
view to fully or partially rewrite projections, filters, joins, and aggregations.
You can perform the following materialized view operations:
• Create a materialized view of queries or subqueries
• Drop a materialized view
• Show materialized views
• Describe a materialized view
42

Cloudera Runtime Materialized views
• Enable or disable query rewriting based on a materialized view
• Globally enable or disable rewriting based on any materialized view
• Use partitioning to improve the performance of materialized views
Related Information
Materialized view commands
Creating and using a materialized view
You can create a materialized view of a query to calculate and store results of an expensive operation, such as
a particular join, on a managed, ACID table that you repeatedly run. When you issue queries specified by that
materialized view, the optimizer rewrites the query based on it. This action saves reprocessing. Query performance
improves.
About this task
In the tasks that follow, you create and populate example tables. The tables are managed tables. You cannot create
a materialized view of an external table. You create a materialized view of a join of the tables. Subsequently, you
run a query to join the tables, and the query plan takes advantage of the precomputed join to accelerate processing.
These over-simplified tasks show the syntax and output of a materialized view, and do not demonstrate accelerated
processing that occurs in a real-world task, processing a large amount of data.
Related Information
Materialized view commands
Creating the tables and view
You see how to create simple tables, insert the data, and join the tables using a materialized view. You run the query,
and the optimizer takes advantage of the precomputation performed by the materialized view to speed response time.
Procedure
1.
Create two ACID tables:
CREATE TABLE emps (
empid INT,
deptno INT,
name VARCHAR(256),
salary FLOAT,
hire_date TIMESTAMP);
CREATE TABLE depts (
deptno INT,
deptname VARCHAR(256),
locationid INT);
2.
Insert some data into the tables for example purposes:
INSERT INTO TABLE emps VALUES (10001,101,'jane doe',250000,'2018-01-10');
INSERT INTO TABLE emps VALUES (10002,100,'somporn klailee',210000,'2017-12
-25');
INSERT INTO TABLE emps VALUES (10003,200,'jeiranan thongnopneua',175000,'
2018-05-05');
INSERT INTO TABLE depts VALUES (100,'HR',10);
INSERT INTO TABLE depts VALUES (101,'Eng',11);
INSERT INTO TABLE depts VALUES (200,'Sup',20);
Tables must be ACID (managed) tables.
43

Cloudera Runtime Materialized views
3.
Create a materialized view to join the tables:
CREATE MATERIALIZED VIEW mv1
AS SELECT empid, deptname, hire_date
FROM emps JOIN depts
ON (emps.deptno = depts.deptno)
WHERE hire_date >= '2017-01-01';
4.
Run a query that takes advantage of the precomputation performed by the materialized view:
SELECT empid, deptname
FROM emps
JOIN depts
ON (emps.deptno = depts.deptno)
WHERE hire_date >= '2017-01-01'
AND hire_date <= '2019-01-01';
Output is:
+--------+-----------+
| empid | deptname |
+--------+-----------+
| 10003 | Sup |
| 10002 | HR |
| 10001 | Eng |
+--------+-----------+
Using optimizations from a subquery
You can create a query having a subquery that the optimizer rewrites based on a materialized view. You create a
materialized view, and then run a query that uses the materialized view.
About this task
In this task, you create a materialized view and use it in a subquery to return the number of destination-origin pairs.
Suppose the data resides in a table named flights_data that has the following columns:
c_id dest origin
1 Chicago Hyderabad
2 London Moscow
...
Procedure
1.
Create a table schema definition named flights_data for destination and origin data.
CREATE TABLE flights_data(
c_id INT,
dest VARCHAR(256),
origin VARCHAR(256));
2.
Create a materialized view that counts destinations and origins.
CREATE MATERIALIZED VIEW mv1
AS
SELECT dest, origin, count(*)
FROM flights_data
GROUP BY dest, origin;
44

Cloudera Runtime Materialized views
3.
Take advantage of the materialized view to speed your queries when you have to count destinations and origins
again.
For example, use a subquery to select the number of destination-origin pairs like the materialized view.
SELECT count(*)/2
FROM(
SELECT dest, origin, count(*)
FROM flights_data
GROUP BY dest, origin
) AS t;
Transparently, the SQL engine uses the work already in place since creation of the materialized view instead of
reprocessing.
Related Information
Materialized view commands
Dropping a materialized view
You must understand when to drop a materialized view to successfully drop related tables.
About this task
Drop a materialized view before performing a DROP TABLE operation on a related table. You cannot drop a table
that has a relationship with a materialized view.
In this task, you drop a materialized view named mv1 from the database named default.
Procedure
Drop a materialized view in my_database named mv1 .
DROP MATERIALIZED VIEW default.mv;
Related Information
Materialized view commands
Showing materialized views
You can list all materialized views in the current database or in another database. You can filter a list of materialized
views in a specified database using regular expression wildcards.
About this task
You can use regular expression wildcards to filter the list of materialized views you want to see. The following
wildcards are supported:
• Asterisk (*)
Represents one or more characters.
• Pipe symbol (|)
Represents a choice.
For example, mv_q* and *mv|q1* match the materialized view mv_q1. Finding no match does not cause an error.
Procedure
1.
List materialized views in the current database.
SHOW MATERIALIZED VIEWS;
2.
List materialized views in a particular database.
SHOW MATERIALIZED VIEWS IN another_database;
45

Cloudera Runtime Materialized views
Related Information
Materialized view commands
Describing a materialized view
You can get summary, detailed, and formatted information about a materialized view.
About this task
This task builds on the task that creates a materialized view named mv1.
Procedure
1.
Get summary information about the materialized view named mv1.
DESCRIBE mv1;
+------------+---------------+----------+
| col_name | data_type | comment |
+------------+---------------+----------+
| empid | int | |
| deptname | varchar(256) | |
| hire_date | timestamp | |
+------------+---------------+----------+
2.
Get detailed information about the materialized view named mv1.
DESCRIBE EXTENDED mv1;
+-----------------------------+---------------------------------...
| col_name | data_type ...
+-----------------------------+---------------------------------...
| empid | int ...
| deptname | varchar(256) ...
| hire_date | timestamp ...
| | NULL ...
| Detailed Table Information |Table(tableName:mv1, dbName:default, own
er:hive, createTime:1532466307, lastAccessTime:0, retention:0, sd:Storag
eDescriptor(cols:[FieldSchema(name:empid, type:int, comment:null), Field
Schema(name:deptname, type:varchar(256), comment:null), FieldSchema(name
:hire_date, type:timestamp, comment:null)], location:hdfs://myserver.com
:8020/warehouse/tablespace/managed/hive/mv1, inputFormat:org.apache.hado
op.hive.ql.io.orc.OrcInputFormat, outputFormat:org.apache.hadoop.hive.ql
.io.orc.OrcOutputFormat, compressed:false, numBuckets:-1, serdeInfo:SerD
eInfo(name:null, serializationLib:org.apache.hadoop.hive.ql.io.orc.OrcSe
rde, parameters:{}), bucketCols:[], sortCols:[], parameters:{}, skewedIn
fo:SkewedInfo(skewedColNames:[], skewedColValues:[], skewedColValueLocat
ionMaps:{}), storedAsSubDirectories:false), partitionKeys:[], parameters
:{totalSize=488, numRows=4, rawDataSize=520, COLUMN_STATS_ACCURATE={\"BA
SIC_STATS\":\"true\"}, numFiles=1, transient_lastDdlTime=1532466307, buc
keting_version=2}, viewOriginalText:SELECT empid, deptname, hire_date\nF
ROM emps2 JOIN depts\nON (emps2.deptno = depts.deptno)\nWHERE hire_date >=
'2017-01-17', viewExpandedText:SELECT `emps2`.`empid`, `depts`.`deptname`
, `emps2`.`hire_date`\nFROM `default`.`emps2` JOIN `default`.`depts`\nON
(`emps2`.`deptno` = `depts`.`deptno`)\nWHERE `emps2`.`hire_date` >= '20
17-01-17', tableType:MATERIALIZED_VIEW, rewriteEnabled:true, creationMet
adata:CreationMetadata(catName:hive, dbName:default, tblName:mv1, tables
Used:[default.depts, default.emps2], validTxnList:53$default.depts:2:922
3372036854775807::$default.emps2:4:9223372036854775807::, materializatio
nTime:1532466307861), catName:hive, ownerType:USER)
46

Cloudera Runtime Materialized views
3.
Get formatting details about the materialized view named mv1.
DESCRIBE FORMATTED mv1;
+-------------------------------+--------------------------------...
| col_name | data_type ...
+-------------------------------+--------------------------------...
| # col_name | data_type ...
| empid | int ...
| deptname | varchar(256) ...
| hire_date | timestamp ...
| | NULL ...
| # Detailed Table Information | NULL ...
| Database: | default ...
| OwnerType: | USER ...
| Owner: | hive ...
| CreateTime: | Tue Jul 24 21:05:07 UTC 2019 ...
| LastAccessTime: | UNKNOWN ...
| Retention: | 0 ...
| Location: | hdfs://myserver...
| Table Type: | MATERIALIZED_VIEW ...
| Table Parameters: | NULL ...
| | COLUMN_STATS_ACCURATE ...
| | bucketing_version ...
| | numFiles ...
| | numRows ...
| | rawDataSize ...
| | totalSize ...
| | transient_lastDdlTime ...
| | NULL ...
| # Storage Information | NULL ...
| SerDe Library: | org.apache.hadoop.hive.ql.io.or...
| InputFormat: | org.apache.hadoop.hive.ql.io.or...
| OutputFormat: | org.apache.hadoop.hive.ql.io.or...
| Compressed: | No ...
| Num Buckets: | -1 ...
| Bucket Columns: | [] ...
| Sort Columns: | [] ...
| # View Information | NULL ...
| View Original Text: | SELECT empid, deptname, hire_da...
| View Expanded Text: | SELECT `emps2`.`empid`, `depts`...
| View Rewrite Enabled: | Yes ...
Related Information
Materialized view commands
47

Cloudera Runtime Materialized views
Managing query rewrites
After changes to base tables, the data in a materialized view is stale. You need to know how to prevent the SQL
optimizer from rewriting queries in this situation. If you want a query executed without regard to a materialized view,
for example to measure the execution time difference, you can disable rewriting and then enable it again.
About this task
As administrator, you can globally enable or disable all query rewrites based on materialized views. By default, the
optimizer rewrites a query based on a materialized view.
Procedure
1.
Disable rewriting of a query based on a materialized view named mv1 in the default database.
ALTER MATERIALIZED VIEW default.mv1 DISABLE REWRITE;
2.
Enable rewriting of a query based on materialized view mv1.
ALTER MATERIALIZED VIEW default.mv1 ENABLE REWRITE;
3.
Globally enable rewriting of queries based on materialized views by setting a global property.
SET hive.materializedview.rewriting=true;
Related Information
Materialized view commands
Purposely using a stale materialized view
A rewrite of a query based on a stale materialized view does not occur automatically. If you want a rewrite of a stale
or possibly stale materialized view, you can force a rewrite.
About this task
For example, you might want to use the contents of a materialized view of a non-transactional table because the
freshness of such a table is unknown. The optimizer cannot determine the data freshness if you use external tables.
You can purposely rewrite a query based on a stale materialized views using these techniques:
• Schedule the materialized view for rebuilding. For example, schedule a rebuild to occur every x minutes.
• Adjust the rewriting time window to use stale or possibly stale data for a period of time. For example, schedule the
window within which to use stale data for x + y minutes.
Procedure
1.
Create a scheduled query to invoke the rebuild statement every 10 minutes.
CREATE SCHEDULED QUERY scheduled_rebuild
EVERY 10 MINUTES AS
ALTER MATERIALIZED VIEW mv_recently_hired REBUILD;
2.
Define the window of time for using stale data.
SET hive.materializedview.rewriting.time.window=10min;
Creating and using a partitioned materialized view
When creating a materialized view, you can partition selected columns to improve performance. Partitioning
separates the view of a table into parts, which often improves query rewrites of partition-wise joins of materialized
views with tables or other materialized views.
48

Cloudera Runtime Materialized views
About this task
This task assumes you created a materialized view of the emps and depts tables and assumes you created these tables.
The emps table contains the following data:
empid deptno name salary hire_date
10001 101 jane doe 250000 2018-01-10
10005 100 somporn klailee 210000 2017-12-25
10006 200 jeiranan thongnopneua 175000 2018-05-05
The depts table contains the following data:
deptno deptname locationid
100 HR 10
101 Eng 11
200 Sup 20
In this task, you create two materialized views: one partitions data on department; the other partitions data on hire
date. You select data, filtered by department,from the original table, not from either one of the materialized views.
The explain plan shows that Hive rewrites your query for efficiency to select data from the materialized view that
partitions data by department. In this task, you also see the effects of rebuilding a materialized view.
Procedure
1.
Create a materialized view of the emps table that partitions data into departments.
CREATE MATERIALIZED VIEW partition_mv_1 PARTITIONED ON (deptno)
AS SELECT hire_date, deptno FROM emps WHERE deptno > 100 AND deptno < 200;
2.
Create a second materialized view that partitions the data on the hire date instead of the department number.
CREATE MATERIALIZED VIEW partition_mv_2 PARTITIONED ON (hire_date)
AS SELECT deptno, hire_date FROM emps where deptno > 100 AND deptno < 2
00;
3.
Generate an extended explain plan by selecting data for department 101 directly from the emps table without
using the materialized view.
EXPLAIN EXTENDED SELECT deptno, hire_date FROM emps where deptno = 101;
The explain plan shows that Hive rewrites your query for efficiency, using the better of the two materialized views
for the job: partition_mv_1.
+----------------------------------------------------+
| Explain |
+----------------------------------------------------+
| OPTIMIZED SQL: SELECT CAST(101 AS INTEGER) AS `deptno`, `hire_date` |
| FROM `default`.`partition_mv_1` |
| WHERE 101 = `deptno` |
| STAGE DEPENDENCIES: |
| Stage-0 is a root stage
...
4.
Correct Jane Doe's hire date to February 12, 2018, rebuild one of the materialized views, but not the other, and
compare contents of both materialized views.
INSERT INTO emps VALUES (10001,101,'jane doe',250000,'2018-02-12');
ALTER MATERIALIZED VIEW partition_mv_1 REBUILD;
49

Cloudera Runtime Materialized views
SELECT * FROM partition_mv_1 where deptno = 101;
SELECT * FROM partition_mv_2 where deptno = 101;
The output of selecting the rebuilt partition_mv_1 includes the original row and newly inserted row because
INSERT does not perform in-place updates (overwrites).
+---------------------------+------------------------+
| partition_mv_1.hire_date | partition_mv_1.deptno |
+---------------------------+------------------------+
| 2018-01-10 00:00:00.0 | 101 |
| 2018-02-12 00:00:00.0 | 101 |
+---------------------------+------------------------+
The output from the other partition is stale because you did not rebuild it:
+------------------------+---------------------------+
| partition_mv_2.deptno | partition_mv_2.hire_date |
+------------------------+---------------------------+
| 101 | 2018-01-10 00:00:00.0 |
+------------------------+---------------------------+
5.
Create a second employees table and a materialized view of the tables joined on the department number.
CREATE TABLE emps2 AS SELECT * FROM emps;
CREATE MATERIALIZED VIEW partition_mv_3 PARTITIONED ON (deptno) AS
SELECT emps.hire_date, emps.deptno FROM emps, emps2
WHERE emps.deptno = emps2.deptno
AND emps.deptno > 100 AND emps.deptno < 200;
6.
Generate an explain plan that joins tables emps and emps2 on department number using a query that omits the
partitioned materialized view.
EXPLAIN EXTENDED SELECT emps.hire_date, emps.deptno FROM emps, emps2
WHERE emps.deptno = emps2.deptno
AND emps.deptno > 100 AND emps.deptno < 200;
The output shows that Hive rewrites the query to use the partitioned materialized view partition_mv_3 even
though your query omitted the materialized view.
7.
Verify that the partition_mv_3 sets up the partition for deptno=101 for partition_mv_3.
SHOW PARTITIONS partition_mv_3;
Output is:
+-------------+
| partition |
+-------------+
| deptno=101 |
+-------------+
Related Information
Creating and using a materialized view
Materialized view commands
50

Cloudera Runtime Using JdbcStorageHandler to query RDBMS
Using JdbcStorageHandler to query RDBMS
Using the JdbcStorageHandler, you can connect Apache Hive to a MySQL, PostgreSQL, Oracle, DB2, or Derby data
source. You can then create an external table to represent the data, and query the table.
About this task
This task assumes you are a CDP Private Cloud Base user. You create an external table that uses the
JdbcStorageHandler to connect to and read a local JDBC data source.
Procedure
1.
Load data into a supported SQL database, such as MySQL, on a node in your cluster, or familiarize yourself with
existing data in the your database.
2.
Create an external table using the JdbcStorageHandler and table properties that specify the minimum information:
database type, driver, database connection string, user name and password for querying hive, table name, and
number of active connections to Hive.
CREATE EXTERNAL TABLE mytable_jdbc(
col1 string,
col2 int,
col3 double
)
STORED BY 'org.apache.hive.storage.jdbc.JdbcStorageHandler'
TBLPROPERTIES (
"hive.sql.database.type" = "MYSQL",
"hive.sql.jdbc.driver" = "com.mysql.jdbc.Driver",
"hive.sql.jdbc.url" = "jdbc:mysql://localhost/sample",
"hive.sql.dbcp.username" = "hive",
"hive.sql.dbcp.password" = "hive",
"hive.sql.table" = "MYTABLE",
"hive.sql.dbcp.maxActive" = "1"
);
3.
Query the external table.
SELECT * FROM mytable_jdbc WHERE col2 = 19;
Related Information
Apache Wiki: JdbcStorageHandler
51
