
Office of the Controller 1
Rev. Dec. 2019
Questions? Contact: ctl-auxiliaryaccounting@fsu.edu
OMNI AR/Billing: Upload & Interface Bills
Detailed Business Process Guides - ABILL1
Upload & Interface Billing Data
This document outlines how to upload and process billing data using the FSU Custom Upload Template.
Use the Auxiliary Specialist Cheat Sheet as a reference when following along with this guide.
Contents of this Guide
1. Billing Terminology
2. Billing Processing Overview
2.1. Bill Creation Process Overview
2.2. Options to Create Bills
2.3. How OMNI Groups Bill Lines
3. Processing Contracts Billing (Reference)
4. Uploading Bill Data: FSU Custom Billing Upload Template
4.1. Entering Bill Data
4.2. Reviewing Bill Data
4.3. Converting Data to CSV Files
4.4. Run Billing Upload Process
4.5. Run Billing Interface Process
5. Upload and Interface Errors
5.1. Common Errors
5.2. Correcting Upload Errors
5.3. Correcting Interface Errors
5.4. Other Billing Errors
6. Reviewing Uploaded/Interfaced Data
Billing Terminology
This section outlines common terms found throughout the billing upload and interfacing process.
• Module: an area within OMNI that houses data about a type of business process. Usually, data
must be moved between modules via processes. Think of modules as separate siloes within OMNI
that need to be updated with new information from other, related areas.
o For example, the Contracts module and the Billing module are applicable to this business
process. We send data from the Contracts module to the Billing module by running a
process that sends activity that is ready to bill from Contracts to Billing. Once the billable
activity is in the Billing module, it is able to be invoiced to create your revenue and
accounts receivable, just like all other bills.

Office of the Controller 2
Rev. Dec. 2019
Questions? Contact: ctl-auxiliaryaccounting@fsu.edu
• Contracts module: the area within OMNI that houses data related to auxiliary contract billing.
• Billing module: the area within OMNI that houses data related to all auxiliary billing.
• FSU Custom Billing Template & Upload: the customized Microsoft Excel template that allows
users to create a batch of bills all at once from source data by populating the required information
on a spreadsheet, converting the file to a format OMNI can read, and then attaching and
uploading the file within OMNI’s billing module on the FSU Custom Billing Interface Upload page.
• Billing Interface: a staging area for billing activity that is created outside of the Billing module (for
example, from a Spreadsheet Upload).
• Billing Interface Process: the process that turns staged billing activity into actual bills in the Billing
module. While this process is running, it performs all of the validations and checks that take place
when a user manually enters bills (such as ensuring valid Customer ID’s, Bill Sources, and accurate
calculations). This ensures that bills are created using valid information. In other words, this
process prevents errors that the system would prevent a user from creating if they were creating
the bill manually. If the process finds an error, it leaves the applicable bill(s) in the Billing Interface
area and marks it as having an error.
• BIIF001: This is OMNI’s technical name for the Billing Interface Process and is what users will see
in the Process Name column when they review the processing status in their Process Monitor.
• Interface ID: This is an identification number created by OMNI when a user uploads a file or a set
of files. Users enter an Interface ID or a range of Interface ID’s to process when running the Billing
Interface Process.
• Interface tables: Also known as staging tables. These are the tables that OMNI stores billing data
after it has been uploaded, but before the Billing Interface Process has been run. These tables also
hold bills that have been through the Billing Interface Process, but that have one or more errors.
• Process: a set of instructions OMNI uses to update itself with new information (such as when
converting billing data in the staging area to bills). When running a process, users will usually start
by setting up or accessing a Run Control. Some processes run automatically each night or
periodically throughout the day.
• Job: a collection of processes. Usually, we use this term interchangeably with the term “Process”
as from a user perspective, it tends to be the same.
• Run Control: a page in OMNI that allows a user to set and save parameters (instructions) for
running a process in OMNI. This is usually the first step to running a process.
• Process Monitor: a page in OMNI that allows users to observe the status and results of a job they
are running and verify it has run to completion with no errors (or to review error messages, if
applicable).
• Bill: in OMNI, a bill represents billing data from initiation through to invoicing.
Contracts Billing
Accounts
Recevable
All
Billing/Invoicing
Activity

Office of the Controller 3
Rev. Dec. 2019
Questions? Contact: ctl-auxiliaryaccounting@fsu.edu
• Invoicing: the process that converts a Bill to an Invoice; this sends the bill to the customer if the
customer is set up to be emailed and creates the accounting entries to record revenue and
accounts receivable.
• Invoice: A bill that has been invoiced.
Billing Processing Overview
Billing data can be entered manually (using Standard Billing; see ABILL2). It can also be uploaded using the
FSU Billing Interface tool. If the Contracts module is used to create billing activity, then contract events
are the origin of billing data. Any bill, whether it is created manually or via one of these tools, can be
associated to a contract in the Contracts module if it relates to a contract. This way, the Contracts module
can be a one-stop resource showing all billing activity related to a specific contract.
If bills are entered manually, they do not need to be interfaced. Interfacing is only required for bills
originating outside of the Billing module.
Once bills are uploaded and interfaced, or entered manually, they can be reviewed, converted to “ready”
status, and otherwise managed and invoiced as shown in other business process guides. When ready, the
invoicing process is imitated by the Controller’s Office Auxiliary Accounting staff on a monthly basis (for
internal bills) or the selling auxiliary’s accounting staff as needed (for external/component unit bills).
Bill Creation Process Overview
Bills
Entered
Manually &
Saved
Bills sent
from
Contracts &
Interfaced
Bills
Uploaded
&
Interfaced
Bills
reviewed
for
accuracy
Bills set to
"Hold" or
"Ready"
status as
appropriate
Bills
Invoiced &
Sent to
Customer
Invoices
loaded in
AR

Office of the Controller 4
Rev. Dec. 2019
Questions? Contact: ctl-auxiliaryaccounting@fsu.edu
Options to Create Bills
How OMNI Groups Bill Lines
When the Billing Interface Process is run, OMNI will look for eligible bills and will add new lines to these
bills so that the number of invoices sent to the customer is minimized. So long as the following criteria are
met, OMNI will add the new lines to an existing bill:
Processing Contracts Billing
The process for interfacing contract events in Ready or Recycled status into the billing module’s Billing
Interface area is documented separately in ACONTRACTS6.
Upload
FSU Billing
Interface Tool
Spreadsheet
Upload for Billing
Interface the
Transactions
Contract Billing
Process from
Contracts module
Interface the
transactions
Standard Billing
Manual entry
Interfacing not
required.
Adjust Bill
Credit/Rebill
Interfacing not
required.
The existing bill hasn’t already been invoiced
The existing bill is for the same:
•Customer
•Contract
•Bill Source
•Purchase Order
•For some auxilairies, it also looks for the same contact number and address number.
The new lines you’d like to add to a bill are not being entered manually
•Billing lines processed via the billing interface will look to manually-entered bills to determine whether a
new bill will be created.
•In other words, if a bill is added manually after lines are uploaded/interfaced, then the system won’t add
the manually-created lines to an interfaced bill. However, if billing data is interfaced that matches a
manually-entered non-invoiced bill, the system will add those lines to the manually-created non-invoiced
bill.

Office of the Controller 5
Rev. Dec. 2019
Questions? Contact: ctl-auxiliaryaccounting@fsu.edu
Uploading Bill Data: FSU Custom Billing Template
1. Retrieve the FSU Custom Billing Upload template from the Controller’s Office Auxiliary
Accounting Forms website.
• Download and save the file to your workstation as an Excel Macro-Enabled Workbook
(*.xlsm).
2. Retrieve the billing source data from your sales staff, lab manager, facility manager, contracts
manager, or other records as appropriate for your auxiliary.
• Save the file(s) to your workstation or your auxiliary’s preferred location for billing source
records.
Entering Bill Data
Follow the steps below to upload your data into OMNI Financials:
1. Navigate to the Query Viewer page in OMNI Financials and run query FSU_CTRL_AUX_CUST.
2. Copy and paste the data from this query to the CUST tab on the Billing Upload Template. Make
sure to only copy and paste data UNDER the column headings. HINT: use the keyboard shortcut
Ctrl+Shift+End to quickly select all data for copying. Ensure formulae in columns BC and BD extend
through all rows.
a. Paste customer data to the CUST tab:

Office of the Controller 6
Rev. Dec. 2019
Questions? Contact: ctl-auxiliaryaccounting@fsu.edu
b. Ensure formulae in columns BC and BD extend through all rows:
3. Navigate to the Query Viewer page in OMNI Financials and run query FSU_AUX_PO_DTL for your
Supplier ID only. The Values tab on the Billing Upload Template contains a list of Supplier IDs for
your reference.
a. Run FSU_AUX_PO_DTL for your Supplier ID only. The Start PO Date should always be the
first day of the current fiscal year. Sample prompts for this query:

Office of the Controller 7
Rev. Dec. 2019
Questions? Contact: ctl-auxiliaryaccounting@fsu.edu
4. Copy and paste this data to the PO tab on the Billing Upload Template. Make sure to only copy
and paste data UNDER the column headings. HINT: use the keyboard shortcut Ctrl+Shift+End to
quickly select all data for copying. Ensure formulae in columns AC, AD, and AE extend through all
rows.
a. Paste data to the PO tab:
b. Ensure formulae in columns AC, AD, and AE extend through all rows. NOTE: a value will
only be returned in column AE if the purchase order distribution is a sponsored project.
Blank values in this column are OK.

Office of the Controller 8
Rev. Dec. 2019
Questions? Contact: ctl-auxiliaryaccounting@fsu.edu
5. Enter your billing data on the All Bill Data Entry tab.
a. Before you begin entering data, make note of the following:
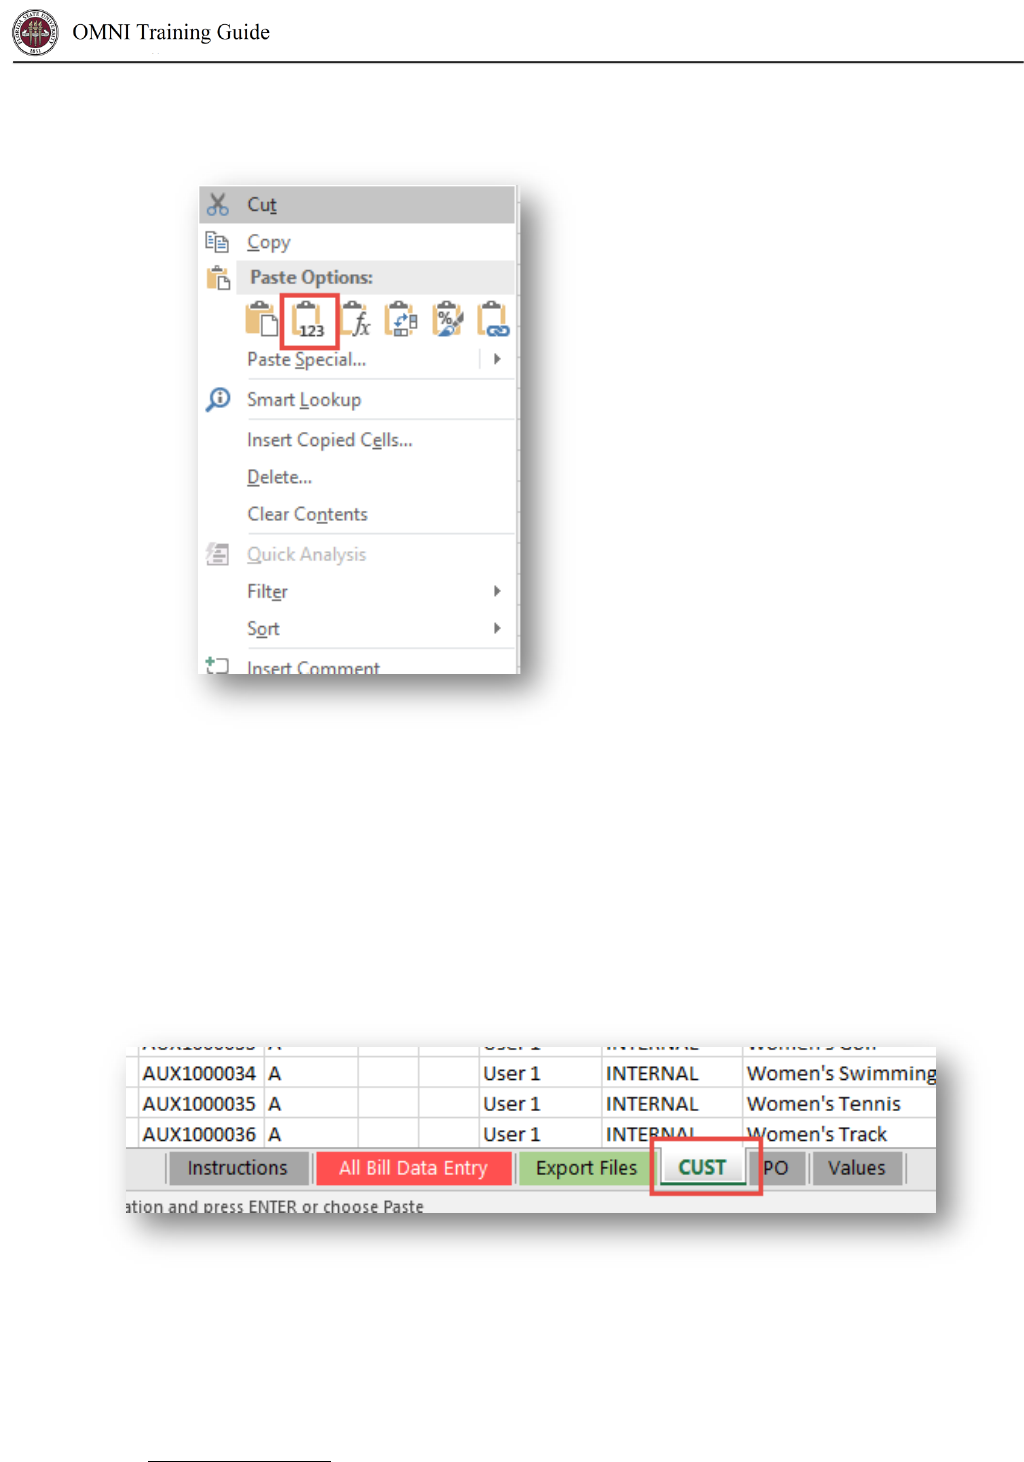
i. When pasting data into the All Bill Data Entry tab, always paste as Values Only.
There are several ways to do this. The quickest is to right click on the cell you want
to paste in to and select the clipboard icon that contains a “123”:
ii. There is a 300 line limit to the spreadsheet. If you have more than 300 lines of
billing data to enter, you will need to split them out into multiple uploads or
contact ctl-au[email protected]
for additional assistance.

Office of the Controller 9
Rev. Dec. 2019
Questions? Contact: ctl-auxiliaryaccounting@fsu.edu
iii. Some cells are locked, and you will not be able to edit these values. Some cells
provide specific warning messages as they are restricted to certain values or text
lengths to assist you in avoiding errors.
b. Begin entering your billing data. The column headers are color coded based on data entry
requirements:
Grey columns
Values auto-populate based upon data entered in other columns.
Green columns
Require data entry by user. The data in these columns may be
copied and pasted from your Sales Data workbook or your Lab
Manager workbook, if used. Otherwise, enter data manually.
Yellow columns
Require data entry by user. See next step for more detail.
Use the description within each column header to give you more information about what
to do:
These descriptions
give helpful tips
and information

Office of the Controller 10
Rev. Dec. 2019
Questions? Contact: ctl-auxiliaryaccounting@fsu.edu
c. Yellow column data entry: these columns contain your customer contact sequence
number as well as your revenue accounting information (including optional chartfields):
i. You are required to enter a contact sequence number when billing an EXTERNAL
customer. Since this field determines who will actually receive the invoice, it is
important to select the correct number. For detailed instructions on how to find
the contact sequence number, see Reviewing Bill Data - Step 5
.
IMPORTANT: INTERNAL and COMPONENT customers will have their contact sequence
numbers default to 1. THIS SHOULD NOT BE CHANGED. You are only required to enter a
contact sequence number when billing an EXTERNAL customer.

Office of the Controller 11
Rev. Dec. 2019
Questions? Contact: ctl-auxiliaryaccounting@fsu.edu
ii. Enter the revenue Dept ID, fund code, account code, and optional chartfields
appropriate for the charge (for the selling auxiliary). Ensure you consider whether
the charge is internal or external before choosing a revenue account code.
d. The Controller’s Office recommends the use of one of two revenue account codes,
depending on the nature of the sales activity:
Account Code
Type
Description
622001
Internal Sales/Services
Sales to FSU departments
, including
the FSU Foundation.
623001
External Sales/Services
Sales to entities other than FSU
departments, including the Research
Foundation and other Direct Support
Organizations.
Note: The Controller’s Office recommends use of 622001 to record internal revenue and 623001 to record
external revenue, unless a more specific allowable revenue account code applies to your sales activity.
Please review the Controller’s Office Revenue Account Dictionary here
and contact us if you have questions
about how to best account for your revenue.
e. Since Revenue Accounting distributions vary from department to department, you will
need to contact your Budget Manager or other Departmental Representative if you have
questions about the selling department ID, Fund, and/or ChartFields.

Office of the Controller 12
Rev. Dec. 2019
Questions? Contact: ctl-auxiliaryaccounting@fsu.edu
6. Once you have entered all your data you may proceed to the next section, Reviewing Bill Data.
Reviewing Bill Data
It is important to review your data for errors and loss of formatting before proceeding to upload. Data
entry errors and formatting errors are the most common cause of upload and interface errors. This section
describes how to thoroughly review your data and correct errors before uploading. Once your data has
been reviewed you can proceed to the next section, Converting Data to CSV Files
.
Data Review Checklist:
Use the checklist below as a quick reference for reviewing your data before uploading it to OMNI.
Additional information and tips on how to correct each item is provided in the steps below. Click the link
to quickly navigate to each review item.
☐ My data contains no red cells and/or all red cells have been reviewed
☐ My data contains no commas
☐ Dates are in the correct format
☐ All Purchase Order numbers contain leading zeros
☐ Customer contact sequence numbers for EXTERNAL customers have been reviewed for accuracy
☐ Revenue accounting information has been reviewed for accuracy
☐ Billing data has been reviewed for accuracy
Reviewing and Correcting Data:
1. Review any cells that are shaded in red. These may be errors requiring your attention to correct:

Office of the Controller 13
Rev. Dec. 2019
Questions? Contact: ctl-auxiliaryaccounting@fsu.edu
a. A red cell doesn’t necessarily mean an error, but it should be reviewed. For example, the
cells below are shaded red because there is no Purchase Order number entered in the PO
column. This is okay because it is an EXTERNAL customer and, for billing upload purposes,
we only require a PO for INTERNAL customers.
b. The description at the top of each column provides helpful information which may help
with identifying the cause of red cells:
2. Ensure there are no commas in your data. Commas in your data will cause an upload error.
a. On the All Bill Data Entry tab, press Ctrl + F on your keyboard to bring up the “Find and
Replace” dialogue box.

Office of the Controller 14
Rev. Dec. 2019
Questions? Contact: ctl-auxiliaryaccounting@fsu.edu
b. Click the Options button.
c. In the Look in field, select Values:
IMPORTANT: when using Find and Replace, be sure to search only in Values. Otherwise, you’ll
replace commas within formulae that are needed to complete your billing spreadsheet.
d. In the Find what field, type a comma (,) and then click the Find Next button.

Office of the Controller 15
Rev. Dec. 2019
Questions? Contact: ctl-auxiliaryaccounting@fsu.edu
e. Replace any commas with another valid punctuation mark, such as a dash (-). Any other
character is OK to use, only commas will cause an error.
f. Commas in column headers or formulas are OK and can be ignored. You only need to
replace commas if they exist within the data you entered.
g. The most common columns where commas will be found are the IDENTIFIER, DESCR, and
TEXT254 columns.
h. Continue clicking Find Next until you’ve verified that there are no commas in your data.
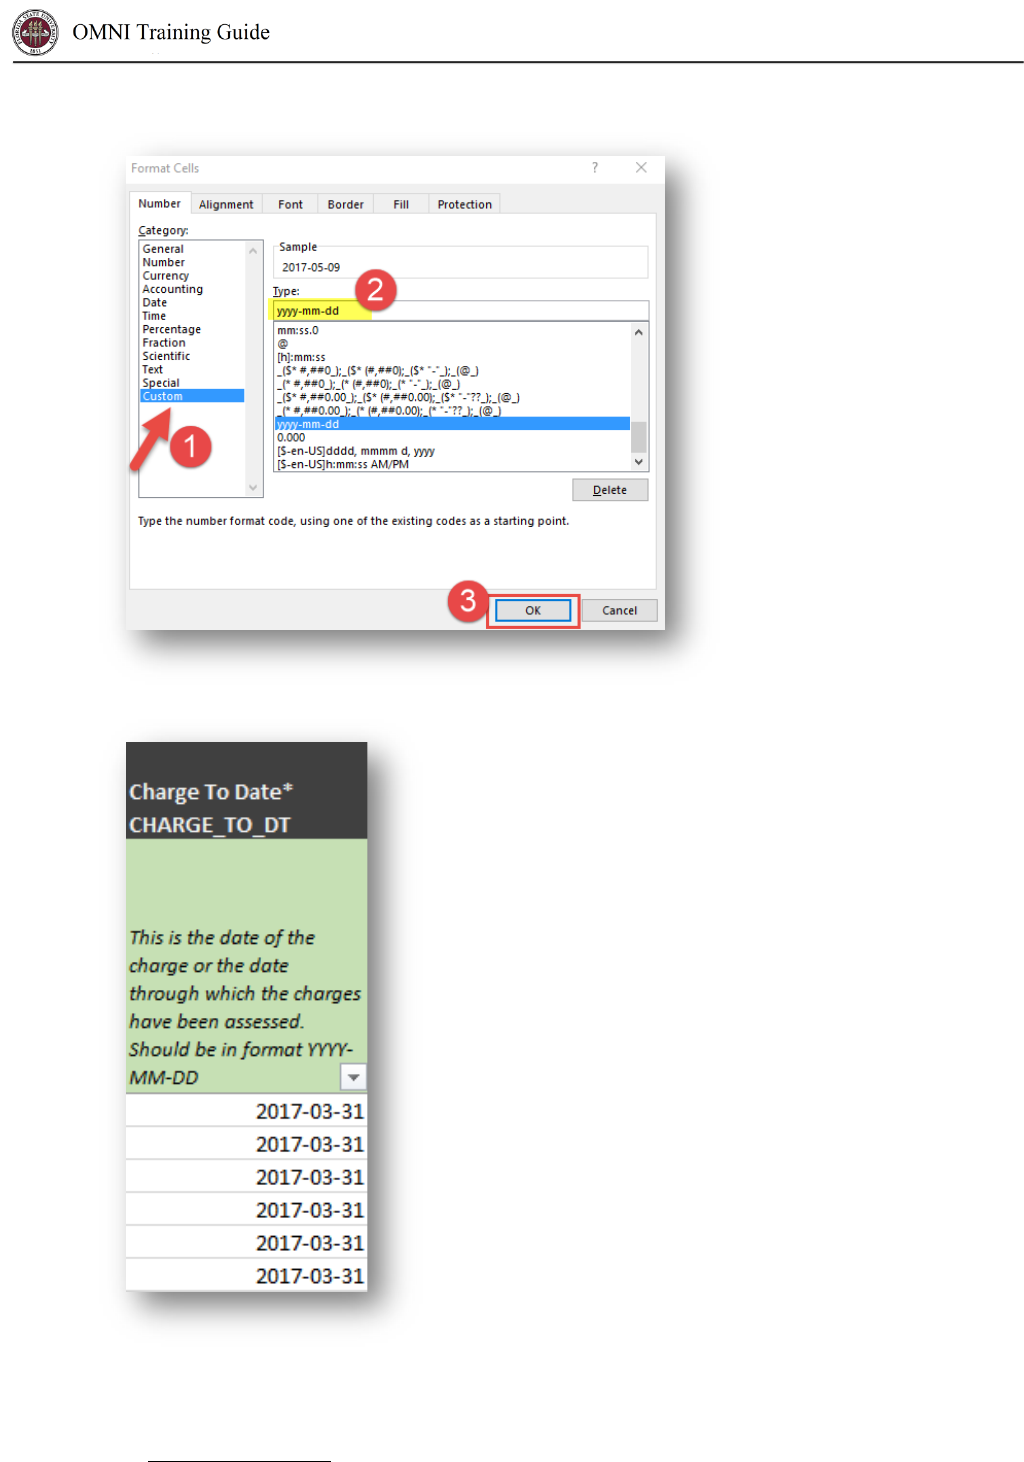
3. Verify that your dates are in the correct format. Dates in the Charge To Date column must be in
the format YYYY-MM-DD as shown below.


Office of the Controller 18
Rev. Dec. 2019
Questions? Contact: ctl-auxiliaryaccounting@fsu.edu
4. Verify that the PO Reference data is formatted as text and that the three leading zeroes on the
PO ID’s are preserved:
You can correct PO formatting issues one PO at a time or all at once. Section a below describes how to
correct them one at a time. Skip to section b to correct them all at once.
a. To correct PO formatting issues one PO at a time:
i. Make note of the existing PO number.

Office of the Controller 19
Rev. Dec. 2019
Questions? Contact: ctl-auxiliaryaccounting@fsu.edu
ii. Delete the existing value from the cell.
iii. Manually re-type the PO number inserting an apostrophe at the beginning of the
number. Make sure to include the leading zeros:
iv. Press Enter and verify that the PO number is formatted correctly.
b. To correct PO formatting issues all at once:
i. Select all PO numbers in the PO Reference column. Copy and paste the PO
numbers to another blank Excel workbook.
ii. Enter a formula (= “000”&<select cell>) to the right of the first PO, copy it all the
way through the data.
Office of the Controller 20
Rev. Dec. 2019
Questions? Contact: ctl-auxiliaryaccounting@fsu.edu
iii. Copy the reformatted PO’s and paste them back in the All Bill Data Entry tab as
values only.
iv. Verify that your POs are now formatted correctly.
5. Review the Contact Sequence Numbers for EXTERNAL customers to ensure the bill will be sent to
the appropriate person. The steps below describe how to retrieve the correct Contact Sequence
Number.
IMPORTANT: INTERNAL and COMPONENT customers will have their contact sequence numbers
default to 1. THIS SHOULD NOT BE CHANGED. You are only required to enter a contact sequence
number when billing an EXTERNAL customer.
a. Navigate to the CUST tab on the Billing Upload Template.


Office of the Controller 22
Rev. Dec. 2019
Questions? Contact: ctl-auxiliaryaccounting@fsu.edu
d. Determine who should receive the invoice based on your department’s order form,
sales data, lab manager workbook, or other relevant information.
e. Once you find the contact you are billing, make note of their Contact Sequence Number
located in column AR:
f. Navigate back to the All Bill Data Entry tab and type the Contact Sequence Number in
the appropriate cell (column N):
g. Repeat for all EXTERNAL customers.

Office of the Controller 23
Rev. Dec. 2019
Questions? Contact: ctl-auxiliaryaccounting@fsu.edu
6. Review Revenue Accounting distributions for accuracy (columns O - T):
a. The Controller’s Office recommends the use of one of two revenue account codes,
depending on the nature of the sales activity:
Account Code
Type
Description
622001
Internal Sales/Services
Sales to FSU departments, including
the FSU Foundation.
623001
External Sales/Services
Sales to entities other than FSU
departments, including the Research
Foundation and other Direct Support
Organizations.
Note: The Controller’s Office recommends use of 622001 to record internal revenue and 623001 to record
external revenue, unless a more specific allowable revenue account code applies to your sales activity.
Please review the Controller’s Office Revenue Account Dictionary here
and contact us if you have questions
about how to best account for your revenue.
b. Since Revenue Accounting distributions vary from department to department, you will
need to contact your Budget Manager or other Departmental Representative if you have
questions about the selling department ID, Fund, and/or ChartFields.
7. Review all of the billing data entered on the All Bill Data Entry tab for accuracy. Send to a
reviewer if needed to validate/approve billable activity before proceeding to the next section.

Office of the Controller 24
Rev. Dec. 2019
Questions? Contact: ctl-auxiliaryaccounting@fsu.edu
Converting Data to CSV Files
1. Convert your data to CSV files for upload.
NOTE: The following instructions apply only to users with a Windows Operating System. If
for further assistance.
a. If you have not already done so, be sure to save your billing upload template file BEFORE
proceeding to export CSV files. It is also important to close out of any other Excel files
you may have open at this time. Once the following steps are completed, Excel will
automatically close all open files and any unsaved changes may be lost.
b. Navigate to the Export Files tab and read the instructions and notes listed.
c. When you are ready to proceed with exporting your files, click the Create .CSV Files
button.

Office of the Controller 25
Rev. Dec. 2019
Questions? Contact: ctl-auxiliaryaccounting@fsu.edu
d. You will be prompted with a reminder to save your billing upload template file. Click “Yes”
if you have already done so. Click “No” to go back and save.
e. After clicking “Yes”, Excel will begin to format and export your billing data to .CSV files
automatically. This may take up to a minute to complete. Once finished, you will receive
the Success! message shown below. Upon clicking “OK” the billing upload template file
will be closed.
2. You will now have either 2 files (AH and LN) or 4 files (AH, LN, NOTE, and NOTELNK) saved to your
Desktop, depending on whether or not you use the Long Note functionality.
a. The file names are appended with the current date (i.e. AH_MMDDYYYY).

Office of the Controller 26
Rev. Dec. 2019
Questions? Contact: ctl-auxiliaryaccounting@fsu.edu
b. You may rename the files, move them to another location on your computer, or leave
them on your Desktop – whatever helps you keep track of them best.
c. DO NOT double click the files. This will open them in Excel and all formatting will be lost.
If you would like to review the data in your files see Step 9. If you accidently open a file in
Excel you will need to start over at Step 7.
IMPORTANT: Excel will automatically save over any existing files that are identically named and the
previous data will be lost. It is encouraged that you either move your files from your Desktop to another
folder/location or rename your files after exporting.
3. If you’re confident that your data is accurate you may proceed to the next section:
Run Billing
Upload Process. If you would like to review your data one more time in Notepad or similar
software before uploading, follow these steps and tips:
a. Right click on the file you want to preview. Select “Open with”, then select “Notepad” or
similar software. DO NOT OPEN IN EXCEL!


Office of the Controller 28
Rev. Dec. 2019
Questions? Contact: ctl-auxiliaryaccounting@fsu.edu
IF YOU ACCIDENTALLY OPEN IN EXCEL: Delete the csv files and begin again at step 7 because opening in
Excel will remove leading zeroes and change date formats, causing upload errors.
4. Proceed to run the billing upload process.
Run Billing Upload Process
1. To upload bills, navigate to OMNI’s FSU Custom Billing Upload page
:
a. In OMNI Financials, select the Auxiliary AR/Billing tile:
b. Select the Auxiliary Billing tile:


Office of the Controller 32
Rev. Dec. 2019
Questions? Contact: ctl-auxiliaryaccounting@fsu.edu
e. Monitor the results of the upload by checking the Process Monitor.
5. When the upload process is complete, retrieve the billing interface ID:
a. Select the Details link next to the process (in the Process Monitor).
NOTE: If you encounter errors when uploading, correct the files and re-upload. See Common Errors and
Correcting Upload Errors for more information.
a. Select View Log/Trace.

Office of the Controller 33
Rev. Dec. 2019
Questions? Contact: ctl-auxiliaryaccounting@fsu.edu
b. Select FSU_Billing_Interface_(numbers).Log (Ensure your browser’s popup blocker is
disabled).
c. View the Interface ID at the top of the page and write it down for use in the next section.
6. Once you have your interface ID you may proceed to the next section,
Run Billing Interface
Process. REMINDER: If you encounter errors when uploading, correct the files and re-upload. See
Common Errors and Correcting Upload Errors for more information.

Office of the Controller 34
Rev. Dec. 2019
Questions? Contact: ctl-auxiliaryaccounting@fsu.edu
Run Billing Interface Process
Uploading the data using the Spreadsheet Upload/FSU Custom Billing Template or processing Contracts
billing loads the data to the interface tables. Now, you must run the Billing Interface Process. This section
outlines how to complete this task. This process is the same regardless of the source of the data
(Contracts, Spreadsheet Upload for Billing, or FSU Billing Interface).
1. To interface bills, navigate to OMNI’s Process Billing Interface
page:
a. In OMNI Financials, select the Auxiliary AR/Billing tile:
b. Select the Auxiliary Billing tile:

Office of the Controller 35
Rev. Dec. 2019
Questions? Contact: ctl-auxiliaryaccounting@fsu.edu
c. Select Interface Bills:
2. Click Search and select your Run Control ID (contact ctl-auxil[email protected]
if you do
not have a run control set up for the billing interface process).

Office of the Controller 36
Rev. Dec. 2019
Questions? Contact: ctl-auxiliaryaccounting@fsu.edu
3. Select your Interface ID:
a. In the *From Interface ID field, type the interface ID you wrote down in the
Run Billing
Upload Process section.
b. Type the same interface ID in the *To Interface ID field:
c. You can also select the interface ID manually by clicking the magnifying glass:
4. Once your interface ID is populated in both fields, click Run:

Office of the Controller 37
Rev. Dec. 2019
Questions? Contact: ctl-auxiliaryaccounting@fsu.edu
5. Check the Billing Interface box and click OK at the bottom of the page:
6. You can monitor the progress of the billing interface process by clicking on the Process Monitor
hyperlink:
7. Click the refresh button periodically until the Run Status says “Success.”

Office of the Controller 38
Rev. Dec. 2019
Questions? Contact: ctl-auxiliaryaccounting@fsu.edu
8. Review the Message Log for Errors:
IMPORTANT: If error(s) are found in the following steps, proceed to the Upload and Interface Errors
section of this document to correct them.
a. Select the Details link to the right of your process:
b. Select Message Log on the next page:

Office of the Controller 39
Rev. Dec. 2019
Questions? Contact: ctl-auxiliaryaccounting@fsu.edu
c. Review the Message Log. In this example, there are 6 errors needing correction:
9. To correct errors, proceed to the Upload and Interface Errors
section of this document.
10. If your interface processed without errors, all of your billing lines have been created successfully.
You can proceed to validate your work ahead of the invoicing processes that remain for these
bills as covered in guide APO2 Unpaid Internal Invoices AP Pre & Post-Check Cheat Sheet on the
Controller’s Office website
.
CONTINUED ON NEXT PAGE

Office of the Controller 40
Rev. Dec. 2019
Questions? Contact: ctl-auxiliaryaccounting@fsu.edu
Upload and Interface Errors
This section outlines how to review and correct errors that you encounter on either the Billing Upload or
Billing Interface processes.
Common Errors
There are several error types that seem to show up most often on uploads. Check for these before
contacting your manager or Auxiliary Accounting staff for assistance.
Common Errors Found During Upload:
Common Errors Found at Interfacing:
Formatting
Issues
Date formatting
errors (should
always be YYYY-
MM-DD)
Blank lines at
bottom of csv file
were not deleted
Did not remove
commas in file
before converting
to csv
Interface line
numbers don't
match up
Missing
Required Fields
Review for required
fields
Review for invalid
data on required
fields (e.g, #N/A for
temporary bill flag)
Review for blank
rows
Missing
Required File
Ensure all required
files are uploaded
Typos & Basic
Errors
Check all fields
for same length
Watch for spaces
before or after
your data
Math errors
Invalid Data
Customer ID's
(e.g, #n/a)
Optional CF 1, 2,
3 not in OMNI
Invalid combos
Other invalid data
not accepted by
OMNI
Formatting
Issues
Lines not
matched up due
to a sort/filter
error
Copy & Paste
mistakes
Missing
Required Fields
Review for
required fields

Office of the Controller 41
Rev. Dec. 2019
Questions? Contact: ctl-auxiliaryaccounting@fsu.edu
Correcting Upload Errors
1. If your upload runs to “No Success,” follow these steps to identify the issue:
a. Click on the Details link next to your unsuccessful upload process in Process Monitor:
b. Click the View Log/Trace link on the Process Detail page:
c. Click on the FSU_Billing_Interface(numbers).Log file:

Office of the Controller 42
Rev. Dec. 2019
Questions? Contact: ctl-auxiliaryaccounting@fsu.edu
d. Scroll through the message to see what the file reveals about the error. Where the
message is located will depend on the error.
i. In the example below, the error was blank rows at the bottom of the csv file.
ii. If you are unsure how to interpret the error message, check your original files
against the instructions. Review the Common Errors
section above.
iii. Always review your original upload template for data entry and formatting errors.
See the Reviewing Bill Data
section.
iv. You should attempt to re-upload your files after validating your original template
and troubleshooting the issue.
e. If your upload fails a second time and/or you are unable to identify the issue, contact
Auxiliary Accounting staff by phone or email ctl-[email protected]
for
assistance.
CONTINUED ON NEXT PAGE

Office of the Controller 43
Rev. Dec. 2019
Questions? Contact: ctl-auxiliaryaccounting@fsu.edu
Correcting Interface Errors
1. If you encounter errors after the Billing Interface Process, proceed as follows:
a. Navigate to Billing > Interface Transactions > Correct Interface Errors.
b. Enter the Interface ID, change the business unit to AUX01, and click “Search.”
c. If a list appears, select the first line. You will be brought to the PS_INTFC_BI tab for the
item.

Office of the Controller 44
Rev. Dec. 2019
Questions? Contact: ctl-auxiliaryaccounting@fsu.edu
d. Review the LoadStatus area for the error. In the example above, the error code tells us
that the Bill-To Contact is invalid.
NOTE: For a complete list of error descriptions, you may visit this link:
Correcting Billing Interface Process
Errors - Complete Error List.
e. Locate the field that needs to be corrected, and then correct the error.
f. Scroll to the bottom of the page, and save your work.
i. IMPORTANT: If your error is an accounting issue, you’ll need to select the
PS_INTFC_BI_AEDS tab to find the field(s) to correct.
ii. IMPORTANT: If there are many errors with your bill line, you may choose to
delete the entire line by selecting the trashcan icon in the upper portion of the
screen. Be aware that this means you will need to create the line again through a
new Upload or via manual entry, so keep track of what is deleted.
g. Repeat until all errors are corrected.
h. Re-process the interface by following the steps outlined in the
Run Billing Interface
Process section.
i. Repeat if needed and more errors are present.
CONTINUED ON NEXT PAGE

Office of the Controller 45
Rev. Dec. 2019
Questions? Contact: ctl-auxiliaryaccounting@fsu.edu
Other Billing Errors
What could go wrong that the Upload & the Interface won’t reveal?
Reviewing Uploaded/Interfaced Data
• To review items on the billing interface table, view query FSU_CTRL_AUX_BI_INTFC_TBL. This is
prompted by Bill Source.
• To review bills for accuracy, use a billing query such as FSU_AUX_BILL_NOT_INV and filter by date
added and bill source to find bills you just created.
• To review internal bills prior to the monthly bill cycle, view query FSU_AUX_BI_PRE_AP_CHECK.
END
Items we focus on later during the Pre-AP Check
Erroneous charges; e.g. you charged the wrong customer
or the wrong amount, or duplicated a line on your upload
Uploaded the wrong file (validate against source data after
upload!)
Uploaded a file twice (validate against source data after
upload!)
