
IceWarp Unified Communications
Web Service Reference
Version 12.1
Published on 4/17/2018

Contents
Web Service .............................................................................................. 4
About .............................................................................................................................................. 4
Reference ....................................................................................................................................... 4
General .............................................................................................................................. 5
Web Site ................................................................................................................ 6
Options .................................................................................................................. 8
Access .................................................................................................................. 10
Scripting ............................................................................................................... 13
MIME ................................................................................................................... 15
Documents .......................................................................................................... 17
Error Responses ................................................................................................... 18
HTTP Header ........................................................................................................ 20
Rewrite ................................................................................................................ 22
Directory Aliases .................................................................................................. 24
Proxy ................................................................................................................................ 25
Proxy – General ................................................................................................... 25
Proxy – Security ................................................................................................... 26
PHP Problems and Workarounds.................................................................................................. 27
Using FastCGI ................................................................................................................... 28
Re-Write Tutorial .......................................................................................................................... 31
Non RegEx Rewrites ......................................................................................................... 32
RegEx Rewrites................................................................................................................. 34

IceWarp Server Web Service
Page 4
Web Service
Icon Description
Warning – very important!
Note or tip – good to know.
Note within a table.
Figure link – click the link to reveal the figure. Click it again to close it. (Works only in the
CHM format.)
Registered Trademarks
iPhone, iPad, Mac, OS X are trademarks of Apple Inc., registered in the U.S. and other countries. Microsoft, Windows, Outlook
and Windows Phone are either registered trademarks or trademarks of Microsoft Corporation in the United States and/or other
countries. Android is a trademark of Google Inc. IceWarp is a registered trademark in the USA and other countries.
About
IceWarp Server's web service allows you to host web sites. The node consists of the General and Proxy settings.
Reference
This chapter describes the Web node of the IceWarp Server administrative console.

IceWarp Server Web Service
Page 5
General
The General tab shows a list of all web sites you have defined to be hosted by IceWarp Server:
Button Description
Add Click the button to open the Web Site dialog for adding a new web site.
Edit Click the button to open the Web Site dialog of an existing web site for editing its
properties.
Copy Select a web site and click the button to copy its settings. Handy when creating a site with
similar settings.
Delete Click the button to delete the selected web site.
Edit File Click the button to open a simple text editor allowing you to directly modify the settings
for defined sites – use with care!
Start/Stop Click the button to start (stop respectively) the web service. These buttons work only on a
local console.

IceWarp Server Web Service
Page 6
Web Site
Field Description
Active Check this option to make this web site active.
Host The URL used to access the web service.
Note that masks can be used here, for example:
*.icewarpdemo.com
or even
*.icewarpdemo.*
As long as the DNS records points to your server, the web site will be displayed.
Multiple host names are supported, separate them by semicolons.
Description A descriptive text for the web service.
Home directory The root folder of the actual web site files.
If you want to redirect the site, see the example within the Rewrite chapter.
IP Address If you wish, you can bind this web site to a specific IP address.
Use ... settings
These radio buttons are not active when editing the
Default site.
Use Default Settings
Select this option and the new web site will use the same settings as the default one.
The default web site is installed with IceWarp Server.
Use Custom Settings

IceWarp Server Web Service
Page 7
Select this option if you wish to specify all options for this web site yourself.
NOTE: Even if this option is selected, the default rewrites are inherited – change them if
desirable (within the Rewrite tab).
Enable W3C logging Check this box to log all connections to this web site, using standardized W3C format logs.
This box is active only if the
Use custom settings option is selected.
Logging file path Specify a fully qualified file name for the log file(s).
The variables yyyy, mm, and dd can be used within the filename:
For example,
C:\logfiles\w3clogs\"yyyymmdd".log
NOTE: If you specify only a directory, IceWarp Server will automatically create log files
in the format of yyyymmdd.log in the specified directory.
Delete logs older than
... days
Specify the number of days after which log files will be deleted.
A value of zero specifies that logs will never be deleted.

IceWarp Server Web Service
Page 8
Options
Field Description
Read Check this box to allow GET and HEAD HTTP protocol requests:
# GET is by far the most common method used to request a specified URL.
# HEAD is similar to GET but only the page headers are retrieved.
This is useful for retrieving meta-information.
Scripts Check this box to allow the execution of scripts within this web site.
Directory content
listing
Check this box to allow directory content listing within this web site. A web browser accesses the
web server storage using an explorer like file.
If a folder is accessed without a page specified and IceWarp Server cannot find a default page (as
listed under the Documents tab), then a directory listing is presented.
NOTE: If you check this option, you should also specify a default virtual host on that tab.
Write Check this box to allow # PUT HTTP protocol requests.
# PUT is used to upload files to a specified Uniform Resource Identifier (URI) on the <WEB>.
Executables
Check this box to allow executables (
http://server.executable.cgi/exe/com) to be run on
this web site.
WebDAV Check this box to allow WebDAV extensions to be used on this web site.
Briefly: WebDAV stands for "Web-based Distributed Authoring and Versioning".
It is a set of extensions to the HTTP protocol which allows users to collaboratively edit and
manage files on remote web servers.
For more information about WebDAV, refer to its official portal
http://www.webdav.org/
(tutorials, FAQs, ...) or see the description available at Wikipedia –
http://en.wikipedia.org/wiki/WebDAV/
Keep open HTTP
connections
Check this options to keep a connection open for a short time after a client request.
This can significantly speed up client/server communications.
Maximum connections Specify the maximum number of simultaneous connections that you wish to allow to this web
site.
Any requests when the limit has been reached will receive a "Server too busy" (Error 503)

IceWarp Server Web Service
Page 9
response.
See also the

IceWarp Server Web Service
Page 10
Access
The Access tab allows you to grant or deny access to a hosted web site. You can specify the whole site or individual sub-folders.
You can allow or deny access for individual IP addresses, users (local or specifically defined), and groups and other account
types.
Selecting the Access tab reveals a list of currently defined access rules.
Button Description
Add Click the button to add an access rule, the Access dialog opens.
Edit Select a rule and click the button to edit this rule. The Access dialog opens.
Copy Select a rule and click the button to copy its settings. Handy when creating a rule with
similar settings.
Delete Select a rule and click the button to delete this rule.
Arrows Select a rule and click one of these buttons to move it up or down in the list.
NOTE: Rules are evaluated according to their order in the list. When one of rules
is met, all others (later ones) are not used.
Example:
You want to grant John Doe (only him) access to some location. Create one rule
that grants him access and second one that denies access to anyone else. The
rule granting access has to be most highly in the list.
In the Access dialog, you specify the location you wish to protect and the resource(s) you are protecting it from.
You should be aware that unless you specifically
Deny access to something everyone will have access. If you want to restrict
access to a particular web site, you should Grant access to the specific user(s) and then Deny access to everyone else.
NOTE: To deny someone access and grant all others is meaningful only if you specify IP addresses (not only
usernames), as the server knows IP addresses but not usernames when users are trying to enter the
resource.

IceWarp Server Web Service
Page 11
You should also be aware that if you wish to specify a local user in the
Username field, you should enclose it in square brackets
to let IceWarp Server know it should check its own database for password verification – this is done automatically if you use the
"..." button to select a user, group or domain.
Field Description
URI Enter a specific URI to allow or deny access to. (optional)
NOTE: If set, it has to end with "/*" (slash and asterisk) to work for all items within the
folder.
IP Enter IP address that will be allowed or denied. (optional)
NOTE: If you leave this field blank, you grant/deny everyone access.
Not Check this box to logically "NOT" the IP range.
In the above example, access is granted to the /admin/ directory from any IP address
except
192.168.*.*
Access Choose whether access will be granted or denied with this rule.
Basic HTTP
Authentication
Tick the box if you want to use basic HTTP authentication – a user has to fill their user name and
password into a usual dialog shown before entering the URI specified above.
Kerberos/SSO HTTP
Authentication
Tick the box if you want to use the Kerberos/SSO HTTP authentication (for more information
refer to the Domains and Accounts – Domain – Directory Service chapter –
Kerberos/GSSAPI/SSO section.) Credentials provided by users when they log into Windows are
used.
NOTE: Both these possibilities can be used. IceWarp Server sends information to the
browser. In the case this browser supports Kerberos/SSO authentication, a login dialog

IceWarp Server Web Service
Page 12
is not shown.
User is authenticated
independently
Select this possibility if you want to check users against data set in the
Username and
Password
fields (see lower).
User is authenticated
against system
accounts
Select this possibility if you want to check users against all IceWarp Server system accounts.
Username Enter a specific user name that will be allowed or denied. (optional)
NOTE: If you leave this field blank, you grant/deny everyone access.
Password Enter a password for the user name specified above.
Kerberos service Fill in the Kerberos service name. For more details, refer to the Domains and Accounts –
Domain – Directory Service chapter – Kerberos/GSSAPI/SSO section – Service name field.
Kerberos keytab Use the "..." button to select keytab files. For detailed information, refer to the Domains and
Accounts – Domain – Directory Service chapter – Kerberos/GSSAPI/SSO section –
Place
keytab files ...
field.
User condition Use the "..." button to select a system user, access to be granted/denied to.
NOTE: If this field is used, the Username column (the Web Site dilaog – Access tab) is
left blank.
User is domain
administrator
Tick this box to allow all local system domain administrator accounts access to the web site with
their username/password.
NOTE: Do not tick both these boxes as users cannot have both these roles. It would
prevent access for all users.
User is administrator Tick this box to allow all local system administrator accounts access to the web site with their
username/password.
NOTE: Do not tick both these boxes as users cannot have both these roles. It would
prevent access for all users.

IceWarp Server Web Service
Page 13
Scripting
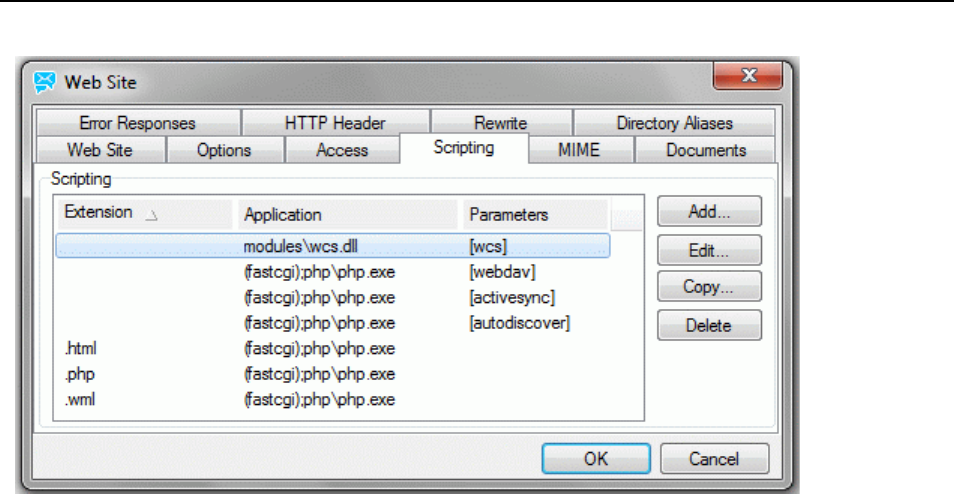
IceWarp Server supports Server Side Scripting engines such as PHP and Perl. It can support these engines via the ISAPI interface
(default), FastCGI interface, or CGI interface.
Here you can specify which modules or executables should be used to process file types that the browser may not
automatically understand, e.g. PHP files:
Button Description
Add
Click the
Add button to link a file extension with its process application. The Scripting dialog opens.
Edit Select a scripting record and click the button to edit settings of this scripting. The Scripting dialog
opens.
Delete Select a scripting and click the button to delete this scripting.
Field Description
Extension Specify the file extension (with the dot).
Application Specify the full path to the application that will process the files.
To use the ISAPI interface you just need to specify the path to the dll file, e. g. \temp\libisapi.dll
To use the CGI interface specify the CGI executable, e. g.
\bin\myCGI.exe

IceWarp Server Web Service
Page 14
To use the FastCGI interface specify the address and port of the FastCGI server, e. g.
localhost:5000
In addition, if you want to specify the interface to use you should add it as a prefix in brackets to
the application path, e. g. (cgi)\bin\mycgi.exe

IceWarp Server Web Service
Page 15
MIME
Here you can set MIME mappings for use with your web site.
There will already be a default set of mappings that should cover normal needs, but you may need to define and add your own
for some purpose.
Button Description
Add
Click the
Add button to add your own MIME mapping. The MIME dialog opens.
Edit Select a mapping record and click the button to edit settings of this mapping. The MIME dialog
opens.
Delete Select a mapping and click the button to delete this mapping.
Field Description
Extension Enter the file extension you want to map.
MIME Enter the MIME type.

IceWarp Server Web Service
Page 16
For more information about MIME types, refer to
IANA
web site:
( http://www.iana.org/assignments/media-types/ ).
Compress If this box is ticked, the server will GZIP the object before transferring it, provided the browser has
the capability to un-compress the object.

IceWarp Server Web Service
Page 17
Documents
Here you can define a list of "default" documents that the <WEB> will look for if an HTTP request comes in with no specific file
identified.
In the above example, if a request comes in for http://webmail.icewarpdemo.com/special, IceWarp Server will look for
index.html, index.wml then index.php in the directory of "special" and display the first one found.
If none of the defined documents is found, IceWarp Server will do one of the following:
If Directory content listing is allowed (see Web Service – Options), the directory listing for directory of "special" will be
displayed.
If Directory content listing is not allowed, the
Page not found error will be returned.
Button Description
Add Click the button to add a document type. The Document dialog opens.
Fill in the
Document field.
Edit Select a document type from the list and click the button to edit the document name.
Delete Select a document type and click the button to remove this document from the list.
Arrows Use the buttons to change order of documents in the list. This order determines how
IceWarp Server will look for documents. (See above.)
IceWarp Server Web Service
Page 18
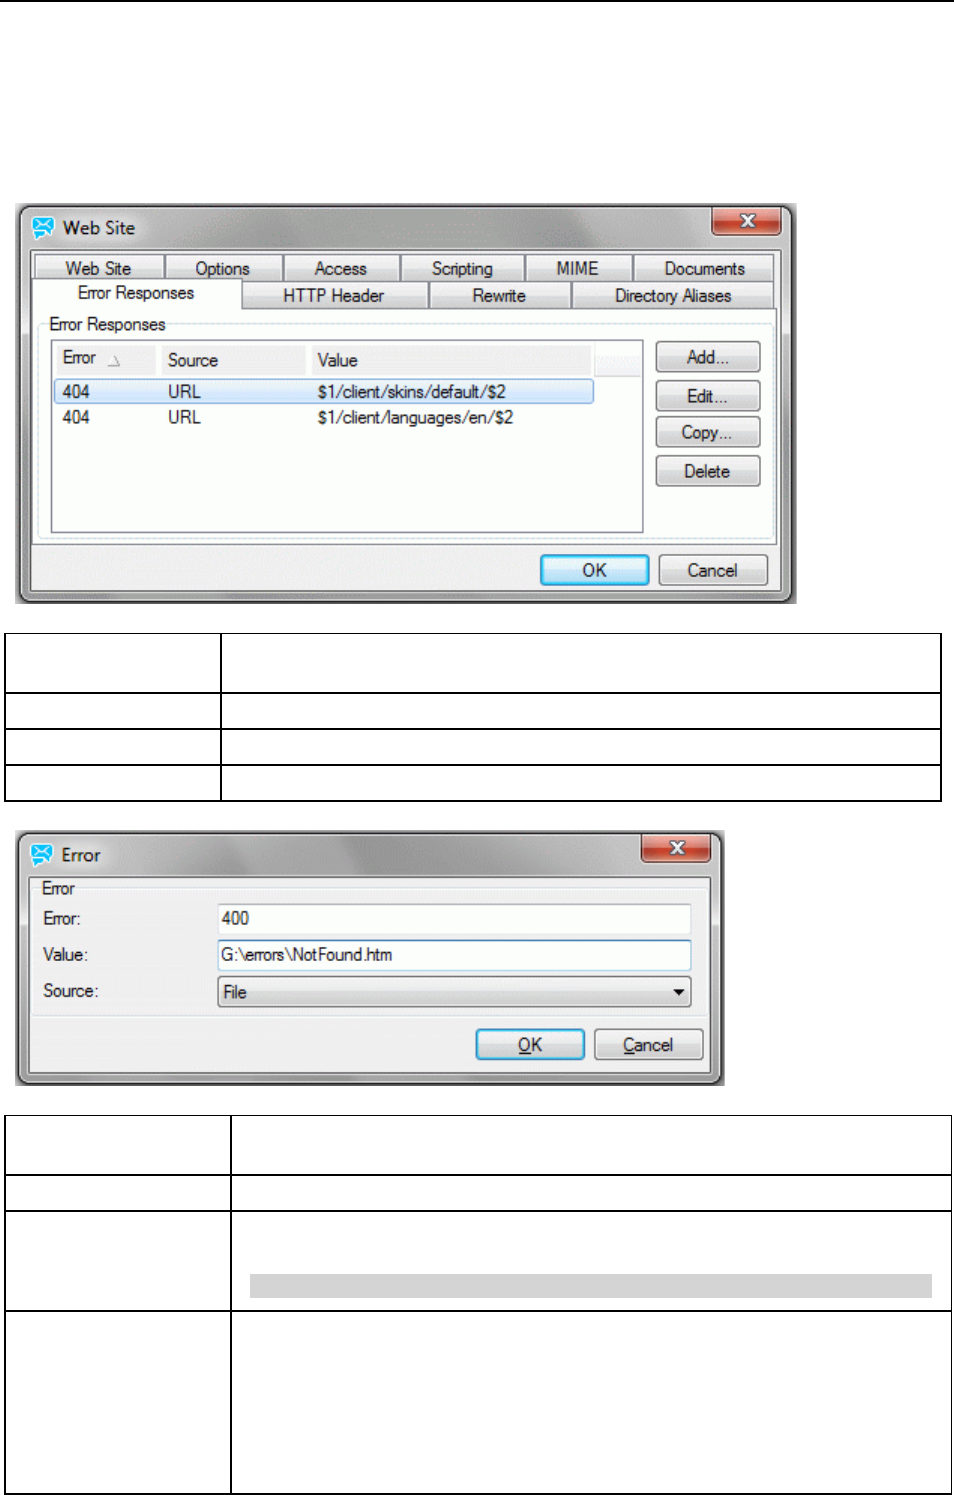
Error Responses
Here you can define your own web pages to be displayed if a server error occurs.
Button Description
Add Click the button to define a new page for an error. The Error dialog opens.
Edit Select an error and click the button to edit properties. The Error dialog opens.
Delete Select an error and click the button to remove this record.
Field Description
Error Fill in the code of error that you wish to be served.
Value Enter either a fully qualified file name (if the source is a file) or a relative URL (which must
be local).
NOTE: This field is disabled when Default is selectede as the Source.
Source Select from the combo box:
File
When the Value is a file name.
URL
When the Value is a URL.

IceWarp Server Web Service
Page 19
Default
If you want to use server default error pages.

IceWarp Server Web Service
Page 20
HTTP Header
HTTP headers define various characteristics of the data that is requested or the data that has been provided.
E. g. Cache-Control tells all caching mechanisms from server to client whether they may cache this object.
Cache-Control: max-age=0, no-cache, no-store, must-revalidate
Here you can define custom HTTP headers which are returned (provided) as a part of the response to a browser request.
Field Description
Expiration You can use this option to include an expiration HTTP header in the response. A browser
compares the date in expiration header to the current one and decides whether the cached page
should be shown or a new version should be requested.
None
The cache page would be shown if any already exists.
Immediate
The browser would have to request updated page anytime it tries to access that page.
After minutes
It sets the expiration period to the current time plus the number of minutes specified.
Custom HTTP Header
Items
This allows you to define special headers that will be returned to a browser as a part of the
response.
Press the Add button to open the Header dialog box:

IceWarp Server Web Service
Page 21
Specify the name of the Header and the content (Value) you wish to insert.

IceWarp Server Web Service
Page 22
Rewrite
This is a very powerful feature allowing you to redirect requests for one URL to another URL.
For details, refer to the Rewrite Tutorial chapter. You can use the simple Non-RegEx Rewrite or much more flexible RegEx
Rewrite
here.
Assume you own
icewarpdemo.com, icewarpdemo.net and icewarpdemo.org. You can create one website called
www.icewarpdemo.com and redirect the .net and .org requests to the .com site.
Button Description
Add Click the button to add a new rewrite formula. The Rewrite dialog opens.
Edit Select a rewrite formula and click the button to perform changes. The Rewrite dialog opens.
Copy Select a rewrite formula and click the button to copy it. The Rewrite dialog opens – here you can
perform some minor changes.
Delete Select a rewrite formula and click the button to remove this formula.
Arrows Use the arrows to change the order how rewrites will be performed.
Field Description
Source Enter either regex or non-regex expression for an URL request.

IceWarp Server Web Service
Page 23
Destination Enter either regex or non-regex expression for a destination.
RegEx Un-check the box if you intend to use a non-regex formula.
BE AWARE: Custom rewrite rules which route all requests from HTTP to secured HTTPS could cause
malfunction of the files upload feature in WebClient. As a work-around, disable Flash uploader within the
WebClient – Administrator Options – General – Global Settings tab or, if you have a valid CA certificate,
you can disable Use HTTP Flash Upload in SSL Session within the WebClient – Administrator Options –
General – Global Settings tab.
NOTE: The rewrite in the figure above redirects any URI that has icewarpdemo behind the first slash (plus
has anything behind the second slash) to http://icewarpdemo.com/[plus what is behind the second slash].
Example: Source: http://mail.icewarp.com/icewarpdemo/mail
Destination: http://icewarpdemo.com/mail

IceWarp Server Web Service
Page 24
Directory Aliases
This feature allows you to create aliases for directories. These aliases can shorten paths to some locations, rename them, etc.
Button Description
Add Click the button to add a new alias. The Alias dialog opens.
Edit Select an alias and click the button to perform changes. The Alias dialog opens.
Delete Select an alias and click the button to remove this alias.
Field Description
Alias Enter an alias. For details refer to the Rewrite Tutorial chapter – Directory Aliases
section.
Path Specify the path to the appropriate resource.
Click the
"..." button to open a browser.
IceWarp Server Web Service
Page 25
Proxy
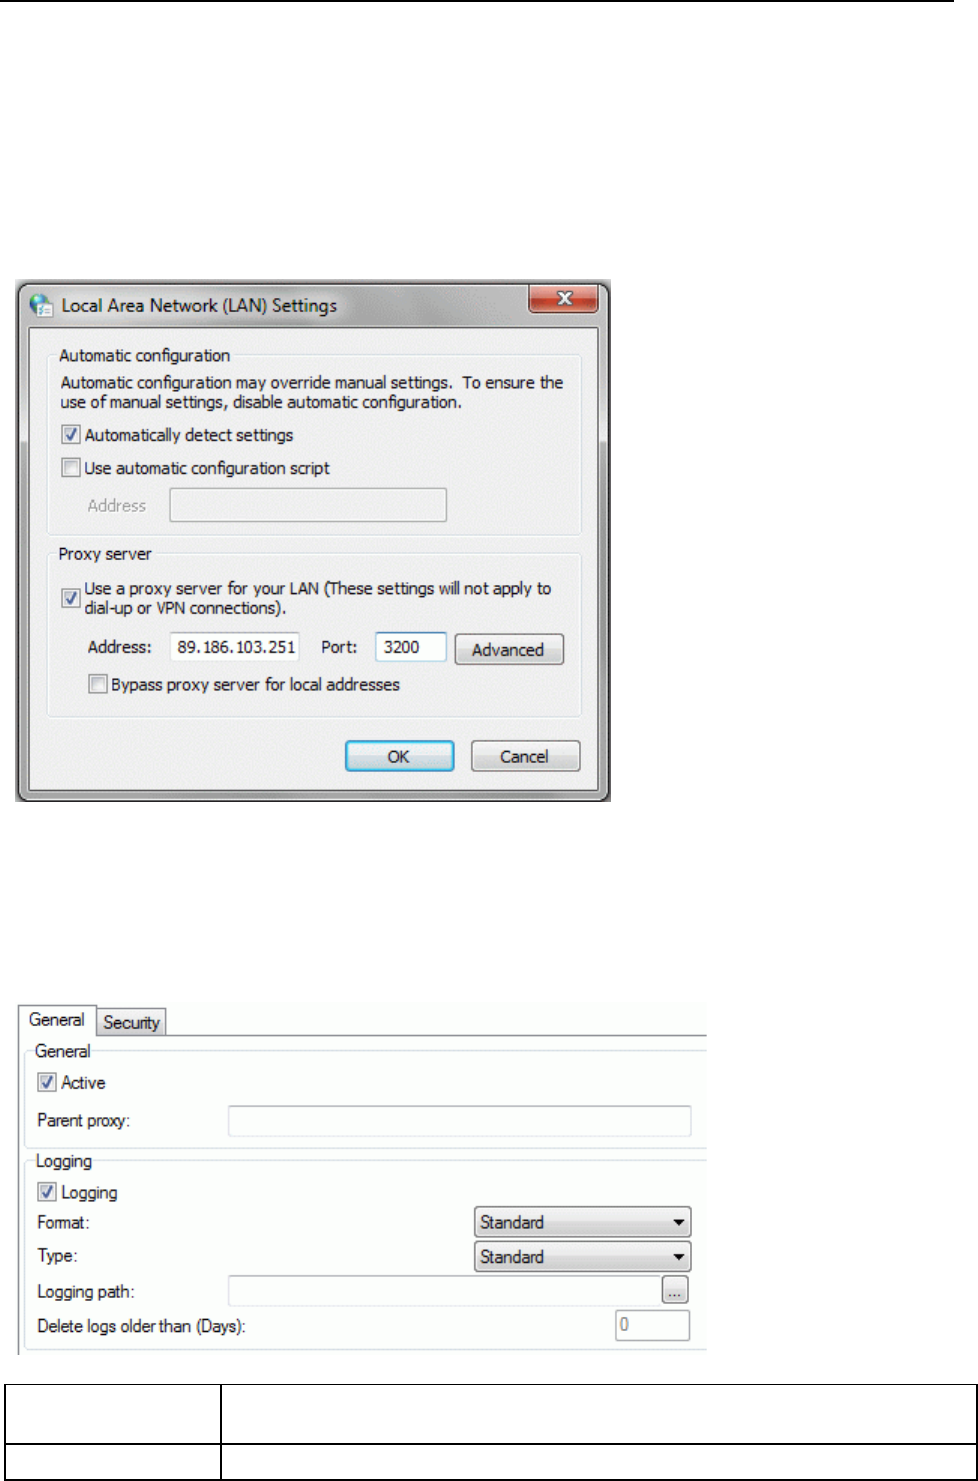
IceWarp Server has a built-in proxy server, which allows you to share Internet browser access across your network.
Your users will need to configure their browsers to use the proxy:
Typical Browser Configuration
IceWarp Server IP is the actual IP address of the server where IceWarp Server is running.
The proxy server runs on the same port as the Web/Control service of IceWarp Server, which defaults to port 32000.
Proxy – General
Field Description
Active Tick the box to enable proxy.
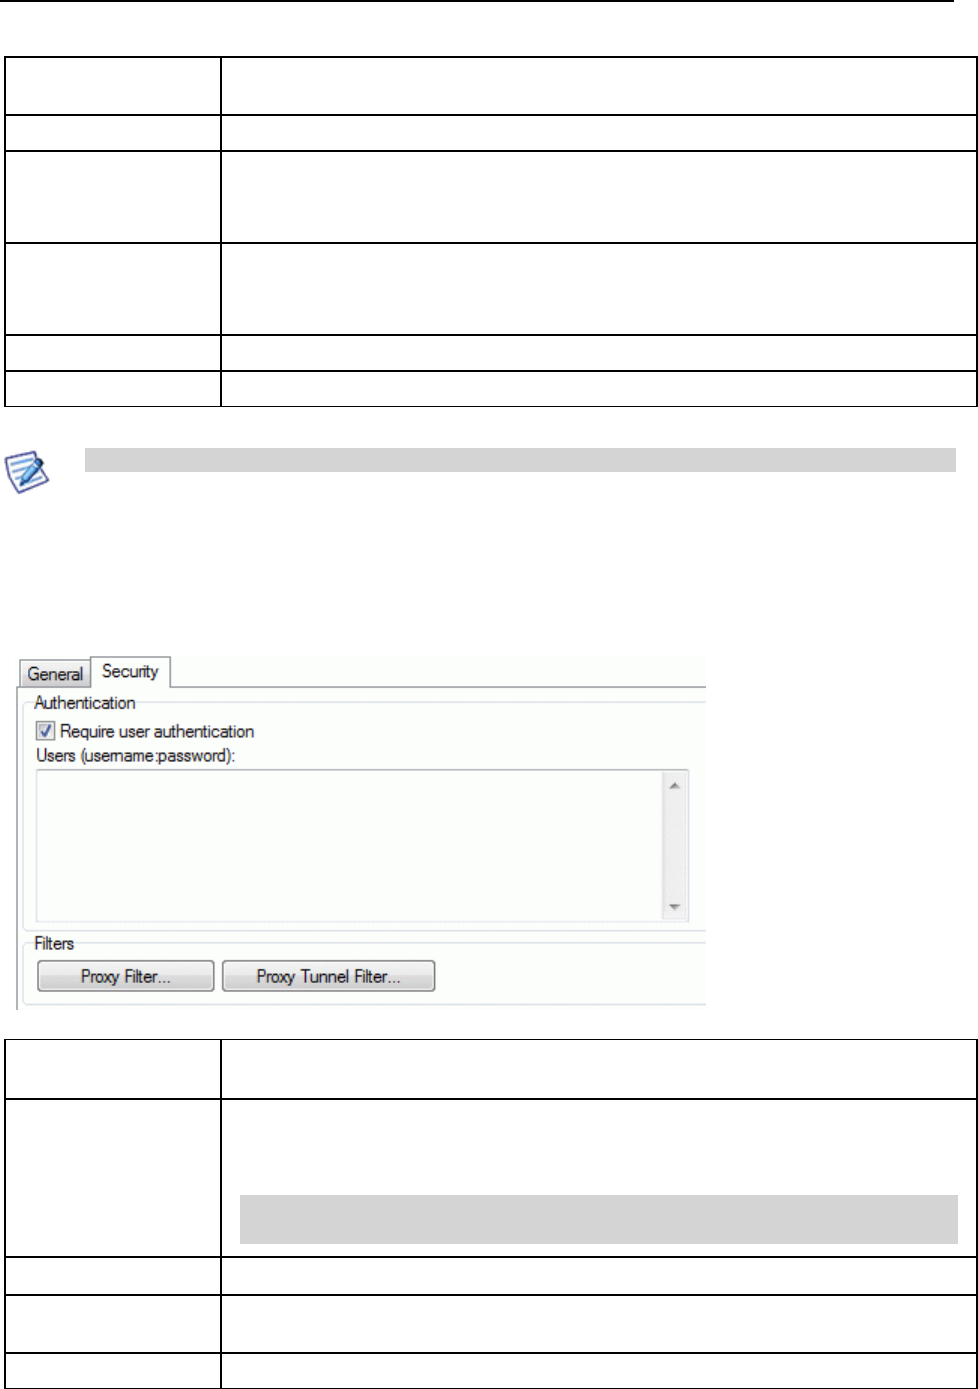
IceWarp Server Web Service
Page 26
Parent proxy Enter the IP address of your parent proxy server here if required. This is used if your IceWarp
Server itself connects to the internet via another proxy server.
Logging Check this box to enable proxy logging.
Format Select the format of the log files.
Standard – for the standard IceWarp Server logging format.
W3C extended – to use the extended log file format as defined by W3C.
Type Select how you want your log files:
Standard – creates one log file.
Day – creates one log file per day.
Logging path Specify the directory to store your log files.
Delete logs older than Specify a non-zero value to have log files deleted after the given number of days.
NOTE: By default, proxy access requires authentication – see Proxy – Security.
Proxy – Security
The Security tab allows you to restrict access to your proxy server.
Field Description
Require user
authentication
Check this box to allow access to the proxy server only to those who have a specified
user:password combination.
User:password combinations are specified in the Users text area.
NOTE: This option is turned on by default, so you will have to either turn it off or define
a user:password combination.
Users
Specify your list of users and passwords in the format
username:password.
Proxy Filter Click the button to edit a filter file where you can grant/deny access to IP ranges and hosts.
Examples are given within the editor.
Proxy Tunnel Filter Click the button to edit filters for your local connections. Exampled are given within the editor.

IceWarp Server Web Service
Page 27
PHP Problems and Workarounds

IceWarp Server Web Service
Page 28
Using FastCGI
About FastCGI
FastCGI is used by default since version 10. Previously used ISAPI caused serious issues. (PHP has many issues and is very
unstable when run with ISAPI modules in heavy load.) FastCGI takes care of these issues by communicating to multiple
instances of PHP executables. IceWarp Server starts several instances of php.exe and forwards the PHP requests to it using TCP
sockets. Should a problem with PHP occur, php.exe is simply killed and new instance is created without affecting the Web
Server at all and the load is effectively balanced between the running instances of php.exe. Remember that the FastCGI mode
can be a little bit slower than the default ISAPI one hence you may use it only after you are sure there is no other possible
solution.
FastCGI Configuration
Use the dropdown selection in Administration GUI – Web Service settings which allows you to switch between Web Server
modes with pre-defined settings. For more options, to fine tune the settings to your particular installation, or to make any
changes manually, you will need to edit the [Installation Directory]\config\webserver.dat configuration file, as instructed
further.
FastCGI Configuration
If you want to enable FastCGI for specific extension, simply modify the webserver.dat file (can be found in <install_dir>\config)
by replacing all php\php.dll with (fastcgi);php\php.exe.
Original form: (ISAPI)
<EXTENSIONS>
<ITEM>
<EXT>.php</EXT>
<MODULE>php\php.dll</MODULE>
Changed form: (FastCGI; for Windows)
<EXTENSIONS>
<ITEM>
<EXT>.php</EXT>
<MODULE>(fastcgi);php\php.exe</MODULE>
The same for Linux:
<ITEM>
<TITLE/>
<EXT>.php</EXT>
<MODULE>(fastcgi)var/php.socket;scripts/phpd.sh</MODULE>
</ITEM>
Now check the settings in the Web Service – Web Site – Scripting tab just to be sure, it should be set like this after the previous
changes in webserver.dat:
IceWarp Server Web Service
Page 29
FastCGI Advanced Options
Behaviour of PHP through FastCGI can be modified using following webserver.dat options.
<WEB>
<OPTIONS>
<FCGI_INITSERVERS>8</FCGI_INITSERVERS>
<FCGI_MAXSERVERS>0</FCGI_MAXSERVERS>
<FCGI_MAXROUNDS>10000</FCGI_MAXROUNDS>
<FCGI_BINDIP>127.0.0.1</FCGI_BINDIP>
<FCGI_CHECKRUNNING>0</FCGI_CHECKRUNNING>
<FCGI_ENVIRONMENT>PHP_FCGI_MAX_REQUESTS=20000</FCGI_ENVIRONMENT>
where:
<FCGI_INITSERVERS> – number of instances of php.exe which are running immediately after start.
<FCGI_MAXSERVERS> – maximal number of running instances.
<FCGI_BINDIP> – IP address bound to php.exe and used to communication between IceWarp server and PHP. This value has
to be set. Usually there is no need to put other value than 127.0.0.1 here.
<FCGI_ENVIRONMENT> – environment variables, which are sent to php.exe to control its behaviour.
PHP_FCGI_MAX_REQUESTS – this environment variable tells php.exe to quit automatically after given number of processed
requests.
<FCGI_MAXROUNDS> – similar option as PHP_FCGI_MAX_REQUESTS, but the counting of requests and killing of
instances is responsibility of IceWarp server and not php.exe itself.
<FCGI_CHECKRUNNING> – boolean value – if set to true, each instance of php.exe is checked, whether it is running or not,
before trying to send data to it. This brings slowdown and it is not needed when PHP_FCGI_MAX_REQUESTS is greater than
FCGI_MAXROUNDS.
FastCGI Timeout Modifier
This modifier allows to override FastCGI timeout. Global timeout still remains as set. The current solution for named modules (i.
e. those with names in brackets, e. g. [activesync]) is as follows:
<WEB>
<OPTIONS>
... other options ...
<MODULES_TIMEOUT>

IceWarp Server Web Service
Page 30
<MODULE TITLE="[activesync]" TIMEOUT="1800000"/>
</MODULES_TIMEOUT>
The following syntax can be used for unnamed modules, supported only with FastCGI(.exe):
<MODULE>(fastcgi)var/phpsocket;scripts/phpd.sh;TIMEOUT</MODULE>
where
TIMEOUT is a value in milliseconds, the default setting is 1800000. (This example is from the Linux version.)
If you wish to set the ActiveSync heartbeat higher than the default maximum of 30 minutes, you need to modify the module's
settings to extend PHP session time-out. Setting it lower should not be required and this modifier can be omitted (including the
semicolon).
FastCGI timeout is accessible via $_SERVER ($_SERVER["FCGI_TIMEOUT"])
FastCGI timeout value defined in webserver.dat file can be easily obtained inside PHP script from $SERVER array. It will help to
determine how often icewarp_keepalive( $tid ) should be called to survive.
FastCGI Quick How-to
Thread Pooling – open the webserver.dat file and set thread pooling to 10 (see higher). Restart the services and you will now
see separate instances of
php.exe running in the task manager.
Usually, 10 threads is a good starting point. It means 10 php.exe files are opened and used when there is processing. For
example, you might have 100 users logged to IceWarp WebClient, but actual requests are much lower.
In the
Control logs, you will see:
SYSTEM [17C4] 10:21:08 Thread pools: Statistics
Global: Inside = 0, Free = 10, Waiting=0
[activesync]: unlimited , Inside=0
[wcs]: unlimited , Inside=4
In this case, for Web service, we set 10 threads. So up to 10 open php.exe files. You can see in
Global that none are being
currently used. If, for example, it shows Inside=10, you might have problems to access WebClient. You have to increase
number of threads. Or better, find the reason why they are used. It can be because of many users, but it can be also because of
some problem. Also user should consider, that each php xonsumes system resources. Setting this value too high is nonsense
and will kill the server.
Problems could also occur when messages to large mailing lists or groups are sent. The solution is to set
Maximum number
of messages to sent out in one minute
in mailing lists and group accounts (the [group/mailing_list] – Options tab) to some
reasonable value (say 40).
Example
of thread pooling in the webserver.dat file (not related to values shown above):
<MODULES_THREADPOOL>
<MODULE TITLE="[activesync]" THREADPOOL="0"/>
<MODULE TITLE="[wcs]" THREADPOOL="0"/>
</MODULES_THREADPOOL>
MySQL PDO
You should also move the WebClient PDO storage to a database. The instructions for doing this are below.
https://support.icewarp.com/hc/en-us/articles/115001055887-Error-Message-When-Sending-We-Do-Not-Relay-
NOTE: If not using php-custom.ini or php.user.ini to enable MySQL PDO for WebClient, after each version
upgrade you will need to uncomment the following lines to get it working again – the original php.ini gets
overwritten: ;extension=php_pdo_mysql.dll

IceWarp Server Web Service
Page 31
Re-Write Tutorial
Diferences
The Re-write function replaces the Redirect option found in the Web service site details in older versions.
The Web Service – Site – Redirect option in the Administration GUI allowed you to define redirect rules based on the URL and
URI. The requests that came to the server based on some string criteria were redirected to other pages. This option has been
renamed to Rewrite and currently supports the old functionality for backward compatibility and a new mod_rewrite regex
replace mechanism.
Non-RegEx (old way) does always redirect and the user can see the change in browser address bar. RegEx way rewrites the URL
internally so for the user the URL appears to be the one shown in address bar.
Alias option has been renamed to Directory Aliases and is strictly for virtual directories. You can have a relative alias (pointing to
the current web site repository, /mail/ –> webmail/) or absolute pointing to any directory or disk on your computer – /data/ –>
/www/mydata/. Subdirectories are also supported, there is a new no match strings function.
Rewrite without RegEx does the former redirect – thus Redirect can be achieved.
Rewrite with RegEx does rewrite and supports mod_rewrite options.
Aliases are only directory aliases and support absolute and relative paths.
Directory Aliases – Absolute Path
Let's start with a short tutorial of directory aliases. There will be more examples to show what is supported and what you can
do with it.
No string match functions can be used in aliases. Only the first part of the source is matched with the URI and then the path is
replaced accordingly. In Absolute Path Directory Aliases, Destination is an absolute path.
/data/ -> /www/mydata/
If we have a path /data/... on the server, it will be physically loaded from /www/mydata/.... (with Linux path of course).
On Windows you could write
/data/ -> c:\www\data\
If the user specifies /data/ in the URL it does not have to be in the actual web sites directory but it can be loaded externally
from some other location (c:\www\data\). That is what directory aliases is all about.
Directory Aliases – Relative Path
Below is an example of a relative path directory alias. In most cases you would use Rewrite feature but it is possible to use an
alias for a similar functionality. In Relative Path Directory Aliases, Destination is a relative path.
/mail/ -> webmail/
This makes sure that if somebody goes to
http://server/mail/... it will redirect him to the IceWarp WebClient directory in the
web site repository.
All files loaded through the URI /mail/... will be in fact read from /webmail/.
Notice the missing "/" at the beginning of the destination value. This is a mark of relative directory alias.

IceWarp Server Web Service
Page 32
Non RegEx Rewrites
Rewrites are more complex and flexible thus it is always hard to explain in detail. Rewrite is a feature allowing the admin to
define certain rules that let him change the actual URL used or simply redirect to another URL.
There are two modes the admin can use:
Non RegEx (simple string)
RegEx (regex replace)
Let's start with the classic. Non regex is for backward compatibility and for somebody also simple as it does not require any
regex knowledge. Non regex does always perform HTTP redirect. Meaning the user will see the redirect in his browser.
Support for advanced functionality has been added: non port 80, protocol redirects, wildcard string replace.
There are several types of usage here:
Path Redirect
Host Redirect
Protocol Redirect
Path Redirect
/data/ -> /otherdata/
E.g. http://server/data/xxx/xxx/a.txt -> http://server/otherdata/
This would replace the data folder in the URL with /otherdata/ BUT all things coming after /data/ would not be appended to
other data.
Wildcard String Replace
The replace does not copy the appendix data to the destination. For that you would need to use string match with * wildcard.
Note that it works with relative path, such as /test/* -> /mail/*.
icewarp.com* -> www.icewarp.com*
/data/* -> /otherdata/*
E.g. http://server/data/xxx/xxx/a.txt -> http://server/otherdata/xxx/xxx/a.txt
Also any other combinations are possible. You basically need to specify the asterisk in the destination too to take all remaining
data from the source.
Last example illustrates the use with a web site integrated with SVN so nobody can access the .svn directories
*/.* -> /
E.g. http://server/mypage/.svn/... -> http://server/mypage/
This makes sure that any access to a directory starting with "." will be redirected to the root of the web page. If somebody
wants to access the special /.svn/ directory, he will get only the public content associated with the address.
Host Redirect
It is also possible to specify the name of the virtual host
icewarp.com* -> www.icewarp.com*
E.g. http://icewarp.com/... -> http://www.icewarp.com/...
The example above would simply append www if not specified by the user.
This would be suitable only for the primary / default virtual host, since other virtual hosts are strictly based on their hostname.
Hostname MUST BE also in the destination as in the example.
This is how you would create a simple Host Redirect. The same as for Path Redirect applies here, too. The difference is made by
the presence of the hostname at the beginning of the Source.
Protocol Redirect
Last usage allows you to use protocol specification

IceWarp Server Web Service
Page 33
http://www.icewarp.com* -> https://www.icewarp.com*
E.g. http://icewarp.com/secure/* -> https://icewarp.com/secure/*
If a plain HTTP connection would be made to the /secure/ URI it would be redirected to HTTPS to the same directory. It also
works vice versa, from https:// to http://.
All combinations of these can be used for non regex rewrite.

IceWarp Server Web Service
Page 34
RegEx Rewrites
The regex rewrite is in fact much simpler as there are solid rules of usage. You always work with URIs and the result is always an
URI or URL for redirect.
Source is a regex match pattern and Destination is a regex replace pattern. In the destination you can also specify flags.
The whole concept is based on mod_rewrite module for Apache and uses the same syntax.
^/data/(.*) -> http://server/$1 [R]
http://myserver/data/other/?script=value -> http://server/other/?script=value
This would take the string after data, redirect to a different server, but with the selected parameters in place.
You can see you can do some tricks with it. Every () in the regex search pattern can be then used as a variable starting with "$"
and index "n":
$1 $2 $3 etc.
You can create even more sophisticated rewrites such as:
^/test/(.*)/(.*)$ -> /scripts/$1?value=$2
^/data/(.*)/\?(.*) -> /$1/script.asp?value=$2
This would not do a redirect but a simple internal URI replace. It works even with URL variables and there are no boundaries at
all.
If you wish to continue with next rewrite, specify the flags without [L].
^/data/(.*)/\?(.*) /$1/script.asp?value=$2 []
Also, there is a special destination "-" which means not to replace anything. It might come handy sometimes.
You may also want to rewrite e. g. http://www.icewarp.com.br/comprar to http://www.icewarp.com.br/purchase.
You can set a non-regex rewrite, but it will fail in the case, someone writes http://www.icewarp.com.br/comprar/ – for a
server it is the same location, but it is not the same string.
Regex rewrite can help:
Source:
^/comprar
Destination:
/purchase [R]
The rest is up to admins – look for mod_rewrite syntax for more details.
Flags
With these flags the admin can gain complete control of <WEB> behavior.
Flags need to be separated from the regex with space and surrounded in "[]" brackets. Such as:
[L,R]
Available flags are:
[R]edirect – redirect instead of rewrite
[L]ast – do not process other rewrite this is the last one
[F]orbidden – the user will receive 403 Forbidden message when accessed the URL
[C]hain – if the rule is not matched, skip all following rules containing [C] flag
[RP] – see lower the Reverse Proxy section
[V=VARNAME] – match to server variable instead of URI
[] - void flag – force processing following rules
If no flag is specified, the default flag is [L]. If rewrite is matched no other rule will be processed, unless you specify void flag [].
The behavior is the same for non regex rewrites (redirects).
Server Varibles

IceWarp Server Web Service
Page 35
Using the [V=] flag you can achieve some sophisticated URI rewrite functionality. Instead of the URI string, the value of the
server variable will be matched. Use with [C] flags and usually without the URI rewrite- thus with "-" for destination only.
Supported variables are the general HTTP_* variables: HTTP_HOST, HTTP_REFERER, HTTP_USER_AGENT, THE_REQUEST,
REMOTE_IP and certificate specific CERT_ and CERT_SERVER variables: CERT_SUBJECT, CERT_ISSUER, CERT_FLAGS,
CERT_SERVER_SUBJECT, CERT_SERVER_ISSUER, CERT_SERVER_FLAGS. If used will require and verify peer certificate
authentication can be based only on the client certificate using CERT_SUBJECT.
^(www\.myhost\.com)?$ - [V=HTTP_HOST,C]
Virtual host is checked for "www.myhost.com".
The V= flag will be usually used with the [C] chained flag as a predecessor, such as in the following rewrite rule.
^/webmail/ - [C]
^Lynx/ /webmail/basic/[V=HTTP_USER_AGENT,C,R]
The example above would match the /webmail/ in the URL (not replace anything) then it would check if the HTTP_USER_AGENT
contains Lynx/ and if it does, redirect to /mail/. Lynx web browser simply cannot go to /webmail/ and will be redirected to
/mail/
Very flexible!
Reverse Proxy
Reverse Proxy serves for hiding another webserver (usually in local networks) and dynamically rewriting all links that would
point to the hidden webserver into links that point to the reverse proxy itself.
Example of rewrite rule setting:
$/proxy/.*^
http://server/uri/$1 [L,P,RP=/proxy/=http://server/uri/\]
When a user goes to /proxy/* URI, the content is loaded from "hidden" server http://server/uri/*
The hidden server may refer to itself in the output HTML code. The definition of RP=/proxy/=http://server/uri/ causes all links
pointing to http://server/uri/* to be dynamically rewritten with /proxy/* URI, so hidden server will be effectively hidden.
