
For further assistance please contact Macquarie Vendor Support – vendor.support@macquarie.com 1
Supplier Guide to submitting invoices
in Coupa
Coupa Supplier Portal introduction
Macquarie Group uses the Coupa platform to process and approve all invoices globally. Suppliers should register and
log into the Coupa Supplier Portal (CSP) to submit their invoices against a purchase order issued by your business
contact at Macquarie.
Coupa is a free platform. There is no need to pay for additional verification by Coupa to be paid by Macquarie.
All invoices must include the payment remittance bank account details in the electronic invoice submission.
The benefits to suppliers of using the Coupa Supplier Portal include:
1. Visibility of all customer purchase orders issued to you;
2. Visibility of all invoices you have submitted to Macquarie, including the approval and payment status, payment
amount, and payment reference number;
3. Ability to submit the invoices electronically, including ability to pre-populate critical information such as the
correct Macquarie entity and address;
4. On average valid invoices submitted electronically through CSP are paid faster than invoices submitted via email.
Contents of this guide
1. Registration and Legal Entity / Remit-To Setup .................................................................................................................. 2
Bank Account Changes .......................................................................................................................................................................................... 3
2. Submitting an invoice in the Coupa Supplier Portal ....................................................................................................... 4
Submitting an invoice against a PO ................................................................................................................................................................... 4
Complete the Create Invoice page .................................................................................................................................................................... 4
Review/Update the section – ‘Invoice Lines’ .................................................................................................................................................. 5
3. Frequently Asked Questions ................................................................................................................................................. 6
Q1. Can I add multiple users to the Coupa Supplier Portal (CSP)? ........................................................................................................ 6
Q2. Can I submit an invoice without a Macquarie PO? .............................................................................................................................. 6
Q3. How can I check the status of my invoices? .......................................................................................................................................... 6
Q4. Do I need to attach my PDF invoice or any additional supporting documents to support my invoice? ........................ 6
Q5. Do I need to register for two factor authentication ........................................................................................................................... 6
Q6. Can I submit Credit Notes in the Coupa Supplier Portal? ................................................................................................................. 6
Q7. Can I add additional lines in my Invoice? ................................................................................................................................................. 7
Q8. How do I add a new bank account or correct my Remit-To setup if I forgot to include bank details when
registering? ........................................................................................................................................................................................................ 8
Q9. Guides in other languages .......................................................................................................................................................................... 11
Q10. Coupa Video Training ................................................................................................................................................................................ 11

For further assistance please contact Macquarie Vendor Support – vendor.support@macquarie.com 2
1. Registration and Legal Entity /
Remit-To Setup
To register on CSP, simply click the link you received in invitation email from Macquarie to create your login and
complete verification.
Once you have logged in, we recommend clicking “Skip Now” in the Coupa pop up window and instead follow
these instructions. This will help you avoid entering the same information twice:
1. Set up your Legal Entity: – Click on “Setup” and “Legal Entity Setup” and “Add Legal Entity”. Complete your legal
entity name and country of operation:
2. Complete the “Tell your customers about your organisation” page (Tip: Ensure that Macquarie is ticked as your
customer)

For further assistance please contact Macquarie Vendor Support – vendor.support@macquarie.com 3
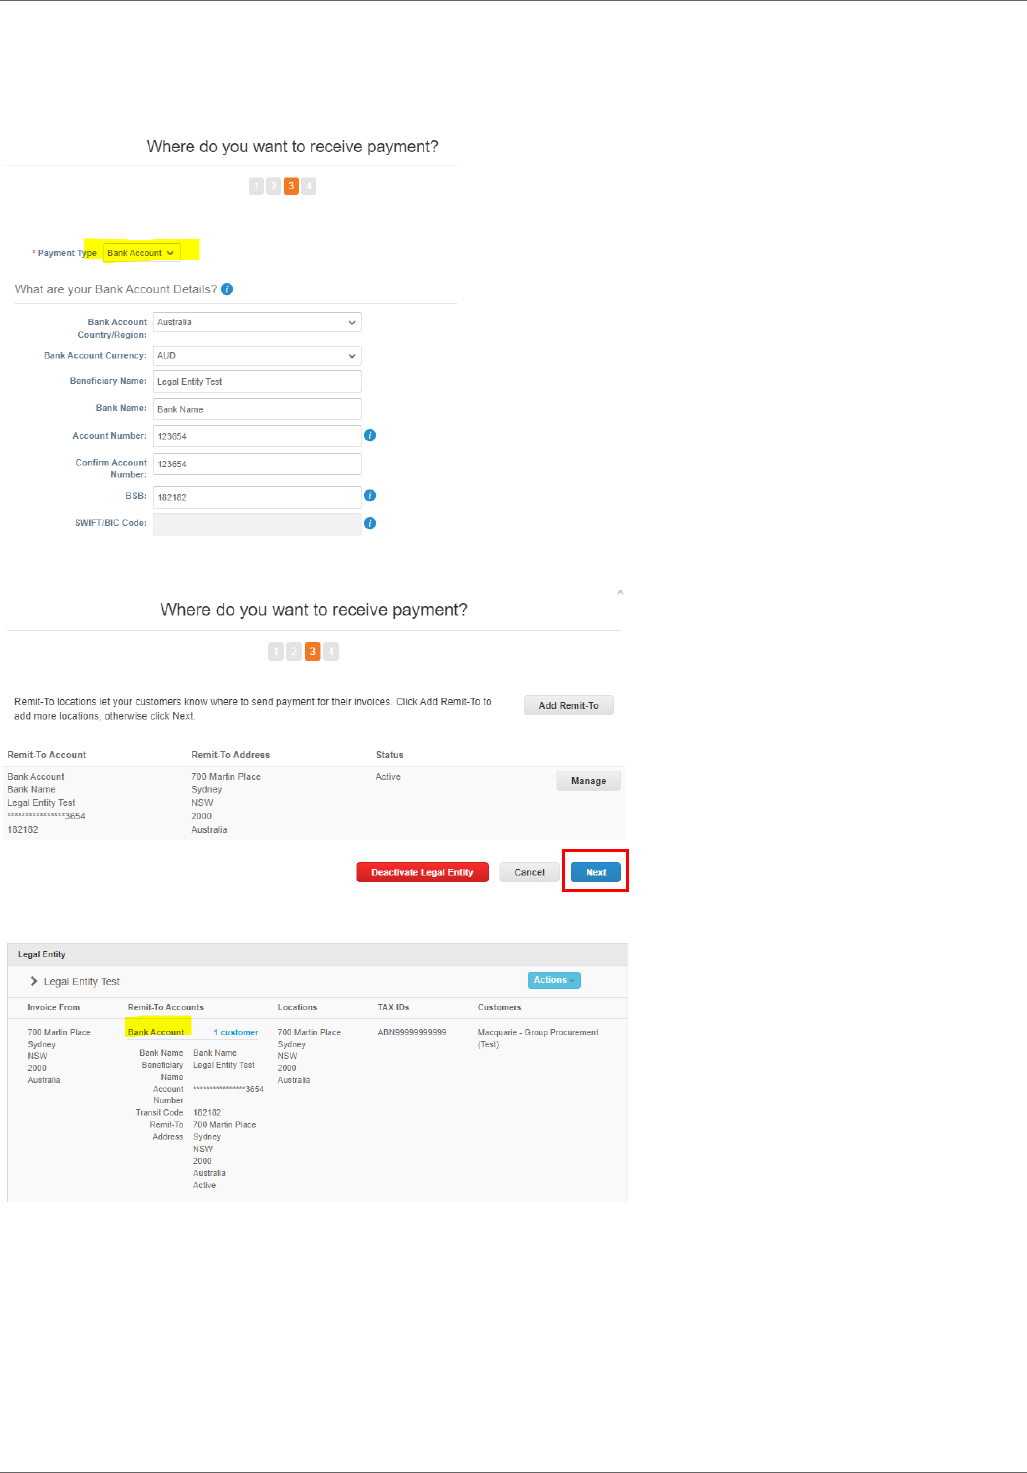
3. Complete the “Where do you want to receive payment?” form. IMPORTANT: Macquarie pays most suppliers
electronically. Please ensure you select Payment Type “Bank Account” and enter your bank account details. If
you do not provide these as part of your remit to then your invoice payment may be delayed.
4. Select “Next” and “Done” to complete your setup.
5. Once registration is complete, save the Coupa Supplier Portal link in your favourites.
If you haven’t received an email from us, please reach out to Macquarie Vendor Support
([email protected]) and let us know the email address of the user who will be submitting the invoices.
We will re-send an invite to the user.
Bank Account Changes
If you change bank accounts, please notify us via email to [email protected] and also make sure you
update your bank account in the Coupa Supplier Portal (refer Q8 in FAQs). You can access this by clicking on “Setup”
and then “Legal Entity”. We recommend you disable all bank accounts that you are no longer using.

For further assistance please contact Macquarie Vendor Support – vendor.support@macquarie.com 4
2. Submitting an invoice in the Coupa
Supplier Portal
Ensure you have been issued with a purchase order to invoice against. If you haven’t please reach out to your
business contact to raise this for you.
Submitting an invoice against a PO
After you have setup your Legal Entity and Remit to (including entering your bank account details) you may now
submit your invoice:
1. On the CSP Home Page, click “Orders” tab.
2. The Purchase Orders page will open where you can select customers to view POs sent by a specific customer (in
case you have more than 1 customers using Coupa).
3. Click the gold coins icon to start creating invoice against the desired PO (or red coins icon for Credit Note).
Complete the Create Invoice page
4. Most of the fields on the invoice should be automatically
populated based on values in Purchase Order. You will
need to enter the Invoice Number and Invoice Date.
Tip: Please check the Invoice Date field as it is defaulted to
today’s date.
5. Complete the mandatory fields and upload a valid PDF
Invoice copy in “Image Scan” field or in the
“Attachments” field.
Tip: Although in some countries it isn’t mandatory to
attach your PDF invoice copy, we recommend you do as it
often includes additional detail that will help approvers
have comfort in approving your invoice.
6. Attach supporting documents in the “Attachments”
section.

For further assistance please contact Macquarie Vendor Support – vendor.support@macquarie.com 5
Review/Update the section – ‘Invoice Lines’
7. Update the PO line values in section if it is a
partial invoice (eg if you are not invoicing for the
full PO amount). The price should be entered as
the amount excluding tax.
Tip: The Description field will be pre-populated
based on the purchase order details. If the invoice
relates to a period of time, it is advantageous to
reference the period in this field. For example,
submitting an invoice for consulting fees could be
“Jane Smith consulting fees March 2024”.
8. Select the tax rate for each Invoice line and
ensure the Gross Total matches with the invoice
copy attached in the Image Scan section by
clicking on “Calculate”.
Tip: Depending on the country you are invoicing
from, some suppliers may need to tick the box
“Line Level Taxation” which is found at the top of
the Invoice Lines section in order to enter different
tax rates for each line.
9. Click “Submit” (or “Save as draft” if you want to
complete at a later date)

For further assistance please contact Macquarie Vendor Support – vendor.support@macquarie.com 6
3. Frequently Asked Questions
Q1. Can I add multiple users to the Coupa Supplier Portal (CSP)?
Yes – you can add multiple users to your company profile. When you log into the CSP, you will see the Setup tab on
the top right-hand side of the page. Here you will have access to User information. To add additional users, simply
click “Invite User” and enter your colleague’s name and email address. They will then receive an email asking them to
register and will have to click on the link and add their details. They may have to log back into Coupa to begin viewing
Macquarie as a customer.
Q2. Can I submit an invoice without a Macquarie PO?
No, to ensure invoices have the relevant pre-approvals all invoices being submitted in the CSP to be backed by a PO.
The use of our PO is part of what helps speed up our payment to you.
Q3. How can I check the status of my invoices?
Review the status of each invoice you have submitted using Coupa in the ‘Invoices’ section by clicking on ‘Invoices’
tab. This page will list each of your invoice with a real time status.
For paid invoices, payment details can be viewed by opening the invoice.
Q4. Do I need to attach my PDF invoice or any additional supporting documents to
support my invoice?
Yes. In most countries, the fields you are entering into Coupa become the tax compliant invoice and the PDF invoice
is not mandatory, however, attaching your PDF invoice and any supporting documentation often makes the approval
process easier and quicker.
You may also use the comments section at the bottom of the invoice to explain anything or reference attachments.
Q5. Do I need to register for two factor authentication
Coupa offers users the chance to set up their dual authentication when they log into the Coupa Supplier Portal. This
is provided by Coupa as an added layer of security and to help prevent fraud. If you do not authenticate when you
log into the portal, then you may be asked to authenticate before you are able to edit a remit-to.
There are many different authenticator apps available but if you haven’t setup then you could download the “Google
Authenticator” as one option. Alternatively you can provide your phone number to authenticate via SMS.
You should not be required to pay for any authenticator apps.
Click here for Coupa Support for two factor authentication (including if you do not have a mobile phone).
Q6. Can I submit Credit Notes in the Coupa Supplier Portal?
Yes. If your Purchase Order is still open (Issued status), please click on the Orders tab (at the top of screen) and the
red coins icon next to the PO to create your credit note. Please reference the original invoice number that you are
offsetting.

For further assistance please contact Macquarie Vendor Support – vendor.support@macquarie.com 7
If your Purchase Order is closed you may still create a credit note by clicking on Invoices Tab (at the top of the
screen) and clicking the “Create Credit Note” button. Select “Other”. Note that you will be required to select the
correct Macquarie “Customer Address” by clicking on the magnifying glass next to this field, so best to make sure
you know which Macquarie entity you are invoicing and search for that exact name otherwise your invoice may be
rejected. You will be able to see the Macquarie entity on your PO even if it is closed.
Q7. Can I add additional lines in my Invoice?
Yes. If your invoice includes some items with tax and some without, you will need to itemise these on your invoice. If
your PO was raised as an all inclusive amount, you will need to add these lines in your invoice:
1. Create your invoice as per normal against a PO.
2. Click on “Add line”
3. Ensure the “Type” matches line 1 of the invoice (Tip: most will be “Amount” based – if this field doesn’t match
line 1 you will not be able to pick the PO line)
4. Enter the Description, Price, and GST/Tax Rate.
5. Click on the magnifying glass under PO Line

For further assistance please contact Macquarie Vendor Support – vendor.support@macquarie.com 8
6. Choose the PO Number and Line.
Q8. How do I add a new bank account or correct my Remit-To setup if I forgot to
include bank details when registering?
Step 1: Log into the Coupa Supplier Portal (CSP)
Step 2: Click “Setup” in the top menu bar
Step 3: Click “Legal Entity Setup” in the left menu bar (note – at this stage you may be asked to authenticate –
refer FAQs).
Step 4: Review the existing Legal Entity setups. If you have several customers using Coupa, you may find that there
are multiple Entities with multiple Remit-To’s set up (which can go over several pages). Some may already
have the Bank Account information and some might just have a street address (like below in yellow). The
goal is to only have one active Legal Entity for the customer Macquarie - Group Procurement and it should
have the Bank Account.
a. Adding a New Legal Entity with a default Bank Account Remit-To Account
If you do not see a Remit-to already created which includes your Bank Account only it is best to add a completely
new Legal Entity and remove Macquarie customer from the previously added ones.
Step 1: Click on “Add Legal Entity”
Step 2: Complete the details “Where’s your business located? and click Continue.
Step 3: Complete the “Tell your customers about your organization” screen. Make sure that Macquarie – Group
Procurement customer is ticked.
For further assistance please contact Macquarie Vendor Support – vendor.support@macquarie.com 9
Step 4: Complete the “Where do you want to be paid” screen and ensure you choose the Payment Type “Bank
Account”:
Step 5: Review the setup and click “Next” and then “Done”
Step 6: Check – now in the Legal Entity screen you should see the newly added Bank Account remit-to:

For further assistance please contact Macquarie Vendor Support – vendor.support@macquarie.com 10
b. Remove Macquarie from other “Address” Remit-To Accounts
In order to simplify your invoicing process and prevent errors, we recommend removing the customer “Macquarie –
Group Procurement” from the other Legal Entity setups. This will also make submitting invoices to Macquarie
quicker as you won’t need to manually select which remit-to you wish to include on the invoice.
Step 1: Click on the Blue “Actions” button and “Manage Legal Entity”
Step 2: On the “Miscellaneous” screen click “Continue”
Step 3: On the “Tell your customers about your Organisation” screen, untick the Macquarie - Group Procurement
customer, then click Continue, Next and Done:
Step 4: Review - Macquarie is no longer listed in the Customers column:

For further assistance please contact Macquarie Vendor Support – vendor.support@macquarie.com 11
c. How will I know if I have set it up correctly?
When you submit your next invoice, the Create Invoice screen should automatically populate with the Remit-To
address (as long as you only have one Remit-To active) and you will see the bank details displayed (circled below).
Here is an example of a correctly configured remit-to in the invoice screen.
Q9. Guides in other languages
Please refer to the Coupa User guides.
Q10. Coupa Video Training
Getting started with CSP – Video Training
