
How to Find the
Switches IP address
M u l t i p l e w a y s t o F i n d t h e
I P a d d r e s s o f t h e s w i t c h .
1

This guide will go over how to find the IP address of the M4300 & M4250 and how to access the web interface of the switch.
There are multiple ways to find the IP address:
• VLAN 1 of the switch is configured by default to receive DHCP.
• Check the DHCP server to find the new lease from the switch.
• VLAN 1 default IP address.
• VLAN 1 is configured by default to receive DHCP, but after 120 seconds it will default to an IP address of “169.254.100.100.”
• For this method, you will need to make sure that there is no DHCP server connected to the switch.
• You will need to configure your computer with an IP address that is in the “169.254.X.X” subnet.
• Console port will allow you to access the CLI of the switch and allow you to view the IP address that VLAN 1 received.
• This will require you to install the USB console drivers on your computer.
• Using the “OOB” port on the device to access the interface using the default address for the management port.
• This will require you to configure a static address on your computer to access the interface.
• The default address for the OOB port is 192.168.0.239 with a subnet mask of 255.255.255.0.
NOTE: the OOB port will request an address via DHCP, if it does not receive an address within 120 seconds it will default to the 192.168.0.239/24.
We are going to go through each of these methods.
M4300 & M4250 How to access the web interface of my switch
Checking the DHCP Server for the address.
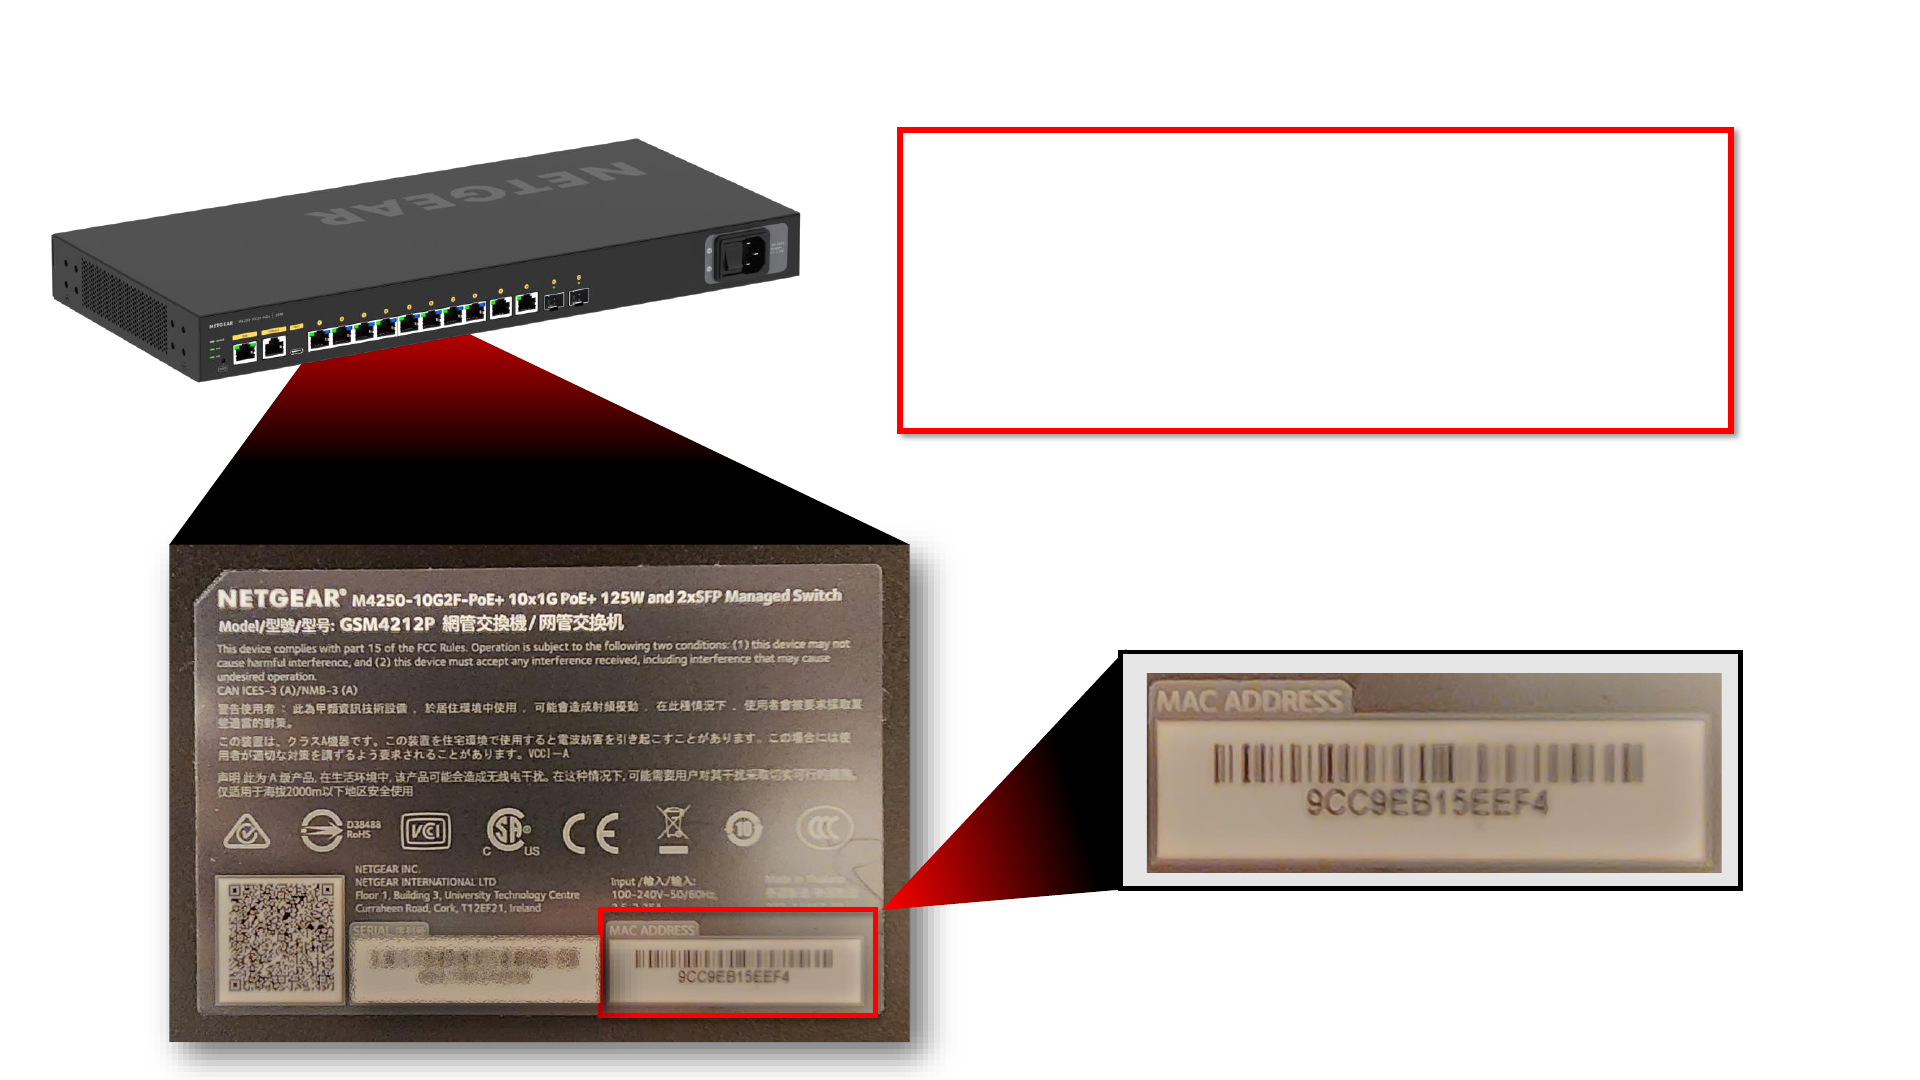
On the bottom of the switch there is a sticker that contains the serial number and the
MAC address of the switch.
We will need the MAC address of the switch to find the DHCP lease.
We will then need to login to our DHCP server and look at the DHCP leases to find the
MAC address of the switch.
For this example, our DHCP is a pfSense firewall.

Click on the “Status” drop-down, then select “DHCP Leases.”

The MAC address on the sticker on the back of the switch will show you the “Base MAC Address.”
This address will differ slightly from the VLAN interface MAC address.
All routable VLANs on the switch will have the same address.
Here we can see the IP address for our switch is “192.168.77.101.”

Open a browser and type in the IP address of the switch.
This will take you to the web interface of the switch.
Login using the “AV UI Login.”
If you do not see the “AV UI Login,” you may need to update the firmware on the device.

Accessing the switch interface using VLAN 1’s default IP address
The default management VLAN (VLAN 1) will request a DHCP address, after 120 seconds, it will default to an address of
“169.254.100.100” with a subnet mask of “255.255.0.0.”
To access the switch, you will need to configure a static IP address on your computer that is on the “169.254.X.X” subnet.
If the switch has been rebooted recently, you will have to wait for VLAN 1 to go into the default address.
Connect to a port on the switch
using an Ethernet cable.

We will first need to configure a static address on the computer to be able to reach the switch.
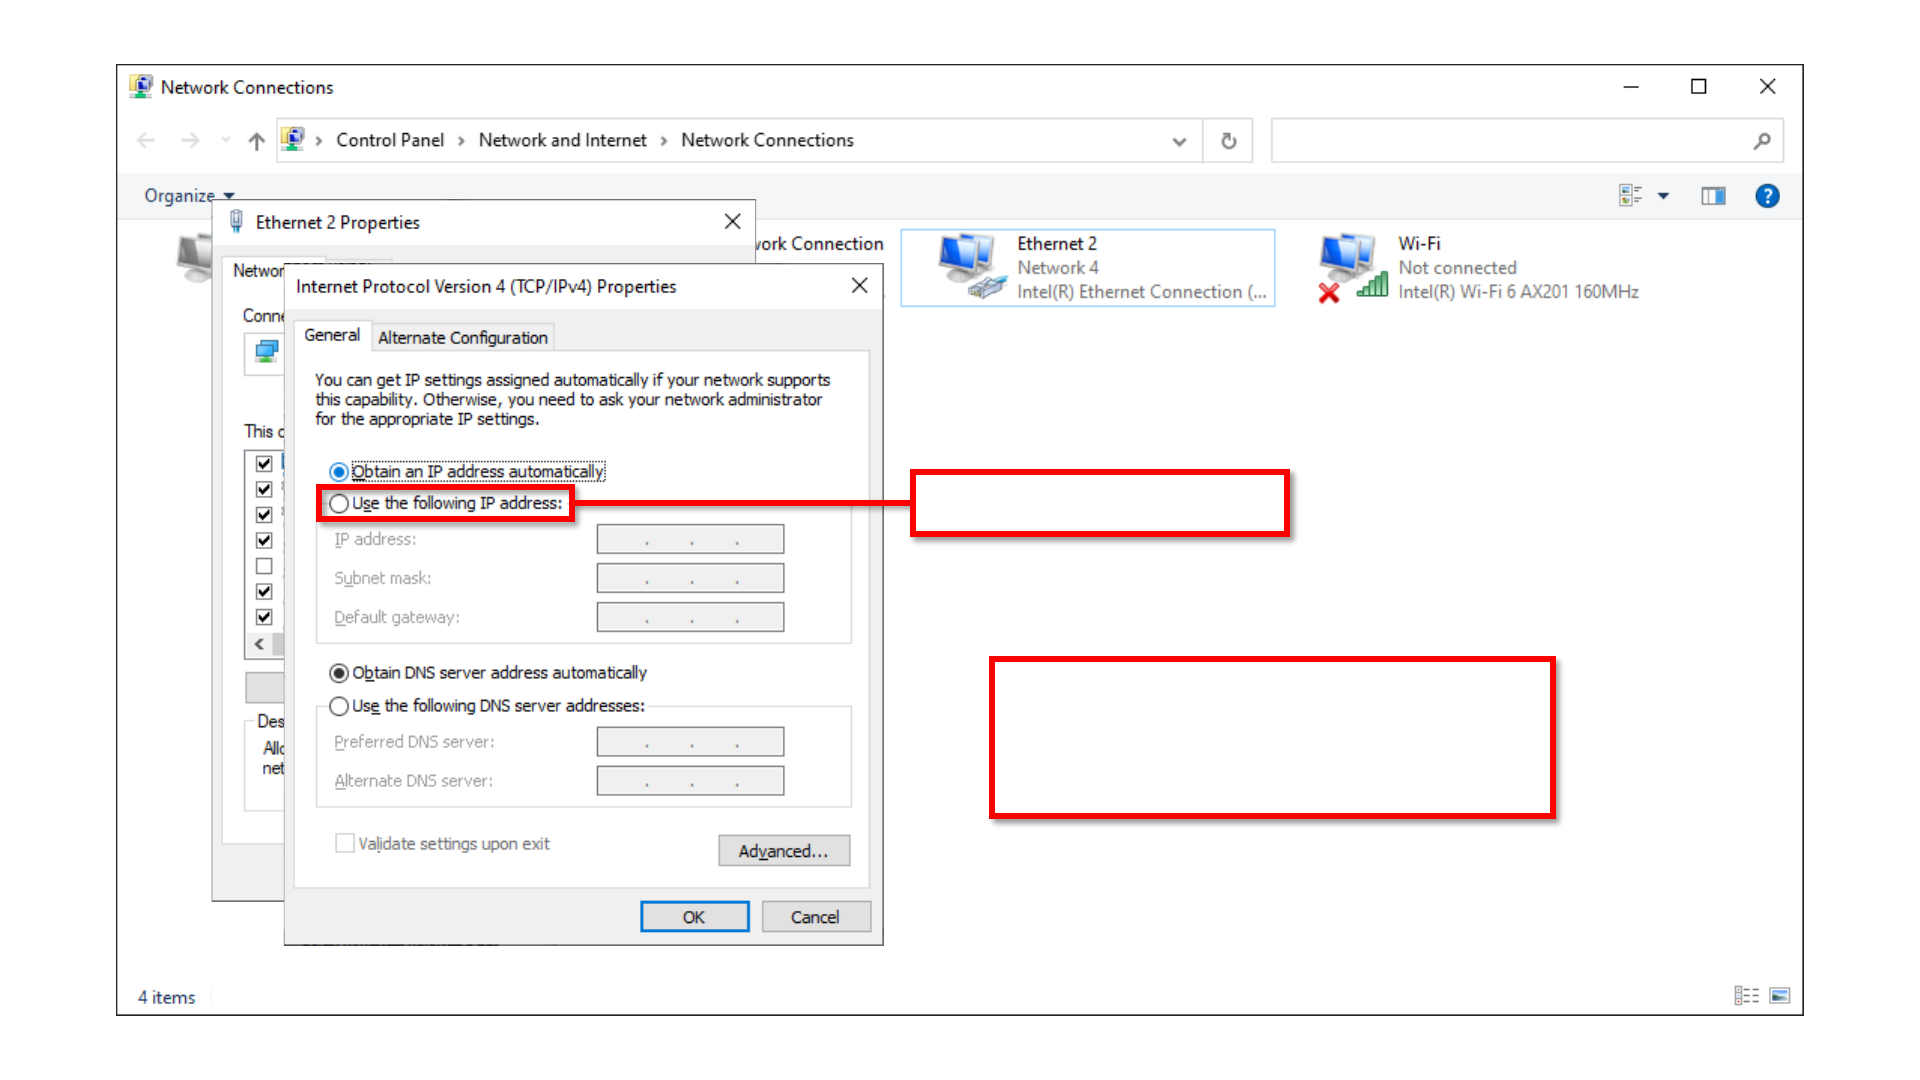
Click on the search icon and search for “network connections.”

Right-click on your ethernet adapter and go to “Properties.”

Double-click on “Internet Protocol Version 4 (TCP/IPv4)

Select “Use the following IP address:”
Once you connect back to the main network, you will need
to configure your computer back to DHCP.
You will do this by following the same steps we just went
through and selecting “Obtain IP address automatically.”

Click on “OK.”
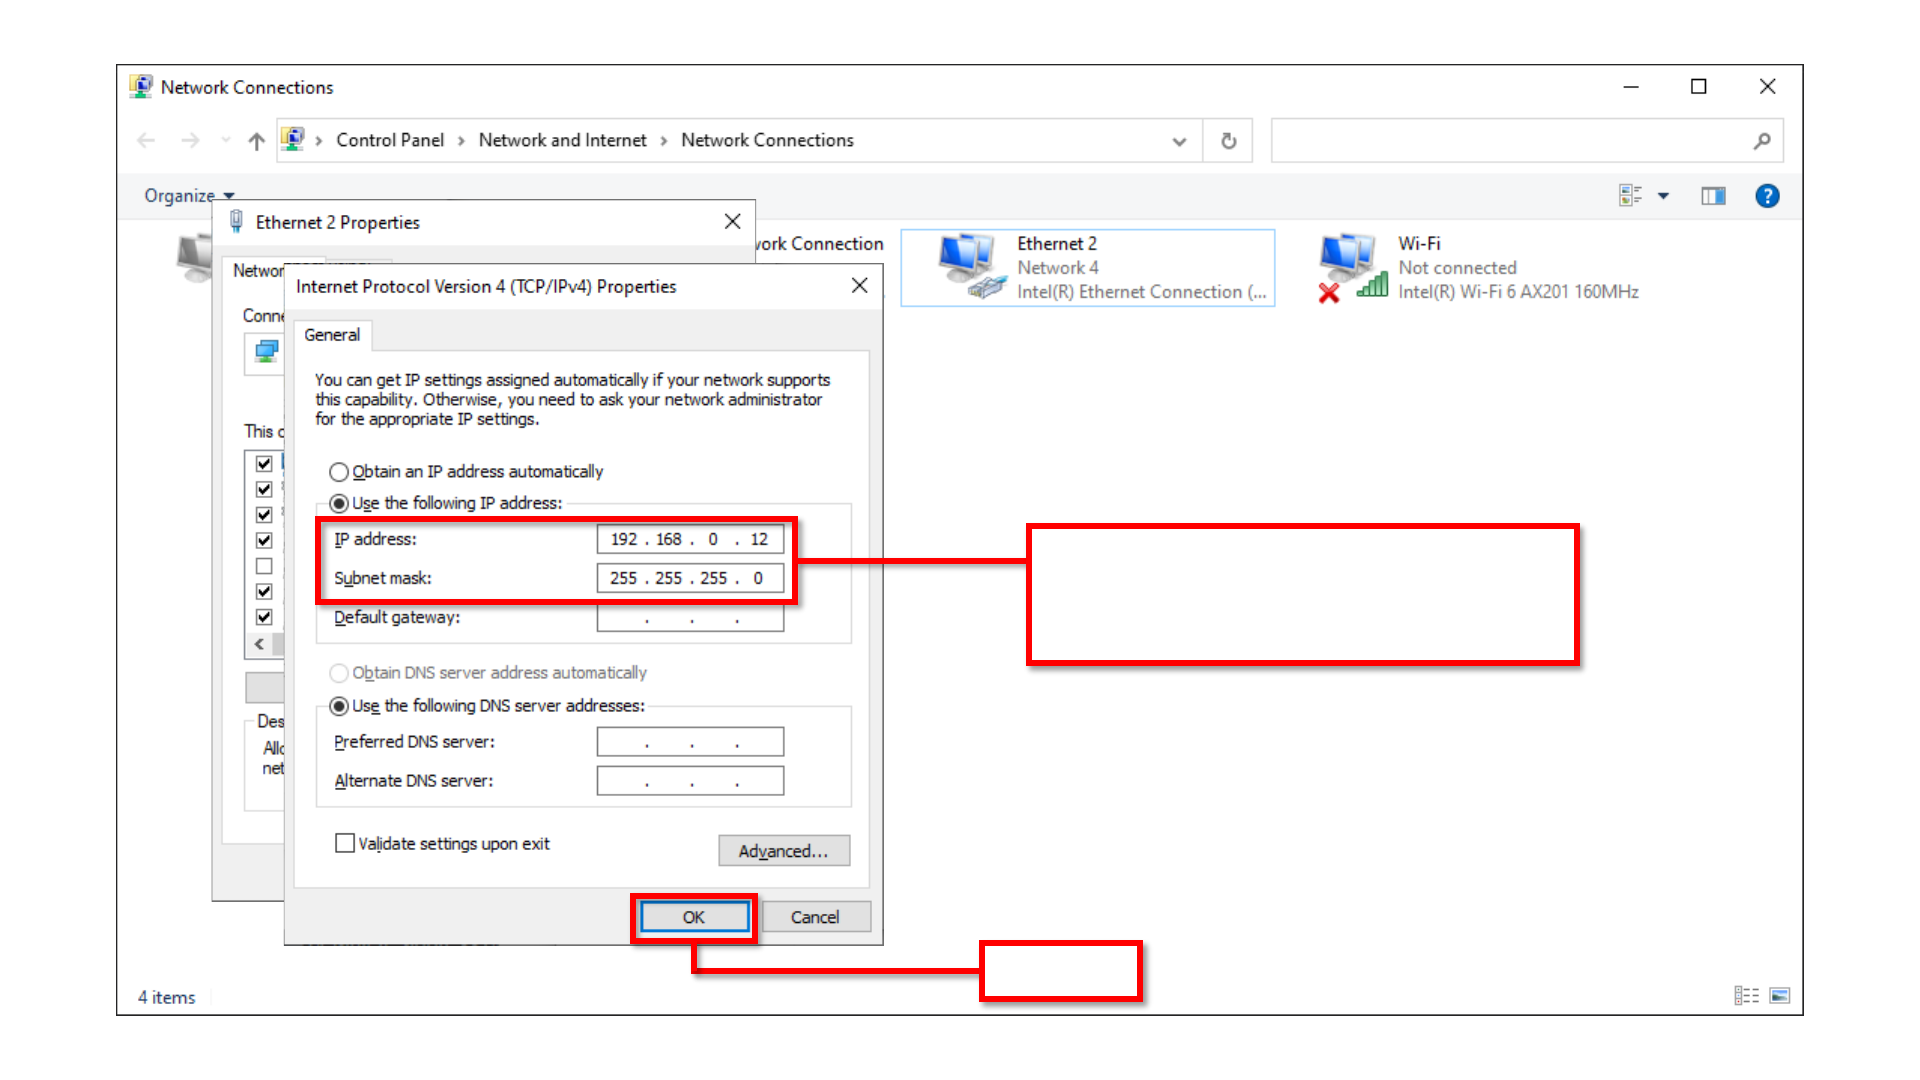
We are going to use “169.254.100.12” for the IP address
and “255.255.0.0” for the subnet mask.
We do not have to configure the default gateway or DNS.

Click on “OK.”

Open a browser and type in the default IP address of VLAN 1 “169.254.100.100.”
This will take you to the web interface of the switch.
Login using the “AV UI Login.”
The default login is “admin” with no password.
If you do not see the “AV UI Login,” you may need to update the firmware on the device.

Accessing the switch interface using the OOB port
The “Out of Band” port is an isolated port on the switch that allows you to access the switch by
connecting an ethernet cable directly to this port.
This port can receive an address via DHCP, after 120 seconds it will revert to the default address.
This port will not provide you with a DHCP address, you will have to configure a static address on
your computer with a subnet of “192.168.0.0/24.”
The port will have a default address of “192.168.0.239/24.”
The “/24” means that the subnet mask will be “255.255.255.0.”
Connect to the OOB port on the
switch using an Ethernet cable.

We will first need to configure a static address on the computer to be able to reach the switch.
Click on the search icon and search for “network connections.”

Right-click on your ethernet adapter and go to “Properties.”

Double-click on “Internet Protocol Version 4 (TCP/IPv4)
Select “Use the following IP address:”
Once you connect back to the main network, you will need
to configure your computer back to DHCP.
You will do this by following the same steps we just went
through and selecting “Obtain IP address automatically.”
We are going to use “192.168.0.12” for the IP address
and “255.255.255.0” for the subnet mask.
We do not have to configure the default gateway or DNS.
Click on “OK.”

Click on “OK.”

Open a browser and type in the default IP address for the
OOB port “192.168.0.239.”
This will take you to the web interface of the switch.
Login using the “AV UI Login.”
The default login is “admin” with no password.
If you do not see the “AV UI Login,” you may need to update the firmware on the device.

The first time that you log into the switch you will have to
create an admin password.
Type in the new password and click on “Save.”

Login using the new password you created.

Scroll down.

Here we can see the “Management IP Address.” This is the address of VLAN 1, the default management VLAN.

You can then connect back to the main network and access
the switch using the IP address for VLAN 1.
NOTE: Don’t forget to switch your computer back to DHCP.
Login using the “AV UI Login.”
Accessing the switch interface using the OOB port using a DHCP server
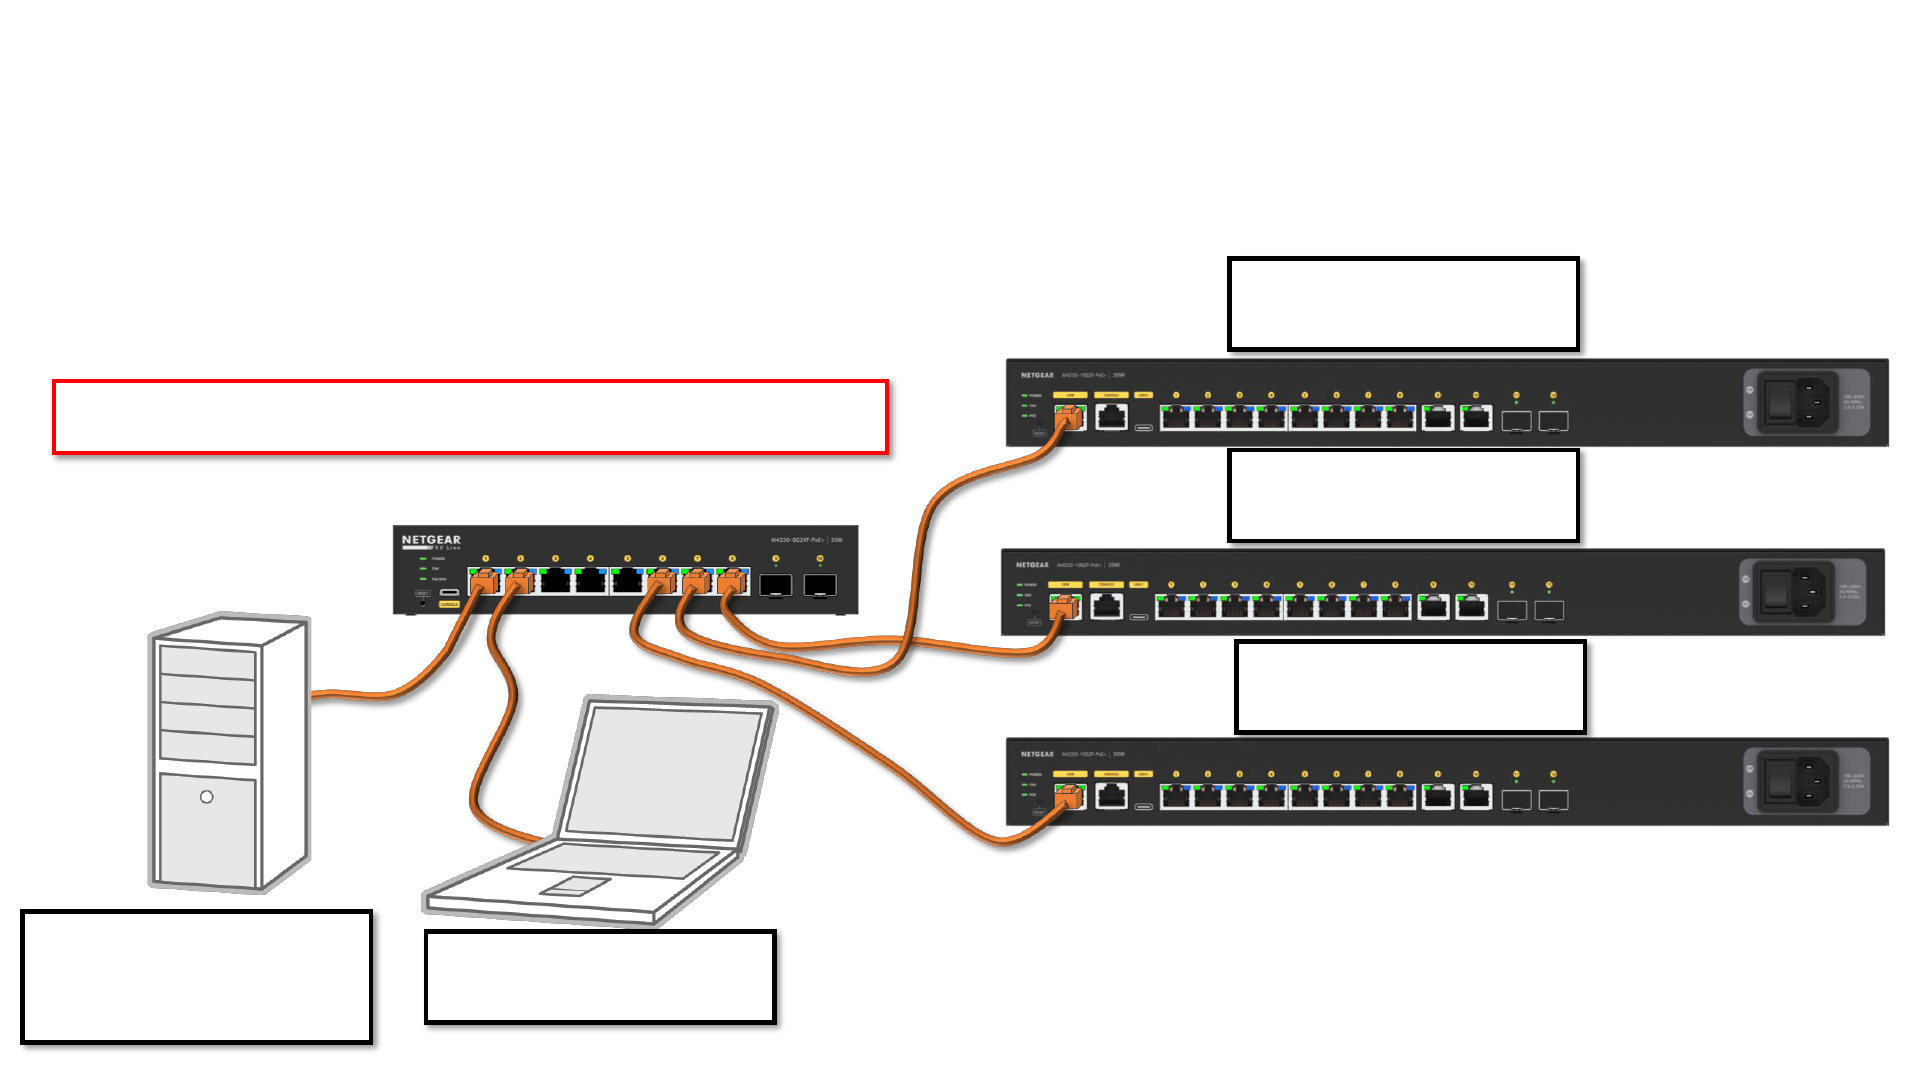
The “Out of Band” port can receive an address via DHCP by default.
To access the OOB port on a switch via DHCP, you will need to connect the OOB port to another
switch on a network that has a DHCP server.
The ports will all receive an address from the DHCP server, and you will have to check the DHCP
leases to view the address to access the switch.
DHCP Server
IP address: 192.168.100.5
Subnet Mask: 255.255.255.0
DHCP Pool: 192.168.100.100 - 200
Switch 1
IP address: 192.168.100.100
Subnet Mask: 255.255.255.0
Switch 2
IP address: 192.168.100.101
Subnet Mask: 255.255.255.0
Switch 3
IP address: 192.168.100.102
Subnet Mask: 255.255.255.0
Laptop
IP address: 192.168.100.103
Subnet Mask: 255.255.255.0
In this example we have the OOB ports for 3 switches connecting to a switch that has a
DHCP server and the laptop that we are using to access the switches.

Accessing the switch via console to find the IP address
To access the switch via console you will need the console cable, a USB-A to USB-C that comes in the box with your switch.
In order for your computer to recognize the USB
connection as a console connection, you will need to
install the drivers on your computer.
It is recommended to install the drivers first, and then
use the console cable to connect from the USB C port on
the switch to your computer

Open a browser and go to “netgear.com/support/” or “support.netgear.com.”
Type in “M4250” and go to the “M4250 – AV Line Managed Switches /M4250”
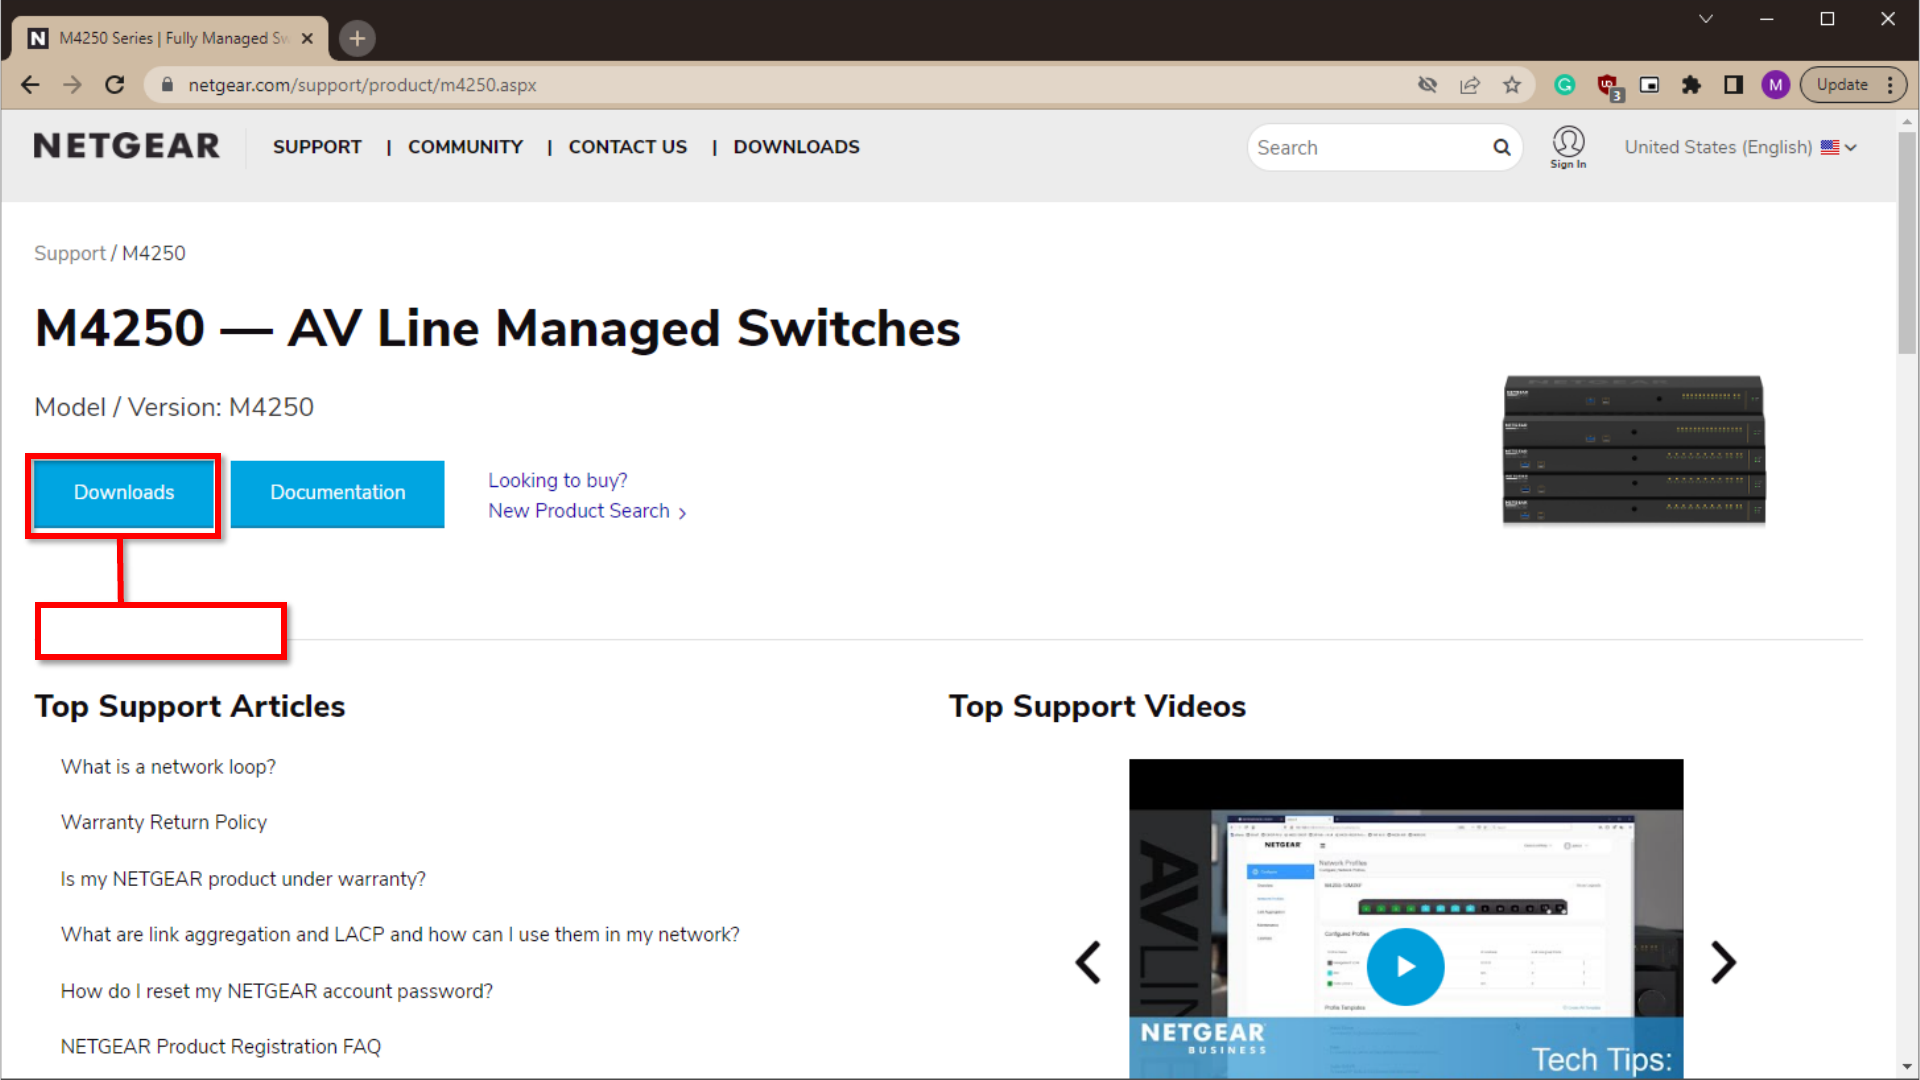
Click on “Downloads.”

Download the “USB Console Driver.”

Right click on the zip file for the console drivers and go to “Extract All…”

Click on “Extract.”

Open the “NetGearUSBConsoleDriver” folder.

Open the folder for the for your operating system.
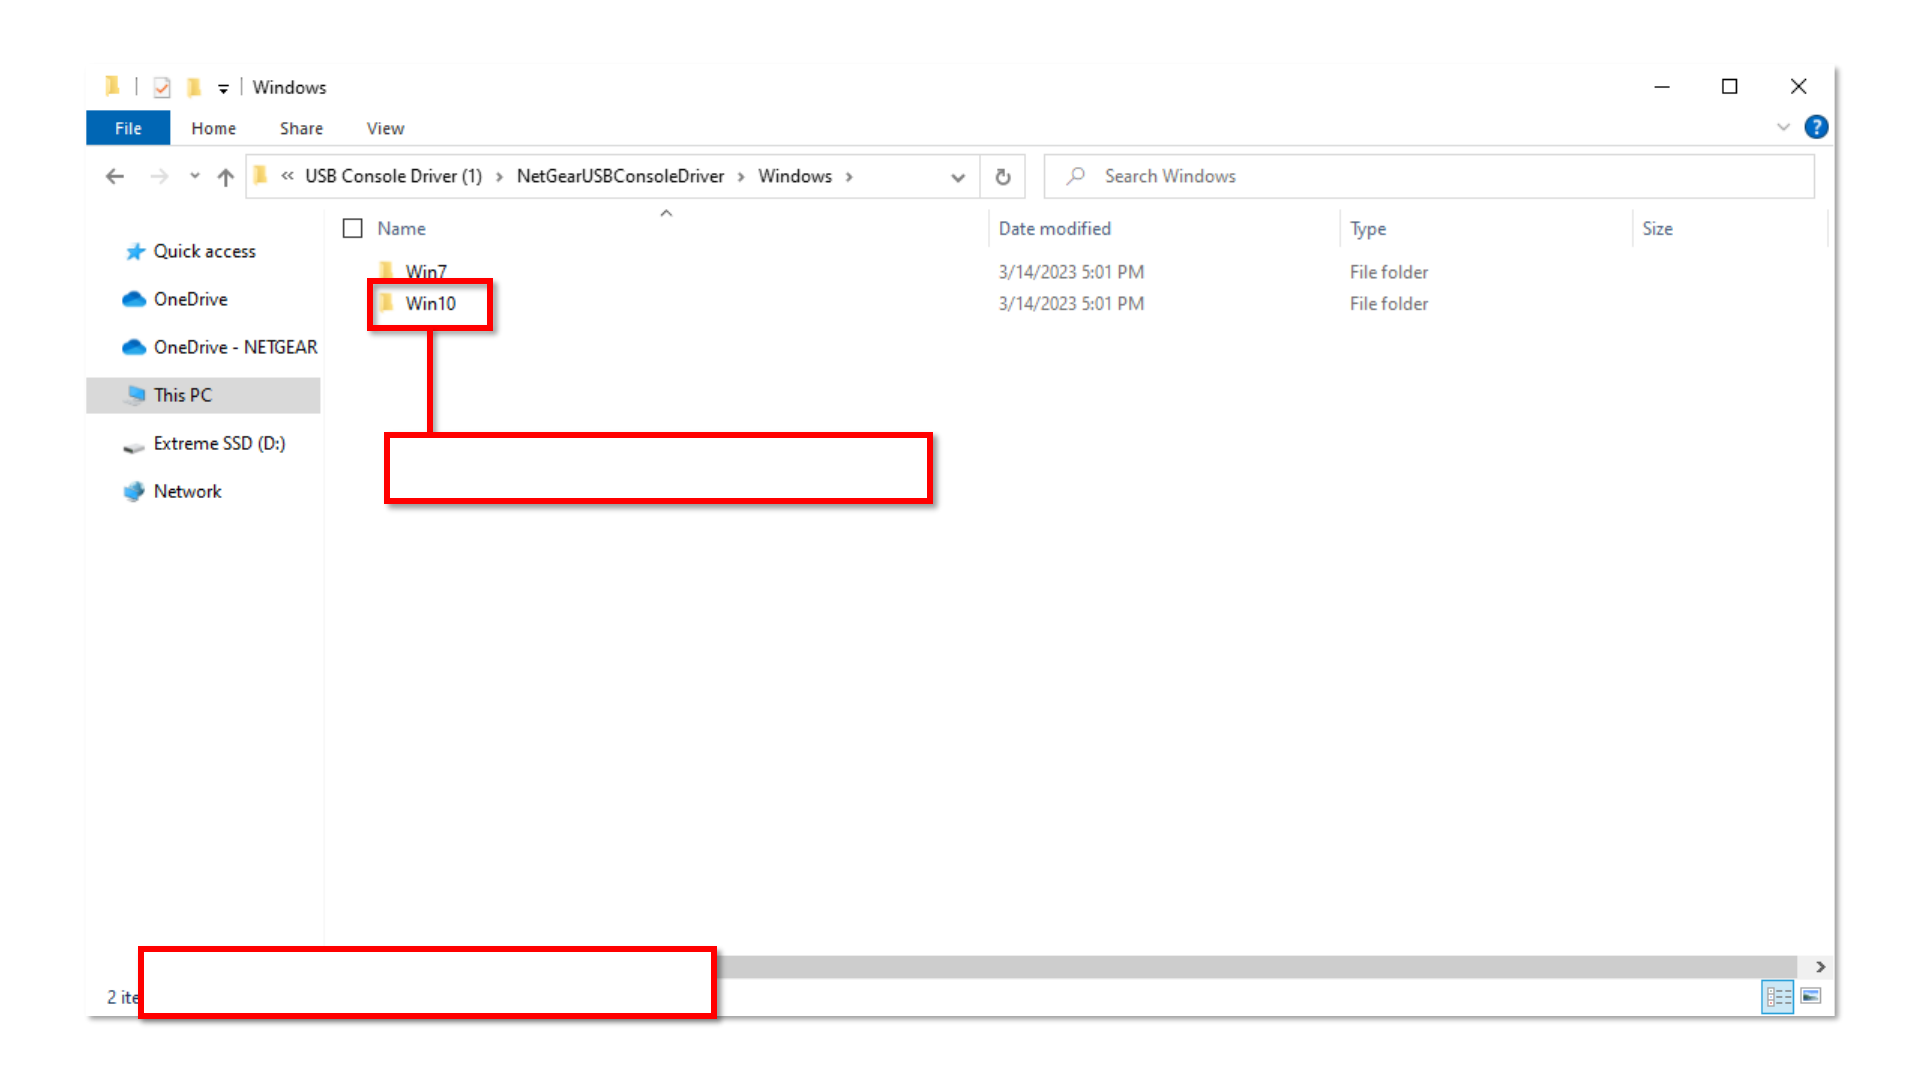
Open the folder for the version of your operating system.
NOTE: if you are using Windows 11 run the ”Win 10” file.
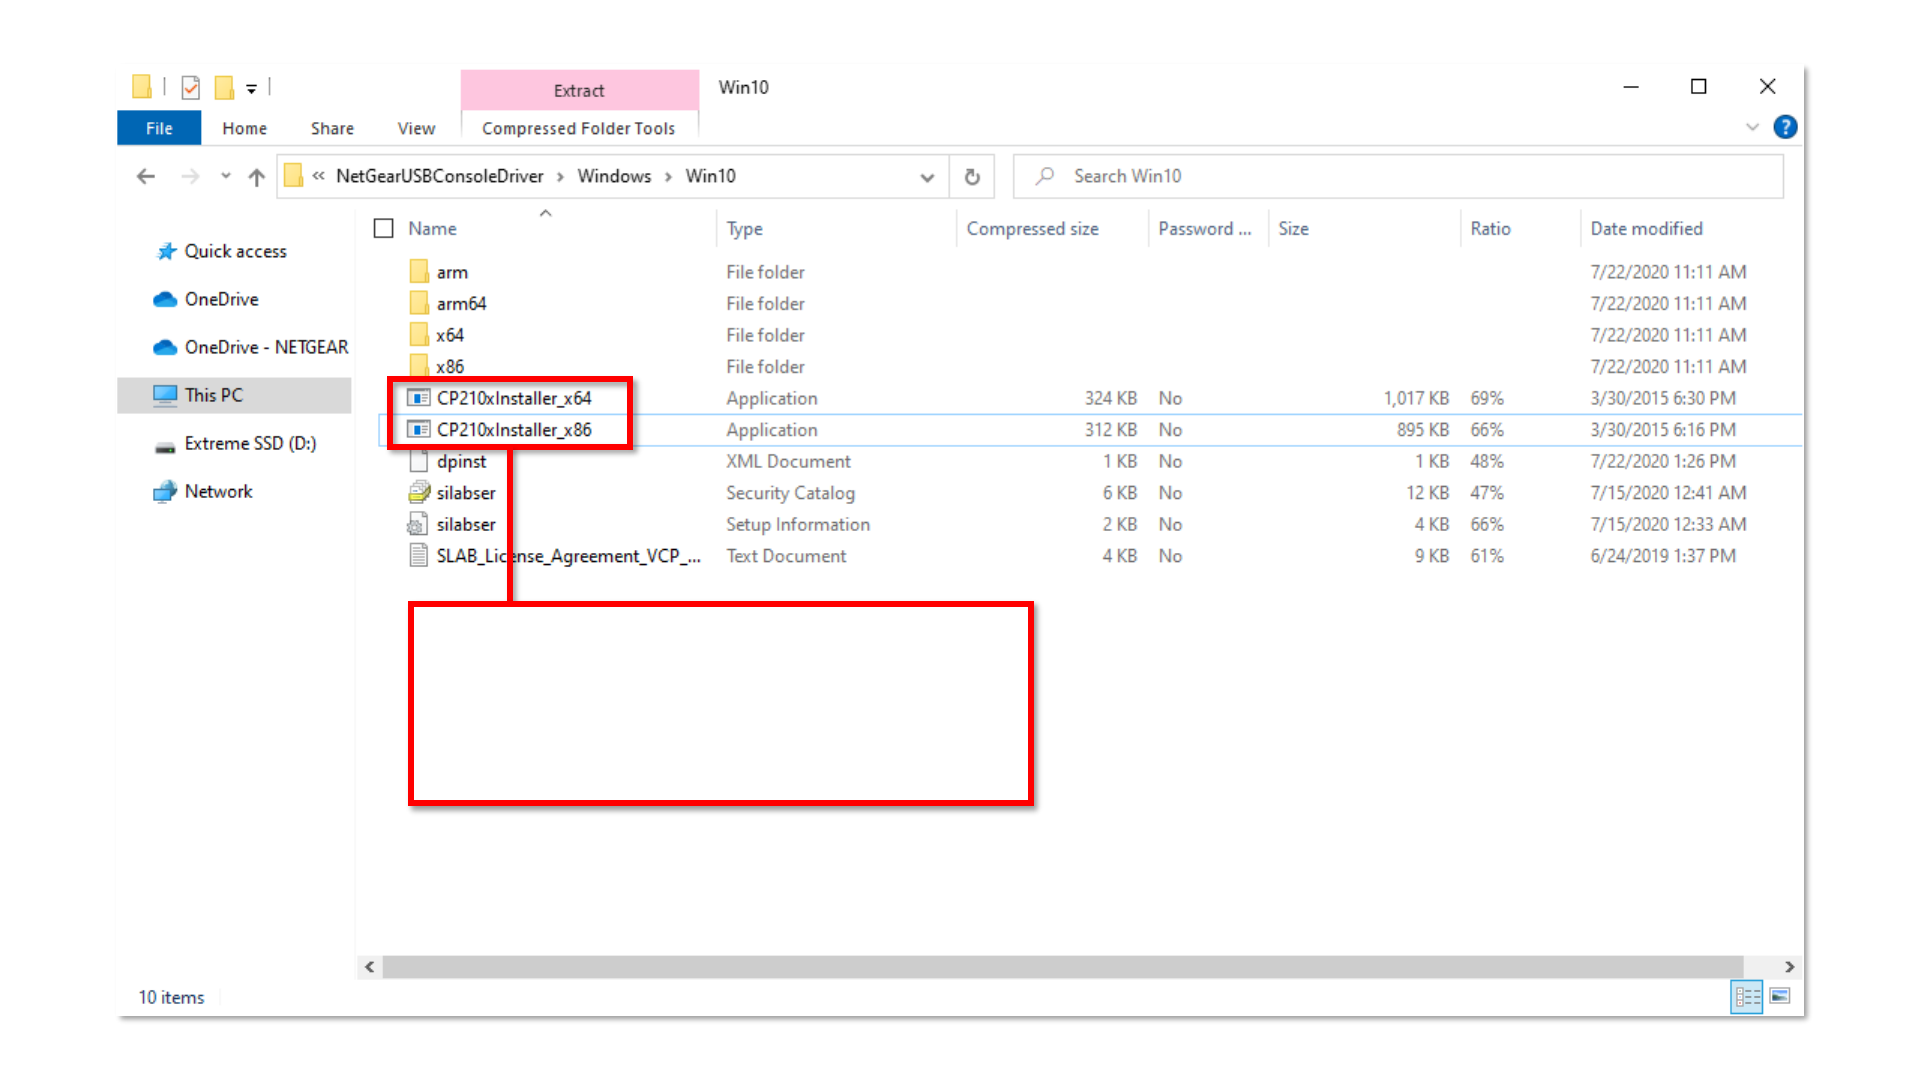
Run the application for your system type.
CP210xInstaller_x86 if you are running a 32-bit operating system.
CP210xInstaller_x64 if you are running a 64-bit operating system.
This will install the USB console drivers.

Once the drivers are installed connect the USB cable from the console port on the switch to your computer.
We will be using “Tera Term” to connect to the switch.

Select the “Serial” connection type.
Select the USB “COM” connection.

Click on “OK.”

Go to “Setup” from the menu at the top and click on “Serial Port…”

Change the “Speed” to “115200.”
After setting the “Speed,” click on “New setting.”

After changing the speed, the screen may remain blank, just press “Enter” and you will see the “User:” prompt.
Login with the user “admin” and no password.
You will be prompted to enter and verify the new password.

Login using the user “admin” and the new password that you created.
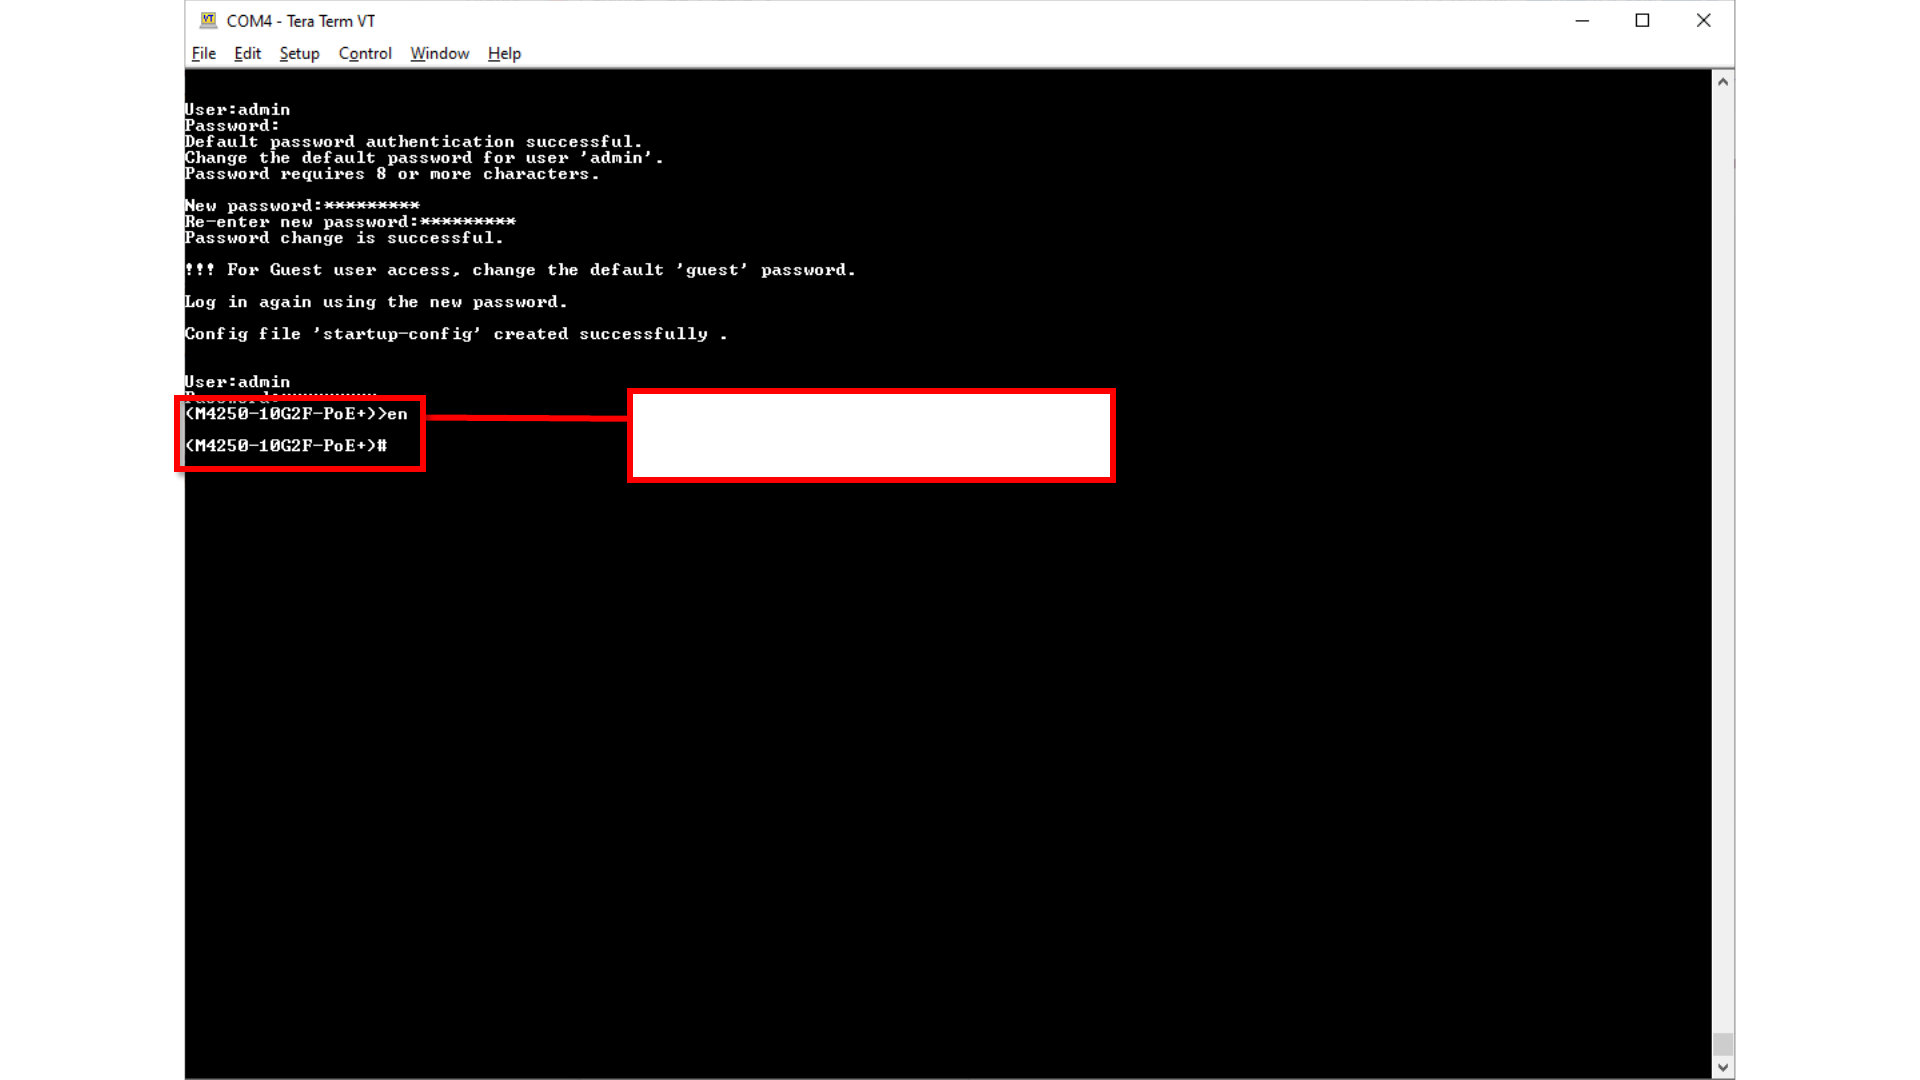
Type in “en” or “enable” to access enable mode.
You will then see the “#” on the prompt.

Type in the command “show ip vlan” and press “Enter.”

Here we can see the IP address that our management VLAN (VLAN 1) received via DCHP.
We can now open a browser and go to this IP address to access the switches web UI.
You can also use the command: show ip management

Open a browser and type in the IP address of the switch.
This will take you to the web interface of the switch.
Login using the “AV UI Login.”
If you do not see the “AV UI Login,” you may need to update the firmware on the device.

If you are using “PuTTY,” you will need to manually type in the USB console “COM” port number.
You can find this information by opening “Device Manager.”

Under “Ports (COM & LPT)” we will see the
“COM” number for your USB connection.
Select “Serial” for the “Connection type.”
Type in the USB “COM” port and change the
“Speed” to “115200.”
You can then click on “Open” and follow
the commands that we went over.

End
