
Olympus
CAMEDIA Master 1.2
User Guide
Image Management
Software User Manual
for
Olympus Digital Cameras
Olympus Optical Co., Ltd.

i
Notices
1998-1999 OLYMPUS OPTICAL Co., LTD. All rights reserved. Copyright © Image Software, Inc. Windows ® is a
registered trademark of Microsoft Corporation in the U.S.A. and other countries. QuickTime™ and the QuickTime
Logo are trademarks of Apple Computer Inc. and Macintosh ® is a registered trademark of Apple Computer Inc. in the
U.S.A. and other countries.
The company names and product names herein are trademarks or registered trademarks of the companies.
The Contents of this software and manual may be modified for the purpose of technical improvements to the products
and so forth without prior notice.

Olympus CAMEDIA Master 1.2 User Guide
ii
Table of Contents
1. WELCOME......................................................................................................................................... 1
1.1 W
HAT IS CAMEDIA MASTER? ........................................................................................................ 1
2. HOW TO USE THIS MANUAL........................................................................................................1
2.1 D
IFFERENCES BETWEEN MICROSOFT WINDOWS AND MACINTOSH SYSTEMS.................................... 1
2.2 C
ONVENTIONS FOR DOCUMENTING PLATFORM SUPPORT ................................................................. 2
2.3 W
HERE TO LOOK FOR HELP .............................................................................................................. 2
3. CAMERA SUPPORT ......................................................................................................................... 2
3.1 S
UPPORTED CAMERA FUNCTIONS ..................................................................................................... 2
3.2 C
AMERA SETTINGS............................................................................................................................ 3
4. GETTING STARTED......................................................................................................................... 3
4.1 C
ONNECTING A CAMERA................................................................................................................... 3
4.2 S
TARTING CAMEDIA MASTER........................................................................................................ 3
4.2.1 Starting Applications on Microsoft Windows or NT Systems................................................... 3
4.2.2 Starting Applications on Macintosh Systems........................................................................... 4
5. USING CAMEDIA MASTER............................................................................................................ 5
5.1 G
ETTING TO KNOW CAMEDIA MASTER ......................................................................................... 5
5.1.1 Primary Modes of Operation................................................................................................... 5
5.1.2 Main Menu Bar....................................................................................................................... 6
5.1.3 Toolbar.................................................................................................................................... 7
5.1.4 Control Windows..................................................................................................................... 8
5.1.5 Status Bar.............................................................................................................................. 11
5.2 S
ETTING UP THE APPLICATION ENVIRONMENT ............................................................................... 12
5.2.1 Setting Display Preferences .................................................................................................. 12
5.2.2 Setting Details View Preferences .......................................................................................... 13
5.2.3 Setting Communications and Download Preferences............................................................ 14
5.2.4 Setting Wallpaper Preferences..............................................................................................15
5.2.5 Setting Slide Show Preferences .............................................................................................16
5.2.6 Setting JPEG Compression Level.......................................................................................... 17
5.2.7 Setting Magic Wand Preferences .......................................................................................... 17
5.2.8 Setting Index View Window Preferences............................................................................... 18
5.3 A
CCESSING AND SAVING IMAGE FILES............................................................................................ 19
5.3.1 Accessing and Saving Images From a Camera ..................................................................... 19
5.3.2 Accessing and Saving Images From Disk.............................................................................. 19
5.4 V
IEWING QUICKTIME™ MOVIES.................................................................................................... 20
5.5 V
IEWING IMAGES AS A SLIDE SHOW ............................................................................................... 20
5.6 C
REATING A DESKTOP BACKGROUND............................................................................................. 20
5.7 W
ORKING WITH IMAGE FILES.......................................................................................................... 21
5.7.1 File Properties ...................................................................................................................... 21
5.7.2 Refreshing the Index View Window....................................................................................... 23
5.7.3 Naming & Renaming Image Files......................................................................................... 23
5.7.4 Copying Image Files ............................................................................................................. 24
5.7.5 Moving Image Files............................................................................................................... 25
5.7.6 Sorting Image Files in Index View ........................................................................................ 25
5.7.7 Finding Image Files.............................................................................................................. 25
5.7.8 Uploading Image Files from Disk to Camera - Selected Camera Models............................. 25
5.7.9 Using Batch Functions.......................................................................................................... 26
Olympus CAMEDIA Master 1.2 User Guide
iii
5.7.10 Protecting Camera Files From Deletion............................................................................... 26
5.8 M
ANIPULATING IMAGES (STILL IMAGES ONLY).............................................................................. 27
5.8.1 Enlarging and Reducing the Image View .............................................................................. 27
5.8.2 Scrolling Enlarged Images.................................................................................................... 27
5.8.3 Rotating Images .................................................................................................................... 27
5.8.4 Flipping Images .................................................................................................................... 28
5.8.5 Enhancing Image Quality...................................................................................................... 28
5.8.6 Selecting Areas in an Image.................................................................................................. 29
5.8.7 Selecting Color Regions in an Image .................................................................................... 29
5.8.8 Using Filters ......................................................................................................................... 30
5.8.9 Using Recent Filters.............................................................................................................. 31
5.8.10 Removing “Red-Eye” from Flash Pictures ........................................................................... 31
5.8.11 Adding Text to an Image ....................................................................................................... 33
5.8.12 Changing the Size of Images ................................................................................................. 34
5.8.13 Changing the Color Depth of Images.................................................................................... 34
5.8.14 Changing the Image File Type ..............................................................................................35
5.8.15 Using Image Templates......................................................................................................... 36
5.8.16 Creating Panoramic Images.................................................................................................. 38
5.8.17 Correcting Distortion in an Image........................................................................................ 40
5.9 C
HANGING CAMERA SETTINGS ....................................................................................................... 42
5.9.1 Setting Camera ID & Internal Watch.................................................................................... 42
5.9.2 Setting LCD Display Preferences.......................................................................................... 42
5.9.3 Setting Power Save Preferences............................................................................................ 43
5.9.4 Setting Camera Image Quality - Selected Camera Models ................................................... 43
5.10 U
SING IMAGES IN OTHER APPLICATIONS................................................................................... 43
5.11 P
RINTING IMAGES AND LAYOUTS.............................................................................................. 43
5.11.1 Printing Options.................................................................................................................... 44
5.11.2 Setting Print Setup................................................................................................................. 44
5.11.3 Printing a Single Image......................................................................................................... 45
5.11.4 Printing an Index View.......................................................................................................... 45
5.11.5 Printing Layout Pages........................................................................................................... 46
6. TECHNICAL SUPPORT OPTIONS .............................................................................................. 47
6.1 O
LYMPUS SUPPORT FOR JAPAN....................................................................................................... 47
6.2 O
LYMPUS SUPPORT FOR THE UNITED STATES................................................................................. 47
6.3 O
LYMPUS SUPPORT FOR CANADA ................................................................................................... 47
6.4 O
LYMPUS SUPPORT FOR EUROPE .................................................................................................... 47
7. APPENDIX A: DIFFERENCES BETWEEN WINDOWS AND MACINTOSH OPERATING
SYSTEMS.................................................................................................................................................... 48
8. APPENDIX B: SUPPORTED CAMERA FUNCTION TABLES................................................. 49
9. APPENDIX C: SUPPORTED FILE FORMATS........................................................................... 50
10. APPENDIX D: FUNCTION MODE REFERENCE TABLE........................................................ 51

Olympus CAMEDIA Master 1.2 User Guide
1
1. Welcome
1.1 What is CAMEDIA Master?
Olympus CAMEDIA Master 1.2 is an image editing and image management application for
Olympus digital cameras. CAMEDIA Master is a full-featured application offering a complete
imaging editing and image management environment to compliment Olympus digital cameras.
CAMEDIA Master is an essential component of Olympus digital camera systems. It is required
to download images and movies from the camera, to index and save images to disk, and to edit
images for use with various output devices such as printers and monitors. It also enables the
digital photographer to perform a variety of sophisticated image modifications such as changing
resolution, changing color space, changing file type, adding text, and changing the appearance of
images.
2. How to Use this Manual
2.1 Differences between Microsoft Windows and Macintosh
Systems
CAMEDIA Master image editing and image management software can be installed on computers
using either Microsoft Windows or on Macintosh operating systems. Most reference and
illustrations will be presented as they appear in the Microsoft Windows operating environment.
Although both operating systems generally perform the same functions, some operations or
menu items may be uniquely different on the Macintosh platform. This manual assumes
familiarity with basic operation for the system in use. If this is not the case, consult the
appropriate system operation manual before proceeding.
Some of the significant differences are:
• The appearance of control windows
• Mouse operation and Drag-and-Drop functions
• File Open & Save Dialogs
• File Conversion & Format Options
• The appearance and behavior of windows on the desktop
• Command-Key combinations
• Color palettes
• Printer Dialogs
• The Wallpaper feature is not supported on Macintosh
On Microsoft Windows systems, the right mouse button will invoke option menus for the
selected feature or function. See Appendix A: Differences between Windows and Macintosh

Olympus CAMEDIA Master 1.2 User Guide
2
Operating Systems for a complete list of supported application features and functions on
Microsoft Windows and Macintosh operating systems.
2.2 Conventions for Documenting Platform Support
Wherever a feature, function, or operation is presented that is uniquely different when performed
on a Macintosh, it will be noted as follows:
Feature Name (Macintosh)
Key differences in the user interface for the “Macintosh Version” will be shown in addition to
the Microsoft Windows version.
Features that are only available on Microsoft Windows systems will be noted as follows:
Feature Name (Microsoft Windows)
See Appendix A: Differences between Windows and Macintosh Operating Systems for a
complete listing of supported features and functions.
2.3 Where to Look for Help
This User Guide contains all of the essential user and help reference information for CAMEDIA
Master Software. This document is available to Olympus camera users in the following formats:
• A printable text file or Adobe Portable Document Format (PDF) file for all supported
platforms.
• Online Help for Windows is installed with the Microsoft Windows version of CAMEDIA
Master. Choosing Help in the main menu bar of the application will activate online Help for
Windows.
• Key information on system requirements, installation, and updated user notes are available in
the CAMEDIA Master Readme file.
• For additional help or technical support, consult the Technical Support Options section of this
manual.
3. Camera Support
3.1 Supported Camera Functions
CAMEDIA Master is designed to work with Olympus digital cameras. The following models are
currently supported:
• C-21
• C-420L / D-220L
• C-820L / D-320L
• C-830L / D-340R
• C-840L / D-340L
• C-900Zoom / D-400Zoom
• C-920Zoom / D-450Zoom
• C-1000L / D-500L
• C-1400L / D-600L
• C-1400XL / D-620L

Olympus CAMEDIA Master 1.2 User Guide
3
• C-2000Zoom
• C-2020Zoom
• C-2500L
See the CAMEDIA Master Readme file for recent updates and additions. Check your camera
documentation for support of special features such as:
• Upload Images
• Special Camera Functions: Panorama, Upload Template
• QuickTime™ Movie
Appendix B: Supported Camera Function Table provides a list of features and functions by
camera model as of the current document release.
3.2 Camera Settings
Camera features, controls, and in some cases optional special camera functions can be set from
the Options dialog in the Edit menu within CAMEDIA Master. See topics Changing Camera
Settings in the Using CAMEDIA Master section.
4. Getting Started
4.1 Connecting a Camera
1) Switch off the camera and the computer.
2) Insert the matching plug of the enclosed camera cable into the serial port of the computer.
3) Match the other cable plug to the camera's connector and insert the plug.
4) Switch on the camera and turn the computer on.
Note: For a detailed explanation about how to connect the camera to the computer, see the Digital
Camera Instructions.
4.2 Starting CAMEDIA Master
4.2.1 Starting Applications on Microsoft Windows or NT Systems
To start up CAMEDIA Master:
1) Double-Click the application icon from the desktop or choose the application name from
the Start/Programs Menu in the Task bar.
2) Double-Click the My Camera icon to establish communications with the camera and open
a Camera Index View Window.
Warning: Do not switch the camera off or pull out the connection cable while the software application
is starting up or running. These actions can cause malfunctioning of camera and application.
Olympus CAMEDIA Master 1.2 User Guide
4
4.2.2 Starting Applications on Macintosh Systems
To start up CAMEDIA Master:
1) Double-Click the application icon from the desktop or choose Open from the File menu in
the Main Menu bar.
2) Click to choose the application name from the file list in the Open File Dialog, then Click
Open.
3) Double-Click the My Camera icon to establish communications with the camera and open
a Camera Index View Window.
Warning: Do not switch the camera off or pull out the connection cable while the software application
is starting up or running. These actions can cause malfunctioning of camera and application.

Olympus CAMEDIA Master 1.2 User Guide
5
5. Using CAMEDIA Master
5.1 Getting to Know CAMEDIA Master
Simplify the process of working with digital images by becoming thoroughly familiar with the
application environment of CAMEDIA Master before proceeding. The CAMEDIA Master
application environment consists of a main menu bar, a toolbar, three kinds of control windows,
and various command, preference, and options dialogs. The behavior of and choices in menus
and control windows is dependent upon the selected mode of operation. CAMEDIA Master
offers four primary modes of operation that will affect the choices available.
5.1.1 Primary Modes of Operation
The primary operating modes for CAMEDIA Master fall into two main categories: 1) File
Modes: working with images stored in camera memory or images stored on disk, and 2) View
Modes: working with an individual image or groups of images (indexes). The type of operations
being performed and the location of the selected image files will limit user choices to functions
uniquely supported by that operation. These unique cases will be identified as File Modes:
Camera Mode vs. Disk Mode and View Modes: Image Mode vs. Index Mode.
Each of these operating modes and the combination of the two main categories will affect the
appearance and choices displayed in menus and dialogs. On Microsoft Windows systems, some
items may not appear in pull-down menus in different modes of operation. On Macintosh
systems, they may appear grayed out. Supported features of the connected camera may also
effect the appearance of menus and dialogs.
See Appendix D: Function Mode Reference Table for a detailed list of differences between the
four primary operating modes.
Camera Mode
When using an Olympus digital camera, images are stored on removable media such as a
memory card like “SmartMedia”. CAMEDIA Master can be used to access removable storage
media in the camera. When working with images stored in the camera, CAMEDIA Master is said
to be working in “Camera Mode” or with “Camera Images”. Only operations specifically
supported by the camera model in use can be performed in Camera Mode.
Disk Mode
When working with images stored on a magnetic disk inside or attached to the host computer,
CAMEDIA Master is said to be working in “Disk Mode” or with “Disk Images”. With the
exception of camera specific operations, all other features and functions of CAMEDIA Master
are supported in Disk Mode.
Index Mode
When working with groups of images selected from an image file index CAMEDIA Master is
said to be working in Index Mode. Various file management functions and batch processing
operations can only be performed when in Index Mode.
Image Mode
When working with individual images, CAMEDIA Master is said to be working in Image Mode.
Various image specific operations such as image editing, renaming, or adding text to an image
can only be performed when in Image Mode.

Olympus CAMEDIA Master 1.2 User Guide
6
5.1.2 Main Menu Bar
The Main menu bar is displayed at the top of the main application window. The appearance of
the Main menu bar may vary from Microsoft Windows-based systems to Macintosh-based
systems. Pull-down submenus under File, Edit, and Help, and system related functions such as
file saving, printing, and on-line help may operate differently. To become more familiar with
how menus work on the computer in use, consult the system operation manual that came with the
host computer.
The CAMEDIA Master Main Application Window (Microsoft Windows)
The Main menu bar displays seven pull-down menu selections.
File Menu
File management operations and printing are performed from the File menu.
Edit Menu
Item selection, copy, paste, delete, undo and other file editing functions are available in the Edit
menu.
Image Menu
Image editing and manipulation tools and options are available in the Image menu.
Camera Menu
Download image commands and camera settings are available in the Camera menu.
View Menu
Viewing options, Slide Show, Sort, and Refresh are available in the View menu.

Olympus CAMEDIA Master 1.2 User Guide
7
Window Menu
On Microsoft Windows-based systems, the Window menu presents options for selecting the
arrangement of windows, as well as a pull-down menu of windows currently available for
selection. On Macintosh systems the Window menu presents only the pull-down menu of
available windows.
Help menu
(Microsoft Windows)
On Microsoft Windows-based systems, options for accessing Help resources are available in the
Help menu.
5.1.3 Toolbar
A Toolbar is displayed below the Main menu bar. The Toolbar is a group of buttons that provide
shortcuts for some of the most commonly used menu functions. It also provides direct access to
some of the image editing tools available in CAMEDIA Master. Some of the image editing tools
do not have counterparts in other menus. Refer to the Manipulating Images topic for a complete
description of the image editing tools.
Each button displays an icon giving a cue to its function. See Appendix A: Differences between
Windows and Macintosh Operating Systems for a complete list of menu and toolbar features and
functions. In order of their appearance in the toolbar the buttons are:
1) Open
2) Save
3) Go Up Folder
4) Properties
5) Print
6) Undo
7) Redo
8) Cut
9) Copy
10) Paste
11) Rotate CW90º
12) Rotate CCW90º
13) Remove Red-Eye
14) Pan
15) Select Rectangle
16) Select Circle
17) Select Polygon
18) Select Lasso
19) Magic Wand
20) Zoom-In
21) Zoom-Out
22) Large Thumbnail (Index Mode)
23) Small Thumbnail (Index Mode)
24) Details (Index Mode)
Olympus CAMEDIA Master 1.2 User Guide
8
5.1.4 Control Windows
At the heart of CAMEDIA Master are three types of control windows, 1) the Folder Tree View
Window, 2) the Index View Window, and 3) the Image View Window. On Microsoft Windows
systems, the Folder Tree and Index View Windows will be joined together in a single composite
window. On Macintosh systems, all three types as well as the Toolbar, will appear as separate
floating windows.
Control Windows with Camera Index View selected (Microsoft Windows)
Folder Tree View Windows
Folder Tree View Windows appear on the left side of the screen and contain a directory icon
map showing the hierarchy of folders available for viewing from the currently selected storage
device. A device may be a disk drive, a disk partition, or the camera itself. There will always be
two Folder Tree View Windows, one for disk drives and one for a connected camera.
Disk Folder Tree View Window
Disk drive icons and folder icons representing data storage locations on the associated drives
of the computer system will be represented in the Disk Folder Tree View Window. Double-
Clicking or selecting Open from the File menu can open folders.
Camera Folder Tree View Window
Camera icons, folder icons, or storage card icons representing image file locations in a
connected camera will be represented in the Camera Folder Tree View Window. Double-
Clicking or selecting Open from the File menu can open storage icons.
Olympus CAMEDIA Master 1.2 User Guide
9
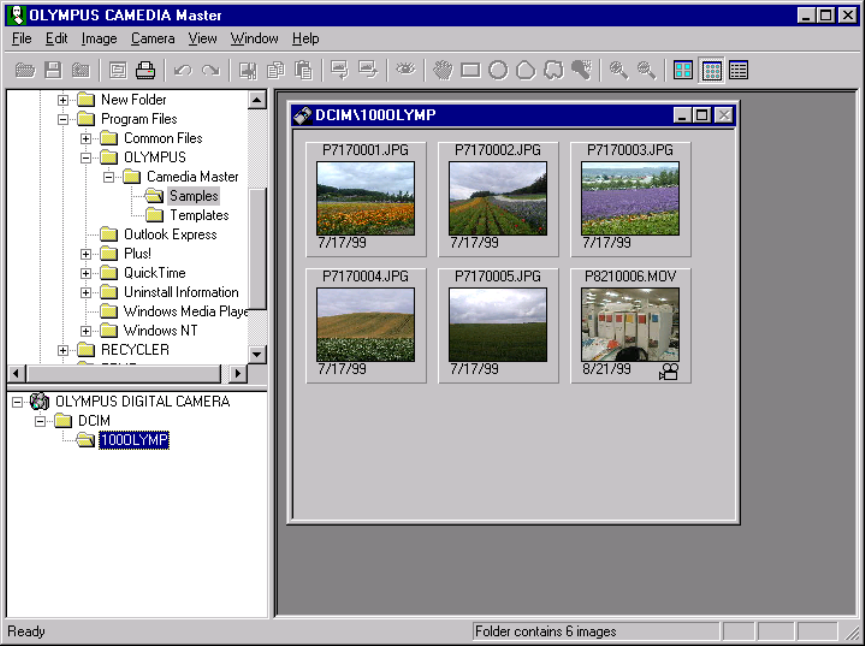
Index View Window
The Index View Window appears to the right of active Folder Tree View Windows. The Index
View Window displays image files contained in the currently selected folder of a Folder Tree
View Window. Only one Index View Window can be open at a time. The Index View Window
can display accessible image files contained in the currently selected folder as a collection of
image thumbnails or as a detail list. The images in the Index View Window can be Dragged-
and-Dropped (copy or move) into another folder, and all images in a folder can be Dragged-and-
Dropped (copy or move) into the Index View Window.
View Mode Options
Large Thumbnail View
Displays 160x120 pixel indexed thumbnails with their associated file names.
Small Thumbnail View
Displays 80x60 pixel indexed thumbnails with their associated file names.
Detail View
Displays the file names, size, image properties, and description of the selected files in a text
list.
Thumbnail Attributes
• File Name
• Creation Date
• Panorama Icon
• Panorama Sequence Number
• Continuous Icon
• Continuous Sequence Number
• Movie Icon

Olympus CAMEDIA Master 1.2 User Guide
10
Image View Window
When an individual image file is selected and opened from the Index View Window, it will be
displayed in a separate Image View Window. More than one Image View Window can be open
at a time. When an Image View Window is open and selected, image editing and manipulation
can be performed on the selected image.
Control Windows in Image Mode (Microsoft Windows)

Olympus CAMEDIA Master 1.2 User Guide
11
Macintosh Control Windows
On Macintosh systems, the Control Windows appear on the desktop as separate floating
windows. Each window behaves independently according to standard Macintosh operating
procedures.
Control Windows in Image Mode (Macintosh)
5.1.5 Status Bar
(Microsoft Windows)
The Status Bar appears at the bottom of the application main control window and
displays information about the currently selected image including image size in pixels,
color depth, and the comment field.

Olympus CAMEDIA Master 1.2 User Guide
12
5.2 Setting Up the Application Environment
5.2.1 Setting Display Preferences
1) Choose Options in the Edit menu. The Options dialog appears.
2) Click on the Display Tab. The Display preferences dialog appears.
3) Click the radio buttons to:
• Set default Thumbnail Display Mode.
• Set default Image View Window size.
4) Click OK to save preferences, Cancel to exit without saving.

Olympus CAMEDIA Master 1.2 User Guide
13
5.2.2 Setting Details View Preferences
To Add File Attributes to the Index View Window
1) Choose Options in the Edit menu. The Options dialog appears.
2) Click on the Details Tab. The Details preferences dialog appears.
3) Click in the Select Item window to select file attributes to be displayed in the Index View
Window.
4) Click the Add button to move the selected item to the Display Item window.
5) Click OK to save preferences, Cancel to exit without saving.
To Remove File Attributes from the Index View Window
1) Click in the Display Item window to select file attributes to be removed from the Index View
Window.
2) Click the Delete button to remove the selected item from the Display Item window.
3) Click OK to save preferences, Cancel to exit without saving.

Olympus CAMEDIA Master 1.2 User Guide
14
5.2.3 Setting Communications and Download Preferences
1) Choose Options in the Edit menu. The Options dialog appears.
2) Click on the Download Tab. The Download preferences dialog appears.
3) Use the Serial Port pull-down menu to set the desired port for downloading images. Refer to
the computer operator manual for the correct port designation.
4) Use the Serial Speed pull-down menu to set the desired transfer speed. Auto is the default
but may take longer to configure each time it communicates with the camera. For optimum
communications speeds that can be used, refer to the Digital Camera Instructions.
Communication at 230Kbps, may require a high-speed communication board. If successful
communication does not occur when using a high communication speed, reduce the
communication speed.
5) Click the radio buttons to:
• Set the default naming preference.
6) Click OK to save preferences, Cancel to exit without saving.

Olympus CAMEDIA Master 1.2 User Guide
15
5.2.4 Setting Wallpaper Preferences
(Microsoft Windows)
1) Choose Options in the Edit menu. The Options dialog appears.
2) Click on the Wallpaper Tab. The Wallpaper preferences dialog appears.
3) Click the radio buttons to:
• Set default Position.
• Set default Color Depth.
4) Click OK to save preferences, Cancel to exit without saving.

Olympus CAMEDIA Master 1.2 User Guide
16
5.2.5 Setting Slide Show Preferences
1) Choose Options in the Edit menu. The Options dialog appears.
2) Click on the Slide Show Tab. The Slide Show preferences dialog appears.
3) Click the check boxes to:
• Set default Play mode.
• Select Include Sub Folders to include images in folders contained within the selected
folder.
4) Drag the slider to the number of seconds desired between slide changes for the Loop
Continuously setting or enter the number of seconds in the field below.
5) Select the desired transition effect from the Transitions pull-down Menu.
6) Click OK to save preferences, Cancel to exit without saving.

Olympus CAMEDIA Master 1.2 User Guide
17
5.2.6 Setting JPEG Compression Level
1) Choose Options in the Edit menu. The Options dialog appears.
2) Click on the JPEG Tab. The JPEG preferences dialog appears.
3) Click the radio buttons to:
• Set default Quality level.
4) Click OK to save preferences, Cancel to exit without saving.
5.2.7 Setting Magic Wand Preferences
Olympus CAMEDIA Master 1.2 User Guide
18
1) Choose Options in the Edit menu. The Options dialog appears.
2) Click on the Magic Wand Tab. The Magic Wand preferences dialog appears.
3) Click-Drag the slider to the desired Tolerance level.
4) Click OK to save preferences, Cancel to exit without saving.
5.2.8 Setting Index View Window Preferences
The Index View Window and multiple Image View Windows can be arranged within the
main application window (Microsoft Windows) or on the desktop (Macintosh) for ease of
viewing and accessing images. On Microsoft Windows systems, multiple windows can be
arranged in Cascade or Tile format. On Macintosh systems, choose Arrange Windows.
Choose the preferred format in the View menu.
Cascading Windows
Arranges multiple open image windows in an overlapping offset cascading from top left to lower
right like a stack of papers. The first open window appears first. The last open window appears
on top.
Tiled Windows
Arranges multiple open image windows in a grid pattern sizing images to fit into the available
window boundary.
Olympus CAMEDIA Master 1.2 User Guide
19
5.3 Accessing and Saving Image Files
CAMEDIA Master can access and save images from Olympus digital cameras and images stored
on disk in a variety of image file formats including JPEG, TIFF, BMP (Microsoft Windows) and,
PICT (Macintosh). See Appendix C: Supported File Formats for a complete list of supported file
types.
Only Camera Mode operations can be performed on images stored in the camera. Disk Mode
operations can only be performed after images have been stored on a disk accessible to the host
computer. Image Mode operations may only be performed on images that have been stored on
disk. Use Save or Save As to preserve changes after editing an image.
All of the images in an Index View Window can be selected by choosing Select All from the Edit
menu and released by choosing Select None.
5.3.1 Accessing and Saving Images From a Camera
1) Make sure that the camera is connected to an appropriate port on the host computer and has
power. For detailed instructions, see the Digital Camera Instructions.
2) Turn the camera ON. For detailed instructions, see the Digital Camera Instructions.
3) Open CAMEDIA Master by Double-Clicking its file icon in the appropriate directory or
select it from the Program Menu on Microsoft Windows systems.
4) When CAMEDIA Master is open. A camera icon titled “My Camera” will appear in the
Camera Folder Tree View Window.
5) Double-Click on the “My Camera” icon. If the camera is detected, the icon title will change
to “Olympus Digital Camera” or the optional camera name set in camera memory.
Thumbnails representing images stored in the camera will appear in the Index View
Window.
6) To download all images to disk, select Download All Images from the Camera menu.
7) To download selected images, Click on the desired thumbnail or image file name in the
Index View Window. To select more than one, hold down the Control-Key and Click
(Microsoft Windows) or the Shift Key and Click (Macintosh) while selecting. Then select
Download Selected Images from the Camera menu. Selected images may also be Dragged-
and-Dropped onto the desired folder in the Folder Tree View Window.
5.3.2 Accessing and Saving Images From Disk
1) Open CAMEDIA Master by Double-Clicking its file icon in the appropriate directory or
select it from the Program Menu on Microsoft Windows-based systems. The desktop folder
structure of your host computer appears in the Disk Folder Tree View Window.
2) Click on the desired folders to find a sub-folder containing images. Image files contained in
the selected folder will appear in the Index View Window.
3) Double-Click on the desired image file. A new Image View Window will be opened.
4) Perform edits on the image.
5) Choose Save in the File menu to save images that have been changed, or choose Save As to
save the image under a new name. Choose Cancel to exit without saving.
Olympus CAMEDIA Master 1.2 User Guide
20
5.4 Viewing QuickTime™ Movies
CAMEDIA Master 1.2 supports QuickTime 4.0 movie files. Compatible movie files stored on
disk can be accessed from the CAMEDIA Master Index View Window. Thumbnails representing
the QuickTime movie are displayed along with other compatible image file types. The
QuickTime movie files display a preview image representing the starting frame of the
QuickTime movie. A small movie projector icon in the lower right corner identifies picture files
in the movie format. QuickTime 4.0 is required to view the movie and may be installed during
the CAMEDIA Master 1.2 installation process. QuickTime movie files cannot be manipulated
using the filters or other image editing tools in CAMEDIA Master.
See Appendix B: Supported Camera Features for a list of cameras supporting this feature. Refer
to your camera instructions for details on capturing images in the QuickTime movie format.
Movie files can be launched by double-clicking the thumbnail or by opening the file from
File/Open in the Main Menu.
5.5 Viewing Images as a Slide Show
(Disk Mode/Index Mode)
Groups of images can be viewed sequential on screen as a slide show. To view images as a slide
show:
1) Click on the desired folders in the Folder Tree View Window to find a sub-folder containing
images. Image files contained in the selected folder will appear in the Index View Window.
2) If individually selected images are desired, select the images to be view in the Index View
Window.
3) Choose Slide Show in the View menu. The images will appear full-screen with a black
surround.
4) Click the mouse to advance the slide show. Use the left mouse button on Microsoft Windows
systems. The following keys will also advance the slide show: Space bar, Return, Page
down, Right Arrow, and Down Arrow.
5) To Reverse the slide show, use the right mouse button on Microsoft Windows systems. On
Macintosh systems Click the mouse button while holding the Command+Option keys. The
following keys will also reverse the slide show: Page Up, Left Arrow, and Up Arrow.
6) To end the slide show, Double-Click the left mouse button on Microsoft Windows systems.
On Macintosh systems Double-Click the mouse button.
5.6 Creating a Desktop Background
(Microsoft Windows/Disk Mode/Index Mode)
1) Click to select the desired image in the Index View Window.
2) Choose Wallpaper from the Image menu. The image will be saved as a wallpaper
background file in the Control Panel Display Settings of the Windows operating system. The
settings in Wallpaper preferences in the Options dialog in the Edit menu will define the
format of the background.

Olympus CAMEDIA Master 1.2 User Guide
21
5.7 Working with Image Files
5.7.1 File Properties
Various file attributes for a selected file can be viewed or edited in the Properties Dialog. The
Properties Dialog contains two tabs:
The General tab contains information about the currently selected picture file. Only the
Comment filed can be edited.

Olympus CAMEDIA Master 1.2 User Guide
22
The Details tab contains specific information about the camera and camera settings in effect
when the picture was taken. All cameras may not support all
Viewing File Properties
1) Choose Properties in the File menu. The Properties Dialog appears.
2) View the General file properties.
3) Edit the Comments field.
4) If desired, click the Details tab to view the camera and settings.
5) Close the dialog.
Adding User Comments to Image Properties
Comments can be added to the Properties of an image file. Comments are descriptive phrases
that may provide future viewers with information about an image such as where it was taken,
who is in the picture, and so on. The Comments field can also be used by the Find command to
search for image files containing certain words or phrases. To add comments to an image:
1) Select an image in the Index View Window or Open an image in Image Mode.
2) Choose Properties in the File menu or Click the Properties Tool button in the Toolbar.

Olympus CAMEDIA Master 1.2 User Guide
23
3) Enter the comment in the Comment field.
4) Click OK to save, Cancel to exit without saving.
5.7.2 Refreshing the Index View Window
When changes are made to the contents of an image file folder or when connecting a camera or
changing a SmartMedia card, it may be necessary to refresh the Image View Window to properly
display the changes. To Refresh the Image View Window:
1) Click on the window that is to be Refreshed.
2) Choose Refresh in the View menu or push the F5-Key.
5.7.3 Naming & Renaming Image Files
(Disk Mode/Index Mode)
Image files may be named automatically by the camera when they are created or by another
application on disk. Image files may be renamed in Index Mode only. Image files open in Image
Mode can be renamed by using Save As in the File menu. Only image files stored on disk may
be renamed using the Rename command. Camera image files cannot be renamed.
To Rename an Image File
1) Select the desired image file in the Index View Window.
2) Choose Rename in the File menu. The Rename Dialog appears.
3) Type the new file name
4) Click OK to Rename. Click Cancel to exit without Renaming.
Olympus CAMEDIA Master 1.2 User Guide
24
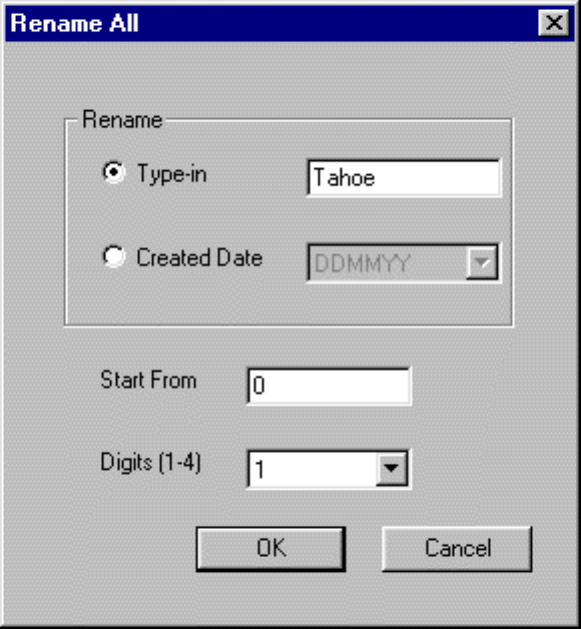
To Rename a Group of Image Files
1) Select the desired image files in the Index View Window.
2) Choose Rename All in the File menu. The Rename All Dialog appears.
3) Type in a brief text description, or select a Created Date.
4) Select a starting number for sequential numbering.
5) Select the number of digits for sequential numbering. Leading zeros will be used.
6) Click OK to Rename All. Click Cancel to exit without renaming.
Files names will be created with the text prefix entered or the creation date and sequential
numbering. For example: Pic00001.jpg, Pic00002.jpg,… become Picnic01.jpg, Picnic02.jpg,…
In Microsoft Windows, file type extensions will be automatically appended.
5.7.4 Copying Image Files
(Disk Mode/Index Mode)
Image files can be copied by opening an image in Image Mode and using the Save As command
in the File menu or by using system copy commands directly from the desktop. Drag-and-Drop
in Index View Mode can also be used for copying image files when the drive of the destination
folder is different from the drive of the original folder.

Olympus CAMEDIA Master 1.2 User Guide
25
5.7.5 Moving Image Files
(Disk Mode/Index Mode)
Drag-and-Drop can be used to move image files from the Index View Window to a folder in the
Disk Folder Tree View Window. Drag-and-Drop can also be used for moving image files when
the drive of the destination folder is the same as the drive of the original folder.
5.7.6 Sorting Image Files in Index View
(Index Mode)
The viewing order of thumbnails and file names can be set in the Index View Window. To sort
the order of image files displayed from the currently selected folder:
1) Choose Sort from the View menu.
2) Select the sorting criteria from the list displayed.
5.7.7 Finding Image Files
(Disk Mode/Index Mode)
Image files can be located by creation date or text stored in the comments field of the image file.
To find an image:
1) Select Find in the File menu or Click the Find Tool button in the Toolbar. The Find dialog
appears.
2) Check the box indicating the desired search criteria.
3) Enter a Creation Date or range of dates to find or a text string to search in the Comment
field.
4) Enter a target device or folder to search in the Find Location field or Browse to select.
5) Click Find Start. The results of the search will be displayed in the Index View Window and
may be viewed as a slide show.
5.7.8 Uploading Image Files from Disk to Camera - Selected Camera Models
(Camera Mode/Index Mode)
Selected camera models support the Upload Image function (see Appendix B). If the connected
camera supports this function, image files may be copied from disk to camera for transportation
Olympus CAMEDIA Master 1.2 User Guide
26
to another location or viewing remotely on the camera LCD. Only “camera-native” EXIF and
JPEG image files containing a “camera type” header that matches the same camera type and the
same file type recorded by the connected camera may be uploaded. JPEG files that have been re-
saved, such as with Photoshop, will lose the header information and cannot be uploaded. To
upload image files to a camera:
1) Select the desired image files in the Index View Window.
2) Choose Upload Images in the Camera menu.
In order to view images on the camera LCD, images can be saved directly to a SmartMedia Card
from the host computer using a PC Card Adapter or FlashPath (Floppy Disk Adapter). The image
file name or the folder name should refer to the picture name or folder name created (recorded)
by the camera when the picture was originally taken.
5.7.9 Using Batch Functions
Some repetitive operations can be performed on groups of image files or “batches” as well as
individual image files to save time. Some batch operations may be limited to Index Mode.
Following is a list of batch operations and acceptable modes of operation:
• Rename - Index Mode/Disk Mode
• Convert Format - Index Mode/Disk Mode
• Copy - Index Mode/Disk Mode
• Delete - Index Mode/Disk Mode/Camera Mode
• Rotate – Index Mode/Disk Mode
5.7.10 Protecting Camera Files From Deletion
(Index Mode/Camera Mode)
The Protect option in the Camera menu toggles protection on and off. Toggle On prevents
images in the camera memory from being deleted. Toggle Off allows images in the camera
memory to be deleted.
To Protect Camera Files from Deletion:
1) Choose Protect from the Camera menu. A sidebar is display.
2) Select On to turn protection on.
3) Select Off to turn protection off.
Olympus CAMEDIA Master 1.2 User Guide
27
5.8 Manipulating Images
(Still Images Only)
5.8.1 Enlarging and Reducing the Image View
(Image Mode)
Zoom-In
Use the Zoom-In function to enlarge a selected image in the Image View Window. To use the
Zoom-In:
1) Select an open Image View Window or Double-Click a Thumbnail to open an Image View
Window.
2) Click on the Zoom-In Tool in the Toolbar or choose Zoom-In from the View menu. The
selected image will be enlarged within the Image View Window.
Zoom-Out
Use the Zoom-Out function to reduce a selected image in the Image View Window. To use the
Zoom-Out:
1) Select an open Image View Window or Double-Click a Thumbnail to open an Image View
Window.
2) Click on the Zoom-Out Tool in the Toolbar or choose Zoom-Out from the View menu. The
selected image will be reduced within the Image View Window.
5.8.2 Scrolling Enlarged Images
(Image Mode)
The area of view in the Image View Window can be changed using the Pan Tool in the toolbar or
choosing Scroll Mode in the View menu. To use the Pan Tool or Scroll Mode:
1) Select an open Image View Window or Double-Click a Thumbnail to open an Image View
Window.
2) Enlarge the area of interest using the Zoom function.
3) Click on the Pan Tool (hand) in the Toolbar or select Scroll Mode in the View menu. The
cursor will change to the Hand icon when it is located over the selected Image View
Window.
4) Click-Drag the cursor over the selected Image View Window. The image area will move
with the cursor.
5) Choose another mode in the View menu to release Scroll Mode.
5.8.3 Rotating Images
(Disk Mode/Index Mode/Image Mode)
To Rotate an Image In Index Mode
1) Click to select the desired image in the Index View Window. To select a group of images, on
Microsoft Windows systems, hold the Shift Key and Click to select a group of adjacent
images or the Control-Key and Click to randomly select a group of images. On Macintosh
Olympus CAMEDIA Master 1.2 User Guide
28
systems hold the Shift Key and Click to select a group of adjacent images or the Option-Key
and Click to randomly select additional images.
2) Choose Rotate in the Image menu or Click the Rotate CW90 Tool button or Rotate CCW90
in the Toolbar. If the Rotate Menu is chosen, a sidebar menu appears. The menu also
includes Rotate 180.
3) Choose the direction and amount of rotation desired from the sidebar menu. The selected
images will be rotated.
To Rotate an Image In Image Mode
1) Select an open Image View Window or Double-Click a Thumbnail to open an Image View
Window.
2) Choose Rotate in the Image menu or Click the Rotate CW90 Tool button or Rotate CCW90
in the Toolbar. If the Rotate Menu is chosen, a sidebar menu appears. The menu also
includes Rotate 180 and Free Rotate. The Free Rotate option is only available in Image
Mode.
3) Choose the direction and amount of rotation desired in the sidebar menu or select Free
Rotate. If Free Rotate is chosen, a flashing marquee and “handles” will appear on the
selected image. The cursor will become a Rotation Icon when placed over the image area.
4) Click-Drag one of the handles to the desired angle.
5) Double-Click inside the image area to apply rotation to the image. The image will be rotated
and clipped to its original size.
5.8.4 Flipping Images
(Disk Mode/Image Mode)
1) Select an open Image View Window or Double-Click a Thumbnail to open an Image View
Window.
2) Choose Flip in the Image menu. A sidebar menu appears.
3) Choose Vertical to flip the selected image top to bottom. Choose Horizontal to Flip the
selected image left to right.
5.8.5 Enhancing Image Quality
(Disk Mode/Image Mode)
Images that appear too light, too dark, or too flat may be fixed using the Instant Fix Command.
To use the Instant Fix Command:
1) Select an open Image View Window or Double-Click a Thumbnail to open an Image View
Window.
2) Choose Instant Fix in the Image menu.
3) The darkest point in the image will be adjusted to black and the lightest point in the image
will be adjusted to white. Instant Fix may not produce desirable results in all images.
Olympus CAMEDIA Master 1.2 User Guide
29
5.8.6 Selecting Areas in an Image
(Image Mode)
Selective changes can be made to images using the Selection Tools, Rectangle, Circle, Polygon,
and Lasso. Drawing a selection marquee around the desired area can isolate selected parts of an
image. Once selected, the area of interest can be Cut and Pasted, Moved, Saved to another file, or
an image Filter can be used to change its appearance. To use the Selection Tools:
1) Select an open Image View Window or Double-Click a Thumbnail to open an Image View
Window.
2) Choose the desired tool by Clicking its icon button in the Toolbar.
3) Click-Drag the cursor in the selected image area to draw a Rectangular or Circular selection.
Click the desired corner points to draw a Polygon selection. Click-Drag freehand to draw a
selection with the Lasso Tool. A flashing marquee appears to indicate the area selected.
4) Hold the cursor over the selected area. The cursor becomes a Hand (Pan) Tool.
5) Click-Drag the center of the selection area to Cut and Move it.
6) Hold the Control-Key (Microsoft Windows) and Click-Drag or Option-Key and Click-Drag
(Macintosh) the center of the selection area to Copy and Move it.
7) To perform other operations such as applying filters or saving the selection, choose the
appropriate menu selection.
5.8.7 Selecting Color Regions in an Image
(Image Mode)
Use the Magic Wand Tool to select specific color ranges or gray levels in an image for
adjustment. The tolerance of the Magic Wand Tool can be set in the Magic Wand preferences in
the Options dialog in the Edit menu. To use the Magic Wand Tool:
1) Click on the Magic Wand Button. The cursor becomes a Magic Wand Icon.
2) Position the cursor so that it is about in the middle of the range of colors to be selected.
3) Click the Magic Wand cursor over the selected image area. A flashing marquee indicates the
selected color.
4) Edit the color of the selected area with the Color Balance Filter in the side bar Filter Menu in
the Image menu.

Olympus CAMEDIA Master 1.2 User Guide
30
5.8.8 Using Filters
(Image Mode)
Image Filters can be used to change the color balance, sharpness or bluriness, edge definition,
brightness or darkness, and contrast of selected images or selected areas of images. Filters cannot
be applied to QuickTime Movies.
Brightness
Increases or decreases the overall lightness or darkness of the selected image.
Contrast
Adjusts the difference in contrast between the lightest area and the darkest area of the selected
image.
Color Balance
Increases or decreases the balance of primary colors (Red, Green, and Blue) in the selected
image.
Gamma
Shifts the tonality of the image from shadows to high lights.
Blur
Decreases the sharpness of the selected image.
Sharpen
Increases the sharpness of edges in the selected image.
Edge
Accentuates edges along contrasting boundaries.

Olympus CAMEDIA Master 1.2 User Guide
31
Distortion Correction
Provides tools for adjusting image perspective and optical distortion. See Correcting Distortion
in an Image for a detailed explanation.
Emboss
Accentuates high-contrast edges in an image and flattens low-contrast areas producing the effect
of a raised surface or relief.
How to Use Filters
1) Select an open Image View Window or Double-Click a Thumbnail to open an Image View
Window.
2) Use Selection Tools to select the area of the image upon which the filter will be applied. If
no area is selected, the filter will be applied to the entire image.
3) Choose Filters from the Image menu. A sidebar menu appears.
4) Choose the desired Filter from the sidebar. In some cases, the filter is instantly applied. In
most cases a Filter Dialog appears.
5) Adjust the sliders or enter the desired settings in the filter dialog.
6) Click OK to save, Cancel or Undo to exit without saving.
5.8.9 Using Recent Filters
(Image Mode)
Recent Filters in the Image menu displays a selectable menu list containing the four most
recently used Image Filter selections. Choosing a recently used filter will reapply the
filter directly to the currently selected image. Additional filtering is added to the effect of
previously applied filters.
5.8.10 Removing “Red-Eye” from Flash Pictures
CAMEDIA Master 1.2 features a Remove Red-Eye tool in the Toolbar. The Remove Red-Eye
Tool removes the color red from any selected area in an image. For precise control, the tool
should be used in conjunction with a selection tool such as the Rectangle, Polygon, Circle, or
Lasso selection tools. Do not select areas containing red that are adjacent to the area to be
corrected. When used without the prior selection of a target area, the tool is applied to a 100 x
100 pixel rectangular selection centered on the cursor.
To Correct for Red-Eye:
1) Select an open Image View Window or Double-Click a Thumbnail to open an Image View
Window.
2) Click the Zoom-In Tool button in the Toolbar to enlarge the selected image to a convenient
size.
3) Use the Pan Tool to position the area to be corrected in the Image View Window.
Olympus CAMEDIA Master 1.2 User Guide
32
4) Click the desired Area Selection Tool button (Rectangle, Polygon, Circle, or Lasso) in the
Toolbar.
5) Click-and-Drag the selected tool cursor to enclose the area to be corrected. Be careful not
include adjacent areas of the image that may also contain red.
6) Click the Remove Red-Eye Tool button in the Toolbar.
7) Click the Remove Red-Eye Tool cursor inside the marquee of the selected area. The red is
removed.

Olympus CAMEDIA Master 1.2 User Guide
33
5.8.11 Adding Text to an Image
(Disk Mode/Image Mode)
Text can be added to an image. To add text to a selected image:
1) Select an open Image View Window or Double-Click a Thumbnail to open an Image View
Window.
2) Choose Insert Text in the Image menu. The Insert Text Dialog appears.
3) Click on the font of the desired typeface in the scrollable Font Window.
4) Click on the style of the desired typeface in the scrollable Font Style Window.
5) Click on the size of the desired typeface in the scrollable Size Window.
6) Click on the Color Button to display the current Color Palette.
7) Click on the desired type color in the Color Palette or select a custom color from the Color
Picker.
8) A type sample of the current selection is displayed in the Sample Window.
9) Enter the desired text in the Enter Text Here Window.
10) Click OK to apply the text to the selected image. Click Cancel to exit without applying.
11) The desired text will appear as a floating selection on the selected image window.
12) Click-Drag to position the text.

Olympus CAMEDIA Master 1.2 User Guide
34
13) Double-Click the cursor to permanently paste the text into the image.
5.8.12 Changing the Size of Images
(Disk Mode/Image Mode)
1) Select an open Image View Window or Double-Click a Thumbnail to open an Image View
Window.
2) Choose Resize in the Image menu. The Resize dialog appears. The Current image size is
displayed.
3) Click the Maintain Aspect Ratio check box to maintain the height to width ratio of the
image. Only one dimension is required when the Maintain Aspect Ratio checkbox is
checked.
4) Enter the desired dimension(s) for the new size.
5) Click OK to Resize or Cancel to exit without Resizing.
5.8.13 Changing the Color Depth of Images
(Disk Mode/Image Mode)
To change the Color Depth of the selected image:
1) Choose Change Color Depth in the Image menu. A sidebar menu appears.
2) Choose the desired color depth. The selected image will be converted to the new color space.

Olympus CAMEDIA Master 1.2 User Guide
35
5.8.14 Changing the Image File Type
(Disk Mode/Index Mode)
To Change the File Type or “convert” images to a different file type:
Using Save As to Save a Copy of a Single Image to a New File (Image Mode/Disk Mode):
1) Click to select an open Image View Window or Double-Click a thumbnail in the Index View
Window to open an Image View Window.
2) Choose Save As in the File menu.
3) Enter or select the desired file type from the pull-down menu in the Save As Type Window.
The new file extension will be automatically applied.
4) Change the filename if desired in the File Name Window. For a list of image file types
supported, see Appendix C: Supported File Formats.
Using Convert Format to Change the File Type of One or More Images
(Index Mode/Disk Mode)
1) To select a group of images, on Microsoft Windows systems, hold the Shift Key and Click to
select a group of adjacent images or the Control-Key and Click to randomly select a group of
images. On Macintosh systems hold the Shift Key and Click to select a group of adjacent
images or the Option-Key and Click to randomly select additional images.
2) Choose Convert Format in the Image menu. The Convert Format dialog appears. A directory
of available storage devices will appear in the Save-In box of the dialog.
3) Click to select the target folder in which the files are to be saved.
4) Choose the desired file type from the File Format pull-down menu. For Microsoft Windows
systems, a file extension will be automatically added to the file names. On Macintosh
systems, no extension will be added.
5) Click OK to convert, Cancel to exit without saving.

Olympus CAMEDIA Master 1.2 User Guide
36
5.8.15 Using Image Templates
(Image Mode)
Images or graphics can be used to create template files containing borders, frames, and
composite images that can be added to or superimposed on other images. There are two types of
template files used with Olympus camera images: 1) Disk-Based Templates, and 2) Camera-
based Templates.
Disk-Based Templates
Preformatted Disk-Based Template files are installed along with the CAMEDIA Master
application. Templates can also be created using a paint program and stored on disk. Colored
areas in the image will become a mask and can be superimposed over the another selected image.
Black areas in the image will become transparent. The selected image upon which the template
file is superimposed will appear in place of the black areas in the template. The Template
Superimpose command in the Image menu is used to apply templates to Disk Images.
Camera-Based Templates
Camera-Based Template files are stored in a special Template Card in some camera models.
They can be superimposed on images automatically in the camera. Camera-Based Template files
are special JPEG image files. They can be created in CAMEDIA Master by using Save As to
“Template” format. Camera-Based Templates can be uploaded to a camera in which there is a
Template Card, or saved into a Template Card directly from the host computer by using a PC
Card Adapter or FlashPath.
As with Disk-Based Templates, the image must contain a black area that will become a
transparent window when superimposed.
To Create a Template File
1) Open an existing image to be modified as a bit-mapped RGB graphics file in CAMEDIA
Master or a paint program.
2) Create a black area (Red=0, Green=0, Blue=0 in the color picker) large enough for other
images to show through. The black area can be created in CAMEDIA Master by selecting
the desired area with a selection tool and choosing Cut. The image must be saved in VGA
format at 640 x 480 pixels to be used as a template.
3) Save the bit-mapped image file to a disk location where Template files are stored.

Olympus CAMEDIA Master 1.2 User Guide
37
To Superimpose a Disk-Based Template on a Disk File in CAMEDIA Master
1) Double-Click to open the image upon which the template will be superimposed in an Image
View Window.
2) Choose Template Superimpose from the Image menu. The Template Superimpose dialog
appears. The selected image will appear in the Preview box of the dialog.
3) Click the Browse button to choose a directory containing Disk-Based Template files.
Available templates will appear in a scrollable preview window.
4) Click to select a template file from the template preview window and Click the Apply
button, or Double-Click to apply it to the selected image. The selected template will be
superimposed on the selected image in the Result Preview window. The Preview image can
be Zoomed-In, Zoomed-Out, and Panned using the buttons provided.
5) Click OK to save the new composite image. Click Cancel to exit without saving.
To apply Camera-Based Template to Camera Images
1) In CAMEDIA Master, select the desired Disk-Based Template file and save it as “Template”
format in the Save As in the File menu.
2) Upload the Template file to a camera that has a Template Card, or save it to the Template
Card directly from the host computer by using a PC Card Adapter or FlashPath.
3) Consult the Template Card Instructions for detailed instructions on applying Camera-Based
Templates to images in the camera and to images as they are captured.

Olympus CAMEDIA Master 1.2 User Guide
38
5.8.16 Creating Panoramic Images
(Disk Mode/Index Mode)
Two or more images can be stitched together to create a panoramic image. The camera used
must support Panorama Mode, the selected images must be recorded in Panorama Mode by the
camera, the Disk Index View Window must be open, and all images to be included in the desired
panorama must be selected. The Panorama Icon and sequence numbers are displayed in the
Index View Window.
For best results in creating panoramic images, use a tripod and let part of each picture overlap
with part of the previous picture. The overlapping part should cover about 20% of the image
area. If you use a camera that displays guide lines in the viewfinder, use them for alignment. If
the overlapping part is too large or too small, the pictures might not fit together well. Because of
image content, some pictures may not suitable for producing panoramic images.
To Create a Panorama Using Automatic Stitch:
1) Select two or more images with a Panorama Icon and sequence numbers in the Index View
Window.
2) Choose Panorama in the Image menu.
Panorama Stitch Dialog (Auto Mode)
3) The Panorama Stitch dialog appears in Full Auto Stitch Mode. The dialog displays a preview
of the panoramic image after stitching all of the selected images together.
Full Auto: Stitches all images automatically.
Manual: Stitches images manually.

Olympus CAMEDIA Master 1.2 User Guide
39
Start: Starts stitching in Manual Mode.
Stop: Stops stitching in Manual Mode.
Rotate 180: Rotates the image 180 degrees.
4) To stitch the selected images together, click OK. The more images in the panorama, the
longer it will take to stitch. The completed panoramic image is displayed in a new Image
View Window.
To Create a Panorama Using Manual Stitch
1) Select two or more images with a Panorama Icon and sequence numbers in the Index View
Window.
2) Choose Panorama under the Image menu and select Manual Stitch Mode.
3) Click Start. The Stitching Alignment Indicator appears.
Stitching Alignment Indicator Dialog (Manual Mode)
4) Click on each image to select two matching reference points in each image that can be used
to align the images.
5) Click Auto or Manual Stitch Mode in the Stitching Alignment Indicator Dialog.
Auto: Stitches the displayed images together automatically.
Manual: Displays two alignment indicators in each image in the Stitching alignment
indicator dialog. Move the alignment indicators in both images to the position where you
want the stitched images to align.
6) Click Next to add more images or Back to adjust the last image.

Olympus CAMEDIA Master 1.2 User Guide
40
Next: Aligns the two displayed images together and proceeds to the next image.
Back: Returns to the last pair of images, which were displayed before the two current images
were stitched together. Only one previous alignment can be adjusted before proceeding.
7) A preview of the panoramic image is displayed.
8) Check Auto Stitch Continuously to automatically stitch all selected images.
9) After the second panoramic image is aligned, the panorama moves to the left side of the
dialog, while the next image is displayed on the right.
10) Repeat steps 3 through 8 until all images in the panorama have been selected.
11) Click OK after the last image is added to complete the stitching operation.
12) The Panorama Stitch Dialog appears. The dialog displays a preview for the panorama after
stitching all selected images together.
13) Click OK to create the completed panoramic image file.
14) The new panoramic image is displayed in a new Image View Window.
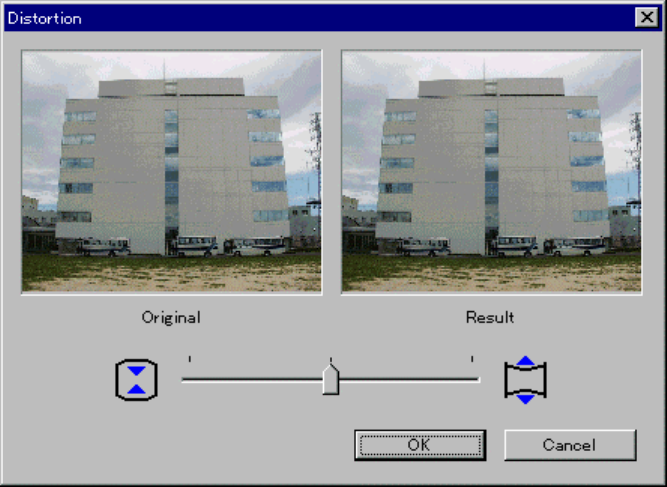
5.8.17 Correcting Distortion in an Image
(Disk Mode/Image Mode)
Distorted images can be corrected with the Distortion Correction command. Distorted images
can be corrected automatically with the distortion data from the file header information, or
manually without distortion data.
Distortion Dialog (Auto Correction)
Automatic Distortion Correction
1) Select an open Image View Window or Double-Click a Thumbnail to open an Image View
Window.
Olympus CAMEDIA Master 1.2 User Guide
41
2) Choose Distortion Correction from Filters sidebar menu in the Image menu. The Distortion
Correction dialog appears.
3) The original image is displayed in the Original preview. The corrected image is displayed in
the Result preview.
4) To make additional adjustments manually, Click the Fine-Tuning button. A slider appears.
5) Click-Dragging the slider adjusts the amount of correction displayed in the Result preview
window.
6) Click OK to save the changes.
Manual Distortion Correction
1) Select an open Image View Window or Double-Click a Thumbnail to open an Image View
Window.
2) Choose Distortion Correction from Filters sidebar menu in the Image menu. The Distortion
Correction dialog appears.
3) The original image is displayed in the Original preview. The corrected image is displayed in
the Result preview.
4) Click-Drag the slider until the desired amount of correction is displayed in the Result
preview.
5) Click OK to save the change.
Distortion Dialog (Manual)

Olympus CAMEDIA Master 1.2 User Guide
42
5.9 Changing Camera Settings
(Camera Mode)
An operational camera must be connected to the host computer. The camera must be turned on
and communicating with the host in order to perform the following functions.
5.9.1 Setting Camera ID & Internal Watch
1) Choose Camera Settings in the Camera menu. The Camera Settings Dialog is displayed.
2) The default Camera ID is “Olympus Digital Camera”. Create a new camera name and enter it
in the Camera ID window if desired.
3) If necessary, change the camera clock setting in the Adjust Internal Watch window or click
on the “Set To PC Time” button to set the camera clock to match the host computer.
5.9.2 Setting LCD Display Preferences
1) Choose Camera Settings in the Camera menu. The Camera Settings dialog is displayed.
2) Click the Options button. The Camera Settings dialog expands to display camera options.
3) Click-Drag the Brightness slider to set the default brightness level of the camera LCD
monitor.
Olympus CAMEDIA Master 1.2 User Guide
43
4) Click on the Date Indicator pull-down menu to select the desired format for the camera date
indicator in the LCD display.
5.9.3 Setting Power Save Preferences
1) Choose Camera Settings in the Camera menu. The Camera Settings dialog is displayed.
2) Click the Options button. The Camera Settings dialog expands to display camera options.
3) Click-Drag the Camera (Usually) slider to set the automatic Power-Off time for the camera
when not connected to the host computer.
4) Click-Drag the Camera – PC Connection slider to set the automatic Power-Off time for the
camera when connected to the host computer.
5) Click-Drag the LCD Monitor slider to set the automatic Power-Off time for the LCD
monitor.
5.9.4 Setting Camera Image Quality - Selected Camera Models
1) Choose Camera Settings in the Camera menu. The Camera Settings dialog is displayed.
2) Click the Options button. The Camera Settings dialog expands to display camera options.
3) Click on the Quality pull-down menu to select the desired image quality for the camera.
See Appendix B: Supported Camera Function Table and refer to the Digital Camera
Instructions.
5.10 Using Images in Other Applications
Image files may be used in a variety of other applications that support high-resolution image
output such as desktop publishing, presentations, or web graphics. Files intended for use in other
applications may require file type conversion to a file type supported by the target application.
If CAMEDIA Master does not support the file type required, it may be necessary to use another
intermediate application such as an image editing application to make the necessary conversions.
Some applications, such as Microsoft Word, support Drag-and-Drop functions from other
applications. For applications supporting this feature, images can be Drag-Dropped from the
Index View Windows of CAMEDIA Master directly onto a page in the other application.
5.11 Printing Images and Layouts
Images, groups of images, and indexes can be printed directly from CAMEDIA Master. A
connected printer capable of printing high-resolution continuous tone color images is
recommended.

Olympus CAMEDIA Master 1.2 User Guide
44
5.11.1 Printing Options
Print Single Image
(Image Mode)
Prints the currently selected image.
Print Index
(Index Mode)
Prints currently selected thumbnails in the Index View Window with file names and dates.
Print Layouts
(Disk Mode)
Prints selected images in 3-up, 4-up and 6-up page format with filenames, dates, and
comments.
Print Header and Footer
Adds a header and footer to the pages printed in the current print session. Header
information contains path and/or file name. Footer prints a page number.
5.11.2 Setting Print Setup
Before printing check the print settings in Page Setup.
1) Choose Print Setup in the File menu. The Print Setup dialog appears.
2) Set the desired page parameters.
3) Click Properties to set options supported by your printer.
4) Click OK to apply settings, Cancel to Exit without changing.

Olympus CAMEDIA Master 1.2 User Guide
45
5.11.3 Printing a Single Image
1) Click to select an image from the Index View Window or print from an open image window
in Image Mode.
2) Select Print in the File menu. The Print dialog appears.
3) Click on the Single Image radio button.
4) Enter the number of copies desired.
5) Check Size and enter the desired size of the image if other than maximum print area.
6) Check Date to include the Print Date.
7) Click OK to Print. Cancel to exit without printing.
5.11.4 Printing an Index View
1) Select an Index View Window or a group of images in the Index View Window.
2) Select Print in the File menu. The Print dialog appears.
3) Click on the Index Print radio button.
4) Enter the number of copies desired.
5) Check Header and/or Footer to add the header and footer. Header information contains path
and/or file name. Footer prints a page number.
6) Check Small or Large size for the size of thumbnail image desired.
7) Click OK to Print. Cancel to exit without printing.
Olympus CAMEDIA Master 1.2 User Guide
46
5.11.5 Printing Layout Pages
1) Select an Index View Window or a group of images in the Index View Window.
2) Select Print in the File menu. The Print dialog appears.
3) Click the Layout Print radio button for the desired number of images per page.
4) Enter the number of copies desired.
5) Check the appropriate boxes for desired image labels.
6) Check Header and/or Footer to add the preformatted header and footer. Header information
contains path and/or file name. Footer prints a page number.
7) Click OK to Print. Cancel to exit without printing.

Olympus CAMEDIA Master 1.2 User Guide
47
6. Technical Support Options
6.1 Olympus Support for Japan
OLYMPUS OPTICAL CO.,LTD.
Customer Support Center
2951 Ishikawacho hachioujishi
Tokyo 192-7499 Japan
Tel: 0426-42-7499 Fax: 0426-42-7486
http://www.olympus.co.jp/
6.2 Olympus Support for the United States
Olympus America Inc.
Two Corporate Center Drive
Melville, NY 11747-3157
1-888-55DIGITAL
1- 888-553-4448
http://www.olympus.com/
6.3 Olympus Support for Canada
Carsen Group
Olympus Digital Camera
1-800-387-0437
6.4 Olympus Support for Europe

Olympus CAMEDIA Master 1.2 User Guide
48
7. Appendix A: Differences between Windows and
Macintosh Operating Systems
The table below indicates feature and function differences between the Microsoft windows and
Macintosh operating systems:
Feature/Function Option Menu Toolbar Windows Macintosh
About - Help - X X
Camera Settings - Camera - X X
Cascade - Window - X X
Change Color Depth - Image - X X
Close - File - X X
Convert Format - Image - X X
Copy - Edit X X
Crop - Edit X X
Cut - Edit X X X
Detail View - View X X X
Delete - File - X X
Download All Images - Camera - X X
Download Selected Images - Camera - X X
Exit - File - X X
Filter All Image - X X
Find - File - X X
Flip Horizontal Image - X X
- Vertical Image - X X
Go Up - Folders - - X X X
Index - Help - X -
Insert Text - Image - X X
Instant Fix - Image - X X
Large Thumbnails - View X X X
Magic Wand - - X X X
Open - File X X X
Options Details Edit - X X
- Display Edit - X X
- Download Edit - X X
-JPEGEdit-XX
- Magic Wand Edit - X X
- Slide Show Edit - X X
- Wallpaper Edit - X -
Pan - - X X X
Panorama - Image - X X
Paste - Edit X X X
Print Index File X X X
- Layout File X X X
- Single-Date File X X X
- Single-Select File X X X
Print Setup - File - X X
Properties - File X X X
Protect Off Camera - X X
- On Camera - X X
Recent Filters - Image - X X
Redo - Edit X X X
Remove Red-Eye - - X X X
Refresh - View - X X
Rename - File - X X
Rename All Creation Date File - X X
- Type-in File - X X
Resize - Image - X X
Rotate 180 Image - X X
- CCW90 Image X X X
-CW90ImageXXX

Olympus CAMEDIA Master 1.2 User Guide
49
- Free Rotate Image - X X
Save - File X X X
Save As - File - X X
Scroll Mode - View - X X
Select All - Edit - X X
Select Circle - - X X X
Select Lasso - - X X X
Select Mode - View - X X
Select None - Edit - X X
Select Polygon - - X X X
Select Rectangle - - X X X
Slide Show - View - X X
Small Thumbnails - View X X X
Sort Date View - X X
-NameView-XX
- Size View - X X
- Type View - X X
Status Bar-Toggle - View - X X
Template Superimpose - Image - X X
Tile - Window - X X
X-Toggle - View - X X
Undo - Edit X X X
Upload Selected Images - Camera - X X
Wallpaper - Image - X -
Zoom-In - View X X X
Zoom-Out - View X X X
8. Appendix B: Supported Camera Function Tables
Appendix B1 – Special Features and Functions
Special Function
Camera Movie Support Upload Panorama Template
C-21 X X X
C-420L / D-220L X X X
C-820L / D-320L X X X
C-830L / D-340R X X X
C-840L / D-340L X X X
C-900Zoom / D-400Zoom X X X
C-920Zoom / D-450Zoom X X X
C-1000L / D-500L
C-1400L / D-600L
C-1400XL / D-620L
C-2000Zoom X X X
C-2020Zoom X X X X
C-2500L

Olympus CAMEDIA Master 1.2 User Guide
50
Appendix B2 – Camera Settings
Camera Internal LCD Date Power Quality
Camera ID Watch Brightness Indication Save (HQ1/2)
C-21 XXX XX
C-420L / D-220L X X X X X X
C-820L / D-320L X X X X X X
C-830L / D-340R X X X X X
C-840L / D-340L X X X X X
C-900Zoom / D-400Zoom X X X X X
C-920Zoom / D-450Zoom X X X X X
C-1000L / D-500L X
C-1400L / D-600L X
C-1400XL / D-620L X
C-2000Zoom X X X X X
C-2020Zoom X X X X X
C-2500L X X X
9. Appendix C: Supported File Formats
The following file formats are supported for both read and write.
• BMP [*.BMP](Microsoft Windows version only)
• Exif 2.1 - JPEG [*.JPG] (Compression rate by selection - Option)
• Exif 2.1 – TIFF [*.TIF] (No compression)
• JFIF – JPEG [*.JPG] (Compression rate by selection - Option)
• MOV [*.MOV] QuickTime Movie
• PICT (Macintosh version only)
• Templates [*.JPG] (Range compression, JFIF - JPEG)
• TIFF [*.TIF]

Olympus CAMEDIA Master 1.2 User Guide
51
10. Appendix D: Function Mode Reference Table
The chart below indicates available features and functions in the four primary operating modes:
File Modes View Modes
Disk Camera Index Image
Feature/Function Option
Menu Toolbar Mode Mode Mode Mode
About - Help - XXXX
Camera Settings - Camera - - X X X
Cascade - Window - XXXX
Change Color Depth - Image - X - - X
Close - File - XXX-
Convert Format - Image - X - X -
Copy - EditXXXX-
Crop - Edit - X - X -
Cut - EditXX- X-
Detail View - View X X - X -
Delete - File - XXX-
Download All Images - Camera - - X X X
Download Selected Images - Camera - - X X X
Exit - File - XXXX
Filter All Image - X - - X
Find - File-X-XX
Flip Horizontal Image - X - - X
- Vertical Image - X - - X
Go Up - Folders - - XXXX-
Index - Help- XXXX
Insert Text - Image-X--X
Instant Fix - Image - X - - X
Large Thumbnails - ViewXXXX-
Magic Wand - - XXX- X
Open - File XXXX-
Options Details Edit- XXXX
- Display Edit- XXXX
- Download Edit- XXXX
- JPEG Edit- XXXX
- Magic WandEdit- XXXX
- Slide ShowEdit - XXXX
- Wallpaper Edit- XXXX
Pan - - XXX- X
Panorama - Image - X - X -
Paste - EditXX--X
Print Index File X X - X X
- Layout File X X - X X
- Single-Date File X X - X X
- Single-Select File X X - X X
Print Setup - File - X - X X
Properties - File XXXXX
Protect Off Camera - - X X -
- On Camera - - X X -
Recent Filters - Image - X - - X
Redo - Edit X X - - X
Refresh - View- XXX-
Rename - File-X-X-
Rename All Creation Date File - X - X -
- Type-in File-X-X-
Resize - Image- XXXX
Rotate 180 Image - X - X X
- CCW90 ImageXX- XX
- CW90 ImageXX- XX
- Free Rotate Image - X - - X
Save - File X X - - X
Save As - File - X X - X
Olympus CAMEDIA Master 1.2 User Guide
52
Scroll Mode - View - X X - X
Select All - Edit- XXXX
Select Circle - - XXX- X
Select Lasso - - XXX- X
Select Mode - View - X X - X
Select None - Edit - XXXX
Select Polygon - - XXX- X
Select Rectangle - - XXX- X
Slide Show - View - X - X -
Small Thumbnails - ViewXXXX-
Sort Date View- XXX-
- Name View- XXX-
- Size View- XXX-
- Type View- XXX-
Status Bar-Toggle - View - XXXX
Template Superimpose - Image - X X - X
Tile - Window - XXXX
Toolbar-Toggle - View - XXXX
Undo - Edit X X - - X
Upload Selected Images - Camera - - X X X
Wallpaper - Image - X - X -
Zoom-In - ViewXXX- X
Zoom-Out - ViewXXX- X
