
CCH
®
ProSystem
fx
®
FixedAssets
User Guide
April 2017
Copyright 2000-2017, CCH Incorporated and its affiliates and licensors. All rights reserved. Material in this publication
may not be reproduced or transmitted, in any form or by any means, without prior written permission. Requests for that
permission should be directed to:
CCH Incorporated
20101 Hamilton Ave.
Suite 200
Torrance, CA 90502
The contents of this publication are believed to be accurate. However, responsibility cannot be assumed for the
information contained herein, and the consequences resulting from the use thereof. Material in this publication is subject
to change without notice.
This User Manual and the computer software it describes are designed to provide accurate and authoritative information
in regard to the subject matter covered. They are distributed with the understanding that the publisher is not engaged in
rendering legal, accounting, or other professional services. If legal advice or other expert assistance is required, the
services of a competent professional should be sought.
"CCH ProSystem fx Fixed Assets" is a registered trademark of CCH INCORPORATED.
“Windows” is a registered trademark of Microsoft Corporation.
All other brand, product, or company names are trademarks or registered trademarks of their respective owners.

Contents • iii
Chapter 1 - Introduction
1
Welcome to CCH®ProSystemfx® Fixed Assets
1
Highlights of CCH ProSystemfx Fixed Assets
1
Additional Resources
3
About the CCH ProSystemfx Fixed Assets User Guide
3
Conventions
4
Keyboard Shortcut Keys
4
Dialog Box Keys
4
Editing Keys
5
Cursor Movement Keys
5
CCH ProSystemfx Fixed Assets Keys
6
Menu Commands
7
Toolbar Buttons
8
CCH ProSystemfx Fixed Assets Toolbar
8
Standard Toolbar
9
Customizing the Standard Toolbar
11
Adding, Removing, and Reordering Buttons
11
Standard Toolbar Display Options
12
Docking the Toolbars
12
Using the Status Bar
12
Using Help
12
CCH ProSystemfx Fixed Assets support on the Web
13
Chapter 2 - Installing CCH ProSystemfx Fixed Assets
14
System Requirements
14
Permission Key
14
Installing CCH ProSystemfx Fixed Assets
14
Workstation Setup
16
Uninstalling CCH ProSystemfx Fixed Assets
17
Setting Preferences
17
Setting Up a Printer
20
Overview of Global Settings
20
Creating Global Settings for Amortization Code Sections
21
Creating Global Settings for Assets
22
Contents
Contents • iv
Default Property Types
24
Creating Global Settings for Books
25
Creating Global Settings for Categories
26
Creating Global Settings for Columns
26
Creating Global Settings for Filters
27
Creating Global Settings for GL Accum Depr/Amort Accounts
30
Creating Global Settings for GL Asset Accounts
30
Creating Global Settings for GL Depr/Amort Exp Accounts
31
Creating Global Settings for Locations
32
Creating Global Settings for Reports
32
Creating Global Settings for Report Sets
33
Creating Global Settings for User Defined Fields
34
Editing Global Settings
35
Renaming Global Settings
35
Copying Global Settings from an Alternate Location
36
Switching Between Local and Network Global Settings
37
Password Protecting Global Settings
37
Editing the Global Settings Password
37
Disabling Password Protection
38
Configuring Global Setting Update Options
38
Chapter 3 - Managing Clients
39
Creating a New Client
39
Applying Global Settings to a File
43
Setting Up Books
44
Book Setup and Section 179/Bonus Setup Default Settings
45
Section 179/Bonus Setup Defaults
48
Setting up Section 179/Bonus Data
48
Editing a Client's Book Setup
50
Resetting Book Defaults
51
Copying Books
51
Section 179 Business Rule
52
Disaster Zone Clean up Business Rule
53
Cellulosic Biomass Ethanol Business Rule
53
Contents

Contents • v
Recycling Business Rule
53
Section 168k and Disaster Zone Special Allowance Depreciation
Differences Business Rule
53
Specifying File Locations for Export and Report Print Files
54
Password Protecting a Client's File
54
Saving the Client File
55
Opening a Client File
56
Printing the Client List
57
Printing a Client List to a Printer
57
Printing a Client List to a PDFor Text File
58
Editing Client Properties
58
Changing the Client Type
59
Editing Fiscal Year Dates
61
Editing a Year
61
Adding a Year
61
Deleting a Year
62
Closing a Fiscal Year
62
Locking/Unlocking Fiscal Year Calculations
63
Amending Assets in a Locked Fiscal Year
63
Reversing a Closed Year
64
Deleting a Client File
65
Overview of Client File Management
65
CCH ProSystemfx Fixed Assets Files
65
Setting Up File Management Default Settings
66
Backing Up Client Data Files
67
Restoring Backup Data Files
68
Overview of Checking Files In/Out
69
Network Installation
69
Remote Check In/Out
69
Locking Files
69
Checking Files out from the Network to a Local Folder
70
Checking Files in to a Network from a Local Folder
70
Remotely Checking Files out from a Network
71
Remotely Checking Files in to a Network
72
Contents

Contents • vi
Abandoning a Checked-Out File
72
Saving a Client File to CCH ProSystemfx Engagement
73
Chapter 4 - Managing Assets
75
Overview of the Asset Detail Tab
75
Customizing Asset Detail Fields
76
Editing the Asset ID Field
76
Customizing Tax Schedule Links
77
Changing an Asset's Tax Link
77
Adding a New Entity
78
Editing an Entity
79
Deleting an Entity
79
Configuring the Asset Detail Picklist
80
Adding an Asset
82
Entering Asset Detail
82
Entering Depreciation Input
83
Navigating the Depreciation Detail Grid
83
Using the Depreciation Detail Grid
84
Type of Property
84
Additional Property Type (Optional)
85
Type of SUV(Optional)
85
Special Allowance Option
85
Cost or Other Basis (Optional)
86
Business Use Percent (Optional)
86
Method (Required)
87
Life (years, rate, or unit) (Required)
87
Convention
87
Sec. 179/Bonus (Optional)
88
Salvage Value (Optional)
88
ITC/Basis Adjustment (Optional)
88
Tax Preference/Section 168(e) Code (Optional)
88
Exchange Parent Current Depreciation
89
Prior Depreciation (Optional)
89
Special Allowance Depreciation (Optional)
89
Contents

Contents • vii
Current Depreciation (Optional)
89
Business Use Current Depreciation (Optional)
89
Total Depreciation (Optional)
89
Basis Reduction (Optional)
90
Adjusted Basis
90
Applying Section 179 Bonus Maximums at a Client Level
90
Apply the Maximum Section 179
91
Maximize all Section 179
91
Applying Section 179 Bonus Maximums at an Asset Level
92
Displaying a Calculation
92
Adding a Vehicle or Listed Property
93
Entering Home Office Input
94
Business Use of Home Information
94
Day Care Facilities
95
Business Use Percentage
95
Editing Property Tax Input Values
95
Entering State Use and State Use Amount Data
98
Projecting Asset Depreciation Data
98
Project Asset Depreciation for all Active Books
98
Project Asset Depreciation for a Specific Book
99
Editing an Asset
99
Duplicating an Asset
99
Clearing Current Depreciation Overrides
100
Locating an Asset
100
Using the Go To Asset Option
100
Using the Navigational Arrows and Keyboard Shortcuts
100
Adding Multiple Duplicates
101
Using Find and Replace
101
Customizing the Asset List View
102
Using the Asset List View
102
Customizing the Asset List View
102
Asset List Status Codes
103
Other Asset List Features
103
Contents

Contents • viii
Right-click Menu
103
To Select Consecutive Assets in the Asset List
103
To Select Non-consecutive Assets
103
To Select All Assets in the Asset List
103
Adding, Removing, and Rearranging Asset List Columns
104
Resizing Asset List Columns
105
Reapplying Default Asset List Column Settings
106
Overview of Using Filters
106
Creating a New Filter
106
Editing a Line in a Filter Formula
108
Removing a Line from a Filter Formula
109
Clearing a Filter's Entire Formula
109
Renaming a Filter
109
Deleting a Filter
110
Using the Calculator
110
Deleting Assets
110
Deleting a Single Asset
111
Deleting Multiple Assets
111
Transferring Assets between Files
111
Transferred Asset Status Codes
112
Copying Assets between Files
113
Splitting Assets
115
Undo Split
116
Tracking Assets
117
Selected Asset Information
117
Event Selection
117
Event Detail
117
Chapter 5 - Managing Asset Disposition
119
Creating an Asset Disposition
119
Changing an Asset Disposition
119
Disposition Detail Input Fields
120
Related Party
121
Disposition Grid
123
Contents

Contents • ix
Disposing of an Asset Using Like-kind Exchange
123
Creating a Partial Disposition
125
Changing an Asset Disposition
127
Removing an Asset Disposition
127
Overview of Processing Group Dispositions
127
Grouping Assets for Disposition
128
Creating a Group Disposition Using Like-Kind Exchange
129
Editing a Group Disposition
131
Deleting a Group Disposition
131
Allocating a Group Disposition
131
Adding/Removing Assets from the Group Disposition
133
Using the Disposition Tab
133
Adding/Removing Books
133
Report Changes
133
Creating Prior Year Dispositions
134
General Dispositions
134
Like-Kind Exchange (Exchange Assets)
134
Partial Disposition
134
Importing and Exporting Disposition Data
134
Creating Future Year Dispositions
135
General Dispositions
135
Like-Kind Exchange (Exchange Assets)
135
Partial Disposition
135
Importing and Exporting Disposition Data
135
Chapter 6 - Reporting Data
136
Selecting Reports
136
Printing Asset Detail
138
Customizing Report Properties
138
Applying Report Properties
138
Editing Report Properties
139
Prior Year Reports
149
Restricted Reports
150
Printing Reports
151
Contents

Contents • x
Previewing Reports
152
Printing to a PDF File
154
Saving Report Data to a File
154
Overview of Managing Report Sets
155
Creating a Report Set
155
Editing a Report Set
157
Deleting a Report Set
158
Printing a Report Set
159
Printing Government Forms
160
Exporting Reports to CCH ProSystemfx Engagement
161
Chapter 7 - Importing Data
163
Integrating CCH ProSystem fx Fixed Assets Data with CCH ProSystemfx
Tax and CCHGlobalfx Tax
163
Importing Assets for a Linked CCH ProSystemfx Tax or
CCHGlobalfxTaxClient
164
Importing Assets from a Non-Linked CCH ProSystemfx Tax or
CCHGlobalfx Tax Client
165
Overview of Importing Data into CCH ProSystemfx Tax and CCHGlobal fx
Tax
166
Importing Data into CCH ProSystemfx Tax and CCHGlobal fx Tax
167
Overview of Importing Data into CCH Access Tax
169
Importing Data into CCH Axcess Tax
170
Overview of Importing Data from Other FAM Products
172
Data to be Imported
172
Importing Data from Asset Keeper Pro
173
Asset Keeper Pro Conversion Issues
173
Importing Data from BNA
173
Importing Data from Fixed Assets CS
174
Fixed Assets CS Depreciation Solution Conversion Issues
174
Importing Data from Intuit® EasyACCT®
175
Importing Data from Sage® Fixed Assets (Sybase™)
175
Sage® Fixed Assets Conversion Issues
176
Importing Data from Sage® Fixed Assets Premier (SQL)
176
Sage® Fixed Assets Conversion Issues
177
Contents

Contents • xi
Overview of Importing Data from User-Defined Files
177
Importing Data from Excel® Spreadsheets
178
Importing Data from ASCII Character Delimited Files
179
Chapter 8 - Depreciation Computations
182
Accelerated Cost Recovery System (ACRS), Optional ACRS Straight Line
Method
182
Asset Life
182
Alternative Minimum Tax (AMT), Adjusted Current Earnings (ACE)
183
Modified Accelerated Cost Recovery System (MACRS), (ADS)
183
Section 168(k) Bonus Depreciation
184
New York Liberty Zone Provision
185
Bonus Depreciation for Disaster Zone Property
185
Bonus Depreciation for Cellulosic Biomass Ethanol Property
186
Bonus Depreciation for Reuse and Recycling Property
186
Asset Life
186
Averaging Convention
187
Depreciation Rate
187
MACRS Tables Method
188
MACRS Calculated Method
188
Pre-ACRS, Financial or Book Depreciation Methods
188
Declining Balance Method
188
Nonrecovery Straight Line Method
189
Sum of the Year's Digits Method
189
Units of Production Method
189
Alternative Minimum Tax (AMT), Adjusted Current Earnings (ACE)
189
Averaging Convention
189
Depreciation Methods Not Calculated
189
Depreciation in the Year of Disposition
190
MACRS, ADS Assets
190
ACRS Assets
190
Financial Depreciation Purposes
190
Like-Kind Exchanges
191
Like-Kind Exchange Computation
191
Contents

Contents • xii
Luxury Auto limits
192
Section 179 Expense
194
Section 179 Expense Computation
194
Alternative Minimum Tax (AMT), Adjusted Current Earnings (ACE)
196
Section 179 Recapture
196
Business Use 50 Percent or Less
196
Section 280F Recapture
197
Business Use 50 Percent or Less
197
Electric Auto Limitations
198
Luxury Auto Limitations
199
Empowerment Zone Property
201
New York Liberty Zone Property
202
Disaster Zone Property
202
Retail Motor Fuels Outlet Property
202
Tax Credits
202
Credit Summary
202
Contents
Chapter1
Chapter 1 - I ntr oducti on
Welcome to CCH
®
ProSystem
fx
®
Fixed Assets
CCH ProSystem
fx
Fixed Assets is a comprehensive software system that computes depreciation
using various methods. CCH ProSystem
fx
Fixed Assets provides reports, worksheets, and FASB-
compliant financial statements. In addition, fixed assets data can be transferred between CCH
®
ProSystem
fx
®
Tax and CCH ProSystem
fx
Fixed Assets, and CCH
®
Global
fx
Tax and CCH
ProSystem
fx
Fixed Assets. Fixed Assets data can also be imported into CCHAxcess™ Tax.
CCH ProSystem
fx
Fixed Assets gives you access to the CCH ProSystem
fx
Technical Support team.
Highlights of CCH ProSystem
fx
Fixed Assets
The following list highlights some of the CCH ProSystem
fx
Fixed Assets features. Details can be
found in this guide and in Help.
Automatic Computations. Simultaneously computes and maintains asset depreciation using
different methods of depreciation for different basis.
CCH ProSystem
fx
Fixed Assets also calculates depreciation for short tax years, special
allowance depreciation, and section 179 depreciation. Gain or loss on asset disposition and ITC
basis adjustments are also automatically calculated.
Automatically calculates prior year depreciation.
Calculations can be overridden. Override CCH ProSystem
fx
Fixed Assets' computed
depreciation amounts, when necessary.
Multiple Depreciation Books. Provides five depreciation books (Federal, Financial, AMT,
ACE, and State), plus three user-defined books.
Asset Disposition. Computes gains and losses on the disposition of an asset. CCH
ProSystem
fx
Fixed Assets can create a group disposition and print Government Disposition
Form 4797.
Financial Statements and Reports. Produces FASB-compliant financial statements and a
variety of reports such as depreciation expense, depreciation expense comparison, projection,
journal entry, variance, and net book value.
Chapter 1 - Introduction • 1
INTRODUCTION

Report Presentation. Reports can be filtered to specify which assets and books to include.
Report Customization. The font, font style and size, and column widths of reports can be
customized. Reports can be printed to a file for export to another program.
Fileable Forms. Produces Government Forms 4562 and 4797.
Annual Cost Summary report. Shows cost totals for each category type for the current and
preceding years to assist in preparing property tax returns.
Simplified Data Entry. Provides asset detail for all books in a grid display as well as
instantaneous compilation for an asset.
Predefined lists of asset types make it easy to add assets. In addition, you can create picklists
for other items such as Location, Category, and General Ledger Account Numbers that can be
used for all assets within a company.
Similar assets can be entered using the Duplicate Asset feature.
Custom Property types. Create and/or modify property types specific to your needs. Enter or
modify the estimated market value, sales tax rate, and sales tax amount of an asset on the
Property Tax
tab.
Autoflow Feature. Fills the cost of other open books with an entry in the federal cost.
GAAP rules for Like-kind Exchanges. GAAP rules can be applied for Like-kind Exchanges in
the Financial book.
Import Capabilities. Imports asset data from CCH ProSystem
fx
Tax, Microsoft
®
Excel
®
, or
CSV files.
Integration with Tax System. Totals only or detailed asset data can be imported into a CCH
ProSystem
fx
Tax return.
Integration with CCH
®
Global
®
Tax System. Totals only or detailed asset data can be
imported into a CCH Global
fx
Tax return.
Depreciation Computations.
Mid-quarter Convention. For assets acquired during the current year, you have the
option of having CCH ProSystem
fx
Fixed Assets determine if the mid-quarter
convention applies, or forcing the mid-quarter or half-year convention. This is done on
the client level when specifying Book Setup.
Adjusted Current Earnings (ACE).
Earnings and Profits (E&P).
Tables and Formulas.
Prior Depreciation.
Section 179 - Total Cost of Property.
AMT Calculation. For personal property acquired after 12/31/1998, AMT and the 150%
election under MACRS are calculated over regular MACRS lives instead of Alternative
Depreciation System lives.
Luxury Autos Limits.
Notes. Provides an 80-character note field for each asset as well as a note field that applies to
the client.
Chapter 1 - Introduction • 2

Additional Resources
Release Information. For information on the latest features in the current release of CCH
ProSystem
fx
Fixed Assets, select Help > Release Info.
User Guide. Select Help > CCH ProSystem
fx
Fixed Assets support on the Web >
Product Home Page > Guides to access the product guides from the CCH Support website.
About the CCH ProSystem
fx
Fixed Assets User Guide
This guide includes the following chapters:
Chapter 1, Introduction, gives an overview of CCH ProSystem
fx
Fixed Assets and explains
the CCH ProSystem
fx
Fixed Assets toolbars and system help features.
Chapter 2, Installing CCH ProSystem
fx
Fixed Assets, gives step-by-step instructions for
installing CCH ProSystem
fx
Fixed Assets on a network server or a standalone computer. It also
discusses setting system preferences.
Chapter 3, Managing Clients, explains how to add, view, and edit client properties. This
chapter also includes information on managing and deleting client files.
Chapter 4, Managing Assets, explains how to add, duplicate, view, edit, filter, and delete
assets. It also discusses how to view asset projections.
Chapter 5, Managing Asset Disposition, explains how to enter an individual or group asset
disposition, view a disposition, change a disposition, and remove a disposition.
Chapter 6, Reporting Data, explains how to define, preview, and print CCH ProSystem
fx
Fixed Assets reports.
Chapter 7, Importing Data, explains how to import clients from CCH ProSystem
fx
Tax and
CCHGlobal
fx
Tax, popular fixed assets applications, and various file types. This chapter also
discusses importing CCH ProSystem
fx
Fixed Assets data into CCH ProSystem
fx
Tax,
CCHGlobal
fx
Tax, and CCHAxcess Tax.
Chapter 8, Depreciation Computations, is a reference for depreciation computations. The
Table of Contents gives a complete list of the topics in this chapter.
Use the guide's table of contents to quickly locate information.
Chapter 1 - Introduction • 3

Conventions
To help you locate and interpret information, this guide uses consistent visual cues and a few
standard text formats as follows:
To clarify the paths to menu functions, the path is shown in parentheses below heading titles:
(File > Client Properties > Basic Information).
Specific actions you should make appear in bold lettering, for example: Select Client
Properties from the menu.
Italics are used to reference titles of chapters and sections in the guide, sections of a screen,
dialogs, tabs, and fields. Here are some examples of this convention:
The
Group Disposition List
dialog displays.
Enter a date in the
Date of Disposition
field.
Chapters and section names will have a hyperlink to that page in the guide, for example,
Allocating a Group Disposition
on page131.
A message beginning with Note, Tip, or Warning contains important additional information
about the preceding text.
Function keys are shown in bold lettering, for example: Press F5 to locate an asset.
Keyboard Shortcut Keys
CCH ProSystem
fx
Fixed Assets assumes you are familiar with Windows
®
operating systems and
that you are using a mouse with Windows
®
. However, for your convenience, the keyboard shortcuts
available within CCH ProSystem
fx
Fixed Assets are listed below.
Dialog Box Keys
Shortcut Function
Page Up or Page Down Scrolls up or down a list box, one window at a time
Alt + Down Arrow,
or F4
Opens a selected drop-down list
Alt +Up Arrow,
or F4
Closes a selected drop-down list
Spacebar Toggles between selecting and clearing a check box
Shift + Up Arrow,
Shift + Down Arrow,
Shift + Right Arrow,
or Shift + Left Arrow
Extends the selection in a text box one character at a
time
Chapter 1 - Introduction • 4

Shortcut Function
Shift + Page Up
Extends the selection to the first character in a text
box
Shift + Page Down
Extends the selection to the last character in a text
box
Enter
Executes a command button or chooses the selected
item in a list box and executes the command
Esc,
or Alt +F4
Closes a dialog box without completing the command
Editing Keys
Shortcut Function
Ctrl + C
Makes a copy of the selected text and places it on the
Clipboard
Ctrl +V Inserts text from the Clipboard to the active window
Ctrl +X
Deletes the selected text and places it on the
Clipboard
Ctrl +Z Reverses the previous editing operation
Cursor Movement Keys
Shortcut Function
Up Arrow Moves up one line
Down Arrow Moves down one line
Right Arrow Moves right one character
Left Arrow Moves left one character
Ctrl + Right Arrow Moves right one word
Ctrl + Left Arrow Moves left one word
Home Moves to the beginning of the line
Chapter 1 - Introduction • 5

Shortcut Function
End Moves to the end of the line
CCH ProSystem
fx
Fixed Assets Keys
Shortcut Function
Ctrl + A Selects Asset List or input field data
Ctrl + D Deletes an asset
Ctrl + F Finds a value and replaces it with another value
Ctrl + G Finds the next occurrence of a specified value
Ctrl + N Creates a new client
Ctrl +O Opens a client
Alt +F4 Closes a client
Ctrl + R Displays client properties
Ctrl +S Saves content without closing the client file
Ctrl + T Adds an asset
Ctrl +U Duplicates an asset
F5 Goes to a specific asset
F6
Toggles between the upper and lower sections of the
Detail
and
Disposition
tabs
Alt +Home Moves to the first asset
Alt + End Moves to the last asset
Alt + Page Up,
or Alt + Up Arrow
Moves to the previous asset
Alt + Page Down,
or Alt + Down Arrow
Moves to the next asset
Chapter 1 - Introduction • 6

Menu Commands
Shortcut Menu Commands
Ctrl + T Assets > Add
Ctrl + D Assets > Delete
Ctrl + U Assets > Duplicate
Alt + Home Assets > First
Alt + End Assets > Last
Alt + Page Down Assets > Next
Alt + Page Up Assets > Previous
Ctrl + C Edit > Copy
Ctrl + X Edit > Cut
Del Edit > Delete
F5 Edit > Go To
Ctrl + V Edit > Paste
Ctrl + A Edit > Select All
Ctrl + F Edit > Find and Replace
Ctrl + Z Edit > Undo
Ctrl + R File > Client Properties
Alt + F4 File > Close
Ctrl + N File > New …
Ctrl + O File > Open …
Ctrl + S File > Save
Chapter 1 - Introduction • 7

Navigation
Keyboard Shortcuts Navigation Shortcuts
or Alt + Home
First
Selects the first asset
or Alt + Page Up
Previous
Selects the previous asset
or Alt + Page
Down
Next
Selects the next asset
or Alt + End
Last
Selects the last asset
Go To
Asset
Locates an asset by system number or company asset
ID
Toolbar Buttons
CCH ProSystem
fx
Fixed Assets provides two toolbars for quick access to frequently used functions.
The CCH ProSystem
fx
Fixed Assets toolbar consists of system-defined icons. The Standard toolbar
can be customized to display user-defined icons. The toolbars can be turned on or off, and
customized from the View menu. Use the following commands to set your toolbar preferences:
View > Toolbars > All. Toggles both the CCH ProSystem
fx
Fixed Assets toolbar and the
Standard toolbar on or off.
View > Toolbars > Fixed Assets. Toggles the CCH ProSystem
fx
Fixed Assets toolbar on or
off.
View > Toolbars > Standard. Toggles the Standard toolbar on or off.
View > Toolbars > Customize. Allows you to customize the Standard toolbar icons.
CCH ProSystem
fx
Fixed Assets Toolbar
New Client. Ctrl + N. Creates a new client file. If another client is open,
you are prompted to save changes before creating a new client.
Open Client. Ctrl + O. Opens an existing client file. If another client is
open, you are prompted to save changes before opening another client.
Save Client. Ctrl + S. Saves the active client file.
Delete Asset. Ctrl + D. Deletes the selected asset or assets.
Chapter 1 - Introduction • 8

Add Asset. Ctrl + T. Adds a new asset.
Duplicate Asset. Ctrl + U. Creates a duplicate of the selected asset.
Print Asset Detail. Prints an asset detail report including depreciation
detail for the asset selected on the Asset List or displayed in the
Detail
tab.
Print Reports. Displays a list of reports that can be printed.
Display Calculation. Displays the calculation for the current year
depreciation.
Open Client Notes. Opens the client's note.
Open Client Properties. Ctrl + R. Opens the
Client Properties
dialog
allowing you to change client detail, setup books, etc.
Filters. Displays the
Filter List
dialog from which you can add filters or
edit existing ones.
Filter List. Displays available filters that can be applied to the Asset List.
This drop-down list is only available on the Asset List window.
Go To Asset. F5. Enables you to locate an asset by system number or
company asset ID.
First, Previous. Alt + Home, Alt + Page Up. Moves to the first asset or
previous asset.
Next, Last. Alt + Page Down, Alt + End. Moves to the next asset or last
asset.
Standard Toolbar
The Standard toolbar can be customized to include the following icons:
New Client. Ctrl + N. Creates a new client file. If another client is open, you are prompted to
save changes before creating a new client.
Open Client. Ctrl + O. Opens an existing client file. If another client is open, you are prompted
to save changes before opening another client.
About. Displays the current version information and current licensing for CCH ProSystem
fx
Fixed Assets.
Close Client. Alt + F4. Closes a client file.
Customize Toolbar. Allows you to add, remove, and organize buttons on the Standard
toolbar.
Exit. Closes CCH ProSystem
fx
Fixed Assets.
Chapter 1 - Introduction • 9

Import from Tax. Allows you to import asset data for CCH ProSystem
fx
Tax and
CCHGlobal
fx
Tax clients.
Import Various File Types. Allows you to import asset data from a selection of fixed assets
management applications, Excel
®
files, and comma separated value files.
Export to Engagement Menu. Displays a drop-down list of export functions that includes
Export Reports and Provide Engagement User Info.
Copy Assets. Allows you to copy assets between client data files.
Transfer Assets. Allows you to transfer assets between client data files.
Print Menu. Displays a drop-down list of print functions, which includes Reports, Asset
Detail, and Forms.
Edit Menu. Displays a drop-down list of editing functions that includes Undo, Cut, Copy (Ctrl
+ C), Paste, Delete, and Select All (Ctrl + A).
Find Menu. Displays a drop-down list of search functions that includes Find and Replace (Ctrl
+ F), and Find Next (Ctrl + G).
Multiple Duplicate. Allows you to specify the number of times to duplicate a selected asset.
Split Asset. Divides a single asset into multiple assets.
Undo Split. Combines split assets into the single originating asset.
Section 179 Allocation. Allows you to set the section 179 amounts on all eligible current-year
assets from the Asset List.
File Management Menu. Displays a drop-down list of functions to manage a client file that
includes Setup, Backup, Restore, Check-in, and Check-out.
Global Settings Menu. Displays a drop-down list to select and setup CCH ProSystem
fx
Fixed Assets Global Settings.
Books. Allows you to activate Financial, AMT, ACE, State, and define three additional books.
Copy Books. Allows you to copy books that are active in the current year to any book that is
available. AMT and ACE are only available to copy if the originating book is Federal, AMT or
ACE.
Columns. Allows you to add, remove, or rearrange columns for display in the Asset List.
Fields. Allows you to edit Asset Detail field definitions.
Lock/Unlock Calculation. Allows you to lock or unlock any active year.
Disposition Menu. Displays a drop-down list of disposition functions that includes Remove
Disposition and Group Disposition.
Chapter 1 - Introduction • 10

Preferences. Allows you to set user preferences for certain print, display, export, currency
rounding, data entry, and Global Settings update functions.
Configure Security. Allows you to password protect a client file.
Calculator. Displays the calculator program.
Close Year End. Allows you to close the current year and open the next year.
Remove Overrides. Removes the current depreciation overrides for all assets in the client
file.
Reverse Closed Year. Allows you to roll back to the prior year.
Help Topics. Alt + F1. Displays the CCH ProSystem
fx
Fixed Assets Help program.
Release Info. Displays release information, feature, and system requirements for the installed
version.
CCH ProSystem
fx
on the Web. Displays the list of CCH ProSystem
fx
Fixed Assets Web
links.
Help for Current Field. F1. Displays field-level help for the selected field.
Tutorial. Launches the tutorial program.
Amend Asset. Allows you to amend a locked asset.
Customizing the Standard Toolbar
(View > Toolbars > Customize)
The CCH ProSystem
fx
Fixed Assets Standard toolbar can be customized using the following
functions:
Add, remove, and reorder buttons.
Insert one or more separators to organize buttons.
Restore previous toolbar settings.
Show or hide button labels.
Display small or large icon images.
Adding, Removing, and Reordering Buttons
To display the
Customize Toolbar - Standard Toolbar
dialog, do one of the following:
Select View > Toolbars > Customize.
Click Customize Toolbar on the toolbar.
Chapter 1 - Introduction • 11

The
Customize Toolbar - Standard Toolbar
dialog provides the following functions:
Add an item to the toolbar. Select a button or separator from
Available toolbar buttons
and
click Add, drag it to
Current toolbar buttons
, or double-click the item to add it.
Remove an item from the toolbar. Select a button or separator from the
Current toolbar
buttons
and click Remove, drag it to
Available toolbar buttons
, or double-click the item to
remove it.
Reorder a toolbar item. Select the item to be moved in
Current toolbar buttons
and click
Move Up or Move Down. You can also drag an item to a new position.
Reset the toolbar. Click to restore the toolbar to its setting prior to opening the dialog.
Standard Toolbar Display Options
The
Customize Toolbar - Standard Toolbar
dialog provides a
Text Options
drop-down list to modify
the appearance of the Standard Toolbar. You can choose to show button labels below each icon, to
the right of each icon, or to display icons without text labels.
Docking the Toolbars
By default, the toolbars are docked at the top of the screen below the menu bar. You can move them
to another toolbar position or to another position on the CCH ProSystem
fx
Fixed Assets window. To
move a toolbar, click a Separator (the vertical line on the left side of each toolbar) and drag it to any
position.
Using the Status Bar
The status bar, located at the bottom of the window, displays messages advising what process is
being performed. It also displays descriptions of selected menu options, field tips, and toolbar
buttons. To toggle the status bar on/off, select View > Status Bar.
Using Help
To access Help, you can use any of the following methods:
Select Help > Help Topics, press Alt + F1, or click Help topics on the toolbar to access help
on all topics.
Select Help > Help for Current Field, press F1, or click Help for Current Field on the toolbar
for field-specific help.
Select Help > Tutorial or click Tutorial on the toolbar to access the tutorial program for CCH
ProSystem
fx
Fixed Assets.
Select Help > CCH ProSystem
fx
Fixed Assets support on the Web > Product Home
Page > Guides to access the product guides from the CCH Support website.
Chapter 1 - Introduction • 12

CCH ProSystem
fx
Fixed Assets support on the Web
The Customer Support Web site can be accessed by selecting Help > CCH ProSystem
fx
Fixed
Assets support on the Web > Product Home Page or by clicking CCH ProSystem
fx
on the
Web on the toolbar.
The CCH ProSystem
fx
Fixed Assets support on the Web menu options open your Internet Web
browser and take you to the selected area of the Customer Support Web site:
Product Home Page. View information (e.g., FAQs, System Requirements, Hot Topics)
related to the product.
Browse our Knowledge Base. Browse articles by topic to find solutions that our tax and
support team have compiled.
Contact Support. Contact us with your general comments and questions, check the status of
support and enhancement requests, view firm information change requests, find Web site
administration information, and more.
Start a Remote Support Session. Start a support session with a support representative.
My Account. Log in or register to manage your account, receive copies of your invoices, check
the status of your order, and more.
Product Guides. Access product user guides for helpful information on features.
Chapter 1 - Introduction • 13

Chapter2
Chapter 2 - I nst all i ng CCH P roSyst em
fx
F ixed Assets
Before beginning the installation, you should exit all Windows
®
programs. If this is a first-time
installation, have your permission files ready or, if you will be downloading the permission files from
the Internet, have your SSO login information ready. See
Permission Key
below for more
information.
Notes:
If this is a network installation, all users must exit the CCH ProSystem
fx
program and all CCH
ProSystem
fx
applications.
If you are using Citrix
®
, you must install CCH ProSystem
fx
Fixed Assets at the server PC as an
administrator and run the installation using Add/Remove Programs in Control Panel. This
ensures that INI and DLL program files are properly installed in the system directories.
System Requirements
You can access the CCH ProSystem
fx
Fixed Assets system requirements on the CCH Support
website.
Permission Key
A permission key is necessary for your first installation of CCH ProSystem
fx
Fixed Assets and for the
installation of the initial CCH ProSystem
fx
Fixed Assets release each year. For subsequent
installations, the install program reads permission information from your hard drive or network server.
Permission keys are downloaded from our web site. For instructions, please see our Knowledge Base
article: https://support.cch.com/kb/solution.aspx/kb159
Installing CCH ProSystem
fx
Fixed Assets
Do the following to install CCH ProSystem
fx
Fixed Assets to a standalone PC or network server:
1.
If you are installing directly from the downloaded install files, then please follow the instructions
provided in the release notes.
Chapter 2 - Installing CCH ProSystemfx Fixed Assets • 14
INSTALLING CCH PROSYSTEM FX FIXED
ASSETS

2. Select Start > Run.
3. Type ?:\Setup (where ? represents the location of the install files) and click OK.
Note: If necessary, click Browse to find your install files and select Setup.exe.
After CCH ProSystem
fx
Fixed Assets Setup prepares for the installation, the
Permission File
dialog displays.
4.
Select one of the following methods to install the permission key:
Internet download. Downloads the permission key from the Internet. If you are
installing for the first time, this option is selected by default.
If you use this method, you must enter your customer account number.
Use previously installed permission key. Not available for the first installation.
Permission key disk drive path. Select this option to use your permission files. Enter
the drive location where the permission key is located or click Browse to locate the drive.
5.
Do one of the following:
If you selected
Internet download
, enter your CCH ProSystem
fx
user ID and password
on the CCH ProSystem
fx
Login screen, and click Login to begin downloading your
permission key. The permission key is downloaded from the Web site and the installation
proceeds to the next step automatically.
If you selected a different option on the
Permission File
dialog, click Next to continue to
the Welcome screen.
6. Click Next on the Welcome screen to display the
Type of Installation
dialog.
7.
Select one of the following options:
Network Install. Installs CCH ProSystem
fx
Fixed Assets to a common network drive
for access by other networked workstations. Users from other workstations must run
Setup.exe from the network drive/directory where CCH ProSystem
fx
Fixed Assets is
installed. See the following section,
Workstation Setup
, for information.
Standalone Install. Installs CCH ProSystem
fx
Fixed Assets to your computer and
creates a program group with an icon to access CCH ProSystem
fx
Fixed Assets.
8. Click Next to continue.
9.
Select the destination location for the program files. You can accept the default location,
C:\FixedAst, or click Browse to select a different location.
Note: If a message advises there is insufficient space on the selected drive, you must
select a different drive or exit the installation and allow for additional space on the
destination drive.
10. Click Next to continue.
11.
Select the destination location for the client data. You can accept the default location,
C:\FixedAst\UserData, or click Browse and select a different location to store the client data
files.
12. Click Next to continue.
Chapter 2 - Installing CCH ProSystemfx Fixed Assets • 15

13.
Select the features you want to install.
Tutorial. Installs the tutorial for CCH ProSystem
fx
Fixed Assets.
Sample Clients. Installs sample client data for your reference.
14. Click Next to continue.
15. Select a program folder for the CCH ProSystem
fx
Fixed Assets icons. You can accept the
default, enter a new folder name, or select another existing folder.
16. Click Next to continue.
17. Click Install to begin the installation.
18.
When the install is complete, you are prompted to restart your computer. Make a selection and
click Finish.
Note: You can select to do this now or later, but the computer must be restarted to update
certain system files before running CCH ProSystem
fx
Fixed Assets.
Workstation Setup
Complete the following steps to give a workstation access to a network installation of Fixed Assets:
1. Select Start > Run.
2. Enter the directory path of the CCH ProSystem
fx
Fixed Assets workstation setup program,
?:\FixedAst\Setup.exe (where ? represents the network drive). Use Browse, if needed, to
locate the path. Click OK.
3. Click Next on the Welcome screen to display the
Type of Installation
dialog.
4. Select Workstation Setup and click Next.
5.
Select a location for your work folder where your backup files will be stored. Accept the default
location or click Browse to select a different location. The work folder should be on a local drive.
Click Next to continue.
6. Select a program folder for the CCH ProSystem
fx
Fixed Assets icons. You can accept the
default, enter a new folder name, or select another existing folder. Click Next to continue.
7. Click Install to begin the installation.
8.
When the install is complete, you are prompted to restart your computer. Make a selection and
click Finish.
Note: You can select to do this now or later, but the computer must be restarted to update
certain system files before running CCH ProSystem
fx
Fixed Assets.
Chapter 2 - Installing CCH ProSystemfx Fixed Assets • 16

Uninstalling CCH ProSystem
fx
Fixed Assets
To uninstall CCH ProSystem
fx
Fixed Assets, complete the following steps:
1. From the Start menu, select Control Panel > Programs and Features.
2. On the
Install/Uninstall
tab, select CCH ProSystem
fx
Fixed Assets from the list of installed
software and click Add/Remove. If you are uninstalling a local installation, skip to step 4.
3.
Do one of the following:
To uninstall the entire network installation, choose Uninstall Network.
To remove the local program group, icons, and registry entries, choose Uninstall
Workstation.
4. A confirmation dialog displays. Click Yes to begin the uninstall program.
5. Click Finish.
Notes:
You may be prompted to restart your computer. You can choose to restart now or later, but the
computer must be restarted to completely remove CCH ProSystem
fx
Fixed Assets program
files.
The uninstall program does not remove client data files or custom Global Settings.
Setting Preferences
(Tools > Preferences)
The CCH ProSystem
fx
Fixed Assets user preferences allow you to do the following:
Control what assets display and the way the Asset List displays.
Control what assets print in reports.
Specify how currency values are rounded on a per file basis.
Carry an existing asset's tax link, sales tax rate, and settings to new assets.
Automatically allocate a portion of gain/loss to assets involved in group dispositions.
Control when you upgrade Global Settings.
Chapter 2 - Installing CCH ProSystemfx Fixed Assets • 17

To set display, print, and new asset preferences, do the following:
1. To display the
Preferences
dialog, do one of the following:
Select Tools > Preferences.
Click Preferences on the toolbar.
2. In the
Display options
section, check one or both of the following boxes:
Display prior year disposed assets. Display assets with prior year disposition dates.
When the option is not checked, assets with disposition dates prior to the current year
are removed from the Asset List.
Display fully depreciated assets. Display fully depreciated assets. When the option is
not checked, assets with no current depreciation, no adjusted basis, and placed in
service prior to the current year are removed from the Asset List.
3. Choose a grid style from the
Asset List style
drop-down list in the
Display options
section.
Display all lines
Display vertical lines only
Chapter 2 - Installing CCH ProSystemfx Fixed Assets • 18

Alternating shaded lines
No lines
4. In the
Print and export options
section, check any or all of the following options:
Print prior year disposed assets. Include assets with disposition dates prior to the
current year in printed reports or printed asset detail.
Print fully depreciated assets. Include all fully depreciated assets in printed reports or
printed asset detail.
Prepare Form 4562 even if not required to be filed. Preview and print Form 4562
whether or not it is required to be filed.
Create single PDF file for multiple report selection. Creates a single PDF file with
bookmarks for multiple reports. When this option is not selected, the system processes a
PDF file for each report.
Note: You can also print a group of reports to a single PDF on a case-by-case basis
by selecting the
Print to single PDF
option on the
Print
dialog.
5. In the
Currency rounding
section, choose whether to round currency values to the nearest dollar
or penny on a per file basis.
Warning! If you change your
Currency rounding
preference from penny to dollar, the
pennies will not recalculate if you change the option back.
6. In the
Data entry
section, select one or both of the following boxes:
Use previous tax link for new asset. New assets assume the same tax link as the
preceding asset in the Asset List.
Use previous asset's sales tax rate. New assets adopt the sales tax rate entered on
the previous asset.
Use previous asset’s settings for new asset. New assets adopt the following details
from the previous asset's settings:
Date Acquired
Date in Service
Category
Location
Type of Property
Additional Property Type
Special Allowance Option
Business Use Percentage
Method
Life
Convention
Tax Preference/Section 168(e) Code
Chapter 2 - Installing CCH ProSystemfx Fixed Assets • 19
7. Select Always allocate portion of gain/loss to each asset to automatically allocate
gain/loss amounts to individual assets involved in group dispositions. Each asset involved in a
group disposition will display allocated gain/loss amounts on the
Disposition
tab.
Note: Selecting this option will not automatically allocate gain/loss amounts to assets
involved in existing group dispositions.
8. See
Configuring Global Setting Update Options
on page38 to determine how updated Global
Settings are applied to client files.
9. Click OK.
Setting Up a Printer
(File > Printer Setup)
Use Printer Setup to change the printer destination for your reports.
1. Select File > Printer Setup.
2. Select a printer from the
Name
drop-down list.
Note: To change printer configurations, click Properties.
3. Click OK to save your changes and exit this dialog.
Overview of Global Settings
(Tools > Global Settings)
Global settings can be customized as default values for a variety of CCH ProSystem
fx
Fixed Assets
components. Apply global settings to reduce the time it takes to create new assets and reports for a
client, and to ensure consistency in the application of certain program and depreciation calculation
settings.
1.
To select a Global Setting option, do the following:
Select Tools > Global Settings.
Click Global Settings Menu on the toolbar.
2.
Select one of the following options:
Amortization Code Sections GL Asset Accounts
Assets GL Depr/Amort Exp Accts
Books Locations
Categories Reports
Chapter 2 - Installing CCH ProSystemfx Fixed Assets • 20

Columns Report Sets
Filters Security
GL Accum Depr/Amort Accts User Defined
See
Setting Preferences
on page17 for instructions on determining how changes to Global Settings
should be applied to existing client files.
Note: An individual using a remote installation of CCH ProSystem
fx
Fixed Assets can configure
the system to use Global Settings from a network installation or copy settings from an alternate
location into a local setup.
Creating Global Settings for Amortization Code Sections
(Tools > Global Settings > Amortization Code Section)
To create a Global Setting for Amortization Code Sections, do the following:
1. To display the
Global Settings - Amortization code section
dialog, do one of the following:
Select Tools > Global Settings > Amortization Code Section.
Click Global Settings Menu and select Amortization Code Section.
2. Click New. The
Global Settings - Amortization code section
dialog displays and lists
amortization codes.
3. Edit the name or enter a new name in the
Global setting
field.
4. If desired, enter descriptive text in the
Field tip
field to display in the left area of the status bar.
5.
Do any of the following:
To move the position of an item in the picklist, select an item and click Move Up or
Move Down.
To delete items from the picklist, select an item and select Delete.
To clear the entire picklist, select Clear list.
Select Restore to restore the system-provided picklist.
To list the items alphabetically, check the Sort list alphabetically box.
To add an item to the picklist, enter a new item in the
Edit item
field and click Add.
To change an item, highlight an existing item. The selected item displays in the
Edit
item
field. Make changes to the item in the
Edit item
field. Click Apply to update the
picklist or Clear field to abandon your changes.
6. Click OK to save your changes and exit this dialog.
7. Click Close.
Chapter 2 - Installing CCH ProSystemfx Fixed Assets • 21

Creating Global Settings for Assets
(Tools > Global Settings > Assets)
Use the following procedure to create customized method, life defaults, and whether to allow Section
179 for existing property types (for example, Auto or Personal). These new defaults can be applied to
Federal and other books (for example, Financial and AMT). You can also create customized property
types.
Use this procedure to create Global Settings:
1. To display the
Global Settings - Assets
dialog, do one of the following:
Select Tools > Global Settings > Assets.
Click Global Settings Menu and select Assets.
2. Click New. The
Global Settings - Assets
dialog displays a list of property types.
3. Edit the default name in the
Global setting name
field.
4.
You can do the following:
Edit the method, life values, and whether to allow Section 179 for one or more of the
default property types.
The values available in the
Method
field for selection are dependent on the start and end
dates. The values in the
Life
field are determined by the selected method.
Chapter 2 - Installing CCH ProSystemfx Fixed Assets • 22

Once Global Settings for Assets are applied to a client's file, changes made to default
method and life values are applied to existing assets.
a.
Click the tab for the book you want to change and highlight a property type.
b. Click Edit and make changes to the default method, life values, and whether to
allow Section 179.
c. Click Apply to update the values for the selected property type or click Clear to
abandon your changes and exit Edit mode.
d. If you change the method value on the
Federal
tab, you may be prompted to
apply your changes to other books where the modifications are relevant. Click
Yes to apply the changes to the other books. Click No to only apply the changes
to the Federal book.
Note: If Global Settings for assets has methods or lives different from the
Federal
tab, the setting for
Compute Basis As...
in File > Client Properties > Book Setup
must be changed to None. Otherwise, the book will follow Federal.
Create a customized property type.
CCH ProSystem
fx
Fixed Assets includes more than two dozen default property types,
see
Default Property Types
on the facing page. You also have the option to create
customized property types.
The
Long Name
,
Abbreviated Name
, and
Code
fields are required fields.
a. Click New on the
Global Settings List - Assets
dialog. The
New Property Type
dialog displays.
b. Enter a name for the property type in the
Long Name
field.
Information entered in the
Long Name
and
Code
fields displays in the picklist of
the
Type of Property
field in the depreciation detail section of the
Detail
tab. The
field allows 40 characters.
c. Enter an abbreviated name for the property type in the
Abbreviated Name
field.
The abbreviated name displays in the
Type of Property
field after a customized
property type has been selected. The code value also displays in reports.
d. Enter a code for the new property type in the
Code
field.
The code is appended to the long name in the
Type of Property
drop-down list
and may also be used in the reports. The field allows four characters.
e. Enter a start date for the new property type in the
Start Date
field.
f. Enter an end date for the new property type in the
End Date
field. Your new
property type displays in the
Type of Property
drop-down list on the
Detail
tab
when the Date in service is in this date range. The new property type will remain
in the list until it has an end date that has expired.
g. Click OK to save your changes and exit this dialog. The
Global Settings - Assets
dialog displays in edit mode.
h. Select a depreciation method from the
Method
drop-down list.
Chapter 2 - Installing CCH ProSystemfx Fixed Assets • 23
i. Select or enter a default value in the
Life
field.
j. Select whether to allow Section 179 for the new property type in the
Allow
Sec179
field.
k. Click Apply to update the values for the new property type or Clear to abandon
your changes and exit edit mode.
Assign default property type.
When adding new assets, you have the option of selecting the default property type that
will display in the
Type of Property
field on the
Detail
tab.
The default property type displays on all book tabs, but can only be set on the
Federal
tab.
a.
Highlight a property type in the list.
b. Click Set as Default. The property type selected now displays an asterisk (*)
denoting that it is the default property type. It is also the first in the
Property Type
list.
5. Click OK to save your changes and exit this dialog.
6. Click Close.
Default Property Types
CCH ProSystem
fx
Fixed Assets includes the following default property types:
Personal Investment Res Rental
Amort Leasehold RRB
Auto NonRes Software
Auto-Elec Other Start Up
Auto-No Lmt Qual Lease SUV
Foreign Real Tax-Exempt
Fuels Outlet Real-Farm Truck/Van
IDC Real LIH Utility
Improvement Reforestation Water Utility
Chapter 2 - Installing CCH ProSystemfx Fixed Assets • 24

Creating Global Settings for Books
(Tools > Global Settings > Books)
To create a Global Setting for books, do the following:
1. To display the
Global Settings List- Books
dialog, do one of the following:
Select Tools > Global Settings > Books.
Click Global Settings Menu and select Books.
2. Select the client type the Global Setting is to be configured for and click New.
The
Global Settings - Books
dialog displays.
3. Edit the name in the
Global settings name
field as needed.
4. Configure the book settings as needed. See
Setting Up Books
on page44 for configuration
details.
5. Click OK to save your changes and exit this dialog.
6. Click Close.
Chapter 2 - Installing CCH ProSystemfx Fixed Assets • 25

Creating Global Settings for Categories
(Tools > Global Settings > Categories)
To create a Global Setting for categories, do the following:
1. To display the
Global Settings List - Category
dialog, do one of the following:
Select Tools > Global Settings > Categories.
Click Global Settings Menu and select Categories.
2. Click New. The
Global Settings - Category
dialog displays.
3. Edit or enter a new name in the
Global setting
field.
4. If desired, enter descriptive text in the
Field tip
field to be displayed in the left area of the status
bar.
5.
Do any of the following:
To move the position of a category in the picklist, select a category and click Move Up or
Move Down.
To delete categories from the picklist, select a category and select Delete.
To clear the entire picklist, select Clear list.
To list the categories alphabetically, select Sort list alphabetically.
To add a new category to the picklist, enter a new category in the
Edit item
field and
click Add.
To change an item, highlight an existing category. The selected category displays in the
Edit item
field. Make changes to the category in the
Edit item
field. Click Apply to
update the picklist or Clear field to abandon your changes.
6. Click OK to save your changes and exit this dialog.
7. Click Close.
Creating Global Settings for Columns
(Tools > Global Settings > Columns)
To create a Global Setting for the columns displayed on the
Asset List
tab, do the following:
1. To display the
Global Settings - Columns
dialog, do one of the following:
Select Tools > Global Settings > Columns.
Click Global Settings Menu and select Columns.
2. Click New. The dialog displays.
3. Edit or enter a new name in the
Global setting name
field.
4. Select a type of book (for example, Disposition, Federal, etc.) from the
Column Category
drop-
down list according to the type of detail you want to display.
Chapter 2 - Installing CCH ProSystemfx Fixed Assets • 26

5.
Change the columns configurations as needed.
Add columns. Select one or more columns from the
Available columns
list and click
the right arrow. You can also double-click or drag columns to add them to the
Columns
selected for display
list.
Remove columns. Select one or more items from the
Columns selected for display
list and click the left arrow. You can also double-click or drag columns to move them to
the
Available columns
list.
Change the order of columns. Select a column in the
Columns selected for display
list. Click Move Up or Move Down.
Restore defaults. Click Apply Default to return the
Columns selected for display
to
the original system-default list.
6.
Repeat steps 4 and 5 until columns for all desired categories are selected. A maximum of 26
columns may be selected for the Asset List view.
7. Click OK.
8. Click Close.
Note: When column selections are made to an active book and the book is then deactivated, any
saved column selections are retained. The data is cleared and the columns become blank.
Creating Global Settings for Filters
(Tools > Global Settings > Filters)
To create a Global Setting for a filter that can be applied to selected files, do the following:
1. To display the
Global Settings List - Filters
dialog, do one of the following:
Select Tools > Global Settings > Filters.
Click Global Settings Menu and select Filters.
Chapter 2 - Installing CCH ProSystemfx Fixed Assets • 27

2. Click New. The
Filter Editor
dialog displays.
3. Edit the name or enter a new name in the
Filter Name
field.
4.
Create the first line of the condition that will control which assets are affected by this filter. The
elements that can be used to define a filter include the following:
Parenthesis. Use the left and right parentheses to connect multiple expressions.
Field name. Use the drop-down list to select the general or detail field to be used. Fields
are listed alphabetically with detail fields listed first and general fields listed last.
From book. This field becomes available if the field name you choose is a detail field.
Select the book from the drop-down list. You also have the option of applying the search
conditions to any or all of the available books. Selecting Any returns results if one or
more books match the search criteria. If All is selected, each book must meet the applied
search condition to return a result.
Condition. Use the drop-down list to select the search operators to use in the formula.
There are eight system-defined operands.
= Equal
<> Not Equal
> Greater Than
>= Greater Than or Equal
< Less Than
<= Less Than or Equal
Chapter 2 - Installing CCH ProSystemfx Fixed Assets • 28

P Present
NP Not Present
Value. The choices available depend on the field name you chose. The following entries
are possible.
Picklist. If the field has a picklist associated with it (e.g., Category field), the
picklist displays in the Value field.
Date field. If the field is a date field, the date entered must match the
mm/dd/yyyy date format.
Numeric amount. If the field is a numeric field, enter a numeric value in the
format to be used.
5.
When you have completed the line, you can do one of the following:
Click Add to List to insert the filter into the bottom section of the window. If this is not
the first line, it is added to the end of the formula list.
Highlight an existing line. Click Insert to add the line directly above the highlighted line.
Highlight an existing line. Click Replace to delete the existing line and replace it with the
newly defined formula.
6.
You can continue adding filters to the formula list. To connect two consecutive lines, use the
And or Or connector by choosing a radio button in the
Connect with previous
section.
7.
You can also manipulate the filter lines by using one of the following buttons:
Modify. Highlight a line in the formula and click Modify. You can change any of the
elements that define the line. Click Replace to exchange the existing line with the
modified line. You can also click Add to List or Insert to add a new line to the list while
leaving the existing line unchanged.
Delete. Highlight a line in the formula list and click Delete. You are asked to confirm
that you want to delete the line.
Clear All. Clicking this button deletes all defined formula lines.
8. Click OK when you are finished.
9. Click Close.
Chapter 2 - Installing CCH ProSystemfx Fixed Assets • 29

Creating Global Settings for GL Accum Depr/Amort Accounts
(Tools > Global Settings > GL Accum Depr/Amort Acct)
To create a Global Setting for GL Accum Depr/Amort Accounts, do the following:
1. To display the
Global Settings List - GL accum. depr./amort. accts.
dialog, do one of the
following:
Select Tools > Global Settings > GL Accum Depr/Amort Acct.
Click Global Settings Menu and select GLAccum Depr/Amort Acct.
2. Click New. The
Global Settings - GL accum. depr./amort. acct.
dialog displays.
3. Edit or enter a new name in the
Global setting
field.
4. If desired, enter descriptive text in the
Field tip
field to be displayed in the left area of the status
bar.
5.
Do any of the following:
To move the position of an item in the picklist, select an item and click Move Up or
Move Down.
To delete items from the picklist, select an item and select Delete.
To clear the entire picklist, select Clear list.
To list the items alphabetically, check the Sort list alphabetically box.
To add an item to the picklist, enter a new item in the
Edit item
field and click Add.
To change an item, highlight or double-click an existing item. The selected item displays
in the
Edit item
field. Make changes to the item in the
Edit item
field. Click Apply to
update the picklist or Clear field to abandon your changes.
6. Click OK to save your changes and exit this dialog.
7. Click Close.
Creating Global Settings for GL Asset Accounts
(Tools > Global Settings > GL Asset Account)
To create a Global Setting for GL Asset Accounts, do the following:
1. To display the
Global Settings List - GL asset accounts
dialog, do one of the following:
Select Tools > Global Settings > GL Asset Account.
Click Global Settings Menu and select GLAsset Account.
2. Click New. The
Global Settings - GL asset account
dialog displays.
3. Edit or enter a new name in the
Global setting
field.
4. If desired, enter descriptive text in the
Field tip
field to be displayed in the left area of the status
bar.
Chapter 2 - Installing CCH ProSystemfx Fixed Assets • 30
5.
Do any of the following:
To move the position of an item in the picklist, select an item and click Move Up or
Move Down.
To delete items from the picklist, select an item and select Delete.
To clear the entire picklist, select Clear list.
To list the items alphabetically, check the Sort list alphabetically box.
To add an item to the picklist, enter a new item in the
Edit item
field and click Add.
To change an item, highlight or double-click an existing item. The selected item displays
in the
Edit item
field. Make changes to the item in the
Edit item
field. Click Apply to
update the picklist or Clear field to abandon your changes.
6. Click OK to save your changes and exit this dialog.
7. Click Close.
Creating Global Settings for GL Depr/Amort Exp Accounts
(Tools > Global Settings > GL Depr Amort Exp Acct)
To create a Global Setting for GL Depr/Amort Exp Accounts, do the following:
1. To display the
Global Settings List - GL depr./amort. exp. accts.
dialog, do one of the
following:
Select Tools > Global Settings > GL Depr Amort Exp Acct.
Click Global Settings Menu and select GLDepr/Amort Exp Acct.
2. Click New. The
Global Settings - GL depr./amort. exp. acct.
dialog displays.
3. Edit or enter a new name in the
Global setting
field.
4. If desired, enter descriptive text in the
Field tip
field to be displayed in the left area of the status
bar.
5.
Do any of the following:
To move the position of an item in the picklist, select an item and click Move Up or
Move Down.
To delete items from the picklist, select an item and select Delete.
To clear the entire picklist, select Clear list.
To list the items alphabetically, check the Sort list alphabetically box.
To add an item to the picklist, enter a new item in the
Edit item
field and click Add.
To change an item, highlight or double-click an existing item. The selected item displays
in the
Edit item
field. Make changes to the item in the
Edit item
field. Click Apply to
update the picklist or Clear field to abandon your changes.
6. Click OK to save your changes and exit this dialog.
7. Click Close.
Chapter 2 - Installing CCH ProSystemfx Fixed Assets • 31

Creating Global Settings for Locations
(Tools > Global Settings > Locations)
To create a Global Setting for Locations, do the following:
1. To display the
Global Settings List - Locations
dialog, do one of the following:
Select Tools > Global Settings > Locations.
Click Global Settings Menu and select Locations.
2. Click New. The
Global Settings - Location
dialog displays.
3. Edit or enter a new name in the
Global setting
field.
4. If desired, enter descriptive text in the
Field tip
field to be displayed in the left area of the status
bar.
5.
Do any of the following:
To move the position of a location in the picklist, select a location and click Move Up or
Move Down.
To delete locations from the picklist, select a location and select Delete.
To clear the entire picklist, select Clear list.
To list the locations alphabetically, check the Sort list alphabetically box.
To add a location to the picklist, enter a new location in the
Edit item
field and click Add.
To change an item, highlight or double-click an existing location. The selected location
displays in the
Edit item
field. Make changes to the location in the
Edit item
field. Click
Apply to update the picklist or Clear field to abandon your changes.
6. Click OK to save your changes and exit this dialog.
7. Click Close.
Creating Global Settings for Reports
(Tools > Global Settings > Reports)
Report properties cannot be customized for Form 4797.
To create a Global Setting for reports or forms, do the following:
1. To display the
Global Settings List - Reports
dialog, do one of the following:
Select Tools > Global Settings > Reports.
Click Global Settings Menu and select Reports.
2. Click New. The
Global Settings - Reports
dialog displays.
3. Edit the contents of the
Global setting name
field as needed.
Chapter 2 - Installing CCH ProSystemfx Fixed Assets • 32

4.
Do one or more of the following as needed:
To modify a report's settings, select a report from the
Reports list
and click Properties.
Make the needed configurations and click OK.
To set the report formatting options, click Set Reporting Format. Make the necessary
changes and click OK.
To modify settings for Form 4562, select the form in the
Forms list
and click Form
Properties. Make the needed configurations and click OK.
5. Click OK on the
Global Settings - Reports
dialog to save settings.
6. Click Close.
Creating Global Settings for Report Sets
(Tools > Global Settings > Report Sets)
Book overrides do not apply to certain reports.
To create a Global Setting for report sets, do the following:
1. To display the
Global Settings List - Report Sets
dialog, do one of the following:
Select Tools > Global Settings > Report Sets.
Click Global Settings Menu and select Report Sets.
2. Click New to display the
Edit Report Set
dialog.
Chapter 2 - Installing CCH ProSystemfx Fixed Assets • 33
3. Edit the contents of the
Set name
field as needed.
4.
Select the reports you want to include in the report set and configure the report and book
overrides as needed. See
Creating a Report Set
on page155 for details.
5. To edit properties for an individual report in a set, highlight the report and click Properties. See
Customizing Report Properties
on page138 for more information.
6. Click Save to save your settings and close the
Edit Report Set
dialog.
7. Click Close.
Creating Global Settings for User Defined Fields
(Tools > Global Settings > User Defined)
Seven user defined fields can be customized for items such as cost center, department, and asset ID
tag.
To create a Global Setting for User Defined fields 1 through 7, do the following:
1. To display the
Global Settings List - User Defined
dialog, do one of the following:
Select Tools > Global Settings > User Defined.
Click Global Settings Menu and select User Defined.
2. Click New. The
Global Settings - User defined
dialog displays.
3. Edit or enter a new name in the
Global setting name
field.
4. If desired, enter descriptive text in the
Field tip
field to be displayed in the left area of the status
bar.
5.
Do any of the following:
To move the position of an item in the picklist, select an item and click Move Up or
Move Down.
To delete items from the picklist, select an item and select Delete.
To clear the entire picklist, select Clear list.
To list the items alphabetically, check the Sort list alphabetically box.
To add an item to the picklist, enter a new item in the
Edit item
field and click Add.
To change an item, highlight or double-click an existing item. The selected item displays
in the
Edit item
field. Make changes to the item in the
Edit item
field. Click Apply to
update the picklist or Clear field to abandon your changes.
6. Click OK to save your changes and exit this dialog.
7. Click Close.
Chapter 2 - Installing CCH ProSystemfx Fixed Assets • 34

Editing Global Settings
(Tools > Global Settings)
To make changes to Global Settings, do the following:
1. Select Tools > Global Settings or click Global Settings Menu on the toolbar.
2.
Select one of the following from the drop-down menu:
Amortization Code Sections GL Asset Accounts
Assets GL Depr/Amort Exp Accts
Books Locations
Categories Reports
Columns Report Sets
Filters Security
GL Accum Depr/Amort Accts User Defined
3. Highlight the Global Setting to be updated and click Edit.
4. Make the necessary changes and click OK.
Note: If editing a Global Setting for a report, select a report or form and click Properties
on the
Global Settings - Reports
dialog. Click Form Properties to edit Form4562.
Renaming Global Settings
(Tools > Global Settings)
To rename a Global Setting, do the following:
1. Select Tools > Global Settings or click Global Settings Menu from the toolbar.
2.
Select the desired category from the drop-down list.
3. Highlight the Global Setting to change and click Rename. The
Rename Global Setting
dialog
displays.
4. Enter a new name in the
Change to
field and click OK.
Chapter 2 - Installing CCH ProSystemfx Fixed Assets • 35

Copying Global Settings from an Alternate Location
(Tools > Global Settings > Select > Copy Global Settings)
This procedure cannot be performed if a client file is currently open.
To configure options for copying Global Settings from an alternate location, do the following:
1. Select Tools > Global Settings > Select > Copy Global Settings. The
Global Data Settings
dialog displays.
2. In the
Current path field,
enter the path to the location of the CCH ProSystem
fx
Fixed Assets
installation (i.e.,x:\fixedast) where Global Settings are to be copied from, or click Browse.
3. In the
Copy global settings from alternate location
section, do one of the following:
To copy Global Settings now, check the Copy settings now box.
To import updated Global Settings the next time CCH ProSystem
fx
Fixed Assets is
opened, check the Always copy alternate settings at startup box.
Check both boxes to import Global Settings when you exit this dialog and to import
Global Settings each time CCH ProSystem
fx
Fixed Assets is opened.
4. Click OK.
Note: If the
Copy settings now
box is checked, you are prompted for a password if you have
enabled the Global Data Security option in your local installation.
Chapter 2 - Installing CCH ProSystemfx Fixed Assets • 36

Switching Between Local and Network Global Settings
(Tools > Global Settings > Select\Copy Global Settings)
To configure CCH ProSystem
fx
Fixed Assets to use local or network Global Settings, do the
following:
1. Select Tools > Global Settings > Select\Copy Global Settings.
2. In the
Active global settings selection
section, do one of the following:
To use your local Global Settings, choose Use local settings.
To use network Global Settings, choose Use alternate location settings.
3. Click OK.
Password Protecting Global Settings
(Tools > Global Settings > Security)
CCH ProSystem
fx
Fixed Assets prompts users for a password when they attempt to edit Global
Settings or copy them from an alternate location. Do the following to password protect Global Setting
configurations:
1. To display the
Secure Global Data
dialog, do one of the following:
Select Tools > Global Settings > Security.
Click Global Settings Menu and select Security.
2. Enter a password in the
New password
field.
3. Reenter the password in the
Verify
field.
4. Click OK.
Editing the Global Settings Password
(Tools > Global Settings > Security)
To change the Global Settings password, do the following:
1. To display the
Secure Global Data
dialog, do one of the following:
Select Tools > Global Settings > Security.
Click Global Settings Menu and select Security.
2. Enter the current password in the
Old Password
field.
3. Enter a password in the
New password
field.
4. Enter the same password in the
Verify
field.
5. Click OK.
Chapter 2 - Installing CCH ProSystemfx Fixed Assets • 37

Disabling Password Protection
1. Enter the current password in the
Old password
field.
2. Leave the
New password
and
Verify
fields blank and click OK.
3. Click OK to accept your changes and close the confirmation dialog.
Configuring Global Setting Update Options
(Tools > Preferences)
For instructions on all of the selections on the
Preferences
dialog, see
Setting Preferences
on
page17.
1. To display the
Preferences
dialog, do one of the following:
Select Tools > Preferences.
Click Preferences on the toolbar.
2. Select one of the following from the
When to use updates to Global Settings
section:
Always apply updates. Changes to Global Settings are applied to client files once the
update process is completed.
Prompt to apply updates. Gives users the option of applying an updated Global
Setting when opening a client file.
Only when global settings are changed in Client Properties. Updated Global
Settings are only applied to a client file when selected in Client Properties.
3. Click OK to save your selections and exit this dialog.
Chapter 2 - Installing CCH ProSystemfx Fixed Assets • 38

Chapter3
Chapter 3 - Managi ngC li ent s
This chapter explains how to create client files, edit their properties, password protect a file, and
delete client data.
If you are a licensed user of CCH ProSystem
fx
Tax or CCHGlobal
fx
Tax, you will learn how to
create and link a CCH ProSystem
fx
Fixed Assets client file to its corresponding CCH ProSystem
fx
Tax or CCH Global
fx
Tax return. This interface allows you to transfer client profile information in a
tax return and fixed assets data.
Creating a New Client
Create a New Client linking to a CCH ProSystem
fx
Tax or CCH Global
fx
Tax Client.
Use the following procedure to create a new CCH ProSystem
fx
Fixed Assets client from CCH
ProSystem
fx
Tax or CCHGlobal
fx
Tax and enter basic client data:
a. Do one of the following to display the
Client Properties
dialog:
Select File > New.
Press Ctrl + N.
Click New Client on the toolbar.
Chapter 3 - Managing Clients • 39
MANAGING CLIENTS

The
Client Properties
dialog displays.
Note: The year will default to the year of the CCH ProSystem
fx
Fixed
Assets product version.
b. Select the client type from the list in the
Client type
section.
c. Click Select CCH ProSystem fx Client.
d.
Choose the location of the Tax version to be used for retrieving client data: Local,
Network, Laptop, or Internet.
Notes:
Select Internet to import from CCH Global
fx
Tax. You are required to enter your
CCH Global
fx
Tax user ID to link to a CCH Global
fx
Tax client.
You may be required to enter your CCH ProSystem
fx
Tax user ID if sign-on has
been activated in Office Manager.
e. The
Select CCH ProSystemfx Tax Client
dialog displays.
Use one of the following to select a client:
Choose Client ID or Client name. Enter a full or partial ID or name and click OK.
Use the drop-down lists in the
Select client by
section to create a filtered list from
which you can choose the desired client and click OK.
Chapter 3 - Managing Clients • 40

Note: If you are importing from a CCH Global
fx
Tax client, the
Select CCH
ProSystemfx Tax Client
dialog has additional drop-down lists to create a filtered
client list using the tax year and office account criteria.
f.
If more than one client matches your filter criteria or you have entered a partial name or
client ID, the
Applicable Clients
dialog displays the matches. Highlight the applicable
client and click OK.
The client's profile data populates the
Basic Information
and
Client Detail
tabs.
Note: When client data is changed in CCH ProSystem
fx
Tax, CCH Global
fx
Tax,
Client Manager, or CCH
®
ProSystem
fx
®
Practice Management, the updates do not
automatically transfer to CCH ProSystem
fx
Fixed Assets. If a client's tax data
changes, it must be imported to CCH ProSystem
fx
Fixed Assets to ensure the
information is accurate.
g. Edit the Current year
Beginning
and
Ending
dates as well as the
Entity start date,
if
necessary. A warning displays when the system detects discrepancies with the entered
dates and you attempt to leave the date fields.
Notes:
Date changes do not display in the Fiscal Year list until you edit the fiscal year
calendar or close and re-open the
Client Properties
dialog.
If your entity start date precedes the current year, you can view and edit the
interim fiscal years by clicking Edit Calendar. See
Editing Fiscal Year Dates
on
page61 for detailed instructions.
Interim fiscal years are also referred to as NA years.
h. Click the Client Detail tab.
i.
Enter the client information you require. No fields on this tab are mandatory.
j. To setup client's books options, see
Setting Up Books
on page44.
k. Click the File Locations tab to set the default directory paths in which export and report
print files will be stored.
l. Click OK to save your changes and exit this dialog.
m. You are prompted to import asset data from the linked return. Click Yes to begin the
import process.
Note: You may click No to postpone importing data to a later time, see
Importing
Assets for a Linked CCH ProSystemfx Tax or CCHGlobalfxTaxClient
on
page164. If you click No, skip the rest of the following steps.
n.
One or more of the following circumstances may apply to your return:
If multiple versions of the client's return exist, a list of applicable returns for the
client displays. Select a return or a version of the return, and click Import.
Chapter 3 - Managing Clients • 41

If no returns exist for the client, you are given the option to browse for and select
an existing return.
If you are importing data from a password-protected return, you are prompted to
enter a password.
o. Click OK when the import has completed.
Notes:
When importing User List secured returns, if your CCH ProSystem
fx
Tax or CCH Global
fx
Tax user ID is not on the list of users authorized to access this return, you receive an
access denied message.
If errors are encountered during the import process, you are given the option to view and
print a report of the exceptions.
Create a New Client not linked to Tax.
Use the following procedure to create a new CCH ProSystem
fx
Fixed Assets client and enter
basic client data:
a. Choose one of the following to display the
Client Properties
dialog:
Select File > New.
Press Ctrl + N.
Click New Client on the toolbar.
b. Select the client type from the list in the
Client type
section.
c. Enter the Client ID and EIN/SSN.
d.
Edit the beginning and ending Current year dates as well as the Entity start date as
necessary. A warning displays when the system detects discrepancies with the entered
dates and you attempt to leave the date fields.
Notes:
Date changes do not display in the Fiscal Year list until you edit the fiscal year
calendar or close and re-open the
Client Properties
dialog.
If your entity start date precedes the current year, you can view and edit the
interim fiscal years by clicking Edit Calendar. See
Editing Fiscal Year Dates
on
page61.
Interim fiscal years are referred to as NA years.
e. Click the Client Detail tab.
f.
Enter the client information you require. No fields on this tab are mandatory.
g. To setup client's books options, see
Setting Up Books
on page44.
h. Click the File Locations tab to set the default directory paths in which export and report
print files will be stored.
i. Click OK to save your changes and exit this dialog.
Chapter 3 - Managing Clients • 42
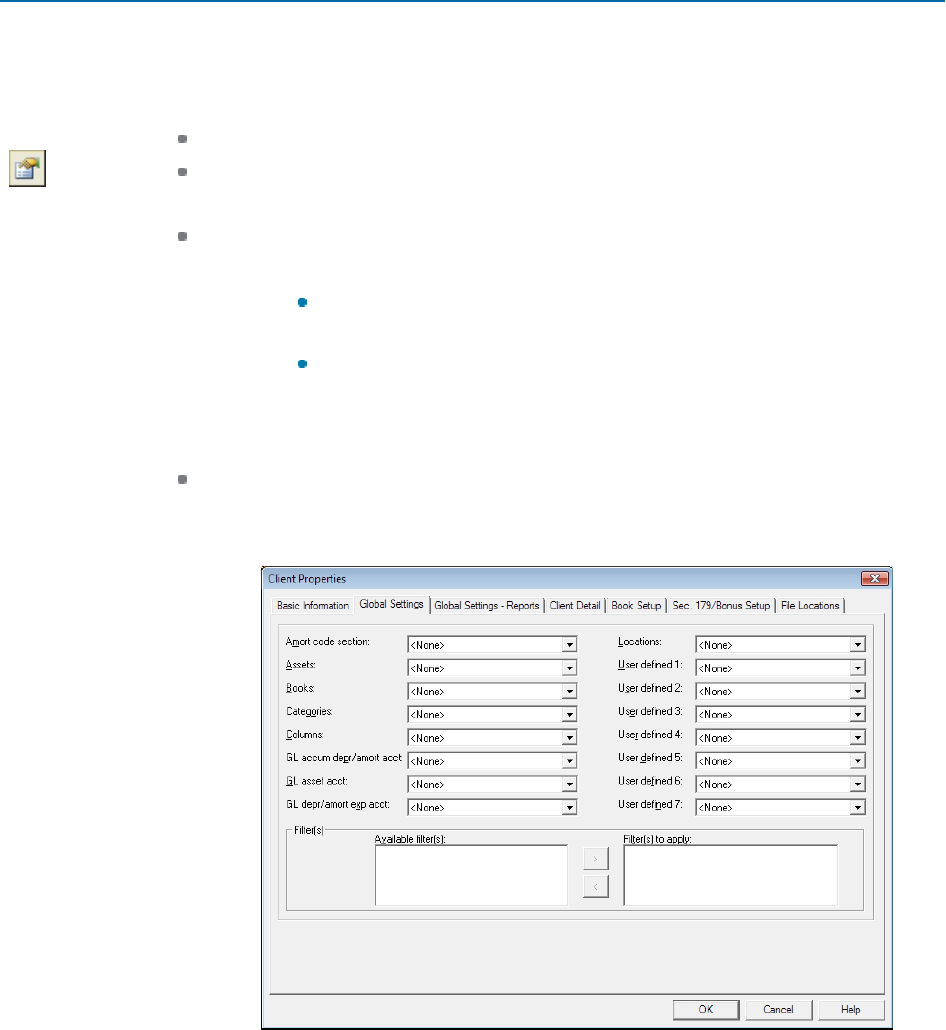
Applying Global Settings to a File
(File > Client Properties > Global Settings or Global Settings - Reports)
To apply the values configured in global settings to a client file, do the following:
1. To display the
Client Properties
dialog, do one of the following:
Select File > Client Properties.
Click Open Client Properties on the toolbar.
2.
Do one of the following:
Apply global settings for reports and report sets
Click the
Global Settings - Reports
tab.
Apply global settings for reports. Select a single report from the
Reports
list.
Apply global settings for report sets. Select one or more report sets in
the
Available set(s)
list and click the right-arrow to move them to the
Set
(s) to apply
list. You can also drag or double-click an individual report set
to move it between lists.
Apply all other global settings
a. Click the Global Settings tab.
b.
Select the appropriate global settings from the drop-down lists.
Chapter 3 - Managing Clients • 43

c. Select one or more filters you want to add to the Asset List
Filter
field from the
Available filter(s)
list, and then click the right-arrow to move them to the
Filter(s)
to apply
list. You can also drag or double-click an individual filter to move it
between lists.
3. Click OK to save your changes and exit the
Client Properties
dialog.
Setting Up Books
(File > Client Properties > Book Setup)
CCH ProSystem
fx
Fixed Assets provides these basic books: Federal, Financial, AMT, ACE, and
State. You can also define three additional books.
To set up books, do the following:
1. With the client file opened, do one of the following to display the
Client Properties
dialog:
Select File > Client Properties.
Click Open Client Properties on the toolbar.
2. Click the Book Setup tab.
Chapter 3 - Managing Clients • 44

3.
Enter the information for each book, keeping the following in mind:
You must activate a book by selecting Yes from the
Activate Book
drop-down list before
you can configure the rest of the book’s fields.
States can be assigned to a book by choosing a state from the
Designate state for
export
drop down. Assigning a state will reset the autoflow and Section 179 options to
reflect the state law in effect for the current year. State AMT and ACE books can be
designated in the Other1, Other 2 or Other 3 book by selecting in the Compute basis as
box. For these options to be available, the state book must be active.
The mid-quarter convention is independently calculated for each book. The mid-quarter
indicator for prior year assets is stored for each asset as a detail item.
4. See the following section,
Book Setup and Section 179/Bonus Setup Default Settings below
for detailed descriptions of the fields on the
Book Setup
tab.
5. When you have completed the
Book Setup
, click OK to save your changes and close this
dialog.
Note: If Global Settings for Books have been applied to this file, you are prompted to apply
your changes to the Global Setting file. Click Yes to update the Global Setting file. Click No
to save your changes without updating the Global Setting file.
Book Setup and Section 179/Bonus Setup Default Settings
The following chart identifies the books activated by default for each client type. The default settings
are the same for all client types with the exception of Fiduciary for which Section 179 is not calculated.
ClientType Federal Financial AMT ACE State
Corporation Yes Yes Yes Yes Yes
SCorporation Yes Yes Yes No(field is read-only) Yes
Partnership Yes Yes Yes No Yes
Individual Yes No Yes No(field is read-only)
Yes
Fiduciary Yes No Yes No(field is read-only) Yes
Exempt Yes No No No Yes
The
Book Setup
tab includes several fields which are described in the sections that follow.
General Options
Activate book. Determines whether a book will be available for data entry or calculation, or
included in reports. The Federal book is set to
Yes
and cannot be changed.
Chapter 3 - Managing Clients • 45

Book description. Displays depreciation book headings in Asset Detail and Reports.
Autoflow Options
Federal cost. Fills the cost for all books based on federal cost. If a change is made to the
Federal
Cost or Other Basis
field and a cost has not been entered for the book, you are given
the choice to flow the change to other books.
Section 179. AMT and ACE books always follow the Federal. If the state allows Section 179,
State AMT, and State ACE follow the state.
Disaster Zone. Enables/disables the autoflow of the Federal Accelerated Depreciation option
(allowed by changes made by the Gulf Opportunity Zone Act of 2005 and the Kansas disaster
area in Food, Conservation, and Energy Act of 2008) to specific books.
Cellulosic Biomass Ethanol. Enables/disables the autoflow of the cellulosic biomass ethanol
plant property allowance to other specific books.
Recycling. Enables/disables the autoflow of the Federal Accelerated Depreciation option
(allowed by changes made by the Emergency Economic Stabilization Act of 2008) to specific
books.
Special Allowance 168(k) Options.
JCWA/JGTRRA. Enables/disables the autoflow of the 2001-2004 30% and 50%
Federal Accelerated Depreciation options (allowed by changes made by the Job
Creation and Workers Assistance Act of 2002 and the Jobs and Growth Tax Relief
Reconciliation Act of 2003) to specific books.
50% Bonus. Enables/disables the autoflow of the 2008-2017 50% Accelerated
Depreciation option to specific books. Allowed by changes made by the Recovery
Rebates and Economic Stimulus for the American People Act of 2008, the American
Recovery and Reinvestment Act of 2009, the Small Business Jobs Act of 2010, the Job
Creation Act of 2010-H.R. 4853, the American Taxpayer Relief Act of 2012, and the
Protecting Americans from Tax Hikes Act of 2015.
100% Bonus. Enables/disables the autoflow of the 2010/2011 100% Accelerated
Depreciation option (allowed by the Job Creation Act of 2010 - H.R. 4853) to specific
books.
40% Bonus. Enables/disables the autoflow of the 2018 40% Accelerated Depreciation
option to specific books. Allowed by the Protecting Americans from Tax Hikes Act of
2015.
30% Bonus. Enables/disables the autoflow of the 2019 30% Accelerated Depreciation
option to specific books. Allowed by changes made by the Protecting Americans from
Tax Hikes Act of 2015.
Calculation Options
Federal ITC basis adjustment. If you select
Yes
, CCH ProSystem
fx
Fixed Assets makes the
Federal basis reduction in the book. The adjustment is not available for the E&P book.
Chapter 3 - Managing Clients • 46

Compute basis as... Causes the book to initially autoflow all amounts for a new asset from the
selected book. The
Financial
field of the
Autoflow Section 179
,
Disaster Zone
,
Cellulosic
Biomass Ethanol
,
Recycling
, and
Section 168(k) Special Allowance Depreciation
options
JCWA/JGTRRA, 50% Bonus, 100% Bonus, 40% Bonus, and 30% Bonus rows are set to
No
when
None
is selected from this option's
Financial
list.
State Export Option
Designate state for export. Each set of asset data must have a state identifier for export
purposes. Your selection affects the status of the
Autoflow Section 179
,
Disaster Zone
,
Cellulosic Biomass Ethanol
,
Recycling
, and
Section 168(k) Special Allowance Depreciation
options JCWA/JGTRRA, 50% Bonus, 100% Bonus, 40% Bonus, and 30% Bonus.
Additional Settings
Depreciate remaining basis in final year of the asset's life. CCH ProSystem
fx
Fixed
Assets calculates depreciation in the final year of an asset's life without regard to accumulated
depreciation taken. If the remaining basis is more than the depreciation allowed in the final
year, select this box to depreciate the total amount.
Notes:
Selecting this box applies this rule to all assets, regardless of the type, method, life, or
convention used, with the exception of luxury autos.
It also applies the entire remaining basis to current depreciation, regardless of the
amount.
Use GAAP rules in the Financial book for Like-kind Exchanges. CCH ProSystem
fx
Fixed
Assets calculates a like-kind exchange to defer gain/loss on an asset until a later date if the
property you are disposing is exchanged with a like property within a specified amount of time.
Select this box to apply GAAP (Generally Accepted Accounting Principles) rules when you do not
want to defer the gain/loss in the Financial book.
Note: Selecting this box in the
Book Setup
tab of Client Properties, or in the
Book Setup
tab of the
Book Setup
dialog, applies this rule only to the active client. Selecting the box
from the
Global Settings – Books
dialog applies the setting to all files to which the global
setting is applied.
Mid-Quarter convention. Applies to current year assets for all books that use an applicable
MACRS method. Based on your entry, CCH ProSystem
fx
Fixed Assets automatically
determines whether the mid-quarter convention applies and recalculates when necessary.
Elections
168(k) Elections. Produces a statement with Form 4562 indicating the election not to claim
additional first-year depreciation, allowable under IRC Sec. 168(k) for selected qualifying
property classes.
Chapter 3 - Managing Clients • 47

Note: If selections are made in this dialog to change the bonus allowed on certain property
classes, a message will be issued to confirm changes to asset detail.
1400L(b) Elections. Produces a statement with Form 4562 indicating the election not to claim
additional first-year depreciation, allowable under IRC Sec. 1400L(b) for selected qualifying
property classes.
1400N(d) Elections. Produces a statement with Form 4562 indicating the election not to claim
additional first year depreciation, allowable under IRC Sec. 1400N(d) for selected qualifying
property classes.
Section 179/Bonus Setup Defaults
The default settings are based on the tax year and the state selected.
Setting up Section 179/Bonus Data
(File > Client Properties > Sec. 179/Bonus Setup)
To establish Section 179 and bonus setup for all assets, do the following:
1. With the client file opened, do one of the following to display the
Client Properties
dialog:
Select File > Client Properties.
Click Open Client Properties on the toolbar.
Chapter 3 - Managing Clients • 48

2. Click the Sec. 179/Bonus Setup tab on the
Client Properties
dialog.
Note: The
Client Properties
dialog will display the current Section 179 limits for the year
end date.
3.
Enter or change the following fields for each book:
Maximum Section 179 limit. You can specify the limit to be used for the year that is
currently computed on a federal and state basis. This amount would override the system
default amount, which will be the maximum for the tax year.
Note: The limits are adjusted for State, Other1, Other2, and Other3 books based on
the State selected for that book on the
Book Setup
tab.
Property placed in service. If you enter an amount, the amount shows as an override.
Business income limitation. This amount is used for preparation of Form 4562 and
other summary calculations. Federal and state amounts are available. Fixed Assets
initially fills the fields with the same amount as the maximum Section 179 limit. This
amount is not exported to the tax return unless you are exporting Totals only data.
Carryover from prior year. This amount is computed and rolled over each year based
on the taxable income limitation provided. This field is only available for books that allow
a carryover in the tax system, including Federal, Financial, and State.
Chapter 3 - Managing Clients • 49

Pass-through (from 1065 & 1120S). Enter the Section 179 amounts being passed
through.
Use bonus depreciation rules. This applies to a Federal CCorporation with a
California SCorporation that does not currently allow section 179. All amounts entered
as Section 179/Bonus that would normally be taken as Section 179 are computed as
bonus.
Qualified Real Property. Enables or disables the autoflow of Section 179 elected for
qualified real property (allowed by the Small Business Jobs Act of 2010 - H.R. 5297 and
made permanent by the Protecting Americans from Tax Hikes Act of 2015) to specific
books. The default is based on the state selected for that book on the
Book Setup
tab.
Treat Section 179 recapture on dispositions as depreciation. Select this box to
include all section 179 recapture on property disposed of during the year as part of
accumulated depreciation in determining gain or loss. This option is only available for
Partnerships and SCorporations.
Principal business activity is related to farming. For Corporations, SCorporations,
and Partnerships where the client file principal business activity is related to farming,
when Wisconsin is selected as the state for export, the increased Sec. 179 limits for
farming will be applied. This only applies to years, 2008 - 2009.
4. Click OK to save your changes and close this dialog.
Note: Click Reset Defaults to restore either the maximum Section 179 dollar limits or the
Section 179 default settings for all books.
Editing a Client's Book Setup
(File > Client Properties)
Use the following procedure to modify a client's book setup. You can also modify client books by
selecting Tools > Books.
1.
Open a client file.
2. To display the
Client Properties
dialog, do one of the following:
Select File > Client Properties.
Press Ctrl + R.
Click Open Client Properties on the toolbar.
3. Select the Book Setup or Sec. 179/Bonus Setup tab.
4.
Make the necessary changes.
5. Click OK to save your changes and exit the dialog.
Chapter 3 - Managing Clients • 50

Resetting Book Defaults
(File > Client Properties > Sec. 179/Bonus Setup)
The
Reset Defaults
dialog provides options to reset Section 179 default values and/or recalculate the
amounts of property placed in service.
1. Choose one of the following to display the
Client Properties
dialog:
Select File > Client Properties.
Press Ctrl + R.
Click Open Client Properties on the toolbar.
Right-click an asset and select Client Properties from the menu.
2. Select the Sec. 179/Bonus Setup tab.
3. Click Reset Defaults.
4. Select one of the following from the
Reset Book Defaults
section:
Section 179 maximum amounts only. Restores the maximum Section 179 dollar
limits for all books only.
All book settings. Restores the initial default values for all book settings. Restores the
initial Section 179 defaults for all books.
None. Retains the current values and settings for all books.
5. Check Reset calculated property placed in service to force a recalculation of the total cost
of Section 179 property placed in service in the current year, the total cost of property used in
calculating the current year mid-quarter convention, and the amount of Section 179 used in the
current year.
6. Click OKto close the dialog.
Copying Books
(Tools > Copy Books)
The Copy Book feature allows you to copy from and to selected books.
Notes:
Copying books is only available if the current year is not locked.
Any non-federal book with an autoflow option set to Yes will automatically update to match the
new Federal entries.
Chapter 3 - Managing Clients • 51

Use the following procedure to copy books:
1. Choose one of the following ways to display the
Copy Book
Dialog:
Select Tools > Copy Books.
Click Copy Books on the toolbar.
Right-click an asset from the Asset List and select Copy Books from the menu.
2. Select a book in the
From
drop-down list. The
From
field includes only the books that are active
in the current year.
3. Select a book in the
To
drop-down list. The
To
field includes all available books except AMT
and ACE books.
4. The
Book Description
field is blank and disabled until one of the
Other
books are selected in
the
To
field.
If the selected book is active, the description matches the description from the
Client Properties
dialog. If the selected book is inactive, the description may be
State AMT
,
StateACE
,
E&P
,
Other1
,
Other2
, or
Other3
, depending on the book that is selected in the
From
field and the
compute basis for that book.
9.
Notes:
The default description may be edited. The description is limited to ten characters.
AMT and ACE books are only available in the Copy Books
From
field if in the
To
field, the book is Federal, AMT or ACE.
5. Click OK.
If the book specified in the
To
field is inactive, the book setup information is copied. When
copying information to a book that is already active, a message displays with the following
options:
Click Yes to overwrite the active book information.
Click No to ignore the copy command and return to the
Copy Book
dialog.
Section 179 Business Rule
When copying information into an active book with a differing state designated in the book setup or
entries on the Section 179 tab, and there are differences in allowed Section 179, other differences
could result, such as the following:
Convention
Section 179 differences
Autoflow of Section 179, Disaster Zone, Cellulosic Biomass Ethanol, Recycling, and all Section
168(k) Special Depreciation Allowance options
ITC
Prior and current depreciation
Chapter 3 - Managing Clients • 52

Disaster Zone Clean up Business Rule
When copying information into an active book, differences in state rules regarding Disaster Zone
clean up deduction could result in differences in areas such as the following:
Convention differences
Section 179 differences
Autoflow of Section 179, Disaster Zone, Cellulosic Biomass Ethanol, Recycling, and all Section
168(k) Special Allowance Depreciation options
Depreciation differences
ITC differences
Note: When copying to the Federal book, books with autoflow designated for cost, Section 179,
Disaster Zone, and Section 168(k) Special Allowance Depreciation options autoflow automatically
when appropriate.
Cellulosic Biomass Ethanol Business Rule
When copying information into an active book, differences in state rules regarding allowed cellulosic
biomass ethanol plant property depreciation could result in differences in areas such as the following:
Depreciation differences
ITC differences
Recycling Business Rule
When copying information into an active book, differences in state rules regarding allowed Recycling
depreciation could result in differences in areas such as the following:
Depreciation differences
ITC differences
Section 168k and Disaster Zone Special Allowance Depreciation Differences
Business Rule
When copying information into an active book, differences in state rules regarding allowed Disaster
Zone, and Section 168(k) Special Allowance Depreciation options could result in differences in areas
such as the following:
Depreciation differences
ITC differences
Chapter 3 - Managing Clients • 53

Specifying File Locations for Export and Report Print Files
(File > Client Properties > File Locations)
You can specify the default location to store export files and reports printed to a file.
1. Choose one of the following to display the
Client Properties
dialog:
Select File > Client Properties.
Press Ctrl + R.
Click Open Client Properties on the toolbar.
Right-click an asset and select Client Properties from the menu.
2. Select the File Locations tab.
3.
Edit the default directory paths to use when printing to a file or exporting files. Do one of the
following:
Click OK to accept the default drive and directories for the printed report and exported
files.
Click Browse and choose a different drive and directory, and then click OK.
Notes:
The default path for print files can be modified at the
Print
dialog.
You may only enter an existing directory path. CCH ProSystem
fx
Fixed Assets does not create
a new directory based on your entry and does not provide the option to create a new directory.
The program default directory paths are based on the locations of the UserData and Reports
directories established during the installation of CCH ProSystem
fx
Fixed Assets.
Password Protecting a Client's File
(Tools > Security)
You can secure client data in CCH ProSystem
fx
Fixed Assets with a password. When the security
option is activated for a client, the client file cannot be opened without entering the correct password.
Notes:
A CCH ProSystem
fx
Fixed Assets password is independent of CCH ProSystem
fx
Tax and
CCH Global
fx
Tax. Changing the password in CCH ProSystem
fx
Tax and CCH Global
fx
Tax
does not affect the password in CCH ProSystem
fx
Fixed Assets. Changing the password in
CCH ProSystem
fx
Fixed Assets does not affect the password in Tax Preparation.
You are prompted to enter a password when importing CCH ProSystem
fx
Tax password-
protected returns. Client files created from these returns retain the same password in Fixed
Assets.
Chapter 3 - Managing Clients • 54

To secure client data, use the following procedure:
1. To display the
Secure Client
dialog, do one of the following:
Select Tools > Security.
Click Configure Security on the toolbar.
2. Check the Secure this client box.
Note: The
Password
and
Verify
fields are disabled until the Secure this Client box is
checked.
3. Enter an alphanumeric password (12 characters maximum) in the
Password
field.
4. Confirm the password by entering it in the
Verify
field.
5. Click OK to close the dialog.
Note: When you click OK and the contents of the
Password
and
Verify
fields do not
match, you are returned to the
Secure Client
dialog to make corrections.
Saving the Client File
(File > Save) or (File > Save As)
If this is a new file, the
Save
dialog displays and you can make changes to the file location and file
name. If the file has been saved before, you can use
File > Save As
to change the file location or
name.
By default, all files are saved in the CCH ProSystem
fx
Fixed Assets User Data directory, which is
created during the installation. The location of the directory is ?:\FixedAst\UserData (where ?
represents the drive where CCH ProSystem
fx
Fixed Assets is installed).
Fixed Asset files are saved with the extension .FAC.
1.
To save the client file, choose one of the following:
Select File > Save.
Select File > Save As.
Press Ctrl + S.
Click Save Client on the toolbar.
2. On the
Save
or
Save As
dialog, you can accept the defaults or change any of the following:
File Display. Select Show file names only to decrease the time it takes to display a list
of file names. This is suggested for a network installation with a large client database.
File Name. Accept the default or enter a different name. CCH ProSystem
fx
Fixed
Assets supports long file names. If you use a long file name and your system does not
support them, a Windows
®
error displays when you try to save.
Change Location. A browser window opens so you can select another directory
location to store the client file.
Chapter 3 - Managing Clients • 55

You can change the way the Client File list displays the files as follows:
Sorting the Client File list. You can sort the list by clicking a column header. A red or
blue arrow displays on the selected column header. A red down-arrow displays when the
list is sorted in descending order. A blue up-arrow displays when the list is sorted in
ascending order. Click on the column header to toggle between ascending and
descending orders.
Resizing the Columns. The list columns are re-sizable. To resize the columns, point
the mouse arrow to either the left or right side of a column header. The mouse pointer
will change from a single arrow to a double-arrow pointer. Hold the mouse button down
and drag the pointer left or right to resize the column.
3. On the
Save
or
Save As
dialog, click Save to save the client file, or click Cancel to exit
without saving.
Opening a Client File
(File > Open)
Use the following steps to open an existing client file. If you have not created a client, see
Creating a
New Client
on page39 for instructions.
1. Choose one of the following to display the
Open Client
dialog:
Select File > Open.
Press Ctrl + O.
Click Open Client on the toolbar.
The codes that represent the product types are as follows:
I
Individual
P
Partnership
C
Corporation
S
S Corporation
F
Fiduciary
X
Exempt Organization
You can change the display of the file list. These settings are saved when you exit the
Open
Client
dialog. When you reopen the dialog, it will appear as it did when it was closed. The
Show
file names only
and column sorting selections are also applied to the
Save
,
Save As
, and
Select Source file for Asset Transfer
dialogs.
Sort the list. You can sort the list by clicking a column header. A red or blue arrow
displays on the selected column header. A red down-arrow displays when the list is
sorted in descending order. A blue up-arrow displays when the list is sorted in ascending
order. Click on the column header to toggle between ascending and descending orders.
Chapter 3 - Managing Clients • 56

Resize the columns. You can resize columns by pointing the mouse arrow to either the
left or right side of a column header. The mouse pointer will change from a single arrow
to a double-arrow pointer. Hold the mouse button down and drag the pointer left or right
to resize the column.
Resize the window. You can use the maximize, restore down, and resizing handles to
resize the window.
Show file names only. Selecting
Show file names only
displays file names only when
selected. For a network installation with a large client database, selecting this option
decreases the time required to display a list of file names.
2. Highlight the client file. If the client is not listed, click Change Location to browse for a client
file in a different directory.
3. Click Show History if you want to display the file history.
4. Click OK to open the client file.
Printing the Client List
You can print the client list that displays in the
Open Client
dialog to a printer, a PDF file, or a text file.
Note: The client list can also be printed from the
Select Source File for Asset Copy
and
Select
Source File for Asset Transfer
dialogs that are displayed from the File menu.
Printing a Client List to a Printer
From the
Open Client
dialog, do the following:
1. Click Print Client List. The
Print Setup
dialog displays.
2.
The default printer or the printer that was last entered is selected. Accept this printer or do one
of the following:
Select another printer from the
Name
list.
Click Network to browse to a shared network printer.
Click Reset to Default to change the printer name to the default printer.
3.
To change printer settings, you can do the following:
Click Properties to change settings for the selected printer. The Properties features vary
depending on the type of printer selected.
Select a different paper size, source, and orientation.
4. Click OK to display the
Print
dialog.
5.
Change the print range and number of copies, if needed.
6. The
Collate Copies
option is selected by default. Clear this option if the copies should not be
collated.
7. Click OK to print the client list and return to the
Open Client
dialog.
Chapter 3 - Managing Clients • 57

Printing a Client List to a PDFor Text File
From the
Open Client
dialog, do the following:
1.
Choose a print option.
Click Print Client List to PDF File to create a PDF file of the current client list.
Click Print Client List to Text File to create a TXT file of the current client list.
2. On the
Save As
dialog, select a location and enter a name for the PDF or TXT file.
3. Click Save.
Editing Client Properties
(File > Client Properties)
1. To edit client properties, choose an option to display the
Client Properties
dialog:
Select File > Client Properties.
Press Ctrl + R.
Click Open Client Properties on the toolbar.
Right-click an asset and select Client Properties from the menu.
2. Edit information as required on any of the following tabs:
Basic Information
,
Global Settings
,
Global Settings - Reports
,
Client Detail
,
Book Setup
,
Sec. 179/Bonus Setup
, and
File
Locations
.
Note: Changing some field values causes CCH ProSystem
fx
Fixed Assets to recalculate
asset details.
3. Click OK to accept changes.
4.
Save the client file.
Note: If Global Settings for Books have been applied to this file, you are prompted to apply
any changes made on the
Book Setup
tab to the Global Setting file. Click Yes to update
the Global Setting file. Click No to save your changes without updating the Global Setting
file.
Chapter 3 - Managing Clients • 58

Changing the Client Type
(File > Client Properties > Basic Information)
CCH ProSystem
fx
Fixed Assets provides a way to change a data file's client type. The following
section provides procedures for changing the client type and describes issues that might occur during
the process.
Note: When the client type is changed in a year beyond the initial year of the file, you are given
the option to change the client type for the current and future years only, or to change the client
type for the current, prior, and future years.
Change a client type using this procedure:
1. To change a client type, choose one of the following to display the
Client Properties
dialog:
Select File > Client Properties.
Press Ctrl + R.
Click Open Client Properties on the toolbar.
Right-click an asset and select Client Properties from the menu.
2. Select one of the client types listed in the
Client type
section.
3. Click Yes at the confirmation message.
4.
Do one of the following:
For an entity with only one year of data, unless you need to re-link assets, the process of
changing a client type is now complete. Continue to the next step.
For an entity with multiple years of data, a second confirmation dialog displays:
Click Yes to apply the selected client type to current and future years only.
Click No to apply the selected client type to prior, current, and future years.
Notes:
The above options are only available for unlocked years.
Only prior years of the same client type that immediately precede the current year in
consecutive order are changed.
If all the assets in the client file use the same default tax link used by the selected client
type, the change client type process is complete.
Chapter 3 - Managing Clients • 59

5.
If a tax link does not exist in the new client type, you are prompted to re-link its associated
assets to a different link or entity.
Do one of the following to link associated assets:
To assign assets to the new client type's existing links, select an entity/activity from the
Re-link
dialog and click OK.
To create a new tax link, click New on the
Re-link
dialog and add entities as needed.
The
Tax Schedule Link List
dialog displays. See
Customizing Tax Schedule Links
on
page77 for instruction on adding new Tax links.
6. When you have completed adding links, click OK. You are returned to the
Re-link
dialog, which
displays the customized links. Select an entity/activity and click OK.
Note: The
Re-link Assets
dialog displays for each entity/activity that does not exist in the
new client type.
7.
Once assets associated with entities/activities in the previous client type have been re-linked,
you are returned to the
Client Properties
dialog.
8. Click OK to save your changes.
Notes:
Section 179 is not allowed for the Fiduciary client type. If Section 179 has been taken in any of
the years to which this client type change will be applied, you are prompted to delete all
information related to Section 179. If you decline to delete this information, the change client
type process is terminated.
When the change client type process is completed, the format of the EIN/SSN number is
changed as needed.
Once the client type has changed, the appropriate changes are made to the Book Setup and
Section 179/Bonus Setup. To compare the new settings to the default settings for the client
type, see
Book Setup and Section 179/Bonus Setup Default Settings
on page45 for details.
Chapter 3 - Managing Clients • 60

Editing Fiscal Year Dates
You can edit, add, or delete full or short fiscal year dates in CCH ProSystem
fx
Fixed Assets using the
Calendar Editor.
Points to Remember:
You can edit current year dates during the initial year until that year is closed. You cannot edit
dates for a year that has been locked.
A status of
Yes
displays in the
Calendar Editor's Short Year
column for any fiscal year period
that is fewer than 12 months.
A future fiscal year may be entered in the calendar as long as it meets the date. The entry
immediately following the current year will be used as the new fiscal year when rolling forward.
Any future entries will also be used in projections.
You cannot delete dates for the current year or any locked prior years.
Editing a Year
(File > Client Properties > Basic Information)
1. To edit year properties, choose one of the following to display the
Client Properties
dialog:
Select File > Client Properties.
Press Ctrl + R.
Click Open Client Properties on the toolbar.
Right-click an asset and select Client Properties from the menu.
2. Click Edit Calendar to display the
Edit Calendar
dialog.
3.
Highlight a year.
4. Click Edit to change the dates of the selected year.
Note: To cancel the edit before applying, click Clear.
5. Click Apply to update the year's information.
6. Click OK to save your changes and close this dialog.
Adding a Year
(File > Client Properties > Basic Information)
1. To add a year, choose one of the following methods to display the
Client Properties
dialog:
Select File > Client Properties.
Press Ctrl + R.
Click Open Client Properties on the toolbar.
Right-click an asset and select Client Properties from the menu.
2. Click Edit Calendar.
Chapter 3 - Managing Clients • 61

3. Click Add. The edit fields will become active.
4.
Enter the appropriate dates.
Note:To cancel the edit before applying, click Clear.
5. If you are adding a short year, select a convention from the
Short Year MACRS
drop-down list
to include or exclude the partial months.
Note:This field is not available for short years with an ending date prior to 06/30/1986.
6. Click Apply to insert the new year.
7. Click OK to save your changes and close this dialog.
Deleting a Year
(File > Client Properties > Basic Information)
You cannot delete dates for the current year or any locked prior years.
1. To delete a year, choose one of the following methods to display the
Client Properties
dialog:
Select File > Client Properties.
Press Ctrl + R.
Click Open Client Properties on the toolbar.
Right-click an asset and select Client Properties from the menu.
2. Click Edit Calendar.
3. Select a year to be removed and click Delete.
4. Click OK to save your changes and close this dialog.
Closing a Fiscal Year
(Tools > Close Year End)
The Close Year End menu option is only available from the Asset List view.
Tip: We recommend backing up your client’s file before beginning this procedure. See
Backing
Up Client Data Files
on page67 for instructions.
Use the following procedure for rolling a year forward.
1. To display the
Close Year End
dialog, do one of the following:
Select Tools > Close Year End.
Click Close Year End on the toolbar.
2. Edit the fiscal year Ending date of the next period, if necessary.
Note: You are prompted to adjust prior year end custom reporting periods to the current
year.
Chapter 3 - Managing Clients • 62

3. Click OK on the
Close Year End
dialog.
4. You are prompted to review your Book Setup and Sec.179/Bonus Setup settings. Click OK to
display the
Book Setup
dialog.
5. Make any necessary changes to your books and click OK.
Locking/Unlocking Fiscal Year Calculations
(Tools > Lock Calculation)
Points to Remember:
All data for a locked year remains unchanged until the year is unlocked.
An asset can be edited in a locked year by selecting Assets > Amend. See
Amending Assets
in a Locked Fiscal Year
below for more information.
Locking must occur in successive years. For example, you cannot lock years one and three of a
business and not lock year two.
Unlocking a year causes all assets for the unlocked year to be recalculated.
The following options are disabled for a locked year:
Copying or transferring assets
Adding, duplicating, deleting, or splitting assets
Removing dispositions
Creating or deleting group dispositions
Replacing data using the Edit/Find and Replace option
Applying book Global Settings
Removing overrides
Copying books
Using Undo Split to combine split assets into the single originating asset
To prevent (lock) or allow (unlock) the calculation of asset data in a fiscal year, do the following:
1. To display
Lock/Unlock Calculations
dialog, do one of the following:
Select Tools > Lock Calculation.
Click Lock/Unlock Calculation on the toolbar.
2. Select a year and click Lock or Unlock.
3. Click OK.
Amending Assets in a Locked Fiscal Year
Warning! Amending asset data can cause the depreciation to recalculate in the amended year
and all subsequent tax years.
Chapter 3 - Managing Clients • 63

Note: When you roll back to the first year an asset was acquired, all fields in the
Depreciation
Detail
grid can be edited. If you roll back to a year between an asset's first and current year, you
are only able to amend the Cost or Other Basis, Method, Life, and Business Use Percent values.
You can also override depreciation values in interim years.
To amend asset data in a year that has been closed and locked, do the following:
1. Select Tools > Reverse Closed Year or click Reverse Closed Year on the toolbar. Repeat
this step until you roll back to the year containing the data you want to update.
Note: The fiscal year dates display at the top of the Fixed Asset window.
2. On the
Asset list
tab, highlight the asset you want to amend and click the Detail tab.
3. Select Assets > Amend. A confirmation message displays. Click Yes.
4. Make the required changes in the
Depreciation Detail
grid.
Note: When either Cost, Method, Life, or Convention are modified in a year that had
previously been closed, a message will display asking if you would like to apply the data to
future years. If you choose
Yes
, the new entries will be carried forward. If you choose
No
,
future years will retain the entries as they were when you reversed the year.
5. When you have completed amending the depreciation data, click the Asset List tab. The
amended depreciation detail is saved and the asset locked.
Reversing a Closed Year
(Tools > Reverse Closed Year)
Points to Remember:
We recommend that you back up your data before you reverse a closed year. If the previous
year was locked, you are not prompted to backup your client data. See
Backing Up Client Data
Files
on page67 for additional information.
When reversing to an unlocked closed year, assets resulting from a partial disposition in the
current year display as two separate assets in the prior year; that is, the original asset and
disposed portion. The original asset contains the basic information and the total depreciation
detail for itself and the portion to be disposed. In the prior year, the disposed portion contains
only the basic asset information. It does not contain any depreciation detail and is unavailable
for editing.
When re-opening an unlocked closed year, assets created by a like-kind exchange in the
following year display on the Asset List in the prior year. The disposed asset displays as an asset
sold in the future year. Only basic information displays in the top pane of the
Detail
tab for the
Continuation and New assets created by the exchange. This information is not available for
editing.
Chapter 3 - Managing Clients • 64

1. Select Tools > Reverse Closed Year or click Reverse Closed Year on the toolbar.
2. Click Yes on the confirmation dialog.
Deleting a Client File
You can delete a client file using the standard Windows
®
methods for deleting files with Windows
®
Explorer or My Computer. The data files are located in the CCH ProSystem
fx
Fixed Assets User Data
directory created during the installation of CCH ProSystem
fx
Fixed Assets. Client files have an
FACextension.
Overview of Client File Management
This section covers the file management options that are provided with CCH ProSystem
fx
Fixed
Assets. The application provides the following file management options:
Backup/Restore. Create archives of client data on your network, local drive, or any removable
storage device (for example, ZIP disk, CD-RW disk, or USB drive). Backup files can be easily
restored when needed.
Check network files in/out. Client files can be checked out to a storage device to be worked
on in another office location or by a user without network access.
Remote check in/out. Allow a user with a local installation and network access to check data
files out from the network data source to work on while away from the office.
File management menu commands are described in the sections that follow. To backup and restore
data, check-in and check-out files, and set up the location of where files are stored, use the
Tools>File Management
commands, or the
File Management Menu
button on the toolbar.
CCH ProSystem
fx
Fixed Assets Files
The following table provides file extensions and brief descriptions of client data and other file types
that are generated when implementing file management procedures (such as backing up and
restoring data files, and checking files in or out).
File
Type
Extension Description
Work *.FAC Active client data file.
Backup *.FAB Client backup file.
Archive *.FAA
This file is generated when a file is checked out. It resides in the CCH
ProSystem
fx
Fixed Assets' client data directory and can only be opened in
read-only mode. It is replaced by the word file type when the client file is
checked back in.
Chapter 3 - Managing Clients • 65

File
Type
Extension Description
History
Link
*.LNK
This file is created when a user selects to delete a client file during a backup.
It contains backup detail for that client. It displays the file location, backup
and modification detail, and processing history for that client.
Setting Up File Management Default Settings
(Tools > File Management > Setup)
To set up file management default settings, do the following:
Note: Default settings must be set up before you can access any of the File Management
options.
1. To display the
File Management Setup
dialog, do one of the following:
Select Tools > File Management > Setup.
Click File Management Menu and select Setup.
2. Edit the contents of the
User ID
field if needed.
Note: If the
User ID
field is blank, it is recommended that you enter an ID. This
information is used for tracking purposes in the file history maintained for client files.
3. In the
File Backup and Restore Paths
section, enter a directory path for backup data in the
Backup to
field, or click Browse to select a different location.
Chapter 3 - Managing Clients • 66

4. You can accept or edit the contents of the
Restore to
field, or click Browse to select a different
location.
For network users, the default for both the
Restore to
and
Check-in to
fields is the Fixed
Assets data directory, ?:\FixedAst\UserData (where ? represents the drive letter).
5. In the
File Check-in and Check-out Paths
section, accept the default location, enter a directory
path in the
Check-in to
field, or click Browse to select a different location.
6. You can accept or edit the contents of the
Check-out to
field, or click Browse to select a
different location.
7. Click OK.
Backing Up Client Data Files
(Tools > File Management > Backup)
Note: The backup utility cannot save data for one file over multiple floppy disks. When backing
up large files, it is recommended you use a large capacity storage device (such as a Hard Drive,
ZIP disk, CD-RW disk, or USBdrive).
To backup client data files, do the following:
1. To display the
File Management - Backup
dialog, do one of the following:
Select Tools > File Management > Backup.
Click File Management Menu and select Backup.
2. In the Source section, the
Current path
field shows the default client file directory. Edit this
information or click Browse.
Chapter 3 - Managing Clients • 67

3. To select one or more files from the
Files to backup
list, do one of the following:
Select an individual file.
Click the first file, hold down the Shift key, and click the last file to select adjacent items.
Click the first file, hold down the Ctrl key, and click additional files to select nonadjacent
items. Do not release the Ctrl key until all the files are selected.
Click New/Modified files to select all new or recently modified files.
Click Select all to highlight all listed files.
4. Check the Delete source after backup box if you want to delete selected files from the source
directory during the backup process.
5. In the
Destination
section, enter the location of the backup target folder in the
Current path
field or click Browse.
6. If you are backing up to a removable media device, check the Removable media box. This
allows you to enter descriptive detail (for example, type of storage device or disk label) during
the backup process.
7. Click Backup.
8. If the
Removable media
box has been checked, the
Removable Media Label
dialog displays.
Enter backup detail and click OK.
9. Click Close.
Note: When a file is deleted during the backup process, a History Link file (.lnk) is created. The
History Link file contains the following descriptive details:
Date of the last modifications
User who backed up the file
Date and location of the backup
To view the History Link file detail, select Tools > File Management > Backup, highlight the file,
and click Show History.
Restoring Backup Data Files
(Tools > File Management > Restore)
To restore backup files, do the following:
1. To display the
File Management - Restore
dialog, do one of the following:
Select Tools > File Management > Restore.
Click File Management Menu and select Restore.
2. In the
Source
section, the
Current path
field shows the backup directory. Edit this information
or click Browse.
Chapter 3 - Managing Clients • 68

3. Select a file from the
Files to restore
list. You can also do the following:
Select an individual file.
Click the first file, hold down the Shift key, and click the last file to select consecutive
items.
Click the first file, hold down the Ctrl key, and click additional files to select
nonconsecutive items. Do not release the Ctrl key until all the files are selected.
Click Select all to highlight all listed files.
Click Show history to view back-up details of a selected file.
4. In the
Restore destination
section, edit the information in the
Current path
field if needed or
click Browse.
5. Click Restore.
6. Click Close to exit the dialog.
Overview of Checking Files In/Out
One of the file management features of CCH ProSystem
fx
Fixed Assets is the Check-in/Check-out
option which allows you to copy data files to any location or storage device. It also lets you work on
client files away from your office or on a non-networked computer (for example, your laptop).
Notes:
Check-in/Check-out can be used by networked or standalone users of CCH ProSystem
fx
Fixed
Assets.
You can edit the contents of a checked out file by saving it under a different name using the File
> Save As menu option.
You can abandon a checked-out file, allowing you to retrieve the file without retaining any
changes made to it. See
Abandoning a Checked-Out File
on page72 for more information.
Network Installation
In a network environment, the Check-in/Check-out utility can be used to copy data files to any location
or storage device (such as a ZIP disk, CD-RW disk, or USB drive). This feature is useful if you need to
edit files at a different office location.
Remote Check In/Out
This feature allows remote users (such as laptop users with a standalone install) to check data out
from a network install to their local installation. Once their work is completed, they can check the
updated files back in to the network install.
Locking Files
When a file is checked out from the network, it is replaced by an Archive file (*.FAA) which contains
the client's data. It can only be opened in read-only mode.
Chapter 3 - Managing Clients • 69

When a client file is checked in, the Archive file that was created during the check out process is
replaced by the work file (.FAC) and other users can edit it.
Checking Files out from the Network to a Local Folder
(Tools > File Management > Check-out)
To check files out to a local folder, do the following:
1. To display the
File Management - Check-out
dialog, do one of the following:
Select Tools > File Management > Check-out.
Click File Management Menu and select Check-out.
2. In the
Source
section, the
Current path
field shows the default client file directory. Edit this
information or click Browse.
3. Do one of the following to select one or more files from the
Files to check-out
list.
Select an individual file.
Click the first file, hold down the Shift key, and click the last file to select consecutive
items.
Click the first file, hold down the Ctrl key, and click additional files to select
nonconsecutive items. Do not release the Ctrl key until all the files are selected.
Click Select all to highlight all listed files.
Click Show history to view a selected file's backup details.
4. In the
Destination work folder
section, edit the information in the
Current path
field or Browse
to the folder.
5. Click Check-out. The selected file or files are now checked out. Archive files (.FAA) are created
in the CCH ProSystem
fx
Fixed Assets data directory.
Checking Files in to a Network from a Local Folder
(Tools > File Management > Check-in)
To check a file in to a network installation of CCH ProSystem
fx
Fixed Assets, do the following:
1. To display the
File Management - Check-in
dialog, do one of the following:
Select Tools > File Management > Check-in.
Click File Management Menu and select Check-in.
2. In the
Source
section, the
Current path
field shows the default check-out directory. Edit this
information or click Browse.
3. Do one of the following to select a file or files from the
Files to check-in
list.
Select an individual file.
Click the first file, hold down the Shift key, and click the last file to select consecutive
items.
Chapter 3 - Managing Clients • 70

Click the first file, hold down the Ctrl key, and click additional files to select
nonconsecutive items. Do not release the Ctrl key until all the files are selected.
Click Select all to highlight all listed files.
Click Show history to view a selected file's backup details.
4. In the
Destination folder
section, edit the information in the
Current path
field or click Browse.
5. Click Check-in. The file or files are now checked in. The updated Work file (.FAC) is copied
back to the CCH ProSystem
fx
Fixed Assets client data directory, replacing the Archive file
(.FAA).
6. Click Close.
Remotely Checking Files out from a Network
(Tools > File Management > Check-out)
Note: These instructions are only for users with a local install of CCH ProSystem
fx
Fixed
Assets.
Users with a local installation of CCH ProSystem
fx
Fixed Assets can remotely check files out from a
network installation of CCH ProSystem
fx
Fixed Assets by doing the following:
1. To display the
File Management - Check-out
dialog, do one of the following:
Select Tools > File Management > Check-out.
Click File Management Menu and select Check-out.
2. In the
Source
section, click the
Current path
field's Browse button, then locate and select the
client data folder of the CCH ProSystem
fx
Fixed Assets network install.
The CCH ProSystem
fx
Fixed Assets default client data directory is UserData and is located on
?:\FixedAst\UserData (where ?represents the drive where CCH ProSystem
fx
Fixed Assets is
installed).
3. Select a file or files from the
Files to check-out
list. You can also do the following:
Select an individual file.
Click the first file, hold down the Shift key, and click the last file to select adjacent items.
Click the first file, hold down the Ctrl key, and click additional files to select nonadjacent
items. Do not release the Ctrl key until all the files are selected.
Click Select all to highlight all listed files.
Click Show history to view a selected file's backup details.
4. Verify that the directory path in the
Current path
field of the
Destination work folder
section is
targeted to your local Client data folder.
The CCH ProSystem
fx
Fixed Assets default client data directory is UserData (for example,
C:\Fixedast\UserData).
5. Click Check-out and then Close. You can now edit the file locally.
Chapter 3 - Managing Clients • 71
Remotely Checking Files in to a Network
(Tools > File Management > Check-in)
Note:These instructions are only for users with a local installation of CCH ProSystem
fx
Fixed
Assets.
Users with a local installation of CCH ProSystem
fx
Fixed Assets can remotely check files back in to a
network install of CCH ProSystem
fx
Fixed Assets by doing the following:
1. To display the
File Management - Check-in
dialog, do one of the following:
Select Tools > File Management > Check-in.
Click File Management Menu and select Check-in.
2. Verify that the directory path in the
Current path
field of the
Source
section is targeted at the
local data folder. Click Browse if necessary.
The CCH ProSystem
fx
Fixed Assets default client data directory is UserData (for example,
C:\FixedAst\UserData).
3. Select a file or files from the
Files to check-in
list by doing one of the following:
Select an individual file.
Click the first file, hold down the Shift key, and click the last file to select adjacent items.
Click the first file, hold down the Ctrl key, and click additional files to select nonadjacent
items. Do not release the Ctrl key until all the files are selected.
Click Select all to highlight all listed files.
Click Show history to view a selected file's backup details.
4. Verify that the path to the client data folder of the network install of CCH ProSystem
fx
Fixed
Assets displays in the
Current path
field of the
Destination work folder
section. Click Browse if
necessary.
5. Click Check-in. The local Work file (.FAC) is copied back to the CCH ProSystem
fx
Fixed
Assets client data directory on the network, replacing the Archive file (.FAA).
6. Click Close.
Abandoning a Checked-Out File
(Tools > File Management > Check-in)
Use the following procedure to delete an edited checked-out file and convert its associated archive
file, located in CCH ProSystem
fx
Fixed Assets client data directory, back to a work file. See
Overview of Client File Management
on page65 for a table describing the file types and file
extensions. This option is useful for retrieving a checked-out file without retaining any changes made
to it.
Chapter 3 - Managing Clients • 72

To abandon a checked-out file, do the following:
1. To display the
File Management - Check-in
dialog, do one of the following:
Select Tools > File Management > Check-in.
Click File Management Menu and select Check-in.
2. In the
Source
section, the
Current path
field shows the default check-out directory. Edit this
information or click Browse to select another path.
3. To select a file or files from the
Files to check in
list, do one of the following:
Select an individual file.
Click the first file, hold down the Shift key, and click the last file to select consecutive
items.
Click the first file, hold down the Ctrl key, and click additional files to select
nonconsecutive items. Do not release the Ctrl key until all the files are selected.
Click Select all to highlight all listed files.
Click Show history to view a selected file's backup details.
4. Check the Abandon check-out box and click Check-in. A confirmation dialog displays.
5. Click Yes.
6. Click Close.
Saving a Client File to CCH ProSystem
fx
Engagement
(File > Save to Engagement Binder)
CCH ProSystem
fx
Fixed Assets data files (.FAC) can be added to a workpaper tab in an Engagement
binder. Prerequisites for exporting to Engagement include the following:
You must have a valid Engagement user name and password.
You must be a team member assigned to the binder you want to store the file in.
You must be assigned the rights to create a new workpaper for the binder and the binder must
be closed.
You must have a licensed version of Engagement for this process.
To export a client file to Engagement, do the following:
1.
Open a client file.
2. Select File > Save To Engagement Binder.
3.
If this is the first time you have exported data during this session, you are prompted for your
Engagement user login information. Enter it and click OK.
4. Click Next on the
Insert Workpaper Wizard
dialog.
5.
In the Local File Room, select the client folder and then the binder where the client file is to be
placed.
6. Click Next.
Chapter 3 - Managing Clients • 73
7. Select the workpaper tab where the client file is to be inserted and click Next.
8.
Enter an index number and name.
9. Click Finish to display a summary dialog listing the binder, workpaper tab, and workpaper index
number and name.
10. Click Insert if the information is correct. Click Back to change any of your selections.
Chapter 3 - Managing Clients • 74

Chapter4
Chapter 4 - Managi ngA sset s
With CCH ProSystem
fx
Fixed Assets, you can enter a wide variety of asset details (such as,
category, location, general ledger asset account), including seven user defined categories for each
client. Once you have entered the details, you can use them to filter the way in which a client's assets
display on screen and print in reports.
Overview of the Asset Detail Tab
To view asset detail information, double-click an asset on the
Asset List
tab or select the Detail tab.
The
Detail
tab provides a full view of an asset's information.
Chapter 4 - Managing Assets • 75
MANAGING ASSETS

Customizing Asset Detail Fields
Creating customized fields speeds data entry and offers greater control with less chance of errors. All
of the fields in the upper pane of the
Asset Detail
dialog can be customized, with the exception of the
following:
System number. This number is assigned by CCH ProSystem
fx
Fixed Assets and cannot be
changed.
Date acquired.
Date in service.
Notes.
Description.
Serial Number.
Editing the Asset ID Field
(Tools > Fields > Edits)
The asset ID is not required, but it can be used as a column filter. You can also elect to print reports
based on the asset ID or the system number. Once you establish a numbering scheme for the asset
ID, the system automatically numbers new assets as they are added.
Notes:
The asset IDcan be changed at any time.
The use of the
Prefix
or
Starting Number
field is optional.
A starting number must be entered to begin the automatic numbering process.
Do not use an asterisk (*) or a question mark (?) in the filter name.
Use the following procedure to change the Asset ID:
1. To display the
Asset Detail Field List
dialog, do one of the following:
Select Tools > Fields.
Click Fields on the toolbar.
2. Select Asset ID and click Edit. The
Edit Field - Asset ID
dialog displays.
3. Enter up to eight characters for the prefix of the Asset ID in the
Prefix
field (hyphens are
allowed).
4. Enter up to six digits in the
Starting number
field; the number must be greater than zero. Do not
use negatives or decimals. The starting number is appended to the prefix.
Note: If you enter fewer than six digits in the
Starting number
field, leading zeroes are
added to the entered value to create a six-digit figure.
Chapter 4 - Managing Assets • 76
5.
Enter the number the Asset ID should increase by each time a new asset is added. The default
is 10.
Note: The
Increment by
field is disabled until a number greater than zero is entered in the
Starting number
field.
6. Click OK to save your settings and exit this dialog.
Customizing Tax Schedule Links
(Tools > Fields > Edit)
When entering asset detail, select a link from the
Tax link
picklist to associate the asset data with a
specific tax schedule or entity. Linking is necessary for exporting data as well as for generating Form
4562. You can use the system-provided links or create your own. All assets must contain a link. A
default tax link is assigned when a new asset is added. The default links are as follows:
Individual - Schedule A
Partnership - Other Depr
Corporation - Other Depr
Fiduciary - Form 1041
S Corporation - Other Depr
Exempt - Form 990, page 10
Notes:
If you import assets from the tax return, the tax schedule links are imported as well.
If you have imported asset data, tax links for the imported assets display in the upper portion of
the
Tax Schedule Link List
dialog. If you have not imported asset data, only the default link
displays in the upper portion of the window.
Choose from the following options to customize your tax schedule links:
To add a tax schedule link, see
Adding a New Entity
on the facing page.
To edit tax schedule link properties, see
Editing an Entity
on page79.
To delete a link, see
Deleting an Entity
on page79.
Changing an Asset's Tax Link
To change a tax link for one asset, do the following:
1. Display the
Detail
tab by doing one of the following:
Double-click an asset in the Asset List view.
Highlight an asset and select the Detail tab.
Chapter 4 - Managing Assets • 77
2. Select a new link from the
Tax link
drop-down list.
3. Click the Save button.
Adding a New Entity
Adding, editing, and deleting entities is client-specific.
To customize tax schedule links, do the following:
1. To display the
Asset Detail Field List
dialog, do one of the following:
Select Tools > Fields.
Click Fields on the toolbar.
2. Highlight Tax link and click Edit to display the
Tax Schedule Link List
dialog.
Note: You can also click Tax link on the
Detail
tab to display the
Tax Schedule Link List
dialog.
3. Click New Entity.
4. Select a tax schedule from the
Tax link
list. This list includes links for the client type that is
active (for example, Individual, Corporation, S Corporation).
5.
Enter an entity description.
6. Edit the system-generated, unique
Entity Number
if desired.
7.
Enter additional fields as needed:
Schedule K-1 entities for Individual and Fiduciary. The
Entity type
field is
available. An entity form can be selected to specify the type of K-1 entity. This
information imports to Tax Preparation tax returns.
Farm activity for Corporation, S Corporation, Partnership, or Exempt. Select
Farm in the
Entity type
field.
SBE, Home Office, or Depletion entities. Use the
Tax Link to parent
drop-down list
to select the parent form with which the link is associated.
Pass-through entities, such as Individual Schedule K-1. In the
Additional pass-
through definition
section, enter an Activity description and edit the Activity number if
desired. Click New Activity.
8. Click Apply to apply changes and update the list, or click Clear to remove all
Edit entity
section
entries.
9.
Repeat steps 3 through 8 to add additional entities.
10. Click OK to exit this dialog.
Chapter 4 - Managing Assets • 78

Editing an Entity
To customize tax schedule links, do the following:
1. To display the
Asset Detail Field List
dialog, do one of the following:
Select Tools > Fields.
Click Fields on the toolbar.
2. Highlight Tax link and click Edit to display the
Tax Schedule Link List
dialog.
Note: You can also click Tax link on the
Detail
tab to display the
Tax Schedule Link List
dialog.
3.
Select the entity you wish to edit.
4. Make the desired changes in the active fields displayed on the
Edit entity
section of the dialog.
Press F1 for information about the available fields.
5. Click Apply to save the edits.
6. Click OK to close the dialog, or click Clear to clear all changes in the
Edit entity
section.
To change a tax link for one asset, do the following:
1. Display the
Detail
tab by doing one of the following:
Double-click an asset in the Asset List view.
Highlight an asset and select the Detail tab.
2. Select a new link from the
Tax link
drop-down list.
3. Click the Save button.
Deleting an Entity
To customize tax schedule links, do the following:
1. To display the
Asset Detail Field List
dialog, do one of the following:
Select Tools > Fields.
Click Fields on the toolbar.
2. Highlight Tax link and click Edit to display the
Tax Schedule Link List
dialog.
Note: You can also click Tax link on the
Detail
tab to display the
Tax Schedule Link List
dialog.
Chapter 4 - Managing Assets • 79

3.
Select the entity to edit.
4. Click Delete.
Note: If you delete an entity that has assets linked to it, the
Re-Link Assets
dialog
displays.
5.
Do one of the following:
Select Delete Assets to delete all of the assets currently linked to the deleted entity.
Click OK.
Note: The
Delete assets
radio button is disabled when assets associated with the
tax link are any of the following:
Included in a group disposition
Included in a partial disposition
Included in a like-kind exchange with a continuation asset
Part of a split asset
Select Change tax link to re-link assets to an entity listed in the
Tax Schedule
drop-down list. Click OK.
6. Click OK to save your changes and exit the
Tax Schedule Link List
dialog.
Configuring the Asset Detail Picklist
This section explains how to customize system and user-defined picklists on the
Detail
tab. Picklists
can be used to filter the list of assets and to filter and sort assets for printed reports. Creating
customized fields speeds data entry and offers greater control with less chance of input errors. The
seven user defined fields can be used for items such as cost center, department, and asset IDtag.
CCH ProSystem
fx
Fixed Assets allows you to create and edit the field picklist, provides a descriptive
field tip to display on the status bar, and adds a field description for user-defined fields.
The system-provided detail fields are as follows:
Category
Location
GLasset account
GLdepreciation/amortization expense account
GLaccumulated depreciation/amortization account
Amortization code section (contains a pre-defined picklist)
Section 263A rules apply
Chapter 4 - Managing Assets • 80

Detail field settings are client-specific.
To customize the asset detail picklist, do the following:
1. On the
Detail
tab click the label of the detail field of the picklist you want to edit. For example,
click Category, Location, or GL asset account. The
Edit Field Properties
dialog displays.
2. If this is a user-defined field, you can enter or edit the contents of the
Description
field. The
information entered in this field is used as the name of the selected picklist.
Note: The
Field name
field cannot be edited.
3. Enter or edit the contents of the
Field tip
field. The field tip information displays in the lower left
portion of the CCH ProSystem
fx
Fixed Assets status bar when you click the picklist.
4.
Do any of the following:
Move up an item. Highlight the item and click Move Up until the item is positioned
correctly. When
Move Up
is selected, the sort option is cleared.
Move down an item. Highlight the item and click Move Down until the item is
positioned correctly. When
Move Down
is selected, the sort option is cleared.
Delete an item. Highlight the item and click Delete.
Delete the entire picklist. Click Clear list.
Sort items alphabetically. Check the Sort list alphabetically box.
Add a picklist item. To add items to the picklist, place the cursor in the
Edit item
field,
enter a value, and click Add. Picklist items have a maximum length of 45 characters.
Edit an item. Highlight the item, change it in the
Edit item
field, and click Apply.
Clear the Edit item field. Highlight the item and click Clear field.
Chapter 4 - Managing Assets • 81

Note: The Amortization code section dialog has an additional button,
Restore
. This button
clears any existing list entries and restores the default list of amortization codes.
5. Click OK when finished.
After editing or deleting picklist values and exiting the
Edit Field Properties
dialog, you are prompted
to delete or retain asset values for the edited fields that no longer exist in the updated picklist.
If your changes affect existing data, CCH ProSystem
fx
Fixed Assets asks if you want to keep existing
data intact or set existing data to blank.
Global Settings can also be applied to field properties using the Global Settings drop-down list at the
top of the dialog.
Adding an Asset
You can add an asset from any tab within the program. The information that displays in the
Asset
Detail
section depends on your data entry preferences (that is,
Use previous tax link for new asset
,
Use previous asset's settings for new asset
, or no preferences set). Use Tools > Preferences to
set data entry preferences.
Entering Asset Detail
(Assets > Add)
1.
Choose one of the following to add an asset:
Select Asset > Add.
Press Ctrl + T.
Click Add Asset on the toolbar.
Right-click the asset and select Add from the menu.
2.
If you have set up a custom Asset ID numbering system, the next sequential number in the
system is applied to the added asset. If you have not set up a custom asset numbering system,
you can enter an asset ID of up to 14 characters.
3. Press Tabto move to the
Tax Link
field. You can select a tax schedule link from the
Tax link
drop-down list. The
Tax link
field is a required field.
To add a new tax schedule link, click Tax Link.
4. Enter a date in the
Date Acquired
field, enter a date in mm/dd/yyyy or mm/dd/yy format.
Note: An empty
Date Acquired
field will be filled with the date in service date entered. The
Date Acquired
field is not a mandatory field. However, if an acquired date is entered, that
date is placed in the
Date in Service
field if it is empty.
Chapter 4 - Managing Assets • 82

5. If the
Date Acquired
field has not been entered, enter a date in the
Date in Service
field. Use
the date formats listed in step 4. An empty
Date Acquired
field is filled with the date entered in
the
Date in service
field.
Note:The date in service can be later than the date acquired.
When the date in service is entered, the asset's Book section becomes available.
6. Enter descriptive information of up to 80 characters in the
Description
field.
7. To flag an asset as inoperative, select the
Asset Inactive
check box. The asset will not be
included in calculations, reports, and exports to CCH ProSystem
fx
Tax.
Note: The Asset List displays an
X
in the status column for all inactive assets.
8. You can enter a note of up to 80 characters in the
Notes
field.
9. To flag an asset as used, select the
Used
check box. The asset will not be considered a
qualifying 168(k) bonus depreciation property.
10. If a serial number exists for the asset, enter it in the
Serial number
field. The number can have
a maximum of 45 digits.
11.
If you have defined custom picklists for the asset detail fields, click the drop-down arrows to
select the correct items for the asset (for example, Location, GL Asset Account).
12. Enter the asset's depreciation input in the
Depreciation Detail Input
grid.
Entering Depreciation Input
Navigating the Depreciation Detail Grid
The following options are available when navigating the Depreciation Detail Grid:
Press F6 to move between the top Detail pane and the Depreciation Detail grid.
Press Tab or Enter to move from one field to the next.
Press Alt + Down Arrow or Alt + F4 to open drop-down lists.
Click a field label to edit its picklist.
Chapter 4 - Managing Assets • 83

Using the Depreciation Detail Grid
The following information reviews the fields available in the Depreciation Detail grid.
Consider the following points when entering depreciation data:
Entries in the Federal book may automatically flow into cells in other books depending on how
you set up books for this client. Therefore, we recommend entering Federal book values first. If
you change a Federal entry that automatically flows into other books, the other books are
automatically updated provided you did not change them manually.
Values for new assets can be set to initially autoflow to other books using the
Compute basis
as...
setting on the
Book Setup
tab.
Values that CCH ProSystem
fx
Fixed Assets calculates display in blue.
Computations are shown for all books based on the fiscal year. Partial year amounts are viewed
through reports in which you specify the time period.
The books displayed depend on the book setup you established when setting up the client.
In regards to partial dispositions, overrides of depreciation amounts in the original asset will be
allocated between it and the asset created for the disposed portion. The override will be treated
as such in both assets. All non-calculated information will remain the same in both assets.
Type of Property
Select the type of property. The types that are available depend on the date in service.
Leased autos are treated as a non-depreciable category so the data can be passed to Tax. You
cannot enter depreciation amounts and they are excluded from depreciation reports.
Chapter 4 - Managing Assets • 84

Additional Property Type (Optional)
The availability of items in this field is determined by the date in service and selected property type.
Click the plus sign (+) next to
Type of Property
. This inserts a row for
Additional Property Type
.
Select an additional property type from the following:
Additions and Improvements
Indian Reservation
Investment Property
Empowerment Zone
Disaster Zone Demolition/Clean Up Costs
Disaster Zone
Disaster Zone Qualified Costs
Renewal Community
Commercial Revitalization Expense (50%)
Commercial Revitalization Expense (120 months)
Type of SUV(Optional)
NYCor MDmust be designated as State or other books in Client Properties > Book Setup.
When the property type is SUV, two or three selections will be available:
Auto Limits
Truck Limits
Eligible Farmer
Note:Eligible Farmer is only available for NYC.
Special Allowance Option
Note: There are limited situations where assets are eligible for Section 168(k) special allowance
depreciation outside of the dates listed below.
Select 168(k) Property - 30% for qualified new property acquired after 9/10/2001 and before
1/1/2005 or after 01/01/2018 and before 01/01/2020.
Select 168(k) Property - 40% for qualified new property acquired after 12/31/2017 and before
01/01/2019.
Select 168(k) Property - 50% for qualified new property acquired after 5/5/2003 and before
1/1/2005 or after 12/31/2007 and before 09/09/2010 or after 12/31/2011 and before
01/01/2018. This option is also available for fiscal years that include 09/08/2011.
Select 168(k) Property - 100% for qualified new property acquired after 9/8/2010 and before
1/1/2012.
Chapter 4 - Managing Assets • 85

Select Cellulosic Biomass Ethanol for a first-year depreciation allowance equal to 50 percent
of the adjusted basis of qualified property used solely to produce cellulosic biomass ethanol,
acquired after 12/20/2006 and before 01/01/2017.
Select Disaster Zone for Gulf Opportunity Zone property placed in service on or after 8/28/05
and for Kansas disaster area property placed in service on or after 5/4/07. This bonus
depreciation applies to nonresidential and residential rental property and the property can be
used property. The property must be placed in service before 2008 (before 2009 in the case of
residential and nonresidential real property) and there must not have been a pre-August 28,
2005, for Gulf Opportunity Zone property, or a pre-May 4, 2007, for Kansas disaster area
property, binding contract to purchase the property. To qualify for bonus depreciation,
substantially all the asset's use must be in the Gulf Opportunity Zone or the Kansas disaster
area.
Select Reuse and Recycle Property for a first-year depreciation allowance equal to 50
percent of the adjusted basis on a qualified reuse and recycling property acquired and placed in
service after 8/31/08.
Select New York Liberty Zone for property substantially used in New York Liberty Zone that
was acquired after 9/10/2001 and before 2007 (before 2010 for residential and non-residential
real property) and that does not qualify as section 168(k) property.
Select 10% of Federal 168(k) for Arizona state assets placed in service in tax years 2013 and
later.
Cost or Other Basis (Optional)
Enter the cost or other basis as a dollar amount.
Business Use Percent (Optional)
If appropriate, click the detail box next to
Business Use Percent
to display the
Business Use
Percent
dialog.
Only one business use percent is allowed for all books. The current year business use percent always
displays.
For assets placed in service in the current year, the business use percent defaults to 100%.
Business Use Percentages for Assets with Prior Years
For assets placed in service in prior years, click the year or short year that you want to enter a
percentage for, and then enter the percentage in the
Enter business use percent
field.
If you change the current business use amount, you are given the option of applying the same amount
to all prior years, provided:
You have not previously chosen
No
when prompted to autoflow business use amounts to
previous years, and
At least one previous year is unlocked, and
The prior years all have 100% business use percentages, or
Chapter 4 - Managing Assets • 86

You have previously chosen to autoflow the business use amount to prior years and all prior year
business use amounts are the same.
Click OK to apply the appropriate business use amount and return to the
Detail
tab.
Notes:
If the asset is an automobile or listed property, the business use percent can be computed from
the
Vehicles and Listed
tab.
Only business use percentages for the past eight years display in this list.
Method (Required)
Select a method. The methods listed in the picklist depend on the selected type of property.
Life (years, rate, or unit) (Required)
Enter the appropriate value.
Once the life is entered, CCH ProSystem
fx
Fixed Assets calculations display in blue in the amount
fields as appropriate for the asset type and method.
Notes:
You can override the amounts calculated by CCH ProSystem
fx
Fixed Assets by placing your
cursor in a field, deleting the current amount, and entering the new amount.
If you change the type of property or method and the Life value is no longer valid, the value will
change to the system default value.
Convention
Select the applicable convention for the asset.
The convention for current year assets is calculated unless it is set in the
Client Properties
dialog in
the Mid-quarter convention field. For current year assets, the convention in use will display in a
grayed-out box in each book’s column.
CCH ProSystem
fx
Fixed Assets determines the quarter based on date in service and fiscal year/short
year information. The quarter number can be modified on prior year assets.
If a MACRSasset, the convention for current year assets is calculated but can be manually set in the
Client Properties
dialog.
Chapter 4 - Managing Assets • 87

For MACRS assets, this field is only editable if entering prior year assets.
Notes:
This field is not available for Other books being used to compute State ACE or AMT, or E&P.
If CCH ProSystem
fx
Fixed Assets determines that the current year convention must be
changed, it will prompt you before making changes and re-calculating amounts.
Computer software, Amortization, and Non-Recovery Straight Line assets offer the Full Month
convention. The Full Month convention treats the asset as if it was placed in service on the first
day of the month. No depreciation is calculated for the last month of the asset's life before the
asset is sold. The Actual Month convention is used if the convention is N/A.
Sec. 179/Bonus (Optional)
If applicable, enter a Section 179/Bonus amount. If Section 179 is allowed, several additional lines
will display. What the lines display depends on whether or not the asset is current year or prior year.
Salvage Value (Optional)
Enter the estimated dollar value that the asset could be sold for at the end of its useful life. Neither
the ACRS nor the MACRS method considers the salvage value.
ITC/Basis Adjustment (Optional)
If applicable, click the detail box next to ITC/Basis Adjustment and select a credit from the
Credit
Type
drop-down list. Click OK to accept the entry. You can override the default amount in the Detail
grid if needed.
Tax Preference/Section 168(e) Code (Optional)
Select the appropriate code for the Federal book. Your selection will autoflow to all open books but
will only be editable in the Federal and State books. The Tax Preference Code is used in the
calculation of the AMT book. The Section 168(e) Code is used for import to CCH ProSystem
fx
Tax as
well as preparation of the 4562 Qualified Section 179 Real Property statement.
When a Property type of Improvements is selected, the following three codes will be available in the
field:
Leasehold
Restaurant
Retail
Note: Leasehold is the default selection.
These selections are related to the Real Property Section 179 elections and will flow to the Real
Property statement for the Form 4562.
Chapter 4 - Managing Assets • 88
Exchange Parent Current Depreciation
If you exchange an asset in the year acquired on old law assets, the current depreciation of the parent
asset will display on the detail grid. This section will only show up if the exchange occurred in the year
acquired.
Prior Depreciation (Optional)
CCH ProSystem
fx
Fixed Assets computes this value each time you enter data, once the fields
required for the calculation have been completed. You can override this calculated amount by
entering your own value. To view the calculated amount after entering your own values, click the
button next to Prior Depreciation.CCH ProSystem
fx
Fixed Assets will display the value you entered,
the calculated amount, and any variance.
Business Use Prior Depreciation (Optional)
If you have at least one current or prior business use percentage, CCH ProSystem
fx
Fixed Assets will
display the business use percentage being applied.
Current Sec 179/Bonus (Optional)
When a Business Percentage is entered for an asset that has elected to take Section 179/Bonus, the
Section 179/Bonus is limited to the Business Percentage entered above and will display in this field.
Special Allowance Depreciation (Optional)
If you have a Special Allowance Option selected and it is the first year of depreciation for the asset,
then this field will automatically calculate after basic data for an asset has been entered. This section
will only show up during the first year of the asset when one of the special Allowance Options is
selected.
Business Use Special Allowance Depreciation (Optional)
The amount in the Special Allowance Depreciation is multiplied by the computed business use
percentage to determine the Special Allowance Business Use depreciation. This section will only
show up during the first year of the asset when one of the Special Allowance Options are selected and
there is a business use percentage less than 100%.
Current Depreciation (Optional)
CCH ProSystem
fx
Fixed Assets computes this value each time you enter data, once the fields
required for the calculation have been completed. You can override this calculated amount by
entering your own value.
Business Use Current Depreciation (Optional)
The amount entered in the Current Depreciation field is multiplied by the computed business
percentage to determine the current business use depreciation.
Total Depreciation (Optional)
The amount is the sum of the prior and current year depreciation.
Chapter 4 - Managing Assets • 89

Business Use Total Depreciation
If the business use percent is other than 100%, you can expand the total depreciation by clicking the
plus sign to display the depreciation amount with the business use percent applied. If a prior year
exists, the amount includes the prior year total depreciation with business use percent applied. The
amount is correct when closing a year, and also when reversing a closed year. If the business use
percent amount is 100%, the expand column will be blank.
Basis Reduction (Optional)
The amount is the total of the following, if present in the asset: Section 179, Disaster Zone clean up,
and ITC basis adjustment. This total reduces the amount of the basis immediately before
depreciation is calculated because these allowances can be taken in full the first year of the asset.
Business Use Basis Reduction
If the business use percent is other than 100%, you can expand the basis reduction by clicking the
plus sign to display the amount with the business use percent applied. If the business use percent
amount is 100%, the expand column will be blank.
Adjusted Basis
The amount is the sum of Cost or Other Basis less Total Depreciation and Basis Reductions.
Applying Section 179 Bonus Maximums at a Client Level
(Assets > Section 179)
CCH ProSystem
fx
Fixed Assets allows you to apply the Section 179 amounts on any eligible current
year assets from the
Asset List
. The
Section 179 Allocation
dialog displays a tab for each active
book.
Chapter 4 - Managing Assets • 90

Each asset displays with the currently allocated amount.
The assets display in order of the date in service.
Note: This option is only available from the
Asset List
tab. If there are no assets eligible for
Section 179, the menu item is not available.
Apply the Maximum Section 179
1. To display the
Section 179 Allocation
dialog, do one of the following:
Select Assets > Section 179.
Click Section 179 Allocation on the toolbar.
2. Select an asset from the list and click Maximize to apply the maximum amount of available
Section 179 to the selected asset.
If you select the
Maximize All
button on the
Federal
tab, you receive a message stating
Would
you like to force the new federal Section 179 to the other books currently designated with
autoflow?
If you select
Yes
, the elected Section 179 applied for the Federal book autoflows to
each book that is set to autoflow Section 179.
If you select
No
, the elected Section 179 does not autoflow to the other books.
3. Click OK to save your changes and exit the dialog.
Maximize all Section 179
1. To display the
Section 179 Allocation
dialog, do one of the following:
Select Assets > Section 179.
Click Section 179 Allocation on the toolbar.
2.
Select from the following options:
Apply Section 179 to assets with longest lives first. Applies Section 179 to longer
life assets first when maximizing all assets.
Apply Section 179 to assets with earliest date in service first. Applies Section 179
to assets with earliest date in service first when maximizing all assets.
Apply Section 179 to assets with latest date in service first. Applies Section 179 to
assets with latest date in service first when maximizing all assets.
3. Click Maximize All. This allocates the available amount of Section 179 among all assets in the
order specified from the
Apply Section 179
fields.
If you select the
Maximize All
button on the
Federal
tab, you receive a message stating
Would
you like to force the new federal Section 179 to the other books currently designated with
autoflow?
If you select
Yes
, the elected Section 179 applied for the Federal book autoflows to
each book that is set to autoflow Section 179.
If you select
No
, the elected Section 179 does not autoflow to the other books.
4. Click OK to save your changes and exit the dialog.
Chapter 4 - Managing Assets • 91

Applying Section 179 Bonus Maximums at an Asset Level
(Assets > Section 179)
CCH ProSystem
fx
Fixed Assets allows you to access the Section 179 detail information on any
eligible current year asset regardless of Section 179 input.
To maximize Section 179 at an asset level, do the following:
1.
Display the asset detail information by doing one of the following:
Highlight an asset with Section 179 on the
Asset List
tab then select the Detail tab.
Double-click the asset on the asset list.
2. In the depreciation detail grid, click the blue square next to the
Section 179/Bonus
field. The
Section 179 Detail Information
dialog displays.
3. Click Maximize Federal.
Note: This allocates the maximum Section 179 expense available for this asset to the
Federal book. A message displays inquiring whether to autoflow the federal amount. If
Yes
is selected, any book designated to autoflow Section 179 also receives the new elected
amount.
4. Click OK to save your changes and exit the dialog.
Displaying a Calculation
(Assets > Display Calculation)
For each asset, you can display the calculation for the current year depreciation. Display Calculation is
not available when a current depreciation override is present or when current depreciation is blank.
You can print the calculation detail from the
Display Calculation
dialog.
Note: Calculation detail can only be printed from the
Display Calculation
dialog.
To display the calculation from the
Detail
tab, do one of the following:
Select Assets > Display Calculation.
Click Display Calculation on the toolbar.
Right-click in one of the books on the
Detail
grid and select Display Calculation from the
menu.
Note: The
Display Calculation
dialog defaults to the corresponding book.
From this dialog, you can display a different book by selecting it from the
Book
drop-down list. Only
active books with current depreciation and no overrides appear in the
Book
drop-down list.
Chapter 4 - Managing Assets • 92

The
Basis
calculation in the
Current Depreciation
section updates automatically for each book and is
based on the applicable items from the following list:
Cost
Section 179
ITC
Clean Fuel
Start Up Costs
Salvage Value
Special Allowance
Prior Depreciation
179/280F Recapture
Other Basis Adjustments
Remaining Basis
Adding a Vehicle or Listed Property
CCH ProSystem
fx
Fixed Assets calculates a vehicle's business percentage use based on mileage
information.
Warning! Performing either of the following causes CCH ProSystem
fx
Fixed Assets to remove
all the Vehicle and Listed property information.
Changing an asset from a listed property type to a non-listed property type.
Changing an asset from a listed auto to another listed property type.
If the business use percentage was computed from entries that were thereafter deleted on the
Vehicles and Listed
tab, the percentage returns to 100%.
Follow these steps to add information about vehicles and listed property:
1. Click the Detail tab and enter information in the upper pane as appropriate. Be sure to enter the
date in service and a description.
2. In the Depreciation Detail grid, select from the
Type of Property
drop-down list.
3. Once the asset is identified as a listed property, the
Vehicles and Listed
tab displays for the
asset. Click the Vehicles and Listed tab.
4. Enter the
Total business/investment miles
. The business miles and total miles are used to
compute the business use percentage.
5. The
Average daily commuting miles
is for Individual returns only. The
Total commuting miles
for the year
is used for print purposes only.
6. Enter the
Total miles driven in a year
.
Chapter 4 - Managing Assets • 93

7. Click the Percentage button next to the
Business use percentage
field to override the
computed business usage percentage. The
Business Use Percent
dialog displays.
Enter a new percent in the
Enter business use percent
box and click OK.
Notes:
If the mileage entries or the business use percentage override causes the business use
to drop to 50% or less, a message displays asking if you want CCH ProSystem
fx
Fixed
Assets to change the method to straight line.
If the
Business use percentage
value has been overridden on the
Asset Detail
tab, it
displays in pink.
8. In the
Questions for this vehicle
section, select Yes or No in response to the questions.
9. Click Questions for All Listed Property.
10. Answer the questions as appropriate and click OK to return to the
Vehicles and Listed
tab.
Business Use Percentage Calculation
When Total business/investment miles have been entered, the business use percentage is calculated
based on the Total business/investment miles and total miles driven in a year. The computed amount
displays in the
Business usage percentage
field on the
Asset Detail
tab.
Business Use Percentage Messages
If the mileage entries or the business percent override cause the business use to drop to 50% or
less, a message displays asking if you want the system to change the method to straight line.
If mileage is entered for an asset with prior years, you are given the option of applying the
business use amount to all prior years, provided:
You have not previously chosen
No
when prompted to autoflow business use amounts
to previous years, and
At least one previous year is unlocked, and
The prior years all have 100% business use percentages, or
You have previously chosen to autoflow the business use amount to prior years and all
prior year business use amounts are the same.
Entering Home Office Input
The
Home Office
tab is available only for Individual returns with Form 8829 as the tax link and
without entries on the
Vehicles and Listed
tab.
The
Home Office
tab includes the following sections:
Business Use of Home Information
The home information is applied for each 8829 tax link entity. Every time the
Home Office
tab is
opened for the same Form 8829 entity, the same home information displays.
Chapter 4 - Managing Assets • 94

Home Number. This field corresponds to M-14, Box 30, and will be loaded on import from Tax.
It will be used when the same home is used in more than one business. The field default is one.
Area used exclusively for business (square footage). Enter appropriate measurements. If
square footage is entered for an asset with prior years, you are given the option of applying the
business use amount to all prior years, provided:
You have not previously chosen
No
when prompted to autoflow business use amounts
to previous years, and
At least one previous year is unlocked, and
The prior years all have 100% business use percentages, or
You have previously chosen to autoflow the business use amount to prior years and all
prior year business use amounts are the same.
Total area of home. Enter appropriate measurements.
Day Care Facilities
When both area fields are entered, the Day care facilities fields will become available and the
Total
hours facility available for use
field defaults to the number of hours in the current fiscal year. The
computed
Day care business percentage
field remains disabled and does not default to any
percentage. The
Day care business percentage
is computed and displayed in the
Business use
percentage
field when the Total hours used is entered. When the Total hours used is deleted, the
Total hours available will be deleted and is disabled.
Business Use Percentage
When values are entered in both of the area fields, the business use percentage will be computed and
displayed at the bottom. The percentage will be 100% when the area fields are empty.
Business Use Percentage - Home Office Percentage vs. Detail Tab
If no business use percent has been entered in the
Detail
tab, then the computed Home Office
percentage will be used and will appear in the Detail view.
If an override for business use has been entered on the
Detail
tab, then this entry will show in
the override color pink in the Detail view.
If the override is removed, the Home Office percentage will be used. The Home Office
percentage will remain the same without regard to the individual asset override since it applies
to all of the home office assets for the same Form 8829 entity.
Editing Property Tax Input Values
The sales tax, sales tax rate, and estimated market value of an asset can be entered or modified on
either the
Property Tax
tab of the individual asset, or on the
Property Tax Input Values
dialog which
is a spreadsheet format listing of all assets that have not been disposed of in a prior year.
Note:Estimated Market Value of an asset should be entered each year.
Chapter 4 - Managing Assets • 95

When a value is entered or modified, the new amount will be displayed from the current tax period
forward.
Follow the procedure for either the
Property Tax
tab or the
Property Tax Input Values
dialog.
Property Tax tab
1. Highlight an asset on the Asset List.
2. Select the Property Tax tab.
The
Estimated market value
,
Sales tax amount
, and
Sales tax rate
fields are populated from
entries made either here or on the
Property Tax Input Values
dialog.
3. Enter or modify the Estimated market value.
4. Enter or modify the Sales tax rate.
5. Enter an override amount for the Sales tax amount, if desired. An override amount entered
either here or on the
Property Tax Input Values
dialog is maintained even if the sales tax rate is
changed. Otherwise, the sales tax amount is automatically calculated.
When not overridden, the sales tax amount is based on the Financial book cost. If the Financial
book is not active, then you must enter the sales tax as an override amount. The override is
magenta in color.
Property Tax Input Values dialog
1. Select Assets > Sales Tax and EMV. The
Property Tax Input Values
dialog displays.
Notes:
The
Sales Tax Rate
,
Sales Tax Amount
, and
Est. Market Value
fields are populated
from entries made either here or on the
Property Tax
tab.
The columns can be resized on this screen.
Use the Arrow keys, Tab, Shift + Tab, or the mouse to navigate the grid. Ctrl + Tab will
exit the grid and move to the OK button.
Change the sort sequence by clicking on a column header, and click it again to reverse
the sort.
2. Enter or modify the Sales Tax Rate for an asset.
3. Enter an override amount for the Sales Tax, if desired. An override amount entered either here
or on the
Property Tax
tab is maintained even if the sales tax rate is changed. Otherwise, the
sales tax amount is automatically calculated.
When not overridden, the sales tax amount is based on the Financial book cost. If the Financial
book is not active, then you must enter the sales tax as an override amount. The override is
magenta in color.
4. Enter or modify the Est. Market Value of an asset.
Chapter 4 - Managing Assets • 96

5. Click OK to save your changes and exit, or click Cancel to exit the dialog without saving the
changes.
Notes:
Locked years. The
Property Tax
Tab and the
Property Tax Input Values
dialog are not
available in the current year if the current year is locked. These screens are also not available for
prior years that are locked.
Reversed to a prior year. If the asset file is reversed to a prior year, the values of future
periods are not displayed.
Reports of prior years. For reports that are run in years prior to the year the data is entered,
the sales tax and sales tax rates are pulled from the future period entries if none are present for
the current year. Any value entered for Estimated Market Value does not display.
Property Tax Listing Report. You can customize the
Property Tax Listing
report to include
these fields:
General - Cost less sales tax
General - Estimated market value
General - Sales tax
General - Sales tax rate
You can also customize the report columns, sort, and filters:
Specify Columns. Select the columns on the
Column Selection
tab of
File/Print/Reports/Activity and Status/Property Tax Listing. See
Customizing Report
Properties
on page138.
Sort and Filter. You can sort or filter the report on these fields:
General - estimated
market value
,
General - sales tax
, and
General - sales tax rate
.
Asset List Filter Selections.
You can include these fields in a client-specific filter or global filter:
General - Estimated market value
General - Sales tax
General - Sales tax rate
Asset List Column Selections.
You can customize the
Asset List
to include the following columns:
Property Tax - Estimated Market Value
Property Tax - Sales Tax Amount
Property Tax - Sales Tax Rate
Asset List Report Column Selections.
You can customize the
Asset List Report
to include the following columns:
Property Tax - Estimated Market Value
Property Tax - Sales Tax Amount
Property Tax - Sales Tax Rate
Chapter 4 - Managing Assets • 97

Find and Replace.
You can search for the following terms and replace them as needed:
Property Tax - Estimated Market Value
PropertyTax - Sales Tax Amount
Property Tax - Sales Tax Rate
See
Creating a New Filter
on page106 and
Creating Global Settings for Filters
on page27.
Entering State Use and State Use Amount Data
To enter input to compute depreciation unique to particular states such as California, New York, North
Carolina, and New Jersey, use the State Use and State Amount fields on the CCH ProSystem
fx
Fixed Assets
Other
tab.
Note: The
Other
tab only displays when a state has been selected from the
Designate state for
export
field on the
Client Properties > Book Setup
tab. See
Setting Up Books
on page44 for
details.
Projecting Asset Depreciation Data
You can apply business use percent to all amounts on the projection tab.
Notes:
A future fiscal year may be entered in the calendar and can be used in projections.
Property information displays when you hover the cursor over a Book column, for example, the
book name, cost basis, and method display.
Detail, Multi-year, and FASB 109 projection reports can be printed by clicking Print Reports
and selecting one of the reports in the Projection Reports folder. Book-based comparative
projections are also available.
Project Asset Depreciation for all Active Books
1.
Select an asset with future years.
2. Click the Projection tab. The system number, asset ID, and description display at the top of the
screen. The list defaults to All books.
3. The
Projection type
field defaults to Current with the additional options of Beginning,
Accumulated and Net Book Value available for selection.
4. To apply business use to all amounts for the selected projection type, select Apply business
percent. The
Apply business use percent
option:
Is not available if all business use for prior and current years is 100%.
Is available for future year assets.
Chapter 4 - Managing Assets • 98

When selected, applies business use to projection amounts until the client is closed.
When the client is reopened, the original amounts display.
Project Asset Depreciation for a Specific Book
1.
Select an asset with future years.
2. Click the Projection tab. The system number, asset ID, and description displays at the top of
the screen.
3. Select a single book from the
Book
drop- down list. The table displays the current, beginning,
accumulated, and net book value depreciation information for the selected book.
4. To apply business use to all projection amounts for the selected book, select Apply business
percent. The
Apply business use percent
option:
Is not available if all business use for prior and current years is 100%.
Is available for future year assets.
When selected, applies business use to projection amounts until the client is closed.
When the client is reopened, the original amounts display.
Editing an Asset
You can change asset information by displaying the asset in the
Detail
tab and changing its values.
CCH ProSystem
fx
Fixed Assets re-calculates certain fields including
Prior Depreciation
and
Current
Depreciation
when field values are changed.
Duplicating an Asset
(Assets > Duplicate)
If you duplicate an asset that is part of a group disposition, CCH ProSystem
fx
Fixed Assets adds the
new asset to the group.
To duplicate an asset, do the following:
1.
Select the asset to be duplicated.
2.
Choose one of the following to duplicate all the information for the asset except for the system
number and any Section 179 information:
Select Assets > Duplicate.
Click Duplicate Asset on the toolbar. A copy of the selected asset is added to the end of
the asset list.
Right-click an asset and select Duplicate from the menu.
Press Ctrl + U.
3.
Edit the duplicated asset as required.
Chapter 4 - Managing Assets • 99

Clearing Current Depreciation Overrides
(Tools > Remove Overrides)
This option only removes overrides entered for the current year. To remove overrides for prior years,
you must roll back to a prior year. See
Reversing a Closed Year
on page64 for details.
Select Tools > Remove Overrides or click Remove Overrides on the toolbar to remove values
manually entered in the
Current Depreciation
field of the Depreciation Grid, and then click Yes on
the confirmation dialog.
Locating an Asset
Using the Go To Asset Option
(Edit > Go To)
To quickly locate an asset, use the Go To tool.
1. Choose one of the following to display the
Go To Asset
dialog:
Select Edit > Go To.
Click Go To Asset on the toolbar.
Right-click an asset in the Asset List and select Go To from the menu.
2. Choose the System Number or Co. Asset ID button.
3. Enter the system number or IDin the field and click OK.
Using the Navigational Arrows and Keyboard Shortcuts
You can also use the navigational toolbar buttons and keyboard shortcuts to page to the next or
previous asset, or move to the beginning or end of the asset list.
Navigation
Keyboard Shortcuts Navigation Shortcuts
or Alt + Home
First
Selects the first asset
or Alt + Page Up
Previous
Selects the previous asset
or Alt + Page
Down
Next
Selects the next asset
or Alt + End
Last
Selects the last asset
Chapter 4 - Managing Assets • 100
Keyboard Shortcuts Navigation Shortcuts
Go To
Asset
Locates an asset by system number or company asset
ID
Adding Multiple Duplicates
(Assets > Multiple Duplicate)
To create multiple asset duplicates, do the following:
1.
Select the asset to be duplicated.
2.
To duplicate all the information for the asset except for the system number and any current year
Section179 information, do one of the following:
Select Assets > Multiple Duplicate.
Click Multiple Duplicate on the toolbar.
3. Enter the number of assets to duplicate on the
Multiple Duplicate
dialog and click OK.
4.
Edit the duplicated assets as required. Duplicate copies of the selected asset are added to the
end of the Asset List.
Using Find and Replace
(Edit > Find and Replace)
To locate a value entered in a specific field or update information in a field for multiple assets, use the
Find and Replace utility to do the following:
Locate and replace content in fields on the
Detail
tab.
Search both editable fields and picklists.
Narrow your search by books, when applicable.
Change the status of check box fields (for example, Asset Inactive).
To locate and replace field content, do the following:
Note:The assets that are searched are limited by the filter currently used by the Asset List. If
multiple assets are selected, only those assets are included in the search. To expand or narrow
your search, select a filter from the
Filter
drop-down list on the toolbar. See
Overview of Using
Filters
on page106 for further details.
1. Choose one of the following to display the
Find and Replace
dialog:
Select Edit > Find and Replace.
Press Ctrl + F.
Click Find Menu and select Find and Replace.
Right-click and select Find and Replace from the menu.
2. Select a field from the
Select field to find and replace
drop-down list.
Chapter 4 - Managing Assets • 101

3.
If you selected a book related field (for example, Type of Property), check the box of each book
to be searched: Federal, Financial, AMT, ACE, State, Other 1, Other 2, and/or Other 3.
4. Click OK.
5. On the
Find and Replace
dialog, enter the search content in the
Find what
field or select a
value from the field's drop-down list, if available.
6. Enter the value that you want to update in the target field's current content in the
Replace with
field or select a value from the drop-down list, if available.
Note: When searching picklist fields, you can select a value from the
Replace with
drop-
down list or enter a value.
7.
Do one of the following:
To search forward to the next field, click Find Next. Click Replace to update a field's
content.
Click Replace All to update all fields. Click OK on the confirmation dialog.
8. Click Close to exit the
Find and Replace
dialog.
Customizing the Asset List View
Using the Asset List View
Click the Asset List tab to display a list of assets. Each asset appears on a separate row and contains
information that can be arranged by column.
Customizing the Asset List View
The Asset List has several customizable features. You can sort the list by column; add, remove or
rearrange the columns; create filters to narrow the list of displayed assets; and control the appearance
of the Asset List grid.
Sort by column header. Click the column that the Asset List should be sorted by. Click the
column header to toggle between ascending and descending sorting order. An arrow (>) will
display beside the column heading that is used to sort the asset list.
Column selection. Use Tools > Columns or click Columns on the toolbar to select the
columns that display on the Asset List. See
Adding, Removing, and Rearranging Asset List
Columns
on page104 for more information.
Change column width. Change the width of a column by clicking the column header separator
and dragging the mouse pointer left or right.
Asset filter. Control the assets that display in the list by using system or customized filters
based on criteria such as:tax schedule link, location, group, and general ledger account
number. See
Creating a New Filter
on page106 for more information.
Grid display preferences. Use Tools > Preferences or click Preferences on the toolbar to
change the line display in grids. See
Setting Preferences
on page17 for details.
Chapter 4 - Managing Assets • 102

Asset List Status Codes
The Asset List can display up to 16 codes in the status column:
The column heading for the asset status column is an asterisk (*).
D Disposed IED Incomplete exchange
DTE Incomplete exchange transferred in IEG Group incomplete exchange
DTI Disposed asset transferred in S Split
DTO Disposed asset transferred out STI Asset is split after being transferred in
G Group disposition STO Split asset transferred out
GTE Group incomplete exchange transferred in TI Transferred in
GTI Group disposed asset transferred in TO Transferred out
GTO Group disposed asset transferred out X Inactive
Other Asset List Features
Right-click Menu
Right-click in the Asset List to display a menu of about 14 commands such as Copy Assets, Transfer
Assets, Client Properties, Find and Replace, Go To, Copy Books, Split, Filters, and more. The items
in this menu vary depending on an asset's status.
To Select Consecutive Assets in the Asset List
Click the first asset, hold down the Shift key, and click the last asset to select consecutive items.
To Select Non-consecutive Assets
Click the first asset, hold down the Ctrl key, and click additional assets to select non-consecutive
items. Do not release the Ctrl key until all the desired assets are selected.
To Select All Assets in the Asset List
Select Edit > Select All.
Chapter 4 - Managing Assets • 103

Adding, Removing, and Rearranging Asset List Columns
(Tools > Columns)
In this section you will learn how to add, remove, and rearrange columns from the Asset List, as well
as how to restore the default column settings. Please see the Notes at the end of this section for
additional information regarding displaying columns including applying Global Settings.
Use the following procedure to change the columns that display and the order in which they display:
1. Display the
Columns
dialog using one of the following methods:
Select Tools > Columns.
Click Columns on the toolbar.
Right-click an asset in the Asset List and select Columns.
2.
Open a client file.
3.
Select a category according to the type of detail you want to display.
The following section describes the options in the
Columns
dialog.
4.
Change the columns configurations as needed.
Add columns. Select one or more columns from the
Available columns
list and click
the right arrow. You can also double-click or drag columns to add them to the
Columns
selected for display
list.
Remove columns. Select one or more items from the
Columns selected for display
list and click the left arrow. You can also double-click or drag columns to move them to
the
Available columns
list.
Use Shift or Ctrl to select multiple columns in either list.
Chapter 4 - Managing Assets • 104

Change the order of columns. Select a column in the
Columns selected for display
list. Click Move Up or Move Down.
Restore defaults. Click Apply Default to return the
Columns selected for display
to
the original system-default list.
Note: Some column descriptions start with an abbreviation of the book, for example, Fin =
Financial, as in Fin. Adj. Basis. Other abbreviations include Fed, O1, O2, and O3 (for
Federal, Other 1, Other 2, and Other 3).
5.
Repeat steps 3 and 4 until columns for all desired categories are selected. A maximum of 26
columns may be selected for the Asset List display.
6. Click OK to save your changes and exit this dialog.
Notes:
Column settings are client-specific.
Changing the columns of the Asset List view will not affect the columns that print on the Asset
List report. To change the report use File > Print > Reports, select Asset List, and click on
Properties.
If Global Settings for columns have been applied to this file and you have set
Prompt to apply
updates
in Tools > Preferences, you are prompted to apply your changes to the Global Setting
file. Click Yes to update the Global Setting file. Click No to save your changes without updating
the Global Setting file.
Resizing Asset List Columns
Column settings are client-specific.
1.
With the Asset List view active, position the cursor arrow over the left or right border of a column
header.
2.
Press and hold the left mouse button and move the cursor left or right to resize the column.
3.
Release the mouse button when you have resized the column to the desired width.
Chapter 4 - Managing Assets • 105

Reapplying Default Asset List Column Settings
(Tools > Columns)
Column settings are client-specific.
1.
Open a client file.
2. To display the
Columns
dialog, do one of the following:
Select Tools > Columns.
Click Columns on the toolbar.
3. Click the Apply Default button.
4. Click OK to save your changes and exit this dialog.
Overview of Using Filters
(Tools > Filters)
You can create and use filters to control the assets displayed in the Asset List view and on reports.
The Filter drop-down list, located on the toolbar, contains seven predefined filters that cannot be
changed. However, they can be copied and changed to create new filters.
The predefined filters are as follows:
All Assets
Assets with Notes
Current Acquisitions Not Placed in Service
Current Year Acquisitions
Current Year Dispositions
Qualified Section 179 Property
Section 168
Creating a New Filter
(Tools > Filters)
Filter settings are client-specific. User-defined filters display in brackets and can be edited. You
cannot edit predefined filters, however you can copy them and change the definition of the new filter.
Chapter 4 - Managing Assets • 106

To create a filter, use the following procedure:
1. From the Asset List, choose one of the following to display the
Filter List
dialog:
Select Tools > Filters.
Click Filters on the toolbar.
Right-click an asset from the Asset List and select Filters from the menu.
2. Click New. The
Filter Editor
displays.
3. Enter the name for the new filter of up to 59 characters in the
Filter Name
field.
4.
Create the first line of the condition that will control which assets are affected by this filter. The
elements with which you can define a filter include the following:
Parenthesis. Use the left and right parenthesis to connect multiple expressions.
Field name. Use the drop-down list to select the general or detail field to be used. Fields
are listed alphabetically with detail fields listed first and general fields listed last.
From book. This field becomes available if the field name you choose is a detail field.
Select the book from the drop-down list. You also have the option of applying the search
conditions to any or all of the available books. Selecting Any returns results if one or
more books matches the search criteria. If All is selected, each book must meet the
applied search condition to return a result.
Condition. Select an operand from the
Condition
drop-down list to use in the formula.
Check box fields are limited to the operands = and <>.
Value. This changes to match the field type of the
Field Name
selected.
Picklist. If the field has a picklist associated with it (for example, Category field)
the picklist displays in the
Value
field.
Chapter 4 - Managing Assets • 107

Date field. If the field is a date field, the date entered must match the date
format of the field you selected (for example, mm/dd/yyyy, mm/yyyy, or yyyy).
Numeric amount. If the field is a numeric field, enter a numeric value according
to the format of the field.
5.
When you have completed the line, do one of the following:
Add to List. Adds the line to the end of the formula list at the bottom section of the
window.
Insert. Adds the line directly above the highlighted line in the formula list.
Replace. Deletes the existing line and replaces it with the newly defined formula.
6.
You can continue adding lines to the formula list. To connect two consecutive lines, select the
And or Or connector in the
Connect with previous
section.
7.
You can also manipulate the filter lines by using the following buttons:
Modify. To edit a line in an existing filter, see
Editing a Line in a Filter Formula
below.
Delete. To delete a line in an existing filter, see
Removing a Line from a Filter Formula
on the facing page.
Clear All. To clear all lines from an existing filter, see
Clearing a Filter's Entire Formula
on the facing page.
8. Click OK to save your changes and exit this dialog.
Editing a Line in a Filter Formula
(Tools > Filters)
1.
In an open client file, do one of the following:
Select Tools > Filters.
Click Filters on the toolbar.
Right-click an asset from the Asset List and select Filters from the menu.
2. Highlight a filter and click Edit.
3. Highlight a line in the formula and click Modify to display the line in the
Define filter
section of
the dialog.
4. Make the desired changes using the
Define Filter
options. Do one of the following:
Click Add to List to insert the line into the bottom section of the window. If this is not the
first line, it is added to the end of the formula list.
Click Insert to add the line directly above the highlighted line.
Click Replace to delete the existing line and replace it with the newly defined formula.
5. Click OK to save your changes and exit this dialog.
Chapter 4 - Managing Assets • 108

Removing a Line from a Filter Formula
(Tools > Filters)
Use the following procedure to remove a line from a filter formula:
1.
In an open client file, do one of the following:
Select Tools > Filters.
Click Filters on the toolbar.
Right-click an asset from the Asset List and select Filters from the menu.
2. Highlight a filter and click Edit.
3. Highlight a line in the formula and click Delete.
4. Click OK to save your changes and exit this dialog.
Clearing a Filter's Entire Formula
(Tools > Filters)
Use this procedure to replace the existing filter conditions. If you want to delete the entire filter, see
Deleting a Filter
on the facing page.
1.
In an open client file, do one of the following:
Select Tools > Filters.
Select Filters on the toolbar.
Right-click an asset from the Asset List and select Filters from the menu.
2. Highlight a filter and click Edit.
3. Highlight a line in the formula and click Clear All. A confirmation dialog displays.
4. Click Yes to delete all lines in the formula.
5.
Define a new formula for the filter.
6. Click OK to save your changes and exit this dialog.
Renaming a Filter
(Tools > Filters)
1.
In an open client file, do one of the following:
Select Tools > Filters.
Click Filters on the toolbar.
Right-click an asset from the Asset List and select Filters from the menu.
2. Select an existing filter and click Rename.
Chapter 4 - Managing Assets • 109
3.
Enter a new name.
4. Click OK.
Deleting a Filter
(Tools > Filters)
1.
In an open client file, do one of the following:
Select Tools > Filters.
Click Filters on the toolbar.
Right-click an asset from the Asset List and select Filters from the menu.
2.
Select an existing filter.
3. Click Delete. A confirmation dialog displays.
4. Click Yes.
5. Click Close.
Using the Calculator
(Tools > Calculator)
CCH ProSystem
fx
Fixed Assets provides a calculator for standard mathematical functions. The
calculated total can be transferred automatically to input fields in the Depreciation Detail grid.
1.
To display the Calculator, do one of the following:
Select Tools > Calculator.
Click Calculator on the toolbar.
2.
Enter your calculation using the keyboard or mouse.
3. Click the input field that you want the results applied to. The
Apply
button becomes active.
4. Click Apply. The results populate the input field.
Deleting Assets
(Assets > Delete)
When deleting one or more assets, the remaining assets in the list are not renumbered.
Chapter 4 - Managing Assets • 110

Deleting a Single Asset
1.
To delete an asset, do one of the following:
Highlight the asset and select Assets > Delete.
Click Delete Asset on the toolbar.
Press Ctrl + D.
Right-click the asset and select Delete from the menu.
2. A confirmation dialog displays. Click Yes.
Deleting Multiple Assets
1.
To delete multiple assets, do one of the following:
Select the Asset List tab.
Click the first file, hold down the Shift key, and click the last file to select adjacent items.
Click the first file, hold down the Ctrl key, and click additional files to select nonadjacent
items. Do not release the Ctrl key until all files are selected.
Select Assets > Delete.
Click Delete Asset on the toolbar.
2. A confirmation dialog displays. Click Yes.
Transferring Assets between Files
(File > Transfer Assets)
Consider the following circumstances that prevent the transferring of assets or generate an exception
report:
Transferring assets is available only if a year is unlocked.
The source and target data files must share the same current Calendar or Fiscal year.
If differences in the beginning and ending prior year calendar dates exist in the source and
target data files.
If an asset selected to be transferred is part of a group disposition, partial disposition, or a like-
kind exchange, all assets involved in that particular disposition must be transferred
simultaneously. If any of the assets from the disposition are missing, none of the assets from
the disposition are transferred and an entry in an exception report is generated.
Chapter 4 - Managing Assets • 111

Use the following procedure to transfer assets between client files:
1.
Open the client file you want to transfer assets to.
2.
From the Asset List, choose one of the following to display a list of client files:
Select File > Transfer Assets.
Click Transfer Assets on the toolbar.
Right-click an asset and select Transfer Assets from the menu.
3. Select the client file you want to transfer assets from and click OK. If needed, click Browse to
display files in another folder.
4. On the
Transfer Assets from
dialog, select the assets to be transferred and click OK.
If no exceptions occur, you are returned to the Asset List. If problems are encountered, you are
prompted to view the details on the exceptions report.
If assets being transferred are associated with tax links that do not exist in the target file, you
are prompted to re-link the assets to a different link or entity.
If no tax link is chosen when you are prompted to re-link assets, the asset is assigned to the
default tax link of the target file and an exception is issued.
5.
Do one of the following to re-link assets:
Assign assets to the new client type's existing links. Select an entity/activity from
the
Re-link Assets
dialog and click OK.
Create a new tax link. Click New on the
Re-link Assets
dialog. The
Tax Schedule
Link List
dialog displays. See
Adding a New Entity
on page78 for instructions on
adding a new tax link.
6. When you have completed adding links, click OK. You are returned to the
Re-link Assets
dialog, displaying the new customized links.
Note: The
Re-Link Assets
dialog displays for each entity/activity that does not exist in the
new client type. If no tax link is chosen, the asset is assigned to the default tax link of the
target file.
7. Select an entity/activity and click OK. When assets associated with entities/activities in the
originating file have been re-linked, you are returned to the Asset List.
Transferred Asset Status Codes
There are 10 status codes that indicate a transferred asset:
The column heading for the asset status column is an asterisk (*).
DTE Incomplete exchange transferred in GTO Group disposed asset transferred out
DTI Disposed asset transferred in STI Asset is split after being transferred in
DTO Disposed asset transferred out STO Split asset transferred out
GTE Group incomplete exchange transferred in TI Transferred in
Chapter 4 - Managing Assets • 112

GTI Group disposed asset transferred in TO Transferred out
Points to Remember when Transferring Assets:
After the transfer, current year section 179 and conventions are recalculated in both the target
and source files.
Transferred assets only display in the year of the transfer and subsequent years in the target
file.
The source file displays transferred assets in the years prior to the year of the transfer, and
during the year of transfer.
Transferred asset detail in system-provided fields such as Category, Location, and GLasset are
appended to the corresponding fields in the destination client file.
When transferring assets with detail contained in user-defined fields, CCH ProSystem
fx
Fixed
Assets appends the new information to any user-defined field in the target file using the same
name. If no matches are found and there is an unused user-defined field, the system copies
over the field name and associated asset detail values.
The transferred asset is assigned its original system number, if available. If the system number
is already in use, the next available system number is used.
Copying Assets between Files
(File > Copy Assets)
The File > Copy Assets option is only available from the Asset List view.
Consider the following circumstances that prevent the copying of assets or generate an exception
report:
Copying assets is only available if a year is unlocked.
If differences in the beginning and ending prior year calendar dates exist in the source and
target data files, each asset is analyzed to determine if the differences in the dates will result in
dissimilarities between the depreciation of the assets. If the differences between the dates are
significant enough to change the assets, an exception report is generated.
If an asset selected to be copied is part of a group disposition, partial disposition, or a like-kind
exchange, all assets involved in that particular disposition must be copied simultaneously. If any
of the assets from the disposition are missing, none of the assets from the disposition are
copied and an entry in an exception report is generated.
Chapter 4 - Managing Assets • 113
To copy assets, do the following:
1.
Open the client data file to which you want to copy in assets.
2.
From the Asset List, choose one of the following to display a list of client files:
Select File > Copy Assets.
Click Copy Assets on the toolbar.
Right-click an asset from the Asset List and select Copy Assets from the menu.
3. Select the file to copy out assets. Click Browse to display data files in another folder.
4. Click OK. The
Copy Assets from
dialog displays.
Note: The source and target data files must share the same current Calendar or Fiscal
year.
5. Select the assets to be copied and click OK. If no exceptions occur, you are returned to the
Asset List. If exceptions occur, you are prompted to view the details of the exceptions.
6.
If assets being copied are associated with tax links that do not exist in the target file, you are
prompted to re-link each asset to a different link or entity.
a.
Do one of the following to re-link assets:
Assign assets to the new client type’s existing links. Select an entity/activity
from the
Re-link Assets
dialog and click OK.
Create a new tax link. Click New on the
Re-link Assets
dialog. The
Tax
Schedule Link List
dialog displays. See
Adding a New Entity
on page78 for
instructions on adding new Tax links.
b. When you have completed adding links, click OK.You are returned to the
Re-link Assets
dialog, which displays the customized links. Select an entity/activity and click OK.
Note: The Re-link Assets dialog displays for each entity/activity that does not exist
in the new client type. If no tax link is chosen, the asset is assigned to the default tax
link of the target file.
c.
Once assets associated with entities/activities in the source data file are re-linked, you
are returned to the Asset List.
Chapter 4 - Managing Assets • 114

Points to Remember:
After assets have been copied, current year section 179, investment tax credits and conventions
are recalculated in the target file.
Copied asset detail in system-provided fields such as Category, Location, and GL asset are
appended to the corresponding fields in the destination client file.
When copying assets with detail contained in user-defined fields, CCH ProSystem
fx
Fixed
Assets appends the new information to any user-defined field in the target file using the same
name. If no matches are found and there is an unused user-defined field, the system copies
over the field name and associated asset detail values.
Copied assets are assigned the same system number, if available. If the system number is
already in use, the next system number is used.
Once an asset is copied from one file to another, there is no further connection between the two
files. If you copy the asset back to the original source file, it is treated as a newly copied asset.
There is no connection to the asset that was originally copied to the destination file.
Splitting Assets
(Assets > Split)
Splitting assets is only available if a year is unlocked.
Use the following procedure to divide a single asset into multiple assets:
1. Choose one of the following methods to display the
Split Asset Based on Federal Cost or
Other Basis
dialog:
Select Assets > Split.
Click Split Asset on the toolbar.
Right-click and select Split from the menu.
2. In the
Split into
field, enter the number of assets you want to divide the selected asset into and
press the Tab key. The assets generated from the split display in the
Allocation
list.
3.
If you want to modify a listed Asset's ID, Description, or Cost/Basis or Allocated Percent
amounts highlight the asset and click Edit.
Note: An asset's system number cannot be edited.
4.
Make the necessary modifications.
Note: 100% of the original asset's cost must be allocated. The unallocated cost amounts or
percentages display in the
Unallocated portion
fields.
Chapter 4 - Managing Assets • 115

This is an example of the
Split Asset Based on Federal Cost or Other Basis
dialog:
5. Click Apply to save your changes or Clear to abandon your modifications.
6. Click OK.
Notes:
To restore split assets to the single originating asset, select Assets > Undo Split or click Undo
Split on the toolbar from the Asset List.
The Asset List displays an
S
in the status column for all assets involved in a split unless the
asset is transferred.
If the asset is transferred out of the file, the status column displays
STO
.
If the asset is split after being transferred into a file, the status column displays
STI
.
Undo Split
To combine split assets into the single originating asset, select Assets > Undo Split or click Undo
Split on the toolbar from the Asset List.
The Undo Split feature is only available if the year of the split is unlocked.
Chapter 4 - Managing Assets • 116

Tracking Assets
The
Asset Tracking
tab displays in the CCH ProSystem
fx
Fixed Assets window when a selected
asset is involved with a like-kind exchange, split, or partial disposition. This tab lists information about
previous activity, allowing you to quickly identify the other assets involved in each event.
Selected Asset Information
The following information is listed for the selected asset:
System Number. Assigned by the CCH ProSystem
fx
Fixed Assets system, it cannot be
edited.
Asset ID. Numbering scheme selected by the user. It is not mandatory and can be changed at
any time.
Description. The description entered on the
Detail
tab.
Event Selection
Select the event and event number to display detail about the other assets involved with the event.
Event. The applicable event for the selected asset. If more than one event is associated with an
asset, the event that is first alphabetically is selected. If multiple events apply, select from the
following options to display a different event:
Like-kind exchange
Partial disposition
Split
Sale/Split Number. The exchange number for a like-kind exchange, the sale number for a
partial disposition, and the split number for a split. The latest number displays for the selected
event. If multiple numbers apply, select from the list to display a different number.
Date of Disposition. The date of the selected like-kind exchange or partial disposition. This
field is blank for split events.
Event Detail
The following information about the assets involved with the selected event is listed:
Sys#. The system number.
Asset ID.
Role. The following values display:
Original
,
Continuation
,
New
, or
GAAP
for like-kind exchange assets.
Disposed
for partial disposition assets that have the disposed portion.
Original
for parent (original) assets involved in a split.
This column is blank for all other assets.
Description. The description entered on the
Detail
tab.
Chapter 4 - Managing Assets • 117

Additional Splits.
Yes
displays in this column when an asset is involved in additional splits
other than the one shown.
Additional Partials.
Yes
displays in this column when an asset is involved in additional partial
dispositions other than the one shown.
Additional Exchanges.
Yes
displays in this column when an asset is involved in additional
exchanges other than the one shown.
Notes:
When the partial disposition or split event is selected, the parent (original) asset is listed first,
followed by the child assets.
The
Asset Tracking
tab will not display when a selected asset has either of the following
conditions, unless that asset is involved in another eligible event:
A split occurs after a locked year and the client reverses to the locked year. The
Asset
Tracking
tab will not display unless the asset is involved in a like-kind exchange or partial
disposition. Additionally, it will not appear for other assets in the Asset Tracking split
detail.
A year is reversed to a year prior to a disposition. The
Asset Tracking
tab will not display
unless the asset is involved in a like-kind exchange or split. Additionally, it will not appear
for other assets in the Asset Tracking partial disposition detail.
Chapter 4 - Managing Assets • 118

Chapter5
Chapter 5 - Managi ngA sset Disposi t ion
CCH ProSystem
fx
Fixed Assets computes gains and losses on the disposition of an asset. You can
create group or mass dispositions and generate a fileableForm4797.
Creating an Asset Disposition
The Asset List displays a
D
in the status column for all single disposed assets.
If a group disposition is allocated, the allocated amounts will display in the disposition grid of the
Disposition tab. If the disposition columns are selected for display, the allocated amounts will also
display on the Asset List.
To enter an asset disposition, use the following procedure:
1.
Select the asset that you will add a disposition to.
2. Click the Disposition tab. See
Disposition Detail Input Fields
on the next page for more
information.
3.
Enter information in the top pane.
4. If the
Type of disposition
is Installment or Exchange, click Related Party to enter related party
information.
5.
Enter information in the Disposition Detail grid (in the bottom pane),as required.
Notes:
If an asset is a member of a group disposition, only the general disposition information in
the upper pane is visible and the disposition grid is unavailable unless it is allocated.
If the type of disposition is an Exchange and no continuation asset(s) exist, the status will
display as
IED - Incomplete Exchange
. Once the continuation asset(s) have been
created through the "Exchange Asset(s)" button, the status will display as
D
.
Changing an Asset Disposition
To change an asset’s disposition information, select the asset, click the Disposition tab, and make
your changes.
Note: When you change disposition type, CCH ProSystem
fx
Fixed Assets warns you that any
related disposition input will be removed from the system.
Chapter 5 - Managing Asset Disposition • 119
M
ANAGING ASSET DISPOSITION
Disposition Detail Input Fields
The following section describes the input fields in the top section of the
Disposition
tab.
Type of disposition. Select a type of disposition from the drop-down list.
Abandonment
Casualty
Exchange
Installment sale
Out of Service
Retirement
Sale
Date of disposition. Enter the date of the disposition.
Property code. Select a property code. These are also used in CCH ProSystem
fx
Tax.
Sale number. This is a required field and must be unique in order for data to transfer correctly
to the CCH ProSystem
fx
Tax system. CCH ProSystem
fx
Fixed Assets automatically issues
the next available sale number. You can override the system-assigned number as long as your
number is not currently in use by another disposition.
Chapter 5 - Managing Asset Disposition • 120

Gross sales price. Enter the gross sales price. Negative numbers are not allowed. This field is
not available for exchanges. For installment sales, CCH ProSystem
fx
Fixed Assets uses this
field to compute the remaining balance.
Disposition expense. Enter the disposition expense. Negative numbers are not allowed.
Proceeds on Form 1099-S. For real property, CCH ProSystem
fx
Fixed Assets calculates the
amount from the Gross Proceeds. You can change the calculated amount. Negative numbers
are not allowed, and zero is a valid entry. This is used for calculating the total line on Form
4797.
Term code. Select the term code.
Related Party
The dialog that displays when
Related party
is clicked depends on the type of disposition:
Installment
or
Exchange.
The
Installment Sales
dialog is shown here.
The following fields appear on the
Installment Sales
dialog:
Name
Address
City, state, ZIP code
Selling price of property if resold by related party
Date related party sold property
Date final installment received from related party
Exception to related party rules
Property sold to related party was marketable securities
First disposition was a sale or exchange of stock to the issuing corporation
Chapter 5 - Managing Asset Disposition • 121

Second disposition was an involuntary conversion where the threat occurred after first
disposition
Second disposition was after the death of the holder
Tax avoidance was NOTthe principal purpose for either of the dispositions
Explanation of tax avoidance
For exchange dispositions, the
Exchange
dialog displays when you click
Related Party
.
The
Exchange
dialog is shown here.
The following fields appear on the
Exchange
dialog:
Relationship
Name
Identifying number
Address
City, state, ZIP code
Related party exception
The disposition was an involuntary conversion
The disposition was after the death of either of the related parties
Tax avoidance was NOT the principal purpose for the disposition
Explanation
During the tax year, the related party disposed of the like-kind property it received
During the tax year, the taxpayer disposed of the like-kind property received
Exchange occurred last year
Chapter 5 - Managing Asset Disposition • 122

Disposition Grid
Most fields in the Disposition grid are calculated and cannot be edited. You can enter values if a field
has a white background. Bold entries indicate totals and pink entries indicate overrides.
Disposing of an Asset Using Like-kind Exchange
The following steps explain how to dispose of an asset using a like-kind exchange. Once these steps
are completed, one or two assets are added to your Asset List. A Continuation asset is created and, if
there is a gain recognized on the sale or boot is paid during the exchange, a new asset is added to the
list. You can also create a Like-kind Exchange for group dispositions. See
Creating a Group
Disposition Using Like-Kind Exchange
on page129.
Points to Remember:
Continuation assets have the same basic information and depreciation detail as the original
asset. The prior depreciation is the sum of the current and prior depreciation of the disposed
asset. The current depreciation for the year of the sale is calculated as if the date acquired was
the date sold. The subsequent year's depreciation is calculated as if there was no exchange.
Note: If you exchange an asset in the year acquired on old law assets , the current
depreciation of the parent asset will display on the detail grid. This section will only show up
if the exchange occurred in the year acquired.
If a new asset is generated by the exchange, it has the same Date Acquired as the original
asset's Date of Disposition and initially has the same depreciation detail as the disposed asset.
If the original asset's Type of Property, Method, and Life values are not applicable to the new
asset's Date in Service, appropriate values are assigned by the system.
The Asset List displays a
D
in the status column for all exchanged assets that are disposed.
The Asset List displays
IED
in the status column if the type of disposition is an Exchange and
no continuation asset(s) exist (as created in the final step of this procedure).
To dispose of an asset through a like-kind exchange, use the following procedure:
1.
Select an asset to exchange.
2. Click the Disposition tab.
3. Select Exchange from the
Type of disposition
drop-down list.
4. Enter a date in the
Date of disposition
field.
5. Enter an amount in the
FMV for like-property received
field in the
Disposition
Grid.
Chapter 5 - Managing Asset Disposition • 123

6. Click Exchange Asset(s) to display the
Like-kind Exchange
dialog.
If the date of the exchange is prior to March 1, 2004, a message displays giving the option to
apply new like-kind exchange rules. Click Yes or No.
Note: The fields in the
New Assets
section of the
Like-Kind Exchange
dialog are
disabled unless there is a recognized gain on the sale or there is a boot paid in the exchange
and the amount is entered in the
Cash paid to other party
field.
7. Edit the contents of the
Asset ID
and
Description
fields as needed for both the Continuation
and New assets.
Note: With the
Elect Section 1.168(i)-6T(i)
selected, the adjusted basis of the new asset is
the remaining basis of the exchanged asset plus the amount of the boot. The election prints
at the top of Form 4562.
8. Clear the Elect Section 1.168(i)-6t(i) check box to separate the continuation and boot asset
Note: The adjusted basis of the new asset is the remaining basis of the exchanged asset
plus the amount of boot.
9. Click OK.
GAAP
On the
Book Setup
tab in Client Properties, you can elect to use GAAP rules in the Financial
book for like-kind exchanges. The
FMV of like-property given
field will then allow an entry in the
Financial column.
Note: This election must be made prior to completing the last step above.
Under the basic principle, the gain or loss will be fully recognized in the financial book.
Chapter 5 - Managing Asset Disposition • 124

When calculating using the exception to the basic principle, if the FMV of the asset surrendered
is less than the adjusted basis of the asset surrendered then the cost of the “New asset” will be
the FMV of the asset surrendered plus any cash paid less any cash received. If the FMV of the
asset surrendered is greater than the adjusted basis of the asset surrendered, the cost of the
“New asset” will be the adjusted basis of the asset surrendered plus any cash paid less any cash
received plus recognized gain.
Under the exception to the basic principle, any loss will be recognized. If the exchange results in
a gain, only the portion of the gain that is attributable to cash received is recognized. If there is
no cash received, the entire gain is deferred. When there is cash received, the recognized gain
equals the realized gain multiplied by the cash proportion, where the cash proportion is derived
by dividing the cash received by the sum of the cash received and the FMV of the asset
received.
Creating a Partial Disposition
Use the following procedure to sell a portion of an asset while continuing to depreciate its remaining
value. After completing this task, a second asset is created containing information for the disposed
portion of the original asset. Adjustments are made to the remaining Cost or other basis, Section 179,
and ITC book values in the original asset.
To create a partial disposition, do the following:
1.
Select the asset you want to dispose a partial amount from.
2. Click the Disposition tab.
3. Select Sale, Retirement, Out of Service, Installment, Exchange, Casualty, or
Abandonment from the
Type of disposition
drop-down list.
4. Enter a date in the
Date of disposition
field and click Partial disposition.
Chapter 5 - Managing Asset Disposition • 125

The
Partial Disposition Information for Disposed Portion of Asset
dialog displays.
5. The
Asset ID
and
Description
fields contain information from the original asset. Edit these
fields as needed.
6.
To adjust the book amounts for Cost or other basis, ITC, or Section 179, do one of the following:
Select either the Percent disposed or Amount disposed radio button and enter the
appropriate value. You can only enter whole numbers between zero and 100 in the
Percent disposed
field. The Cost or other basis, ITC, or Section 179 book values are
adjusted accordingly.
Edit the Cost or other basis, ITC, or Section 179 amounts on a book-by-book basis.
Note: For disposing of only one book, do one of the following:
To dispose of only one book, enter a zero for any book not being disposed.
To partially dispose one book, enter a zero in the books that are staying and adjust
the cost of the book for the portion that is being disposed.
7. Click OK.
Notes:
If you click OK without editing any values, you are prompted to fully dispose of the
original asset.
The Asset List displays a
D
in the status column for all single disposed assets.
Chapter 5 - Managing Asset Disposition • 126

Changing an Asset Disposition
To change an asset’s disposition information, select the asset, click the Disposition tab, and then
make your changes.
Note: When you change the disposition type, CCH ProSystem
fx
Fixed Assets warns you that
any related disposition input will be removed from the system.
Removing an Asset Disposition
(Assets > Remove Disposition)
The
Remove Disposition
option is only available if a year is unlocked.
Warning! When removing a disposition used in a like-kind exchange, the assets that were
generated from the exchange are deleted and the current year depreciation amounts are
recomputed for the originally disposed asset.
To remove an asset disposition, do the following:
1.
Select the asset containing the disposition you want removed.
Note: If the selected asset is a partial disposition, it is deleted when removed. The Cost or
other basis, ITC, or Section 179 book values are re-combined with the original asset's
values and re-computed.
2.
Do one of the following:
Select Assets > Remove Disposition.
Click DispositionMenu and select Remove Disposition.
3. CCH ProSystem
fx
Fixed Assets asks you to confirm that you want to remove the disposition
and recalculate the depreciation amounts for the current year. Click Yes to continue.
Overview of Processing Group Dispositions
(Assets > Group Disposition)
CCH ProSystem
fx
Fixed Assets allows you to dispose of multiple assets in groups. In this section,
you will learn how to create, edit, and delete group dispositions. When grouping assets for disposition,
keep the following in mind:
All assets must share the same disposition information
All assets should be of the same sale number, type, and holding period.
Chapter 5 - Managing Asset Disposition • 127

Grouping Assets for Disposition
To begin the group disposition process, use the following procedure:
1.
Select the assets to be grouped using the multi-select feature.
Note: The Edit > Select All menu option can also be used to select all assets in the list for
group disposition.
2. Do one of the following to display the
Group Disposition List
dialog:
Select Assets > Group Disposition.
Click Disposition Menu and select Group Disposition.
3. Click New. The
Group Disposition
tab displays with the selected assets in the Asset list.
4. Enter the overall description of the sale in the
Description
field. The group description entered
appears in the Group Disposition List, on the Form 4797, and in disposition statements. If no
description is entered, the system inserts
Group sale #xx
(xx=sale number).
Note: The description is also transferred to either the D-1 or D-2 forms in a CCH
ProSystem
fx
Tax or CCHGlobal
fx
Tax return.
5. Add or Remove Assets from the
Assets selected for disposition
list box.
Adding Assets. Select one or more assets and click Add. Click Add All to select all the
available assets for disposition.
Removing Assets. Select one or more assets and click Remove. Click Remove All to
delete all assets from the Disposition list.
6. All assets in the
Assets Selected for Disposition
list are used in the gain/loss computation
when the Type of disposition has been entered. When enough information has been entered to
calculate the gain/loss, then each asset included is marked as disposed in the Asset List. The
information is saved when you leave the
Group Disposition
tab.
Notes:
This
Group Disposition
tab looks the same as the regular disposition tab for an individual asset
but the pane from the asset
Detail
tab is replaced with the group disposition description and
asset selection list boxes.
If the group disposition is allocated, the allocated amounts will display in the disposition grid of
the Disposition tab. If the disposition columns are selected for display, the allocated amounts
will also display on the Asset List.
The asset List displays a
G
in the status column for all group disposition assets.
The Asset List displays
IEG
in the status column if the type of disposition is an Exchange and
no continuation asset(s) exist (as created in the final step in Creating a Group Disposition using
Like-Kind Exchange.
Chapter 5 - Managing Asset Disposition • 128
Creating a Group Disposition Using Like-Kind Exchange
(Assets > Group Disposition)
Refer to
Disposing of an Asset Using Like-kind Exchange
on page123 for a list of points to
remember when creating a group disposition.
1.
Select the assets to be grouped in the exchange using the multi-select feature.
2. To display the
Group Disposition List
dialog, do one of the following:
Select Assets > Group Disposition.
Click Disposition Menu and select Group Disposition.
3. Click New. The
Group Disposition
tab displays with the selected assets in the Asset list box.
4. Enter the overall description in the
Description
field.
5. Add or Remove assets from the
Assets selected for disposition
list box.
6. Select Exchange from the
Type of disposition
drop-down list.
7. Enter a date in the
Date of disposition
field.
8. Enter an amount in the
FMV for like-property received
field in the Group Disposition Grid.
9. Enter an amount in the
Disposition expense
field, if desired.
10. Click Exchange Asset(s). The
Group Like-kind Exchange
dialog displays.
Note: If the date of the exchange is prior to March 1, 2004, a message displays giving the
option to apply new like-kind exchange rules. Click Yes or No.
Chapter 5 - Managing Asset Disposition • 129

11. Edit the contents of the
Asset ID
and
Description
fields as needed for both the Continuation
and New Assets.
Note: Clear the Elect Section 1.168(i)-6T(i) check box to separate the continuation and
boot asset.
12. With the Elect Section 1.168(i)-6t(i) selected, the adjusted basis of the new asset is the
remaining basis of the exchanged asset plus the amount of the boot. The election prints at the
top of Form 4562.
13. Click OK.
Note: The Asset List displays a
G
in the status column for all group dispositions. If this step
is not completed, the Asset List will display
IEG
in the status column.
GAAP
On the
Book Setup
tab in Client Properties, you can elect to use GAAP rules in the Financial
book for like-kind exchanges. The
FMV of like-property given
field will then allow an entry in the
Financial column.
Note: This election must be made prior to completing the last step above.
Under the basic principle, the gain or loss will be fully recognized in the financial book.
When calculating using the exception to the basic principle, if the FMV of the asset surrendered
is less than the adjusted basis of the asset surrendered then the cost of the “New asset” will be
the FMV of the asset surrendered plus any cash paid less any cash received. If the FMV of the
asset surrendered is greater than the adjusted basis of the asset surrendered, the cost of the
“New asset” will be the adjusted basis of the asset surrendered plus any cash paid less any cash
received plus recognized gain.
Under the exception to the basic principle, any loss will be recognized. If the exchange results in
a gain, only the portion of the gain that is attributable to cash received is recognized. If there is
no cash received, the entire gain is deferred. When there is cash received, the recognized gain
equals the realized gain multiplied by the cash proportion, where the cash proportion is derived
by dividing the cash received by the sum of the cash received and the FMV of the asset
received.
Chapter 5 - Managing Asset Disposition • 130

Editing a Group Disposition
(Assets > Group Disposition)
To edit a group disposition, do the following:
1. Click the Asset List tab.
2. To display the The
Group Disposition List
dialog, do one of the following:
Select Assets > Group Disposition.
Click Disposition Menu and select Group Disposition.
3. Select a group disposition and click Edit.
4.
Make the necessary changes. The system recalculates the disposition information and saves
your changes when you leave the
Group Disposition
tab.
Deleting a Group Disposition
(Assets > Group Disposition)
To delete a group disposition, do the following:
1. Click the Asset List tab.
2. Choose Assets > Group Disposition on the toolbar.
3. Select the disposition from the
Group Disposition
list.
4. Click Delete.
Note: You can select
Asset > Remove Disposition
while editing a group disposition in the
Group Disposition
tab. The group disposition is deleted and the
Group Disposition
tab closes.
You are returned to the Asset List.
Allocating a Group Disposition
(Assets > Group Disposition)
The option to allocate a portion of the gain (loss) to each asset in a group disposition is available on
the Group Disposition tab after the minimum required sale information has been entered (Type of
Disposition and Date of Disposition). This allocation is reflected on reports.
The Asset List displays a
G
in the status column for all group dispositions.
Note: If the group disposition is allocated, the allocated amounts will display in the disposition
grid of the Disposition tab. If the disposition columns are selected for display, the allocated
amounts will also display on the Asset List.
Chapter 5 - Managing Asset Disposition • 131

To allocate a portion of a gain (loss) to each asset in a group disposition, do the following:
1.
Select the assets to be grouped in the disposition using the multi-select feature.
2. To display the
Group Disposition List
dialog, do one of the following:
Select Assets > Group Disposition.
Click Disposition Menu and select Group Disposition.
Right click an asset and select Group Disposition.
3. Click New. The
Group Disposition
tab displays with the selected assets in the
Asset list
box.
4. Enter the overall description in the
Description
field.
5. Add or remove assets from the
Assets selected for disposition
list box.
6. Select the disposition type from the
Type of Disposition
drop-down list.
7. Enter a date in the
Date of Disposition
field.
8. Click the Allocate button. The
Allocate Portion of Gain (Loss) to Each Asset
dialog displays.
9. You can display a different book by selecting it from the
Book
drop-down list. Only active books
appear in the drop-down list.
The allocated percent for each asset defaults to the cost for each asset over the total cost for
the assets included in the group disposition.
10. Select an asset from the
Allocation
list.
11. Click Edit.
12. Enter the percent of the asset to allocate in the
Percent to allocate
field.
13. Click Apply. When the allocated percent is applied, the
Percent unallocated
is recalculated.
When the allocated percent is applied to the Federal book, you receive a message. The
message displays each book with an allocation percentage matching the Federal percentage
before the change is included.
At this time, you may also apply percentages allocated to the remaining active books.
14.
Allocate any percentage that is unallocated.
15. Click OK.
There is an option available to disable the allocation. When the
Disable allocation
check box is
selected, the assets do not display an allocation in the
Disposition
tab or the Disposition report.
The modifications to the allocation percentages are not retained. If the allocation is enabled,
the allocation percentages are recalculated to the default amount.
Chapter 5 - Managing Asset Disposition • 132

Note: You can select Always allocate portion of gain/loss to each asset on the
Preferences
dialog to automatically allocate gain/loss amounts to individual assets
involved in group dispositions.
Adding/Removing Assets from the Group Disposition
When assets are added or removed from the group disposition, the allocation percentages are
adjusted automatically as long as some of the assets have the default allocation. If all of the assets
have the default allocation, the allocation for each asset is recalculated based on each asset's cost
versus the total cost for the assets in the group disposition. If only a portion of the assets has the
default allocation, the allocation is recalculated for only those assets with the default allocation.
If all of the original assets have modified percentages, the newly added assets have allocation
percentages of zero.
If all of the original assets have modified percentages and an asset is removed, the percentages are
not recalculated. At that point, the total allocation percentage is less than 100%. The allocation
percentages need to be modified to adjust the total allocation percentage back to 100%.
Using the Disposition Tab
An asset involved in a group disposition that has been allocated displays the asset’s allocated
amounts on the bottom pane of the Disposition tab. In addition to the items that normally display in
the Disposition tab, the first item in the bottom pane is the applicable allocation percentage; the
allocated gross sales price is also included in this pane.
Adding/Removing Books
When a book is added, the new book assumes the default allocation percentage for that book unless
the allocation percentage has been modified and applied to all books. If the allocation percentages
have been modified, but are different for each book, the newly added book assumes the default
percentages.
Report Changes
When an allocation has been made to each allocated asset in a group disposition, the report reflects
the new allocated amounts. Otherwise, the totals are assigned to the first asset added to the group
and the remaining assets in the group are cleared.
Chapter 5 - Managing Asset Disposition • 133

Creating Prior Year Dispositions
You can enter dates on the
Disposition
tab for dispositions that have occurred prior to the initial year
and after the entity start date. This section details the effects of creating prior year dispositions on
like-kind exchanges, partial dispositions, and importing and exporting disposition data.
General Dispositions
The gain or loss from a prior year disposition is based on the cost or other basis, the entered
accumulated and current depreciation, and the gross sale price of the disposition. This value is
displayed on the
Disposition
tab.
Like-Kind Exchange (Exchange Assets)
When information for a like-kind exchange is entered for a year prior to the current year,
Continuation
asset system no.
and
Boot asset system no.
fields display in the
Disposition
tab. A continuation
asset as well as a boot asset must be linked on the
Disposition
tab. If the date of the exchange is
prior to March 1, 2004, an
Apply new calculation rules
field displays in the
Disposition
tab giving the
option to apply new like-kind exchange rules.
The statement "Asset sold in prior year" displays at the top of the
Detail
and
Disposition
tabs in the
exchanged asset.
Note: The Boot and Continuation assets cannot be deleted unless the disposition is removed.
Partial Disposition
CCH ProSystem
fx
Fixed Assets does not allow entry of partial disposition information prior to the
year of sale.
Importing and Exporting Disposition Data
Prior year disposition information cannot be imported from CCH ProSystem
fx
Tax because Tax
assumes the sale is in the current year. Prior year disposition information can be imported from other
FAM products. See
Overview of Importing Data from Other FAM Products
on page172 for a list of
products supported for data import.
Prior year disposition information cannot be exported into Tax.
Chapter 5 - Managing Asset Disposition • 134

Creating Future Year Dispositions
You can enter dates on the
Disposition
tab for dispositions that will occur beyond the current year.
This section details the effects of creating future dispositions on like-kind exchanges, partial
dispositions, and importing and exporting disposition data.
General Dispositions
The gain or loss from a future disposition is calculated based on the depreciation projected out to the
date of the disposition. This value is displayed on the
Disposition
tab.
The projected depreciation for the year of the sale is displayed in the
Current Depreciation
line of the
Disposition
tab. The remaining depreciation will display on the
Disposition
tab in the
Accumulated
Depreciation
field.
If the disposed asset is not used 100% for business, the business use percent for the current year is
applied to all future years for projecting the allowed depreciation.
Like-Kind Exchange (Exchange Assets)
If the disposition is a future year exchange, the Exchange Asset(s) button is grayed out until the year
is closed to the year of disposition. Once in the year of disposition, the Exchange Asset(s) button is
available for the creation of the new asset(s).
Partial Disposition
CCH ProSystem
fx
Fixed Assets does not allow entry of partial disposition information prior to the
year of sale.
Importing and Exporting Disposition Data
Future year disposition information cannot be imported from CCH ProSystem
fx
Tax because Tax
assumes the sale is in the current year. Future year disposition information can be imported from
other FAM products. See
Overview of Importing Data from Other FAM Products
on page172 for a
list of products supported for data import.
Future year disposition information cannot be exported into Tax.
Chapter 5 - Managing Asset Disposition • 135

Chapter6
Chapter 6 - Reporti ng D at a
CCH ProSystem
fx
Fixed Assets allows you to print a single report or multiple reports. Depending on
the report, you can filter reported assets by several criteria including date range, asset number or
system number, book, category, etc. You can also sort reports using a variety of criteria and preview
reports before printing them.
This section discusses the procedures for printing details for a currently selected asset, single reports,
and report sets. You will also learn how to customize the system-provided reports to suit your needs.
Selecting Reports
CCH ProSystem
fx
Fixed Assets allows you to print a single report or multiple reports. Depending on
the report, you can filter reported assets by several criteria including date range, asset number or
system number, book, category, etc. You can also sort reports using a variety of criteria and preview
reports before printing them.
This section discusses the procedures for printing details for a currently selected asset, single reports,
and report sets. You will also learn how to customize the system-provided reports to suit your needs.
The available CCH ProSystem
fx
Fixed Assets reports are categorized as follows:
Calculation Reports
Depreciation Expense. The primary report to generate useful totals from the individual
asset information.
Depreciation Expense Comparison. Allows you to compare any two books. The
Federal and Financial books are the default.
Disposition Report. Summarizes the assets disposed in the current year.
Exchange Detail Report. Shows the detail of prior and current year exchanges.
MACRS Mid-Quarter Calculation. Displays the assets that are included in the mid-
quarter convention calculation and the percentage of the assets placed in service in the
fourth quarter over the full year.
Chapter 6 - Reporting Data • 136
REPORTING DATA

Projection Reports
Detail Projection. Projects detail depreciation forward for any single year.
FASB 109 Projection. The Financial Accounting Standards Board report compares
Federal to Financial projections for depreciable lives.
Multiple Book Projection. Projects detail depreciation for all active books.
Multi-Period Projection. Projects detail depreciation forward for up to eight years.
Activity and Status
Current Acquisitions. Shows acquisitions from the current year.
Journal Entry. Displays a total for each account number.
Property Tax Listing. Provides a generic listing that can be used for property tax
returns. Most property tax returns ask for the cost at acquisition by category for each
year.
The following summary reports can be selected to print with the Property Tax Listing
Report. These reports are activated by selecting the respective check boxes on the
Property Tax tab at Property Tax Listing >Properties.
Property Tax Summary. Provides depreciation information by category for the
year of the report.
Annual Cost Summary. Provides a look at each asset category based on the
year acquired.
Asset Reports
AMT Report. Two reports display as one item showing AMT adjustments.
The Adjustment report shows differences between MACRS and ADS methods.
The Preference report shows ACRS method assets with Federal book current
depreciation greater than the AMT book current depreciation.
Annual Activity Report. Shows the asset balances with additions and deletions during
the current year.
Asset Information. Displays the contents for an entire asset on an asset-by-asset basis.
Asset List. Displays Asset List columns that are specified for selected categories on the
Edit Report Properties
dialog.
Asset Notes. Lists only those assets that have notes attached.
Depreciation Variance. Shows the difference between submitted and computed
depreciation. Variance is usually caused by overrides or imports.
Net Book Value. Calculates the net book value of all assets.
Tax Form Reports
ACE Worksheet. Computes ACE adjustments when there is a difference between the
ACE and AMT books.
Form 4562 Worksheet. Provides the detail by line number of Government Form4562.
Chapter 6 - Reporting Data • 137
Section 168 - Special Depreciation Allowance. Summarizes the different sources of
special depreciation taken as accelerated additional depreciation when the asset is
placed in service.
Section 179. Lists the current year assets that are eligible for Section 179, and amounts
elected and allowed.
Government Forms
Form 4562. Summarizes the current year depreciation by date of service and type. It
also includes current year Section 179.
Form 4797. Summarizes current year dispositions by type.
Printing Asset Detail
(File > Print > Asset Detail)
If you are viewing an asset using the
Detail
tab, or any other tab (for example, Projections) is active,
you are only able to print detail information for the asset currently being viewed.
To print detailed information for the selected asset, do any of the following:
1. Select File > Print > Asset Detail.
2. Click Print Asset Detail on the toolbar.
3. Right-click an asset and select Asset Detail from the menu.
4. Click Print Menu and select Asset Detail.
Customizing Report Properties
(File > Print > Reports)
The following information provides instructions on editing the information to be displayed in your
reports. Some of the available options include filters, sort order, date range, amount of detail, and
column selection.
Applying Report Properties
Before editing report properties, consider whether you want to apply the changes for a single print
session or save the changes so they can be retained for another print session.
To edit properties for a single print session, use option 3a.
To save edits after the
Reports
dialog is closed, use option 3b. Using this step, you have the
following additional options:
If you do not save the client file, the report property edits will be reset when you close the
client file.
If you save the client file, the edits will be retained after the client is closed and they will
override Global Settings, if applied to the client, for the modified report.
Chapter 6 - Reporting Data • 138

Editing Report Properties
1. To open the
Reports
dialog, do one of the following:
Click Print Reports on the toolbar.
Select File > Print > Reports.
Select Reports from Print Menu on the toolbar.
2. Click the plus sign (+) next to a report category folder, such as Asset Reports, to display the
reports available within that category.
a.
Select the current reporting month if the time period is less than a year (for example,
current month or current quarter). This will be based on the fiscal year defined in Client
Properties.
3.
Do one of the following:
a. Edit properties for a single print session. Move the reports or reports you want to
print from the
Reports list
to the
Reports selected for print
box using one of the
following methods:
Double-click the report or reports
Select the report or reports and click the right arrow.
Select the report or reports you want to print from the
Reports selected for print
box.
Chapter 6 - Reporting Data • 139

b. Save edit after the
Reports
dialog is closed. Select the report or reports you want to
print from the
Reports list
box. Click Save Client after you close the
Reports
dialog if
you want to retain your edits after the client is closed.
4. Click Properties.
5. If applicable, select the books to be included in the report on the
General
tab. The available
books vary by report and appear in the
Available Books
list. To select a book, highlight it in the
list and click Add. You can remove a book from the
Books to Process
list by highlighting it and
selecting Remove.
6.
Choose from the following options to customize your report. The options can vary depending on
the selected report.
Configure General Report Settings
a. On the General tab, add the books to be included in the report. The available
books will vary by report.
b. Select the Apply business percent box to display values on a report that apply
business use percent. This field is available for the following reports:
Depreciation Expense Report
Depreciation Expense Comparison Report
Exchange Detail Report
Detail Projection
Multiple Book Projection
Chapter 6 - Reporting Data • 140

Multi-Period Projection
Current Acquisitions
Journal Entry
Property Tax Listing
AMT Report
Net Book Value
Section 168 - Special Depreciation Allowance
Section 179
Apply business percent
is selected by default for the following reports:
Disposition Report
MACRS Mid-Quarter Calculation
ACE Worksheet
Form 4562 Worksheet
c. Select how amortized assets display in the report from the
Amortized Assets
presentation
list. This field is available for the following reports:
Depreciation Expense Report
Depreciation Expense Comparison Report
Detail Projection
Net Book Value
The drop-down list gives you the following options:
Separate report for amortization. Creates a report including all assets
except amortized. The amortized assets will print on a separate report.
Included amortized assets - grouped. Creates a report including all
assets with amortized assets grouped together.
Include amortized assets - not grouped. Creates a report of all assets,
including amortized.
d. The
Presentation of Section 179
section is enabled for the following reports:
Depreciation Expense Report
Depreciation Expense Comparison Report
Detail Projection
Multiple Book Projection
Current Acquisitions
Journal Entry
Property Tax Listing
AMT Report
Net Book Value
Section 168 - Special Depreciation Allowance
Chapter 6 - Reporting Data • 141

e.
Select from one of the following options:
All 179, Accumulated, Current, Total. The current year and prior year
Section179 amounts display only in the Section179 column.
CY 179, Accumulated+PY 179, Current, Total+PY 179+CY179.
The current year Section 179 amounts display in the Section179 column,
and the prior year Section179 amounts display in the accumulated
depreciation column. Both current and prior section 179 amounts display
in the total depreciation column.
All 179, Accumulated+PY 179, Current, Total+PY179+CY179. The
current and prior year Section 179 amounts display in the Section179
column. The prior Section179 amounts display in the accumulated
depreciation column. The current and prior Section179 amounts display in
the total depreciation column.
CY 179, Accumulated+PY 179, Current+CY179,
Total+PY179+CY179. The current year Section179 display in the
Section179 column, the current depreciation column, and the total
depreciation column. The prior year Section179 amounts display in the
accumulated depreciation column and the total depreciation column.
All 179, Accumulated+PY179, Current+CY179,
Total+PY179+CY179. The current year Section179 amounts display in
the Section179 column, the current depreciation column, and the total
depreciation column. The prior year Section179 amounts display in the
Section179 column, the accumulated depreciation column, and the total
depreciation column.
f. In the
Detail options
section, choose one of the following:
Subtotals and totals only
Details, subtotals, and totals
g. Select an asset description option from the
Description
drop- down list.
Basic Description
Full Description
No Description
Separate Description with Method, Life, Convention & Business Percent
Specify Report Date Range
a. Click the Reporting Period tab. This tab is available for the following reports:
Depreciation Expense Report
Depreciation Expense Comparison Report
Disposition Report
Current Acquisitions
Journal Entry
AMT Report
Annual Activity Report
Chapter 6 - Reporting Data • 142

Depreciation Variance
Net Book Value
ACE Worksheet
Form 4562 Worksheet
Section 168 - Special Depreciation Allowance
Section 179
b. In the
Reporting date range
section, select a date range from the
Select type
drop-down list.
Current Month
Current Quarter
Current Year
Custom
Next Year
c. If you selected the
Custom
report date range option, use the
From
and
To
drop-
down lists to specify the dates used in the report.
Notes:
The reporting period date range displays on the
Reports
dialog in the
Properties preview for selected report
box.
If you select
Custom
in the
Select type
field, notice that the year in the
date field does not change from its prior setting. You can change the year
as needed.
The
Set overrides information
section displays information only when a
report set override has been applied to the report being configured. To
change the override, you must edit the report set.
You will need to scroll up for prior years.
Chapter 6 - Reporting Data • 143

Configure Filter and Sort Options
a. Click the Sort/Filter tab.
b. Select filters from the
Select asset filter
drop-down lists to change the assets
that will display on the report.
Notes:
To create or edit a filter, click Filter.
You will need to scroll up for user defined filters and global settings filters.
c. In the
Sort order
section, you can change the sort fields on all of the following
reports. You can choose to include a subtotal, page break, or both on all reports
except the Asset List.
Depreciation Expense Report
Depreciation Expense Comparison Report
Disposition Report
MACRS Mid-Quarter Calculation
Detail Projection
Multiple Book Projection
Multi-Period Projection
Current Acquisitions
Journal Entry
Chapter 6 - Reporting Data • 144

Property Tax Listing
AMT Report
Annual Activity Report
Asset List
Asset Notes
Depreciation Variance
Net Book Value
ACE Worksheet
Form 4562 Worksheet
Section 168 - Special Depreciation Allowance
Section 179
d. In the
Sub Total
field you can select from the following options:
None. No subtotal is created.
Back out dispositions. Subtotals contain a line to subtract amounts for
disposed assets. Current depreciation is not subtracted.
Dispositions included. Subtotals do not contain a line to subtract
disposition amounts.
Customize a Report's Header and Footer
a. Click the Header/Footer tab
b.
Select from the drop-down lists to customize the header and footer information to
display in a report. You can also enter custom information in the fields.
Chapter 6 - Reporting Data • 145
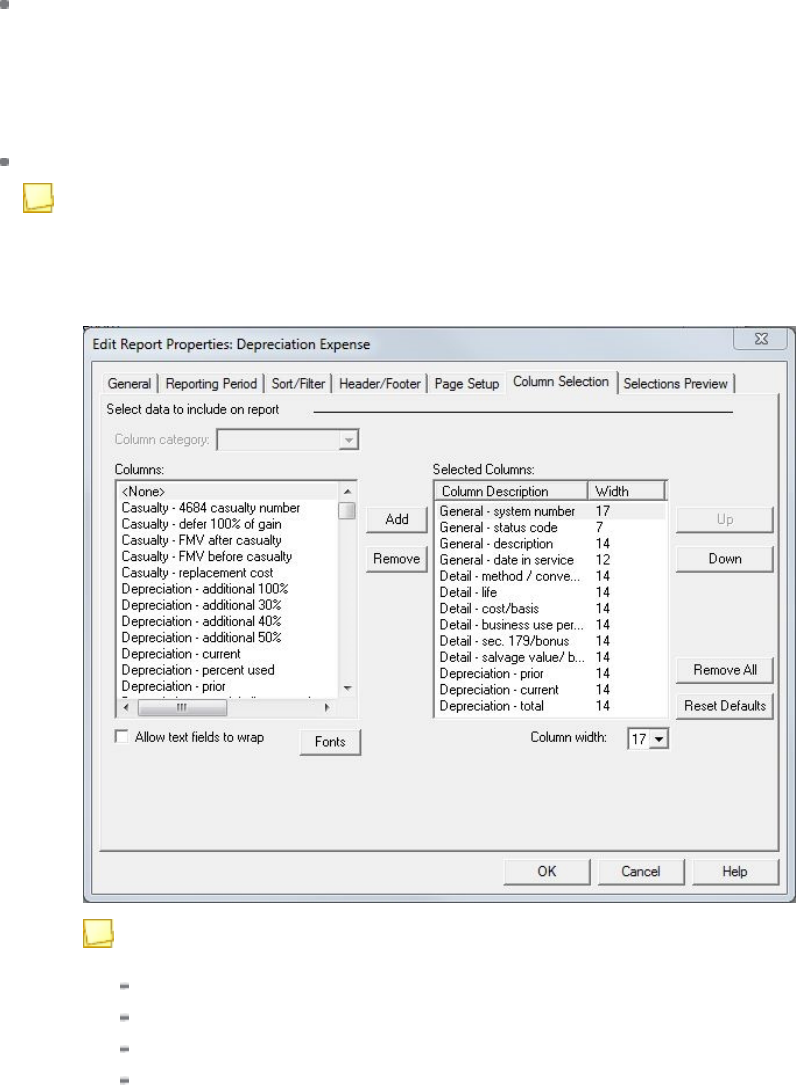
c. Select the Print header on page 1 only box if you only want headers to display
on the first page of your report.
Set Margins and Page Orientation
a. Click the Page Setup tab.
b.
Use the available options to configure the report's margins and layout orientation.
c. Select the Alternate line shading box to enable alternate shading for each line
of data displayed in the report.
Select and Position Data by Column
Note: Changing the columns for the Asset List report will not change the columns
viewed on the Asset List tab. To change the view, use Tools > Columns or Tools >
Global Settings > Columns.
a. Click the Column Selection tab.
Note: The
Column Selection
tab is not available on the following reports:
Exchange Detail
FASB 109 Projection
Multi-Period Projection
Journal Entry
Chapter 6 - Reporting Data • 146

Asset Information
Form 4562 Worksheet
b.
For the Asset List report, select a category according to the type of detail you
want to display in the report. For all other reports, continue to the next step.
c. Select individual column headers and click Add or Remove to specify the
columns you want to include in the
Selected Columns
list.
Notes:
Move a column up or down in the list by highlighting the column in the
Selected Columns
list and selecting either the Up or Down button.
You can clear the list of all columns in the
Selected Columns
list by
clicking Remove All. You can restore the list to its default settings by
selecting Reset Defaults.
The width settings of selected columns can be adjusted by making
selections from the
Column Width
drop-down list.
You have the option to change the appearance of the font type, style, or
size in the report. Select Fonts and a dialog displays that allows you to
modify the font.
d.
For the Asset List report, repeat steps b and c until columns for all desired
categories are selected. A maximum of 25 columns can be selected to print. For
all other reports, continue to the next step.
e. Click Fonts to change the font style or font size.
f. Select the Allow text fields to wrap to allow text to wrap to the next line in a
column.
g. Select a column and use the Column width list to adjust the settings of individual
columns.
Note: Customized reports allow 25 columns to view except Asset List which
has retained its 26 columns to view. All reports except the Annual Cost
Summary Report allow 25 columns for printing.
Preview Header/Footer and Column Selections
a. Click the Selections Preview tab.
b.
Review your header, footer, and column selections.
If you are configuring the Depreciation Expense Comparison, Detail Projection,
Multi-Period Projection, Multiple Book Projection, Property Tax Listing, or Journal
Entry reports, continue to the next step; otherwise, click OK to return to the
Reports
dialog.
Chapter 6 - Reporting Data • 147

Configuration Options for Specific Reports
Do one of the following:
Depreciation Expense Comparison Report. Click the Compare tab
and select two books to compare using the
Compare
and
To
drop- down
lists. You must select two books to compare.
Multiple Period Projection Report. Click the Projection Period tab
and select the number of periods to project from the
Number of periods
drop-down list and the projection range from the
Starting period
drop-
down list.
Select the
Include fully depreciated assets
box to include projection
detail on fully depreciated assets in the report.
Multiple book Projection and Detail Projection Reports. Click the
Projection Period tab and select the projection range from the
Starting
period
drop-down list.
Select the
Include fully depreciated
assets box to include projection detail
on fully depreciated assets in the report.
Journal Entry Report. Click the Reference Number tab to enter a
journal reference number.
Property Tax Listing Report. Click the Property Tax tab to specify the
12-month period you want to process from the
From
drop-down list. The
To
field is automatically filled with a date that is 12 months from the
From
date selected.
Select the
Include property tax summary report
box if you want to include
a property tax summary report.
Select the
Include annual cost summary report
box if you want to include
an annual cost summary report.
Note:The Annual Cost Summary Report will print all categories
created on the detail tab.
7. Click OK to return to the
Reports
dialog.
Note: If you want to create or edit a filter, click the Filter button on the
Sort/Filter
tab.
Chapter 6 - Reporting Data • 148

Prior Year Reports
(File > Print > Reports)
Reports can be easily created and printed for prior years. The same level of customization is available
for prior year reports that exist for the corresponding report for the current year. See
Customizing
Report Properties
on page138 for detailed information on additional report customization options.
Notes:
Prior year selection is available for the Annual Activity report; however, the asset filter must first
be changed from the default,
Current Year Acquisitions
, to produce a report with asset data.
To print a prior year report, the year must be a year that was in the file and has been closed.
To create a prior year report, do the following:
1. To display the
Reports
dialog, do one of the following:
Click Print Reports on the toolbar.
Select File > Print > Reports.
Click Print Menu and select Reports.
2. Click the plus sign (+) next to a report category folder, such as Asset Reports, to display the
reports available within that category.
Chapter 6 - Reporting Data • 149

3.
To select a report, double-click the report, highlight the report and click the right arrow, or drag
the report from the
Reports list
to the
Reports selected for print
section. The reporting period
date range displays in the
Properties preview for selected report
field for the selected report.
Notes:
If a report's properties are changed before the report has been selected for print, the
properties are retained. If the properties are updated while a report is selected for print,
the properties are reset when the
Reports
dialog is closed.
If you selected multiple reports and selected
Create single PDF file for a multiple report
selection
on the
Preferences
dialog, you can create a single PDF file for multiple
reports when you print.
4. Highlight the report and click Properties. The
Edit Report Properties
dialog displays.
5. Click the Reporting Period tab.
Note: The
Edit Report Properties
dialog can also be accessed by selecting Tools > Global
Settings > Reports > Properties or Tools > Global Settings > Report Sets > Properties.
6. In the
Reporting date range
section, select Custom as the date range type.
7. Use the
From
and
To
drop-down lists to specify the dates used in the report. The
Year
drop-
down list includes the option to select prior years.
Notes:
The
Set overrides information
section only displays information when a report set override has
been applied to the report being configured. To change the overrides, you must edit the report
set.
The reporting period date range displays on the
Reports
dialog in the
Properties preview for
selected report
field for each selected report.
You will need to scroll up for prior years.
Restricted Reports
Prior year selection is not available for the following reports:
Projection Reports:
Detail Projection
FASB 109 Projection
Multi-book Projection
Multi-period Projection
Current year only report:
MACRS Mid-Quarter Calculation
Asset Information Report
Chapter 6 - Reporting Data • 150
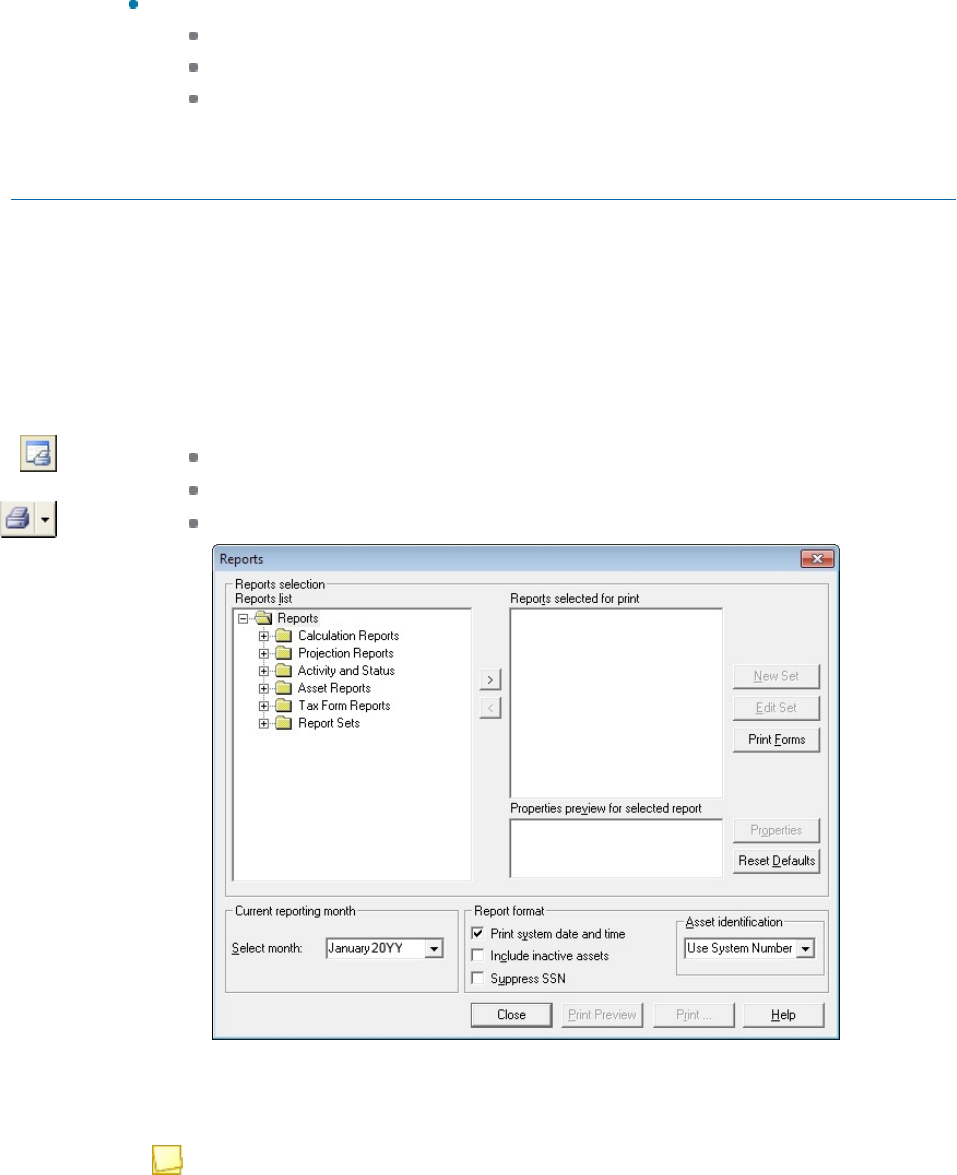
Non-year specific reports:
Exchange Detail
Asset List
Asset Notes
Printing Reports
(File > Print > Reports)
You can print one or more reports to a printer or to an ASCII Comma Delimited, Microsoft
®
Excel
®
,
Microsoft
®
Word, or PDF file.
Select the
Create single PDF file for a multiple report
option on the
Preferences
dialog to create a
single file every time you print multiple reports to the PDFformat. See
Setting Preferences
on
page17for details.
1. To display the
Reports
dialog, do one of the following:
Click Print Reports on the toolbar.
Select File > Print > Reports.
Click Print Menu and select Reports.
2.
Double click a report category folder, such as Asset Reports, to display the reports available
within that category.
3. Double-click Depreciation Expense. The report displays in the
Reports selected for print
list.
Note: To save these settings for this client, modify the report on the left side of the report
list before selecting the report for print.
Chapter 6 - Reporting Data • 151

4. Select a month from the
Select month
drop-down list if needed.
5. Choose the appropriate formatting option or options in the
Report format
section.
6. Click Print to display the
Print
dialog.
7.
Do one of the following:
To print to a printer, do the following:
a. Select a printer from the
Name
list.
b.
If you are printing more than one copy, enter the desired number.
c.
If needed, select to collate the print copies.
To print to a file, do the following:
a. Select the Print report to file box.
b.
The directory location and file name defaults to the directory specified on the
Client Properties File Locations
tab and the client ID. You can enter a different
directory in the
File name
box or browse to another location.
c.
Select the file format.
d. If you are printing multiple reports to a PDF file, you can select Print to single
PDF to print all reports in one file.
8.
If you are printing a page range, enter the page numbers.
9. Click OK to print and exit this dialog.
Previewing Reports
(File > Print > Reports)
1. To display the
Reports
dialog, do one of the following:
Click Print Reports on the toolbar.
Select File > Print > Reports.
Click the Print Menu and select Reports.
2.
Double-click a folder to display a list of available reports.
3.
Do one of the following to select a report:
Double-click the report.
Highlight the report and click the right arrow.
Drag the report from the
Reports list
to the
Reports selected for print
section.
Note: Multiple reports can be previewed from the Print Preview window.
The reporting period date range, filter, and sort information display in the
Properties preview for
selected report
field for the selected report.
4. Select a month from the
Select month
drop-down list if needed.
5. Check the appropriate formatting option or options in the
Report format
section.
6. Click Print Preview to view the reports before printing.
Chapter 6 - Reporting Data • 152
7.
Choose to print, preview,export, and navigate through the reports by using the buttons on the
Print Preview toolbar:
Print this page. Prints the page currently displayed.
Print previewed reports. Prints all reports selected for
preview.
Close print preview. Closes the Print Preview window.
Export all reports. Exports all reports selected for preview to
CCH ProSystem
fx
Engagement.
Export this report. Exports the report currently displayed to
CCH ProSystem
fx
Engagement.
Page backward. Move forward through the pages of a report.
Page forward. Move backward through the pages of a report.
Direct page selector. Lists the report or reports you selected
to preview, allowing you to select another report to preview.
Set zoom factor. Zooms in to enlarge the page size and
zooms out to reduce the page size.
Notes:
To navigate multiple reports in the
Preview
screen, use the toolbar page buttons or
select a page from the drop-down list field.
If you selected multiple reports on the
Reports
dialog and selected
Create single
PDFfile for a multiple report selection
on the
Preferences
dialog, you can create a
single PDFfile for multiple reports when you export all reports. See
Exporting Reports to
CCH ProSystemfx Engagement
on page161 for more details.
To change the resolution, make a selection from the resolution drop-down list (
Fit
window width
is the default).
8.
To exit this dialog, do one of the following:
Click Exit Print Preview.
Click Close print preview on the toolbar.
Chapter 6 - Reporting Data • 153

Printing to a PDF File
The following information provides instructions on printing to a PDF file.
1. Select File > Printer Setup.
2. Select CCH FA PDF Printer from the
Name
drop-down list.
3. In the
Paper
section, select a size from the
Size
drop-down list.
4. Select Portrait or Landscape in the
Orientation
section.
5. Click OK.
6. Select File > Print, and then select a printing option.
7. Set the printing options and click OK.
8. Enter a name in
File name
field. Change the location, if desired.
9. Click Save.
To print to a PDF file on a report by report basis, see
Printing Reports
on page151.
Saving Report Data to a File
(File > Print > Reports)
You can save report data to a file using the following file formats:
ASCII Comma Delimited (*.CSV)
Microsoft
®
Excel
®
(*.XLS)
Microsoft
®
Word (*.DOC)
Portable Document Format (*.PDF)
To save report data to a file, do the following:
1. Select File > Print > Reports to display the
Reports
dialog.
2.
Select the report or reports you want to save to a file.
3. Click Print to display the
Print
dialog.
4. Choose a printer from the
Name
drop-down list or check the
Print report to file box
. If you
select
Print report to file
, the file name location defaults to the directory you specified for saving
report files and the client ID. You can enter a different directory in the
File name
box or browse
to another location.
Chapter 6 - Reporting Data • 154

If you print multiple reports and selected
Create single PDF file for a multiple report selection
on the
Preferences
dialog, you can create a single PDF file when you select the
PfxEngagement PDF Converter
printer or choose the
Print report to file
option. Otherwise,
each report is saved to a separate file. The file name will be the name displayed in the File
name box with an appended number (the extension will not change). For example, if your file
name is SAMPLE.CSV, the first of your files will be named SAMPLE1.CSV, the second
SAMPLE2.CSV, etc.
5. To change the file format, select a format from the
File format
drop-down list.
6. Click OK to save the report or reports to a file.
Overview of Managing Report Sets
Report Sets allow you to group various reports into a set for printing. You may set report properties
such as reporting period, sort order, filters, column selection, select books to process, and
presentation of Section 179 for specific reports. See
Customizing Report Properties
on page138 for
details of the selections.
This section shows you how to add, edit, delete, and print report sets. CCH ProSystem
fx
Fixed
Assets includes the following default report sets:
The Month End report set includes the following reports:
Depreciation Expense
Net Book Value
The Year End—Federal Tax set includes the following reports:
Depreciation Expense
Net Book Value
The Year End—Alternative Minimum Tax set includes the following reports:
AMT Report
Depreciation Expense
Net Book Value
Creating a Report Set
(File > Print > Reports)
Report Set properties are client-specific.
Use the following procedure to create a report set:
1. In an open file, do one of the following to open the
Reports
dialog:
Click Print Reports on the toolbar.
Select File > Print > Reports.
Chapter 6 - Reporting Data • 155

Click Print Menu and select Reports.
2. Double-click a folder in the
Report list
section to display a list of available reports.
3.
Select a report set using any of the following methods:
Double-click the report set.
Highlight the report set and click the right arrow.
Drag the report set from the
Reports list
to the
Reports selected for print
section.
Drag a folder from the
Reports list
to the
Reports selected for print
section to include
all the reports in the folder.
Unselected reports remaining in the
Report List
are not used in the Report Set.
The reporting period date range displays in the
Properties preview for selected report
field for
the selected report.
4. Click New Set when all the reports for this set are in the
Reports selected for print
section.
5. Enter the information in the
Edit Report Set
dialog.
Set name. Enter a name for the new set.
Set definition. Select the reports in the
Reports List
to add to the report set and click
the right arrow. Use the Up and Down arrow buttons to change the order.
Note: Only reports in the
Set list and print sequence
section are included in the set.
Chapter 6 - Reporting Data • 156

Override reporting period. Check this box to override the reporting period properties
of all applicable reports in the set without editing each one. Select the
From
and
To
dates from the drop down list.
Override book selection. Select this box to use one or more books other than the
books set in each report's individual properties. Select the respective box for each book
you want to use.
Note: Book and period overrides do not apply to the following reports:
FASB 109
AMT
Asset Information
Asset List
Asset Note
ACE™ Worksheet
6. To change the properties of an individual report in a set, highlight the report, click Properties,
and make the appropriate changes. See
Customizing Report Properties
on page138 for more
information.
7. Click Save. The
Save
button is disabled until a name is entered in the
Set name
field and a
report has been placed in the
Set List and Print Sequence
list.
Editing a Report Set
(File > Print > Reports)
Report set configurations are client-specific.
Use the following procedure to edit a report set:
1. In an open file, do one of the following to display the
Reports
dialog:
Click Print Reports from the toolbar.
Select File > Print > Reports.
Click Print Menu and select Reports.
2. Double-click the Report Sets folder or click the plus sign (+) next to the folder.
3. Select and add the report set to be modified to the
Reports selected for print
box.
Note: Additional reports can be added to the
Reports selected for print
box.
4. Click Edit Set.
5. Change the report set definition, as required. See
Creating a Report Set
on page155 for more
information.
Chapter 6 - Reporting Data • 157

6.
Do one of the following:
Add a report to the set. Highlight the report in the
Report list
box and click the right
arrow or double-click the report set.
Remove a report from the set. Highlight the report in the
Set list and print sequence
box and click the left arrow or double-click the report set.
Note: Changing the set name does not create a new set.
7. Click Save to accept the changes.
Note: If you change the report set name to an existing name, a warning displays confirming the
replacement of the existing set.
Deleting a Report Set
(File > Print > Reports)
Report Set configurations are client-specific.
Use the following procedure to delete a report set:
1. In an open file, do one of the following to display the
Reports
dialog:
Click Print Reports on the toolbar.
Select File > Print > Reports.
Click Print Menu and select Reports.
2. Open the Report Sets folder and highlight a set.
3. Click Edit Set.
4. Click Delete Set.
5. When asked to confirm the deletion, click Yes.
Chapter 6 - Reporting Data • 158

Printing a Report Set
(File > Print > Reports)
Report set configurations are client-specific.
Select the
Create single PDF file for a multiple report
option on the
Preferences
dialog to create a
single file every time you print multiple reports to the PDFformat. See
Setting Preferences
on
page17 for details.
Use the following procedure to print a report set:
1. To display the
Reports
dialog, do one of the following:
Click Print Reports on the toolbar.
Select File > Print > Reports.
Click Print Menu and select Reports.
2. Double-click the Report Sets folder or expand it by clicking the plus sign (+) next to the folder.
3.
Select a report set folder by highlighting the folder and clicking the right arrow, or drag the folder
from the
Reports list
to the
Reports selected for print
section.
The reporting period date range, filter, and sort information display in the
Properties preview for
selected report
field for the selected report.
4. Select a month from the
Select month
drop-down list if needed.
5. Choose the appropriate formatting options in the
Report format
section.
6. Click Print to display the
Print
dialog.
7.
Do one of the following:
To print to a printer, do the following:
a. Select a printer from the
Name
list.
b.
If you are printing more than one copy, enter the desired number.
c.
If needed, select to collate the print copies.
To print to a file, do the following:
a. Select the Print report to file box.
b.
The directory location and file name defaults to the directory specified on the
Client Properties File Locations
tab and the client ID. You can enter a different
directory in the
File name
box or browse to another location.
c.
Select the file format.
d. If you are printing multiple reports to a PDF file, you can select Print to single
PDF to print all reports in one file.
8.
If you are printing a page range, enter the page numbers.
9. Click OK to print and exit this dialog.
Chapter 6 - Reporting Data • 159

Printing Government Forms
(File > Print > Forms)
This section outlines the procedures for printing the government forms available in CCH ProSystem
fx
Fixed Assets.
Note: Form 4562 can be printed when it is not required to be filed. This function is enabled using
the
Print and export options
section on the
Preferences
dialog. See
Setting Preferences
on
page17 for more information.
To print government forms, do the following:
1. Use one of the following methods to display the
Print Forms
dialog:
Click Print Reports then select Print Forms on the
Reports
dialog.
Select File > Print > Forms.
Click Print Menu and select Forms.
2. Select forms for printing by double-clicking each form in the
Forms list
box to move it to the
Forms selected to print
list box.
Note:To select or deselect a form for printing, you can double-click the form or use the left
and right arrow buttons positioned between the list boxes.
3. Click the up and down arrows to set the print order of the form or forms listed in the
Forms
selected to print
list box.
4.
Select the book to use.
5. If printing Form 4562, highlight the form in the
Forms selected to print
list and select a print
option from the
Printing options
section.
Chapter 6 - Reporting Data • 160

6. Select options from the
4562 elections
section, as needed.
Notice 2001-70. Select to indicate this election on the top of Form 4562. (This election
is valid for 2001 current calendar years only.)
Electing under Sec. 168(I)(4) to group any assets during the tax year into
general asset accounts. To group any assets placed in service during the year into
one or more general assets accounts, check this option to allow the question on
Form4562, Line 18 to be checked.
7.
Do any of the following:
Click Print to begin printing the selected form or forms.
Click Preview to preview the selected form or forms before printing.
Click Print to PDF to indicate a location and name, and then save the selected forms in
PDF format.
Exporting Reports to CCH ProSystem
fx
Engagement
(File > Export > Engagement Binder > Export Reports)
This section provides instructions for adding PDF files created from CCH ProSystem
fx
Fixed Assets
reports to a workpaper tab in a CCH ProSystem
fx
Engagement binder.
To export reports to CCH ProSystem
fx
Engagement, you need to establish the following in
Engagement:
You must have a valid Engagement user name and password.
You must be a team member assigned to the binder you want to store the file in.
You must be assigned the rights to create a new workpaper for the binder and the binder must
be closed.
You must have a licensed version of engagement for this process.
To export report data to Engagement, do the following:
1.
Open a client file.
2. Select File > Export > Engagement Binder > Export Reports or select Export Reports on
the Export to Engagement toolbar menu.
3.
Double-click a folder to display a list of available reports.
4. Select one or more reports by double-clicking on the report to add it to the
Reports selected
list.
Note: Reports are exported in PDF format. If you select multiple reports and checked the
Create single PDF file for a multiple report
selection on the
Preferences
dialog, you can
create a single PDF file for multiple reports when you export. See
Printing Reports
on
page151 for more instruction.
5. Select the month from the
Select month
drop-down list if necessary.
6. Check the appropriate formatting options in the
Report format
section.
Chapter 6 - Reporting Data • 161
7. Click Properties to edit a selected report's print settings as needed.
8. Click Export.
9.
If this is the first time you have exported during this session, you are prompted for your
Engagement user login information. Enter it and click OK.
10.
If you are exporting multiple reports and selected the print and export option to create a single
PDF file for multiple reports, enter a file name in the
PDF File Name
dialog and click OK.
11. Click Next on the
Insert Workpaper Wizard
dialog.
12. In the
Local File Room
, select the client folder and then the binder where the report PDF file is
to be placed.
13. Click Next.
14. Select the workpaper tab where you want to insert the report PDF file and click Next.
15.
Enter an index number and name. You may keep the default name, which reflects the specific
report name and the book being reported or the PDF file name.
16. Click Finish to display a summary dialog listing the binder, workpaper tab, and workpaper index
number and name.
17. Click Insert if the information is correct. Click Back to change any of your selections.
Chapter 6 - Reporting Data • 162

Chapter7
Chapter 7 - I mport i ng Data
This chapter explains the procedures for importing data into CCH ProSystem
fx
Fixed Assets. Users
who are integrated with CCH ProSystem
fx
Tax, CCHGlobal
fx
Tax, or CCH Axcess Tax will also be
shown how to import CCH ProSystem
fx
Fixed Assets data into a tax return.
Integrating CCH ProSystem
fx
Fixed Assets Data with CCH
ProSystem
fx
Tax and CCHGlobal
fx
Tax
This section provides instructions on importing data to CCH ProSystem
fx
Fixed Assets clients that
are linked to CCH ProSystem
fx
Tax or CCHGlobal
fx
Tax data, and non-linked clients. Any Fixed
Assets client created by importing CCH ProSystem
fx
Tax or CCHGlobal
fx
Tax client profile data is
linked.See
Creating a New Client
on page39 for information on linking to a CCH ProSystem
fx
Tax
or CCHGlobal
fx
Tax Client.
Points to Remember before Importing Data from CCH ProSystem
fx
Tax and
CCHGlobal
fx
Tax:
Calculate and save the return at least once before importing data. The import process stops if
the return has never been calculated.
If you make changes to the return and are planning to import data to CCH ProSystem
fx
Fixed
Assets, calculate and save the return before importing again.
Assets are assigned a CCH ProSystem
fx
Fixed Assets system number based on their
CCH ProSystem
fx
Tax or CCHGlobal
fx
Tax asset number. The system number is used for
matching purposes when data is imported into the tax program and can be reviewed in the data
grid in worksheet view.
If "Totals Only" has been used in the tax return, CCH ProSystem
fx
Fixed Assets will not import
any asset information into the fac file.
When importing data from CCH ProSystem
fx
Tax or CCHGlobal
fx
Tax, you are given the
choice of the location of Tax you want to import from Network or Local, Laptop, or Internet.
Select Internet if you want to import from CCHGlobal
fx
Tax.
If you select a CCH ProSystem
fx
Tax or CCH Global
fx
Tax client whose data has been
secured with a password, you must enter the password. If the return is secured through the user
Chapter 7 - Importing Data • 163
IMPORTING DATA

access list, you must be on the list of users granted access to the client’s data or have supervisor
access before the client’s data can be imported into CCH ProSystem
fx
Fixed Assets.
If you have imported asset data, the data imported on a subsequent import overwrites existing
assets.
If exceptions are found during the import process, an exception log displays. You can print the
log while viewing it.
Once a CCH ProSystem
fx
Tax or CCHGlobal
fx
Tax client’s return data is imported into Fixed
Assets and assigned a password, the CCH ProSystem
fx
Fixed Assets password is independent
of CCH ProSystem
fx
Tax and CCHGlobal
fx
Tax.
Importing Assets for a Linked CCH ProSystem
fx
Tax or
CCHGlobal
fx
TaxClient
(File > Import > Tax)
Note: Some returns only allow access for designated CCH ProSystem
fx
Tax and CCHGlobal
fx
Tax users. If your sign-on user ID does not match the user ID on the list of users authorized to
access a return, you receive an access denied message.
To import asset data in to a CCH ProSystem
fx
Fixed Assets client file that has been linked to a
CCH ProSystem
fx
Tax or CCHGlobal
fx
Tax return, do the following:
1.
Open the applicable client and do one of the following:
Select File > Import > Tax.
Click Import from Tax on the toolbar.
Note: If the client's return is password-protected in CCH ProSystem
fx
Tax or
CCHGlobal
fx
Tax, you are asked to enter a password before the
Applicable Returns
dialog displays.
2.
Choose the location of the Tax version to be used for retrieving client data: Network or Local,
Laptop, or Internet. If you want to import from CCHGlobal
fx
Tax, select Internet.
3. Select the return that data will be imported from and click OK to begin the import process.
Note: If exceptions are encountered during the import process, an exception log displays
once the import has finished. Click Yes to view the log. While viewing the log, you can click
Print to print a hard copy of the log.
4. Once the import process has completed, click OK.
Chapter 7 - Importing Data • 164

Importing Assets from a Non-Linked CCH ProSystem
fx
Tax or
CCHGlobal
fx
Tax Client
(File > Import > Tax)
Notes:
When accessing CCH ProSystem
fx
Tax, you may be prompted to enter your user ID and
password.
When accessing CCHGlobal
fx
Tax, you will be prompted to enter your user ID and password.
When importing user list secured returns, if your CCH ProSystem
fx
Tax or CCHGlobal
fx
Tax
sign-on user ID is not on the list of users authorized to access a return, you will receive an
access denied message.
To import data for a client who has not yet been linked to CCH ProSystem
fx
Tax, follow these steps:
1. Select File > Open and highlight the target CCH ProSystem
fx
Fixed Assets client file.
Do one of the following:
Select File > Import > Tax.
Click Import from Tax on the toolbar.
2. Choose the location of the CCH ProSystem
fx
Tax version to be used for retrieving client data:
Network or Local, Laptop, or Internet.
Notes:
If you want to import from CCHGlobal
fx
Tax, select Internet.
You will be prompted to enter a password when importing CCH ProSystem
fx
Tax and
CCHGlobal
fx
Tax password-protected returns. Files created from these returns will not
retain the same password in CCH ProSystem
fx
Fixed Assets.
3. The
Select CCH ProSystemfx Tax Client
dialog displays.
Notes:
If you are importing from a CCHGlobal
fx
Tax client, the
Select CCH ProSystemfx
Client
dialog has an additional drop-down list called
Tax year
. You can specify the tax
year from which clients are selected.
If you are importing from a CCHGlobal
fx
Tax client, the
Select CCH ProSystemfx
Tax Client
dialog has an additional drop-down list called
Office account
. This list
contains all of the office accounts to which the user has access rights.
Do one of the following:
Select a specific client. Click the
Client ID
or
Client name
radio button, enter the
client’s ID or name, and click OK. You can enter a partial name or client ID in the
Select
specific client
section to display a list of clients matching the partial name or ID.
Chapter 7 - Importing Data • 165

Display a list of clients. Use the drop-down lists in the
Select client by
section to
display a list of clients filtered by client type, office group, and/or tax preparer.
4. The
Applicable Clients
dialog displays. Highlight the client whose return data you want to
import and click OK. If there is only one return for the client, the import process begins
immediately.
If there are multiple returns for the client, the
Applicable Returns
dialog displays. Highlight the
return containing the data you want to import and click OK to begin the import process.
If exceptions are encountered during the import process, an exception log displays when the
process is complete.
Overview of Importing Data into CCH ProSystem
fx
Tax and
CCHGlobal
fx
Tax
CCH ProSystem
fx
Fixed Assets data for one or more clients can be imported into a return in
CCH ProSystem
fx
Tax or CCHGlobal
fx
Tax. The import process takes place in Tax Preparation.
Note: It is recommended that you save the return before beginning the import process.
Points to Remember when Importing Data into CCH ProSystem
fx
Tax and
CCHGlobal
fx
Tax:
The current year period of the CCH ProSystem
fx
Fixed Assets file being imported must match
the tax year of the open return.
The SSN or EIN of the CCH ProSystem
fx
Tax or CCHGlobal
fx
Tax and Fixed Assets client
files do not need to match. You will receive a warning dialog if there is a mismatch.
When importing data to CCH ProSystem
fx
Tax or CCHGlobal
fx
Tax from Fixed Assets, you
are given the choice of importing asset data as asset detail or totals only. Data populates as
follows:
Worksheet View: To the Depreciation and Amortization Worksheet (Form 4562) for
each entity.
Interview View:
Asset detail. Interview Forms DP-1, DP-2, DP-3, or DP-4
Totals only. Interview Forms DP-5, DP-6, DP-7, or DP-8
During the import, CCH ProSystem
fx
Tax and CCHGlobal
fx
Tax deletes assets in the return
associated with the entities being imported and replaces the existing asset data with the Fixed
Assets data.
The following assets are not imported from CCH ProSystem
fx
Fixed Assets:
Assets marked as inactive on the
Detail
tab.
Previously disposed assets, if the asset's disposed date is prior to the tax year of the
return.
Assets with a date in service after the tax year of the return.
Chapter 7 - Importing Data • 166

Entities in the return that do not have corresponding asset data in CCH ProSystem
fx
Fixed
Assets remain as they were prior to the import.
If there is a conflict between asset data from CCH ProSystem
fx
Fixed Assets and the return
data regarding the use of totals only and asset detail, CCH ProSystem
fx
Tax and
CCHGlobal
fx
Tax will give you the choice of stopping the import and changing the method of
import or continuing.
When importing asset detail, you can import current year acquisitions, dispositions, or both.
To import data from CCH ProSystem
fx
Fixed Assets, you must close the Fixed Assets client
file.
Importing Data into CCH ProSystem
fx
Tax and CCHGlobal
fx
Tax
(File > Import > Fixed Assets)
If a CCH ProSystem
fx
Fixed Assets client is password protected, you will be prompted for the
password during the import process.
Notes:
We recommend that you save the return (File > Save) before beginning the import process.
To import data from CCH ProSystem
fx
Fixed Assets, you must close the CCH ProSystem
fx
Fixed Assets client file.
To import Fixed Asset data into a CCH ProSystem
fx
Tax or a CCHGlobal
fx
Tax return, do the
following:
1. In Tax Preparation, open the return to import asset data. The CCH ProSystem
fx
Fixed Assets
menu command is unavailable until a return is open.
2. To display the
Welcome to the Import Wizard for Fixed Assets
screen, do one of the following:
Select File > Import > Fixed Assets.
Click Import Fixed Assets on the toolbar.
3. Click Save and then click Next.
4. A list of CCH ProSystem
fx
Fixed Assets clients that match the return type (for example,
Individual) of the open return displays.
Note: If AutoSave is running, you will be prompted to disable it before continuing. Select
Tax Preparation > Preferences > AutoSave.
5. Select the client or clients to import data from and click Next. If needed, click Change
Location to select data files in a different folder.
6. If a CCH ProSystem
fx
Fixed Assets data file is password protected, enter the password and
click Next. If not, continue to the next step.
Chapter 7 - Importing Data • 167

7.
If you selected only one client, go to step 8. If you selected multiple clients, do one of the
following:
If a selected client has been previously imported to this return, select it and click Next.
This lets the program know what existing entities need to be appended or replaced for
asset data associated with this client. New entities will be created for the imported
assets of the additional listed clients.
If none of the listed clients have been imported to this return before, click Next.
8.
Choose one of the following import options:
Select Totals only to import current depreciation total figures for each entity to the
Depreciation and Amortization Worksheet (Form 4562) in Worksheet view and Interview
Forms DP-5, DP-6, DP-7, and DP-8. Click Next and go to step 10.
Select Asset detail to import current depreciation detail for each asset to the
Depreciation and Amortization Worksheet (Form 4562) for each entity in Worksheet view
and to Interview Forms DP-1, DP-2, DP-3, and DP-4. Click Next and continue to the
following step.
Note: Whether you select to import Totals only or Asset Detail, all existing asset detail and
total amounts in the return will be deleted and replaced with the CCH ProSystem
fx
Fixed
Assets data.
9. Choose one of the following options and click Next.
Current Year Acquisitions only
Current Year Dispositions only
Both Current Year Acquisitions and Current Year Dispositions
Append and Update all Assets
Full Import
Note: If this is the first time an import has been implemented for this return, you will have
to do a full import. All existing asset detail will be overwritten.
10. If there are entities within CCH ProSystem
fx
Fixed Assets that do not exist within the tax
return, select one of the following options and click Next.
Choose Add entity to create the entity in the tax return and import the assets associated
with it in CCH ProSystem
fx
Fixed Assets.
Choose Bypass entity if you do not wish to create the entity in the return. Assets
associated with these entities will not be imported.
11.
A confirmation dialog displays the return ID, client's name and tax year, and the method of
import. Do one of the following:
Click Finish to begin importing asset data into the return.
Click Back to return to the previous step in the import process.
Chapter 7 - Importing Data • 168

Note: If importing a large CCH ProSystem
fx
Fixed Assets file (over 5,000 KB) into
CCHGlobal
fx
Tax, you will receive a prompt indicating the file is large and will be
submitted for processing at the server. The return will be closed and unavailable for editing
until the import has completed. You can check the Job Status in Production Processing to
check the status of the import.
12. When the import has finished, a successful import message will display. Click OK.
Overview of Importing Data into CCH Access Tax
CCH ProSystem
fx
Fixed Assets data for one or more clients can be imported into a return in
CCH Axcess Tax. The import process takes place in CCH Axcess Tax.
Note: It is recommended that you save the return before beginning the import process.
Points to Remember when Importing Data into CCH Axcess Tax:
The current year period of the CCH ProSystem
fx
Fixed Assets file being imported must match
the tax year of the open return.
The SSN or EIN of the CCH Axcess Tax return and Fixed Assets client files do not need to
match for the import process to work. You will receive a warning dialog if there is a mismatch.
When importing data to CCH Axcess Tax from Fixed Assets, you are given the choice of
importing asset data as asset detail or totals only. Data populates the Depreciation and
Amortization Worksheet (Form 4562) for each entity.
During the import, CCH Axcess Tax deletes assets in the return associated with the entities
being imported and replaces the existing asset data with the CCH ProSystem
fx
Fixed Assets
data.
The following assets are not imported from CCH ProSystem
fx
Fixed Assets:
Assets marked as inactive on the Detail tab.
Previously disposed assets, if the asset's disposed date is prior to the tax year of the
return.
Assets with a date in service after the tax year of the return.
Entities in the return that do not have corresponding asset data in CCH ProSystem
fx
Fixed
Assets remain as they were prior to the import.
If there is a conflict between asset data from CCH ProSystem
fx
Fixed Assets and the return
data regarding the use of totals only and asset detail, CCH Axcess Tax will give you the choice
of stopping the import and changing the method of import or continuing.
When importing asset detail, you can import current year acquisitions, dispositions, or both.
To import data from CCH ProSystem
fx
Fixed Assets, you must close the CCH ProSystem
fx
Fixed Assets client file.
Chapter 7 - Importing Data • 169

Importing Data into CCH Axcess Tax
If a CCH Axcess Tax client is password protected, you will be prompted for the password during the
import process.
Notes:
We recommend that you save the return (File > Save) before beginning the import process.
To import data from CCH ProSystem
fx
Fixed Assets, you must close the Fixed Assets client
file.
To import CCH ProSystem
fx
Fixed Asset data into CCH Axcess Tax return, do the following:
1.
In CCH Axcess Tax, open the return to import asset data.
2. Select Fixed Assets > Fixed Assets in the Import group on the
Import / Export
tab.
3. If the CCH ProSystem
fx
Fixed Assets file is not in the default location specified in Fixed
Assets, click Browse to navigate to the file.
4. Select the CCH ProSystem
fx
Fixed Assets client file(s) to import.
Notes:
The CCH ProSystem
fx
Fixed Assets client type and current year beginning and ending
dates must match the tax return.
If you want to import multiple files, you must import them at the same time.
5. Select Save client return before import to save the return before performing the import.
6.
If you selected only one client, go to step 7. If you selected multiple clients, do one of the
following:
If a selected client has been previously imported to this return, select it and click Next.
This lets the program know what existing entities need to be appended or replaced for
asset data associated with this client. New entities will be created for the imported
assets of the additional listed clients.
If none of the listed clients have been imported to this return before, click Next.
7. Click Next to continue.
8. If prompted, enter the password, and then click Next.
9.
Select the import method.
Totals only. Current depreciation totals for each entity in the CCH ProSystem
fx
Fixed
Assets system will be imported to the Depreciation and Amortization Totals worksheet
for each business, rent, royalty, farm, or depletion entity. Existing totals in the return for
these entities will be overwritten.
Asset detail. Current depreciation totals for each entity in the CCH ProSystem
fx
Fixed Assets system will be imported to the Depreciation and Amortization worksheet
for each business, rent, royalty, farm, or depletion entity. Existing totals in the return for
these entities will be overwritten.
Chapter 7 - Importing Data • 170

If you select this option, you also must choose one of the following asset detail
methods from the list:
Import current year acquisitions only
Import current year dispositions only
Import only current year acquisitions and dispositions
Append and update all assets
Full import (overwrites all asset detail data)
Notes:
If you are doing an initial import (no depreciation or disposition data on the
input forms or worksheets), only Current year acquisitions and Full import are
available.
Entities that do not have corresponding asset data in CCH ProSystem
fx
Fixed
Assets remain as they were prior to import.
Inactive, disposed, or future year assets will not be imported from Fixed
Assets.
10.
Select to either add an entity or bypass the entity when handling a fixed asset entity that does
not already exist in the return.
11. Review the information selected for import, and, if the information is correct, click Next to begin
the data validation.
12.
Examine the validation log and make your selection for handling the log summary.
Validation succeeded. You can continue with the next step.
Validation partially succeeded. This message indicates that some data in the
source file cannot be imported successfully. You can click Details to view information
about the problematic data. You can continue with the import, and all the data will be
imported except the records identified as having errors.
Validation failed. The data file cannot be imported in its current form. You can click
Details to view information about why the validation failed. If needed, you can print or
copy the log. After viewing the log, you must exit the wizard so you can resolve the
validation issues before trying the import again.
13. Click Import to begin the import.
Note: You cannot cancel the import once it has begun.
14. If needed, click Details to view the Detail Log for the import. The detail log will not be available
after you close the import wizard. If you need to maintain a record of the import, do one of the
following on the Detail Log window:
Click Print on the Detail Log window to send the file to your printer.
Click Copy to copy the information in the log to the clipboard so you can paste it into
another document.
15. Click Finish to exit when the import is complete.
Chapter 7 - Importing Data • 171

Note: The return must be recalculated for the program to indicate there is data present on
the worksheets.
Overview of Importing Data from Other FAM Products
This section provides instructions for importing data from various file types into CCH ProSystem
fx
Fixed Assets. Data can be imported from the following popular fixed asset management programs:
Application Version
Asset Keeper Pro 2014 - 2016
BNA 2015.0.0.20 - 2017.0.0.15
Fixed Assets CS 2014.1.9 – 2016.1.7
Intuit
®
EasyACCT
®
Professional Series 2013.2.9 - 2015.2.06
Sage® Fixed Assets 2015.1 - 2017.1
Note: Imports are not supported for application releases prior to the versions listed.
Data to be Imported
Below is a general list of some of the data that will be imported into CCH ProSystem
fx
Fixed Assets:
Client level information. Name, Client ID, EIN, Product type, fiscal year beginning and end
dates
Field information. Names of system and user-defined fields
Asset detail. Items that occur only once per asset, such as description, date acquired, tax
schedule, and Serial number
Depreciation detail. Book values for each asset (for example, Type of Property, Method, Life)
Points to Remember:
Depreciation data is assumed to be for the full year and will be treated as a user override.
CCH ProSystem
fx
Fixed Assets accepts a maximum of eight books. To import a subset of
books or fields, you must make a copy of the original file and remove all books or fields except
the ones to be imported using the original application.
The current year beginning and end dates, entity start date, prior short years, and entity type of
the file being imported must match that of the target file. If the information does not match, the
import will abort.
Excel
®
spreadsheets detailing the fields converted from competitor products can be found on
the CCH ProSystem
fx
Fixed Assets installation folder.
Chapter 7 - Importing Data • 172

Note:For further detail on data imported into CCH ProSystem
fx
Fixed Assets or product
specific conversion issues, see the spreadsheets contained in the ?:\info folder on the Fixed
Assets installation folder (where ? represents the drive where Fixed Assets is installed).
Importing Data from Asset Keeper Pro
(File > Import > Various File Types > Asset Keeper)
Excel
®
spreadsheets detailing the fields converted from competitor products can be found on the
CCH ProSystem
fx
Fixed Assets installation folder.
Use the following steps to import data from Asset Keeper into CCH ProSystem
fx
Fixed Assets:
Note: Asset Keeper Pro must be installed on the same drive as CCH ProSystem
fx
Fixed Assets.
1. Open the CCH ProSystem
fx
Fixed Assets client file that data will be imported to.
2. To display the
Client Data Path
dialog, do one of the following:
Select File > Import > Various File Types > Asset Keeper Pro.
Click Import Various File Types and select Asset Keeper Pro.
3. Enter the drive, directory, and name of the Asset Keeper Pro data file in the
Client Data Path
box, or click Browse to search for the file. Click OK to continue.
4. Click OK to start importing the client data.
If exceptions occur during the import process, an exception log displays when the import is complete.
Click Yes to view the log. The log lists exceptions and the exception disposition by asset number.
Click Print to print a hard copy.
Asset Keeper Pro Conversion Issues
The following information cannot be converted:
Sort codes
"New" or "Used" designation for ITC property
Importing Data from BNA
(File > Import > Various File Types > BNA)
BNA files cannot convert directly into CCH ProSystem
fx
Fixed Assets. CCH
®
Conversion Services,
however, can convert the files to a format that is compatible with CCH ProSystem
fx
Fixed Assets.
Chapter 7 - Importing Data • 173

Copy the BNA files (with .cdb extensions) to CD and mail to:
CCH Conversion Services
Attn: File Processing
580 Naches Ave SW, Bldg #D2
Renton, WA 98057-2297
Importing Data from Fixed Assets CS
(File > Import > Various File Types > Fixed Assets CS)
Use the following steps to import data from Fixed Assets CS into CCH ProSystem
fx
Fixed Assets.
Neither application must be installed.
Excel
®
spreadsheets detailing the fields converted from competitor products can be found in the
Fixed Assets installation folder.
1.
Open the Fixed Assets client file that data will be imported to.
2. Do one of the following to display the
Client Data Path
dialog:
Select File > Import > Various File Types > Fixed Assets CS.
Click Import Various file Types and select Fixed Assets CS.
3. Enter the drive, directory, and name of the data file in the
Client Data Path
box, or click
Browse to search for the file. Click OK to continue.
Note: When browsing for Fixed Assets CS data, you are only able to select the folder
containing the data files.
4. Click OK to start importing the client data.
Fixed Assets CS Depreciation Solution Conversion Issues
Life of asset determines Real Property Code.
Preparer-defined depreciation methods cannot be converted.
Additional data that cannot be converted:
Home Office
Related Party Information
State and Local Information: State postal code, Local government code, Local
government date
Some ITC Codes
Chapter 7 - Importing Data • 174

Importing Data from Intuit
®
EasyACCT
®
(File > Import > Various File Type > Intuit
®
EasyACCT
®
Professional Series)
Excel spreadsheets detailing the fields converted from competitor products can be found in the Fixed
Assets installation folder.
Use the following steps to import data from Intuit
®
EasyACCT
®
into CCH ProSystem
fx
Fixed Assets.
1. Open the CCH ProSystem
fx
Fixed Assets client file that data will be imported to.
2. To display the
EasyAcct
®
Data Import
dialog, do one of the following:
Select File > Import > Various File Types > Intuit
®
EasyACCT
®
Professional
Series.
Click Import Various File Types and select Intuit
®
EasyAcct
®
Professional Series.
3. Enter the drive, directory, and name of the data file in the
Client Data Path
box, or click
Browse to search for the file. Click OK to display the
EasyAcct
®
Data Import
dialog.
4. Select a client to import into CCH ProSystem
fx
Fixed Assets and click OK.
If exceptions are found during the import, you are given the option to view and print them.
Importing Data from Sage
®
Fixed Assets (Sybase™)
(File > Import > Various File Types > Sage
®
Fixed Assets (Sybase™))
This procedure can be used to import data files from Sage
®
Fixed Assets for Windows
®
.
Excel
®
spreadsheets detailing the fields converted from competitor products can be found in the
Fixed Assets installation folder.
Use the following steps to import data from Sage
®
Fixed Assets into CCH ProSystem
fx
Fixed
Assets:
Notes:
Sage
®
must be installed on the same drive as CCH ProSystem
fx
Fixed Assets.
Custom depreciation methods are imported as
Preparer Computed
.
1. Open the CCH ProSystem
fx
Fixed Assets client file that data will be imported to.
2. To display the
Client Data Path
dialog, do one of the following:
Select File > Import > Various File Types > Sage
®
Fixed Assets (Sybase™).
Click Import Various File Types and select Sage
®
Fixed Assets (Sybase™).
3. Enter the drive, directory, and name of the Sage
®
Fixed Assets client database file in the
Client
Data Path
box, or click Browse to search for the database file. Click OK to display the
Sage
®
Data Conversion
dialog.
4. Select a client and click OK to start importing the client data.
Chapter 7 - Importing Data • 175
If exceptions occur during the import process, an exception log displays when the import is complete.
Click Yes to view the log. The log lists exceptions and the exception disposition by asset number.
Click Print to print a hard copy.
Sage
®
Fixed Assets Conversion Issues
For optimal conversion performance, it is recommended that both Sage
®
Fixed Assets
Depreciation and CCH ProSystem
fx
Fixed Assets software be installed on the same drive.
The last period calculated in Sage
®
(all assets and all books) must reflect the Current Year
Ending date entered in the CCH ProSystem
fx
Fixed Assets
Client Properties
dialog.
The following depreciation methods cannot be converted:
RV = Remaining value over remaining life
OC = Own depreciation calculation
A property type of V (Vintage account) cannot be converted.
Importing Data from Sage
®
Fixed Assets Premier (SQL)
(File > Import > Various File Types > Sage
®
Fixed Assets Premier (SQL))
Excel
®
spreadsheets detailing the fields converted from competitor products can be found in the
Fixed Assets installation folder.
Use the following steps to import data from Sage
®
Fixed Assets Premier Depreciation into CCH
ProSystem
fx
Fixed Assets:
Notes:
Microsoft
®
SQL notes:
The SQL Server
®
database for the Premier client must be online.
The server must allow Mixed-Mode Authentication.
The server must allow an administrator to login to create the necessary user data
connection.
Custom depreciation methods are imported as
Preparer Computed
.
1. Open the CCH ProSystem
fx
Fixed Assets client file that data will be imported to.
2. To display the
Client Data Path
dialog, do one of the following:
Select File > Import > Various File Types > Sage
®
Fixed Assets Premier (SQL).
Click Import Various File Types and select Sage
®
Fixed Assets Premier (SQL).
3.
On the first time import, do the following:
a. Select the Server and Database for the client information.
b. Select Create DSN to create the connection between the database.
c.
Submit administrator credentials when asked to log on.
d. When a successful connection has been made, select OK to continue.
Chapter 7 - Importing Data • 176

4. On the
Sage
®
Data Conversion
dialog, select a client and click OK to start importing the client
data or select Change Database to switch the SQL Server or database.
If exceptions occur during the import process, an exception log displays when the import is complete.
Click Yes to view the log. The log lists exceptions and the exception disposition by asset number.
Click Print to print a hard copy.
Sage
®
Fixed Assets Conversion Issues
The last period calculated in Sage
®
(all assets and all books) must reflect the Current Year
Ending date entered in the CCH ProSystem
fx
Fixed Assets
Client Properties
dialog.
The following depreciation methods cannot be converted:
RV = Remaining value over remaining life
OC = Own depreciation calculation
A property type of V (Vintage account) cannot be converted.
Overview of Importing Data from User-Defined Files
CCH ProSystem
fx
Fixed Assets offers multiple options for decreasing data entry time. The user
defined import feature is one of those options. This feature provides the option to import fixed assets
data that has been entered into a spreadsheet or exported from another fixed assets management
program to a spreadsheet or ASCII comma delimited file. You have the option to overwrite or append
to the existing data.
Points to Remember:
Data imported. The user defined import option does not import client profile data or
information on entities that assets may be attached to in a tax system. Only asset detail can be
imported.
Spreadsheets. Spreadsheets selected for import must be in Excel
®
format. The data must be
on one worksheet, not spread across multiple sheets.
ASCII character delimited (CSV) files. Any ASCII character delimited file can be imported.
The commonly used file extension of *.CSV is not required. Various value separators (for
example, tabs, colons, spaces) are supported.
Data format. For a successful import, fixed assets data must be stored in a specific format.
Each column of data should represent a field. Each row of data should represent an asset. The
initial row may contain field headers, but this is optional.
Editing a translation table. Changing data file settings (for example, value separator
characters, location of headers and import data in source file) after mapping fields resets all
existing map settings.
Chapter 7 - Importing Data • 177
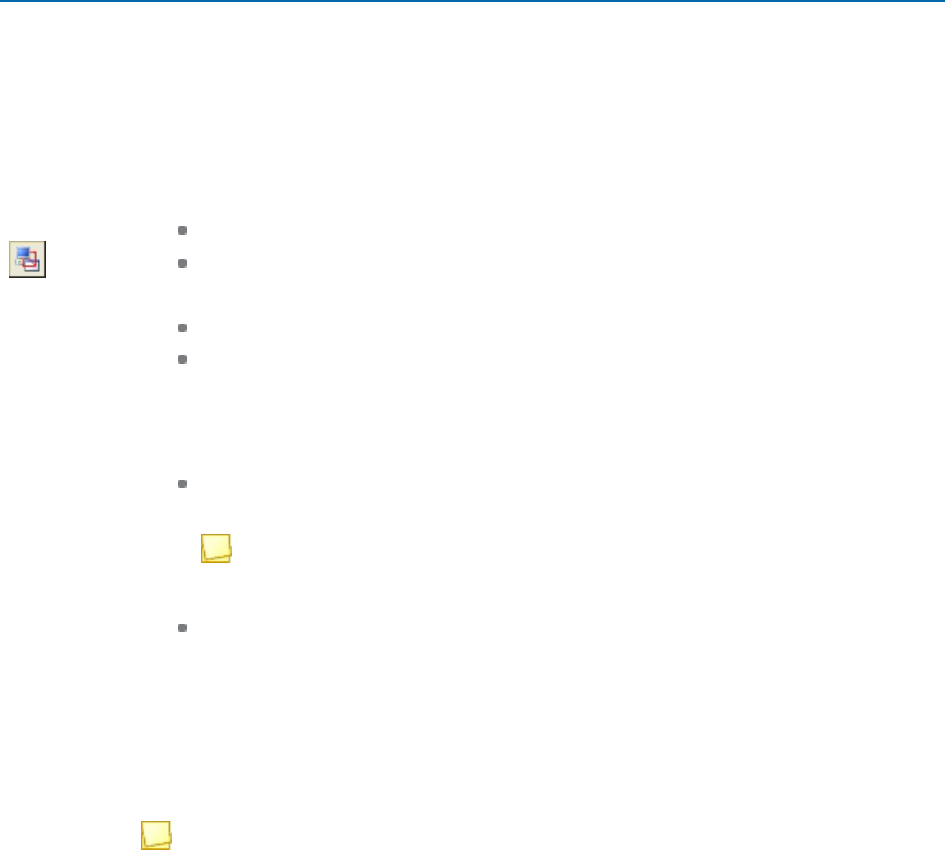
Importing Data from Excel
®
Spreadsheets
(File > Import > Various File Types > User defined import)
This procedure will walk you through the steps of importing data from an Excel
®
file into Fixed Assets.
When importing data from an Excel
®
spreadsheet into an existing CCH ProSystem
fx
Fixed Assets
file, you have the option to overwrite or append to the existing data. When appending an asset, the
next number after the greatest system number is assigned.
1.
To import data from an Excel
®
spreadsheet, do the following:
Select File > Import > Various File Types > User defined import.
Click Import Various File Types and select User defined import.
2.
At the lower left of the dialog, select one of the following:
Overwrite existing assets
Append to existing assets
3. Enter the path to the Excel
®
spreadsheet file (*.xls or .xlsx) in the
Path
field or use the Browse
button to locate the file.
4.
Do one of the following:
If you are importing a file using an existing Translation table, select the table from the
Select table
drop-down list and click OK. The import process will begin.
Note: An existing translation table can be edited during an import by clicking the
Edit button after the table has been selected.
If you are importing a file and a translation table does not exist, enter the name of the
translation table in the
Select table
field. Click Edit Table. Click Yes on the
confirmation dialog to display the
Import File Translation
dialog and continue to the next
step.
5. If the first row of your data file contains field headings, leave the
Source file has headings
box
checked (default). Uncheck this box if there are no field headings in the file. When you uncheck
this option, the header row location fields will become disabled.
Note: If the
Source file has headings
option is unchecked, the field folders in the Source
file data tree will be labeled Column 1, Column 2, etc.
6. Enter the number of the first row where the field headings exist in the
First heading row
field. If
field headers exist on two lines, enter the row number of the second row containing headers in
the
Second heading row
field.
7. Enter the number of the row where the first line of data begins in the
First data row
field.
8.
If your spreadsheet contains multiple worksheets, enter the sheet number where your data is
located in the
Excel
®
worksheet
field.
Chapter 7 - Importing Data • 178

9. Map fields and field values from the data file to their corresponding CCH ProSystem
fx
Fixed
Assets values listed in the
Translation table
tree.
Note: You cannot map a field’s values before mapping its header or folder.
To map a field, do one of the following:
Highlight the field folder in the
Source file data
tree. Locate and highlight the equivalent
CCH ProSystem
fx
Fixed Assets field in the
Translation table
tree. Click the Right
Arrow between the two trees to link the selected fields.
When mapping to a CCH ProSystem
fx
Fixed Assets field with a list of items (such as,
Methods) you will be prompted to map field values from your data file to the associated
CCH ProSystem
fx
Fixed Assets list items.
Highlight a field folder in the
Source file data
tree then drag it to the associated field in
the
Translation table
tree.
10. Once mapping is complete, click OK.
11. Click OK to begin the import process.
Notes:
Field links must exist for the CCH ProSystem
fx
Fixed Assets
Date in service
and
Method
fields. These are located in the Required entries folder of the Translation table tree. The import
process will not be successful if source file data has not been mapped to these fields.
To unlink items, highlight a linked field folder or value in the Source file data tree. Locate and
highlight the associated CCH ProSystem
fx
Fixed Assets field or value in the
Translation table
tree. Click the Left Arrow between the two trees to unlink the selected fields.
Changing values in the
Source file attributes
section after mapping fields will reset all existing
map settings.
Importing Data from ASCII Character Delimited Files
(File > Import > Various File Types > User defined import)
You can import any comma-delimited ASCII file. A file extension of *.CSV is not required.
1. To display the
User Defined Data File Import
dialog, do one of the following:
Select File > Import > Various File Types > User defined import.
Click Import Various File Types and select User defined import.
2.
At the lower left of the dialog, select one of the following:
Overwrite existing assets
Append to existing assets
3. Enter the path to the ASCII data file in the
Path
field or use the Browse button to locate the
file.
Chapter 7 - Importing Data • 179

4.
Do one of the following:
If you are importing a file using an existing Translation table, select the table from the
Select table
drop-down list and click OK. The import process will begin.
Note: An existing translation table can be edited during an import by clicking the
Edit button after the table has been selected. Remember, changing any source file
attributes resets your map settings.
If you are importing a file and a translation table does not exist, enter the name of the
translation table in the
Select table
field. Click Edit Table. A confirmation dialog will
display. Click Yes. Continue to step 5.
5. Select the character separator used in your data file from the
Value separator character
drop-
down list. If you are using a separator that is not listed, select Other and enter the character in
the
Other value
separator field.
Note: If the
Source file has headings
option is unchecked, the field folders in the Source
file data tree will be labeled Column 1, Column 2, etc. In addition, if the source data file
contains headers, they are imported into CCH ProSystem
fx
Fixed Assets as data.
6. If the first row of your data file contains field headings, leave the
Source file has headings
box
checked (default). Uncheck this box if the data file does not contain field headings.
7. Map fields and field values from the data file to their corresponding CCH ProSystem
fx
Fixed
Assets values listed in the
Translation table
tree.
Note: You cannot map a field’s values before mapping its header or folder.
To map a field, do one of the following:
Highlight the field folder in the
Source file data
tree. Locate and highlight the equivalent
CCH ProSystem
fx
Fixed Assets field in the
Translation table
tree. Click the Right
Arrow between the two trees to link the selected fields.
When mapping to a CCH ProSystem
fx
Fixed Assets field with a list of items (such as,
Methods) you will be prompted to map field values from your data file to the associated
CCH ProSystem
fx
Fixed Assets list items.
Highlight a field folder in the
Source file
data tree and drag it onto its associated field in
the
Translation table
tree.
8. Once mapping is complete, click OK.
9. Click OK to begin the import process.
Chapter 7 - Importing Data • 180

Notes:
Field links must exist for the CCH ProSystem
fx
Fixed Assets
Date in service
and
Method
fields. These are located in the Required entries folder of the Translation table tree. The import
process is not successful if source file data has not been mapped to these fields.
Changing values in the
Source file attributes
section after mapping fields resets all existing
map settings.
To unlink items, highlight a linked field folder or value in the
Source file data
tree. Locate and
highlight the associated CCH ProSystem
fx
Fixed Assets field or value in the translation table
tree. Click the Left Arrow between the two trees to unlink the selected fields.
Chapter 7 - Importing Data • 181

Chapter8
Chapter 8 - Depreci ati on Computati ons
This is a reference chapter. Some topics covered in the chapter are:
Depreciation Methods
Section 179 Expense Limits
Section 179 Recapture and Section 280F Recapture
Electric and Luxury Auto Limitations
Section 179 expense limits for property placed in an empowerment zone, New York Liberty
Zone, or Disaster Zone
Please see the Table of Contents for the complete list of subjects covered in this chapter.
Accelerated Cost Recovery System (ACRS), Optional ACRS
Straight Line Method
Assets placed in service before January 1, 1987 and after December 31, 1980 are generally
depreciated using the Accelerated Cost Recovery System (ACRS) for federal purposes Depreciation
for ACRS assets is calculated using the tables specified in Regulation Section 1.168-2(b) and in IRS
Publication 534.
Asset Life
For ACRS personal property the asset lives are 3, 5, and 10 years. The recovery periods under the
optional ACRS straight line method are listed below.
3-year property 3, 5, or 12 years
5-year property 5, 12, or 25 years
10-year property 10, 25, or 35 years
For ACRS real property that is not low-income housing property, valid asset lives are 15, 18, or 19
years. If the optional ACRS straight line method is used, the valid asset lives are 15, 18, 19, 35, or 45
years.
Chapter 8 - Depreciation Computations • 182
DEPRECIATION COMPUTATIONS

For low-income housing property, the valid asset life is 15 years. Valid recovery periods when using
the optional ACRS straight line depreciation method include 15, 35, or 45 years.
For public utility property, the valid asset life is 15 years. Valid recovery periods when using the
optional ACRS straight line depreciation method include 15, 35, or 45 years.
Alternative Minimum Tax (AMT), Adjusted Current Earnings (ACE)
For ACE purposes, the depreciation is computed using the straight line depreciation method as
prescribed under the Alternative Depreciation System (ADS). The depreciation life is the recovery
period under the ADS system that is remaining at the start of the first tax year beginning after 1989.
The depreciable basis used to compute the ACE depreciation is the adjusted basis for regular tax
purposes as of the close of the last tax year beginning before 1990.
The default ADS lives for the various ACRS property classes are as follows:
ACRS ADS Assumption
3 year property 5 year property (half-year convention)
5 year property 8 year property (half-year convention)
10 year property 15 year property (half-year convention)
ACRS real property 40 years (mid-month convention)
For AMT purposes, the amount of regular tax depreciation in excess of the amount computed using
the straight line method is a tax preference item. This computation of the tax preference item is done
on an asset by asset basis.
Modified Accelerated Cost Recovery System (MACRS), (ADS)
The Tax Reform Act of 1986 requires most assets, placed in service after December 31, 1986, to be
depreciated using Modified Accelerated Cost Recovery System (MACRS) depreciation methods and
allowed MACRS depreciation to be elected for assets placed in service after July 31, 1986. MACRS
contains two different depreciation systems, the General Depreciation System (GDS) and the
Alternative Depreciation System (ADS). For CCH ProSystem
fx
Fixed Assets purposes, the GDS
system is referred to as MACRS and the Alternative Depreciation System is referred to as the ADS
system.
Chapter 8 - Depreciation Computations • 183

Section 168(k) Bonus Depreciation
The Job Creation and Worker Assistance Act of 2002 (JCWA, H.R. 3090) added Section 168(k), which
modified the depreciation calculation for many MACRS assets. The Job Creation and Worker
Assistance Act of 2002 (JCWA, H.R. 3090) was later amended by the Jobs and Growth Tax Relief
Reconciliation Act of 2003, the Job Creation Act of 2010 (HR 4853) and the Economic Stimulus Acts
of 2008, 2009, 2010, and 2015.
Qualified MACRS assets and certain computer software are eligible for a deduction equal to 30%,
40%, 50%, or 100% of the property's depreciable basis in the year placed in service. The deduction is
not prorated for short tax years, but allowed in full in the year the asset is placed in service. This
deduction is allowable for both AMT and ACE computations.
To qualify for the special depreciation deduction, the asset must meet an original use test, an asset
life test, acquisition date, and placed in service date tests (see table below). Generally the asset must
have a life of 25 years or less; an exception is provided for certain qualified leasehold improvements
to nonresidential property that can have a 39 year life. The original use test generally precludes used
property from qualifying for the additional depreciation.
Certain property is ineligible for this special depreciation allowance. Property that must be
depreciated using the ADS method does not qualify for the special depreciation allowance; however,
the special depreciation can be claimed on property depreciated using ADS if that property qualifies to
use the General Depreciation System (GDS).
If the qualifying property is subject to the luxury auto limits, the applicable limit is increased by
$4,600, $4,800, $6,400, $7,650, or $8,000. These increases are not adjusted for inflation.
If the property has a recovery period of at least 10 years or is transportation property, the property can
be placed in service a year beyond the ending date displayed in the table below and still qualify for the
specific bonus.
Taxpayers can elect out of the bonus rules as desired.
Beginning Date Ending Date Bonus Rate Auto Limit Increase
9/11/2001 12/31/2004 30% $4,600
5/6/2003 12/31/2004 50% $7,650
1/1/2008 9/8/2010 50% $8,000
9/9/2010 12/31/2011 100% $8,000
1/1/2012 12/31/2017 50% $8,000
1/1/2018 12/31/2018 40% $6,400
1/1/2019 12/31/2019 30% $4,800
Chapter 8 - Depreciation Computations • 184
New York Liberty Zone Provision
Special depreciation provisions also apply to property placed in service in the New York Liberty Zone,
located in New York City. These assets can qualify for a deduction equal to 30% of the property's
depreciable basis in the year placed in service. Like the deduction allowed under Sec.168(k), this
deduction is allowable for both AMT and ACE computations. The deduction is not prorated for short
tax years, but allowed in full if the year the asset is placed in service is a short tax year.
Aside from the requirement that the asset be placed in use in the Liberty Zone, the requirements for
qualified New York Liberty Zone property are less stringent than those for Sec. 168(k) assets.
Nonresidential and residential rental property in New York Liberty Zone can qualify for the additional
depreciation to the extent it rehabilitates or replaces real property damaged or destroyed in the
September 11 terrorist attack. Also, the property can be used property, provided the asset had not
been previously used in the New York Liberty Zone. To qualify, the asset must be placed in service
prior to January 1, 2007, or January 1, 2010, in the case of nonresidential or residential rental
property.
Certain property is ineligible for this special depreciation allowance. Property that qualifies for the
additional 30% depreciation under Sec. 168(k) is not eligible for this deduction, nor does property that
must be depreciated using the ADS method. Qualified New York Liberty Zone leasehold
improvements are also ineligible for the special 30% depreciation allowance.
Qualified New York City leasehold improvements to nonresidential real property located in the New
York Liberty Zone can be depreciated using a 5 year life instead of a 39 year life. Under the ADS
method, these assets have a life of 9 years. These assets must be depreciated using the straight line
depreciation method.
Bonus Depreciation for Disaster Zone Property
Taxpayers may claim an additional first-year depreciation allowance equal to 50 percent of the
adjusted basis of qualified Gulf Opportunity Zone property acquired on or after Aug. 28, 2005, and
placed in service on or before Dec. 31, 2007. The bonus depreciation allowance is in accordance with
the Gulf Opportunity Zone Act of 2005. This is only applicable to certain counties in Alabama,
Louisiana, and Mississippi. See IRS Publication 4492 for a list of the counties that are within the
Disaster Zone. Taxpayers may claim an additional 50% first-year depreciation allowance for property
that commences in use in the Kansas disaster area after May 4, 2007 and placed in service on or
before December 31, 2008. For nonresidential and residential real property, the assets must be
placed in service on or before December 31, 2009. Taxpayers may claim an additional 50 percent
first-year depreciation allowance for property placed in service on or after 2008 and before 2012 (2013
for nonresidential and residential real property) in an area designated as a disaster area.
Generally, the Disaster Zone bonus deduction will be equal to 50 percent of the cost of the property
after reduction of the cost by any amount expensed under Section 179. MACRS depreciation
deductions are then computed on the cost as reduced by the expensed amount and the bonus
deduction.
Chapter 8 - Depreciation Computations • 185

Bonus Depreciation for Cellulosic Biomass Ethanol Property
Taxpayers may claim an additional first-year depreciation allowance equal to 50 percent of the
adjusted basis of qualified cellulosic biomass ethanol plant property acquired on or after
December21,2006, and placed in service on or before December 31, 2016.
Bonus Depreciation for Reuse and Recycling Property
Taxpayers may claim an additional first-year depreciation allowance equal to 50 percent of the
adjusted basis of qualified reuse and recycling property acquired on or after August 31, 2008.
Asset Life
The recovery period or life used for MACRS must be either 3, 5, 7, 10, 15, 20, 25, 27.5, 31.5, 39, or
50 years. If a MACRS method other than the ADS method is entered, and the life entered is not 3, 5,
7, 10, 15, 20, 25, 27.5, 31.5, 39, or 50 years, a 5 year life is assumed for computation purposes.
Under ADS, the recovery period or life is the asset's class life or the life as established by statute.
The life used for regular tax purposes is the life used to compute the AMT depreciation if the asset
was placed in service after 1998.
If the asset was placed in service prior to 1999, the life used for AMT purposes is determined by
reference to the life used for regular tax purposes. Below are the assumed AMT lives, based upon the
life entered for federal tax purposes.
Federal Life AMT Life
3 years 3 years
5 years 5 years
7 years 10 years
10 years 16 years
15 years 20 years
20 years 25 years
25 years 50 years
27.5 years 40 years
31.5 years 40 years
39 years 40 years
50 years 50 years
Chapter 8 - Depreciation Computations • 186

For ACE purposes, depreciation is computed using the previously mentioned AMT life.
Averaging Convention
Both depreciation systems utilize an averaging convention. The averaging convention used is the half-
year, mid-quarter, or mid-month convention. The mid-month convention is applied to MACRS assets
with a 27.5, 31.5, 39, or 50 year life and ADS assets with a 40 year life. The mid-quarter or half year
convention is applied to assets with either 3, 5, 7, 10, 15, 20, 25 year life.
The half-year convention assumes that the asset is placed in service at the mid-point of the tax year.
The mid-month convention assumes that the asset is placed in service at the mid-point of the
applicable month.
The mid-quarter convention assumes that the asset is placed in service at the mid-point of the
computed quarter. The mid-quarter convention, rather than the half-year convention, must be used to
compute depreciation on assets placed in service during the current tax year if more than forty percent
of the business portion of tangible depreciable personal property assets are placed in service during
the last quarter of the tax year. CCH ProSystem
fx
Fixed Assets determines whether the use of the
mid-quarter convention is required. This calculation can be overridden by forcing a convention in the
book setup. If required, this convention computes the depreciation deduction for assets placed in the
current tax year. Assets with a depreciable life of 3, 5, 7, 10, 15, 20, or 25 years are assumed to be
tangible depreciable personal property assets and are included in the forty percent test calculation.
The convention methods described above apply for all MACRS assets for Tax, AMT, and ACE
depreciation purposes. It is also the default convention for State depreciation purposes.
The default convention for Financial depreciation purposes is an Actual month convention method
where depreciation is computed based on the number of months that the asset was placed in service
in the tax year. An asset placed in service in the first half of the month is deemed to have been placed
in service on the first day of the month. An asset placed in service in the second half of the month is
deemed to have been placed in service on the first day of the following month.
Note: Computer Software, Amortized, and Non-Recovery Straight Line assets offer the Full
Month convention. The Full Month convention treats the asset as if placed in service on the first
day of the month. No depreciation is calculated for the last month of the asset's life or the month
the asset is sold. The Actual Month convention is used if the convention is N/A.
Depreciation Rate
Under MACRS, assets are depreciated using the straight line method, 200% declining balance
method or 150% declining balance method. Under the 200% declining balance method or 150%
declining balance method, a switch to the straight line method of depreciation is made in the year in
which the straight line method generates a larger depreciation deduction.
MACRS allows assets with a 3, 5, 7, and 10 year life to be depreciated using the 200% declining
balance, 150% declining balance, or straight line method. Assets with a 15 or 20 year life can be
depreciated using 150% declining balance or the straight line method. Assets with a 25, 27.5, 31.5,
39, or 50 year life can be depreciated only by using the straight line method.
The straight line depreciation method is the only depreciation method allowable under ADS.
Chapter 8 - Depreciation Computations • 187

For AMT depreciation purposes, the 150% declining balance method is used unless the straight line
depreciation method is used for federal tax purposes or bonus depreciation has been elected. In these
cases, the AMT depreciation is computed using the federal tax method. Effective for property placed
in service after 2015, AMT will use the depreciation method used for federal tax purposes on property
that qualifies for bonus depreciation even if the election out is made.
For ACE purposes, the straight line method prescribed under ADS is used for all assets placed in
service prior to 1994. ACE depreciation for assets placed in service after 1993 is computed using the
method used for alternative minimum tax purposes.
Note: If the Financial book Compute Basis As... field in Book Setup is set to None, then the
default depreciation method for financial purposes is the straight line method.
MACRS Tables Method
In computing depreciation under the MACRS tables method, depreciation is computed by multiplying
the depreciable basis by the applicable percentage. These percentages are derived from IRS-
prepared depreciation tables that can be found in IRS Publication 946.
The depreciable basis is computed as cost minus Section 179 expense, ITC basis reduction, and
Section 168(k) bonus depreciation.
MACRS Calculated Method
Under the MACRS calculated method, depreciation is calculated by dividing the depreciable asset's
basis by the asset's life. This amount is multiplied by the applicable declining balance percentage,
such as 150%, or 200%.
A switch to the straight line method of depreciation is made in the year in which straight line method
generates a larger depreciation deduction.
The depreciable basis is computed as cost minus Section 179 expense, ITC basis reduction, Section
168(k) bonus depreciation, and accumulated depreciation.
Pre-ACRS, Financial or Book Depreciation Methods
Assets placed in service before January 1, 1981, generally are depreciated using pre-ACRS methods
for federal tax purposes. These depreciation methods are also applicable for financial or book
purposes. These methods include declining balance method, nonrecovery straight line method, sum
of the years digits method, and the units of production method.
Declining Balance Method
Under the declining balance method, the amount of depreciation for each year is subtracted from the
basis of the property (determined without regard to salvage value). This amount is multiplied by a
uniform rate that is 200%, 150% or 125% of the straight line rate. Depreciation can also be calculated
under the declining balance method where the method is switched to the straight line method when
the depreciation computed under the straight line method is greater.
Chapter 8 - Depreciation Computations • 188

Nonrecovery Straight Line Method
Depreciation is calculated under the nonrecovery straight line method by dividing the asset's cost by
the asset's life. This method provides a uniform depreciation amount throughout the asset's life.
Sum of the Year's Digits Method
The sum of the year digits method is similar to the declining balance depreciation method in that it is
an accelerated depreciation method. Depreciation is computed by reducing the asset's cost by its
salvage value and multiplying this cost by a fraction. The denominator of the fraction is the sum of the
numbers that represent the total life of the asset and the numerator corresponds to the remaining
useful life of the asset. The numerator is decreased each year while the denominator remains
constant.
Units of Production Method
Under the units of production method, depreciation is calculated by multiplying the cost by a fraction.
The numerator is the current period units produced and the denominator is the estimated total
number of units to be produced during the life of the asset. If this method is chosen, the total number
of units to be produced over the asset's life should be entered in the life box.
Alternative Minimum Tax (AMT), Adjusted Current Earnings (ACE)
The amount of depreciation calculated for regular tax purposes is the depreciation amount for ACE
purposes if the asset was placed in service prior to 1981 or if the units of production method is used to
compute regular tax depreciation.
For Alternative Minimum Tax purposes, the amount of regular tax depreciation in excess of the
amount computed using the straight line method is a tax preference item. This computation of the tax
preference item is done on an asset by asset basis. Depreciation for assets depreciated using the
units of production method is not considered a tax preference item.
Averaging Convention
The default convention for Financial depreciation purposes is an Actual month convention method
where depreciation is computed based on the number of months that the asset was placed in service
in the tax year. An asset placed in service in the first half of the month is deemed to have been placed
in service on the first day of the month. An asset placed in service in the second half of the month is
deemed to have been placed in service on the first day of the following month.
Depreciation Methods Not Calculated
CCH ProSystem
fx
Fixed Assets does not calculate depreciation expense on assets using one of the
following property types:
Foreign Property - Outside U.S.
Land
Qualified Lease Property
Chapter 8 - Depreciation Computations • 189

Tax Exempt Obligations
Retirement-Repl-Betterment
The default method for these property types is
No Calc
. To calculate depreciation expense, the
method needs to be changed to something other than
Various
or
No Calc
.
Note:
No Calc.
is the only method available for Land.
Depreciation in the Year of Disposition
MACRS, ADS Assets
Depreciation is allowed in the year of disposition when the asset is disposed of prior to the end of its
recovery period. The depreciation deduction is determined by the date of disposition and the
applicable averaging convention.
Depreciation for property depreciated under a half year convention is based upon the depreciation
deduction that would have been allowed for the whole year but is reduced by fifty percent since the
asset was deemed to have been in service for half of the year of disposition. No depreciation is
allowed if an asset is placed in service and disposed of in the same tax year.
Depreciation for property depreciated using a mid-quarter convention is based upon the depreciation
deduction that would have been allowed for the whole year. This is prorated based on the number of
months the asset was in service in the year of disposition. Under this convention, the asset is deemed
to have been disposed of in the middle of the quarter in which the disposition date falls. No
depreciation is allowed if an asset is placed in service and disposed of in the same tax year.
Depreciation for property depreciated under a mid-month convention is based upon the depreciation
deduction that would have been allowed for the whole year but prorated based on the number of
months in the year the asset was in service. The asset is deemed to have been in service for half of
the month in which the disposition occurred.
ACRS Assets
No depreciation is allowed in the year of disposition of ACRS personal property. ACRS real property is
allowed a depreciation deduction in the year of disposal. Depending on the convention used, ACRS
real property is either subjected to a mid-month convention or else no depreciation is allowed for the
month of disposition.
Financial Depreciation Purposes
The default convention for Financial depreciation purposes is an Actual month convention method
where depreciation is computed based on the number of months that the asset was in service for the
tax year. An asset disposed of in the first half of the month is deemed to have been disposed on the
first day of the month. An asset disposition occurring in the second half of the month is deemed to
have occurred on the first day of the following month. The annual depreciation deduction is prorated
for the year of disposition, based on the number of months the asset was deemed to have been in
service.
Chapter 8 - Depreciation Computations • 190

Like-Kind Exchanges
Like-Kind Exchange Computation
Like-kind exchanges allow the deferral of gains/losses on the disposition of an asset until the like
property, the continuation asset, is sold. The continuation asset will take up depreciation calculations
where the disposed asset left off as of the date of exchange. This treatment will allow the taxpayer to
combine the remaining basis of the asset traded in with the boot to arrive at the depreciable cost of a
single new asset with a date acquired matching the date of the exchange. If Reg. Sec. 1.168(i)-6t(I) is
not elected, the exchange will result in two assets on the books: the continuation asset and the boot
asset.
Note: Refer to the Like-kind exchange sections for how CCH ProSystem
fx
Fixed Assets handles
these transactions.
If the recovery method or depreciation method of the transferred asset is the same as the
replacement asset, the same method or same recovery period is used for the continuation asset. If
the replacement asset's life is longer than that of the transferred asset, the depreciation is calculated
using the longer asset life of the replacement asset. If the replacement asset's life is shorter than that
of the transferred asset, the depreciation is calculated using the longer life of the transferred asset.
If the depreciation method of the replacement asset is less accelerated than that of the transferred
asset, the depreciation on the continuation asset is calculated using the less accelerated method
starting at the time the replacement asset is deemed to have been placed in service by the taxpayer.
If the depreciation method of the replacement asset is more accelerated than that of the transferred
asset, the depreciation on the continuation asset is calculated using the less accelerated method that
had been used by the transferred asset starting at the time the replacement asset is deemed to have
been placed in service by the taxpayer.
As for convention, it appears that the longest convention possible is used. If the transferred asset is
depreciated using the mid-month convention, the continuation asset must be depreciated using the
mid-month convention even if the property would otherwise have been depreciated using the mid-
quarter or half year convention.
If the property acquired is normally depreciated using the mid-month convention, the continuation
asset must be depreciated using the mid-month convention, even if the asset that was transferred is
depreciated using the half year or mid-quarter convention. If the property transferred was subject to
the mid-quarter convention but is exchanged for property that would be depreciated using the half
year convention, the mid-quarter convention must be used to calculate the depreciation on the
continuation asset.
Chapter 8 - Depreciation Computations • 191
For example, assume that in Jan. 2005 an office building is acquired for $46,800. In July 2007, the
office building is traded for an apartment complex. As of the date of the exchange in July, the asset
has accumulated depreciation of $3,000 (1,150 + 1,200 + 650) and a remaining life of 36.5 years (39
yrs - 11.5 months - 12 - 6.5 months). Since the life of the transferred asset is longer than that of the
acquired asset, the apartment building is depreciated using the remaining 36.5 years and has $550 in
depreciation in 2007 (5.5 months of depreciation). As an alternative, the taxpayer can elect under
Reg. Sec. 1.168(i)-6t(I) not to apply this rule. If that election is made, the asset would be treated as a
27.5 year asset placed in service in July 2007 and the depreciation would have been $730. ((46,800 -
3,000) / 27 * 5.5/12).
Assume that a farmer owns a farm machinery shed that has a 20 yr. life and is depreciated using
150% MACRS and the half year convention. He bought the shed in 2005 for $46,800 and claimed
total depreciation of $5,133 on the shed for those two years. In March 2007, he trades the shed for an
office building with a life of 39 years. The 2007 depreciation on the shed is $1,555 (46,800 - 5,333)
/20 * 150% /2 = 1,555. Because under the half year convention, the machine shed was deemed to
have been sold on July 1, the office building is deemed to have been acquired on July 1. The machine
shed has used up three years of its life at that point (.5 yrs in 2005 + 1 yr. in 2006 + .5 yr in 2007).
Accordingly, the office building life of 39 years is reduced by three years to 36 years. The office
building is depreciated over a 36 year life using the mid-month convention and a date placed in
service on July 1. The depreciation on the office building is $508 (46,800 - 5,333 - 1,555) /36 * 5.5/12
=508.
Unless Reg. Sec. 1.168(i)-6t(I) treatment is elected, the boot portion of the asset is treated as if it is a
new asset that is placed in service in the year of replacement. The depreciation on the boot
component is depreciated using the applicable recovery period, depreciation method, and convention
that apply to the replacement property.
For example, assume that in Jan. 2005 an office building is acquired for $46,800. In April 2007, the
office building is traded for a farm machine shed and $1,000 cash is paid and a boot as well. The farm
machine shed has a 20 yr. life that is depreciated using 150% MACRS and the half year convention.
As of the date of the exchange in April, the asset had accumulated depreciation of $2,700 (1,150 +
1,200 + 350) and a remaining life of 36.75 years (39 yrs - 11.5 months - 12 - 3.5 months). Since the
life of the transferred asset is longer than that of the acquired asset, the continuation asset
component of the machine shed is depreciated using the remaining 36.75 years of life and will have
$850 in depreciation in 2003 (8.5 months of depreciation). The $1,000 of boot will be treated as a 20
year asset, depreciated using 150% MACRS, and a half year convention. The 2007 depreciation on
the boot will be $38 (1,000 /20 * 150%/2). The total depreciation would be $1,238 (350 + 850 + 38).
If the taxpayer elects under Reg. Sec. 1.168(i)-6t(I) not to apply this rule, the asset would be treated
as a 20 year asset placed in service in July 2007 and the depreciation would have been $2,041. 350 +
((46,800 - 2,700 + 1,000) / 20 * 150% /2).
Luxury Auto limits
For purposes of the following discussion, boot asset limitation means the luxury auto limit in effect for
the boot asset component. Transferred asset limitation means the luxury auto limit would have
applied to the auto that was the transferred asset. For example, a car is traded in on a new Sec.168
(k) asset in Dec. 2003, the boot asset limitation would be $10,710 and the transferred asset limitation
would be $4,900.
Chapter 8 - Depreciation Computations • 192
The calculations will have to be reversed in the following instances:
1.
First calculate the regular depreciation on the transferred asset, taking into account the luxury
auto limits and the applicable convention. For purposes of this computation, the luxury auto
limit that is applied is the lesser of the luxury auto limit that applies for the current year or the
year that pertains to the life of the transferred asset. For example, assume they have traded in a
car acquired in 2000 for a new car in Dec. 2003 that is Sec.168(k) property. The auto limit that
applies to the 2000 asset in its fourth year of life is $1,775 and the auto limit for yr. 1 of a Sec.
168(k) asset is $10,710. In this case, the depreciation on the transferred asset is limited to
$1,775.
If they exchange the auto prior to the end of the year, and acquire the replacement auto in a
different tax year, the auto limit for the applicable year is always used. For example, assume
that in the example above, they give up the car on Dec. 30, 2003, and they pick up the
replacement car on Jan. 2, 2004. In this case, the $1,775 limit is used regardless of what the
auto limit is for 2004.
2.
After you calculate the depreciation in step one, you calculate any bonus depreciation on the
transferred asset if applicable (note that this ordering rule is different than what was in the
original Reg. Sec. 1.168(k) and the example it contained). The IRS has revised that regulation
and its example so that it follows this computation. Change will be made to all like kind
exchange property not just one subject to the luxury auto limits. This bonus depreciation amount
is limited to the lesser of the lesser of (a) the bonus depreciation on the transferred asset or (b)
the boot asset limitation amount reduced by any normal depreciation claimed on the transferred
asset in step one.
3.
Claim the half year (or applicable mid-month convention) regular depreciation on the asset basis
that was transferred to the new asset. This amount is calculated on the transferred asset's
remaining basis, reduced by the depreciation computed in steps one and two. The amount is
limited to the lesser of (a) the depreciation calculated under this computation or (b) the smaller
of the boot asset limitation or transferred asset limitation reduced by the amounts claimed in
steps one and two.
4.
Claim any Sec. 179 expense on the boot asset. The Sec. 179 expense is limited to the lesser of
(a) the Sec. 179 expense elected on the boot asset or (b) the boot asset limitation amount
reduced by any depreciation calculated in steps one through three above.
5.
You claim the bonus depreciation on the boot asset. The bonus depreciation is limited to the
lesser of (a) the bonus depreciation computed on the boot asset or (b) the boot asset limitation
amount reduced by any depreciation and Sec. 179 expense calculated in steps one through four
above.
6.
You claim the normal depreciation on the boot asset. This amount is limited to the lesser of the
normal depreciation calculated or the boot asset limitation reduced by the deductions calculated
in the first five steps above.
Chapter 8 - Depreciation Computations • 193

The calculation of the bonus depreciation on the transferred asset has changed. For example,
assume in 2002 they placed in service a 5 yr. Sec. 168(k) property costing $10,000. It is depreciated
using 200% MACRS and a half year convention. In 2003, they trade it in for another five year asset
and $1,000 in cash. In 2002, they claimed total depreciation of $4,400 (3,000 bonus and $1,400 of
regular (7,000 /5 * 200% /2). Under the old regulations, they would have claimed bonus depreciation
on the boot asset of $2,800 (5,600 * 50%). The new method of calculating the bonus depreciation on
the continuation asset also applies to assets involved in a like kind exchange that are not subject to
the luxury auto limits.
Under the new rules, you would first calculate the depreciation on the transferred asset prior to the
exchange. In this case, under a half year convention it would be $1,120 (((10,000 - 3,000 - 1,400) *
40%) /2). The asset's basis would be reduced to $4,480. The bonus depreciation would be calculated
on the $4,480, giving them a bonus depreciation deduction of $2,240.
However, taxpayers can elect not to apply the new regulations. If they make such an election, the
depreciation on the transferred asset is calculated until the date of the transfer (taking into account
the applicable convention).The basis of the continuation asset and boot asset are treated as if it were
a new asset, depreciated using the new asset's life, method and convention, and deemed to have
been placed in service at the time of disposition. The election is made by the entity (taxpayer,
partnership, common parent of a consolidated group) that performed the exchange. A separate
election must be made for each like kind exchange. The election must be made by the return due date
(including extensions) of the taxpayer's federal return for the year in which the replacement property is
received. The election is made by printing on top of the Form4562 Election made under Sec.1.168
(i)-6T(I) or as otherwise required in the Form4562 instructions.
Section 179 Expense
Section 179 Expense Computation
The maximum annual Section 179 expense deduction for various tax years can be found in the table
below:
Tax Year Beginning in Sec. 179 Expense Limit Investment Limit
2000 $20,000 $200,000
2001 or 2002 $24,000 $200,000
2003 $100,000 $400,000
2004 $102,000 $410,000
2005 $105,000 $420,000
2006 $108,000 $430,000
Chapter 8 - Depreciation Computations • 194

Tax Year Beginning in Sec. 179 Expense Limit Investment Limit
2007 $125,000 $500,000
2008 $250,000 $800,000
2009 $250,000 $800,000
2010 - 2015 $500,000 $2,000,000
2016* $500,000 $2,010,000
*Section 179 Expense and Investment limits are adjusted for inflation starting in 2016.
Section 179 expense is not allowed for an asset unless the asset's depreciation method is a MACRS
or ADS depreciation method and the asset's life is not that associated with real property (for example,
27.5, 31.5, 39, 40, or 50 years).
Notes:
The H.R.2. Act provides an exception that allows Section 179 expenses for off-the-shelf
computer software that does not qualify under the MACRS/ADS rule made permanent by Path
Act of 2015.
The H.R.5297 Act provides an exception that allows Section 179 expensing of Qualified Real
Property, up to $250,000 in 2010 and 2011.
The H.R. 8 Act provides an exception that allows Section 179 expensing of Qualified Real
Property, up to $250,000 in 2012 and 2013.
The H.R. 5771 Act provides an exception that allows Section 179 expensing of Qualified Real
Property, up to $250,000 in 2014.
The PATH Act of 2015 provides an exception that allows Section 179 expensing of Qualified
Real Property, up to $250,000 in 2015 and up to the full expense limit in 2016+.
The Section 179 expense deduction is subject to the following limitations.
Dollar Limitation
The maximum amount of allowable Section 179 expense is reduced by the cost of qualifying property
placed in service in the tax year that exceeds the year's Section 179 investment limit
($2,000,000 for tax year 2015). CCH ProSystem
fx
Fixed Assets performs this limitation
automatically. The cost of property placed in service in the current year that is depreciated under the
MACRS or ADS depreciation method and that has a life that is not 27.5, 31.5, 39, 40, or 50 years will
be considered Section 179 property and included in this computation.
Chapter 8 - Depreciation Computations • 195

Trade or Business Income Limitation
The Section 179 deduction is limited to the taxable income derived by the taxpayer from the active
conduct of any trade or business. The deduction disallowed under this limitation can be carried
forward. CCH ProSystem
fx
Fixed Assets performs this calculation if the trade or business income
limitation is entered on the
Section 179
tab of Client Properties.
Pennsylvania Section 179 Allocation
When the Federal Section 179 taken exceeds the PAlimit, the PASection 179 amounts will be
reallocated amongst the assets with a Federal Section 179 basis reduction. The method for these
assets will also be changed to MSL (MACRS Optional Straight-Line). This does not apply to
PACorporations.
Alternative Minimum Tax (AMT), Adjusted Current Earnings (ACE)
The amount of Section 179 expense deduction calculated for regular tax purposes is the allowable
Section 179 expense deduction for Alternative Minimum Tax purposes and Adjusted Current Earnings
purposes.
Section 179 Recapture
Business Use 50 Percent or Less
Section 179 expense must be recaptured when the business use falls to 50% or less for any year
during the asset's recovery period.
If the business use changes from last year, dropping to 50 percent or less, the difference between
Section 179 expense and the amount of depreciation that would have been claimed on the
Section179 deduction must be recaptured as ordinary income.
CCH ProSystem
fx
Fixed Assets calculates Section 179 recapture if Section 179 has been claimed
and the business use percentage has dropped to 50% or less during the asset's recovery period.
In the event that both Section 280F recapture and Section 179 recapture apply, the Section 280F
recapture rules are applied.
Below is an example of the Section 179 recapture computation.
Example:
Date in service 01/01/2010
Life 5 years
MACRS calc 200%
Sec. 179 elected $6000.00
Chapter 8 - Depreciation Computations • 196

100% business use until 2014 when it fell to 49%
The Sec. 179 recapture would be 1,389.31 (6000 - (1297 + 1998 + 9952 + (691.20 * .49))).
The recapture is computed taking into account the depreciation that could have been claimed the year
business use fell to 49%.
Section 280F Recapture
Business Use 50 Percent or Less
Listed property, for which the business use is 50% or less, cannot be depreciated using an accelerated
depreciation method.
If the business use changes from last year, dropping to 50 percent or less, or if a new asset's business
use is 50 percent or less, the straight line method is used to compute depreciation, regardless of the
selected method. The straight line method is applied over a recovery period of 5years for 3 year
property, 12 years for 5year property, and 25 years for 10year property for ACRS assets. For MACRS
property, the depreciation must be computed using the straight line depreciation method and the ADS
life.
If the business use falls to 50% or less in the current year and an accelerated depreciation method
was previously elected, the depreciation claimed previously that is in excess of the amount that would
have been allowed under the straight line depreciation method must be recaptured and reported as
income. Any Section 179 expense claimed is treated as additional depreciation for Section 280F
recapture purposes.
CCH ProSystem
fx
Fixed Assets calculates Section 280F recapture if the property type is "auto-
electric", "auto - listed" or "other listed property", the business use percentage has dropped to 50% or
less, and an accelerated ACRS or MACRS depreciation method has been used to compute
depreciation.
The following example shows the Section 280F recapture computation.
Example:
Cost 6,000
Date in service 01/01/2009
Life - MACRS 5 years
Life – ADS 5 years
MACRS calc 200%
Accum. Depr. 12/31/99 $4,272.00
100% business use until 2012 when business use fell to 49%
The depreciation under ADS straight line would be $600 for 2009, $1,200 for 2010, and $1,200 for
2011 for a total accumulated depreciation of $3,000.
Chapter 8 - Depreciation Computations • 197

Accum. Depr. 4,272
MACRS SL 3,000
Sec. 280 F recapture 1,272
Under Sec. 280F, the recapture is based on the amount of accumulated depreciation. They would be
entitled to $588 of depreciation in 2012 (49% * 1,200).
Section 280F recapture is not calculated for financial depreciation purposes.
Electric Auto Limitations
Section 280F(a)(1)(C) increases the luxury auto limits for the Section 179 expense deduction and
annual depreciation deductions for certain electric vehicles. These increased limits apply to electric
vehicles placed in service after August5, 1997, and before January1, 2007. These limits are further
reduced by the percentage of nonbusiness use of the asset. These limitations are prorated for short
tax years; however, no proration or other reduction is required in these limits in the asset's year of
acquisition or disposal. If the property type is an electric auto, CCH ProSystem
fx
Fixed Assets
automatically performs this limitation. The limits are also based on the date the electric vehicle was
placed in service.
If the additional depreciation allowed under Sec. 168(k) is claimed for the electric vehicle, the luxury
auto limits of Sec. 280F are increased by $13,800; $22,950 for assets acquired after May5, 2003.
This increase only applies to the first year that the asset is placed in service.
The following table shows the electric auto depreciation limits used by CCH ProSystem
fx
Fixed
Assets.
For Cars Placed in Service Depreciation Allowable in
After but Before Year Year Year Year
1 2 3 4
12/31/05 1/1/07 $8,980 $14,400 $8,650 $5,225
12/31/04 1/1/06 $8,880 $14,200 $8,450 $5,125
12/31/03 1/1/05 $8,880 $14,300 $8,550 $5,125
5/5/03 1/1/04 $9,080 $14,600 $8,750 $5,225
12/31/02 5/6/03 $9,080 $14,600 $8,750 $5,225
12/31/01 1/1/03 $9,180 $14,700 $8,750 $5,325
12/31/99 1/1/01 $9,280 $14,800 $8,850 $5,325
Chapter 8 - Depreciation Computations • 198

For Cars Placed in Service Depreciation Allowable in
12/31/98 1/1/00 $9,280 $14,900 $8,950 $5,325
12/31/97 1/1/99 $9,380 $15,000 $8,950 $5,425
8/5/97 1/1/98 $9,480 $15,100 $9,050 $5,425
Luxury Auto Limitations
Section 280F limits the Section 179 expense deduction and annual depreciation deductions for
certain vehicles. These limits are further reduced by the percentage of nonbusiness use of the asset.
These limitations are prorated for short tax years; however, no proration or other reduction is required
in these limits in the asset's year of acquisition or disposal. If the property type is a listed auto, CCH
ProSystem
fx
Fixed Assets automatically performs this limitation. The limits are also based on the
date the luxury auto was placed in service.
If the additional depreciation allowed under Sec. 168(k) is claimed for the vehicle, the luxury auto
limits of Sec. 280F are increased (by $4,600 for assets acquired prior to 5/6/2003; $7,650 for assets
acquired after 5/5/2003 and prior to 01/01/2005; $8,000 for assets acquired in 2008 through 2014).
This increase applies only to the first year that the asset is placed in service. These increases are not
prorated for short tax years.
Special Handling for NYCand MD: The Section 280F limits apply to all SUVs regardless of weight.
The default NYC deduction is based on the Section 280F limits that would apply if the SUVwere a
truck or van. The NYClimitations apply to SUVs acquired on or after January 1, 2004, regardless of
when the assetwas placed in service. Type of SUV options are available to calculate limits based on
truck, or auto limits, or no limits if Eligible Farmer. Eligible Farmer does not apply to MD.
Luxury Auto Depreciation Limits used by CCH ProSystem
fx
Fixed Assets
For Cars Placed in Service Depreciation Allowable in
After but Before Year Year Year Year
1 2 3 4+
12/31/11 1/1/17 $3,160 $5,100 $3,050 $1,875
12/31/09 1/1/12 $3,060 $4,900 $2,950 $1,775
12/31/07 1/1/10 $2,960 $4,800 $2,850 $1,775
12/31/06 1/1/08 $3,060 $4,900 $2,850 $1,775
Chapter 8 - Depreciation Computations • 199

For Cars Placed in Service Depreciation Allowable in
12/31/05 1/1/07 $2,960 $4,800 $2,850 $1,775
12/31/04 1/1/06 $2,960 $4,700 $2,850 $1,675
12/31/03 1/1/05 $3,060 $4,800 $2,850 $1,675
12/31/99 1/1/04 $3,060 $4,900 $2,950 $1,775
12/31/98 1/1/00 $3,060 $5,000 $2,950 $1,775
12/31/97 1/1/99 $3,160 $5,000 $2,950 $1,775
12/31/96 1/1/98 $3,160 $5,000 $3,050 $1,775
12/31/95 1/1/97 $3,060 $4,900 $2,950 $1,775
12/31/94 1/1/96 $3,060 $4,900 $2,950 $1,775
12/31/93 1/1/95 $2,960 $4,700 $2,850 $1,675
12/31/92 1/1/94 $2,860 $4,600 $2,750 $1,675
12/31/91 1/1/93 $2,760 $4,400 $2,650 $1,575
12/31/90 1/1/92 $2,660 $4,300 $2,550 $1,575
12/31/88 1/1/91 $2,660 $4,200 $2,550 $1,475
12/31/86 1/1/89 $2,560 $4,100 $2,450 $1,475
4/2/85 1/1/87 $3,200 $4,800 $4,800 $4,800
12/31/84 4/3/85 $4,100 $6,200 $6,200 $6,200
6/18/84 1/1/85 $4,000 $6,000 $6,000 $6,000
6/19/84 and earlier None None None None
Truck/Van Depreciation Limits used by CCH ProSystem
fx
Fixed Assets
For Trucks/Vans Placed in Service Depreciation Allowable in
After but Before Year Year Year Year
Chapter 8 - Depreciation Computations • 200

For Trucks/Vans Placed in Service Depreciation Allowable in
1 2 3 4+
12/31/15 1/1/17 $3,560 $5,700 $3,350 $2,075
12/31/14 1/1/16 $3,460 $5,600 $3,350 $1,975
12/31/13 1/1/15 $3,460 $5,500 $3,350 $1,975
12/31/12 1/1/14 $3,360 $5,400 $3,250 $1,975
12/31/11 1/1/13 $3,360 $5,300 $3,150 $1,875
12/31/10 1/1/12 $3,260 $5,200 $3,150 $1,875
12/31/09 1/1/11 $3,160 $5,100 $3,050 $1,875
12/31/08 1/1/10 $3,060 $4,900 $2,950 $1,775
12/31/07 1/1/09 $3,160 $5,100 $3,050 $1,875
12/31/06 1/1/08 $3,260 $5,200 $3,050 $1,875
12/31/04 1/1/07 $3,260 $5,200 $3,150 $1,875
12/31/03 1/1/05 $3,260 $5,300 $3,150 $1,875
12/31/02 1/1/04 $3,360 $5,400 $3,250 $1,975
Empowerment Zone Property
The Section 179 expense limits for property placed in service in an Empowerment Zone are increased
over the limits that would otherwise apply. The normal Section 179 expense limit is increased by the
lesser of $20,000 through 2001, $35,000 after 2001 or the cost of Section 179 property placed in
service in the year that is qualified zone property.
The maximum amount of allowable Empowerment Zone Section 179 expense deduction is reduced
by the cost of qualifying property placed in service in the tax year that exceeds the year's Section179
investment limit ($2,000,000 for tax year 2015). In computing this cost limitation, the full cost of non-
Empowerment Zone Sec.179 property and only one half of the cost of Empowerment Zone
Section179 property is used.
The deduction is also limited to the taxable income derived by the taxpayer from the active conduct of
any trade or business.
Chapter 8 - Depreciation Computations • 201

To indicate that the property qualifies for the specialized handling of Section 179 for Empowerment
Zone Property enter "Empowerment Zone Property" in the
Additional Property Type
field.
New York Liberty Zone Property
The Section 179 expense limits for property placed in service in the New York Liberty Zone are
increased by the lesser of $35,000 or the amount of Section 179 property that is qualified New York
Liberty Zone property. The additional deduction ends with property placed in service after 2006.
The maximum amount of allowable New York Liberty Zone Section 179 expense deduction is reduced
by the cost of qualifying property placed in service in the tax year that exceeds the year's Section 179
investment limit ($560,000 for tax year 2012). In computing this cost limitation the full cost of Non-
Empowerment Zone Sec. 179 property and only half of the cost New York Liberty Zone Section 179
property and half of the cost of Empowerment Zone Section property is used. The deduction is limited
to the taxable income derived by the taxpayer from the active conduct of any trade or business.
Disaster Zone Property
The Code Sec. 179 allowance may be claimed on Disaster Zone property that is also Section 179
property. The law increases the Section 179 dollar limitation on Section 179 Disaster Zone property by
an additional $100,000 and the investment limitation by an additional $600,000 (Code Sec.1400N
(e)).
Retail Motor Fuels Outlet Property
Section 1250 property, which is a retail motor fuels outlet, can be considered 15 year property for
MACRS depreciation purposes. Under the ADS system, the asset would have a 20 year life.
To indicate that the property is retail motor fuels outlet property, select Retail Motor Fuels Outlet
Property from the
Type of Property
field.
Tax Credits
In many instances where a taxpayer claims a business or investment credit, the asset's basis must be
reduced by the amount of the credit claimed.
Credit Summary
The following table summarizes the various credit percentages for which CCH ProSystem
fx
Fixed
Assets performs an automatic basis adjustment.
Advanced coal integrated gasification 20% credit rate increased to 30% after 10/3/08
Advanced coal other technologies credit 15% credit rate increased to 30% after 10/3/08
Chapter 8 - Depreciation Computations • 202
Alternative fuel refueling credit 30% credit rate increased to 50% for 2009 and 2010
Alternative motor vehicle conversion kits 10% credit rate after 2/17/09
Certified historic structures 20% credit rate
Combined heat and power systems credit 10% credit rate
Disabled access credit 50% credit rate
Electric vehicle credit 10% credit rate
Enhanced oil recovery (Form 8830) 15% credit rate
Gasification project credit 20% credit rate
Geothermal equipment 10% credit rate
Geothermal heat pump systems 10% credit rate
Hydrogen refueling property 30% credit rate
Investment in advanced energy facilities 30% credit rate after 2/17/09
Microturbine property credit 10% credit rate
Plug-in vehicle 10% credit rate after 2/17/09
Reforestation (timber) 10% credit rate
Regular investment credit 6.5% credit rate
Rehabilitation of pre-1936 buildings 10% credit rate
Small wind property 30% credit rate
Solar energy equipment 30% credit rate
Transition property 30 year buildings 10% credit rate
Transition property 40 year buildings 13% credit rate
Transition property historic buildings 25% credit rate
Chapter 8 - Depreciation Computations • 203
