
1
Table of Contents
Expert TA: Student Registration Instructions .......................................................................................................................... 2
Step 1: Enter your registration link into your browser ...................................................................................................... 2
Step 2: Enter your email ..................................................................................................................................................... 2
Step 3: Choose a password or Enter your Password .......................................................................................................... 2
Step 4: Update your User Profile ....................................................................................................................................... 3
Step 5: Payment .................................................................................................................................................................. 3
14-Day Free Trial ............................................................................................................................................................. 4
Payment with Credit Card ............................................................................................................................................... 4
Payment with Access Code ............................................................................................................................................. 5
Step 6: Begin using Expert TA ............................................................................................................................................. 5
Logging In ................................................................................................................................................................................ 6
Class Management .................................................................................................................................................................. 7
Taking an Assignment ......................................................................................................................................................... 8
Question Types ............................................................................................................................................................... 8
Interacting with the Palette .......................................................................................................................................... 22
Submitting Answers ...................................................................................................................................................... 24
Hints .............................................................................................................................................................................. 24
Correct and Incorrect Notifications .............................................................................................................................. 24
Saved Answers .............................................................................................................................................................. 26
Assignment Status ......................................................................................................................................................... 26
Feedback ....................................................................................................................................................................... 27
Grade Summary and Submissions................................................................................................................................. 28
Taking an Assignment with Respondus Lockdown Browser ......................................................................................... 29
View Printable Assignment ............................................................................................................................................... 30
View Grade Report (shows your detailed work) ............................................................................................................... 31
View Grades (Spreadsheet) ............................................................................................................................................... 32
View Assignment Solutions ............................................................................................................................................... 32
Take in Practice Mode ....................................................................................................................................................... 34
View/Manage Class Grades .................................................................................................................................................. 35
Student Practice Area ........................................................................................................................................................... 36
Tips for Using Expert TA with LMS (Canvas, Blackboard, Moodle, D2L, etc.) ....................................................................... 42
Registration and Payment ................................................................................................................................................. 42
Expert TA is asking you to pay again ................................................................................................................................. 42
Grade is not syncing up with LMS ..................................................................................................................................... 43
Other Error Messages ....................................................................................................................................................... 43

2
Expert TA: Student Registration Instructions
Step 1: Enter your registration link into your browser
Your instructor will provide you with a registration link that looks similar to this: http://goeta.link/DEI56MO-82F156-I
Enter the link into your browser and you will see the registration screen,
see Figure 1. Check to see that your Class and Class Description match the
class you are registering for. Note: This step applies to both first-time
registrations and returning users registering for a new class.
Step 2: Enter your email
At the bottom of this registration screen, Figure 1, you are asked to enter
your email. Your email will serve as your username, so please remember
which email address you use. You will only be able to log into Expert TA
with the exact email you register with. Confirm your email address and
click the Continue button to move on to the next step.
Step 3: Choose a password or Enter your Password
After entering your username (your email address), Expert TA will
check to see if you have an account in the system.
• If you have previously registered with Expert TA before, the
system will recognize your email and you will be prompted
to enter your password, see Figure 2.
• If this is your first time registering with Expert TA, the
system will likely not find a match for your email and you
will be asked to choose a password and confirm your
password, see Figure 3.
Your password must be at least 7 characters in length, and we
recommend including a mixture of upper-case and lower-case
letters, numbers, and at least one special character (ex: #, !, $, etc.).
Click the Continue button to move on to the next step.
Figure 1: Registration Page
Figure 2: Enter Your Password
Figure 3: Choose Your Password

3
Step 4: Update your User Profile
The next screen, Figure 4, contains your user profile information.
Your First Name and Last Name are required fields. Your school
may also require you to enter your Student ID. If this field is
required, enter your student ID number provided by your school.
Please take care while entering your student ID number as your
instructor needs this to keep grades organized across sections.
Note: If you have registered for an Expert TA class before, this
information will already be filled in for you, but you are free to
make changes, if needed. Your instructor may have set up your
class with sections. If available, open the Section drop-down and
select your section from the list.
Lastly, read through the Terms of Service Agreement and then
check the checkbox. By checking the checkbox, you are saying
that you have read, accept, and agree to the Terms of Service
Agreement. When you are finished, click on the Continue button
to complete your registration and move on to the payment
screen.
Step 5: Payment
The next screen you see is the payment screen, shown in Figure 5.
Note: You will not be able to do homework until you start the 14-Day Trial or complete the payment process.
First, click the checkbox next to your class and
then select one of the following options:
A: 14-Day Trial – Expert TA offers a free 14-day
trial for each class. See 14-Day Free Trial below
for additional details
B: Credit Card – This will take you to a secure
cart where you can complete your purchase with
a credit card. See Payment with Credit Card
below for additional details.
C: Access Code – Access codes can be purchased
at your bookstore, if available. See Payment
with Access Code below for additional details.
Figure 4: Update User Profile
Figure 5: Payment Screen

4
14-Day Free Trial
If you select the 14-Day Trial option, you will be taken to your class. The payment screen will appear again in 14 days
where you will then be required to pay with a credit card or with an access code to continue with your class. You can
pay anytime by clicking on the blue words Upgrade to Full Version at the top of your screen after you log in (Figure 6).
Note: If you see Shopping Cart instead of Upgrade to Full Version, like in Figure 7, you have not paid for your class.
Click on Shopping Cart to go to the payment screen where you can pay for your class with a credit card or access code.
Payment with Credit Card
If you are paying with a credit card, you will click on the Credit Card button on the payment screen, Figure 5 above, and
you will be taken to a secure cart to check-out.
Note: For your security Expert TA never takes your credit card information and does not handle the transaction directly.
The secure cart is run by Authorize.net which is an
industry leader in secure payments and used by tens of
thousands of companies. Figure 8 is an example of what
the secure cart for processing credit card transactions
looks like.
Note: The amount displayed could be different depending
on the cost for your class.
All fields are required except for a Phone Number. Pay
careful attention when entering your address
information. This information must match the billing
information on file with your card’s financial institution
(this is normally your permanent address and not your
dorm address). If the zip code entered here does not
match, the transaction will not process. This is a security
measure to prevent unauthorized purchases in the event of theft.
Figure 8: Secure Cart for Credit Card Transaction
Figure 6: Upgrade to Full Version
Figure 7: Shopping Cart

5
Payment with Access Code
If you purchased an access code from
your bookstore, click on the Access Code
button and you will see 4 boxes in which
to enter the code you purchased (Figure
9). Access codes are 16 characters long
and contain a combination of numbers
and letters in 4 groups of 4 characters.
When you are finished entering your
code, click Submit to begin using Expert
TA. If a message appears stating “You
have entered an invalid access code”, try
entering your code again. If you continue
to have trouble entering your code,
contact support@theexpertta.com.
Note: Some of the characters are easily mistaken for one another (ex: 1, I, 0, O), so pay careful attention when
entering your code.
Step 6: Begin using Expert TA
When you have completed your payment, you will be directed to the Class Management screen where you can begin
working on your class assignments.
Figure 9: Payment with Access Code

6
Logging In
From the Expert TA home website, https://theexpertta.com/ , click on Log In near the top right corner of the screen.
This will take you to the log in window in Figure 10.
The Expert TA uses a two-step login process. On the first screen enter
your username or email address associated with your account and click
the Next button.
Note: If you enter the incorrect username, you will see a message
“There is no account associated with the user name you entered. Please
ensure you are entering the full email address that you used to register
for Expert TA”.
On the next screen, shown in Figure 11 to the left, enter
your password and click the Next button. This will take
you to the main Class Management page shown in
Figure 13.
If you have entered the wrong user name or need to log
in as a different user, click on the blue words Login in
with a different account.
If you happen to have forgotten your password, click on the
blue words Request Password Reset Email and you will be
presented with a password reset screen, see Figure 12. Simply
enter your username and then click on the Request Reset
button. You will receive an email with a link to reset/change
your password.
Note: If your user name is not a functioning email or you do not
have access to the email, please contact us at
support@theexpertta.com for help resetting your password.
To exit from this screen without requesting a new password, use the back arrow key on your browser.
Figure 10: Enter User Name
Figure 11: Enter Password
Figure 12: Request Password Reset

7
Class Management
When you first log in, you will be taken to the Class Management page, seen in Figure 13Error! Reference source not f
ound. below. This page contains five main features:
• Classes – If you ever register for another class you may need to select it by opening this drop-down menu.
• Class Menu – This menu contains options like View/Manage Class Grades and Student Practice Area which will
be discussed later in this document.
• Additional Class Resources – This area contains clickable links to any additional resources that your instructor
added for your class, if available.
• Assignments – This area contains assignments your instructor has created for your class.
• Class News – This area contains any news announcements your instructor posts for your class.
Figure 13: Class Management Page

8
Taking an Assignment
To take an assignment you can either left click on the
assignment name or the down arrow to the left of the
assignment name (Figure 14) to open the Assignment
Menu. Then select Take Assignment (Figure 15) which
will take you to the first problem in the assignment.
Question Types
There are several different types of questions in the Expert TA system. Below are descriptions of the problem types and
how they function.
Multiple Choice
In this question type you will choose the single the best answer from the selection of words or pictures by selecting the
radio button next to your choice (Figure 16).
True or False
In this question type you will read the statement provided, decide if the statement is true or false, and then select the
radio button next to True or False to indicate your choice (Figure 17).
Figure 14:Click on the
Assignment Name
Figure 15: Select Take Assignment
Figure 16: Multiple Choice
Figure 17: True or False

9
Multiple Select
This question type is like multiple choice, where the options are either text or images, but the correct answer may
involve selecting more than one of the choices. In Figure 18, you are asked which shapes appear in the image and to
select all the answers that apply. There were four choices provided but only three answered the question correctly.
Advanced Essay
In this question type you will write a short essay to answer the question to the left and then illustrate your answer by
drawing in the canvas to the right using the Tool Selection drop-down menu. If you make a mistake in your drawing,
click on Clear Canvas to start over (Figure 19).
Note: Clear Canvas will not clear any text entered in the essay area; only the drawing area.
Figure 18: Multiple Select
Figure 19: Advanced Essay

10
Short Answer
This question type is an essay formatted answer with limited characters. Type your answer into the space provided.
There is a maximum limit of 3000 characters for your answer. There is a character counter above the space provided for
your answer to help you keep track of the characters in your answer (Figure 20).
Ranking Drag-and-Drop
In a Ranking Drag-and-Drop problem, you are ordering the answers provided. Figure 21 shows an example of a ranking
drag-and-drop question where you are asked to place the items in order from smallest to largest.
Figure 20: Short Answer
Figure 21: Ranking Drag-and-Drop Part 1

11
To drag an answer box, click and hold the left mouse button. As you drag the answer box, you will see a dotted line
indicating where the answer box will be placed when dropped. Release the left mouse button to drop your answer into
the bucket. In Figure 22, you can see the one of the items being dragged into the answer area.
In Figure 23 below, you can see the completed answer.
Figure 22: Ranking Drag-and-Drop Part 2
Figure 23: Ranking Drag-and-Drop Part 3

12
Matching Drag-and-Drop
In this type of problem, you are matching a label to the missing parts of the figure. Figure 24 is an example of a
matching drag-and-drop problem.
Figure 25 is partially completed. As you drag your item, you will see a dotted line which indicates where the item will be
placed when dropped. Release the left mouse button to drop the label in the figure.
Figure 24: Matching Drag-and-Drop Part 1

13
Figure 25: Matching Drag-and-Drop Part 2

14
In Figure 26, you can see the completed figure and all the labels were used. Keep in mind that this may not always be
the case and you may have extra labels in some problems.
Fill in the Blank Drag-and-Drop
In this type of problem, you will fill in the missing words in the paragraph. Figure 27 is an example of a Fill in the Blank
Drag-and-Drop problem. In this example, you will use the figure to help you complete the missing words in the
paragraph.
Figure 26: Matching Drag-and-Drop Part 3
Figure 27: Fill in the Blank Drag-and-Drop Part 1

15
As you drag your item, you will see a dotted line which indicates where the item will be placed when dropped (Figure
28). Release the left mouse button to drop the answer into the appropriate blank to complete your answer.
In Figure 29, you can see the completed answer. Notice that not all of the items were used to complete this answer.
The problem instructions also stated that you would not use all of the available items.
Figure 28: Fill in the Blank Drag-and-Drop Part 2
Figure 29: Fill in the Blank Drag-and-Drop Part 3

16
Sorting Drag-and-Drop
In this type of problem, you are sorting the items provided into groups. Also, the order in which items are placed in the
groups will not matter for this type of problem. Figure 30 is an example of a sorting drag-and-drop problem. Notice the
instructions state that we will not use all the labels.
As you drag your item, you will see a dotted line which indicates where the item will be placed when dropped (Figure
31). Release the left mouse button to drop the item.
Note: Buckets generally hold three to five answers, and each bucket may not receive the same number of answers.
Figure 30: Sorting Drag-and-Drop Part 1
Figure 31: Sorting Drag-and-Drop Part 2

17
In Figure 32, you can see the completed answer. Notice again that all the items were not used to complete this answer.
Free Body Diagram
When working on a free body diagram problem, you will be presented with a problem statement and image, just like
many other problems in the Expert TA system. Below you will see the free body diagram drawing area with a silhouette
of the object and its surroundings (Figure 33).
Figure 32: Sorting Drag-and-Drop Part 3
Figure 33: Free Body Diagram Problem


19
Next, change the angle by dragging and dropping the vector. The vector will snap to all major axes, as well as 45-degree
intervals in between. If the vector is an arbitrary angle, an arc is drawn, and a symbolic angle is presented. You can also
change the angle by using the drop-down menu to the right, see Figure 36.
Next, use the drag and drop to lengthen or shorten each vector, as needed, to illustrate the force magnitude (Figure 37).
Figure 36: Change the Angle of the Force
Figure 37: Lengthen or Shorten each Vector

20
Lastly, your diagram must be proportionally accurate in both the x and y directions. In the bottom left-hand corner of
the diagram area, you can see sum of the x and y axes. If you see a 0 in the x or y axis, this means that the diagram is in
equilibrium (Figure 38). If you see a + (pos) in the x or y axis, this means that the diagram has a positive bias in that
direction. If you see a - (neg) in the x or y axis, this means that the diagram has a negative bias in that direction (Figure
39).
Note: Some problems will require the diagram to be in equilibrium, while others may require a bias in a given direction
to illustrate motion. Make sure to read the problem statement carefully to identify these scenarios.
Figure 38: Equilibrium
Figure 39: Negative Bias

22
Interacting with the Palette for more information. Expert TA counts mathematically equivalent answers as correct. For
example, if the answer to the question is y = x + 3, you can enter a non-simplified answer and still be counted correct,
like “3 + x” or “3 - x(-1)”. You can enter anything that calculates to the correct answer, and it will be graded as correct.
For example, if the correct answer is 11, you can enter 2 + 5 + 4 and it will be counted correct.
Numeric answers will be accepted that are within the +/- 3% of the correct answer or are correct within two significant
figures. You should not round results that are to be used in subsequent calculations. Any final numeric answer should
be entered with at least two significant figures. Take the following two calculations in Figure 40 for example:
For this particular problem, the correct answer is 0.7653. This means that in Case A, the answer is correct to within 2
significant figures. The answer is only -0.69% different than the correct answer and well within the accepted tolerance.
In Case B, 0.74 is not correct to within 2 significant figures. The answer is -3.31% different than the correct answer and
is outside the accepted tolerance.
This error occurred by mishandling significant figures in one step of the equation. To avoid mistakes such as this, we
recommend using the entry palette as a calculator or avoid rounding when calculating outside of the system.
Order of Operation is also something that you need to be careful about, particularly with division. For example, If the
correct answer to a problem is “y = a/(b + c)” but you enter the answer as “a/b + c”. Your answer would not be a correct
answer because the order of operations dictates that you first divide a by b, and then add c.
Lastly, you should read the problem statement and the question very carefully before attempting to answer. The
question may be asking for you to write an expression instead of solving an equation.
Figure 40: Example Problem Case A and Case B

23
Interacting with the Palette
Expert TA has a palette to help you enter expressions and also functions as a calculator when entering numerical
answers. The palette will also change, depending on the needs of the problem you are working with. To move the
cursor around you must use either the arrow keys on your keyboard or use the arrows in the palette (Figure 41).
Note: The answer field is NOT a text box.
The BACKSPACE and DELETE keys in the palette or on your keyboard will help you delete individual characters from the
answer field. You can also use the CLEAR button on the palette to clear everything from the answer field (Figure 42).
To enter an exponent in the answer field, use the up arrow with the carrot next to it (Figure 43), also known as
superscript.
Once you enter an exponent, the carrot with a down arrow will become available (Figure 44), also known as subscript.
Figure 41: Use the Arrows to Move the Cursor
Figure 42: Deleting Characters & Clearing the Answer Field
Figure 43: Superscript button for exponents
Figure 44: Subscript button

24
This button will take you out of superscript mode and return you to regular number entry in the answer field where you
can continue entering additional figures for your answer (Figure 45).
Warning: If you have any additional numbers or calculations that need to be entered AFTER an exponent, make sure you
use the subscript button first or your calculations will be part of the exponent and could cost you points on your
assignment for an incorrect answer (Figure 46).
Another thing to watch out for is to make sure you close all open parentheses. If you submit your answer without
closing all open parentheses, you will see an Incorrect Answer message, like (Figure 47). This submission will not count
against your submission attempts for the assignment and if you close your parenthesis, you will be able to submit your
answer.
Figure 45: Continue entering your answer
Figure 46: Additional figures added in superscript incorrectly
Figure 47: Incorrect Answer message

25
Submitting Answers
When you have finished entering your answer, click the Submit button at the bottom of the problem area, see ().
Hints
If your instructor has made hints available, you can access them by
pressing the Hint button located under the palette or choices, see
Figure 49. Expert TA structures hints based on a detailed analysis
of the areas of study where the students typically become
confused. Keep in mind that each hint may deduct a percent of your
grade as decided by the instructor. In Figure 49, you can see that
each hint is worth a 2% deduction, and there are a total of two hints
available. In Figure 50, you can see that 2 hints were accessed, the
student received a total hint deduction of 4%, and the Hint button is
no longer available (greyed out) because there are no hints
remaining.
Correct and Incorrect Notifications
When answering questions in Expert TA, the system may notify
you that your answer was Correct or Incorrect. This setting is
controlled by your instructor and may be disabled for certain
assignments, like quizzes and exams.
If this setting is enabled, the Correct Answer Notification and
Incorrect Answer Notification will look like the notifications in
Figure 51.
Figure 49: Hint Area - Unused
Figure 50: Hint Area - Used Example
Figure 48: Submit your answer
Figure 51: Correct and Incorrect Answer Notifications
26

27
Saved Answers
Some assignments, like quizzes or exams, may not tell you if an answer is Correct or
Incorrect. You will instead see that your Answer Saved Successfully when you click on the
Submit button (see Figure 52). This means the system has saved your answer and you
can continue to the next question or question part. Your saved answers will be graded all
at once after the due date for the assignment has passed.
Assignment Status
The Assignment Status area is located on the left-hand side of your assignment, under the Expert TA logo. It will show a
minimized view of your progress in an assignment where you can see how many problems there are in the assignment
and how many you have completed or partially completed. To see a detailed view of your Assignment Status, click on
the blue Click here for detailed view (Figure 53).
In the detailed view, Figure 54, you can
see your completed and incomplete
problem parts, navigate to any problem
part by clicking on it, and the color guide
in the top right-hand corner explaining
what the status of each problem part is.
Click on the blue Click here for minimized
view to exit the detailed view and return
to the minimized view. If you are working
on a timed assignment, like a quiz or an
exam, you can also see the Time
Remaining counting down in both the
minimized and the detailed views.
Figure 52: Answer Saved
Successfully
Figure 53: Assignment Status Minimized View
Figure 54: Assignment Status Detailed View

28
Feedback
If you submit an answer that was incorrect, you may be able to click the Feedback button. Feedback identifies specific
errors, explains what you did wrong, and reinforces the concepts taught in class. To access feedback, press the
Feedback button under the palette or choices (Figure 55).
Note: Feedback is not always available for every question and your instructor controls if access to feedback will be
allowed for the assignment.
You may receive a deduction for each feedback you access, as determined by the instructor, which is displayed under
the Feedback button (Figure 56). In the example below, you can see the incorrect answer given, the feedback that was
provided, and the student received a 2% deduction for that feedback.
Figure 56: Feedback Area
Figure 55: Feedback Button

29
Grade Summary and Submissions
They are located to the right side of your answer section in every assignment question. The Submissions section lets you
know how many attempts you have remaining for the question and how many percentage points will be deducted for
each attempt. Your Potential in the Grade Summary may decrease due to incorrect submissions and accessing Hints
and/or Feedback (Figure 57).
If you are late submitting your assignment and your instructor accepts late work, you will also see the late work penalty
and potential grade in the Grade Summary (Figure 58).
Figure 57: Grade Summary Area
Figure 58: Grade Summary Area with Late Work Deductions

30
Clicking on the blue detailed view will show the Submission History. The Submission History shows a time and date
stamp for each submission and any Hints and/or Feedback that was accessed (Figure 59). Click on the blue detailed
view again to hide the Submission History.
Taking an Assignment with Respondus Lockdown Browser
Your instructor may use Respondus Lockdown Browser for assignments like quizzes and exams. The screen in Figure 60
will be the first screen you see every time you open an assignment with Respondus Lockdown Browser enabled (even if
you have Respondus Lockdown Browser already installed). Follow the steps below to download, install, test, and launch
your assignment using Respondus Lockdown Browser.
1. Download the Respondus Lockdown Browser version that matches your operating system.
Note: If you have already downloaded and installed Respondus Lockdown browser, skip to step 3.
2. Install Respondus Lockdown Browser by opening and running the EXE file (Windows) or extract the files and run
(Mac).
3. Once the Respondus Lockdown browser is installed, click on Test Launch (see image above) to ensure that the
Respondus Lockdown browser is working correctly.
Note: If you have any trouble with this step, uninstall Respondus Lockdown browser and reinstall.
Figure 59: Submission History
Figure 60: Respondus Lockdown Browser Launch Screen

31
4. If you didn’t experience any trouble with the Test Launch in step 3, you can now open your assignment (Quiz or
Exam) by clicking Launch Exam (see Figure 60 above).
Your instructor also determines and controls the number of times you are allowed to enter your assignment. If you
exceed the max number of attempts to access the assignment, you will receive the following message:
“You have reached the max number of attempts; you can no longer continue accessing this assignment. You will
need to contact your instructor to re-open this assignment.”
As the message states, you will need to contact your instructor to let them know that you have reached your max
number of access attempts for your assignment.
View Printable Assignment
This assignment menu option allows you to view and/or print a blank copy of
your assignment to manually complete.
Note: This option may or may not be available based on your instructor’s
assignment preferences.
To access View Printable Assignment, click on the assignment and select
View Printable Assignment from the menu (Figure 61).
The next screen you will see is the printable assignment, which will look like Figure 62 below.
To exit the printable assignment screen, click on Class Management in the upper left-hand corner to return to the Class
Management screen.
Figure 61: Select View Printable Assignment
Figure 62: Printable Assignment Example

32
View Grade Report (shows your detailed work)
To view your grade report, click on the assignment and then selecting View Grade Report (shows your detailed work)
from the menu (Figure 63).
The next screen is your grade report for the assignment. This shows each answer you submitted, any hints or feedback
you received, any deductions you may have earned, and your grade for each problem or problem part (see example in
Figure 64). This report can be printed or saved to a PDF file, as needed, and directions vary depending on your browser.
Note: If you need additional instructions how to print or save your grade report, please see the help section of your
browser.
When you are finished with the grade report, click on Class Management in the upper left-hand corner to return to the
Class Management screen.
Figure 63: Select View Grade Report (shows your detailed work)
Figure 64: Grade Report Example
33
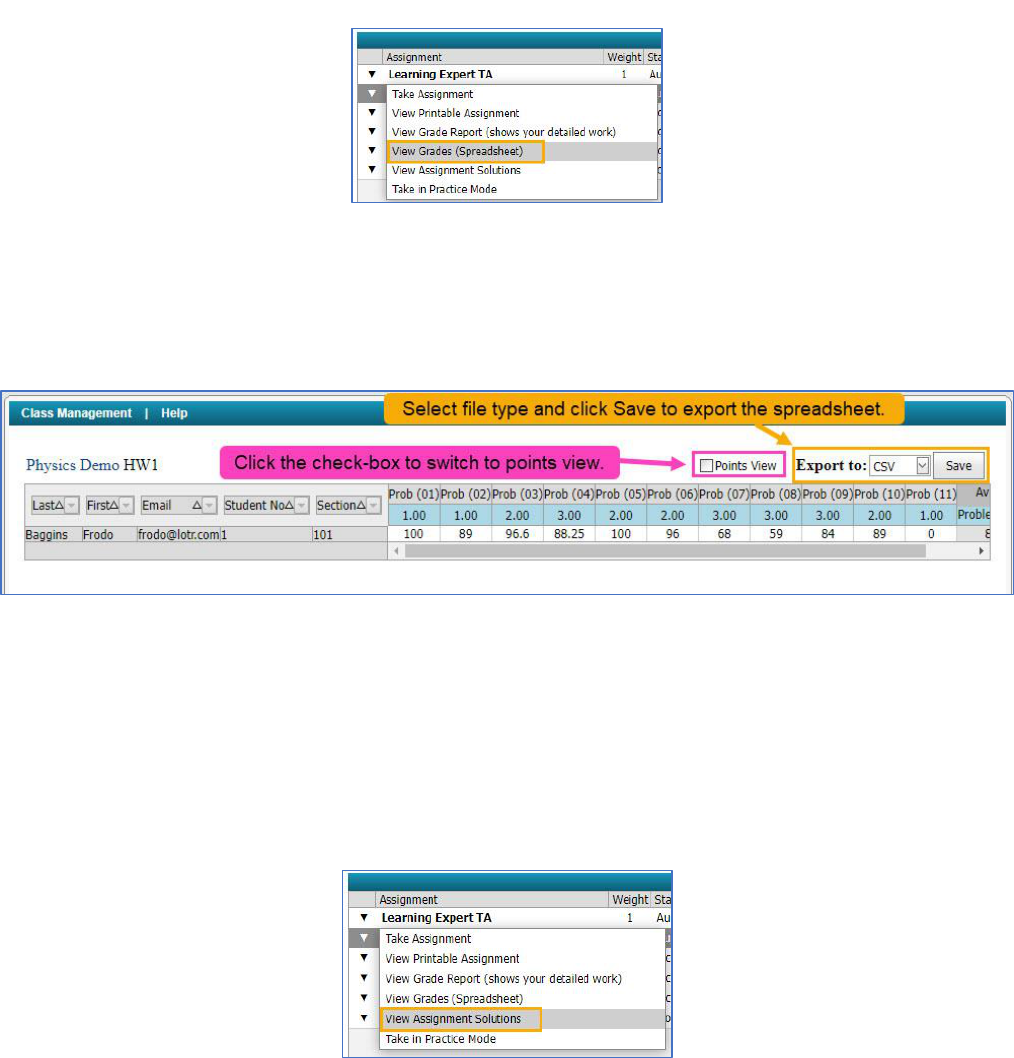
View Grades (Spreadsheet)
Grades for an assignment can also be viewed in a spreadsheet. To view your grades in a spreadsheet form, click on the
assignment and then select View Grades (Spreadsheet), as seen in Figure 65.
In the next screen, you can see your grade percentages for each problem and problem part (Figure 66). This view can be
changed from percentage to points view by clicking on the check-box next to Points View. The spreadsheet can also be
exported to another program, like Excel or Adobe, by selecting the file type from the drop-down menu and then clicking
the Save button.
When you are finished with the assignment grade spreadsheet, click on Class Management in the upper left-hand
corner of the screen to return to the Class Management screen.
View Assignment Solutions
To access the solutions to an assignment, click on the assignment and select View Assignment Solutions (Figure 67).
Note: This may or may not be available based on your instructor’s settings for the assignment.
Figure 65: Select View Grades (Spreadsheet)
Figure 66: Assignment Grade Spreadsheet Example
Figure 67: Select View Assignment Solutions

34
If the instructor has not enabled View Assignment Solutions for this assignment, you will see a new screen with a
warning “This assignment is not currently configured to allow viewing of solutions” (Figure 68). Click on Class
Management in the upper left-hand corner to exit this screen and return to the Class Management screen.
If your instructor has enabled View Assignment Solutions for this assignment, you will see a new screen with the full
solution worked out step by step (Figure 69). If the question has a random variable, the problem will use a different
random variable than you received in your assignment and the answer will be slightly different as a result. A basic
answer view is available by clicking on View Basic/Answers.
Figure 69: Full Solution View
Figure 68: View Assignment Solutions Not Enabled

35
The basic answer view shows the answer to the question without the detailed step by step (Figure 70). To switch back
to the full solution, click on View Full Solution.
To exit from either basic answer or full solution view, click on Class Management in the upper left-hand corner and you
will be returned to the Class Management screen.
Take in Practice Mode
Take in Practice Mode can be accessed by clicking on the assignment
and selecting Take in Practice Mode from the menu (Figure 71).
Note: Your instructor may or may not have enabled this feature for
one or more of your class assignments.
If Take in Practice Mode was not enabled for the assignment, you will see a message like the one in (Figure 72).
If Take in Practice Mode is enabled but is accessed before the start date or after the end date configured by your
instructor, you will receive a message like the one in (Figure 73). Practice mode is only available during the timeframe
set by your instructor.
Figure 70: Basic Answer View
Figure 71: Select Take in Practice Mode
Figure 72: Practice Mode is not enabled
Figure 73: Practice Mode start date and end date

36
If Take in Practice Mode is enabled and it is accessed during the timeframe set by your instructor, you will see your
assignment with Practice Mode in red in the upper left-hand corner (Figure 74). Practice mode functions exactly like
your regular assignment, except that it does not count toward or against your actual grade, and you can take it as many
times as you like during the designated timeframe set by your instructor.
To exit practice mode, click on Class Management in the upper left-hand corner to return to the Class Management
screen.
View/Manage Class Grades
You can view your class grades by clicking on the Class Menu drop-down on the Class Management screen and selecting
View/Manage Class Grades (Figure 75).
Figure 74: Practice Mode Assignment
Figure 75: Select View/Manage Class Grades

37
On the next screen, you will see your class grades (Figure 76). The assignment names in blue at the top.
You can click on the assignment names to view your grades for each individual problem and problem part in that
assignment, just like View Grade Report (shows your detailed work), see Figure 77.
Both the Class Grades and Assignment Grades can be exported by choosing the format from the drop-down next to
Export To and clicking the Save button. Both Class Grades and Assignment Grades can be changed from a percentage
view to Points View by clicking on the checkbox next to Points View. To exit either Class Grades or Assignment Grades
view, click on Class Management in the upper left-hand corner to return to the Class Management screen.
Student Practice Area
The Student Practice Area is set up for physics students only and allows for extra practice of difficult problems and
concepts. To access the Student Practice Area, click on the Class Menu drop-down on the Class Management screen
and select Student Practice Area, Figure 78.
Figure 76: View Class Grades
Figure 77: View Assignment Grades
Figure 78: Select Student Practice Area

38
Note: The Student Practice Area is only configured for physics. For other subjects, see Take in Practice Mode for
additional practice when available.
The next screen you will see looks like Figure 79.
The Expert TA: Introduction to Physics book will already be selected for you, but if another book is available, you can
select it by opening the drop-down menu under Books, Figure 80.
Next, select the chapter you want to practice with by clicking the down-arrow under Chapters, Figure 81.
Figure 79: Student Practice Area
Figure 80: Book Selection

39
Figure 81: Chapter Selection

40
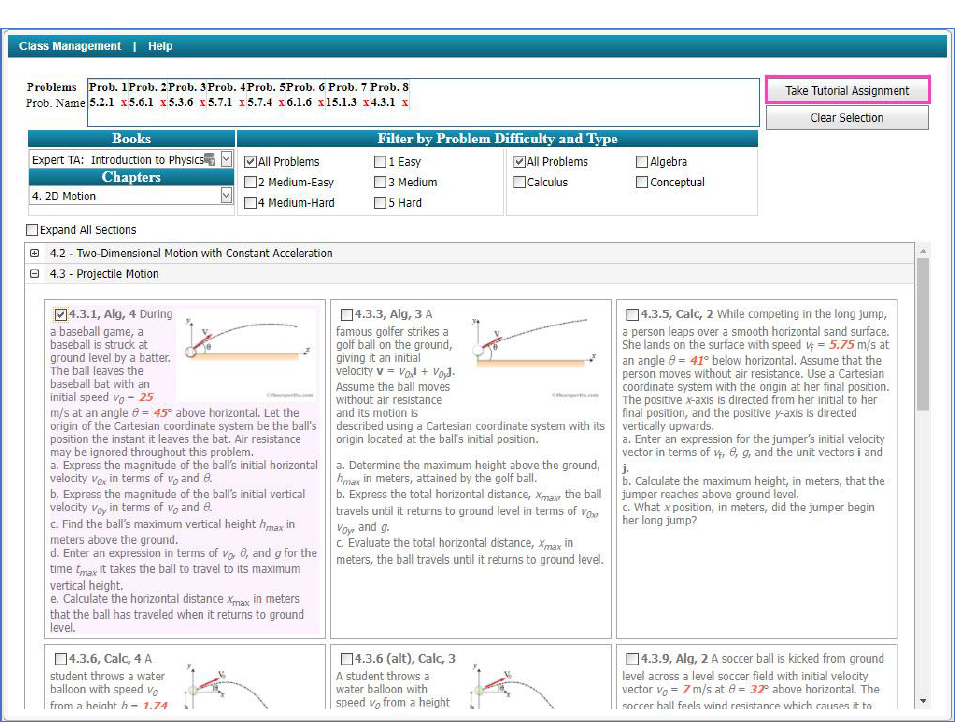
After selecting the chapter, you can select the problems you want to practice with, Figure 82. Click to expand the
sections or clicking on the check box next to Expand All Sections to expand all the sections at once. Click on to
collapse a section or uncheck the Expand All Sections box to collapse all sections at once. To select a problem, click on
the check box next to the problem name. As problems are selected for practice, they will appear in the Problems box
near the top of the Student Practice Area screen. Problems can be removed from the Problems box by clicking the
next to the problem name.
Figure 82: Expand Sections to Select Problems for Practice
41
You can add as many problems to your practice assignment as you like, and you can choose problems from multiple
chapters as well. When you’ve finished adding problems to your practice assignment, click on Take Tutorial Assignment
to start your practice assignment, Figure 83.
Figure 83: Select Take Tutorial Assignment

42
The practice assignment functions just like the assignments in your class. When you are finished with your practice
assignment, click on Return to Tutorial Problem Selection to return to the Student Practice Area screen, Figure 84.
After clicking on Return to Tutorial Problem Selection, you will receive a warning message advising you that any work
you have completed will be reset, Figure 85. Click OK to continue back to the problem selection or click Cancel to
continue working on your practice assignment.
Figure 84: Practice Assignment
Figure 85: Return to Tutorial Problem Selection Warning Message

43
From here (Figure 86) you can retake the same assignment again, you can change the assignment by removing or adding
problems, or you can clear all problems and start from scratch by clicking on Clear Selection. When you are ready to exit
the Student Practice Area, click on Class Management in the upper left-hand corner to return to the Class Management
screen.
Tips for Using Expert TA with LMS (Canvas, Blackboard, Moodle, D2L, etc.)
Registration and Payment
LMS programs, like Canvas or Blackboard, use links to access Expert TA assignments. If your class uses links to access
Expert TA assignments, clicking on your first assignment link will automatically register you for Expert TA. After you click
on your first assignment, the first screen you will see is the payment screen. For more information see Figure 5 in Step
5: Payment. After you have completed your payment, you will then be taken to your assignment.
Expert TA is asking you to pay again
Expert TA relies on the default email in your LMS program. If that default email changes, for any reason, this can cause
you to register for Expert TA with another email account. The different email account is why you are being asked to pay
for your class again.
Warning: DO NOT pay again or do any work before contacting us at support@theexpertta.com . When you contact us,
please provide the default email in your LMS program, so that we can resolve this problem for you.
Figure 86: Retake Assignment or Edit Assignment

44
Grade is not syncing up with LMS
It is important to access each assignment with the assignment link in your LMS program. If you complete an assignment
and then move on to the next assignment, without clicking the assignment link in your LMS program, you may see a
warning like, Figure 87.
As the message states, you will be able to complete your assignment, but your grades will not sync up with your LMS
program automatically. To sync up your grades, click on the assignment link from your LMS program and the grades will
begin to sync up within 5-10 minutes. Occasionally, the grade sync process can fail for other reasons, but clicking on the
assignment link from your LMS program will initiate the sync process and should resolve the issue.
Note: If you are trying sync your grade and you see a message that your assignment is expired, do not be concerned.
The sync process will start even if the assignment has expired.
Other Error Messages
If you encounter any other error message while trying to access your assignment, contact us at
support@theexpertta.com and include a screenshot of the error, if possible.
Figure 87: LMS Warning
