
1
Got a question? No problem. Open a suppor case by clicking the
button below. We’re here to help!
Seller Help
Need help with Completing Registration?
Complete Registration for Walmar Marketplace
This guide shows you how to complete registration and set up your account. Let’s get stared,
so you can begin selling on Walmar.com!
Information you’ll need during Registration:
• Company corporate address
• Company bank account information
• Information to complete your Form W-9
Download Form W-9
After applying and being approved, you’ll first create your username and password. This
username and password gives you access to Seller Center, which is where you will manage
your Parner Account moving forward. Your username will be auto-filled based on the
application you submitted to become a Marketplace Seller.
Account Creation
1
Please complete finish Registration before exiting.
You may lose access to Seller Center if you exit early or miss a step.
Safely store your security question answers.
You’ll need them to reset your password or restore your account.

2
Step-by-Step Instructions
Company Registration
3
Fill out all of the forms on this page, then click “Save and Continue.”
Display Name
Name that will show to
Walmar.com customers.
Address
Provide your company or
corporate headquarers
address. This is for internal
use only.
Next, please carefully review the Walmar Marketplace Program Retailer Agreement. This is
the legal agreement we have with all of our Marketplace Sellers.
If you agree, please check the box at the bottom of the agreement. Then click “Submit and
Continue” to move to the next step.
Walmar Retailer Agreement
2

3
Step-by-Step Instructions
Next is adding your Form W-9 information. This enables us to send your 1099 tax forms.
Fill out all of the required fields: your display name, business name (if different than display
name), address, and taxpayer identification number (TIN).
Click“SaveandContinue”when you’re finished.
Taxes (Form W-9)
4
Need additional help with Form W-9?
See our QuickStar guide on setting up and updating the Form W-9.
Or download the official IRS Form W-9 to use when filling out the section.
Download Form W-9Form W-9 QuickStar Guide
Keep going!
Next is setting up your payments.

4
Step-by-Step Instructions
Payment Info: Registering with Payoneer
5
Before you register with Payoneer
We’ve parnered with Payoneer to process all Walmar Marketplace payments.
You mustregister with Payoneer to receive your Walmar payments.
Creating or updating Payoneer accounts should star in Seller Center and complete on the
Payoneer website.
Only “Admin” roles can view and manage financial settings for your company.
Your Payoneer account links to your Walmar Marketplace Parner ID. All admins will log in
using the same Payoneer credentials.
Not recommended
Registering directly on Payoneer.com
You may incur a $1.50 fee each time you withdraw from your Payoneer
MyAccount. To avoid this fee, contact Payoneer Customer Care to change your payment
method to “Bank Transfer.”
You may also request a fee refund by contacting Payoneer Customer Care. After requested,
the refund will appear in your USD balance.
Recommended
Registering for Payoneer through Seller Center
Choose Payoneer’s Bank Transfer as your payment method. All Walmar payments will
deposit directly to your bank account. There are zero fees and transfer amount limits for this
payment method. Yay!
Payoneer Customer Care

5
1. Click “Create an Account”to register a new account on the Payoneer website.
Already have a Payoneer account? Click “Log In,” to link it to Walmar Marketplace.
To correctly create or link your Payoneer account, you must star or log in from
Seller Center.
2. Complete the process on the Payoneer website.
You’ll be redirected back to Seller Center when finished. Your status in Seller Center
will be “INACTIVE” as your Payoneer registration is pending.Soon after, you’ll receive a
confirmation email from Payoneer.
3. Click“Continue to Next Step” when you’re finished.
Step-by-Step Instructions
Payment Info: Registering with Payoneer (Continued)
5
You’re all set up to take payments!
Now let’s figure out your shipping.

6
Let’s determine what to charge for shipping by setting up default shipping price modelsfor
all your items.
Have items that don’t fit a default Shipping Price Model?
No problem. You’ll be able to create shipping exceptions during Item Setup later on.
Which Shipping Price Model is best for you?
ItemWeight or Number of Items per Order
Select if shipping is calculated by how much the item(s) weigh
or the total number of items in the order.
Price of Total Order (tiers)
Select if shipping is calculated by the total order price or if
shipping is free.
$
Step-by-Step Instructions
Shipping Info: Selecting a Shipping Price Model
6

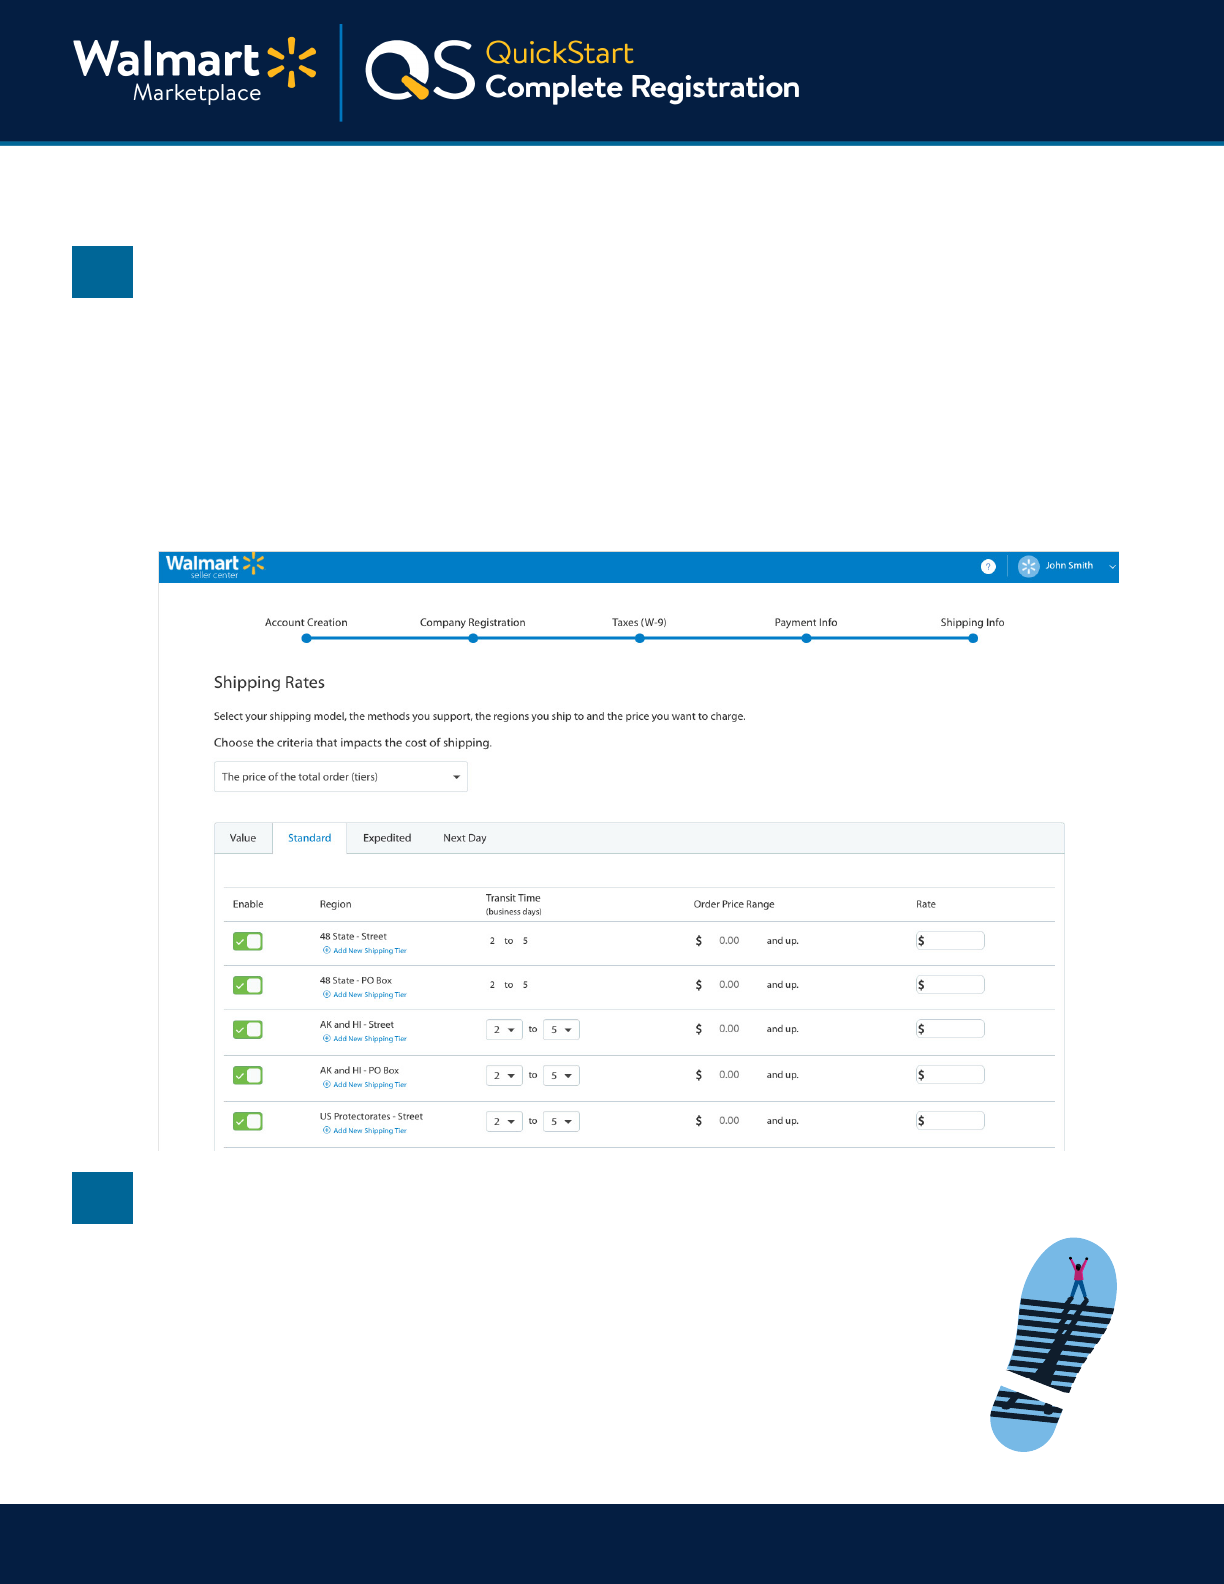
7
Choose your Shipping Methods and Regions
Next, select your default Shipping Methods and Regions you suppor and can ship tofor
all items.
Default Shipping Methods include:
• Value
• Standard
• Next Day
• Expedited
Within each Shipping Method tab, select your shipping regions by setting the toggle to either
green or red under the“Enable”column.
Step-by-Step Instructions
Shipping Info: Selecting Shipping Methods & Regions
7
8
Set transit time minimums and maximums
Next, within each shipping method and region combination, choose transit time minimums
and maximums (in days) and the price you’ll charge.
Adjust shipping time zone settings
Review and adjust (if needed) your shipping time zone settings within the Standard
Processing Schedule.
Step-by-Step Instructions
Shipping Info: Transit Time and Time Zones
8
9
Review, Submit & Finish!
Review before you submit
Double check all of your shipping selections. And don’t fret, you’ll be able
to change your settings in Seller Center later onif needed.
When you finish, click “Submit.”
You can now exit and return to Seller Center where you can finish the rest
of your Launch Checklist. Yay! You completed all the steps!

9
Links from this QuickStar Guide
We’re here to help you learn more, faster. Click below to find other
QuickStar guides, help aricles, and contact Parner Suppor!
Seller Help
Keep on learning, and let’s grow your business!
Seller Help
sellerhelp.walmar.com/seller/s/
Download Form W-9
irs.gov/pub/irs-pdf/fw9.pdf
Form W-9 QuickStar Guide
marketplace.walmar.com/walmar-marketplace-quickstar-seller-settings-w9-setup/
Payoneer Customer Care
payoneer.custhelp.com/app/Contact_us
