
This quick reference guide is for Contract Administrators who will set up binding authority contracts in Tide. It includes guidance on
how to create the contract in Tide, including how to set up reporting channels and assign activity roles across the contact.
Setting up a Binding Authority Contract in Tide

1
Table of Contents
Introduction .................................................................................................................................................................................................. 2
Divisions and Teams ................................................................................................................................................................................... 3
Contracts Screen ......................................................................................................................................................................................... 4
Create a Contract Folder ............................................................................................................................................................................. 5
Complete the Main Contract Details ............................................................................................................................................................ 6
Complete the Sections of the Contract ........................................................................................................................................................ 9
Adding Markets .......................................................................................................................................................................................... 11
Adding Claims Authorities .......................................................................................................................................................................... 12
Adding Risk Codes .................................................................................................................................................................................... 13
Copying a Section ...................................................................................................................................................................................... 14
Creating Reporting Channels .................................................................................................................................................................... 15
Updating Reporting Channels.................................................................................................................................................................... 20
Update the Status of a Contract to Signed ................................................................................................................................................ 21
Making Changes to a Contract .................................................................................................................................................................. 22
Contract Endorsement ............................................................................................................................................................................... 24
Creating a Renewal ................................................................................................................................................................................... 26
Further Information .................................................................................................................................................................................... 27

Setting up a Binding Authority Contract in Tide
2
Introduction
Contracts are created in Tide to reflect each single delegated authority contract. Companies/Company divisions are assigned to each
individual contract at the point of creation to determine access to contract information. All bordereaux submissions must be assigned to
a contract in Tide.
There are two ways that a binding authority contract can be created in Tide:
Brokers can create contracts manually in Tide.
Managing Agents can upload a contract through Structured Data Capture (SDC):
- SDC is a simple online service that converts the content of a Market Reform Contract/Slip into consistent, electronic data in
line with ACORD standards
- Contacts can be uploaded to SDC, converted using Optical Character Recognition software (OCR) and sent to Tide
- Contracts uploaded through SDC, should be reviewed for data accuracy and updated as required
Note that this guide runs through how to create a binding authority contract manually in Tide. Please refer to the SDC toolkit
page on the LMTOM website for more information on how to send contracts to Tide through SDC.
Contract Creation in Tide
The process for creating a delegated authority contract in Tide can be categorised into the following steps:
Create a Contract Folder (applicable to new contracts)
Complete the main contract details, including Coverholder information
Create the Sections of the contract, adding the associated market and risk code information, claims authorities and contractual
rules / location restrictions that apply to each section
Create Reporting Channels and assign Activity Roles across the contract
Capture contractual rules, including general and bespoke rules and location restrictions
Update the status of the contract to Signed
When adding parties to a contract, it is important to understand how contract permissions are determined in Tide – please refer to the
Divisions and Teams section of this guide for more information on how teams can be set up for a company to reflect its organisation
structure and ultimately drive permissions across contracts.

Setting up a Binding Authority Contract in Tide
3
Divisions and Teams
Divisions
Each Company Type in Tide (for example – insurer, coverholder and broker) may have
a different company structure. For example, within the Lloyd's market, each syndicate
is a division of an insurer company and each coverholder PIN (branch) is a division of
a coverholder company. In addition, a company can have divisions of different company
types, for example, a broker can have a broker division and a coverholder division.
When creating a contract in Tide, the associated companies are selected at division
level.
Note that only users assigned to the respective company division(s) and not just
the overall company will be able to access the associated data.
Teams
Teams can be created within each company division to reflect a company’s internal
organisation structure, for example, marine, aviation, property, financial institutions, etc.
By assigning individuals to the correct Team(s) within a division, access to contract
information (including access to specific sections of a contract) can be controlled at a
more granular level.
Each team can be assigned one or more classes of business – when setting up a
contract in Tide, a class of business will be assigned to each section of the contract and
this principal will drive permissions across the contract, including the assignment of
activity roles (Transformation, Assignment and Approval) across Reporting Channels in
a contract (refer to the Creating Reporting Channels section of this guide). This is
particularly useful for multi-section / multi-lead contracts, where associated parties
should be limited to viewing or processing data across only their respective sections.
Figure 1
An example of a company structure for a Managing Agent, including divisions and teams
is shown in Figure 1.
TEAM B (Management) has been assigned all classes of business:
- User C has been added to the team, as they are a senior manager that
requires read-only access to all data associated to Division A (Syndicate
1234)
- User C also works in the Property Team under Division B (Syndicate 5678),
and requires Standard access to be able to view and process data across
contracts/sections aligned to the Property class of business.
User A has been assigned to both the Aviation Team under Division A (Syndicate
1234), and also the Property Team under Division B (Syndicate 5678) – Standard
access has been assigned across both teams, allowing User A to view and
process data across contracts/sections aligned to both the Aviation and Property
classes of business.
Figure 1: Example of division and team structures
USER A
(Standard)
USER B
(Standard)
USER A
(Standard)
USER C
(Standard)
Managing Agent
Class of Business
AVIATION
TEAM A
Aviation Team
TEAM B
Senior Management
Class of Business
ALL CLASSES
TEAM A
Property Team
Class of Business
PROPERTY
USER C
(Read-Only)
DIVISION A
Syndicate 1234
DIVISION B
Syndicate 5678

Setting up a Binding Authority Contract in Tide
4
Contracts Screen
The Contracts screen displays the list of contracts that are
associated to your company division – company divisions can be
created in Tide by your Company Administrator to reflect your
company’s organisation structure. As an individual user, your company
administrator will assign you to the appropriate company division(s) and
this will drive what contracts you will have access to from the Contracts
screen.
1. Click the CONTRACTS icon on the main navigation bar in Tide to
access the Contracts screen – refer to Figure 1.
Note that filters can be applied on the Contracts screen to filter
out specific contracts – use the icons on each of the column
headings to apply a filter:
The list of contracts displayed on screen can be exported into
Excel by clicking on the EXPORT button:
The list of contracts can be sorted ascending/descending by
clicking on any of the column headings:
Use the icons in the bottom-left corner of the screen to
navigate across any available pages of results:
Figure 1: Contracts screen
Filter by Contract Leader
To view the contracts where you are the leader, click the button in top-right corner of the Contracts screen:
Opening a Contract
Click on the contract to open the contract details screen:
Setting up a Binding Authority Contract in Tide
5
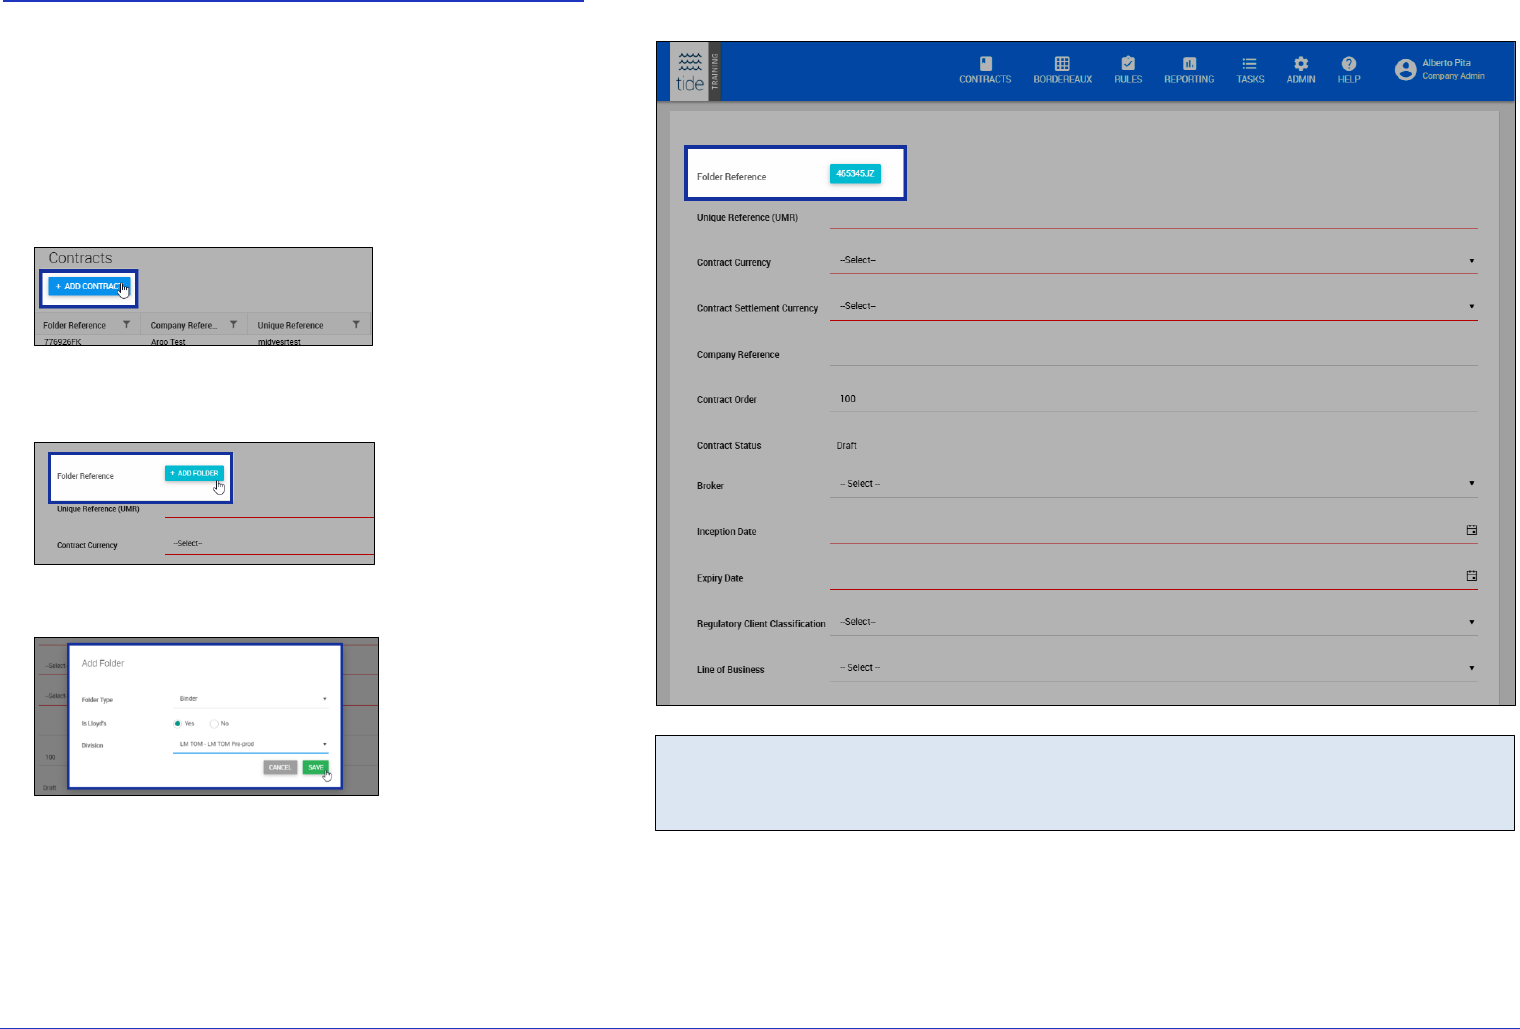
Create a Contract Folder
Tide uses the concept of contract folders to link renewing contract
years of account. For example, a contract folder may contain a
2016 contract and subsequent 2017 and 2018 renewing contract
years of account. A contract folder must be created for the first
contract, after which, the renewing contract can then be created
from within the latest contract in the folder. This ensures that all
renewing contract years of account are saved within the same
contract folder.
1. Click the ADD CONTRACT button on the Contracts screen:
2. A screen will be displayed prompting you to enter the contract
details – click ADD FOLDER in the first instance, to create the
folder:
3. The Add Folder dialogue box will be displayed, as shown below.
Complete the following fields and click SAVE:
Folder Type: Select either Binder or Lineslip from the drop-
down list provided (note that you will not be required to add a
Coverholder when creating lineslips).
Is Lloyd’s: Click the Yes radio button (note that only Lloyd’s
business is currently in scope).
Division: Select your company division from the drop-down
list provided. Note that only divisions that you have been
assigned to will be available for selection.
Figure 2: Folder Reference
Folder Reference
Note that a unique folder reference is generated once the folder details have been saved. This reference appears at
the top of the enter contract details screen, as shown above.

Setting up a Binding Authority Contract in Tide
6
Complete the Main Contract Details
1. Once the contract folder has been created, you will need to
complete the main contract details (note that mandatory fields
are marked with a red underline as shown in Figure 2). An
example of completed contract fields is shown in Figure 3:
Unique Reference (UMR): Enter the unique market
reference number for the contract.
Contract Currency: Select a currency from the drop-down
list provided. A primary currency is required for each contract
in Tide, but a currency can also be selected for each section
in the contract.
Contract Settlement Currency: Select a currency from the
drop-down list provided.
Company Reference: Enter your internal company
reference number. This will only be visible to individuals
associated to your company division.
Contract Order: This is the percentage of risks written that
are allocated to the contract. If this varies by risk, this can be
adjusted accordingly through the Risk Order % field on the
questionnaire being used to process the bordereau. Financial
fields will be adjusted by the Risk Order % where financials
presented in the bordereau are 100% of the Contract Order
captured on the contract.
Contract Status: This will default to Draft in the first instance,
but will need to be updated to Signed before bordereaux can
submitted and processed against the contract.
Broker: Select the broker that is responsible for the contract
- use the drop-down list provided to perform a search for a
broker. A Broker Contact can also be selected where
applicable.
Inception Date: Select the inception date of the contract
using the date calendar provided.
Expiry Date: Select the expiry date of the contract.
Regulatory Client Classification: Select a classification
from the drop-down list provided – Commercial Customer,
Consumer, Consumer Exempt, Group Risks, Large Risk,
Reinsurance.
Line of Business: Select the primary line of business of the
contract from the official list of Lloyd’s lines of business
available.
2. Click SAVE.
Figure 3: Enter Contract details
Duplicate UMR
Note that Tide will not accept a duplicate UMR, so where a duplicate UMR has been provided, a warning message will
appear when attempting to save the contract:

Setting up a Binding Authority Contract in Tide
7
Complete the Main Contract Details (continued)
3. The Contract Details screen will be displayed – an example is
shown in Figure 4. In addition to the contract information
recorded, the following references and options are available on
the contract screen:
Contract Folder: Where renewing contracts have been
created within the same folder, use the drop-down list in the
top-right corner of the contract screen to toggle between
each contract year of account – note that this will not be
visible when you r:
Contract Status: A contract will inherit a draft status when it
is first created (note that all contract fields are editable when
it is in draft). Note that the status of a contract will need to be
updated to Signed before you can submit bordereaux against
the contract – refer to the Update the Status of a Contract to
Signed section of this guide.
Contract Administrator: Displays the name of the company
division that has been assigned the Contract Administrator
role. Note that the role of Contract Administrator can be
reassigned to another party named on the contract through
the Edit Contract Details screen.
Edit Contract Details/Create Renewal: To update the main
contract details, click and select Edit (note that changes
made to a contract will trigger the endorsement process –
refer to the Making Changes to a Contract section of this
guide. To create a renewing contract within the same contract
folder, select the Create Contract option:
Figure 4: Contract Details screen
Linking to a Master Binder
Contract Link(s): To link the selected contract to a master binder in Tide, click the NONE icon to select the master
parent binder. Note that you will only be able to link to binders with the same contract year of account and that are
administered by your company division:

Setting up a Binding Authority Contract in Tide
8
Complete the Main Contract Details (continued)
4. Enter the Coverholders that are associated to the contract –
click the COVERHOLDERS tab, as shown below (note that the
COVERHOLDERS tab will not be available when creating
lineslips):
5. The Coverholders screen will be displayed – click ADD
COVERHOLDER:
6. The Add Coverholder dialogue box will be displayed, as
shown in Figure 5:
Coverholder: Select a Coverholder from the drop-down list
provided – note that the list contains the list of approved
Coverholders that is sourced from the ATLAS system.
Coverholder Contact: Where contacts are available for the
selected Coverholder, select a contact from the list provided.
Primary Coverholder: Click Yes/No respectively, to mark
the selected Coverholder as primary. Note that the first
Coverholder added to the contract will automatically be
marked as the primary, but can be updated where you have
multiple Coverholders listed on the contract.
SAVE: Click SAVE to save the selected Coverholder details.
7. The selected Coverholder will now be displayed on the
Coverholders screen – repeat steps 5-6 above to add additional
Coverholders to the contract. An example of multiple
Coverholders assigned to a contract is shown in Figure 6. To
update the primary Coverholder, click EDIT on the entity that to
which you would like the primary role assigned.
Figure 5: Add Coverholder screen
Figure 6: Coverholders screen

Setting up a Binding Authority Contract in Tide
9
Complete the Sections of the Contract
1. Each section in the physical binding authority contract will need
to be created on the contract record in Tide. Click +ADD
SECTION to add a section to the selected contract:
2. Complete the fields on the Add Section screen (note that
mandatory fields are displayed with a red underline), providing
the relevant section details from the contract document and click
SAVE – an example of completed section fields is shown in
Figure 7:
Section Number: Will display the next sequential section
number.
Market Section Reference: Enter the reference for the
section as it appears on the contract document – note that
the reference will be displayed on the section tab on the
contract details screen.
Market Section Description: Enter the section description
as set out in the contract document.
Brokerage: Enter the brokerage applicable to the section. If
this varies per risk, then it should be reported on data
submissions and mapped in the questionnaire.
Coverholder Commission: Enter the Coverholder
commission applicable to the section. If this varies per risk,
then it should be reported on data submissions and mapped
in the questionnaire.
Additional Deductions: Enter any additional deduction
percentage applicable to the section. Where no additional
deductions apply, you will need to enter a value of 0.
Class of Business: Refer to the adjacent note – Selecting a
Class of Business.
Section Currency: Select the currency for the section – note
that this does not impact risk, premium or claims records
being reported in different currencies.
Maximum Limit of Liability/Estimated Premium
Income/Gross Premium Income: Enter each of the
respective values as set out in the contract document.
Gross Premium Income Limit Notification Percentage:
Enter the percentage of the gross premium income limit that
when reached, should result in notification from the
Coverholder to the Insurer.
Conduct Risk Rating: Select Low, Medium, High or NA.
Figure 7: Add Section screen
Selecting a Class of Business
Note that the class of business selected on a section
will determine which parties on the contract will have
access to view the section details. When adding
Markets and TPAs to a section, only Teams (within the
selected company divisions) associated to the same
class of business as the section, will have the ability to
view or submit data linked to that section.
Refer to the Divisions and Teams section of this guide
for more information on how the creation of teams
within divisions drives permissions across contracts in
Tide.
Please contact your Company Administrator if you
have any questions in relation to your access to
contracts and contract information in Tide.
Section Linking
When creating renewing contracts, you will have the option to link to the assignment rules from a section on the previous
contract (simply select the section that you want to link to from the drop-down list provided, as shown below). This
ensures that when processing bordereaux that cover multiple years of account, the assignment step (where bordereaux
records are assigned to sections and risk codes) will only need to be completed once:

Setting up a Binding Authority Contract in Tide
10
Complete the Sections of the Contract (continued)
3. The Section details screen is displayed, as shown in Figure 8.
Note that the section tab name reflects the Market Section
Description that has been provided. The example shown in
Figure 8 is a property binder that has three sections.
4. The top of the Section details screen displays the class of
business associated to the section, the Market Section
Reference and Description. The selected section can be
updated or copied to a new section by clicking and selecting
Edit or Copy respectively. Note that the first section created on
a draft contract can also be deleted:
5. A series of tabs are available on the left of the Section details
screen:
SECTION DETAILS: Displayed by default when accessing
the section in Tide, this screen displays the details of the
section as captured on the Add Section screen.
MARKETS: Add the lead and follow markets on the section
– refer to the Adding Markets section of this guide.
CLAIMS AUTHORITY: Add any claims authorities (Third
Party Administrators responsible for claims) that apply on the
section – refer to the Adding Claims Authorities section of
this guide.
RISK CODES: Enter the risk codes and splits that apply to
the section – refer to the Adding Risk Codes section of this
guide.
LOCATION: Enter any location restrictions that apply on the
section – refer to the Setting up Contractual Rules across a
Contract in Tide guide.
RULES: Add any bespoke rules that apply on the section –
refer to the Setting up Contractual Rules across a Contract
in Tide guide (includes how to set up general rules across a
contract).
Figure 8: Section Details screen
Updating Section Details
To update the section details, click and select Edit:

Setting up a Binding Authority Contract in Tide
11
Adding Markets
1. Click on the MARKETS tab on the left of the section screen and
click + ADD MARKET:
2. The Add Market dialogue box will be displayed, as shown in Figure
9. Complete the fields provided and click SAVE:
Insurer: Select an insurer from the drop-down list provided. Note
that a Non-Lloyd’s Insurer entity is available for contracts that
have a non-Lloyd’s insurer on the section – simply perform a
search for XXXX to return the Non-Lloyd’s Insurer entity.
Company Section Reference: If you are the named insurer, you
can add your internal section reference here (note that this will
only be visible to individuals in your company).
Underwriter: If you are the named insurer, you can select the
underwriter that is responsible for this section from the drop-down
list provided (note this will only be visible to individuals in your
company).
Written Line %: Enter the written line % on the section – note
that values of up to 7 decimal places are supported.
Estimated Signed Line %: Enter the estimated signed line
% on the section – note the total estimated signed line % on
each section of a contract must equal 100%. Values of up to
7 decimal places are supported.
Signed Line %: Enter the signed line % for your company.
Note that this field can only be completed by individuals
associated to the named insurer. Values of up to 7 decimal
places are supported.
Is Lead: Each section on the contract must have a lead
assigned. To mark the named insurer as the lead, click Yes.
3. Repeat steps 1-2 to add other insurers to the section. The lead
insurer appears at the top of the markets screen, other insurers
will be listed in descending order by estimated signed line %:
Figure 9: Add Market screen
Updating Markets Details
To update or remove a market on the section, click on the insurer line on the markets screen to open the
Edit Market screen (shown below):

Setting up a Binding Authority Contract in Tide
12
Adding Claims Authorities
Claims Authorities are companies that are allocated to handle
claims on sections of the contract (e.g. Third Party
Administrators/TPAs). Note that multiple claims authorities can be
added on a section where applicable.
1. Click on the CLAIMS AUTHORITY tab on the left of the section
screen and click + ADD CLAIMS AUTHORITY:
2. The Add Claims Authority dialogue box will be displayed, as
shown in Figure 11. Complete the fields provided and click
SAVE:
Claims Authority: Select the company that has been
allocated to handle claims from the drop-down list provided.
Claims Authority Limit: Enter the maximum claims limit that
the named company can authorise.
Claims Authority Currency: Select a currency from the
drop-down list provided.
Authority Type: Displays the company type for the selected
company – for example, TPA, Coverholder.
3. Repeat steps 1 – 2 to add additional claims authorities that are
applicable to the section. Note that the list will be sorted in
descending order by authority limit:
4. To update or remove a claims authority, click on the company
name to open the Edit Claims Authority screen (shown in Figure
12).
Figure 11: Add Claims Authority
Figure 12: Edit Claims Authority screen
Setting up a Binding Authority Contract in Tide
13
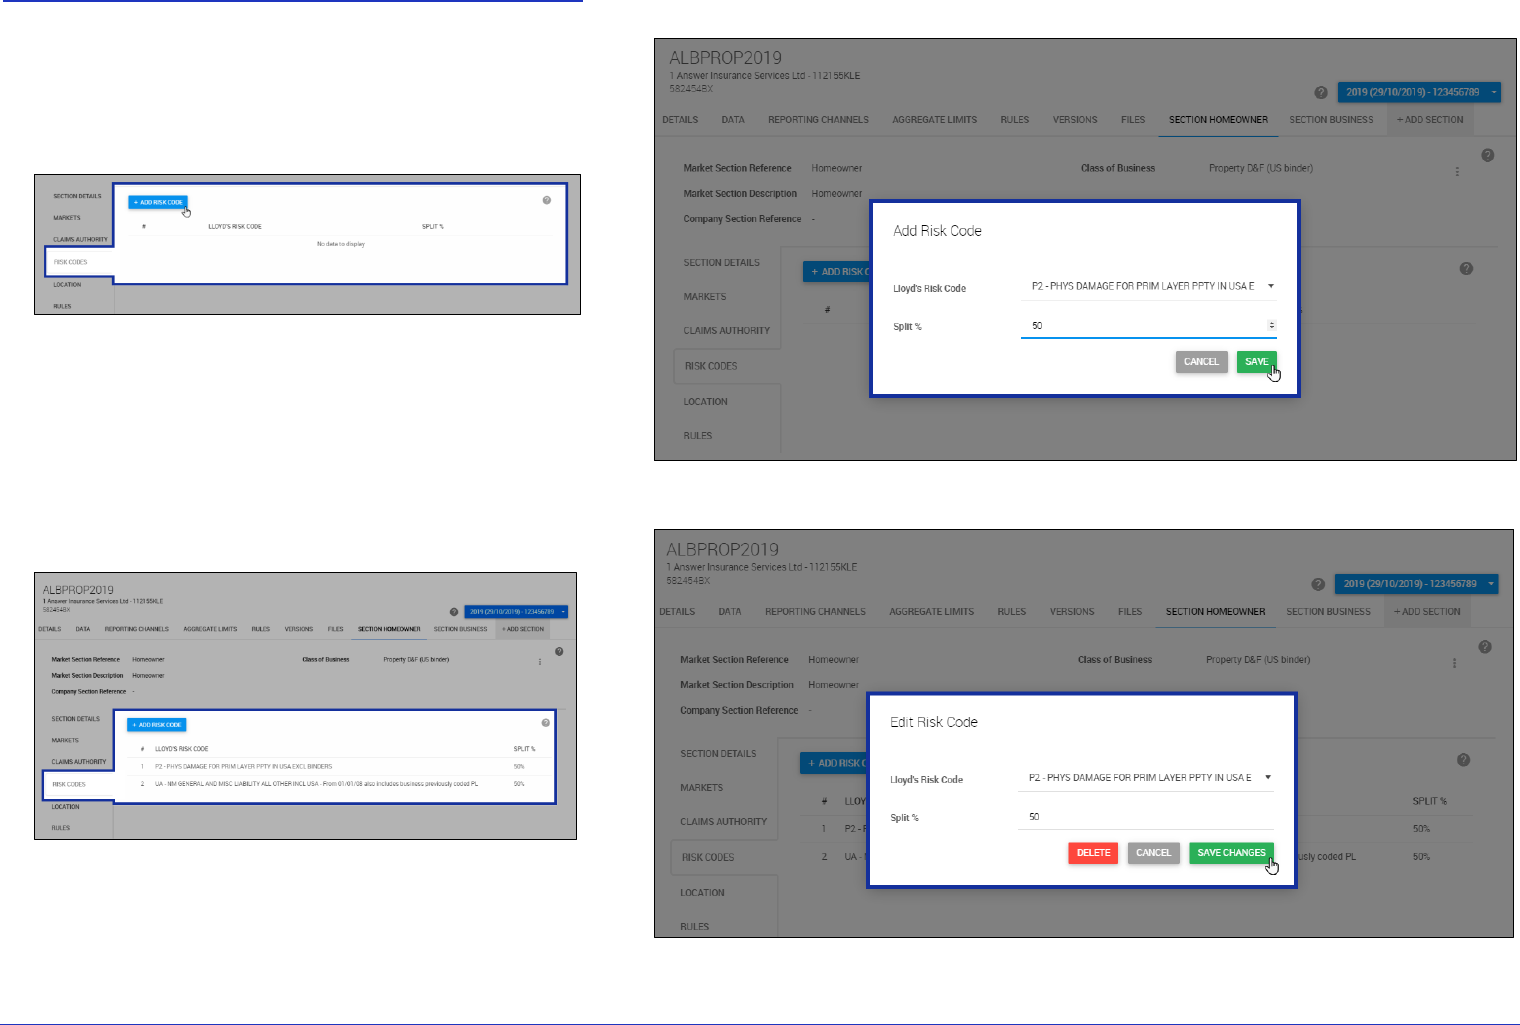
Adding Risk Codes
The risk codes and risk code splits that are applicable to the
section should be entered through the Risk Codes screen. These
will be allocated to risk, premium and claim bordereaux records
during the Assignment stage of bordereau processing.
1. Click on the RISK CODE tab on the left of the section screen and
click + ADD RISK CODE:
2. The Add Risk Code dialogue box will be displayed, as shown in
Figure 13. Complete the fields provided and click SAVE:
Lloyd’s Risk Code: Select the risk code from the list of
Lloyd’s risk codes provided in the drop-down list.
Split %: Enter the percentage split that should be allocated
to the selected risk code.
3. Repeat steps 1 – 2 to add any additional risk codes and risk
code splits that apply to the section. Risk codes will be sorted
in descending order by their split percentage values:
4. To update or remove a risk code, click on the risk code to open
the Edit Risk Code screen (shown in Figure 14).
Figure 13: Add Risk Code
Figure 14: Edit Risk Code

Setting up a Binding Authority Contract in Tide
14
Copying a Section
You can copy sections of a contract when it has a Draft or Signed
status. Note that when copying a section, all areas of the section
will be copied across to the new section, with the exception of the
following:
Market Section Reference and Market Section Description
Company Section Reference(s)
1. Open the section of the contract that you would like to copy –
the selected section tab appears in bold:
2. Click in the top area of the screen and select Copy, as
shown in Figure 15.
3. The following prompt will appear on screen; click CONTINUE:
4. A new section tab will be displayed at the top of the contract
screen (refer to in Figure 16). When copying a section from a
Signed contract, the contract will inherit a status of DRAFT
ENDORSEMENT when the new section has been copied. Note
that the Market Section Reference, Market Section Description
and Company Section Reference will appear blank on the new
section (refer to in Figure 16).
5. Both the Market Section Reference and Market Section
Description can be updated by clicking in the top area of the
screen and selecting Edit (refer to in Figure 16). Note that
both will need to be provided before the contract can be updated
to a Signed status. Your Company Section Reference can be
updated through the MARKETS screen (refer to the section of
this guide that covers Adding Markets to a Section).
6. Note that sections of a contract can be deleted if the contract has
a Draft status. Click in the top area of the screen and select
Delete – refer to Figure 17. Note that the Delete option will only
be available if the contract has a Draft status.
Figure 15: Copy Section
Figure 16: Edit Section
Figure 17: Delete Section
Section

Setting up a Binding Authority Contract in Tide
15
Creating Reporting Channels
Reporting Channels must be created in Tide to establish how
bordereaux data is expected to be reported against a contract.
They are set up for each repeated submission and type of
bordereau that is expected. For example, if two risk bordereau are
expected per month (each one in a different currency), then you
should set up two risk reporting channels to reflect this. In addition,
if you are also expecting premium and/or claim bordereaux, then
the appropriate premium and claim reporting channels should be
created.
Reporting channels are also used to define activity roles
(Transformation, Assignment and Approval) across a contract and
can be created for the following:
All contracts within a contract folder
One or many contracts within a contract folder
One or many sections within a contract
1. To create a new Reporting Channel, click on the REPORTING
CHANNELS tab in the contract:
2. On the Reporting Channels screen, click + ADD REPORTING
CHANNEL:
3. The Add Reporting Channel dialogue box will be displayed, as
shown in Figure 18
Figure 18: Add Reporting Channel

Setting up a Binding Authority Contract in Tide
16
Creating Reporting Channels (continued)
4. The contract from which the reporting channel was created is
selected and displayed at the top of the screen – note that all
sections of the contract are selected by default:
To add additional contracts that are stored within the
contract folder (including all or specific sections within the
contracts), click +ADD CONTRACT:
This will launch the Add Contract screen. Select the
contract(s) that you would like to add to the reporting
channel, from the Contract drop-down. Once a contract has
been selected, use the Section(s) field to select the
section(s) of the contract that you would like to add to the
reporting channel, as shown below:
Click SAVE – the reporting channel shown in Figure 19
includes all contracts and sections within the contract folder.
Figure 19: Add Reporting Channel – add/remove contract(s) and section(s)
Updating Contracts and Sections in a Reporting Channel
To remove a contract or update the sections of the contract that have been added to the reporting channel, click
to launch the Edit Contract dialogue box:
Use the Section(s) field to add/remove sections as required and click SAVE CHANGES. To remove the contract
from the reporting channel altogether, click DELETE.

Setting up a Binding Authority Contract in Tide
17
Creating Reporting Channels (continued)
5. Complete the fields on the left of the Add Reporting Channel
dialogue box, as shown in Figure 20:
Channel Type: Bordereaux will be selected by default – note
that the XML option should not be selected at this time.
Type: Select the type of bordereau data that will be
associated to the reporting channel – Risk, Claim, Premium,
Risk and Premium.
Frequency: Select how frequently the data will be reported
in the reporting channel – Monthly, Quarterly, Annually.
Due Days: Enter the number of days after the end of each
period that reporting will become due. For example, if a
monthly frequency is set on the reporting channel and the
number of due days is set to 30, the due date for March
bordereau will be 30
th
April.
Number Expected: The number of bordereau that are
expected against the selected contract(s) and section(s)
associated to the reporting channel. The numb
Expected Bordereau Entries
Bordereaux reporting channels are used to create and drive expected
bordereau entries. Note that the fields displayed in Figure 20 will drive
these entries under the EXPECTED tab within the contract’s
BORDEREAUX screen, as shown in the example below:
Figure 20: Add Reporting Channel – define how data is expected to be reported against the selected contract(s)
Restrict Bordereau Access
Access to the original bordereau file can be restricted to only the Contract Administrator and those parties assigned to
the Transformation, Assignment and Approval roles on the reporting channel, by clicking the Yes radio button. This
ensures that no other parties named on the contract can access the original bordereau file from the contract’s
BORDEREAUX > APPROVED tab in Tide, as shown below:

Setting up a Binding Authority Contract in Tide
18
Creating Reporting Channels (continued)
6. Enter a name for the reporting channel in the Reporting
Channel Identifier field – refer to Figure 21.
Note that a default name will be provided based on the type of
reporting channel that is being created (Risk, Claim, Premium,
Risk and Premium), however this a more meaningful name or
description for the reporting channel should be provided,
particularly if when setting up multiple reporting channels that
include different contracts and sections within the same contract
folder.
Submitting a Bordereau – Selecting a Reporting Channel
Note that when submitting bordereaux, you must select the reporting
channel that the submission applies to from the Reporting Channel drop-
down list in the Submit Bordereaux screen:
Figure 21: Add Reporting Channel – Reporting Channel Identifier

Setting up a Binding Authority Contract in Tide
19
Creating Reporting Channels (continued)
7. Assign the Activity Roles for the reporting channel using the
drop-down lists provided and click SAVE – refer to Figure 22.
Note that all roles should be agreed and allocated via
consultation with your market counterparties on a per-
contract basis during placement.
Activity Role
Role Description
Contract
Administrator
Create and manage contract in Tide – note
that the party that creates the contract in Tide,
will inherit the role of Contract Administrator.
Submission
All parties named on a contract have the
ability to submit data into Tide, although this
will be dependent on the company division
and team to which they have been assigned.
Transformation
Translate your bordereau format to Tide
standard data fields using a simple pre-
defined and once-only Questionnaire
Use on-screen prompts to assist in resolving
data quality issues automatically; resulting in
a standardised, cleansed and enriched
bordereau.
Assignment
Define rules by which records are assigned to
Section(s) and Risk Code(s).
Approval
Final approval of the bordereaux.
8. Click Save.
Figure 22: Add Reporting Channel – assigning Activity Roles
Important Note
Company Divisions can only be selected for activity roles (for the selected reporting channel) if they are associated
with ALL selected contracts and sections.
Insurers and TPAs named on a section that are in a team that is linked to a section’s selected class of business,
can be selected for activity roles for the selected reporting channel.
A Broker or a Coverholder named on a contract, can perform Transformation, Assignment, Approval roles across
all sections of the contract, if they are in a team (within the selected company division) that is associated to the
class of business of at least one of the sections of the contract.

Setting up a Binding Authority Contract in Tide
20
Updating Reporting Channels
Once created, reporting channels are displayed under the
Reporting Channels tab on the contract screen – an example is
shown below:
1. Reporting channels can be updated to cater for changes in
bordereau reporting during the term of the contract. To update
a reporting channel, click Edit (note that only the Contract
Administrator has the ability to update and delete
reporting channels):
2. The Edit Reporting Channel screen is displayed, as shown in
Figure 23. In addition to updating the current values set on the
reporting channel, a number of additional options are available:
Auto-Review: Selecting Yes will automatically move a
bordereau to the Assignment phase of processing when it
reaches a status of Review,
Auto-Approve: Selecting Yes will automatically approve a
bordereau (and mark it with an Approved status) when it
reaches the For Approval phase of processing.
3. Click SAVE CHANGES to save any updates that have been
made to the reporting channel.
Figure 23: Edit Reporting Channel
Deleting Reporting Channels
Note that only reporting channels that have not yet been used to process bordereaux can be deleted. Where the reporting
channel has been used to process a bordereau, the DELETE button will not be available on the Edit Reporting Channel
screen.

Setting up a Binding Authority Contract in Tide
21
Update the Status of a Contract to Signed
Before you can submit and process bordereaux on a contract, the
status of the contract must be updated to Signed.
1. Click the DETAILS > MAIN tab on the contract screen to display
the main details of the contract:
2. Click the DRAFT button to update the status of the contract, as
shown in Figure 24.
3. The Contract Status dialogue will be displayed, as shown below.
Select the Signed status from the drop-down list provided and
click SAVE:
4. A SIGNED status will now be displayed on the contract screen –
note that any changes made to the contract (outside of Reporting
Channels), will trigger the endorsement process:
Figure 24: Contract Main Details – update Contract Status
Validation Warnings
Any mandatory fields that have not been completed on the contract, will trigger a number of validation warnings when
attempting to update the status of a contract to Signed. Validation warnings will appear in red, as shown below, and
will need to be addressed before the status of the contract can be updated:

Setting up a Binding Authority Contract in Tide
22
Making Changes to a Contract
Updates made to any of the following areas of a Signed contract in
Tide, will automatically trigger the Contract Endorsement process.
Updating Contract Details
(Including Broker and Contract Administrator)
1. Click in the top area of the screen and select Edit, as shown
below.
2. This will open the Edit Contract Details screen, where the main
contract details can be updated, including Broker and Contract
Administrator – refer to Figure 25. On saving your updates, the
Contract Endorsement screen will be displayed – refer to the
Contract Endorsement section of this guide.
Updates to Markets, Coverholders and Claims Authorities
1. Updates to Markets, Coverholders or Claims Authorities on the
contract will also trigger the endorsement process:
Click +/- AMEND MARKETS on the Markets screen – refer to
Figure 26.
Click +/- AMEND COVERHOLDER(S) on the Coverholders
screen.
Click +/- AMEND CLAIMS AUTHORITY on the Claims
Authority screen.
2. The Contract Endorsement dialogue box will be displayed – the
example shown below has been triggered by clicking +/- AMEND
MARKETS. Click CONTINUE:
Figure 25: Edit Contract Main Details – update Broker
Figure 26: Section Markets screen (+ /- AMEND MARKETS)

Setting up a Binding Authority Contract in Tide
23
Making Changes to a Contract (continued)
3. On clicking CONTINUE, you will be able to amend the
respective parties – in the example below, the Markets on the
selected section of the contract can now be updated. In addition,
the status of the contract will automatically be updated to DRAFT
ENDORSEMENT as shown in Figure 27:
Click +ADD MARKET to add additional markets to the
section.
To update or remove an existing market, click on the market
line to open the Edit Market screen – ensure that click SAVE
CHANGES when your updates are complete:
Parties that have been assigned an activity role on a reporting
channel on the contract, will need to be removed from the
reporting channel before they can be removed from the
associated contract. A warning message will be displayed
when attempting to remove a party that is associated to a
reporting channel:
Figure 27: Contract Status – DRAFT ENDORSEMENT
Important Note
Note that parties removed from a contract will cease to have access to the contract and its associated data in Tide with
immediate effect.

Setting up a Binding Authority Contract in Tide
24
Contract Endorsement
The Contract Endorsement screen is launched when the
endorsement process is triggered – refer to Figure 28. Note that
updates to some areas of a contract, such as Reporting Channels,
will not trigger the endorsement process, but will be recorded to
support the audit process.
1. Is this change the result of a previously incorrect entry of
the Contract, rather than a change to the Contract?: Click
Yes/No as required – note that marker will be placed on the
updated version of the contract – refer to Contract Versions
section of this guide.
2. What is the Effective Date of the Endorsement?: Select the
effective date of the endorsement using the date calendar
provided. Note that this date is simply a marker and will not drive
when the endorsement(s) changes will take effect – updates
made to a contract as part of an endorsement take effect
immediately.
3. Notes: Use the field provided to enter any notes or comments
that may be applicable to the endorsement.
4. Upload Files: Use this area of the screen to attach any related
files – note that files attached here will be available under the
FILES tab on the associated contract.
5. Click SAVE.
The contract will now inherit a status of DRAFT ENDORSEMENT,
as shown below, allowing you to make any further changes to the
contract that are required. When all changes to the contract have
been made, click the DRAFT ENDORSEMENT button to update
the status of the contract back to Signed:
Figure 28: Contract Endorsement

Setting up a Binding Authority Contract in Tide
25
Contract Endorsement (continued)
6. Each time the status of a contract is updated (or if
endorsements are made to a Signed contract), a new version
of that contract is created.
The Versions screen (accessible by clicking the VERSIONS tab
on the contract screen), displays the list of versions created for
the selected contract – refer to Figure 29.
A version number is assigned to the first Signed version of
the contract – thereafter, the version number will increase
whenever the status of the contract is updated or the
endorsement process is triggered:
Note that updates made to a contract that do not trigger the
endorsement process will still be recorded in the Versions
screen, but these will not generate a new version number for
the contract – refer to the example in Figure 29, where a
number of changes made to reporting channels have not
generated a new version number for the contract.
Each version listed, displays the name of the individual that
has made the changes, the date and time the changes were
made and a summary of the changes made (refer to the
Version Changes column in Figure 29).
Figure 29: Versions screen
Cancel Contract
Contracts in Tide cannot be deleted, but can be marked with a status of Cancelled. Clicking the Signed status
button on the contract screen will launch the Cancel Contract dialogue box, as shown below:
Tick the Cancel Contract tick box, enter the revised contract expiry date and click SAVE – the status of the
contract will be updated to CANCELLED, as shown below:

Setting up a Binding Authority Contract in Tide
26
Creating a Renewal
Tide uses the concept of contract folders to link renewing contract
years of account. For example, a contract folder may contain a
2016 contract and subsequent 2017 and 2018 renewing contract
years of account. A contract folder must be created for the first
contract, after which, the renewing contract can then be created
from within the latest contract in the folder.
1. Open the latest contract in the contract folder, click and
select Create Renewal Contract in Contract Folder, as shown
in Figure 30 (note that this option can only be selected from the
latest Signed contract in the folder).
2. The following prompt will appear on screen – click CONTINUE:
3. The renewal contract will now be presented on screen – refer
to Figure 31. Note the following:
All details from the previous contract will be copied across
into the renewal contract, with the exception of:
- The Unique Reference (UMR), which will need to be
updated manually through the Edit Contract Details
screen.
- Company References and Section References that have
been entered by different contract participants.
- Supporting files stored under the Files tab.
- Signed Line percentage values against Markets on
sections (note that Written and Estimated Signed Lines
are copied)
The renewal contract will inherit a status of Draft.
The Inception Date of the renewal contract will default to the
day after the expiry date of the previous contract.
The Expiry Date of the renewal contract will default to 365
days from (and including) the Inception Date of the renewal
contract.
Reporting Channels that include the contract from which the
renewal was created are to be expanded to include the new
renewal contract, including any associated sections.
Use the drop-down list in the top-right corner of the screen to
toggle between each of the contract years of account in the
contract folder.
Figure 30: Create Renewal Contract in Contract Folder
Figure 31: Renewal Contract
Create Blank Contract in Contract Folder
This option can be selected from within any of the contracts that are in the existing contract folder that have a Draft or
Signed status. Note that selecting this option will launch the Edit Contract Details screen where you will be prompted
to enter the main contract details – refer to the Complete the Main Contract Details section of this guide.

27
For more information on Delegated Data Manager – Contact: dasats.servicedesk@limoss.london
The following training aids are also available for you to access on-demand:
Tide Knowledge Base
A knowledge base containing a library of help articles:
Accessible via the Help icon in the main navigation in Tide
Articles are grouped by category
Context-driven help is also available by clicking on the various system screens
Useful Contacts
For technical support contact the Service Desk:
UK: + 44 (0) 800 024 6089
Belgium: + 32 (0) 800 16246
USA: +1 8333 457 984
Service Desk Portal – accessible via the Knowledge Base
For more information on self-service reporting and data extraction from Tide, contact
dasats.servicedesk@limoss.london
LIMOSS Website
Slide decks running through the background to the Delegated Data Manager initiative
Quick reference guides, covering steps in the delegated authority process in Tide
Self-led video tutorials, focussing on each of the system elements
Frequently asked questions
Adoption tools
