
Athletic Medicine
Pelvic Stabilization, Lateral Hip
and Gluteal Strengthening Program
Dynamic Stability Bridge Series
Double Leg Bridge Level 1
Position and Movement: Supine, keep heels close to the glutes. Keep
hips level. Abdominals engaged with a neutral pelvis. Focus on
stabilizing legs through the glutes instead of the hamstrings. Raise and
lower hips slowly and with control.
Reps:
8-10 times
Single Leg Bridge
Level 2
Position and Movement: Same as double leg bridge, but only one
leg is fixed on the ground. Other leg remains lifted off the floor
ideally 90 degrees. The lifted leg should be straight with a flexed
foot.
Reps:
8-10 times each side
Introduction
Numerous lower body problems can be caused by inefficient pelvic and/or
hip stabilization. Our body works as whole and when certain regions are
not performing optimally, the body will find a way to move using another
muscle or joint in a less efficient manner. This program is aimed at
addressing the most common weaknesses seen in the lumbo-pelvic-hip
complex.
Flexibility may also greatly contribute to these issues, and while stretching is
not addressed in this program, it can be found in other programs on the
UHS website. Please refer to cord flexibility, dynamic flexibility, Pilates
flex and stretch and static flexibility programs.
Pilate's principles focusing on centering or maintaining the body in a
neutral position are foundational concepts in this program. Maintaining
"neutral" pelvis versus being tilted forward or backwards allows for proper
muscle function.
While performing this program, please be aware of good body position,
number of repetitions and resistance. Maintaining a controlled, neutral pelvis
throughout each exercise is required.
Start with small ranges and lower
repetitions until you feel comfortable. Slowly increase range or repetitions when
you feel you can maintain and control pelvic neutral with ease. When you feel you
are ready to progress you can add resistance starting with 1 lb and increase by
1 lb with maximum of 3-5 lbs.
The muscles that are primarily responsible for pelvic stabilization
include: gluteus medius, gluteus maximus, pirformis and deep core
muscles.
These exercises are not intended to replace working
with an allied health care professional. If you
experience pain or discomfort lasting longer than 1
day, please seek assistance from a medical
professional. When in doubt see a medical
professional.

Rotary Stability
Clam Level 1
Position and Movement: Sidelying, heels are in line with the
gluteals.
Make sure hip flexion is only 45 degrees. Knees flexed to 90 degrees.
Abdominals engaged with a neutral pelvis. Keep hips stacked, don’t
allow them to rock open. Lift the top knee. At peak height, your
positioning resembles an open clamshell. Feet remain in contact
throughout arc.
Reps: 8-10 times each side
Clam Level 2
Position and Movement: Advance to level 2 by lifting lower leg up to
a 45 degree angle.
From this lifted position, lift the top knee. Pause at the top and slowly
and with control lower top leg. Feet remain in contact the entire time.
Reps: 8-10 times each side
Clam Level 2 with Knee Extension
Position and Movement: Align the body as for Clam Level 2. Lift top
knee. Hold this open clam shell position and add knee extensions. The
bottom leg remains lifted the entire time.
Reps: 8-10 times each side
Clam Level 2 with Small Ball at Feet
Position and Movement: Align the body as for Clam Level 2, add small
weighted ball between feet. Lift top knee while ball and feet remain in
contact.
Reps: 8-10 times each side
Clam Level 3
Position and Movement: Align the body as for Clam Level 2, then
extend the lower leg, keeping the top hip and knee flexed with the foot
hooked behind the lower leg. Lift knee. Pause at the top and slowly and
with control, lower to start position.
Reps: 8-10 times each side
Mobility
Sidebend
Position and Movement: Lie on your side with body propped up on
elbow and forearm. T
op arm resting on top leg. Lift pelvis off the oor.
Simultaneously, reach top arm upwards toward ear and stretch the
uppermost side of trunk.
Reps: 6-8 times on each side

Plank Series
Sideplank Static Holds
Position and Movement: Sidelying with upper body propped on
elbow and forearm. Top arm is resting on top leg. Lift pelvis. Maintain
straight alignment of body while holding sideplank position.
Reps: 4: hold 15-30 seconds, alternating sides to avoid overload to
upper extremity
Sets: 2-4 each side
Sideplank with Abduction Static Leg Holds
Position and Movement: Sidelying with upper body propped on
elbow and forearm. Top arm is resting on top leg. Lift pelvis while
simultaneously lifting top leg to abducted position. Keep body in
straight alignment while maintaining sideplank with leg lift
position.
Reps: 4: hold 15-30 seconds, alternate sides to avoid overload to
upper extremity
Sets: 2-4 each side
Sideplank with Abduction Leg Raises and Lowers
Position and Movement: Sidelying with upper body propped on elbow
and forearm. Top arm is resting on top leg. Lift pelvis while
simultaneously lifting top leg to abducted position. Maintain sideplank
while raising and lowering top leg to an inch above bottom leg. Feet
do not come into contact.
Reps: 6-8 raises and lowers, alternate sides to avoid overload to upper
extremity
Sets: 2-4 each side
Raised Sideplank Static Holds
Position and Movement: Sidelying with arm extended under shoulder.
Top leg is crossed over bottom leg so that feet are in a straight line. Top
hand rests on hip. Lift pelvis.
Reps: 4: hold for 10-15 seconds, alternate sides to avoid overload to
upper extremity
Sets: 2-4 each side
Raised Sideplank with Static Abduction Leg Lift Holds
Position and Movement: Sidelying with arm extended under
shoulder. Top leg is crossed over bottom leg so that feet are in a
straight line. Top hand rests on hip. Lift pelvis while simultaneously
lifting top leg. Maintain lifted pelvis and leg in abducted position.
Reps: 2: hold 10-15 seconds, alternate sides to avoid overload to
upper extremity
Sets: 2-4 each side
Raised Sideplank with Abduction Leg Raises and Lowers
Position and Movement: Sidelying with arm extended under
shoulder. Top leg is crossed over bottom leg so that feet are in a
straight line. Top hand rests on hip. Lift pelvis while simultaneously
lifting top leg. Maintain lifted pelvis while raising and lowering top leg.
Feet do not come into contact.
Reps: 4-6 raises and lowers, alternate sides to avoid overload to upper
extremity
Sets: 2-4 on each side

Lateral Hip Circuits
Circuit A:
Equipment: Yoga mat, cuff weights (optional)
Start Position: Place both feet in the top left corner of mat, sidelying
at a 45 degree angle. Bottom hand supports head and is in line with
torso. Place top hand down on mat, in front of torso to aid in keeping
hips stable and balanced. Keep hips stacked one on top of the other.
Engage abdominals the entire time. Lift the top leg rst for all of these
exercises. After completing entire series, switch corners, to lie on
opposite side.
Reps: Start with 5 reps for each exercise. Do each rep slowly and
controlled. Continuously ow from one exercise to the next without
resting. Progress up to a maximum of 12 reps, then add small
(1.5-2.5 lb) cuff weight.
Exercises:
1) Abduction Lifts
Lift top leg 12 inches from bottom leg, lower top leg down. Don’t
let legs touch. Top foot is exed the entire time.
2) Abduction Lifts with Internal Rotation
Repeat exercise #2, except top knee and foot are turned in. Top
foot is exed the entire time.
3) Bent Knee Abduction Lifts aka: Fire Hydrants
90 degrees of hip exion and knee exion. Foot is exed. Lift leg
up and out without losing 90/90 position or rolling torso/hips
back. Start and end with top leg parallel to oor.
4) Large Clockwise Circles
Looking down at feet, make a large
clockwise circle with top leg. Leg
reaches long with pointed toe.
Don’t let top leg touch down. Keep
it lifted at least an inch from the
bottom leg.
5) Large Counter-clockwise Circles
Repeat exercise #4, except with
counter-clockwise circles with top
leg.

6) Small Clockwise Circles
Repeat exercise #4, except place L Leg in slight hip extension
and foot is exed. While keeping leg at hip height, make small
clockwise circles the size of a dinner plate with L leg.
7) Small Counter-clockwise Circles
Repeat exercise #6, except make counterclockwise circles.
8) Toe Taps
Top foot is pointed entire time,
tap foot in front of bottom leg
and then behind bottom leg.
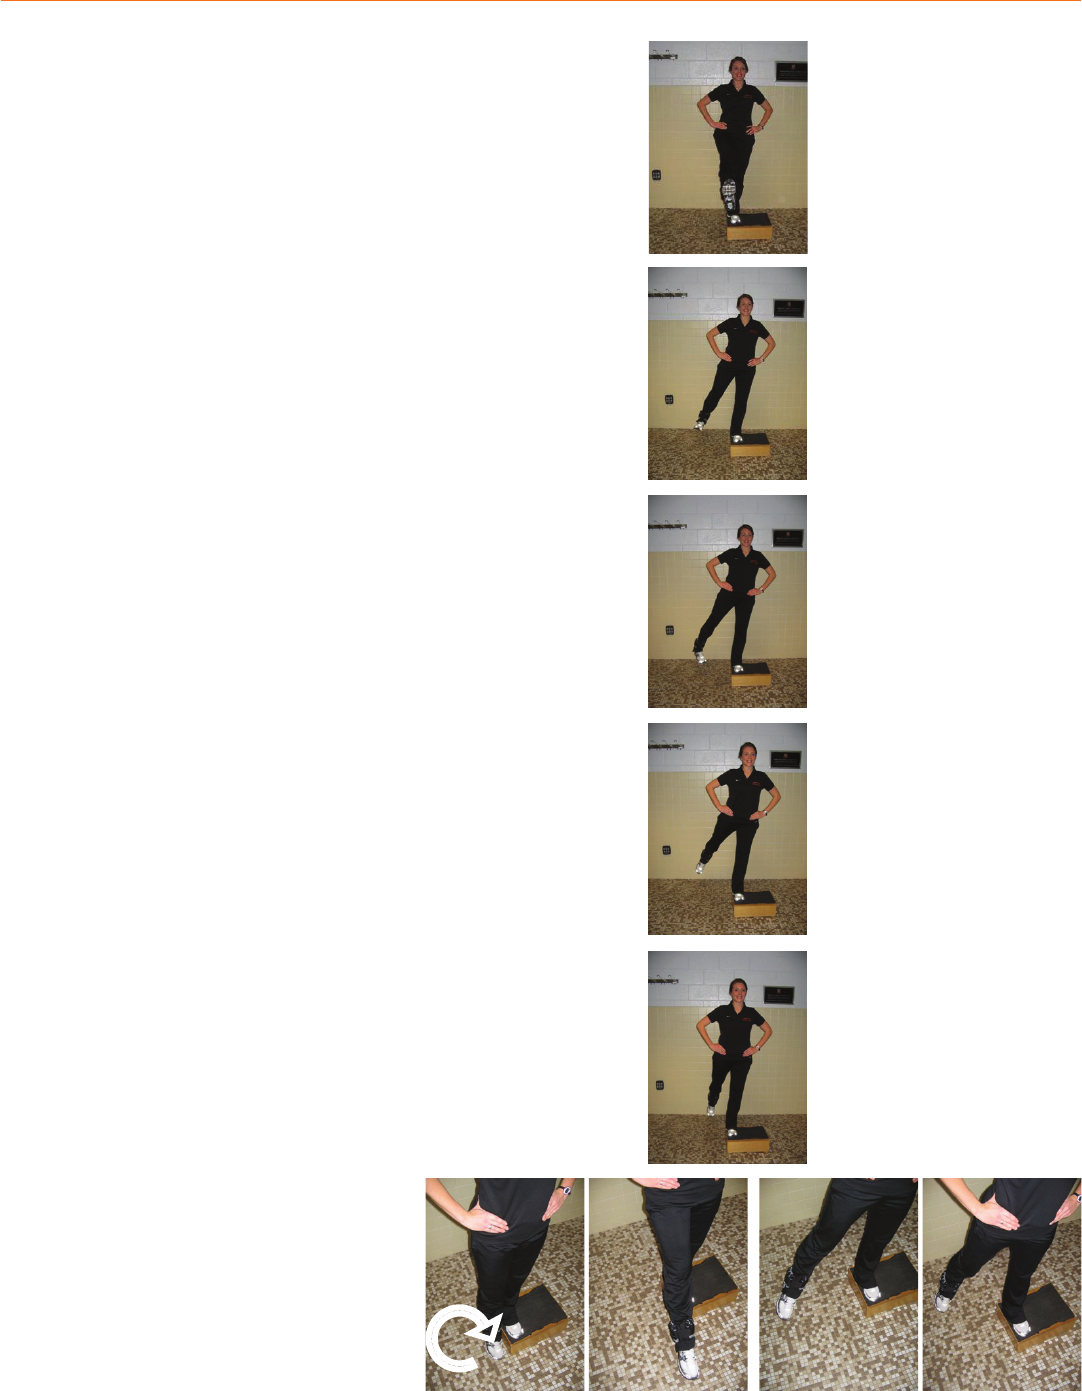
Circuit B:
Equipment: Box (At least 6 inches in height) and
Small Cuff Weight (2.5 lb)
Start Position: Place cuff weight on R ankle. Step onto the edge
of the box and balance on L leg. It is important to stand up straight,
keep the torso still and engage abdominals throughout all exercises. L
shoulder must be kept stacked directly over L hip. The R leg does not
rest in between movements nor does it touch the box. After completing
entire series, switch, and place cuff weight on L ankle and reference
starting position of stance leg. You will perform a prep exercise for
circuit B called a pelvic drop to ensure proper form during circuit B.
Reps: Start with 5 reps for each exercise. Do each rep slowly and
controlled. Continuously ow from one exercise to the next without
resting. Progress up to a maximum of 12 reps.
Prep Exercise for Circuit B: Pelvic Drop
Step onto the edge of the box and balance on L leg. Place hands on
hips. Stand tall with abdominals engaged. The R hip should be lower
than L hip at start position. Then lift R hip on stance leg up to level of L
hip. Be sure not to hip hike L hip, as the focus is on the R hip. Fatigue
should be felt in the R hip and gluteal.
Exercises:
1) Hip Flexion:
Lift leg in front of you. Foot is exed the entire time. Return to
start position.
2) Abduction:
Lift leg out to the side only as far as you can control and
maintain your center (small movement). Foot is exed entire time.
Return to start position and repeat.
Keep leg in line with body throughout exercise.
3) Abduction with Internal Rotation:
Repeat exercise #2, except foot is pointed down and in.
4) Abduction with Hip Extension:
Lift straight leg diagonally, out and behind at a 45 degree angle.
Foot is pointed entire time. Minimize lumbar extension.
5) Hip Extension:
Lift straight leg behind you. Foot is pointed entire time. Return to
start position and repeat. Minimize/avoid lumbar extension.
6) Large Clockwise Circles:
Move straight leg in large clockwise
circles. Foot is pointed entire time.
Circles are as a large as you can
control while maintaining while
centered.

7) Large Counterclockwise Circles:
Repeat exercise #6, except make
counterclockwise circles.
8) Single Leg Box Squat:
Bend knee of stance leg until opposite heel touches oor lightly.
Straighten stance leg back to start position. Keep pelvis level
throughout exercise. As you squat, avoid bending knee over toe.
Foot with cuff weight is exed the entire time. Sit back, engage
gluts.
Advanced Lateral Hip and Gluteal Strengthening Exercises
Fire Hydrants
Position and Movement: On all fours, hands directly under shoulders
and knees over hips. Abdominals are engaged. Lift leg up and out
maintaining 90 degrees of hip
exion and knee exion. Avoid rotating
hips or arching back as you lift the leg. Goal is to lift thigh to level of
torso. Foot is flexed the entire time.
Reps: 8-10 lifts
Sets: 2-3 on each side
Physioball Sidelying Pelvis Static Holds:
Position and Movement: Physioball placed between legs at the
ankle. Begin with smaller physioball. Elbow under shoulder. Body in
neutral alignment. Top hand on hip, do not use it lift the body off the
floor. Squeeze Physioball between legs while lifting pelvis off the
floor. Lift until only foot is touching the floor.
Reps:
4: hold for 10-15 seconds, alternate sides to avoid overload
to upper extremity
Sets: 2-4 on each side.
Physioball Sidelying Pelvis Raises and Lowers:
Position and Movement: Physioball placed between legs at the ankle.
Begin with smaller physioball. Elbow under shoulder. Body in neutral
alignment. T
op hand on hip, do not use it lift the body off the oor.
Squeeze Physioball between legs while lifting pelvis off the oor. Lift
until only foot is touching the oor. Lower pelvis back towards the mat
until it is 1 inch above the mat.
Reps: 4 to 6 raises and lowers. Alternate sides to avoid overload to
upper extremity.
Sets: 2-4 on each side.

Frankenstein Slides
Position and Movement: Set the core. Hands on hips. Legs straight.
T
ake small lateral steps. Can add resistance band at ankles or knees or
(both for advanced challenge).
Reps: 15-20 steps
Sets: 2-4
On all 4’s Clockwise and Counterclockwise Circles
with Hip in Extension
Position and Movement: On all fours, hands directly under
shoulders and knees over hips. Both hands and one knee are
placed on an unstable surface such as a dynadisk. To increase
instability, don’t allow foot of bent knee to touch the mat. Lift
opposite leg into hip extension. While hip is lifted in extension,
make small clockwise and counterclockwise circles with the leg. This
is an advanced core and balance challenge while working the
gluteals. Avoid rotating hips or arching back as you lift the leg.
Reps:
5 clockwise and 5 counterclockwise circles on each leg
Sets: 2-4 each leg
Modied Raised Sideplank Abduction Leg Raises and Lowers
Position and Movement: Sidelying with arm extended under shoulder.
Bend knee of bottom leg. Top leg is straight and toe is pointed. Body is
aligned in a straight line. Top hand rests on hip. Lift top leg to abducted
position. The goal is to lift it to parallel. Raise and lower top leg without
coming into contact with the mat.
Reps: 4-6 raises and lowers, alternate sides to avoid overload to upper
extremity
Sets: 2-4 on each leg
