Table of Contents
Multi-Factor Authentication for Office 365 ............................................................................................................................ 2
MFA Setup Instructions, One Page ..................................................................................................................................... 2
Sign-in Instructions with MFA Enabled ............................................................................................................................... 2
MFA Setup Instructions – Authenticator App (Recommended) ......................................................................................... 3
MFA Setup Instructions – Text Message Option ................................................................................................................. 8
MFA Setup Instructions – Voice Call (Best For Those Without a Mobile Phone) ............................................................. 12
How to Fix Outlook 2016 When It Freezes at Startup (MFA Enabled).............................................................................. 15
MFA Questions and Answers ............................................................................................................................................ 16

Multi-Factor Authentication for Office 365
Rivier University has implemented multi-factor authentication (MFA) for its campus email and Office 365 web services.
MFA greatly enhances the security of our email and data infrastructure. MFA is now enabled for all faculty, staff,
students, and alumni.
MFA changes the login process to your campus email and Office 365 data. After you log in with your Rivier University
email address and password, you will need to verify yourself by responding to a message on your mobile phone.
If you do not have a mobile phone, you can also authenticate using a voice call to your landline or office phone.
MFA Setup Instructions, One Page
1. Visit https://aka.ms/MFASetup from a computer (desktop, laptop, or VDI). Do not visit from phone or tablet.
2. Sign in by entering your Rivier email address and password. You will be asked to provide more information.
3. When you see Start by getting the app, click Next. When you see Set up your account, click Next.
4. When you see the Scan the QR code screen, pause and continue setting up MFA on your phone.
5. On your phone, download the Microsoft Authenticator app from the App Store (iPhone) or Google Play Store
(Android/Samsung). Open the Authenticator app.
6. Important: You might receive a prompt asking to allow the app to access your camera or take pictures. You must
select Allow so that your phone can take a picture of the QR code. If prompted to allow giving notifications, you must
select Allow or the app won’t work.
7. Skip through any welcome screens in the Authenticator app. From the Customize and Control icon (+), select Add an
account. Choose Work or school account.
8. Aim your phone’s camera at the QR code. The phone will scan the QR code and add your account to the app. You are
ready to proceed to the next step when you see your email address and a rolling (changing) code.
9. On your PC (page with the QR Code), click Next. The next screen says “Let’s try it out. Approve the notification we’re
sending to your app.”
10. On your phone, you should receive a pop-up notification. Tap Approve. On your PC, click Next. You should be taken
to a screen that says “Notification approved.” Click Next, then click Done.
11. You’re done setting up MFA! When you see a summary page, you can simply close your browser. Or, you can choose
to add a backup/alternate MFA option such as a text message notification.
Sign-in Instructions with MFA Enabled
1. Enter your email address and your Rivier password.
2. One of 3 things will happen, depending on how you set up MFA:
a. You will receive a text message with a code. Key this code into the verification box.
b. You will be prompted with a notification on your phone. Click "Approve" on your phone.
c. You will receive a voice call. Answer the automated call from Microsoft. Press pound (#) when
prompted.
3. You may optionally check the box that says “Don’t ask again for 60 days”. Click Next.
4. “Stay signed in?” If you see this prompt, it is safe to hit Yes unless it is a public (shared) computer.

MFA Setup Instructions – Authenticator App (Recommended)
1. Visit https://aka.ms/MFASetup (recommended from a PC or VDI)
2. Sign in by entering your Rivier email address and password. You will be asked to provide more information.
3. Microsoft Authenticator is now the default authentication method. Simply click Next, Next.


6. On your phone, open the Authenticator app. If prompted to allow sending notifications, select Allow. If
prompted to allow taking pictures, choose Allow. You may also be prompted to tour the app. You can Skip these
screens. Click the + to Add Account. [Note: Your phone screens may differ slightly.]
7. Choose Add Work or school account. If prompted, allow Authenticator to access the camera. This is needed so
that the app can take a picture of the QR code on your computer (next step).

8. Aim your phone’s camera at the QR code. The phone will scan the QR code and add your account to the app.
You are ready to proceed to the next step when you see your email address and a rolling (changing) code.
9. On your PC (page with the QR Code), click Next. You will then see “Let’s try it out—Approve the notification
we’re sending to your app.”
10. On your phone, tap Approve. On your PC, you will see “Notification approved.” Click Next.

11. You are done! You should see a page that says “Success!” Click Done. You can then optionally add additional
alternate/backup MFA authentication methods. Or, you can simply close your browser.
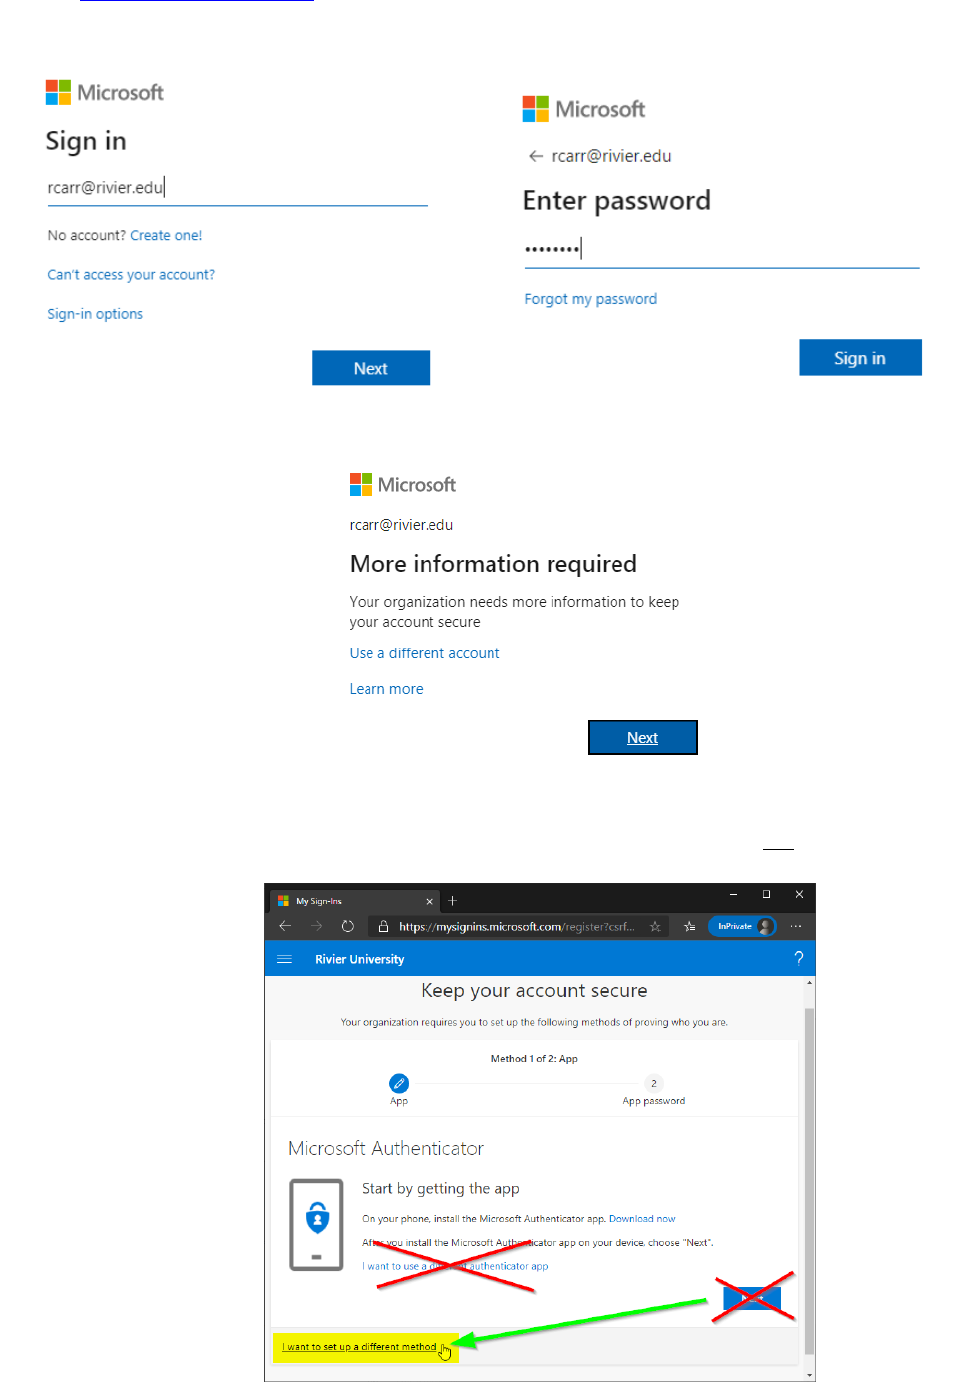
MFA Setup Instructions – Text Message Option
1. Visit https://aka.ms/MFASetup (recommended from a PC or VDI)
2. Sign in by entering your Rivier email address and password. You will be asked to provide more information.
3. Microsoft suggests using Microsoft Authenticator app. If you prefer to use the text message option, you will
need to click “I want to set up a different method” at the bottom of the page. Do not click Next.

4. A dialog box will appear with a drop-down menu. Change the method to Phone (from app), then click Next.
5. Enter your 10-digit phone number, select “Text me a code” and then click Next.

6. You will then get a text message code on your phone. Enter the code on your PC and click Next.
Mobile Phone Showing Code Received from Microsoft
Enter the code from your mobile phone into the website

7. If the code was entered correctly, you will see a confirmation (“SMS verified.”). Click Next.
8. The next page forces you to create an app password. Most people do not need this app password. Simply type
any 8 letters into the box and then click Next.
9. Again, you do not need your app password. Ignore this screen and click Done. If you see “Success!” then you are
done! Click Done.

MFA Setup Instructions – Voice Call (Best For Those Without a Mobile Phone)
1. Visit https://aka.ms/MFASetup (recommended from a PC or VDI)
2. Sign in by entering your Rivier email address and password. You will be asked to provide more information.
3. Microsoft suggests using Microsoft Authenticator app. If you prefer to use the voice call option, you will need to
click “I want to set up a different method” at the bottom of the page. Do not click Next.

4. A dialog box will appear with a drop-down menu. Change the method to Phone (from app), then click Next.
5. Enter your 10-digit phone number. Select “Call me” and then click Next.
6. You will receive a phone call. Answer the call. When prompted, press # to verify your number.
7. After the number was verified, you will see this on your screen. Click Done.

8. The next page forces you to create an app password. Most people do not need this app password. Simply type
any 8 letters into the box and then click Next.
9. Again, you do not need your app password. Ignore this screen and click Done. If you see “Success!” then you are
done! Click Done.

How to Fix Outlook 2016 When It Freezes at Startup (MFA Enabled)
Sometimes, after enabling MFA, Outlook 2016 will lock up at startup. You may see something like this:
Here’s how to resolve this by signing in through Word:
1. Close Outlook. Click the X in the blue, not the X in the white.
2. Open Word. Open a blank new document. Click File -> Account.
3. If it has your name in User Information, click the Sign out button. Hit “Yes” if prompted to confirm.
4. Click the “Sign In” button.
5. Enter your Rivier email address, click Next. Enter your password and click Sign in.
6. You will receive a text message. Enter the code from the text into the Word dialog box. Hit Next.
7. You are now signed into Office, which signs you into Outlook. The next time you open Outlook, you will not be
prompted for a password.
Step 3 Step 4

MFA Questions and Answers
Q. Does MFA change the way I log into my computer/laptop/VDI?
A. No. MFA is only used for Rivier email and other Office 365 services such as OneDrive.
Q. Does MFA affect how I log into Canvas?
A. No. You can still log into Canvas with just your Rivier username and password.
Q. Will I need to enter a code from my phone every time I log into email?
A. No. You can choose to sign into your email for up to 60 days (per location) before it prompts you to re-verify.
Q. Will I need to use MFA to check email on my phone?
A. Yes. You will be prompted every 60 days to enter a code even on your mobile phone.
Q. What happens if I forget my mobile phone?
A. Contact itsupport@rivier.edu and we will temporarily disable MFA for you.
Q. How do I log into shared mailboxes?
A. Nothing changes. You can still find your shared mailboxes in Outlook, or open them through Outlook on the web.
Note: If you are using a separate username and password to log into a shared mailbox, please contact us right away!
Q. I don’t have a mobile phone or do not wish to use it.
A. Not a problem. Please set up MFA by choosing “Call me” and enter your direct office number.
Note: You will not be able to check email from other locations with this method.
Q. Can I use a personal email address?
A. No. You cannot use a personal email address with MFA. However, you can download the free Microsoft
Authenticator app to receive push notifications instead of text messages. If you are on our Rivier wireless network,
there is no charge to use this app.
Q. I want to learn more about the Microsoft Authenticator app.
A. Microsoft Authenticator is a free app that can be found in the Apple App Store and the Google Play Store. After
configuring the app, you can verify by receiving a “push” notification on your screen. Simply press “Approve” on
your phone’s screen and you are logged in! There are no codes to type and you don’t have to receive any text
messages. IT can help you set it up, or you can set it up yourself by visiting this site: https://support.office.com/en-
us/article/use-microsoft-authenticator-with-office-365-1412611f-ad8d-43ab-807c-7965e5155411
For step-by-step setup instructions, please click here.
Q. Does checking email on my phone change?
A. MFA may not support the iPhone built-in “Mail” app. iPhone will need to download the Outlook mobile app. You will
also want to remove your Rivier account from Mail by heading to Settings -> Accounts & Passwords, selecting your
Rivier email, and clicking Delete Account. NOTE: Some iPhones users have reported that they can make email work
in the built-in Mail app by deleting their Rivier account (Settings -> Accounts & Passwords) and re-adding it.
Android phone users can continue using Outlook.
Q. Can Rivier University spy on my phone usage if I install the Authenticator app or use text messaging?
A. No. Rivier University does not and cannot monitor your phone usage or location history.
