
Student Quick
Reference
Guide

i
e Chart Student Quick Reference Guide is a resource for PowerLab systems in the classroom
laboratory. e topics in this guide are arranged to help you, the student, with many of the
most commonly used functions in Chart.
Color coding scheme: Each section in this guide is color coded. Acquisition is blue, Analysis
is green, Troubleshooting is red, and the Appendix is violet. You will nd words printed in
these colors in the text of your experiment protocols to call your attention to the appropriate
section of this guide if you need help.
Legend: References to PowerLab hardware and Chart so ware will o en be followed by a
number in parentheses. ese numbers refer you back to the legend on pages III-V.
e exclamation icon indicates a caution or warning. Be sure to carefully read steps
marked with this icon before proceeding.
e check mark icon is used when a graphic represents the way your window should
look if everything is adjusted properly.
How to use this guide

ii
Preface: PowerLab and Chart Diagrams
iii PowerLab Front Panel
iv PowerLab Rear Panel
v Chart
View Window
vi Experiments Gallery
Part One:
Acquisition
2 Input Ampli er
3 Setting the Range
4 Setting the Sampling Rate
5 Y axis/Auto Scale
6 Time Scale Compression
7 Units Conversion
8 Adding Comments
Part Two:
Data Analysis
10 Selecting Data
11 e Waveform Cursor
12 e Marker
13 e Zoom Window
14 e Data Pad: Setting up
15 e Data Pad: Adding Data
16 Cyclic Measurements (Chart for Windows)
Part ree:
Troubleshooting
18 Signal is too small
19 “Out of Range” message appears in Chart View
20 Data appears compressed
21 Waveform appears choppy or irregular
22 Data not scrolling a er Start button is clicked
23 Data not present in Chart a er clicking Stop
24 Start button not working
25 Unable to select Input Ampli er
26 Troubleshooting the MLT
1
0
1
0 Finger Pulse Transducer
Part Four: Appendix
28 Cycle Variables
Contents

iii
1
Power indicator light: illuminates when PowerLab is turned on.
2 Analog output connections: provides a voltage output in the range of ±10 V.
NOT safe for human connection!
3
Analog inputs (2): Inputs
1
and 2 on the PowerLab; for connecting transducers and
devices with BNC connectors.
4 Isolated Stimulator status light: Indicates that the Isolated Stimulator is working
properly (green) or out of compliance (yellow).
5 Dual Bio Amp input: Connects a 5 lead Bio Amp cable to the PowerLab; reads as
Inputs 3 and 4.
SAFE for human connection.
6 Trigger input: may be used to start or stop a recording event
7 Pod ports (2): 8-pin connectors for attaching Pods and certain transducers to Inputs
1
and 2.
NOT safe for human connection!
8
Isolated Stimulator safety switch: Turns the Isolated Stimulator on and o .
9 Isolated Stimulator outputs: For connecting stimulating electrodes to the Isolated
Stimulator.
SAFE for human connection.
Do not connect two devices to the same input. at is, do not connect a device to the
Analog BNC Input and to the same Pod port.
PowerLab Front Panel
1
2
6 7 9
5
3
4
8

iv
1
3
1
5
11 1
2
1
4
1
0
1
0 Audio output connector: Standard
1
/8˝ (3 mm) phono jack for sound output of
recordings from the Bio Amp.
11
Earthing post: Used to ground PowerLab, if grounded power supply is unavailable.
1
2 Power switch: Turns PowerLab on and o .
1
3 I
2
C connector: Connects PowerLab to special ADInstruments signal conditioners
called Front-ends.
1
4 USB connector: Connects a computer to the PowerLab.
1
5 Serial Port connector: Connects PowerLab to certain devices.
1
6 Power cord connector: Attaches to power cord.
PowerLab Rear Panel
1
6

v
17 Tool bar: A set of buttons used to access common
functions in Chart.
18 Scale pop-up menu: Allows the Y-axis scale to be
adjusted manually or automatically.
19 Comments bar: Used to type comments that are
then added to the data le during a recording at
user-de ned times.
20 Waveform Cursor: Tracks the waveform in the
Chart View window.
21 Scaling buttons: Allow the Y-axis to be expanded
or compressed to improve the data view.
22 Marker: An analysis tool that can be dragged onto
the waveform in any channel to mark relative time
and amplitude.
23 Scroll bar: Allows the user to scroll through the
data in the Chart View window.
24 Scroll/Review button: Switching this to Review
mode allows users to scroll through data while it is
still being recorded.
25 View buttons: Change the compression of the time
(horizontal) axis.
26 Record/Monitor button: Enables recording.
Monitor mode: Data is visible in the Chart View
window but not recorded/saved to the computer.
27 Start/Stop button: Used to start or stop a Chart
recording.
28 Range pop-up menu: Changes the range of the
input ampli er.
29 Range/Amplitude display: Shows the range (idle)
or waveform amplitude (recording) of an input
channel.
30 Channel Function pop-up menu: Allows the user
to access all major channel functions.
31 Rate/Time display: Shows sampling rate (idle) or
elapsed time (recording).
32 Rate pop-up menu: Allows the user to adjust the
sampling rate.
Chart View Window
25 View buttons
17 Tool bar
18 Scale pop-up
menu
19 Comments bar
23 Scroll bar 24 Scroll/Review
button
26 Record/Monitor
button
32 Rate pop-up
menu
31 Rate/Time
display
30 Channel
Function pop-
up menu
29 Range/
Amplitude
display
28 Range pop-up
menu
27 Start/Stop
button
20 Waveform
Cursor
21 Scaling buttons
22
Marker
Tool Bar Buttons
New Chart
document
Open
document
Save le
Print
Show Chart
window
Zoom
window
X-Y window
Data Pad
window
Data Pad
mini window
Scroll
to start
of le
Scroll
to end
of le
Auto Scale
all channels

vi
3
2
1
Overview: e Experiments Gallery contains all of the les that are required to perform
classroom experiments. Use this tool to access the experiment protocol les, sample data
les, Chart settings les and lab report forms.
Click on the File pop-up menu and
select the Experiments Gallery.
Select the experiment that you are
going to perform.
Select from the les that are dis-
played in the right hand screen.
Here you will nd your experiment
protocol le, sample data le, Chart
settings le and lab report forms.
To open a le “double-click” on its
icon.
Experiments Gallery

Acquisition
Acquisition
2
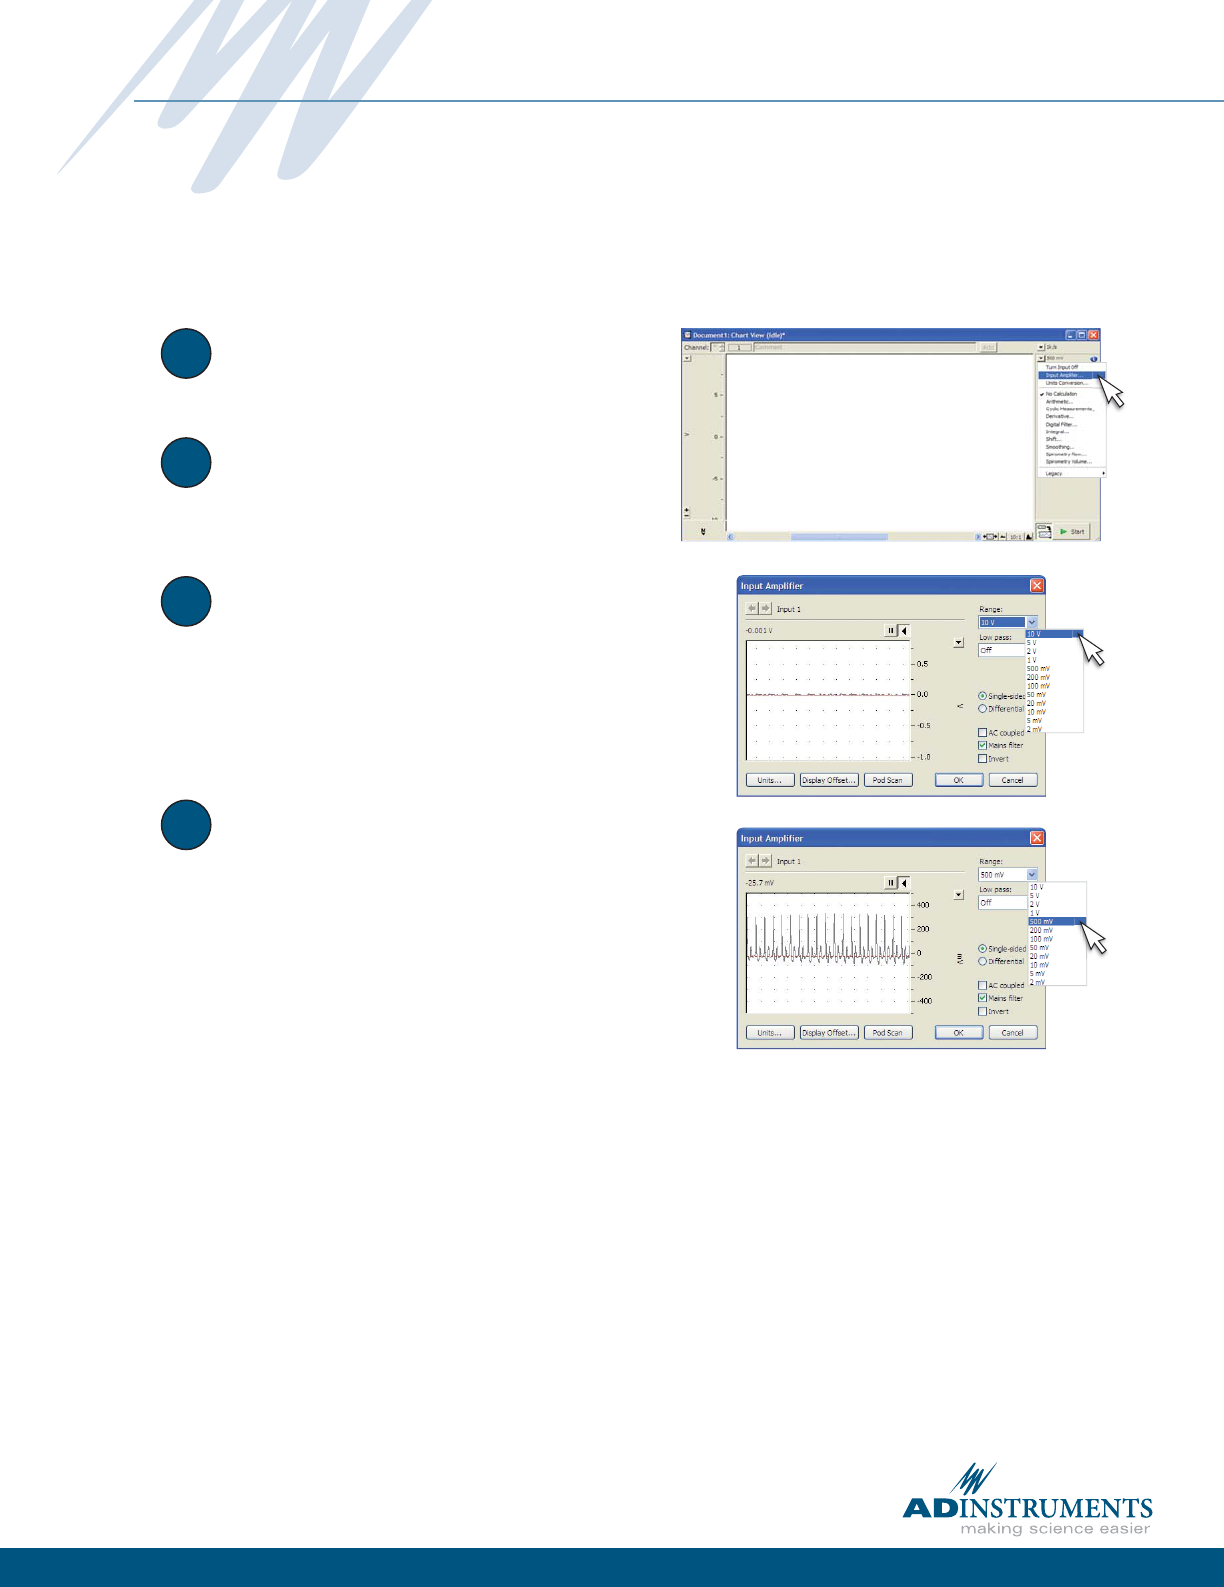
Input Amplifi er
Overview: Allows for precise setting of the input range for a recording channel and provides
ltering options for speci c transducers.
*Note: If you already know the output voltage for your transducer, you may skip to the next page “Setting
the Range”
Click the channel function pop-up
menu for the channel you are
interested in.
Observe the signal in the scrolling
window, then click on the range pop-up
menu to adjust the signal strength.
When the signal occupies 1/3 to 1/2 of
the screen, you have found the proper
range. Make sure to leave enough
room to accommodate the signal. You
will have the option to adjust the Y axis
once your recording is underway.
Other features available from the input
ampli er:
Check with your instructor before
changing these settings
• Low pass lter: is is a digital lter
designed to remove unwanted high
frequency “noise” from the signal.
• Single sided vs. Di erential input.
Specialized transducers will require
these settings.
• AC Coupled: Removes any DC component from the signal.
• Mains lter: Eliminates 50 or 60 Hz mains “hum” from the signal
• Invert: e Invert checkbox lets you invert the signal on the screen.
• Units: Opens Units Conversion dialog (page 7)
• Display O set: Displays the o set of some transducers
• Pod Scan: Used to update the Input dialog if a Pod is plugged in a er it is opened.
Note: Front-ends and pods are ampli ers that provide additional ampli cation, ltering, isolation,
and support for special transducers. When they are connected to PowerLab inputs, the Input
Ampli er dialog for those inputs may be replaced with a dialog speci c to the device.
1
2
3
4

1
2
4
3
Click the Range pop-up menu 28
next to the channel of interest.
Note: is procedure can be done while
recording.
Select a new range from the pop-up
menu.
If you were not already recording,
click Start. Verify that the signal is
1/3 to 1/2 of the channel window
height. If not, readjust the range as
necessary.
Note: Ensure that the range is su cient
to accommodate changes in signal
amplitudes during recording.
Scale the Y-axis (amplitude) if
desired, using the Scaling buttons
21 .
Setting the Range
Overview: Establishes the maximum and minimum range of signal to be recorded in a
selected channel.
*Note: if you do not know the range of the transducer you are using we suggest you use the input ampli er from the
previous page. Skip this step if you have just completed the “Input Ampli er” procedure from the previous page.
3

1
2
3
4
Click the Rate pop-up menu 32
located at the upper-right of the
Chart View window.
Note: is procedure can be performed
while recording.
Use the pop-up menu to select a
new rate.
Your data will automatically begin
recording at the new rate. Adjust
time axis compression as needed
using the View buttons 25 .
Note: Only adjust the Rate if instructed
to do so by your instructor. Rate settings
a ect the quality and size of your
data les, an inappropriate rate could
adversely a ect your results!
Setting the Sampling Rate
Overview: Sets the number of times per second the PowerLab samples data from your
transducer. Use fast sampling rates for rapidly changing signals, such as nerve recordings
or ECG. Use slow sampling rates for slow changing signals such as force or temperature
measurements.

1
2
5
e Scaling buttons 21 in the
channel window will expand or
compress the Y-axis (amplitude)
scale.
e Auto Scale button on the Tool
bar 17 will automatically adjust the
Y-axis scaling on ALL channels.
OR: Double-click on the Y-axis of
an individual channel to auto Scale
the data in that channel only.
Y-Axis Scaling/Auto Scale
Overview: Makes the signal appear larger or smaller in the vertical scale. without a ecting
the Range settings. Options include Auto Scale, manual and interactive scaling.
Alternatively, you can adjust the
scale by dragging the mouse over
the Y-axis. You will notice the
cursor change to arrow symbols
that indicate the direction of axis
expansion or compression.
3

1
2
3
4
6
Locate the View buttons 25 in the
Chart View window.
e right button
will expand the
data timescale.
e le button
will compress the
data timescale.
e center button is a pop-up menu
which will allow you to select a
compression ratio manually.
Time Scale Compression
Overview: e View buttons allow you to expand or compress the view of your data in the X-axis.

1
2
3
4
7
Using the mouse, select a block of
data to use for your calibration. From
the Channel Function pop-up menu
30 ,select Units Conversion. e Units
Conversion dialog will open.
Choose the units you want to
express your data in from the
pop-up menu. Or, select De ne
Unit to type a new unit.
In the waveform window click on
the waveform corresponding to
Point 1 of the calibration. Click
the arrow next to Point 1 to add
the value. Type the known value
of your waveform in the value eld
(on right).
Repeat step 3 for the second
calibration point.
Click OK to return to the Chart
View window and to a display in
your calibrated units.
Units Conversion
Overview: Changes the units of the Y-axis from Volts to meaningful units such as %, °C, grams, etc.
5

1
2
3
8
Click the cursor in the Comments
bar 19 and type in a comment.
When the event takes place, either
click the Add button or press Enter/
Return on the computer keyboard.
Your comment will appear as a
vertical dashed line in your data le.
Adding Comments
Overview: Comments facilitate analysis by marking events on your Chart recording as they
occur. You can also add comments to a data le when recording has stopped by selecting
data with the waveform cursor.
Type and add additional comments
as necessary. You can type a com-
ment well in advance of the event.

Data Analysis
Data Analysis

1
2
3
10
From the Chart View window, click
and drag the mouse over the data in
the channel of interest.
To select data in a second channel
while retaining the rst selection,
drag the mouse over the second
channel while holding down the
Shi key on the keyboard.
To select data in all of the viewable
channels, click and drag the mouse
along the time axis.
Selecting Data
Overview: You can use the mouse to select data in one or more channels.

1
2
3
11
To use the Waveform Cursor 20 ,
you must not be recording data
or have Chart in Review mode
by depressing the Scroll/Review
button 24 .
Move the mouse over your data
trace. You will see the Waveform
Cursor appear on the trace and
follow it as you move the mouse.
As you move the cursor, values will
change at the top of the Channel
window. e Rate/Time display 31
will show elapsed time, while the
Range/Amplitude display 29 will
show signal amplitude. You can
use this information to write down
values for speci c time points in
your data trace.
The Waveform Cursor
Overview: e Waveform Cursor scrolls along your data trace in the Chart window or
Zoom window. As you move the cursor, the data values (time and amplitude) are displayed
in the Channel window.

1
2
3
4
12
Locate the Marker 22 in the lower
le corner of the Chart View window
or Zoom window as shown right.
Note: If the icon is not there, double-
click in the empty Marker box and it
will reappear.
Using the mouse, drag the Marker
along your waveform to the spot
you want to place it. Release the
mouse button to drop the Marker.
If the Marker is not where you want
it, reposition it by dragging it with
the mouse.
e read-out from the waveform
cursor will now be displayed as
relative (Δ) time and amplitude
from that of the Marker point.
The Marker
Overview: e Marker can be placed on any point on your waveform data trace. When in
use, the display output from the Waveform Cursor changes from absolute time and amplitude
to relative time and amplitude with respect to the Marker. e Marker can be used in either
the Chart or Zoom window.

1
13
Select a range of data from one
or more channels from the Chart
window.
To zoom in further, select a new
area with the mouse in the
Zoom window. e window will
automatically zoom to the new
view. To revert to the previous view,
click the back arrow button
.
Multiple channels may be super-
imposed by clicking the overlay
button
. e waveform cursor
will track in the channel selected at
the bottom of the Zoom window.
Note: Alternate multichannel display
using the stack button
.
The Zoom Window
Click the Zoom window button
from the Tool Bar 17 .
Your data will now appear magni-
ed in the Zoom window. Y-axis
(amplitude) scaling is available
exactly as in the Chart View window.
You can use the Marker 22 directly
from the Zoom window.
Overview: e Zoom window expands the view of your data, facilitating precise
measurements with the Marker and Waveform Cursor and the viewing of multiple channels
in overlay mode.
2
3
4
5

1
2
3
14
To access the Data Pad dialog,
click the Data Pad button in the
Tool bar 17 .
Click the column header in the
Data Pad window to set up the
calculation for the channel of
interest. By default, each column
number corresponds to the channel
of the same number.
First, select the type of calculation
you want to perform from the le
column. en select a speci c
function from the available choices
in the right column.
Make sure that you have selected
the correct channel for analysis
before you click OK.
The Data Pad: Setting up
Overview: e Data Pad is a powerful analysis tool that functions like a spreadsheet. e
Data Pad can be set up to perform a variety of calculations on your waveform data. e rst
step is to set up the Data Pad columns with the calculations you want to use.

1
15
Drag the mouse to select a range
of data in either the Chart View
window or the Zoom window.
From the Commands pop-up menu,
select Add to Data Pad.
Click the Data Pad button in the
Tool bar 17 . Your results will be
displayed in the Data Pad window.
To save the Data Pad output as a
text le which can be imported into
a spreadsheet or graphics program,
select Save As... from the File menu,
and choose Data Pad Only as Text
File (.txt) from the pop-up menu.
Select Data Pad Only as Excel File
(.xls) to save as an Excel spreadsheet
(Windows only).
The Data Pad: Adding Data
Overview: Once you have set up the Data Pad columns, you are ready to analyze data from
your le. e data in the Data Pad can then be saved as text or as an Excel le (Windows
only) for importing into spreadsheets or graphics applications.
2
3
4

1
16
Click the channel function pop-up
menu for the channel you are NOT
recording data in and select Cyclic
Measurements.
Select the source channel you want
to perform the calculation on from
the pop-up menu. Next select the
parameter you want calculated from
the Measurement pop-up menu.
Select a detection setting from the
preset pop-up menu. Pick a waveform
that matches the type of signal you are
acquiring or select a general setting.
Detection adjustment: Adjust the
minimum peak height using the
detection adjustment slide bar. A
circle will appear above detected
peaks in the preview window. Set
the minimum amount of Standard
Deviation required to detect all peaks
of interest whilst skipping unwanted
noise. Scroll back and forth in the
preview window to make sure you
have the optimal setting.
Cyclic Measurements (Win only)
Overview: e Cyclic Measurements feature automatically calculates cyclic parameters of
waveform data. ese include rate, interval, count, mean and many others.
Note: Users of Chart version 5.2X or below, see “Cycle Variables” in the appendix.
2
3
4
Your calculated value will now be
displayed in real time on the selected
channel.
NOTE: Cyclic Measurements is also
available from the Data Pad dialog.
5

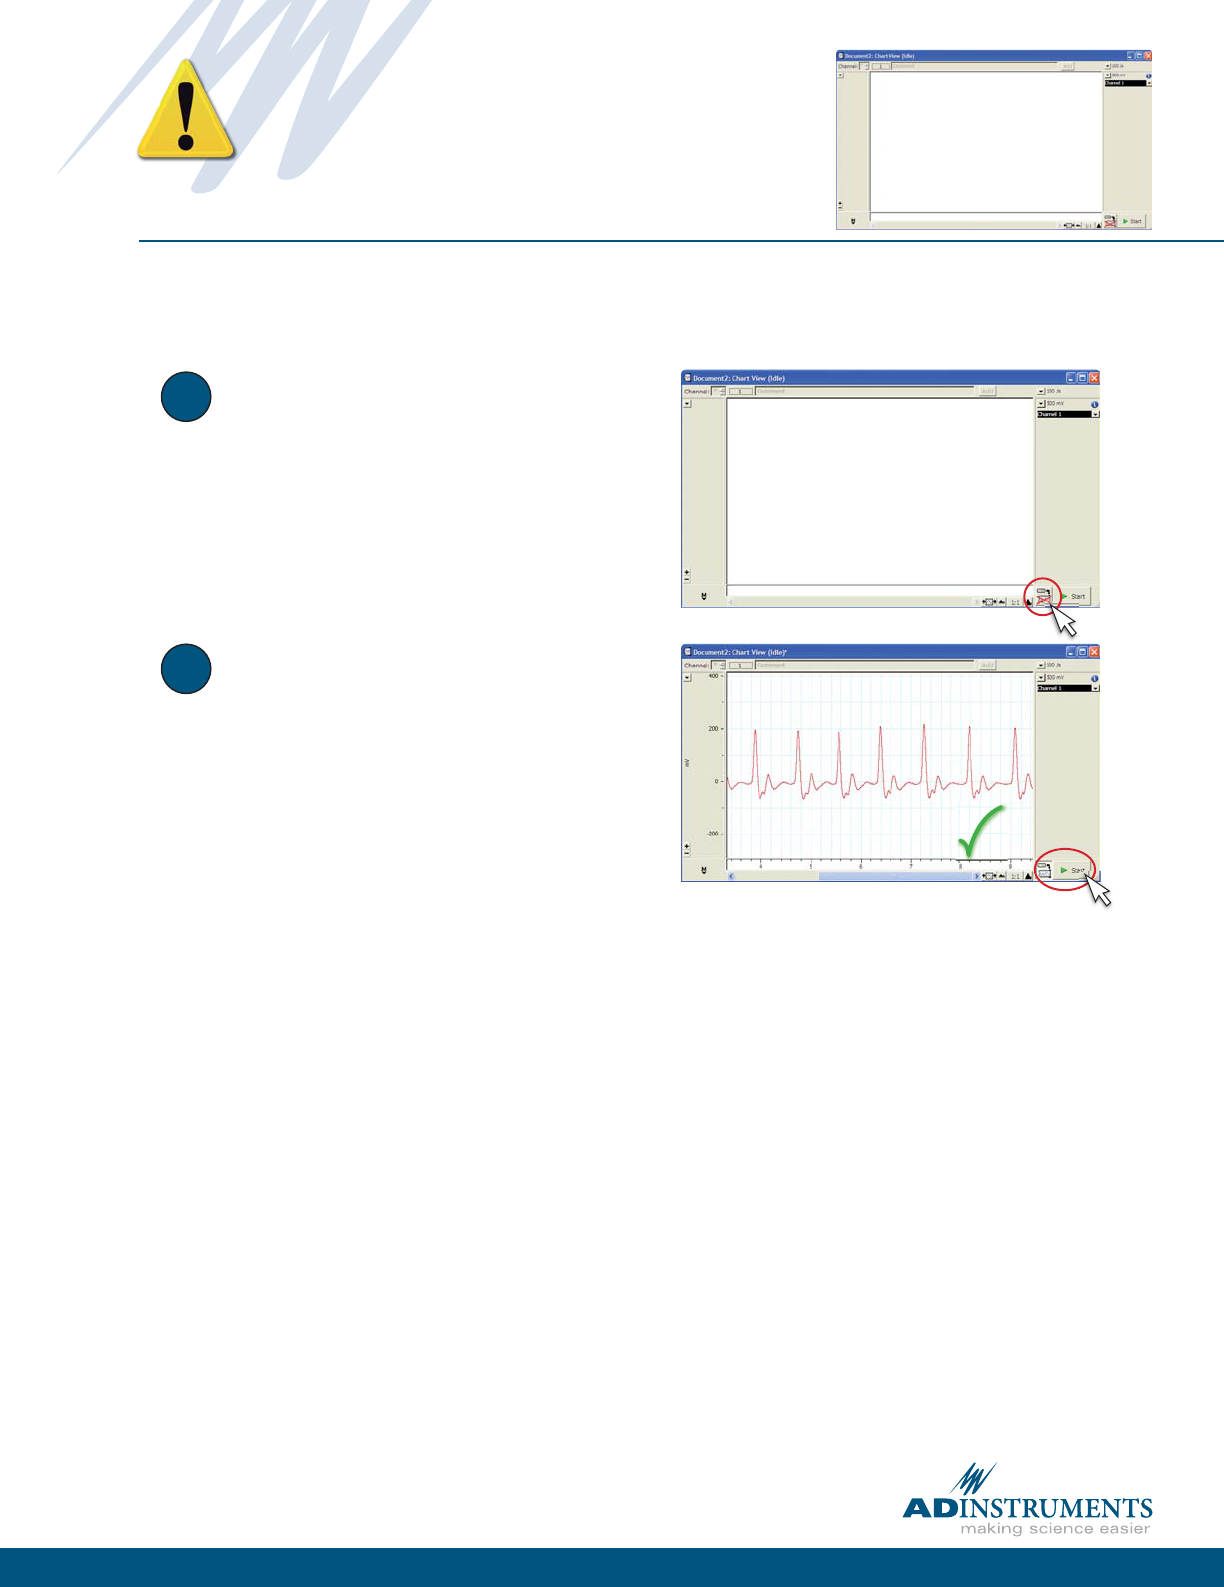
Troubleshooting
Troubleshooting

Problem: Signal
is too small
1
2
3
4
18
While recording, click the Range
pop-up menu 28 .
Select a smaller range value.
Verify the new range is appropriate
for your signal. e maximum
height should be 1/3 to 1/2 of the
total range.
Scale the Y-axis (amplitude) if desired,
using the Scaling buttons 21 .
Solution: Decrease range using the Range pop-up menu

1
2
3
4
19
Click the Range pop-up menu 28
in the “out of range” channel.
Select a larger range value.
Verify that your signal is now 1/3 to
1/2 the window height.
Scale the Y-axis (amplitude) if desired,
using the Scaling buttons 21 .
Problem:
“Out of Range”
message appears in
Chart View
Solution: Increase range from the Range pop-up menu

1
2
3
20
Continue to click the View button
until the time axis is at a desirable
scale.
Note: e View button functions
both while recording and when in
analysis mode.
From the Chart View window, click
the right-hand View button 25 to
expand the time axis.
Problem:
Data appears
compressed
Solution: Adjust time axis scaling using the View buttons

1
2
3
21
Click the Rate pop-up menu 32 in
the Chart View window.
Select a faster sampling rate.
Verify that your signal quality has
improved. If the signal still looks
unusual, ask your instructor for
assistance.
Solution: Increase sampling rate with the Rate pop-up menu
Problem:
Waveform appears
choppy or irregular

1
2
3
22
e Scroll/Review button 24 allows
the chart data le to be reviewed
while data is being recorded.
To return to scroll mode, make
sure the Scroll/Review button is not
depressed.
You can return to review mode at
any time during your recording by
clicking the Scroll/Review button
again.
Problem: Data not
scrolling after Start
button is clicked
Solution: Set the Scroll/Review button to scroll mode
1
2
23
Click the Record/Monitor button
so that it does not have a red “X”.
If you are not already recording,
click Start. Data will now be
recorded and remain in the Chart
View window when you click Stop.
Problem: Data
not present in Chart
after clicking Stop
Solution: Click the Record/Monitor button

1
2
3
4
24
Exit Chart by clicking the Exit
button in the Chart application
window.
Check the USB connection 14
between the PowerLab and the
computer.
Make sure PowerLab is plugged in
and turned on. e power indicator
light 1 should be lit.
Restart Chart. Dialog at start up
should indicate that a PowerLab is
connected.
Problem:
Start button not
working
Solution: Restart Chart in acquisition mode

1
2
3
4
25
Exit Chart by clicking the Exit
button in the Chart application
window.
Check the USB connection
between the PowerLab 14 and the
computer.
Problem: Unable
to select Input
Amplifi er
Solution: Restart Chart in acquisition mode
Make sure PowerLab is plugged in
and turned on. e power indicator
light 1 should be lit.
Restart Chart. Dialog at start up
should indicate that a PowerLab is
connected.

1
2
3
4
26
Noisy signal: e MLT1010 is very
sensitive. Try to keep your nger
still while recording.
Small signal: Adjust the Range.
If that doesn’t work, readjust
transducer strap or try placing the
MLT1010 on your thumb.
Large signal: Increase the range
using the Range pop-up menu 28 .
No data: Make sure the MLT1010
is connected to the correct Input
channel on the PowerLab.
Troubleshooting the
MLT1010 Finger Pulse
Transducer
e MLT1010 is a very sensitive transducer.
Here are some tips to get the best possible signal

Appendix
Appendix

1
28
Click the Channel Function pop-up
menu 30 in an empty channel and
select Cycle Variables.
Be careful to choose a channel that is
not being used for data collection!
e Cycle Variables dialog will ap-
pear. Set Source to the channel that
you want to perform calculations on.
Select a Cycle Variables function
from the Function pop-up menu,
and select a Scale if necessary.
Adjust the Noise reshold with
the slider bar so that only the peaks
of interest are detected. ese will
be identi ed by black dots on the
waveform trace. When you are
nished, click OK.
Cycle Variables
Overview: Cycle Variables calculates cyclical parameters of periodic waveform data.
Examples of Cycle Variables functions include rate, frequency and period. Cycle Variables
calculations are performed either in a separate channel or in the Data Pad.
2
3
4
